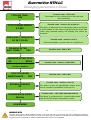
1
User manual
R
Resistive steam humidifier
from 3 to 17 kg/h
Pictures for illustra tive purpos es only
ELECTROVAP RTH-LC
Contents
Product accreditation
4
Safety information
5-6
Unit wall installation
Dimensions
7
Wall mounting
8
Wall installation
9
Water connection
10
Steam outlet
11
Condensate draining
12
Steam distribution
13
Steam absorbing distance
14
Steam pipe positioning
15 -18
Steam pipe installation
19
Room ventilation pack
20
Electrical installation
Electrical tables
22-24
Electrical w iring
25-26
Control connection
27
Connecting options
28-29
RTH-LC w iring schemes
30-36
Setting up
37
Software assistant
User information menu
38-39
Humidifier status menu
40
Changing parameters menu
41-42
Alerts & w arnings
43-47
Maintenance
RTH-LC steam tank maintenance
48-49
Valve maintenance
50-51
Split view s & component parts
52-57
2
Pictures for illustra tive purpos es only
ELECTROVAP RTH-LC
Product accreditation
DIRECTIVES
APPLIED
Electromagnetic Compatibility Directive :
Low Voltage Directive :
« Machinery » Directive:
89/336/EEC, 2004/108/EC
73/23/EEC, 2006/95/EC
98/37/EC, 2006/42/CE
The humidifier complies with :
EN 61000-6-3: Electromagnetic compatibility generic requirements (residential, commercial
and light industries)
- EN 55022 class B; conducted and radiated emission limits
EN 61000-6-2: Electromagnetic compatibility (EMC) - Generic standards—Immunity for industrial environments;
- EN 61000-4-3: Radiated, radio frequency, electromagnetic field immunity test
- EN 61000-4-6: Immunity to conducted distrubances induced by radio frenquency fields
- EN 61000-4-4: Electrical fast transient/burnt immunity test
- EN 61000-4-5: Surge immunity test
- EN 61000-4-2: Electrostatic discharge immunity test.
EN 60335-1: Low voltage : safety of electrodomestical devices and similar
EN 60335-2-88: Low voltage : safety of electrodomestical devices and similar, concerning
humidifiers
EN 60204-1: Safety of machinery—Electrical Equipment of machines—Part 1 : General
requirements
Manufacturer’s name & address
devatec SAS
87 Rue Feu Saint Eloi
76550 Ambrumesnil - FRA NCE
Type of equipment
Steam humidifier
Model name & series
ELECTROVAP RTH-LC
Year of manufacturing
2007
We the undersigned, hereby declare that the equipment specified above complies
w ith the above-mentioned Directive(s) and Standard(s).
Name : FRAMBOT Jean-François
Position : General Manager
Date : 05.06.2008
Signature:
3
Pictures for illustra tive purpos es only
ELECTROVAP RTH-LC
Safety information
IMPORTANT
Please read, heed and follow the enclosed safety inform ation and the w arning labels
inside the hum idifier before installation or m aintenance.
Warnings & safety symbols
Warning : This symbol is used to designate a danger of injury or potential damage to the
system.
Caution : High voltages are present inside the humidifier. All w orks concerned w ith the
electrical installation must be carried out by skilled and qualified personnel.
Caution : Danger of scalding ! The ElectroVap RTH-LC generates steam during operation
and therefore surfaces and pipe-w ork become very hot. Ensure that equipment not sustaining
high temperatures be kept aw ay.
Warning : the end user should ensure that the equipment be disposed of according to the
local prevailing regulations.
Delivery and storage
Any loss or damage during delivery should be reported to carrier by registered letter within 3 working
days and be advised to devatec or to authorized dealer.
It is recommended that the ElectroVap RTH-LC humidifier be kept in its transit packaging for as long as
possible prior to maintenance. If the humidifier is to be put into storage prior to installation, it must be
stored under cover and protected from physical damage, dust, frost, rain and humidity. More than 6
months storage is not recommended.
.
4
Pictures for illustra tive purpos es only
ELECTROVAP RTH-LC
Safety information
IMPORTANT
This section should be read carefully to ensure safe and correct installation of y our humidifier.
GENERAL
This manual contains all details necessary for the planning and installation of the ElectroVap RTH-LC humidif ier. In addition
commissioning and maintenance details are included.
The manual is intended for use by engineers and properly trained technical personnel. Maintenance, servicing or repair
work must only be carried out by suitable skilled and qualif ied personnel, the customer must be responsible for ensuring
their suitability.
Any risks or hazards, especially when working from ladders or towers should be identified by a skilled and
Health and Safety representative and effective control measure put in place.
No liability will attach to the Distributor if any damage, injury or accident is attributable to inattentiv e, inappropriate, negligent
or incorrect operation of the machinery whether or not caused deliberately. Always isolate all electrical and water supplies
bef ore commencing any maintenance.
Ev ery effort has been made to ensure details contained in this manual are correct, howev er, in view of the wide range of
conditions experienced in air handling systems, the information prov ided should only be used as a guide. Please contact
your Agent if any doubt.
Correct use
ElectroVap RTH-LC humidifiers are ONLY intended for use with air handling systems or direct air humidification. ANY OTHER APPLICATION IS NOT CONSIDERED USE FOR THE INTENDED PURPOSE. THE
MANUFACTURER CANNOT BE MADE LIABLE FOR ANY DAMAGE RESULTING FROM INCORRECT USE.
Water
ElectroVap RTH humidifiers are designed to be used with mains, demineralized R/O with a minimum conductivity of 30 µs or softened water. On no account attempt to introduce any other fluid or chemical into the
system. Water supply should not exceed 6.0 bar and installation should comply with local regulations. If the
water pressure exceeds 6.0 bar, a water regulator valve must be used.
Electricity
All work concerned with electrical installation MUST only be perf ormed by skilled and qualified technical personnel
(eg electrician or technicians with appropriate training). The customer MUST be responsible for ensuring their suitability.
It is the duty of the installer to ensure that suitable sized cables and MCB protection is prov ided. Please observ e the local
regulations concerning the provision of electrical installations.
Warranty
A two year warranty term—cost and labor—is applicable to the parts of the ElectroVap RTH-LC to the
exception of the usual consumable parts provided our recommendations of use & maintenance have been
adhered to. Failure to specify and fit original parts and accessories will invalidate our warranty.
NOTE
The manufacturer’s policy is one of continuous research and development. He therefore reserves the right to
amend without notice the specifications given in this document.
5
Pictures for illustra tive purpos es only
ELECTROVAP RTH-LC
Dimensions
RTH 3 to 15
C
1
1
1
1
B
a1
A
1
Ov erall
Steam outlet
Drain outlet (mm)
dimensions (mm)
A
550
B
680
C
272
(mm)
1
140
a
140
6
Weight empty
(kg)
In operation
(kg)
25
35
Pictures for illustra tive purpos es only
ELECTROVAP RTH-LC
Unit wall installation
TAKE CARE :
The humidifier should be installed in a room the temperature of w hich must be
betw een 5°C and 40°C that the humidity level should not exceed 80 %.
The rear part of the RTH-LC becomes hot during operation (about 60°C). Make sure
that the surface on which the humidifier is installed can sustain hot temperatures.
The devatec steam humidifiers are designed to be installed on w all. Make sure that
the surface the humidifer is hanged on is strong enough.
Install the humidifier at the shortest distance of the steam pipe (s.a. page 13)
whenever possible for best performance.
Arrange position of the humidifier on w all to provide free access for easy maintenance
(see after installation draw ings here under).
500 mmmini
Rem ove the blocking ring from the stainless steel cylinder before use.
600 mmmini
1250 mm
1000 mmmini
600 mm
7
Pictures for illustra tive purpos es only
ELECTROVAP RTH-LC
Unit wall installation
NOTA BENE :
Use attachment equipment appropriate to the support.
Installation procedure :
Mark the 4 mounting holes and drill.
Insert pegs. Screw the upper screws allow ing (diam 6mm) allow ing about 10
mm for hanging the cabinet.
Hang the cabinet and screw the low er screws. Tighten up all the screws for
securing the installation w hile ensuring that the cabinet is level.
41
467
R6
20
10
110
R4
D
ETAIL A
Attachment
40
525
point (detail)
4x
21
O
507
6
8
Pictures for illustra tive purpos es only
ELECTROVAP RTH-LC
Water connection
A fresh mains cold water service should be used to supply the
unit. The water pressure should be between 1 & 6 bar & should
not exceed 40°C in temperature. In case the water pressure
exceeds 6 bar, a water regulator valve must be used.
The water supply connection is under the bottom of the unit. The
humidifier is delivered with a water inlet hose of 50 cm long with
a 3/4" female fitting to the cold water supply. A direct copper
connection is PROHIBITED.
A check valve should be located on the mains and cold water service connection to the unit.
The inlet valve base has a basket filter (s.a. page 47).
The RTH humidifier uses water to produce steam so leakage may happen causing potential damage. If an installation
in false ceiling or abov e prime rooms (such as museum,
exhibition or laboratory rooms) is considered, ensure that
the floor below the humidifier is constructed from w aterproof materials (w ith draining facilities) to w ithstand any
water spilling during servicing or if a problem occurs.
Water inlet hose with 3/4"
female union.
Check valve
Information about the w ater quality : chloride concentration :
< 75mg/l, phosphate concentration : < 5mg/l, chlorine consentration (3 to 6° dA) : < 100mg/l, poor concentration inCO2, organic
elements in poor concentration.
The RTH humidifier can run w ith the follow ing water
qualities :
•
Tap or raw water : water TH between 5° and 40° French
grade.
•
Demineralized water : 30µS/cm minimum (caution : the
demineralized water is corrosive; use appropriate piping
material : stainless steel, PVC)
•
Demineralized water of less than 30µS/cm : for ensuring a correct water lev el detection, a special floating water level detection
dev ice must come in replacement of the standard water level
system (s.a. attached picture). This replacement is f actory made
when this is specified on the purchase order or a replacement kit
is av ailable f or existing humidifiers (caution : the demineralized
water is corrosive; use appropriate piping material : stainless
steel, PVC). Please consult your local reseller.
Water supply service
Floating water lev el
detection dev ice
9
Pictures for illustra tive purpos es only
ELECTROVAP RTH-LC
Water connection
•
Softnened waters (not recommanded)
A water softener does not affect the quantity of mineral salts contained in the water but alters their nature, the
poly phosphate measuring dev ices as well.
An excess of sodium chloride may generate foam which disturbs greatly the correct running of the humidifier. It
is essential that a duplex softener be used.
A small volume of tap water must be added to the softener water to get a TH value of 10° minimum
(however a TH value of 12° is highly recommended). A water analysis should be made to determine the
sodium chloride content.
Far from what is generally considered, the use of softened waters does not bring down the maintenance f requency. Only the use of reverse osmosis or demineralized water can space maintenance periods significantly.
TAKE CARE : the use of deminerilized water in combination with tap water is strictly prohibited.
10
Pictures for illustra tive purpos es
ELECTROVAP RTH-LC
Steam output
1. Use preferably hose from our supply
NB : when brand new hoses are installed, a smell of burning may be smelt during the first
running of the steam humidifier. This is normal and will eventually dispel.
2. Number of steam outlets :
RTH-LC 3 to 15
= 1 x Ø 25 mm
3. The RTH-LC humidifier can be used with pressure ducts (P) having the following characteristics :
• If P is inferior to 150 mm CE (Water column) i.e. 1470 Pa.
• If P is between 150 mm CE and 300 mm CE (2941 Pa.) , our optional filling cup
plateform must be used.
4. Please adhere to the recommendations given underneath for the installation of the steam hose
according to one of the shown examples, the most suited to your installation. A set of hose clamps is
supplied for ensuring a correct installation.
The humidifier should be located within 3 m. of the steam distribution pipe. If the distance is superior
to 3 m. insulated steel or copper pipe of a slightly larger diameter must be used. It should not exceed
6 m.
TAKE CARE : The steam hose must be kept as tight as possible. If it happens to be pinched or
kinked, this can cause the heating elements to overheat and to be destroyed due to an incorrect
detection of a too low water level inside the cylinder.
Radius of bend f or steam hose :
Example a
- Ø 25mm steam hose = 250mm minimal radius
500 mm min.
500 mm min.
Example b
11
Pictures for illustra tive purpos es
ELECTROVAP RTH-LC
Condensate draining
Pciture.1
Fig.1
The follow ing draw ings show the w ater draining connections that should be m ade.
1. The dev atec supplied steam hose should be
used :
RT H-LC 3 to 15 : 1 m Ø 25 mm hose w ith 1
hose clamp (supplied).
This hose is designed to be connected to the
draining system. Regular replacement is recommended.
10
°
2. If rigid piping is used, it must be heat (100°C)
and pressure resistant PVC material and have a 100 mm w ide diameter.
O 60mm mini
3. The discharge hose must be free from any
obstacle. It is recommended that each humidifier has its ow n drain pipe and tank arrangement in case a number of humidifiers is
installed.
Pict..2
10 °
10 °
4. Use w ater tanks w ith a lid that has w ater collecting facilities (option on request) (s.a. drawing 1).
O60mm mini
5. A funnel can also be used (s.a. pict. 2), but it
should be offset from the underside of the
unit to prevent any steam and/or condensation from getting into the cabinet. The installation of a siphon (as per the draining hose)
is recommended and arrangements for holding w ater spilling should also be made.
6. CAUTION : keep a minimum pitch of 10° for
both the draining & overflow hoses of the humidifier and for general drain pipe (s.a. pictures 1 and 2).
12
Pictures for illustra tive purpos es
ELECTROVAP RTH-LC
Steam distribution
Steam distribution pipe
The steam from the boiler enters
the duct or an air handling unit via a
steam distribution pipe.
L
Ø25mm
In order to obtain the optimum performance of the humidifier, select the
longest pipe.
Ø8mm
ExpressPack
Ex pressPack
The Armstrong ExpressPack
is a bespoke steam humidification
system made to suit your configuration
and ready to install in a ventilation duct.
It per mits to have vapor trails
(absorbing distances) as short as 600
mm. For further reference, please
contact devatec or their authorized agent.
ExpressPack
Steam distribution selection table
L
Steam distribution pipe for RTH-LC 3 to 15
mm
D25 -L290
290
D25-L590
590
D25-L790
790
D25-L1000
1000
D25-L1250
1250
D25-L1500
1500
13
Pictures for illustra tive purpos es
ELECTROVAP RTH-LC
Steam pipe positioning
Evaporation distance or vapor trail « D »
A certain length is required so that the steam coming out of the steam distribution pipe
be absorbed by the air. All along this length, descrided as the evaporation distance, the
steam can still be seen in the airflow as a mist w hich can condensate in w ater against any
obstacle if placed w ithin. To prevent condensation, this evaporation distance should be
calculated before positioning the steam distribution pipe.
How to calculate the evaporation distance « D » (FAST METHOD)
In order to determine the evaporation distance, the attached calculation table can be used :
% RH1 inlet air
5
% HR2 outlet air
10
20
30
40
50
60
70
Minimum humidification distance « D » in m.
40
0,9
0,8
0,7
0,5
-
-
-
-
50
1,1
1
0,9
0,8
0,5
-
-
-
60
1,4
1,3
1,2
1
0,8
0,5
-
-
70
1,8
1,7
1,5
1,4
1,2
1
0,7
-
80
2,3
2,2
2,1
1,9
1,7
1,5
1,2
0,8
90
3,5
3,4
3,2
2,9
2,7
2,4
2,1
1,7
Nota bene : this calculation table is to be used for temperatures betw een 20°C and 25°C.
HR1 = relative humidity of air before humidification in %.
HR2 = relative humidity of air after humidification in %.
Minimal humidification distance
The steam distribution pipes must be positioned after the minimum humidification
distance calculated w ith the help of the above table.
Before / after fan
D
before / after heater/filter
1,5 x D
D
5cm
2,5 x D before thin particule filter
14
Pictures for illustra tive purpos es
ELECTROVAP RTH-LC
Steam pipe positioning
(continued)
Before a j unction
D
Before / after a constriction
0,5 x D
before an air opening
before a humidity
D
5 xD
before an expansion
0,5 x D
before a bend
D
A high humidity limit humidistat must be installed in the duct to stop the humidifier in case
the level of humidity exceeds the preset value.
In case the recommended distances cannot be met, please contact devatec or their
authorized agent for an alternative solution.
If accurate values cannot be reached, a distance of 2 m. should be considered as a
minimum distance betw een pipes & obstruction and 3 / 4 m. before sensor or
humidistat.
15
Pictures for illustra tive purpos es
ELECTROVAP RTH-LC
Steam pipe positioning
Please meet the follow ing dimensions and spaces according to your configuration. For
further information, please contact devatec or their authorized agent.
H1 = 110mm = Minimum height betw een the duct floor and the axle of the steam pipe.
H2 = 140mm = Minimum distance betw een two pipes.
H3 = 160mm = Minimum height betw een the duct top and the axle of the steam pipe.
The H3 distance can be 80 mm at the shortest in case the steam pipe is installed at an angle of
30°.
1
H3
1
H3
H > 550 mm
H > 410 mm
H > 27 0 mm
The arrow shows the direction of the air flow .
19,61
1
H3
H2
1
H2
8,51
H1
1
H2
1
1
H1
H> 480 mm
H1
H> 660 mm
1
H3
1
H3
1
H2
1
H2
1
1
H2
H1
1
H1
16
Pictures for illustra tive purpos es
ELECTROVAP RTH-LC
Steam pipe positioning
30
°
(continued)
15°
1
H3
In vertical ducts w here the air flow is
upw ard or downward, the steam
distribution pipe(s) must be tilted by
15° sidew ays.
In duct w ith limited height, the distribution pipe(s)
can be tilted by 30° to get the 80 mm minimum
height.
590
d
47,2
d/2
D1
d = Duct diameter
D = Humidification distance
17
Pictures for illustra tive purpos es
ELECTROVAP RTH-LC
Steam pipe positioning
(continued)
Steam pipe under humidifier RTH-LC 3 to 15
Steam pipe abov e humidifier RTH-LC 3 to 15
Condensates
DRAIN
Cone nsates
DRAIN
Draining system
300 mm MINI
200 mm MINI
Siphon must be full of water before starting-up
A loop hav ing the right diameter may also suit.
Ex pressPack duct insersion RTH-LC 3 to 15
Condensats
DRAIN
18
Pictures for illustra tive purpos es
ELECTROVAP RTH-LC
Steam pipe installation
For ensuring the best steam distribution possible, we would recommend to install the steam
pipes as per the two methods described underneath.
How to install in a duct
Your steam pipes must be screwed onto the ventilation duct by the fixing plate with a set of 4 bolts and
nuts of Ø 5 mm. For ensuring airtightness, apply a large silicon film all around the duct installation plate.
The length of the bolts will be according to the thickness of the ventilation duct.
4X
84
O
8
5
140
d
38
90
112
8
124
36
Steam pipe Ø 25mm
100
O
5
How to attach the pipe (inside the duct)
The end of the steam pipe should be attached to the duct with a threaded rod of Ø 5 mm
going from the dedicated hole of the fixing plate to the outside of the duct and attached
by a couple of nuts (method 1). A rail attached to the inner side of the duct can also be
used - a 5mm bolt and nut are used to settle the pipe on the rail (method 2).
The steam pipe must be at level w ith the duct.
Method 2
Method 1
Rail
Threaded rod
19
Pictures for illustra tive purpos es
ELECTROVAP RTH-LC
Room ventilation pack
BLOWER PACK
The Blower Pack BP1 permits the use of the humidif ier in direct in-space
applications where there is no ductworks.
The Blower Pack BP1 provides an output of 5kg/h.
The direct steam connection to the humidifier is ensured by a Ø 25 mm steam
hose.
The Blower Pack BP1 is energized by connecting it to terminals 3 & 4 of the
humidif ier.
Blower Pack BP1
Allow a 3 m. distance ahead to the BP1 for a free diffusion of the steam.
For use and installation of the Blower Pack ventilation unit, please refer
to the Blower Pack technical manual available in English.
Examples of installation
TAKE CARE :
0,50m mini
3 mètre s maxi
Attach hose on wall bef ore connecting
it to Blower Pack.
1m mini
Dimensions & characteristics
BP1
Width
Heigth
Depth
Weight
Kg
dB
Max. output
Kg/h
260mm
170mm
285mm
2
40
5
20
m3/h Steam connection Ø
53
Ø 25 mm
Pictures for illustra tive purpos es
ELECTROVAP RTH-LC
Electrical installation
Recommandations:
All w orks concerned w ith the electrical installation must be carried out by skilled
and qualified personnel (eg electrician w ith appropriate training). The customer
is responsible for ensuring their suitability. Please observe local regulations
concerning the provision of electrical installations.
Check all electrical ter minal screws at commissioning, after 50 hours operation
and at every service thereafter.
Take care : the RTH-LC electronic components are very sensitive to electrostatic shocks. Appropriate steps must be taken before any operation.
21
Pictures for illustra tive purpos es
ELECTROVAP RTH-LC
Electrical tables
RTH-LC steam humidifier in 1 x 230V - 50/60Hz
RTH
Steam
production
(kg/h)
Voltage (V)
Nb of
phase(s)
Amperage
(A)
Power
(KW)
Nb of
boiler(s)
Nb of
heating
element(s)
Power of
heating
element (KW)
3
2,5
230
1
8,3
1,9
1
1
1,9 (230V)
5
6
230
1
19
4
1
1
4,3 (230V)
8
8
230
1
27
6
1
2
4,3 (230V)
1,9 (230v)
RTH-LC steam humidifier in 3x 208V - 50/60Hz
RTH
Steam
production
(kg/h)
Voltage (V)
Nb of
phase(s)
Amperage
(A)
Power
(KW)
Nb of
boiler(s)
Nb of
heating
element(s)
Power of
heating
element (KW)
8
6
230
3
13
5
1
3
1,9 (230V)
RTH-LC steam humidifier in 3x 230V - 50/60Hz
RTH
Steam
production
(kg/h)
Voltage (V)
Nb of
phase(s)
Amperage
(A)
Power
(KW)
Nb of
boiler(s)
Nb of
heating
element(s)
Power of
heating
element (KW)
8
8
230
3
14
6
1
3
1,9 (230V)
RTH-LC steam humidifier in 3 x 400V - 50/60Hz
RTH
Steam
production
(kg/h)
Voltage (V)
Nb of
phase(s)
Amperage
(A)
Power
(KW)
Nb of
boiler(s)
Nb of
heating
element(s)
Power of
heating
element (KW)
5/3
5
400
3
6
4
1
3
1,9 (277V)
7
8
400
3
8
6
1
3
1,9 (230V)
10
12
400
3
13
9
1
3
4,3 (277V)
15
17
400
3
19
13
1
3
4,3 (230V)
Beware ! Before connecting power, make sure that the electrical installation has been made
according to the above-mentioned values.
22
Pictures for illustra tive purpos es
ALL WORKS CONCERNED WITH THE ELECTRICAL INSTALLATION MUST BE CARRIED OUT BY SKILLED AND QUALIFIED PERSONNEL.
ELECTROVAP RTH-LC
Electrical tables
RTH-LC steam humidifier in 3x 400V - 50/60Hz
RTH
Steam
production
(kg/h)
Voltage (V)
Nb of
phase(s)
Amperage
(A)
Power
(KW)
Nb of
boiler(s)
Nb of
heating
element(s)
Power of
heating
element (KW)
5/3
5
400
3
6
4
1
3
1,9 (277V)
7
8
400
3
8
6
1
3
1,9 (230V)
10
12
400
3
13
9
1
3
4,3 (277V)
15
17
400
3
19
13
1
3
4,3 (230V)
RTH-LC steam humidifier in 3x 415V - 50/60Hz
RTH
Steam
production
(kg/h)
Voltage (V)
Nb of
phase(s)
Amperage
(A)
Power
(KW)
Nb of
boiler(s)
Nb of
heating
element(s)
Power of
heating
element (KW)
5/3
6
415
3
6
4
1
3
1,9 (277V)
7
8
415
3
9
6
1
3
1,9 (230V)
10
13
415
3
14
10
1
3
4,3 (277V)
15
19
415
3
20
14
1
3
4,3 (230V)
RTH-LC steam humidifier in 3x 460V - 50/60Hz
RTH
Steam
production
(kg/h)
Voltage (V)
Nb of
phase(s)
Amperage
(A)
Power
(KW)
Nb of
boiler(s)
Nb of
heating
element(s)
Power of
heating
element (KW)
7
7
460
3
7
6
1
3
1,9 (277V)
15
16
460
3
15
12
1
3
4,3 (277V)
Beware ! Before connecting power, make sure that the electrical installation has been made
according to the above-mentioned values.
23
Pictures for illustra tive purpos es
ALL WORKS CONCERNED WITH THE ELECTRICAL INSTALLATION MUST BE CARRIED OUT BY SKILLED AND QUALIFIED PERSONNEL.
ELECTROVAP RTH-LC
Electrical tables
RTH-LC steam humidifier in 3x 480V - 50/60Hz
RTH
Steam
production
(kg/h)
Voltage (V)
Nb of
phase(s)
Amperage
(A)
Power
(KW)
Nb of
boiler(s)
Nb of
heating
element(s)
Power of
heating
element (KW)
7
8
480
3
7
6
1
3
1,9 (277V)
15
17
480
3
16
14
1
3
4,3 (277V)
RTH-LC steam humidifier in 3x 575V - 50/60Hz
RTH
Steam
production
(kg/h)
Voltage (V)
Nb of
phase(s)
Amperage
(A)
Power
(KW)
Nb of
boiler(s)
Nb of
heating
element(s)
Power of
heating
element (KW)
7
7
575
3
5
5
1
3
1,9 (346V)
15
16
575
3
12
12
1
3
4,3 (346V)
RTH-LC steam humidifier in 3x 600V - 50/60Hz
RTH
Steam
production
(kg/h)
Voltage (V)
Nb of
phase(s)
Amperage
(A)
Power
(KW)
Nb of
boiler(s)
Nb of
heating
element(s)
Power of
heating
element (KW)
7
8
600
3
6
6
1
3
1,9 (346V)
15
17
600
3
12
12
1
3
4,3 (346V)
Beware ! Before connecting power, make sure that the electrical installation has been made
according to the above-mentioned values.
24
Pictures for illustra tive purpos es
ALL WORKS CONCERNED WITH THE ELECTRICAL INSTALLATION MUST BE CARRIED OUT BY SKILLED AND QUALIFIED PERSONNEL.
ELECTROVAP RTH-LC
Wiring connections
ELECTRICAL CONNECTIONS
All works concerned with electrical installation must be carried out by a skilled and qualif ied personnel.
Make sure that all incoming power supplies are isolated before installation and maintenance of the
ElectroVap RTH humidifier.
1 - Power supply isolator and MCB ( near the unit )
2 - Power supply cable
3 - Electrical compartment
1
WARNING :
3
Failure to fit an electrical power isolator and MCB as part of
the electrical installation signif icantly increases the risk of
electric shock, which can be f atal.
2
Install a differential electrical circuit breaker in head of the line supplying the humidifiers inside the general
switchboard. In case of several humidifiers, we would recommend to install a differential circuit breaker
per humidifier so as to prevent a total power cut off of all the humidifiers.
A)
2 x 220-230V
RTH 3 to 5
B) 3 X 380-400 V without neutral
Q2: 3 poles
Q2: 2 poles
L1
220 V /
230V
50-60Hz
L
L2
L3
3 x 380V / 3
x 400V
50-60Hz
RTH 5/3
to 15
L1
L2
L3
N
220-230V
50-60Hz
L
N
L
PE
GROUND
Q1: 2 poles
2A
Q2: MCB and electrical power isolation
C) 3 phases + neutral: 3 x 380-400 V
Q2: 3 poles
RTH 5/3
to 15
L1
3x380V
3x400V
50-60Hz
PE
GROUND
The symbol ∆ between Q1 & Q2 means that these
MCB are coupled. The power MCB Q2 and control
MCB Q1 are mechanically linked together. So if a
fault is detected, the power and the control circuits
are switched off and there is no voltage on the unit.
The unit is really off voltage.
L2
L3
N
N
D) 3 phases without neutral: 3 x 380-400 V
L
In this case, a transformer (option) must be installed
(See technical notice page n°26)
PE
GROUND
Failure to observe m anufacturer’s installation recommendations w ill invalidate the
m anufacturer’s w arranty.
25
Pictures for illustra tive purpos es
ALL WORKS CONCERNED WITH THE ELECTRICAL INSTALLATION MUST BE CARRIED OUT BY SKILLED AND QUALIFIED PERSONNEL.
ELECTROVAP RTH-LC
Wiring connection
(continued)
Humidifier without neutral fitted with a 400/230V transformer
The RTH-LC 5/3 to 15 humidifiers are electrically supplied in 3x400v + G + N. In case a neutral
line is not available, this can however be easily substitued by the use of our optional transfomer
preventing the installation of a specific neutral line.
RTH 5/3
to 15
L1
Power
External
protection
power
3x380400VAC
39
L2
40
L3
41
N
42
L
Primary circuit
protection
PE
+15V
J1
J2
Prim: 400V
Sec: 230V
1
Transformer
41
2
39
-15V
230V
J4
4
J3
3
42
0V
400V
40
WITH NEUTRAL « I T »
The neutral is not earthed. In this case, we advocate the installation of a transformer
Power
3 x-XXX VAC
50-60Hz
RTH 5/3
to 15
External
protection
power
L1
L2
L3
N
L
F1
F2: 2A
T: Transformer
Prim: XXXV
Sec: 230V
PE
f: 50/60Hz
T
26
Pictures for illustra tive purpos es
ALL WORKS CONCERNED WITH THE ELECTRICAL INSTALLATION MUST BE CARRIED OUT BY SKILLED AND QUALIFIED PERSONNEL.
ELECTROVAP RTH-LC
Control connection
The wiring of the optional equipment described under must be made with 0.75 mm2 flexible cable. This
control signal wire should not go along with a power cable.
Outside connections
RTH ON / OFF
Electrical compartment
%
1
2
S1 Dip Switch :
Connection with ON/OFF control humidistat, high
level safety humidistat or to a ventilation system
Allows to select the
kind of regulation (see
attached scheme for
conf iguration)
RTH PROPORTIONAL CONTROL
1-2 connection
Hygrom eter
+
-
1
%
2
control humidistat high
level safety humidistat,
or (and) ventilation
X5 connector : 18-19-20
X5
S1
on
S1
1 2 3 4
on
19
20
20
S1
1 2 3 4
0 _ 10 V
19
4 _ 20 m A
on
Caution : mind the signal polarity on
connecting the control signal :
(+) on terminal 19 & (-) on terminal
20. Reversing the polarity will
damage the board.
S1
on
1 2 3 4
1 2 3 4
0 _ 20 V
1_5V
RTH + HUMIDITY SENSOR
1
S1
on
2
1
2
3
1 2 3 4
%
DEVAT EC SENSOR
V+ g Rh
Devatec
Sensor
18
18
19
19
20
20
S1
on
1 2 3 4
0 _ 5 V SENSOR
27
Pictures for illustra tive purpos es
ALL WORKS CONCERNED WITH THE ELECTRICAL INSTALLATION MUST BE CARRIED OUT BY SKILLED AND QUALIFIED PERSONNEL.
ELECTROVAP RTH-LC
Connecting options - RS485 outlet
The w iring of the optional equipment described under must be made w ith 0.75 mm2 flexible cable.
REMOTE INFORMATION BOARD (OPTION)
Contact can be modified in NO or NF by wiring as per the
following schemes (ex: wiring on 30 & 31 = NO contact).
NO
NF
30 31 32
X20
NO
NF
NO
33 34 35
X21
NF
36 37 38
X22
X22 connector (36-37-38): Remote steam
production dry contact.
X21 connector (33-34-35): Remote general
f ault dry contact
X20 connector (30-31-32): Remote cy linder
maintenance dry contact
MODBUS connection - RS485 - Hardware connection
The RS485 connection must be plugged on the J1 connector (see pic.) :
Terminal 1 : Data –
Terminal 2 : Data +
Terminal 3 : Signal Ground
The S37 switch is use to enable or disable
the line resistor. In most of cases, those
resistors are useless and should be disabled.
Communication settings
Some settings are really important for a great communication with Devatec humidifiers.
Speed of the communication
9600 Bauds/sec (changeable)
Packet size
8 bits
Parity
No parity
Stop bit
1
Timeout response
2500ms (2.5sec)
Time between requests (after response receiv ed).
Min. 100ms
Nb of register per request
5
28
Pictures for illustra tive purpos es
ALL WORKS CONCERNED WITH THE ELECTRICAL INSTALLATION MUST BE CARRIED OUT BY SKILLED AND QUALIFIED PERSONNEL.
ELECTROVAP RTH-LC
Connecting options - RS485 outlet
REGISTER MAP
29
Pictures for illustra tive purpos es
ALL WORKS CONCERNED WITH THE ELECTRICAL INSTALLATION MUST BE CARRIED OUT BY SKILLED AND QUALIFIED PERSONNEL.
ELECTROVAP RTH-LC
Wiring dagrams
STEAM HUMIDIFIER RTH-LC 3 & 5 in 1x230V
45
L EVELS DETEC TOR
(détec teur de ni vea ux)
Whit e / blanc (X1-63)
Reds / rouges (X1-64)
51
50
52
Bl indage PT100
Temperatu re
sensor
T°C
pt1 00
R esistances
TANK
see SCH PUISS
LEVELS DE TECTOR
(déte cte ur de niveaux)
46
41
32
POWER LAMP
3
31
1
X1
44
45
46
47
68 67
X2
69
70
X3
73
74
75
76
77
78
50
51
52
53
54
55
56
57
58
59
60
61
62
63
64
Devatec
Ref: 500851/02
CO1
45
42
43
50
51
52
21
22
23
24
25
Whit e / bl anc
Reds / rouges
X51
B linda ge
T°C
p t100
dans
cuve
B u tée
5
4
40
3
Devatec: R ef : 500600/03
5
4
3
4
2 0
2
Butée
1
2 /T1
5
4
3
2
1
0
1/ L1
X 10
X14
X9
26
3/ A1+
S1
27
4/ A2-
X8
Butée
28
29
F3
TI
X11
31
32
27
F2
X1 5
J1
1
2
3
X7
26
Bu tée
27
2T1
J5
34
25
24
25
23
23
21
21
24
X6 22
35
X23
34
X14
4T2
41
36
35
J4
46
K1
6T3
A2
X3
X2
X16
14
13
12
2
0
L
9
32
PE
42
PE
16
15
DEVA TEC
Réf: 5001 00- 02
38
31
N
17
17
43
8
L2
+
X4 16
13 NO
L1
HUM IDIS .
0 -10 V
-
20
P1
38
5L 3
14NO
33
18
40
3L 2
A2
22
X 5 19
10
1L1
A1
26
15
PE
25
1
1
24
2
11
B utée
J3
C OU V ER CL E
P O RT E EL EC
E NT RE TO IS E
Swit ch
ON/ OFF
F4
F ON D CO F F R ET
F1
X 22
X21
X12
C AR TE P RIN C IP A LE
X1
B OB IN E V A NN E D E V ID A NG E
6 0 61 6 2
53
54 6 7
Dia m: 18 AWG
8 9
C U VE
P O R TE H U M ID
9
8
6
10
6
10
Mark
Intensity
Fuse functi on
F1
2A
Protection of the power contactor coil
F2
2A
Protection of the inlet valve coil
F3
2A
Protection of the drain valve coil
F4
100mA
Protection of the electronic boards
30
Pictures for illustra tive purpos es
ALL WORKS CONCERNED WITH THE ELECTRICAL INSTALLATION MUST BE CARRIED OUT BY SKILLED AND QUALIFIED PERSONNEL.
ELECTROVAP RTH-LC
Wiring dagrams
STEAM HUMIDIFIER RTH-LC 3 to 15 in 3x230V
45
L EVE LS DETECTOR
(déte cte ur de niveaux)
Whit e / blanc (X1-63)
R eds / rouges (X1-64)
51
50
52
Bli ndage PT100
Temperature
sen sor
T°C
pt100
R esistances
TANK
see SC H PUISS
LEVELS DETECT OR
(déte cte ur de niveaux)
46
41
32
POWER LAMP
3
31
1
X1
44
45
46
47
68 67
X2
69
70
X3
73
74
75
76
77
78
50
51
52
53
54
55
56
57
58
59
60
61
62
63
64
Devatec
Ref: 500851/02
CO1
45
42
43
50
51
52
21
22
23
24
25
Whi te / bla nc
T°C
pt100
dans
cuve
Reds / rouge s
X51
B li ndage
Butée
5
4
40
3
Devatec: R ef: 500600/ 03
5
4
3
4
2 0
2
Butée
1
5
4
3
S1
1
2
0
X9
27
4/ A2-
1/L 1
X10
X14
26
3/A1+
2 /T1
X8
Butée
F3
28
29
31
32
27
F2
TI
X1 1
X 15
J1
1
2
3
26
X7
Butée
27
J5
41
35
34
34
25
24
25
23
23
21
21
24
X6 22
X 23
X1 4
33
18
X3
X2
X 16
14
13
12
10
38
A2
13NO
43
L1
8
38
L2
31
N
0
L
9
32
PE
17
42
PE
16
15
2
40
5L 3
14NO
+
17
16
15
DEV ATEC
Réf :50 0100 -0 2
46
K1
6T3
A2
HUMIDIS.
0-1 0V
-
20
X4
3 L2
22
X 5 19
P1
1L 1
4T2
A1
26
36
35
J4
2T1
PE
25
1
1
24
2
11
Butée
J3
C OU V ER CL E
PO RT E EL EC
EN T RET O ISE
Swit ch
ON/OFF
F4
X22
X21
60 6 1 62
FO N D CO FFR ET
F1
53
X1 2
C AR TE PRIN C IPA LE
X1
BO B IN E V A N NE DE VI DA N G E
546 7
Di am: 18 AWG
8
9
8
6
10
C UV E
PO RT E H U MID
9
6
10
Mark
Intensity
Fuse functi on
F1
2A
Protection of the power contactor coil
F2
2A
Protection of the inlet valve coil
F3
2A
Protection of the drain valve coil
F4
100mA
Protection of the electronic boards
31
Pictures for illustra tive purpos es
ALL WORKS CONCERNED WITH THE ELECTRICAL INSTALLATION MUST BE CARRIED OUT BY SKILLED AND QUALIFIED PERSONNEL.
ELECTROVAP RTH-LC
Wiring diagrams
RTH –LC 3 & 5 STEAM HUMIDIFIERS in 1 x 230V
CO UVERCLE V UE DE
DESSU S
Butée
4
3
Butée
7
2/T1
3/A1+
S1
73
1/L1
4/A2Butée
Butée
2T1
1L1
4T2
3L2
A1
73
11
K1
6T3
A2
14NO
7
Façade appareil /
Front Unit
RTH
R5
3
1,9KW-230V
5
4,3KW-230V
13NO
L1
L2
N
L
PE
PE
PE
1
2
Butée
11
32
70
5L3
A2
R8
72
72
70
Pictures for illustra tive purpos es
ALL WORKS CONCERNED WITH THE ELECTRICAL INSTALLATION MUST BE CARRIED OUT BY SKILLED AND QUALIFIED PERSONNEL.
ELECTROVAP RTH-LC
Wiring diagrams
STEAM HUMIDIFIER RTH-LC 8 in 1 x 230V
Butée
4
3
Butée
9
COUVERCL E VUE DE
DE SSUS
2 /T1
8
3/A1+
S1
73
1/L1
4/A2Butée
Butée
2T1
1L1
A1
18
73
4T2
R6
17
9
18
8
6T3
72
3L2
70
5L3
A2
A2
14NO
13NO
L1
L2
N
L
PE
PE
PE
1
2
Bu tée
R8
Façade appareil /
Front Unit
K1
17
RTH
R8
R6
8
4,3KW-230V
1,9KW-230V
33
72
70
Pictures for illustra tive purpos es
ALL WORKS CONCERNED WITH THE ELECTRICAL INSTALLATION MUST BE CARRIED OUT BY SKILLED AND QUALIFIED PERSONNEL.
ELECTROVAP RTH-LC
Wiring diagrams
RTH-LC 8 STEAM HUMIDIFIER in 3x208-230V
COUV ERCLE VUE DE
DESSUS
Butée
4
3
Butée
2/T1
3/A1+
8
18
18
6
10
S1
73
R6
R9
9
17
6
1/L1
4/A2-
2/T1
3/A1+
S2
74
1/L1
4/A2Butée
Butée
74
R8
2T1
72
1L1
A1
73
4T2
10
8
17
9
Façade appareil /
Front Unit
K1
70
3L2
5L3
6T3
A2
68
A2
14NO
13NO
L1
L2
L3
N
L
PE
PE
PE
1
2
Butée
RTH
R6
R8
R9
8
1,9KW-230V
1,9KW-230V
1,9KW-230V
34
72
70
68
Pictures for illustra tive purpos es
ALL WORKS CONCERNED WITH THE ELECTRICAL INSTALLATION MUST BE CARRIED OUT BY SKILLED AND QUALIFIED PERSONNEL.
ELECTROVAP RTH-LC
Wiring diagrams
RTH-LC 5/3 to 15 STEAM HUMIDIFIER in 3x380 to 600V
18
B utée
4
3
P1
Butée
2/T1
3/A1+
18
73
1/L1
4/A2-
9
17
2/T1
3/A1+
74
1/L1
COUV ERCLE VU E DE
D ES SUS
6
8
6
R6
R9
10
9
S1
S2
4/A2Butée
Butée
74
R8
2T1
A1
73
4T2
10
8
72
1L1
K1
6T3
17
A2
14NO
Façade appareil /
Front Unit
R8
R9
5/3
1,9KW-277V
1,9KW-277V
1,9KW-277V
7
1,9KW-230V
1,9KW-230V
1,9KW-230V
10
4,3KW-277V
4,3KW-277V
4,3KW-277V
15
4,3KW-230V
4,3KW-230V
4,3KW-230V
13NO
72
L1
L2
L3
N
L
PE
PE
PE
1
2
Butée
3X380 - 400 - 415V
R6
68
5L3
A2
RTH
70
3L2
3X440 - 460 - 480V
70
68
3X575 - 600V
RTH
R6
R8
R9
RTH
R6
R8
R9
7
1,9KW-277V
1,9KW-277V
1,9KW-277V
7
1,9KW-346V
1,9KW-346V
1,9KW-346V
15
4,3KW-277V
4,3KW-277V
4,3KW-277V
15
4,3KW-346V
4,3KW-346V
4,3KW-346V
35
Pictures for illustra tive purpos es
ALL WORKS CONCERNED WITH THE ELECTRICAL INSTALLATION MUST BE CARRIED OUT BY SKILLED AND QUALIFIED PERSONNEL.
ELECTROVAP RTH-LC
Wiring diagrams
WATER LEVEL MANAGEMENT BOARD
X1
44
45
46
47
68 67
X2
69
70
X3
73
74
75
76
77
78
50
51
52
53
54
55
56
57
58
59
60
61
62
63
64
Devatec
Ref: 500851/02
CO1
X51
45
42
43
50
51
52
21
22
23
24
25
63
64
45
51
50
52
WATER LEVEL
SENSOR
ALL WORKS CONCERNED WITH THE ELECTRICAL INSTALLATION MUST BE CARRIED OUT BY SKILLED AND QUALIFIED PERSONNEL.
36
Pictures for illustra tive purpos es
ELECTROVAP RTH-LC
Setting up
Before putting your humidifier in operation,
please make sure that your installation is
in conformity w ith the manufacturer’s
technical specifications.
•
Remov e the blocking ring from the cylinder.
•
Open the water valve of the main water line.
•
Switch on the main power supply contactors
(voltage and command).
•
The power-on light 1 must be illuminated.
•
Switch on I the I/O (on/off) rocker switch.
•
The display will default to show the rate of steam
produced. You are in the user’s information menu.
Blue anti-bubble hose
inside filling cup
DISPLAY OPERATION :
1 Pressing the select button
between the three main pages.
repeatedly will rotate
2 Enter the derised menu by pressing the up
button.
or
down
2
• As soon as the humidifier is prompted by the
regulator, the humidity sensor or the humidistat, the
contactor of the DIN rail turns on and the power
heating is on
(the steam production LED is
illuminated) 2
• When the humidifier is switched on, the inlet valve
opens and the boiler is flushed with water. The
heating elements then heat the water up and after
about 10 minutes (the heating time depends on the
model of humidifier and the water conductivity), the
humidifier steams up.
1
Humidifier identif ication label stuck under and shielded by the
front panel polycarbonate label.
This identification label provides the following information :
RTH-LC model, unit serial number, command v oltage, power
voltage, number of power phases, intensity and electrical power.
37
Pictures for illustra tive purpos es
ELECTROVAP RTH-LC
User information menu
Any press on the enter key
from any of these menus.
MENU: HUMIDIFIER
STATUS
This display shows up
shortly when the
hum idifier is powered on
or when in stand-bye
m ode
WWW.DEVATEC.COM/
ELECTROVAP/06_26.1
MENU : USER
INFORMATION MENU
STEAM HUMIDIFIER
RTH ---3x400V
STEAM PRODUCED
XX.Xlbs
XX.XKG/LBS
ACTUAL CURRENT
XX.X A
ACTUAL CONTROL
SIGNAL Y
-- %
ACTUAL CONTROL
SIGNAL Y
XX.Xuu
If in Modbus
Uu=mA or V according to
the control signal
CHECK RH SENSOR
SET POINT - - % HrHR
MEASURE - - %
If rh < 7%
If in RH sensor mode
38
Pictures for illustra tive purpos es
ELECTROVAP RTH-LC
User information menu
(CONTINUED)
STEAM DEMAND XX
%
CHECK THE SAFETY
SWITCH
STEAM DEMAND
NO DEMAND
Standard working
If there is no
steam demand
SAFETY SWITCH
(1-2) OPEN
NO DEMAND
MODBUS STOP
FILLING IN PROGRESS
PLEASE WAIT
If the stop is prompted
by Modbus
Filling of the steam tank
before production
If safety switch open &
steam demand on
TANK TEMPERATURE
XXX°F XXX°C
PRODUCT BEFORE
CLEANING XXX KG
NEXT SERVICE DUE
XXX H
39
Pictures for illustra tive purpos es
ELECTROVAP RTH-LC
User information menu
Continued
HOUR METER
XX
H
STEAM METER
XX
KG
DRAINING AFTER XX H
STOP
If end of period draining
has been enabled
ELECT. POWER
XX.XKW
HOME MENU
40
Pictures for illustra tive purpos es
ELECTROVAP RTH-LC
Humidifier status menu
MENU: CHANGING MENU
CONFIGURATION
Any press on the enter key
from any of these menus.
HUMIDIFIER
CONFIGURATION
CONTROL SIGNAL IN
XXXXXXXXXXX
TOTAL STEAM PRO
( XXXX KG)
TOTAL HOURS RUN
XXXX H
WATER QUALITY
XXXXXXXXXXX
POWER SUPPLY
XXXXXX V
MAXIMUM POWER
INSTAL XX.X KW
HOME MENU
41
Pictures for illustra tive purpos es
ELECTROVAP RTH-LC
Changing parameters menu
ATTENTION
• A press on button 1 will allow you to shift to sub-menu for changing configuration
parameters.
• Then scroll display using the up (2) or down (3) keys.
1
2
3
• The selected parameter will f lash and press return key (1) f or recording.
MENU: CHANGING UNIT
CONFIGURATION
MENU: HUMIDIFIER
STATUS
DIAL ACCESS CODE :
XXX
DIAL ACCESS CODE :
2XX
DIAL ACCESS CODE :
23X
DIAL ACCESS CODE :
234
ACCESS MENU
AUTHORIZED
menu according to the
access code
42
Pictures for illustra tive purpos es
ELECTROVAP RTH-LC
Changing parameters menu
MENU : CHANGING UNIT
CONFIGURATION
CONTROL SIGNAL IN
XXXXXXXXXXXX
STEAM CAPACITY LIMIT
XX %
Press on the enter key
from any of these menus
MENU: HUMIDIFIER
MENU
Possible value : 1 step on/off, digital control, digital
sensor 4 steps, 0-10V / 2-10V controler, 0-20 / 4-20 mA
controler, 1-5V sensor, Devatec sensor
Possible value : between 20 and 100 % if On/Off control
otherwise 50-100 %
ADJUST SET POINT
XX % Hr
Possible value : between 10 and 99 %
ADJUST PROP BAND
XX %
Enables to tune the proportional accuracy.
Possible value : between1 and 50 %
MAINTENANCE FREQUENCY 10000 KG
MAINTENANCE FREQUENCY 300 H
Possible value : between 0 and 999000 kg
This is to preset a number of kg of steam or a number of hours
of running before a visual inspection of the steam boiler takes
place. If the steam boiler needs being maintained, please revert
to the maintenance pages of this manual. Otherw ise, a higher
preset maintenance figure can be adjusted (factory preset
value : 300h).
Possible value : between 0 and 2000 H
SETTING WATER T° : YES
WATER TEMP. °C MAINTAINED XXX °F XXX °C
Possible value : YES or NO
This is to keep or not the w ater temperature on w hen
the unit is on halt.
Possible value : between 25°C and 85°C
43
Pictures for illustra tive purpos es
ELECTROVAP RTH-LC
Changing parameters menu
COOLING TANK :
YES
CYCLIC DRAIN PERIOD
X.X SEC
Possible value : YES or NO
This enables or not a cooling cycle of the water tank
before servicing
Possible value : between 0.5 and 20 sec
This allow s to adjust the time of short drains after a succession
of water intakes. If some foam is noticed inside the w ater tank
(w hen using softened w aters), this draining time should be
increased .
FREQUENCY DRAIN EVERY XX CYCLES
Possible value : between 1 and 5
If anti-foam enabled, so value betw een 1 and 200 min.
DRAINING AFTER
SHUT DOWN ?
YES
DRAINING AFTER STOP
OF
XXX H
Possible value : YES or NO
Possible value : between 1 AND 168 H
If end of period draining
has been enabled
STOP RTH WHEN
MAINTENANCE : YES
MODBUS ADDRESS
XX
TRANSMISSION SPEED
9600 b/s
Possible value : YES or NO
Possible value : between 1 and 32
This allow s to input an indentification number w hen
there is a number of humidifiers on the bus line.
Possible value : 1200, 2400, 4800 and 9600 b/s
This allows to synchronise the communication speed
betw een the RTH and the trans mission system.
HOME MENU
44
Pictures for illustra tive purpos es
IMPORTANT NOTICE
The units have a factory default maintenance time of 300 hours that suits to most cases. The exact maintenance frequency is
variable and depends on the water quality, the hours of run and the lev el of demand for humidif ication. New installations should be
inspected or serv iced f requently to enable a suitable maintenance routine to be established.
ELECTROVAP RTH-LC
System management - Messages
Alerts and alarms
This means that the temperature inside the water tank is
too high. The heating elements are no longer completely
immersed.
ALARM
A1
When this alarm is shown, the water tank is drained out, the
genaral fault alert is trigged on and the humidifier is
stopped.
Causes and corrections
1. Incorrect water supply. Few or
no water flushes the tank due to
a piece of chalk clogging the
inlet valve. All the water pipe
must be cleaned up.
Water supply tees to clean up
Water f iltre inside the
water tank to clean or
change
2. Faulty water level detector.
Make sure that the sensor wires
are correctly attached to their
posts and that none of them
create short-circuits. Open the
detecto r and
clean the
electrodes. Make sure they
work well.
3. Faulty temperature sensor : this message is generally displayed when the water tank is still cold.
The temperature must be replaced and calibrated (s.a. §4).
4. Temperature calibration drifting. The sensor must be re-calibrated.
5. Control correct connection of wires 45, 50, 51, 52, 25, 24, 23, 22 and 21. There should be no
short-circuit.
6. Electronics. Change the water level management board first. If the fault persist s, change the main
board.
45
Pictures for illustra tive purpos es
ELECTROVAP RTH-LC
System management - Messages
Alerts and alarms
ALARM
A2
This means that there is no water supply.
The water level does not reach the low water detection level
(the unit cannot produce steam). The fault is trigged on after
some time.
When the fault is displayed, the tank is drained out, the
general fault alert trigged on and the unit stopped.
Causes and corrections
1. Water pressure - It must be between 1 & 6 bar
and kept as constant as possible. If not, a water
regulator valve must be installed on the supply
line and adjusted at 2 bar.
2. Water softerfer - In case a softener is used,
make sure that the humidifier is still supplied in
water during the regeneration cycles.
3. Blue hose in f illing cup - The blue hose in the filling
cup is missing or mislocated. The blue hose must
hav e one end in the water feed hole and the other in
the middle hole. The part having the shortest
diameter should be in the center hole and go
down to the level of the black tee (s.a. attached
pictures)
4. Steam hose - Make sure that the pitch of the
steam hose is constant and prevent unecessary
ups and downs. The latter create pockets of
condensate that hamper the natural flow of
steam. This generates an undue pressure
inside the tank that prevents the water to flush
in.
5. Water level detector - Lime deposits clog the water access to the detector. The latter should be
cleaned up together with the water supply union.
6. The draining valve does not close - Either a piece of chalk keeps the valve open (this is the most
frequent occurrence) or the valve has become faulty. In one case, the complete cleaning of the
valve solves the issue and in the other, the valve must be changed.
7. Water level detection - Control water level electrode sensors, X1 connector on the water level
management board and X6 connector on the main board.
8. Electronics - Change the water level management board first. If the fault persists, change the
main board.
46
Pictures for illustra tive purpos es
ELECTROVAP RTH-LC
System management - Messages
Alerts and alarms
ALARM
A3
This means that the water feeding does not work well.
The alert is trigged on 8.5 mn after the feeding has begun
and that the water has exceeded the low level dectection (the
unit can produce steam).
When this message is shown, the tank is drained out, the
general fault alert is trigged on and the humidifier is stopped.
Causes and corrections
1. Water pressure - It must be between 1 & 6 bar
and kept as constant as possible. If not, a water
regulator valve must be installed on the supply
line and adjusted at 2 bar.
2. Water softerfer - In case a softener is used,
make sure that the humidifier is still supplied in
water during the regeneration cycles.
3. Blue hose in f illing cup - The blue hose in the filling
cup is missing or mislocated. The blue hose must
hav e one end in the water feed hole and the other in
the middle hole. The part having the shortest
diameter should be in the center hole and go
down to the level of the black tee (s.a. attached
pictures)
4. Steam hose - Make sure that the pitch of the
steam hose is constant and prevent unecessary
ups and downs. The latter create pockets of
condensate that hamper the natural flow of
steam. This generates an undue pressure
inside the tank that prevents the water to flush
in.
5. Water level detector - Lime deposits clog the water access to the detector. The latter should be
cleaned up together with the water supply union.
6. The draining valve does not close - Either a piece of chalk keeps the valve open (this is the most
frequent occurrence) or the valve has become faulty. In one case, the complete cleaning of the
valve solves the issue and in the other, the valve must be changed.
7. Water level detection - Control water level electrode sensors, X1 connector on the water level
management board and X6 connector on the main board.
8. Electronics - Change the water level management board first. If the fault persists, change the
main board.
47
Pictures for illustra tive purpos es
ELECTROVAP RTH-LC
System management - Messages
Alarms & alerts
ALARM
A4
This means that the temperature sensor either fails or does
not work correctly.
In any of these cases, the humidifier is stopped.
Causes and corrections
1. Check correct wiring of the sensor on the water
management board : X1 connector (terminals
63, 64) for the single tank humidifier.
2. Electronics - Change the water level management board f irst. If the f ault persists, change the main board.
48
Pictures for illustra tive purpos es
ELECTROVAP RTH-LC
System management - Messages
Maintenance warnings
MAINTENANCE
M1
This means that the maintenance of the tank and of the
draining and filling circuits are to be done.
Do not forget to replace the tank gasket.
Message w ith version program prior to program version RTH06-24
CLEANING : OUTLET
VALVE + TANK
IF THIS MESSAGE IS SHOWN :
The RTH humidifier keeps producing steam if « NO » is
selected
at sub-menu « STOP RTH WHEN
MAINTENANCE : NO » in the configuration changing
menu (code 2,3,4).
STOP RTH WHEN
MAINTENANCE XXX
The RTH humidifier comes to a halt if « YES » is selected
at sub-menu « STOP RTH WHEN MAINTENANCE :
YES » in the configuration changing menu (code 2,3,4).
WHAT TO DO :
•
Power off the unit.
•
Revert to paragraph « maintenance ».
•
Once the maintenance done, process a s per under-mentioned to reset the maintenance timer to 0
RTH humidifier w ith softw are version V01_07, V02_08, V03_08 & V04_08 :
- Press first on
then press on
RTH humidifier w ith softw are version V05_08 or above :
- Press first on
then press on
Once the initialization is over, press on the « manual drain » button again to set the unit back to production. A « STEAM PRODUCED » indication appears in the display window.
49
Pictures for illustra tive purpos es
ELECTROVAP RTH-LC
Tank maintenance
•
Drain the tank out by pressing the
manual drain button (s.a. picture n°
1). Wait for complete draining and
allow the tank to cool down (if this
feature has been enabled).
•
Cut off the power supply at the power switch-board and power off the
RTH humidifier (s.a. picture n°1).
•
Screw off the front door, lift it a little
and take it away. Remove the black
steam hose from the steam tank
(s.a. picture n°2) and draw it out the
humidifier.
•
Unscrew all the screws of the boiler
to p w i th a 1 0 m m w re n ch
(s.a. picture n°3).
•
Lift the boiler up to get it free from
its base (s.a. picture n° 4).
•
Grasp the body of the boiler and
take off the top with the heating elements attached (s.a. picture n° 5).
50
Pictures for illustra tive purpos es
Picture n°1
Picture n°2
a
Picture n°3
Picture n°4
Picture n°5
ELECTROVAP RTH-LC
Tank maintenance
(continued)
•
Put the heating element assembly on the
top of the humidifier (s.a. picture n° 6).
•
Put a container or the optional flexible
calcius collecting bag on ground and
empty the boiler contents in it (s.a. picture n° 7).
Picture n°6
• Take
care : the tank gasket should be
changed whenever the boiler is m aintained (s.a. picture n° 8). Retigthen all
the collar clam ps.
Picture n°7
Do not scratch harshly, hit or use corrosive liquids on the heating elements.
•
Picture n°8
Uncap the w ater level tank and clean the
4 electrodes (s.a. picture n° 9).
Do not use any solvent to clean the
w ater level tank nor special glues if the
tank needs being attended but use teflon. Use a scraper on sensor electrodes if needed.
Picture n°9
•
Set back the high w ater level tank cap.
•
Reassemble the boiler cover assembly
and the boiler in the same position. Pay
particular attention that no power wires be jammed between the tank and the bottom and gathered them in the insert bundleclips as shown
in picture 3.
•
Picture n°10
b
Make sure there is still the O ring in the
drain valve body before putting back the
steam boiler (s.a. picture n° 10-b).
Tighten up all the screws of the boiler
top and reconnect the steam hose.
51
Pictures for illustra tive purpos es
ELECTROVAP RTH-LC
Maintenance - Valves
DRAIN VALVE MAINTENANCE
The drain valve should be maintained whenever the steam
cylinder is maintained or changed.
Once the steam cylinder has been pulled out (please refer to
the « cleaning of the steam cylinder » page ), disconnect the
drain valve supply w ires.
Unscrew the solenoid retaining nut and remove the w asher.
Put them on the cylinder compartment tray.
Remove the coil from the valve stem.
Unscrew and remove the valve stem and the filling hose from
the valve body.
Im portant : Apply some soap on the O-ring and the
cylinder draining outlet
Remove the « O » ring and the drain valve collar. Remove
any pieces of calcius, rinse the steam and the body w ith fresh
water.
Assemble in reverse order.
Once the drain valve has been cleaned up, put the boiler back in its
compartment in proceeding this w ay : set the maintaining clip on the steam cylinder
outlet, engage the drain outlet into the drain valve and push the cylinder dow nward.
Locate the steam hose and fasten the clamp.
Ensure that all the clam ps are properly tightened whenever the hum idifier is
m aintained.
52
Pictures for illustra tive purpos es
ELECTROVAP RTH-LC
Maintenance - Valves
INLET VALVE MAINTENANCE
The inlet valve should be m aintained every 6 months as a
m inimum and after 50 hours operation.
1
Isolate the w ater supply and remove the w ater supply hose from
the valve.
Disconnect the electrical w ires from the coil.
Untighten the collar clamp and remove the w ater feed hose.
Unscrew the black nut 1 and lay it on the cylinder compartment
tray.
Take the valve out and remove the basket filter from the base of
the valve w ith a pair of long nose pliers. Pull the coil out w ith a flat
screw driver.
Wash the basket filter under clean w ater to remove any dirt and
debris.
Replace w hole valve if cleaning is not practical or replace coil if
necessary.
Assemble in reverse order taking care to replace collar clamp if
necessary.
Ensure that everything is correctly assembled and sw itch the
humidifier on.
Ensure that all the clam ps are properly tightened whenever
the hum idifier is m aintained.
53
Pictures for illustra tive purpos es
ELECTROVAP RTH-LC
Split view & component parts
OVERVIEW
54
Pictures for illustra tive purpos es
ELECTROVAP RTH-LC
Split view & component parts
STAINLESS STEEL BOILER
5
6
3
7
8
4
2
Please refer to the electrical tables on pages
22 to 24 and to the wiring schemes on pages
32 to 35 for the selection of the heating element(s) fiting your model of humidifier.
9
1
Rep
Code
1
2
Description
Stainless steel cylinder
930553
3
Cylinder gasket
Cylinder top
930500
Heating element 1,9KW (230V)
930547
Heating element 1,9KW (277V)
930503
Heating element 4,3KW (230V)
930548
Heating element 4,3KW (277V)
4
5
6
Watertight nut M6
930505
7
Metal stuffing box
Stuffing box screw
8
930504
PT100 temperature sensor
9
930558
PPH inner filter
55
Pictures for illustra tive purpos es
ELECTROVAP RTH-LC
Split view & component parts
Filling cup
7
9
3
1
2
Rep
Code
Description
1
930137
Water hose Ø18x22mm
2
930137
Water hose Ø18x22mm
3
930082
Ring clamp Ø16x27mm
4
930137
Water hose Ø18x22mm
5
93135
Water feed hose Ø12x16mm
6
930137
Overflow hose Ø18x22mm
7
930231
Filling cup assy
8
930506
Black PVC fluted tee Ø20x20x20mm
9
930081
Ring clamp Ø12x22mm
10
930082
Ring clamp Ø16x27mm
11
930554
RTH-LC filling cup with hoses
12
930287
Anti-bubble blue hose inside fillicing cup
4
11
8
Water level detection tank
10
3
2
5
5
1
6
6
Rep
Code
1
930521
Description
Water level sensor (set of 4)
2
Stainless steel nut Ø4mm
3
Fluted chromium plated tip 1/4" G - Ø8mm
5
930523
Black O ring SIL70 (bag of 2)
6
930522
Water level assy
56
4
Pictures for illustra tive purpos es
ELECTROVAP RTH-LC
Split view & component parts
Water inlet valve
Rep
1
2
Code
Description
930160 Inlet valve solenoid coil
2
1
Inlet valve body N2
3
930224 Screw 3/4"
4
930151 Complete inlet valve
4
3
Water drain valve
2
1
3
4
5
Rep
Code
Description
1
930307 Drain valve body
2
930189 Drain valve O ring (bag of 10)
3
930161 Drain valve solenoid coil
4
930220 Insert (+ drain valve coil)
5
930153 Complete drain valve
57
Pictures for illustra tive purpos es
ELECTROVAP RTH-LC
Split view & component parts
Drain cups
1
Rep
Code
Description
1+2
930359
RTH-LC upper & lower drain cups
2
Electronic circuitry
2
3
Rep
Code
Description
1
930532
RTH-LC main board (ref: 500102-10)
2
930530
Water level control board (ref: 500851/02)
3
930101
Display board (ref: 500600/03)
4
930106
Remote information board (option) (ref:
500400/03)
1
4
58
Pictures for illustra tive purpos es
ELECTROVAP RTH-LC
Split view & component parts
Electrical Din rail
1
2
3
4
5
Rep
Code
1
930097
Electrical terminal JSAK 2,5 EN
2
930549
Static relay + heatsink RTH-LC
3
930093
Power contator LC1-D32
4
930094
Electrical terminal JSAK 16 EN
5
930096
Earth terminal JEK 35/35
6
Description
DIN rail
6
59
Pictures for illustra tive purpos es
Rue Feu St Eloi
76550 Am brumesnil - France
LR 94104-2
Export Division: tel. +33 (0)2 35 83 06 44 or +33 (0)2 35 83 03 86
fax. +33 (0)2 35 85 36 72
Email: [email protected] - www.devatec.com
60
Pictures for illustra tive purpos es
devatec reserves the right to change specifications or design of the equipment described in this brochure
without prior notice.
RTH LC CMS tech. Rev6b – 26-08-2015 - For program version V02_20_1