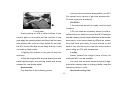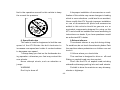
1
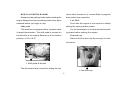
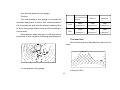
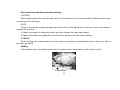
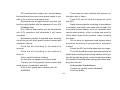
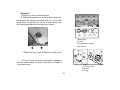
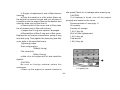
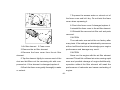
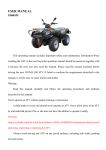
Brief introduction
The full name of ATV is All-Terrain vehicles. ATV300 is newly manufactured by our industries (group) co.,Ltd..
ATV300 embodies the experience and essence of world motorcycle technology.It adpots
single-cylinder four-stroke air -cooled engine newly developed by our company,and employs
the devices of carburetor manual clutch,four-speed shifting,and have reverse, PEI ignition,
pressure splash lubrication system,etc,which are good in performance.This ATV is novel and
bright in design,having moved,streamlined model and luxury decoration design,And it meet the
national standard in noise and dirt drainage ,especially it embodies the great power,reliability,
endurance,being an ideal transportation facility for ATV funs.
The correct operation and maintenance are the prerequisites at your safety riding of the
ATV,and also can reduce the fault of the ATV and keep its best performance. So please read
this manual! to understand its basic operation,repair and maintenance methoels .The information contained herein all relates to the ATV of the current design and is subject to changes by
our company according to the demands of market and users without notice .if you have any
questions.Please consult with our motorcycle dealer.We are welcome for you precious advice
and suggestions.Our company has established many service centers (stations,points),with specially-tranined technical personnel in operation and maintenance ,please contact with our motorcycle dealer and service center(stations,points).Our company consisitantly adheres to the
principle of quality first,users upmost,reputation foremost and be ready to provide you with high
quality service.
IMPORTANT INFORMATION FOR OPERATION
WARNING
Injury or death could be result from failure to follow WARNING instructions when you are operating inspecting or repairing the ATV.
CAUTION
A CAUTION indicates special precautions that must be taken to avoid
damage to the ATV.
A NOTE provides information can make your operation in the ATV easier
NOTE
or clearer.
Content
Safety information.......................................... Ⅰ
Fuel tank cap ................................................. 7
Description and machine identification ......... 1
Fuel cock ....................................................... 8
Control functions............................................ 3
Seat ............................................................... 8
Main switch.................................................... 3
Storage box ................................................... 9
Indicator lights ............................................... 3
Front carrier ................................................... 9
Handlebar switches ....................................... 3
Rear carrier .................................................... 9
Start switches................................................ 3
Rear shock absorber ..................................... 9
Light switches................................................ 4
Spring preload adjustment ............................ 9
Throttle lever .................................................. 4
Pre-operation checkes .................................. 10
Speed limiter.................................................. 5
Front and rear brakes .................................... 10
Front brake lever ............................................ 5
Fuel ................................................................ 11
Rear brake pedal and lever ............................ 5
Engine oil ....................................................... 11
Parking brake ................................................ 6
Lubrication oil of gear case ........................... 11
Shift pedal ...................................................... 7
Throttle lever .................................................. 11
Drive select lever ............................................ 7
Fittings and Fasteners .................................. 12
Recoil statrer ................................................. 7
Lights ............................................................. 12
Content
Switches ........................................................ 12
Engine break-in ............................................. 16
Battery ........................................................... 12
Accessories ................................................... 17
Tires ............................................................... 12
Loading .......................................................... 17
How to measure tire pressure ....................... 12
Ride with care ................................................ 18
Tire wear limit ................................................ 13
Speed limit valve ............................................ 19
Operation ....................................................... 14
Exhaust silencer ............................................ 19
Starting an engine ......................................... 14
Turning ........................................................... 20
Starting a cold engine ................................... 14
Climbing slope ............................................... 21
Starting a warm engine ................................. 14
Riding downhill ............................................... 22
Prewarming .................................................... 14
Crossing depression...................................... 22
Drive select lever operation
Crossing through shallow water .................... 22
and reverse driving ......................................... 15
Riding over rough terrain ................................ 23
Shifting ........................................................... 15
Slipping .......................................................... 23
To start out and accelerate ........................... 16
Periodic maintenance and adjustment ......... 24
To decelerate ................................................. 16
Operation manual and tool kit ....................... 24
Content
Periodic maintenance /Lubrication ............... 25
Wheel removal ............................................... 35
Engine oil ....................................................... 27
Wheel installation .......................................... 36
Spark plug inspection.................................... 29
Fuse replacement .......................................... 37
Air filter cleaning ............................................ 30
Replacing the headlight bulb ......................... 37
Carburetor adjustment .................................. 31
Spark arrester cleaning ................................. 38
Idle speed adjustment .................................. 31
Cleaning and storage .................................... 39
Valve clearance adjustment .......................... 31
Cleaning ......................................................... 39
Throttle lever adjustment ............................... 31
Storage .......................................................... 40
Front and rear brake shoe inspection ........... 32
Main data and specification .......................... 41
Front brake lever free play adjustment ......... 32
Maintenance record ....................................... 43
Rear brake adjustment .................................. 33
Electric wiring diagram .................................. 44
Clutch adjustment ......................................... 34
Cable inspection and lubrication ................... 35
Brake and shift pedal/brake lever lubrication
Steering vertical tube lubrication ................... 35
SAFETY INFORMATION
This operation manual includes important safty and maintenance information.When reselling the ATV TO THE NEXT BUYER,the operation manual should be passed on together with it
because the next user also need the manual .Please read the manual carefully before driving
the new .If failed to conform the requirements described in the manual,it will be easy to cause
injuries and deaths.
WARNING
●
Read this manual carefully and follow the operating procedures and methods described
in this manual.
●
Never operate an ATV without proper training or instruction.
●
A child under 16 years old should never operate an ATV.Never allow drive of an ATV by
an individal person if he or she does not have the abilities to operate it safely.
●
Always avoid driving an ATV on any paved surfaces,including sidewalks,driveways, park-
ing lots and streets.
●
Never operate an ATV in any public street,road or highway,even a dirt or gravel one.
Ⅰ
●
Never drive an ATV without wearing an approved motorcycle helment that fits properly.
You should also wear eye protection(goggles or face shield),gloves,boots,long-sleeved shirt or
jacket,and long pants.
●
Nevr consume alcohol or drugs before or while operating this ATV.
●
Never operate at speeds too fast.always drive at low speed on dusty surface.
●
Always inspect your ATV each time you use it to make sure it is in safe operating condition.
Always follow the inspection and maintenance procedures and schedules described in this
maunal.
●
Always keep both hands on the handlebars and both feet on the footboards of the ATV
during operation.
●
Never operate on excessively rough,slippery or loose terrain unless you have learned
and practiced the skills necessary to control the ATV on such terrain.Always be especially
cautious on these kinds of terrain.
●
Always follow proper procedures for turning as described in this manual.Practice turning
at low speeds before attempting to turn at faster speeds.Do not turn at excessive speed.
●
Never drive the ATV on hills too steep for the ATV or for your abilities.Practice on smaller
hills before attempting larger hills.
Ⅱ
●
Always follow proper procedures for climbing hills as described in this manual.Check the
terrain carefully before starting up any hill.Never climb hills with excessively slippery or loose
surfaces.Shift your weight forward.Never open the throttle suddenly or make sudden gear
changes.Never go over the top of a hill at high speed.
●
Always follow proper procedures for going down hills and for braking on hills as described
in this manual.check the terrain carefully before starting down any hill .Shift your weight backward.
Never go down a hill at high speed .Avoid going down a hill at an angle that would cause the
vehicle to lean sharply to one side .Go straight down the hill where possible.
●
Always follow proper procedures for crossing the side of a hill as described in this manual.
Avoid hills with excessively slippery or loose surfaces,shift your weight to the uphill side of the
ATV.Never attempt to turn the ATV around on any hill until you have mastered the turning
technique described in this manual on level ground .Avoid crossing the side of a steep hill if
possible.
●
Avoid crossing the steep hills.
●
Always use proper procedures if you stall or roll backwards when climbing a hill.To avoid
stalling,use proper gear and maintain a steady speed when climbing a hill.If you stall or roll
backwards,follow the special procedure for braking described in this manual.
Ⅲ
●
Always check for obstacles before operating in a new area.Never attempt to operate over
large obstacles,such as large rocks or fallen trees.Always follow proper procedures when operating over obstacles as described in this manual.
●
Always be careful when skidding or sliding.Learn to safely control skidding or sliding by
practicing at low speeds and on level ,smooth terrain .On extremly slippery surfaces,such as
ice,go slowly and be very cautious in order to reduce the chance of skidding or sliding out of
control.
●
Never operate an ATV in fast flowing water or in water deeper than that recommended in
this manual.Remember that wet brakes may have reduced stopping ability.Test your brakes
after wiping water away.If necessary,apply them several times to let fricting dry out the linings.
●
Always be sure there are no obstacles or people behind you when operating in reverse.
When it is safe to procceed in reverse,go slowly.Always use the size and type tires specified in
this manual.Always maintain proper tire procedure as described in this manual.
●
Never modify an ATV through improper installation or use of accessories.
●
Never exceed the stated load capacity for an ATV.Cargo should be properly distributed
and securely attached.
●
Reduce speed and follow instructions in this manual for carrying cargo or pulling a trailer.
Ⅳ
Allow greater distance for braking.
●
Improper handing of gasoline can cause fire and can cause injuries and deaths and
other serious accident. So do not refuel right after the engine has been running and is still
every hot .Never refuel while smoking ,or while in the vicinity of sparks ,open flames ,or other
sources of ignition,when transporting the machine in another vehicle,be sure it is kept upright
and that the fuel cock is in the”OFF”position,otherwise fuel may leak out of the carburetor or
fuel tank.
●
Starting or running the engine in a closed area will cause the breakdown.And exhaust
fumes are poisonousus and may cause loss of consciousness and death within a short time.
Always operate your machine in an area with adequate ventilation.
Ⅴ
DESCRIPTION AND MACHINE IDENTIFICATION
1
7
2
3
8
4
9
5
10
6
11
1. Front wheel
12.Clutch
2.Headlight
13.Throttle lever
3.Shift pedal
14.Fuel tank cap
4.Fuel cock
15.Main switch
5.Cushion
16.Parking brake
6.Taillight
17.Rear brake lever
7.Rear wheel
8.Spark arrester
9.Carturetor
12
13
14
15
16
10.Rear brake pedal
17
11.Bumper
The machine you have purchased may differ
slightly fron those shown in the figures of this manual
for progress or other change.
-1-
Identification numbers record
W hen ordering spare parts from a our dealer or for reference in case the vehicle is stolen Record ,
vehicle identification number in the spaces provided for assistance.
1.VEHICLE IDENTIFICATION NUMBER:
Vehicle identification number
The vehicle identification number is stamped on crosstube of pedestal.
-2-
CONTROL FUNCTIONS
This indicator light comes on when the transmission is in reverse.The light is blue in color.
Neutral indicator light“
”
This indicator light comes on when the transmission is in neutral.
High beam indicator light“
”
This light is yellow in color .It comes on when
the head light and high beam light is on.
Handlebar switches
Engine stop switch
Make sure that the engine stop switch is in
the “
” position.The engine stop switch
controls ignition and can be used at all times to
stop the engine,especially in an emergency.The
engine will not start or run when the engine stop
switch is turned to“
”.
Start switch
The starter motor cranks the engine when this
switch is pushed.
See starting instructions prior to starting engine
(see page for details).
If the starter switch is pushed with the
Main switch
Functions of the respective switch positions are
as follows:
ON:
Engine can be started only at this position and
the headlight and taillight come on when the light
swithc is on.
OFF:
All electrical circuits are switched off.The key
can be removed in this position.
OFF
N
ON
Indicator lights
Reverse indicator light“R ”
-3-
main switch“
switch “
”and the engine stop
”,the starter motor will be activated
but the engine will not start.To start the engine ,be
sure to set the engine stop switch at“
”.
Lights swtich “LIGHTS”
Turn the switch to“
”for the low beam and
taillight.
③
①
②
Turn te switch to “
and taillight.
1.Neutral indicator light“ N”
Throttle lever
2.Reverse indicator light“R ”
3.Hight beam indicator light“
”for the hight beam
Once the engine is running ,movement of the
”
throttle lever will increase the engine speed.Adjust
the speed of the machine by changing the throttle
①
position.Because the throttle is spring-loaded,the
machine will decelerate,and the engine will return
to an idle any time the hand is removed from the
throttle lever,Before starting the engine ,check the
②
③
throttle to be sure it is operating smoothly .Make
sure it returns to the idle position as soon as the
1.Lights switch“LIGHTS”
2.Engine stop switch“
3.Start switch“
”
lever is released.
”“
”
Check the operation of the throttle lever before
starting the engine.If it does not work smoothly,check
-4-
for the cause.Correct the problem before riding the
ATV.Consult a our dealer if you can’t find or solve the
probem yourself.
①
①
②
1.Locknut 2.Adjusting screw
a.12mm(047in)
②
CAUTION
Do not turn the speed adjusting screw out more
1.Throttle lever 2.Front brake lever
than 12mm.Always make sure the throttle lever free
Speed limiter
play is adjuted to 3-5mm.
The speed limiter keeps the throttle from fully
Front brake lever
opening,even when the throttle lever is pushed to
The front brake lever is located on the right
the maximum.Screwing in the adjusting screw lim-
handlebar.Pull it toward the handlebar to apply the
its the maximum engine power available and de-
front brake.
creases the maximum speed of the ATV.
Rear brake pedal and lever
The brake pedal is located on the right side of
-5-
engine,This could cause loss of control or a
the machine and the brake lever is located on the left
collision.
handlebar.Pull the lever toward the handlebar or tread
The barke could overheat if you ride the ATV
slow the pedal to apply the rear brake.
Parking brake
without releasing the parking brake.You could lose
W hen you have to start the engine or park the
braking performance which could cause an accident
.You could also wear out the brakes prematurely.
machine,especially on a slope,use the parking brake
①
②
1.Front brake lever 2.Lock plate
①
1.Rear brake pedal
Apply the rear brake lever and push down the
lock plate to apply the parking brake,squeeze the
rear brake lever to release the parking brake.
①
CAUTION
the ATV could start moving unexpectedly if the
1.Lock plate
parking brake is out of function before starting the
-6-
HOW TO AVOID THE HAZARD
chine either forward or in reverse.Refer to page for
Always set the parking brake before starting the
drive select lever operation.
engine.Always be sure the parking brake have been
CAUTION
released before you begin to ride.
Don’t start the engine in non-neutral or without
Shift pedal
setting the parking brake system.
This machine is equipped with a constant mesh
Put the transmission in neutral and set the park-
4-speed transmission .The shift pedal is located on
ing brake before starting the engine.
the left side of the engine.Reverse is at the bottom
Fuel tank cap
position. 4-3-2-1-N-R
Remove the fuel tank cap by turning it counterclockwise.
①
1.Shift pedal N.Neutral
①
The drive select lever is used for driving the ma-
1.Fuel tank cap
-7-
Fuel cock
RES:
The fuel cock supplies fuel from the fuel tank to
This indicates reserve.If you run out of fuel while
the carburetor.
riding,turn the lever to this position.After refuelling,
return the fuel cock lever to the “ON”position.
OFF:
If the lever is in this position ,fuel will not flow.
Always turn the lever to this position when the engine is not running
Seat
To remove the seat,pull the seat lock lever upward and pull up the seat at the rear.
ON:
To install the seat,insert the lobes on the frame
If the lever is in this position,fuel flows to the
and push down the seat at the rear,you should pay
carburetor.Normal riding is done with the lever in
this position.
attention to make sure that the seat is securely
fitted.
-8-
Rear shock absorber
The spring preload can be adjusted to suit the rider’s weight and riding conditions.
Spring preload adjustment
To increase the spring preload,turn the adjuster in direction ① .To decrease the spring preload,rurn the
adjuster in direction.
Standard position:
A-Minimum(Soft)
E-Maxinum(Hard)
-9-
PRE-OPERATION CHECKS
Before using this machine,check the following points:
ITEM
Brakes
Engine oil
Fuel tank
Gear oil
Throttle
W heels and tires
Fittings and fasrteners
Lights
Battery
ROUTINE
.Check operation,condition and free play
.Adjust if necessary
.Check oil level
.Fill with oil if necessery
Check fuel level
Fill with fuel if necessary
.Check for leakage
.Check for proper throttle cable operation
.Check tire pressure wear and damage
.Check all fittings and fasteners
.Check for proper operation
.Check the voltage
PAGE
the ATV inspected by a our deatler.
1.Brake levers and brake pedal
Check for correct free play in the brake levers
and brake pedal,If the free play is incorrect adjust it
see pages.
Check operation of the levers and pedal.They
should move smoothly and there shoud be a firm
feeling when the brake is applied.If not ,have the
machine inspected by a our dealer.
2.Brake operation
Inspect the ATV each time you use it to make
sure the ATV is in safety operationg condition.
Follow the inspection and maintenance procedures and scheclules described in the 0peration
Manual.
Front and rear brakes
Always check the brakes at the start of every
side .Do not ride the ATV if you find any problem with
the brakes.If a problem cannot be corrected by the
adjustment procedures.Provided in this manual,have
-10-
Test the brakes at slow speed after starting out
to make sure they are working properly.If the brakes
do not provide proper braking performance,inspect
the brakes for wear.See page.
Fuel
Make sure there is sufficient gasoline in the tank.
Recommended fuel:unleaded fuel
Fuel fank capacity: 12L
Unleaded fuel will give a longer spark pulg life
and reduce maintenance cost.If unleaded gasoline
is not available,the leaded regular gasoline can be
used.
cerful .Not to spill fuel,especially on the engine or
exhaust pipe.wipe up any spilled fuel immediately.
Be sure the fuel tank cap is closed securely.Do not
refuel right after the engine has been running and is
still very hot.
Enegine oil
Make sure the engine oil is at the specified level.
Add oil as necessary.(See pape)
Recommended oil
SAE20W40
SAE10W30
SAE5W30
Recommended engine oil classfication:
SE,SF,SG,type or higher.
Engine oil capacity:1.3L
Lubrication oil of gear case
Make sure the lubrication oil of gear case is at
the specified level. Add oil as necessary.(see page
for defails).
Recommended oil
SAE80 API GL Hypoid gear oil
Throttle lever
Check to see that throttle lever operates correctly.
It must open smoothly and spring back to idle posi-
①
②
CAUTION
Fuel can spill, causing a fire and severe injury.
Fuel will expand when it heats up if the fuel tank
is overfilled ,fuel could spill out due to heat from the
engine or the sun .So,do not overfill the fuel tank .Be
-11-
tion when released.Repair as necessary for proper
operation.
Fittings and Fastenerns
Always check the tightness of chassis fittings
and fasteners before a ride.Refer to the Service .
Manual for correct tightening torque.
Lights
Check the headlight and taillight to make sure
they are in working condition. Repair as necessary
for proper operation.
Switches
Check the Operation of the headlight switch,
engine stop switch and any other switches.Repair
as necessary for proper operation.
Battery
.The battery is an enclosed one and unnecessary to fill water(see page)
.Don’t take off the closing bolt when charging.
.W hen charging,please obey the charging current and time as shown on the following table.
Charge criteria:Charge the battery with ten percent of capacity of battery for 5 to 10hours,or quickly
charge the battery with 2A to 3A for 2 hours.
Tire
The size and type (in low pressure condition) of
hollow tire used for ATV300 are listed below.
Size
Front wheel
Rear wheel
AT22 × 7-10
AT22 × 10-10
warning
Use of improper tires on this ATV,or operation
of this ATV with improper tire pressure may increase
your risk of accident.
Use of improper tires on this ATV,or operation
of this ATV with improper tire pressure may cause
loss of control.
Pay attention to choose the Size and type of
used tire according to the description in the above
chart and make sure that the tire pressure is normal.
2.The tires should be set to the recommended
pressure.
Front 20KPa(0.20kgf/cm22,2.8pai)
Rear 25KPa(0.25kgf/cm 22,3.6pai)
Check and adjust tire presssure when the tires
are cold.
Tire Pressure below the minimum specified
could cause the tire to dislodge from the rim under
severe riding conditions,the following are minimums:
Front 17KPa(0.17kgf/cm2)
Rear 22KPa(0.22kgf/cm 2)
Higher pressures may cause the tires to burst.
Inflation could cause the tires to burst.
How to measure tire pressure
-12-
Use the low-pressure tire gauge.
Caution:
Recommended
The low-pressure tire gauge is included as
pressure
standard equipment. conduct two measurements if
Front
the tire pressure and use the second reading.Dust
Minimum
Maiximum
20Kpa
17Kpa
23Kpa
(0.20kgf/cm 2)
(0.17kgf/cm 2)
(0.23kgf/cm 2)
or dirt in the gauge would cause the First reading to
be incorrect.
Rear
25Kpa
22Kpa
23Kpa
(0.25kgf/cm 2)
(0.22kgf/cm 2)
(0.28kgf/cm 2)
Set pressure when tires are in cold and set tire
pressures to the condition following specifications:
Tire wear limit
When the tire groove decreases to 3mm due to
wear.
1.Low-pressure tire gauge:
a.3mm(0.12in)
-13-
OPERATION
WARNING
Never operate ATV until you are familiar with all controls.
Read the operation Manual carefully. If there is a controls or function you do not understand ,ask your our
dealer.
WARNING
Never ride the ATV in cold weather,always make sure all control cables work smoothly before you begin
ridding.Please read the engine brake-in section before you operate the engine at first time.
Starting a cold engine:
1.set the parking brake.
2.Turn the fuel lock to “ON”and the engine stop switch to “
”.
4.Shift the transmission into neutral.
WARNING
The engine can be started in any gear if the rear brake lever is applier. However,it is recommended to shift
into neutral before starting the engine.
5.use the starter(choke)in reference to the figure.
NOTE
If the engine fails to start,release the start switch,then push the start switch again,pause a several
secords before the next attempt.Each cranking should be as short as possible to preserve battery energy.Do
not crank the engine more than 10 secords for each starting.
If the battery is discharged. pull the recoil starer to start ergine.
Starting a warm engine
The throttle should be opened slightly when starting a warm engine.
Prewarming
To get maximum engine service life,prewarm.the engine before startting off.Never accelerate forcefully
with a cold engine.
-14-
Drive select lever operation and reverse driving.
CAUTION
Before shifting,stop the machine and return the throttle lever to its closed position.Otherwise the transmission may be damaged.
NOTE
When in reverse the reverse indicator light should be on.If the light does not come on .ask a our dealer to
inspect the machine.
5.Check for people or obstacles behind you,then release the rear brake pedal.
6.Open the throttle lever gradually and continue to watch to the rear while backing.
WARNING
W hen shifting into reverse,make sure there are no obstacles or people behind you .when it is safe to
proceed, go slowly.
Shifting:
This machine has a 4-speed forward and 1-speed reverse transmission with manual clutch.
①
1.Shift pedal
-15-
increasing the possibillity of an accident.
Engine break-in
There is never a more important period in the
left of your machine than the period between zero
and 20 hours .During this period prolonged full
throttle operation or any condition which might result
in excessive engine heating must be avoided,after
every full throttle acceleration,the engine should run
at lower speed for a rest so as to rid itself of the
temporary build up of heat.If any abnormality is found
during this period ,consult a our dealer.
1.0-10 hours:
Avoid continuous operaton above half throttle.A
allow a cooling off period of five to ten minutes after
every hour of operation.Vary the speed of the machine from time to time.Do not operate it at one set
throttle position.
2.10-20 hours:
Avoid prolonged operation above 3/4throttle revolving the machine can freely through the gears
during running of engine but do not use full throttle
any time.
3 After break-in
Avoid prolonged full throttle operation.change
speeds occasionally.
Parking
W hen parking.Stop the engine and shift into
neutral.Turn the fuel to “OFF” and apply the parking
brake.
CAUTION
Do not coast for long periods with the engine
off, and do not tow the machine a long distance.
Even when gears are in neutral, the transmission is
only.Properly lubricated when the engine is running.
In a d eq u ate lu b r ic at io n m ay d am a g e t h e
trarsmission.
To start and accelerate:
1.Release the throttle lever.
CAUTION
Always close the throttle while shifting gears.
Otherwise,the engine and drive train may be
damaged.
2.Shift into first gear and release the shift pedal.
3.Open the throttle gradually once the machine
has obtained adequate speed.release the throttle
lever.
4.Shift into second gear and release the shift
pedal.
5.Open the throttle gradually,Follow the same
procedure.W hen shifting to the next higher gear.
To clecelerate:
W hen slowing down or stopping, release the
throttle and apply the brakes smoothly and even.As
you slow down,shift to a lower gear,Be sure that the
engine has sufficiently slowed before engaging a
lowe gear.Improper use of the brakes or control can
cause the tires to lose traction,reducing control and
-16-
choose only accessories designed for you ATV
Our dealer has a variety of genuine accessories .
Choose a genuine accessory.
WARNING
①
1.Accessories should be rigidly and securely
installed.
1.Lock plate
2.Do not install an accessory where it could in-
Avoid parking on hills or other inclines .If you
terfere with your ability to control the ATV.Examples
have to park on an incline put the machine in low
include a heavy or bulky object attached to the handle-
gear,apply the parking brake and block the front and
bars which could make steering difficult,an acces-
rear wheels with rocks or other object.Do not park
sory that limits your abitiy to move around on the
the ATV on the hills that are so steep that you could
seat,or one that limits you view.Use extra caution
not walk up them easily.
when riding an ATV with accessories.
1.Appling the brakes in low gear to stop the
Loading
machine.
Never exceed the weight limits shown An
2.Stop the engine.With the rear brake lever and
overloded ATV can be unstable.
pedal applied,apply the parking brake and slowly
You must use common sense and good judge-
release the rear brake pedal.
ment when carring cargo or towing a trailer. keep the
Accecsories:
following points in mind:
Pay attention to the following points.
Maximum loading limit
-17-
Vehicle Loading limit :150kg.
OPERATION
Make sure the load does not interfere with con-
1.Get training if you are unexperienced.
Beginners should be trained at the guide of professional person.Drive with this ATV with low speeds
first to familiar with its performance,even if you are
an experienced rider,do not attemp to operate at maximum performace until you are totally familiar with
ATV s performance.
2.Dress
Always wear a motorcycle helment when riding
.Also wear the following protective tools eye protection
(goggles or dust-proof shield,gloves,boots longsleeved shirt or jacket,pants)
3.Do not operate after drinking alchohol or drugs
containing sleeping pill composition,because operator would be slow in driving in such way.
4.Always check your ATV each time before you
ues it to make sure the reliability of ATV.Always follow the inspection and maintenance procedures in
the operation manual to protect you ATV.
5. Always select the size and type of tires speci-
trols or your sighting.
Ride more slowly than you would with a load,
The more weight you carry,the slower you should go
.Although conditions is different ,it is not allowed to
exceed 2nd gear whenever you are carrying heavier
loads or when towing a trailer ,Allow more braking
distance.A heavier vehicle takes longer to stop.Avoid
making sharp turns unless at very slow speeds.
Avoid riding on hills and rough road surface.
And choose terrain carefully .Extra weight will affects
the stability and operation of the ATV.
This machine could be used to carry cargo and
passengers is prohibited.
-18-
fied in the operation manual for this vehicle to keep
the normal tire pressure.
8.Improper installstion of accessories or modification of this vehicle may cause changes in harding
which in some situations ,could lead to an accident,
Never modify this ATV through improper installation
or use of accessories.All parts and accessories
added to this vehicle should be genunie our or
equivalent components designed for using on this
ATV and should be installed and used according to
instructions our dealer .If you have questions cousult
an.authorized ATV dealer.
9.Exhaust silencer
6. Speed limit valve
This valve is used for beginners to limit the max
The exhaust silencer is very hot during driving.
speed of the ATV.Rotate the bolt clockwise to
To avoid burn,do not touch the exhaust cylinder .Park
incresase max.speed,and rotate it coutercloclwise
the machine where pedestrians or children can not
to decrease max speed.
touch it.
10.Know where you should ride
7.Always keep your feet on the footboards dur-
This machine is designed to drive on off-road
ing operation .otherwise your feet may contact the
Riding on asphalt road may lose control.
rear wheels.
Don’t ride the ATV on asphalt road,including
Never attempt stunts ,such as wheelies or
sidewalks,driveways,parking lots and walk streets.
jumps.
Prohibit to drive the machine on any driveway,
WARNING
streets or highways.
Don’t try to show off
-19-
Must make the turning practice in low speed
Know the terrain where you ride
Ride carefully in complicated terrain ,stay alert
before making a turn.
for holes,rocks or roots or roots in the terrain other-
Turn your ATV according to procedures in op-
wise may cause the machine to tip over.
eration ,manual.Practice should be done before turn-
W hen riding in an area where you might not
ing in high speed.
easy to be seen ,such as dune and hilly land ,must
The turning speed should not be too high.
mount a caution flag on the machine to remind
As you approach a curve,slow down and begin
other vehicles. Do not ride in areas of forbidding
to turn the direction rod .Then put you gravity center
pass.Do not ride on private property.Operation
on the footboard to the outside of the curve and lean
course
your body inside .Make the engine to maintain an
CAUTION
even speed when passing the curve.This maneuver
Do not shift gears without releasing the throttle.
will let the tire on the inside of the curve slip slightly.
Otherwise may cause damage to the engine or drive
The turning practice should be in flat area with-
gear.
out any obstacles.Improper operation may make
W hen slowing down or stopping,release the
your ATV to go straight.If the ATV doesn’t turn,stop it
throttle and brake gradually. As you brake,shift to
and practise again .If the riding surface is loose and
lower gear .Ensure that the engine has sufficiently
slippery,move your weight forward.
slowed Improper use of the brakes or shifting can
Once you have learn this technique you can turn
cause the tires slidding to lose the control .
your ATV at higher speed.
Must make the engine to slow down fully before
The sudden acceleration,brake,incorrect body
engaging a lower gear.
position and too high speed will cause the ATV to
slip.If the ATV slips while passing a curve and the
Turning
-20-
ATV machine leans inward ,you should release
There may be other vehicles and persons on
the throttle and move your body gravity center to out-
the other side of slope .
side of the curve to avoid tipping over.
If your ATV can not climb the slope,turn round
Remember:ride at higher speed only after you
your ATV.
are thoroughly familiar with the operation of your ATV
Make turning practice according to procedures
Climbing slope
in operation manual.Do not make turn on slope .Be
Don’t ride on slope before you are very familiar
more careful when making a turn on slope.Be more
with ATV operation skill.otherwise it will cause
careful when making a turn on slope and avoid to
accidents.
climb steep slope when possible .when climbing
Neccessary practice is required.when climbing
the slope:
the hill,move your body gravity center forward and
Do not drive on depression and slippery slope
operation manual.
and drive according to procedures in operation
Climb the hill according to the method in
manual.
manual.
Ensure the ATV not to slip when stop it on slope.
Climb the hill according to the method in
The shift should be proper and speed shuld be
manual.
stable when climbing slope.losing traction force,you
Check carefuly before climbing.
should transfer the gravity center forward and brake
Do not drive on slippery and loose slope.
the machine.Close the brake closing piece after stop-
Transfer your body gravity center forward and
ping the machine.
avoid abrupt acceleration and shift.
If the machine slips backward
Drive in low speed when climbing the hill.
Transfer you gravity center backward;
WARNING
Use front brake;
-21-
Do not use rear brake
with body gravity center.You should be familiar with
Close the brake closing piece after stopping
basic skills before crossing depression.Avoid to lose
balance to cause accident.
the machine.
Don’t ,make a turn on a slope before grasping
Riding downhill
turning skill totally.You should be careful and cau-
Move your gravity center backward,when riding
tious if making a turn on any slope.
ATV downhill,your and grisp steering bar and drive at
When crossing procedure
low speed.
Always follow proper prouclures in operation
Note:The brake performance is very important.
manual;
W henever possible,ride your ATV straight,Turing may cause the ATV to tip over.Avoid too high speed
Avoid slope with slippery or loose surface.
so that you have time to deal with accident.
Lean your gravity center in the slope direction.
CAUTION
Crossing through shallow water
Practise the braking skill when decending the
The ATV can be used to cross shallow water of
maximum distance of 35cm.Check your path care-
hill.look over the terrain carefully before decending
fully before crossing,and avoid of ride where there is
and transfer your body gravity center backward.
sharp drop off,Drive slowly and carefully.
Ride in low speed when decending the hill turning
Pay attention that wet brakes may reduce brake
speed should not be too high when making a turn,
ability.Check your brakes after leaving water.If
and keep driving straight as far as possible.
Crossing depression
necesary,apply them to let friction dry out the linings
W hen crossing depression,balance your ATV
several times.
-22-
Riding over rough terrain
and slippery surface.Moving you gravity center for-
Be careful when riding on rough terrain .when
ward is helpful to control the slipping of front wheels
riding over terrain which may damage the ATV,lay
.when the rear wheel begin to slip,steer direction
your feets on the foot pedals to avoid jumping and
properly.Apply the brake only until you have stopped
loss of control.
the slipping.
Don’t try to ride over big obstacles such as rock
Practise safely control slipping at low speed.
and tree on the road .Follow the proceduces in op-
on very slippery surefaces,such as ice,drive slowly
eration manual when riding over obstacles.
to avoid loss of control.
Slipping
The above introduction is only for reference.
The ATV may lose control when driving on loose
Read it carefully and act according to circumstances.
-23-
PERIODIC MAINTENANCE AND ADJUSTMENT
Periodic inspection ,adjustment,and lubrication will keep your machine in the safety and most efficient
condition.The points of machine inspection,adjustment,and lubrication are detailed in following.
NOTE
Turn off the engine when maintaining unless specified,Have a our dealer perform service if you are not
familiar with maintenance.
Operation manual and tool kit
You are recommended to put this operation manual in the vinyl bag and lay it under the seat as shown.Put
the tool kit and low -pressure tire gauge in the storage case.
The maintaining information included in this manual is provided you with the necessary information for
completing preventive maintenance and minor repairs by yourself,The tools provided in the tool kit are sufficient for this purpose,except a torque wrench necesary to tighten nuts and bolts.
NOTE
If you do not have a required torque wrench during maintenance,take you machine to a our dealer to check
the torque settings and adjust them as necessary.
-24-
PERIODIC MAINTENANCE/LUBRICATION
ITEM
INITAL
ROUTINE
Valves
Check valve clearance,Adjust if necessary.
Spark plug
Check condition.Adjust gap and clean.Replace if necessary.
Air filter
Clean.Replce if necessary.
Carburetor
Check idle speed/Starter operation.Adjust if necessary.
Cylinder head
Check breather hos e f or c racks or damage. Replace if
breather system
Exhaust system
EVERY
1month 3months 6months 6months 1Year
Every 20-40 hours(more often in wet or dusty areas)
necessary.
Check for leakage.Retighten if necessary.Repace gasket if neces sary
Spark arrester
Clean.
Fuel line
Check fuel hose for cracks or damage.Replaceif necessary.
Engine oil
Replace(W arm engine before draining).
Engine oil filter
Clean.
Engine oil strainer
Clean.
Final gear oil
Check oil level/oil leakage.Replace.
-25-
PERIODIC MAINTENANCE/LUBRICATION
ITEM
ROUTINE
Brakes
Check operation.Adjust if necessary.
clutch
Check operation.Adjust if necessary.
W heels
Check balance/damage/runout. Replace if necessary.
W heel bearings
Check balance assembly for looseness/damage.
Replace if damaged.
Front and rear suspension* Check operation.Correct if necessary.
Steering system
Check operation.Correct if necessary.Check toe -in.
Steering system
Adjust if necessary.
Steering shaft
Lubricate every 6months.(use Li grease)
Fittings and Fasteners*
Check all chassis fittings and fasteners.Correct if necessary.
-26-
INITAL
EVERY
1month 3months 6months 6months 1Year
Engine oil
1.Engine oil level measurement
a. Place the machine on a flat surface wram up
the engine for several minutes and turn off it.wait
more than 10 minutes for the oil to drain back into
the crankcase before checking the oil level.
①
1.Drain plug
2.O-ring
3.Compression spring.
4.Oil strainer
②
1. Maximum level mark 2.Minimum level mark
b.The oil level should be between maximum
and minmum marks .If level is low,add oil to raise it
to proper level.
1.Oil filter cover
2.Oil filter
3.O-ring
-27-
idle speed.Check for oil leakage when warming up.
CAUTION
If oil leakage is found ,turn off the engine
promptly and check for the cause.
Recommended oil :see page 11
Oil quantity:
Periodic oil change:
1.5L(1.3mp qt)
W ith oil filter replacement:
1.6L(1.4mp qt)
Total amout:
1.8L(1.6mp qt)
2. Engine oil replacement and oil fitter element
cleaning
a.Place the machine in a flat suface,W arm up
the engine for several minutes and turn off place a
container under the engine.Remove the dipstick and
open the drain plug to drain the oil.
b.Remove the oil fiter cover and oil filter,clean
the oil strainer and oil filter with solvent.
c.Inspect the O-ring and replace if damaged.
d.Reinstall the oil filter,O-ring and oil filter cover.
Replace the oil strainer,compression spring,O-ring
and drain pulg .Then tighten the drain plug and filter
cover bolts to the specified torque.
Tightening torque:
Drain pulg(engine):
43Nm(4.3m.kg)
Filer cover bolt:
10Nm(1.0m.kg)
e.Add oil to the engine with oil and install the
dipstick.
CAUTION
B e su re n o foreign m aterial en ters th e
crankcase.
f.W arm up the engine for several minutes at
①
1.oil gallery bolt
-28-
Air fillter cleaning
Spark plug inspection
You should periodically remove and check the
There is a check hose at the bottom of the air
spark plug because heat and deposits will cause
fillter case.if there are dust or water collects in this
slow damage and erosion of the spark plug if elec-
hose,empty the hose and clean the air filter element
trode erosion is excessive,you should replace the
and air filter case.
spark plug with one of the propet type D7RTC
Before installing the new spark pulg measure
the electrode gap with a feeler gauge and adjust to
spectifcation.
①
1.Check hose
1.Spark plug gap
Spark plug gap:
0.5-0.7mm
①
W hen installing the spark pulg,generally clean
the gasket surface and use a new gasket. Clean off
an y g rim e f ro m t h e th read s an d tig h t en t o
specification.
1.Remove the seat.
Spark plug torque:17.5Nm(1.75m.kg)
2.Remove the air filter case cover.
-29-
7.Squeeze the excess water or solvent out of
the foam cover and let it dry .Do not twist the foam
cover when squeezing it.
8.Check the foam cover.if damaged,replace it.
9.reinstall the foam cover to the air filter element.
10.Reinstall the removed air filter unit and parts
removed.
CAUTION
The carburetor was set at the our factory after
many tests .If the settings are disturbed by somenone
1.Air filter element 2.Foam cover
without sufficient technical knowledge,poor engine
3.Remove the air filter element.
performance and damage may result.
CAUTION
4.Remove the foam cover from the air filter
Never run the engine with the air filter element
element.
5.Tap the element lightly to remove most of the
removed.This will let unfiltered air enter,causing rapid
dust and dirt.Blow out the remaining dirt with com-
wear and possible damage of engine.Additionally,
pressed air .If the element is damaged,replace it.
operation without the filter element will weak the
performance of carburetor and cause overheating of
6.Wash the foam cover gently thoroughly in water
engine.
or solvent.
-30-
Carburetor adjustment
Valve clearance adjustment
The idle speed may be performed by customer
Incorrect valve clearance will result in improper
as a part of the routine maintenance.
fuel/air supply or engine noise.To prevent this ,the
ldle speed adjustment
valve clearance must be adjusted regularly,but the
1.Start the engine and warm it up for a few min-
adj ustment should be done by a professional
utes at approximately 1,000 to 2,000 r/min, increase
mainterance technician.
the speed of engine to 4000 to 5000r/min .
Throttle lever adjustment
2.Set the specified idle speed by adjusting the
NOTE
throttle adjusting screw,Turn the screw into increase
Adjust the engine idle speed before adjusting
engine speed,and out to decrease engine speed.
the throttle lever.
Specified idle speed:1450-1550 r/min
1.lossen the locknut.
2.Rotate the adjusting bolt until the throttle lever
free play is 3-5mm(0.12-0.20in)
3.Tighten the locknut,
↓
↑
①
1.Throttle adjusting screw
-31-
②
a
1.Adjusting bolt
2.Locknut
a.3-5mm(0.120.20in)
Front and rear brake shoe inspection
Front brake lever free play adjustment
A wear indicator is mounted on each brake.The
Inspect the front brake shoes ,before adjusting
wear of brake shoe could be checked under the con-
the brake,
dition of disassembling brake .If the indicator
The front brake lever free play should be ad-
reaches the wear limit line ,ask a our Group dealer
justed to 5-7mm(0.2-03in) If the free play is incorrect,
to replace the shose as a set.
adjust as following steps:
Front
1.W ear indicator
2.Wear limit
②
①
Rear
1.Loosen the locknut and fully turn in the adjusting bolt of the front brake lever.
1.W ear indicator
2.Wear limit
2.Make sure the cable joint of the balancer is
straight when applying the brake.If not,rotate the ad-
①
justing nut at the front hubs until the cable joint be-
②
comes straight.
-32-
1 . A d j u st in g n u t
(front hub)
4.Tighten the locknut
After maintaining,pay attention to :
Make sure the brakes operate smoothly and
the free play meet the requirement;
Make sure the brakes do not skid.
Replacement of brake components requires
professional knowledge.These procedures should
be done by our Group dealer.
Rear brake adjustment
1.Brake pedal
a.Fully loosen the adjusting nut on the brake
cable.
b.Rotate the adjusting nut on the brake rod untill
free play is 20-30mm.
①
3.Retate the adjusting bolt at the front brake lever to make the free play satisfy the requirement.
Specified free play:
5-7mm(0.2-0.3in)
a
①
②
a.5-7mm
1.Brake cable adjusting nut 2.Brake rod adjusting
nut
-33-
After maintaining ,pay attention to:
Make sure the brakes operate smoothly and
the free play is correct.
↓
Make sure the brakes do not skid.
a
Replacement of brake components requires
↑
professional knowledge.These procedures should
be done by our Group dealer.
a.20-30mm
Clutch adjustment
2.Brake lever
1.Loosen the lock nut
a.Loosen the locknut and fully turn in the adjusting nut on the handlebar.
2.Slowly rotate the adjusting bolt counterclockwise until resistance is felt then,rotate it by1/8 turn
b.Turn in the adjusting nut on brake cable to get
o
clockwise,i.e.45 .
a gap of 0-1mm between the lever and pin of pivot.
①
②
@
1.Locknut 2.Adjusting nut a.5-7mm
-34-
cable inspection and lubrication
The damage of outer covering of control cable
can cause corrosion,fray or kink of cable .Operation
of cables could be strictly executed,which could
cause an accident or injury.
Inspect cable frequently and replace damaged
cables.Lubricate the inner cables and the cable
joints.If the cables do not operate smoothly ,ask a
our Group dealer to replace them.
Wheel removal
Recommended lubricant:
1.Lift the wheel by placing a suitable support
SAE 10W30 Lubricant
under the frames.
Steering vertical tube lubrication
2.Remove the nut on the wheel.
Use a grease gun to lubricate the pivots.
3.Remove te wheel assembly.
Revommended lubricant:Lithium-base grease
-35-
3.Tighten the wheel nut.
→
Wheel installation
W hen installing the wheel reverse the removal
procedure.Pay attention to the following points:
1.Tapered nut
Wheel nut torque:
Front wheel :55Nm(5.5m.kg)
Rear wheel :55Nm(5.5m.kg)
Battery
WARNING
Avoid contact with skin,eyes or clothing,Always
shield eyes when working near batteries.keep out
of reach of children.
Use and maintenance
1.Don’t remove electrolyte cover after enclosed
battery being used.Please obey the operation instruction on battery to use the battery.
2.If ATV is suspended from use for a month or
much longer time,remove the battery and store in a
cool and dark place,charge fully before reusing.
3.If the battery is stored over the above men-
←
1.Arrow mark
1.The arrow mark”
” on the tire must point to
the rotation direction of the wheel.
2.Tapered wheel nuts are used for both front
and rear wheels .Install tapered side of the nut towards the wheel.
-36-
2.If the fuse is blown ,switch off the main switch
and replace with a new fuse of the same specifiction.
If the fuse immediately blows again ,consult a our
Group dealer.
Specified fuse:20A
CAUTION
To prevent accidental short-circuting,switch off
the main switch when checking or replacing a fuse.
Replacing the headlight bulb
If the headlight bulb burns out,replace the bulb
as following steps:
1.Remove the headlight cover.
2.Remove the cover ,and rotate the bulb holder
counterclockwise and remove the defective bulb.
tioned time,check the voltage at least one month.
Charge the battery when the voltage is lower than
12V.
1.Battery
1.Main fuse 2.Start relay
Fuse replacement
1.The fuse case is put under the seat.
1.Headlight
-37-
1.Cover
WARNING
Wait for the bulb to cool before removing it.
3.Install a new bulb to the bulb holder.
4.Reinstalll the cover and headlight cover,Adjust the headlight beam if necessary.
Spark arrester cleaning
Select a well-ventilated area free of combustible materials and make sure the exhaust and silencer are
cool.
1.Remove the bolt.
2.Start the engine ,block the end of sillencer with a dowel,which will increase the speed about twenty
times by momentarily producing exhaust system back pressure.
3.Stop the engine and cool the exhaust pipe.
4.Install the bolt and tighten it.
-38-
WORKING SOCKET ATTENTION
in the socket firmly or the wire will be burned.
1) The power connected to the socket should
3) Do keep the engine running if you want to
be less than 100 watts.
use the plug-in facilities for more than 10 minutes.
2) The plug should be plugged in the plugged
CLEANING AND STORAGE
CLEANING
with degreaser,Do not use degreaser for wheel axles.
General speaking ,thorough cleaning of your
3.Rinse the dirt and remove oil dirt on the soft
ATV W ill improve its runing performance and pro-
hose.
long the service life of many components.
CAUTION
1.Before cleaning the ATV:
Excessive water pressure may cause water
a.Block off the exhaust pipe with plastic bag or
seepage and deterioation of wheel bearings,brakes,
strong rubber band to prevent water entry.
transmission seals and electrical equipment.
b.Make sure the spark plug and all filler caps
4.W hen rinsing dirty material for many times,
are properly installed.
use warm water and mild,detergent-type soap.Use
2. If the engine case is excessively dirty,wash
old toothbrush or bottle brush to wash hard -to-get-39-
2.Add one tablespoon of SAE 10W30 or 20W40
at places.
5.After cleaning ATV with clean water,immedi-
motor oil in the spark plug.Ground the spark plug
ately dry all surfaces with a chamois ,clean towel or
wire and run the engine over several times to coat
soft absorbent cloth.
the cylinder body with oil.
3.Lubricate all control cables.
6.Clean the seat with a vinyl upholstery cleaner
4.Elevate the engine body to raise all wheels off
to keep the cover pliable and glossy.
the ground.
7.Apply automotive type wax to all chrome plated
5.Seal with plastic bag over the exhaust pipe
surfaces.Avoid use combination cleaner -waxes.Af-
outlet to prevent moisture from entering.
ter using abrasives to protect scratched surface,let
6 . If st o ring AT V in a h um id or salt-air
the engine idle for several minutes.
atmosphere,cover all exposed metal surfaces with
After washing the brakes,let engine brake sev-
a light plastic film of oil .Do not apply oil to any plastic
eral times at slow speeds to dry the linings.
parts or the seat cover.
B.Storage
Long term storage(60 days or more) of your ATV
7.Take out the battery and store it in a dry place.
will require some protective procedures to prevent
The battery should be stored in the place where the
ATV from damage. After thoroughly cleaning the ATV,
ambient temperatrue should be 30℃ maximum and
adopt the following protective measures:
0℃ minimum.
1.Add fresh fuel into fuel tank.
-40-
MAIN DATA AND SPECIFICATIONS
Item
specification
Item
specification
Engine oil:
Dimension:
1850mm
Periodic oil change
1.3L
Overal width
1140mm
W ith oil fillter replacement
1.6L
Overall height
1190mm
Total amount
1.6L
Main fuel tank capacity
12L
Reserve fuel tank capacity
1.6L
Overall length
Seat height
900mm
W heel base
1170mm
Minimum ground clearance
Minimum turning radius
185mm
2300mm
Carburetor:
Type
Basic weight:
With oil and full fuel tank
Engine
190kg
Air cooled,4-stroke,single-cylinder
Displacement
290ml
Bore × Stroke
71 × 58mm
Compression ratio
Starting system
Lubrication system
8.9:1
Electric starter or recoil starten
Pressure splash
Vacuum film piece type
Spark plug type
DR8EA
Spark plug gap
0.6-0.7mm
Clutch type
W et,centrifugal automatic
Transmission:
Primry reduction system
Spur gear
Primary reduction ratio
73/22(3.318)
Secondary reduction system
Shaft drive
Secondary reduction ratio 19/18 × 46/11(4.414)
Transmisson type
Constant mesh,5-speed
forward-speed reverse
Operation
left foot operation
-41-
MAIN DATA AND SPECIFICATIONS
Item
Gear ratio:
1st
2nd
3rd
4th
Frame
Frame type
CasterA angle
Trail
Tire:
Type
Size:Front
Size:Rear
Brake:
Front brake type
Operation
Rear brake type
Operation
Item
specification
2.636
1.687
1.263
1.000
Steel tube
4°
20mm
Suspension
Front
Rear
Shock absorber:
Front
Rear
Wheel travel:
Front
Rear
Disc brake
Left-hand operation
Disc brake
Right-foot operation
Supporting rod
Rotary rod
Spring/Oil damper
Spring/oil damper
135mm
135mm
Electrical:
Ignition system
Vacuum
AT22 × 7-10
AT22 × 10-10
specification
Generator system
PEI
A.C.Magneto
Battery type/voltage,capacity 12N14-BS/12V,14AH
Headlight
12v,55W
Taillight
12V,21W
Neutral indicator
12V,3W × 1
Reverse indicator
12V,3W × 1
Hight beam indicator light
12V,3W × 1
-42-
MAINTENANCE RECORD
Maintenance times,receipts of purchased componects and assembly will be required to be recorded,
which should be done according to the warranty.The chart below only acts as maintenance record,not as
maintenance proof:
MAINTENACE
DATE
INTERVAL
OF
TIME
MAINTENANCE
DRIVING MILEAGE
SERVICING DEALER NAME AND ADDERSS
1Month
3Months
6Months
12Months
18Months
24Months
30Months
36Months
42Months
48Months
54Months
60Months
-43-
REMARKS
ELECTRIC WIRING DIAGRAM
-44-