1
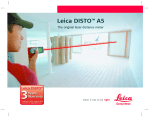
Leica DISTO™ A8
The original laser distance meter
14 12
1
2
3
4
5
6
7
8
9
10
11
13 15
16
17
18
19
20
21
22
23
User Manual
Version 1.0
Inserting / replacing Batteries
English
See figure {C} - Open the positioning bracket.
Remove the locking clip and slide the endpiece down.
Slide the red locking mechanism to the side and open
the battery compartment. Insert new or replace used
batteries. Close battery cover, reinsert the endpiece
and fix locking clip.
The battery symbol {B, 6} appears permanently blinking in the display when the battery voltage is too
low. The batteries should be replaced as soon as
possible.
• Pay attention to correct polarity.
• Use alkaline batteries.
• Batteries should be removed if the device will not
be used for a long time (danger of corrosion).
When changing the batteries the settings and stack
content remain unchanged.
Congratulations on your purchase of a Leica DISTO™.
The safety instructions can be
found in a separate booklet, which
accompanies this user manual. The
safety instructions along with the
user manual should be read carefully before initial
operation.
Helpful Hint: The first and last page including the
pictures should be folded out and left open, whilst
reading through the manual. Letters and numbers in
braces {} refer to the illustrations.
Content
Start-up ................................................................ 1
Menu functions ................................................... 3
Operation............................................................. 4
Measuring ............................................................ 6
Functions ............................................................. 6
Appendix .............................................................. 9
Leica DISTO™ A8 1.0.0 gb
D
Start-up
GB
F
I
E
P
NL
DK
S
N
FIN
J
CN
Multifunctional Endpiece
See figure {D}
The device can be used for different measurement
situations:
• For measurements from an edge open the positioning bracket until it locks in place.
See figure {E}.
• For measurements from a corner, open the positioning bracket until it locks in place, with a slight
1
Start-up
RC
ROK
PL
H
RUS
CZ
D
GB
F
I
E
P
push to the right the bracket can be turned
further. See figure {D and F}.
A built-in sensor automatically detects the orientation of the positioning bracket and calculates the
corresponding distances accordingly.
The integrated bubble level allows simple horizontal
levelling of the instrument.
Keypad
DK
See figure {A}:
1 ON/MEASURING
2 DIGITAL VIEWFINDER
3 PLUS [+]
4 TIMER
5 EQUAL [=]
6 AREA/VOLUME
7 STORAGE
8 MEASUREMENT REFERENCE
9 CLEAR/OFF
10 TILT
11 MINUS [-]
12 INDIRECT MEASUREMENT (PYTHAGORAS)
13 ILLUMINATION
14 MENU
N
FIN
J
CN
RC
ROK
PL
See figure {B}
The graphics display shows clear, large symbols which
enable an easy to use interface.
1 Laser active
2 Reference (front)
3 Reference (rear)
4 Reference(corner stop)
5 Measuring with the tripod
6 Battery status
7 Save constant value
8 Call up constant value
9 Historical mermory, call up values
10 Tilt
11 Area
12 Volume
13 Circumference
14 Wall area
15 Ceiling area
16 Single tilt measurement
17 Double tilt measurement
18 Single Pythagorean measurement
19 Double Pythagorean measurement
20 Beep
21 Offset settings
22 Reference (tripod)
23 Continuous laser
Level
NL
S
Display
H
RUS
CZ
Start-up
2
Leica DISTO™ A8 1.0.0 gb
Distance
0.0 in
0 1/32 in
Menu functions
Presettings
The menu allows selection of the settings that will
remain in memory after the instrument is switched
off.
±90.00°
±180.00°
360.00°
0.00%
0.0 mm/m
0.00 in/ft
Leica DISTO™ A8 1.0.0 gb
3
E
P
S
N
FIN
Measure with offset (add/subtract
tolerance)
Volume
0.000 m³
0.00 m³
0.000 m³
0.00 ft³
0.00 ft³
0.00 ft³
I
DK
The Beep symbol is displayed. It can be switched on
or off.
"UNIT ?" and the DISTO symbol with the laser beam
{B, 1}.are displayed on the screen
Possible units:
GB
NL
Beep
Set unit of distance
D
F
"UNIT ?" and the tilt symbol {B, 10} are displayed on
the screen.
Possible units:
Press the MENU -key {A, 14} repeatedly to scroll
through the possible menu functions.
When the desired menu option appears, select it with
the EQUAL - key {A, 5}, scroll through the possible
settings with the PLUS - key {A, 3} or the MINUS key {A, 11} and store the selected setting with the
EQUAL - key {A, 5}. Press CLEAR - key {A, 9} to leave
the menu without saving any changes in the settings.
Area
0.000 m²
0.00 m²
0.000 m²
0.00 ft²
0.00 ft²
0.00 ft²
Volume
0.00 ft³
0.00 ft³
Set unit of tilt
Navigation in the Menu
Distance
0.000 m
0.00 m
0 mm
0.00 ft
0.00 1/32 ft in
0' 0'' 1/32
Area
0.00 ft²
0.00 ft²
J
CN
RC
An offset automatically adds or subtracts a value to/
from all measurements. With this feature toler-ances
can be taken into consideration e.g. between unfinished and finished dimensions.
ROK
Select the menu function OFFSET {B, 21} (OFFSET
blinks in the display), confirm with the EQUAL - key
RUS
Menu functions
PL
H
CZ
D
GB
F
I
E
P
NL
DK
S
N
CAUTION: Any customized presettings as well as
stored values will be deleted.
{A, 5}. Adjust the OFFSET with the PLUS - key {A, 3}
or the MINUS - key {A, 11}.
By holding the keys down, the setting values will
increase/decrease faster. Once you have entered the
proper offset confirm your selection with the EQUAL
- key {A, 5}. As long as an OFFSET {B, 21} is added/
subtracted the symbol is visible on the display.
Operation
Switching On/Off
ON:
Measuring with tripod
OFF:
Using a tripod eliminates shaking when measuring
over long distances. On the back of the instrument is
an industry standard ¼"-threaded hole for use with a
camera tripod mounting screw. For correct measurements the reference needs to be adapted. Select the
menu function TRIPOD {B, 22}. Confirm with the
EQUAL - key {A, 5}. The corresponding symbol {B, 5}
is displayed permanently.
CLEAR key
Pressing the CLEAR - key {A, 9} cancels the last
action.
While making area/volume or indirect measurements,
each single measurement can be deleted and remeasured.
FIN
J
CN
RC
ROK
PL
H
RUS
Continuous laser
Select the Menu function Continuous laser and
confirm with the EQUAL - key {A, 5}. The laser is now
on permanently and whenever the DIST - key {A, 1}
is pressed, a measurement is taken.
The laser is automatically switched off after 60
minutes.
Digital Viewfinder (3x zoom)
The instrument has a built in camera that displays the
target in 16 grayscales on the camera. With the crosshairs blended in, targets can be aimed at and accurately measured, even if the laser is not visible. Refer
to piture {G}.
The integrated camera is a great help outdoors and
can be used for every function. Long distance measurements and accurate measurements to small areas,
Reset
When you select the menu function RESET and press
the EQUAL-key {A, 5} twice the device will default to
factory settings.
CZ
Operation
Press ON - key {A, 1} briefly. Battery indication is displayed until the next keystroke.
Press and hold OFF - key {A, 9}. To maximize
battery life the laser beam will switch off after
3 minutes of inactivity, the device will automatically switch off after 6 minutes of inactivity.
4
Leica DISTO™ A8 1.0.0 gb
under MENU. Refer to picture {H}. You need to
consider the height difference, between the housing
and the laserpoint, by marking off the tilt with help of
the laser beam.
can be made even in bright sunlight without any
problems. The 3- fold zoom supports the individual
magnification.
Press the DIGITAL VIEWFINDER - key {A, 2} and the
camera is activated. Press the DIGITAL VIEWFINDER
- key {A, 2} repeatedly to switch from 1-fold to 2-fold
to 3-fold zoom.
The PLUS - key {A, 3} and the MINUS - key {A, 11}
adjust in steps 9-1 the brightness of the camera.
Whenever a distance measurement is triggered, an
hour glass symbol appears in the lower left corner of
the display screen until the measurement is
completed.
For measurements of less than 5 meters, using the
digital viewfinder is not recommended as the laser is
not centered because of the parallax.
Leica DISTO™ A8 1.0.0 gb
F
I
Pressing the ILLUMINATION - key {A, 13} turns on/
off the display backlight.
E
P
If the positioning bracket is folded out, the device
recognizes the position, adapts the reference and
calculates distances accordingly.
The default reference setting is from the rear of the
instrument. By pressing the REFERENCE - key {A, 8},
the setting can be changed, so that the next measurement taken will be from the "front" of the in-strument. Afterwards the reference setting automatically
defaults back to rear. See picture {I}.
You can choose the "front" reference permanently by
pressing the REFERENCE - key {A, 8} longer. Press
the REFERENCE - key {A, 8} longer another time to
change back to the "rear" reference.
Measurements from the front edge are signalled by a
different sounding "Beep".
See also "Measuring with tripod".
The instrument has a built in tilt sensor with an accuracy of ± 0.15° in reference to the laser beam. Activate the tilt sensor with the TILT- key {A, 10}. While
measuring, the tilt is now displayed in the upper right
of the screen. The housing can also be held at a tilt.
By pressing the DIST - key {A, 1} the tilt is stabilised
and displayed in an intermediate row. The tilt measurement works independently of the distance measurement.
Please make sure that the instrument is not traverse
tilted when making a tilt measurement. If the transverse tilt is too large, an error message is displayed
to prevent measuring errors. The units can be set
GB
Illumination
Measuring reference
Tilt
D
NL
DK
S
N
FIN
J
CN
RC
ROK
PL
H
RUS
CZ
5
Operation
D
GB
F
I
E
P
NL
DK
S
N
FIN
J
CN
RC
ROK
PL
H
RUS
Measuring
Functions
Single distance measuring
Addition/Subtraction
Pressing DIST - key {A, 1} turns the laser on. Aim at
the desired target and press DIST - key {A, 1} again.
The measured distance is displayed immediately in
the chosen unit.
To add or subtract two or more measurements simply
works as follows:
Measurement +/- Measurement +/- Measurement +/- …. = RESULT
Pressing the EQUAL - key {A, 5} ends the sequence
and displays the result in the main line; the actual
measurements are scrolled upwards in the display.
Pushing the CLEAR - key {A, 9} undoes the most
recent operation.
Areas and volumes can be added/subtracted in
exactly the same manner.
Minimum/maximum measuring
This function allows the user to measure the
minimum or maximum distance from a fixed measuring point as well as to determine spacing - see figure
{J}.
It is commonly used to measure diagonal distances
(maximum values) or horizontal distances (minimum
values).
Press and hold DIST - key {A, 1} until you hear a
beep, indicating the device is in a continuous measuring mode. Then slowly sweep the laser back and
forth respectively up and down over the desired
target point - see figure {K, L} - (e.g. a corner in the
room).
Press DIST - key {A, 1} again and the continuous
measurement will be stopped. The values for
maximum and minimum distances are shown in the
display as well as the last measured value in the main
line.
With tilt activated, the tilt value of the maximum
measurement is displayed in the frame.
Area/Volume
Press the AREA/VOLUME - key {A, 6}. In the symbol
{B, 11, 12} the distance to be measured is highlighted. Make the required two or three measurements and the result will be displayed in the summary
row. Press the AREA/VOLUME - key {A, 6} for a
longer period to display additional information
{B, 13-15}. Press the AREA/VOLUME - key {A, 6}
again for a longer period to return to the current
area-/volume measurement or a short press to make
the next area/volume measurement.
Special functions
If desired, the sides of an Area/Volume can be
composed of several partial lengths. Select the
AREA/VOLUME function.
CZ
Measuring
6
Leica DISTO™ A8 1.0.0 gb
Press the PLUS - key {A, 3} or MINUS - key {A, 11}
before you start with the first partial measurement.
Proceed with the first partial measurement by pressing DIST - key {A, 1}. In the display an addition or
subtraction symbol appears. Make the first partial
measurement, press PLUS - key {A, 3} or MINUS key {A, 11} and make the second partial measurement. Unlimited partial measurements can be
summed up or subtracted. To finish the distance
measurement press the EQUAL - key { A, 5}. The
second distance can be made up of partial distances
with the same method. The result of the Area/Volume
calculation is displayed as usual in the summary row.
•
•
•
Indirect Measuring
All target points must be in a straight line to the
wall area. See figure {N, P}
Best results can be expected if the device is
turned around a fixed point (e.g. positioning
bracket folded out completely and the device is
held towards a wall)
It is highly recommended to use the "Minimum/
maximum measuring" by pressing the DIST key {A, 1} longer. The minimum value is used for
the measurements perpendicular towards the
target respectively the maximum value for the
other measurements. This increases the accuracy
of the indirect measuring considerably.
Indirect single tilt measurement - determine
all 3 sides and an angle with 1 distance measurement
The instrument can measure vertical distances with
the tilt sensor. This procedure is especially helpful if
the upper target point does not reflect the laser. The
upper target point can be aimed at, with the digital
viewfinder. For a double tilt measurement, the first
measurement only requires a tilt measurement and
not a distance measurement.
Then the vertical and horizontal distances can be
calculated with the Pythagorean theorem. This
method is ideal when the distance to be measured is
hard to reach.
• Both methods only serve to estimate distances
and cannot replace an exact measurement.
• Make sure you adhere to the prescribed sequence
of measuring.
See figure {M}
Press the INDIRECT MEASUREMENT - key {A, 12}. In
the symbol, the distance to be measured is highlighted. Make the required distance measurement.
The result is displayed in the summary row, the
measured distance and the angle in the secondary
row.
Press the INDIRECT MEASUREMENT - key {A, 12}
for a longer period to obtain more details.
Indirect double tilt measurement - obtain all
detail information with 1 tilt measurement
and 1 distance measurement
See figure {N}
Leica DISTO™ A8 1.0.0 gb
7
D
GB
F
I
E
P
NL
DK
S
N
FIN
J
CN
RC
ROK
PL
H
RUS
CZ
Functions
D
GB
F
I
E
P
NL
DK
S
N
FIN
J
CN
RC
ROK
PL
H
RUS
CZ
Press the INDIRECT MEASUREMENT - key {A, 12}
twice. In the symbol, the tilt to be measured is highlighted. Make the required tilt measurement with the
Digital Viewfinder. Here will we measure with the
DIST-key {A, 1}, a tilt and not the distance. In the
symbol, the distance to be measured is highlighted.
Make the distance measurement. The result is
displayed in the summary row, the measured
distance and angles in the secondary row. Press the
INDIRECT MEASUREMENT - key {A, 12} for a longer
period to obtain more details.
If the tilt of the distance measurement is above 0°,
the result is automatically displayed as a partial
height.
symbol the distance to be measured is dark. Make the
required distance measurements. The result is
displayed int the summary row. Press the INDIRECT
MEASUREMENT - key {A, 12} for a longer period to
obtain more details.
You will find application examples with detailed
measuring sequences on our homepage
www.disto.com.
Storage of Constants/Historical
Storage
Storage of a Constant
It is possible to store and recall a frequently used
value e.g. height of a room. Measure the desired
distance, press and hold STORAGE - key {A, 7} until
the device beeps to confirm the storage.
Indirect single Pythagorean measurement determine a stretch with 2 auxilliary measurements
See figure {O}
Press the INDIRECT MEASUREMENT - key {A, 12}
three times. In the symbol, the distance to be
measured is highlighted. Make the required distance
measurements. The result is displayed int the
summary row. Press the INDIRECT MEASUREMENT key {A, 12} for a longer period to obtain more details.
Recalling the constant
Press STORAGE - key {A, 7} to recall the constant
and make it available with a press on the EQUAL - key
{A, 5} for further calculations.
Special function: Adjusting the constant
A measured value can be adjusted. If you press the
EQUAL - key {A, 5}, the value starts blinking and can
be adjusted with the PLUS - key {A, 3} or MINUS key {A, 11}. Through pressing the EQUAL - key {A, 5}
again the adjustment is confirmed. Now the value can
be stored as usual as a constant.
Indirect double Pythagorean measurement determine a stretch with 3 auxilliary measurements
See figure {N, P}
Press the INDIRECT MEASUREMENT - key {A, 12}
until the corresponding symbol is displayed. In the
Functions
8
Leica DISTO™ A8 1.0.0 gb
Historical Storage
InFo
206
Press STORAGE - key {A, 7} twice quickly and the
previous 30 results (measurements or calculated
results) are shown in reverse order. Using the PLUS key {A, 3} and the MINUS - key {A, 11} allows to
navigate in the historical storage. Press EQUAL - key
{A, 5} to take a result from the historical storage to
use for further calculations.
252
253
255
Timer
Press and hold TIMER - key {A, 4} until desired time
delay has been reached (5 - 60 seconds).
Press DIST - key {A, 1}. Once the key is released the
remaining seconds until measurement are displayed.
The last 5 seconds are counted down with a beep.
After the last beep the measurement is taken.
256
257
260
Appendix
Error
Message Codes
All message codes will be displayed with either "InFo"
or "Error".
The following mistakes can be corrected:
InFo
154
204
Cause
Remedy
No endpiece detec- Attach the endpiece
tion
properly. If error still
occurs, replace the
endpiece.
Temperature too
Cool down instrument
high
Temperatur too low Warm up instrument
Receiver signal too Use target plate
weak, measurement
time too long,
distance > 100 m
Received signal too Use target plate
powerful
(grey side)
Use target plate
Wrong measure(brown side)
ment, ambient
brightness too high
Laser beam interRepeat measurement
rupted
Cause
Hardware error
Remedy
Switch on/off the
device several times
and check if the
symbol still appears. If
so please call your
dealer for assistance.
D
GB
F
I
E
P
NL
DK
S
N
FIN
J
CN
RC
ROK
Cause
Remedy
Transverse tilt < 20° Hold the instrument
without any transverse tilt
Calculation error
Repeat procedure
PL
H
RUS
CZ
Leica DISTO™ A8 1.0.0 gb
9
Appendix
D
GB
F
I
E
P
NL
DK
S
N
FIN
J
CN
RC
ROK
PL
H
RUS
Storage of constant
Indirect measurement
with the tilt sensor
Indirect Measuring functions with Pythagoras
Area/Volume calculation
with room calculations
Addition/Subtraction
Tripod thread
Battery life,
Type AA, 2 x 1.5V
IP rating
Technical Data
Power Range Technology™:
Range (without target
plate)
Range (with target plate)
Measuring accuracy up to
30 m (2 σ, standard deviation)
Smallest unit displayed
Laser class
Laser type
Ø laser spot (at distance)
Autom. switch off laser
Autom. switch off instrument
Digital Viewfinder (3x
zoom)
Display illumination
Integrated level
Multifunctional endpiece
Timer
Single Measurement
Tilt sensor:
Accuracy
- to laser beam
- to the housing
Maximum, Minimum,
Continuous Measurement
Historical storage of
100 m (330 ft)
200 m (650 ft)
typ.: ± 1.5 mm*
1 mm
II
635 nm, < 1 mW
6 / 30 / 60 mm
(10 / 50 / 100 m)
3 min
Dimension
Weight (with batteries)
Temperature range:
Storage
6 min
9
9
9
9
9
9
Operating
9
9
9
9
9
9
up to 5000
measurements
IP 54
splash proof, dust proof
148 x 64 x 36 mm
280 g
-25°C to +70°C
(-13°F to +158°F)
-10°C to +50°C
(-14°F to +122°F)
* maximum deviation occurs under unfavourable conditions
such as bright sunlight or when measuring to poorly
reflecting or very rough surfaces. For distances over 30 m the
maximum deviation may increase to a maximum of ± 10 mm.
± 0.15°
± 0.3°
9
30 values
CZ
Appendix
10
Leica DISTO™ A8 1.0.0 gb
Measuring Conditions
D
Warranty
Measuring Range
At night, at dusk and when the target is shadowed
the measuring range without target plate is
increased.
Use a target plate to increase the measurement
range during daylight or if the target has a bad reflection.
The Leica DISTO™ A8 comes with a two (2) year
warranty from Leica Geosystems AG.
More detailed information can be found at:
www.disto.com
All illustrations, descriptions and technical specifications are subject to change without prior notice.
GB
F
I
E
P
Measuring Surfaces
NL
Measuring errors can occur when measuring toward
colourless liquids (e.g. water) or dust free glass,
styrofoam or similar semi-permeable surfaces.
Aiming at high gloss surfaces deflects the laser beam
and measurement errors can occur.
Against non-reflective and dark surfaces the measuring time can be increased.
DK
S
N
FIN
J
Care
CN
Do not immerse the unit in water. Wipe off dirt with
a damp, soft cloth. Do not use aggressive cleaning
agents or solutions. Treat the optical surfaces with
the same care that you would apply to eyeglasses
and cameras.
RC
ROK
PL
H
RUS
CZ
Leica DISTO™ A8 1.0.0 gb
11
Appendix
Leica Geosystems AG, Heerbrugg, Switzerland has been certified as being equipped
with a quality system which meets the International Standards of Quality
Management and Quality Systems (ISO standard 9001) and Environmental
Management Systems (ISO standard 14001).
Total Quality Management - Our commitment to total customer satisfaction. Ask
your local Leica Geosystems agent for more information about our TQM program.
Printed in Switzerland - Copyright Leica Geosystems AG, Heerbrugg,
Switzerland 2006
Translation of original text (743367)
Pat. No.: WO 9427164, WO 9818019, WO 0244754, WO 0216964,
US 5949531, EP 1195617, US 7030969, WO 03104748
Leica Geosystems AG
CH-9435 Heerbrugg
(Switzerland)
www.disto.com