1
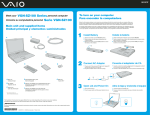
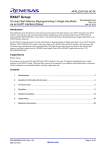
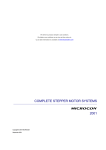
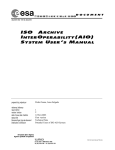
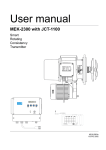
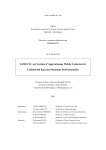
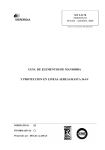
USER MANUAL
HYLENSYSTEM.COM
03.19.2007
Manual Version 1.10
Software version 1.13a
ULTRA PRECISION EQUIPMENT FOR THE MOTION PICTURE INDUSTRY
1
Copyright Information
Copyright © 2006 Panavision Inc. All rights reserved. This document is not permitted to be distributed by anyone other than
the employees of Panavision or its distributors. No part of this publication may be reproduced, transmitted, transcribed, stored
in a retrieval system, or translated into any language in any form by any means without the prior written consent of Panavision.
Prior written approval from Panavision must be obtained for any and all derivative works or aggregate works incorporating any
of the information in this document, except as provided for under normal copyright law.
Disclaimer
Information in this document is provided solely for the user’s information and, while thought to be accurate, is provided strictly
“as is” and without warranty of any kind, including liability or warranties relating to fitness for a particular purpose,
merchantability, or infringement of any patent, copyright or other intellectual property right. Panavision reserves the right to
revise this publication and to make changes from time to time in the content hereof without obligation to notify any person of
such revisions or changes. Specifications are subject to change without notice.
Panavision’s obligations with respect to the products referenced herein are only as provided in Panavision’s terms and
conditions for rental. In no event shall Panavision, its employees or distributors be liable to you for any damages or losses,
direct or indirect, arising from the use of any information contained in this document or the use of any products or services
referenced within, or the information contained in, this manual.
FCC, IC, CE Compliance Notice
This equipment has been tested and found to comply with the limits for a Class A digital device, pursuant to part 15 of the FCC
Rules. These limits are designed to provide reasonable protection against harmful interference when the equipment is operated
in a commercial environment. This equipment generates, uses, and can radiate radio frequency energy and, if not installed and
used in accordance with the instruction manual, may cause harmful interference to radio communications. Operation of this
equipment in a residential area is likely to cause harmful interference in which case the user will be required to correct the
interference at his own expense.
This Class A digital apparatus complies with Canadian ICES-003.
Cet appareil numérique de la classe A est conforme à la norme NMB-003 du Canada.
2
Table of Contents
1.
Case Contents .......................................................... p5
2.
Set Up ........................................................................... p7
3.
Calibration ................................................................... p11
4.
Plug-ins ......................................................................... p13
5.
Lens Compatibility .................................................... p15
3
4
Case Contents
The Diagram to the left shows the standard components and accessories included with
the Hylén System™. Additional plug-ins are available [see pg 13]
5
Use the appropriate screw-holes
6
Set Up
Mounting & Baseplates
The Hylén System™ sliding dovetail has 2 different centering positions, for film or
Genesis
Genesis: attach dovetail base plate in GENESIS position
Panaflex:attach dovetail base plate in FILM position
use PCOBXL
Arri:
attach dovetail base plate in FILM position
use OUABL and PAOD [Pan-Arri Offset Dovetail]
use spacer plate in between camera & baseplate [e.g. BP-9]
Use 4mm hex driver to remove & install dovetail baseplate screws.
1.
Mount the Hylén System™ Main Unit [HSMU] to the long baseplate [can be
mounted from the front on some baseplates.]
2.
Mount camera and its baseplate to the long baseplate.
3.
If applicable, remove camera irisrod bracket and replace with HSHB [Panaflex]
or HSGB [Genesis]. All power ports are replicated on the front of the Hylén
System™. These brackets allow use of the “Hollywood Handle."
4.
Slide camera & Hylén System™ together and tighten lens lock. Once the Hylén
System™/ camera combination is balanced fore & aft on the head, tighten the
dovetail locks on both camera and Hylén System™.
Note: The Hylén System™ presents an inverted image to the
film or sensor. Therefore the captured image requires
inversion in post, via telecine, DI, or optical printer.
Also the camera viewfinder must be inverted. For Panaflex
cameras, rotate the pechan prism before mounting the Hylén
System™ Main Unit [HSMU]. The pechan prism on Millennium
and XL cameras is not manually rotatable, so it is
recommended to operate the camera via video assist.
CAPTURED IMAGE REQUIRES INVERSION
7
The Hylén Controller
“Ready” light
On switch
Low battery
Video In
Image invert
switch
Video & Power Out
Video Out Clean
For small monitor on or
near controller
Video Out with graphics
Controller
connector
Power from battery
System is ready to use.
Software version displayed.
8
Set Up
Plugging in & Powering up
The Hylén System™ replicates camera front accessories, including a powered
irisrod bracket, 2 tape hooks, and a modular follow focus dovetail.
1.
Connect controller [HSC] to main unit using 7-pin controller cable [CS-HC30 or
CS-HC100]. Turn on controller.
2.
Connect 24V battery power to power input port using CBLE-24H/P. Two
connectors are provided so that batteries can be changed without interrupting
operation.
3.
Use main power switch to turn on system. Power LED will light, Ready light will
flash when initialization begins, and glow steadily when unit is ready. System
startup takes approximately 30 seconds.
On the other side of the unit, the LCD panel will display “Hylén System
Initializing” and then “Ready..." along with the software versions. At this point
the controller will become active.
4.
Connect video tap output to video input on Hylén System™ connection panel.
Connect video outputs to monitors. Operator output will provide cursor and
numerical information. For example, the cursor shows the shape and location of
the clear spot on the RFC plug-in.
The effect position is also indicated numerically at the bottom of the screen,
with X Y Z coordinates.
NOTE: PAL / NTSC mode: To change from one format to the other, make sure the
controller is connected and the whole system is powered up. Then press and
hold the eject button for about 8 seconds, until the mode changes. “PAL mode”
or “NTSC mode” will be displayed on the LCD.
Push Eject Button for 8
seconds to change video mode
Axis activation switches
illuminate when axis is active
9
Lock ring
Focus Calibration ring
Axis Calibration knobs on controller
X-Y-Z-R
10
Calibration
Focus Calibration
The Hylén System™ defines its own focus plane near the middle of the box,
as indicated by the tape hooks on the sides and top of the main unit. The
relay lens then re-focuses the image onto the actual imaging plane in the
camera. Taking lenses should be taped off from the tape hooks on the Hylén
System™, not from the camera. A focus calibration ring is provided to adjust
the taking lens focus scale. To calibrate focus:
1.
A plug-in cartridge must be in the system, as the glass stack affects the focus
point.
2.
Move the cartridge to a clear area [i.e. center oval of RFC].
3.
Mount a lens and set a target at a measured distance [i.e. 6 ft.]. Set lens to
this mark.
4.
Unlock the focus calibration ring. Adjust focus calibration ring for sharpest
focus. Lock the ring. This position can be marked for future reference.
* Check / adjust focus calibration whenever a new cartridge is inserted *
Axis Calibration
Due to variances in video assist centering from camera to camera, the Hylén
controller has its own calibration knobs. Use these to align the on-screen
cursor [for plug-ins with a cursor] to the video image of the plug-in [i.e. align
the oval cursor to the RFC oval], and to set the zero effect position on the Z
axis.
Lens Compatibility
The Hylén System™ is compatible with all Primo primes 14.5mm and up, and
all Primo zooms. For other lenses, please see the list on pages 14 & 15.
11
Push this
tab to
release
cartridge
Eject Button
Note: All axes must be
activated [up & lit] for
cartridge to eject.
Cartridge ejects.
Use A & B Buttons to scroll through plug-in choices
The LCD screen shows the names of the plug-ins.
Push EJECT to load selected plug-in cartridge.
12
Plug-ins
The Hylén System™ is expandable. Various cartridges, or plug-ins, can be inserted to
create different effects. Some of the currently available plug-ins are listed below,
with more being developed all the time.
Regional Focus Control [RFC]
The RFC plug-in [product type HSRF] provides a clear center oval, through which
the image is sharp, surrounded by a holographic cone pattern which selectively
softens the image.
The FX knob controls the strength of the effect, from 0 [clear] to 100 [full effect]
The joystick moves the clear oval around, or out of, the frame. The oval can be
manually rotated [motorized rotational control coming soon].
Rotational Filters
The Rotating Effect Plug-in [HSRC] provides for the use of ND grad or polarizer
filter. The filter can be manually rotated [Motorized rotational control coming
soon]
By using the FX knob, you can smoothly change from a hard to soft grad. The
joystick moves the grad line around, or out of, the frame.
Mask Mosaic
Various masks mosaics provide cutout effects for the intermediate image plane.
Some current choices are: 4 different gunsights, 6 different sized binoculars, or
4 still camera focusing screens. The joystick moves the effects throughout the
image frame, and the FX knob moves them through focus.
Text / Image Overlay
A clear glass rectangle accepts nearly any sort of printed text or artwork, for
superimposition on your image. It can be moved around the frame and in and
out of focus.
Changing Plug-ins
Press the eject button and the current plug-in cartridge will open the door.
Push the tab on top of the cartridge to remove it. Press the A or B buttons to
choose the desired plug-in on the LCD screen. Insert plug-in until it clicks. For
mosaic plug-ins, use the A or B buttons to choose the mosaic position.
Note: Check / adjust focus calibration whenever a new cartridge is inserted
13
The following lenses are known to fit on the front relay.
SL10 [some]
(U)SZ29
SL14.5
(U)SZ85
SL14.5-CF
(U)SZ100
SL17.5
(U)SZ135
SL17.5-CF
(U)SZ180
SL21
SS20
SL21-CF
SS29
SL27
SS50
SL27-CF
SS75
SL35
SS100
SL35-CF
SS125
SL40
SS150
SL50
SS127
SL75
SS200
SL100
SF6
SL150
SP20
1.4XE
SP20-CF
2XE
SP24-CF
SL24-MS, SL24CF
SP28
SL30-MS, SL30CF
SP28-CF
SL35-M
SP32
SL50-M
SP50
SL65-MS, SL65
SP100
SL85-MS, SL85
SP150
SL100-M
MC60
SL125-MS, SL125
MS90
SM50-MF
SLZ
SM90-MF
SLZ11
SM200-MF
SLZ3
SR24-SF
PMZ
SF45-SF
Z5S
Z10S/ZC10
TELEPHOTOS
14
Lens Compatibility
The following lenses WILL NOT FIT on the front relay.
SL21-M
SPN6
SL27-M
SPN8
SM100-MF
SP8D
(U)SZ14
SP9.8
(U)SZ24
SP15
(U)SZ35
SP16
(U)SZ50
SP24
SS14
SP35
SS17
SP35-CF
SS17-CF
SP40
SS24
SP75
SS28
MS40
SS35
MS100
SS40
LWZ
SS50
LWZ2
SS55
Note: The Hylen™ System was designed primarily for use with spherical lenses. Panavision
recommends testing before using anamorphic lenses, to ensure mechanical and
optical compatibility.
15
HYLENSYSTEM.COM
P A N AV I S I O N . C O M
16
ULTRA PRECISION EQUIPMENT FOR THE MOTION PICTURE INDUSTRY