1
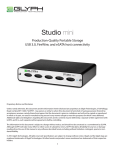
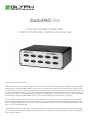
StudioRAID mini
Production-Quality Portable RAID
USB 3.0, FireWire 800, eSATA host connectivity
Proprietary Notice and Disclaimer
Unless noted otherwise, this document and the information herein disclosed are proprietary to Glyph Technologies, 3736
Kellogg Road, Cortland NY 13045 (“GLYPH”). Any person or entity to whom this document is furnished or having possession thereof, by acceptance, assumes custody thereof and agrees that the document is given in confidence and will not be
copied or reproduced in whole or in part, nor used or revealed to any person in any manner except to meet the purposes
for which it was delivered. Additional rights and obligations regarding this document and its contents may be defined by a
separate written agreement with GLYPH, and if so, such separate written agreement shall be controlling.
The information in this document is subject to change without notice, and should not be construed as a commitment by
GLYPH. Although GLYPH will make every effort to inform users of substantive errors, GLYPH disclaims all liability for any
loss or damage resulting from the use of this manual or any software described herein, including without limitation contingent, special, or incidental liability.
© 2014 Glyph Technologies. All rights reserved. Specifications are subject to change without notice. Glyph and the Glyph
logo are registered trademarks of Glyph Technologies. All other brands and product names mentioned are trademarks of
their respective holders.
1
Contacting Glyph
Please use the following contact information to contact Glyph and its distributors.
Glyph USA offers phone support Monday through Friday, 8:00 am to 5:00 PM Eastern Time.
Note: DO NOT ship any return goods to the mailing addresses below unless you have a valid RMA number. All goods will
be refused delivery unless a valid RMA number is displayed on the outside of the package.
United States of America
Glyph Technologies
3736 Kellogg Rd.
Cortland, NY 13045
USA
Phone: +1 607-275-0345
Fax: +1 607-275-9464
www.glyphtech.com
Sales Contact
[email protected]
Technical Support:
[email protected]
Unpacking Your StudioRAID mini
Your Glyph StudioRAID mini and accessories are packaged in a sturdy shipping container. Please inspect the container for
evidence of shipping damage and mishandling. If the container is damaged, file a report with the carrier or dealer immediately. Do not attempt to unpack and operate your StudioRAID mini until the carrier or dealer confirms the damage. If the
container is in good condition, proceed with unpacking the StudioRAID mini. Verify that all of the items described in the
next section are present and in good condition. If any of the items you expect to find in your container is missing or damaged, contact the dealer before proceeding any further. In any case, do keep the shipping container and all packing materials in a safe place.
The StudioRAID mini package includes:
StudioRAID mini Hard Drive
FireWire 800 (9-pin to 9-pin) cable
USB 3.0-micro Cable
Universal AC external power supply
Features
7,200 RPM and 5,400 RPM models available
SSD models available
RAID 0 & RAID 1 modes
Bus-powered with FireWire 800
Internal fan for maximum airflow and proper cooling
Rear power switch
Applications: Field recording, moving audio, video, graphics, and prepress files
Includes universal power supply
3 Year Warranty
2 Year Free Basic Data Recovery*
1 Year Advance Replacement in USA (Continental 48 states)
*While Glyph is not obligated to recover lost data, we always give it our best effort. Nonetheless, we can’t guarantee we’ll
always be successful.
2
Content Creation Applications
Qualified with Final Cut Pro, Avid Media Composer, Adobe Premiere, and all major audio production packages that support
FireWire storage, including Digidesign Pro Tools, Steinberg Nuendo and Cubase, Apple Logic, MOTU Digital Performer,
Cakewalk Sonar, Sony Vegas.
About the StudioRAID mini
StudioRAID mini is modeled after it’s powerful big brother the StudioRAID, a high-performance storage solution in a tiny
footprint. With two internal SATA drives available in 7,200 and 5,400 RPM, the StudioRAID mini supports RAID 0 and RAID 1
modes. A built-in auto-sensing fan keeps the drives cool while special sensors constantly monitor the drive and enclosure
health, notifying you if there is a problem.
Ports
On the rear of the StudioRAID mini there are two FireWire 800 ports, one eSATA port, and a USB 3.0 port. Officially,
FireWire 800 ports are IEEE 1394b ports that run at up to 800Mbits/sec. One of these ports should be connected to your
computer, and the other should be connected to other downstream FireWire devices. It doesn’t matter which port you connect to the computer, they are functionally identical. If your computer has a FireWire 800 port, use the provided FireWire
800 9-pin cable. If your computer has a FireWire 400 port only, you can use a FireWire 800 to FireWire 400 converter
cable, available from Glyph (part# CAB-FW800-9/6-2). If your computer doesn’t have any FireWire ports you will need to
purchase a FireWire adapter card. Check the Glyph web site for suggestions.
The fastest interfaces on the StudioRAID mini are the USB 3.0 and eSATA ports. If you choose to connect your StudioRAID
mini using eSATA, you will need an eSATA port on your computer. Glyph sells various eSATA cards, please check the website for details. The StudioRAID mini does not ship with an eSATA cable.
3
Bus Power
Bus-powered with FireWire 800, the StudioRAID mini also includes USB and eSATA ports for optimum compatibility, allowing you to easily work on the road with a reliable RAID. An external power supply is included with the StudioRAID mini if
bus power is not available or is insufficient.
StudioRAID mini can be run successfully using FireWire bus power supplied by many notebook computers, however Glyph
can’t guarantee compatibility with all notebooks due to differing bus power specs. If you want to guarantee StudioRAID mini
will work, use the included DC supply.
Front panel LED
The StudioRAID mini front panel has a bi-color LED. The LED will display solid blue when power is on. The LED will flash
blue when there is disk activity. The LED will flash or display a solid red color when error conditions exits with the drive or
enclosure. Any error that results in the system state “Halted” generates a solid red LED on the front panel of the drive. All
other errors result in the blinking red LED. Should you encounter a red LED, please backup your data immediately and
contact our support team.
About eSATA
• eSATA is an external interface technology that grew from the internal SATA I interface.
• The StudioRAID mini eSATA port supports speeds up to 6 Gb/sec (600 MB/sec), much faster than FireWire 400 or FireWire
800.
• Shielded eSATA cables up to 2 meters in length are available.
• eSATA cables are different than SATA I cables, they are shielded and cannot be used with internal SATA I connectors.
• eSATA uses a “point-to-point” connection, therefore each eSATA drive needs to be connected to its own eSATA port.
• Most computers do not have built-in eSATA, so you’ll need a PCI card to connect your drive with eSATA. Glyph sells various eSATA cards.
About FireWire
FireWire is an implementation of the IEEE 1394 serial bus standard. It not only supports automatic configuration (“plug and
play”) and hot-swapping of devices, it’s fast, and best of all it’s reliable for audio/video as well as for computer peripherals.
FireWire supports peripherals in a tree-like structure, and it allows peer-to-peer device communication—e.g. between a
scanner and a printer—to take place, without using system memory or the CPU. With FireWire you can hook up to 63 devices to the same bus, with cable lengths of up to 4.5 meters (14 feet) including internal cabling, allowed between devices.
Its cable is convenient and can also carry power. This allows low-consumption devices to operate without a separate power
cord, by using power supplied by other devices on the bus.
About FireWire 800
• FireWire 800 supports speeds up to 800 Mb/sec, twice as fast as FireWire 400.
• If your computer does not have built-in FireWire 800, you’ll need a PCI card to achieve a true FireWire 800 connection.
• Most 800 ports are Bi-Lingual, which means they speak both FireWire 400 and FireWire 800.
• If you connect a 400 device to an 800 device, you will be running at 400 speed maximum.
• FireWire is forward-compatible and back-compatible.
• Beta cables are used to connect 800 devices to 800 devices.
• Bi-Lingual cables are available to connect 400 devices to 800 devices.
• Bi-Lingual cables have a 9-pin Bi-Lingual connector at one end and a 4-pin or 6-pin FireWire 400 connector at the other
end
4
About the StudioRAID mini and Drive Modes
The StudioRAID mini enclosure contains two hard disk drives, which function as one single volume. It supports two drive
modes: RAID 1 (mirroring) and RAID 0 (striping. Each drive mode has its own advantages, depending upon the application.
RAID 1 (mirroring) offers data redundancy and real-time backup by writing the same data to the two hard drives at
the same time. Should a drive failure happen, data is still available on the remaining drive. In RAID 1 mode, the two
drives are seen by the computer as one volume, but with half the capacity. For example, a 1TB StudioRAID mini will
be seen as a 500GB drive. Reading and writing occurs on both drives simultaneously so that each of the drives
contains exactly the same data, mirroring each other. If either of the drives should fail the other is there to continue
to provide operation.
RAID 0 (striping) increases the performance of the drive system by spreading the data across two drives. RAID 0 is
a proven technology for editing video, working with huge graphics files, sound libraries, and streaming instruments
that play hundreds of samples simultaneously. RAID 0 is the default shipping drive mode. In RAID 0 (striping) mode,
the two drives are seen by the computer as one large drive, and reading and writing occurs on both drives simultaneously. It is designed to increase the performance and data throughput of the drive system. The StudioRAID mini’s
built-in RAID controller splits each piece of data across both of the drives in segments and distributes the I/O burden. Since data is written without any form of parity data-checking, it allows for the fastest data transfer of all other
RAID levels. However, if one drive becomes damaged, the data on both drives can become corrupted. RAID 0 is
not redundant or fault tolerant like RAID levels 1, 3, and 5, but the trade off is that it’s the fastest of all RAID levels.
MAKE SURE TO BACKUP YOUR DATA OFTEN!
Changing RAID modes
StudioRAID mini is shipped in RAID 0 mode. If you would like to change or reset the RAID at any time, please follow these
simple instructions:
1. Safely eject the StudioRAID mini unit from your desktop.
2. Power off your StudioRAID mini and disconnect all FireWire, USB, and eSATA cables from the unit.
3. Move the recessed switch to your desired setting on the rear of the device, to either RAID 0 or RAID 1. Note, you may
need to use a paper clip or some other pointed device as the switch is recessed.
4. You may now reconnect your cables and power adapter, if necessary. Do not turn on the StudioRAID mini yet.
5. Using a paper clip or other pointed device, press and hold the “SET” button on the back of the device.
6. While holding in the “SET” button, power on your StudioRAID mini and count slowly from 1 to 5.
That’s it! Your StudioRAID mini should now show up in Disk Utility (on Mac) or Disk Management (on Windows) and be ready
to format.
If you need assistance in changing RAID modes, please contact our support team at 800.335.0345 and a specialist will
gladly walk you through the instructions.
5
Mac OS X Formatting Instructions
Since Glyph StudioRAID mini drives come pre-formatted for Macintosh you don’t need to format them on installation. If you
decide to reformat or partition your drive at a later date, use Disk Utility (supplied with the Mac OS X operating system).
Caution: This procedure will destroy any data currently on the drive. Before formatting a drive, save any important data it
contains.
1. Open Disk Utility:
-Double click on your internal hard drive mounted on the desktop
-Open Applications Folder > Utilities Folder > double click on Disk Utility
2. Select your StudioRAID mini drive(s) from the list on the left. The top entry represents the FireWire device and the entry
underneath it represents the volume associated with that device. Click on the top device which will say something like
“XXXGB Glyph Technologies”.
3. Click the “Erase” tab on the right side of the screen.
4. Choose the desired volume format from the drop-down list. Glyph recommends the default “Mac OS Extended (Journaled)”.
5. Click in the “Name” field and type the desired name for the drive. This name will identify the drive on the desktop
6. Click the “Install Mac OS 9 Disk Driver” button if you would like your drive to compatible with OS 9.
7. Click the “Erase” button to erase your drive. Your new drive should automatically mount on the desktop as a Glyph volume.
Windows 2000 / XP / Vista / 7 Formatting Instructions
1. Right-click My Computer and click Manage.
2. In the Computer Management window, under Storage, click Disk Management.
The Write Signature wizard pops up.
3. Use the wizard to write a signature to the new drive. If you want only one partition we suggest using a primary partition
and selecting the maximum size. In most cases you’ll want to use NTFS volumes, this is the default for most versions of Windows. Choose FAT32 if you want to use the drives with Windows 98 or ME , or if you want to use the drive with Windows
and Mac OS.
4. Formatting will take a few minutes, after which your drive will be ready to use.
Windows 98 / 98SE Formatting Instructions
1. From your computer’s task bar, go to Start > Programs > MS-DOS Prompt.
2. At the prompt, type fdisk and press Enter. You’ll see a long message about disk support.
3. Enter Y (type Y and press Enter).
4. You are invited to make a choice. Enter 5 to change the current fixed disk drive. MS-DOS displays the connected disk
drives.
5. Enter the number of the disk that has no corresponding drive letter.
6. You are invited to make a choice (same list as in Step 3). Enter 1 to create a primary DOS partition. Your computer verifies
the drive’s integrity, after which you are asked to choose whether you want to use all the space available.
7. Enter Y to opt for using the maximum available space. Your computer again verifies the drive’s integrity.
8. When the drive’s integrity has been verified, press ESC (Escape) three times to exit fdisk.
9. At the prompt, type exit.
10. Restart your computer.
Your new drive is now ready to use.
6