1
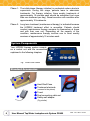
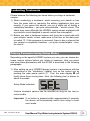
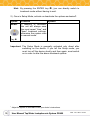
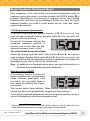
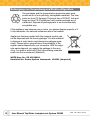
Deckblatt Table of Contents Table of Contents ................................................................................................ 2 Read Before Use .................................................................................................. 3 Your safety is important - Contraindications ......................................................... 3 Additional important safety considerations........................................................... 4 Intended Use / Mechanism of Action ............................................................ 5 Treatment Fundamentals ........................................................................................... 5 System Components........................................................................................... 6 Standard Accessories ................................................................................................. 6 Optional Accessories................................................................................................... 7 Controls on the Casing Panels .................................................................................. 7 Front Panel Controls .................................................................................................... 8 Installation / Treatment Setup......................................................................... 9 Setup for Treating Hands and Feet .......................................................................... 9 Setup for Axillary Treatment (Armpits) ................................................................. 10 Treatment Setup for Special Applicators ............................................................. 10 Conducting Treatments ................................................................................... 11 Primary Parameter Setup (Setup Mode) ............................................................... 11 Begin Treatment (Treatment Mode) ...................................................................... 13 Important Advise for Conducting Treatments..................................................... 16 Side Effects .................................................................................................................. 17 General Information.......................................................................................... 17 Special Remark ........................................................................................................... 17 Care and Maintenance .............................................................................................. 17 Operational Check...................................................................................................... 18 Symbol Legend............................................................................................................ 19 Error Checklist............................................................................................................. 19 Shipping the Device for Repair or Maintenance.................................................. 20 Applicable Regulations and Legal Requirements .................................. 20 Reconditioning and Disinfection ............................................................................. 20 Technical Safety Inspection .................................................................................... 21 Lifespan......................................................................................................................... 21 Electric-Magnetic Compatibility.............................................................................. 21 Entsorgung von Verpackung und Elektro-Altgeräten ........................................ 22 Technical Data .................................................................................................... 23 Distribution / Trading.................................................................................................. 23 2 User Manual Tap Water Iontophoresis System GS400 Rev. 1.0 / 2011-10-10 Read Before Use Your HIDREX iontophoresis device was designed to maximize functionality and usability. System setup is easy and the device is simple to operate. This manual is intended to guide you through the setup procedure, familiarize you with the system’s features, and will offer hints on the use of your new therapy system. Your safety is important - Contraindications Important: Under no circumstances should you use iontophoresis if any of the following conditions apply: Patient with a cardiac pacemaker Patient with an ICD (implantable cardioverter/defibrillator) Pregnancy Patient with a metal-containing intrauterine device (IUD) Metallic implants within the current path (arm or leg) Large skin defects / wounds that cannot be covered with petrolatum Patients with impaired sensibility in their hands or feet (e.g. patients with polyneuropathies) Warning: The treatment system may only be powered by the HIDREX wall adapter (to recognize at HIDREX nameplate with Serial-No.). This power supply is especially designed for this device. In order to prevent burns during treatment, make sure the supplied towels cover the treatment electrodes at all times. Avoid direct contact with the metallic surface. Two devices may not be simultaneously used by one patient. Prior to treatment, remove any metallic jewellery (wedding bands etc.) which would otherwise be immersed in the water bath. Keeping such accessories on would lead to localized minor (electrical) burns secondary to increased current densities. Rev. 1.0 / 2011-10-10 User Manual Tap Water Iontophoresis System GS400 3 Additional important safety considerations Place the treatment device on a firm level surface. Make sure that the treatment device is at room temperature before you power it up. You may remove your hands or feet from the treatment water bath at any time, but it is advisable to lower the dose to zero before you do so. In rare cases, uncomfortable electric shocks1 may result if the dose is not reduced. The system may not be operated in the vicinity of shortwave or microwave medical diathermy devices. A minimum distance of 2 meters should be kept at all times. Prior to using wall power, check that your outlet power meets the system’s requirements of 110-230 V~ and 50-60 Hz. Unplug the wall power adapter if a thunderstorm approaches or if you do not intend to use the treatment system for an extended period of time. This treatment device may only be used indoors. Do not expose the system to rain or excessive moisture. Prior to cleaning the system, turn the device off and unplug all connectors. For cleaning, use a soft cloth moistened with a mild cleaning agent. Do not use kerosene, thinner, alcohol, wax remover or any other solvents. Prevent kinking of the cable and do not expose the cable to heat or chemicals. If the cable is damaged, unplug it from the device and have it checked by the HIDREX Company. Never open the device; there are no control elements inside. The system may only be serviced by the HIDREX Company. Wash the supplied towels on a regular basis together with your regular laundry (make sure to comply with the laundry instructions on the tag). 1 4 These electric shocks are definitely uncomfortable, but absolutely harmless. User Manual Tap Water Iontophoresis System GS400 Rev. 1.0 / 2011-10-10 Intended Use / Mechanism of Action During HIDREX treatment, a current flows through the body regions under treatment. The water bath mediates this current flow. The skin areas inside the treatment water will thereby secrete less sweat. Although treatment success has been validated in numerous medical studies, there is still no completely satisfactory scientific explanation for the mechanism of action. Medical researchers believe that the electrical current irritates the synapses between sweat-inducing nerves and sweat glands to such an extent that sweat glands can no longer be stimulated. In other words: The treatment does not affect the sweat glands directly, it only affects the nervous input to these glands. This effect explains why the original condition returns relatively quickly when the treatment is discontinued! The treatment current can be adjusted according to your individual sensitivity. There is no risk involved as the current cannot exceed certain maximum values. Remark: In general, HIDREX treatment results do not depend on the direction of current flow. The anode (red), however, is slightly more effective than the cathode (black). Current direction should therefore be reversed on a regular basis – but not within one treatment session. Important: The HIDREX iontophoresis unit GP450 is intended to treat hyperhidrosis affecting hands, feet, face, necks / back and arm pits. Any other use or usage beyond this scope is considered unintended use and may have dangerous consequences. Treatment Fundamentals HIDREX iontophoresis devices are primarily intended for treating hyperhidrosis1 (excessive sweating) of hands and/or feet. Provided the optional axillary applicators are utilized, the system can also be used for treating axillary hyperhidrosis. The HIDREX treatment concept comprises two treatment phases: 1 Additional indications include: Dyshidrotic dermatitis, palmoplantar pustolosis and acrocynosis. Rev. 1.0 / 2011-10-10 User Manual Tap Water Iontophoresis System GS400 5 Phase 1: The initial phase (therapy initiation) is conducted under a doctor‘s supervision. During this stage, patients learn to administer treatments. For therapy initiation, three weekly treatments of approximately 15 minutes each should be scheduled (not more than one treatment per day). Sweat secretion will normalize after approximately 10 treatments. Phase 2: Long term treatment (maintenance therapy) is indicated because the HIDREX treatment effect is reversible. Patients should conduct maintenance therapy sessions by themselves at home and with their own unit. Depending on the severity of the condition, maintenance therapy involves one to three weekly sessions of approximately 15 minutes each. System Components Your HIDREX therapy system comprises a control unit and the accessories explained in the following chapters. Fig.: Control Unit GS400 Standard Accessories Hard Shell Case Treatment electrode (covered in the picture) Towel Dual connecting cable set Safety wall adapter (Fig. similar) 6 User Manual Tap Water Iontophoresis System GS400 Rev. 1.0 / 2011-10-10 Optional Accessories Ergonomic treatment tray Axillary applicators1 (Fig.: Model AX 1) Face mask2 Nape or back applicator (not shown)2 Set DUO allows simultaneous treatment of hands and feet (not shown)3 Controls on the Casing Panels 12V DC + Therapy system main ON/OFF switch (main power switch) Jacks for connecting the dual connecting cable set (treatment electrodes) Connector for safety wall adapter (12V DC) 1 includes a pair of sponge cushions with leather covers respectively a pair of sponge pouches and special small electrodes (AX electrodes) 2 made of foam and come equipped with hook and loop tapes (used with the AX electrodes) 3 includes 2 additional electrodes each, towels, and a dedicated cable set Rev. 1.0 / 2011-10-10 User Manual Tap Water Iontophoresis System GS400 7 Front Panel Controls LED: MEMO Main Display LED: DIVE Button: Time + Button: Dose + Button: Time - lower dose Setup: confirm primary settings increase dose decrease time increase time Setup: Memory function indication memory function active Immersion monitoring (Dive) 8 User Manual Tap Water Iontophoresis System GS400 Button: Dose - Rev. 1.0 / 2011-10-10 Installation / Treatment Setup The following steps describe how you set up your therapy system for a treatment session. Please note that the setup for treating hands or feet is slightly different from the setup required for treating hands and feet simultaneously and for treating the armpits. Setup for Treating Hands and Feet 1) Place the therapy device on a firm, level surface. Make sure an electric outlet is within reach. 2) Insert the safety wall adapter cable into jack on the rear panel and plug the adapter into a wall outlet. 3) Plug the color-coded connectors of the dual cable set into the jacks on the back panel, matching colors. 4) Push the red and black terminals of the dual connecting cable set firmly onto the respective connectors on the treatment electrodes . Make absolutely sure to forcefully push the connectors all the way onto the necks of the treatment electrodes. 5) For simultaneous treatment of hands and feet, use the optional DUO accessory set and the hard shell cases for your feet and the ergonomic blue treatment trays for your hands. Connect the two electrodes in the hard shell cases and the electrodes in the treatment trays each to the respective cables from the DUO set. Now connect the black and red connecting cable with one electrode of the hard shell case and one electrode of the treatment tray. 6) Place one treatment electrode in each hard shell case, or in each treatment tray , respectively. When using the ergonomic treatment trays , make sure the sloping rims point toward yourself (drainage groove away from you) – this will facilitate hand immersion. 7) Completely cover all treatment electrodes with a towel each. 8) Now fill both hard shell cases and/or treatment trays with hand warm tap water so that the skin areas to be treated can be easily immersed (the backs of the hands and backs of the feet should not be covered with water!). Rev. 1.0 / 2011-10-10 User Manual Tap Water Iontophoresis System GS400 9 Setup for Axillary Treatment (Armpits) The setup for axillary treatment is mostly identical to the setup for hand or feet treatment, although axillary treatment requires special axillary applicators instead of water baths (trays). Axillary applicators 1) Proceed with steps 1 to 4 of the instructions on the previous page. 2) Thoroughly soak the sponge cushions (AX I) equipped with integral leather pouches or the sponge pouches (AX II) with hand warm tap water. At this time, insert the AX electrodes (Do not squeeze any water from the sponge cushions or sponge pouches.). Hint: Subdivide every treatment of the axillar- or the special applicators in two sessions of 7 minutes each, in order to soak the applicators once again! Treatment Setup for Special Applicators The AX electrodes are also used for conducting treatments with the face mask or the nape or back applicator . Treatment setup is identical to the setup for axillary treatments except for the requirement to insert the AX electrodes into the pouches sewn onto the respective applicators. Please ascertain that the sponge material is completely soaked (do not squeeze). Now secure the applicator with the hook and loop fasteners. Important: The treatment with face mask is possible only in the MEMO mode! 10 User Manual Tap Water Iontophoresis System GS400 Rev. 1.0 / 2011-10-10 Conducting Treatments Please observe the following two items before you begin a treatment session: 1) When conducting a treatment, avoid removing your hands or feet from the water bath or removing the axillary applicators from your armpits. If you ignore this advice, you run a slight risk of feeling a completely harmless – yet quite uncomfortable – electric shock. This shock may occur although the HIDREX system comes equipped with a protection circuit designed to permit current flow interruption. 2) Before you start a treatment session and close the current path with your armpits, hands, or feet, make sure to first turn on the main power switch . If this sequence is reversed, there is also a chance that you receive a completely harmless – yet quite uncomfortable – electric shock! Primary Parameter Setup (Setup Mode) Depending on the specific HIDREX system you own, you can choose between various options before you initiate a treatment. How you select and store these parameters with the GP450 is described in the following paragraphs. 1) After setting up your HIDREX therapy system in accordance with the instructions in the “Installation” chapter, turn on the control unit by pushing the main power switch . First, the main display will briefly show three moving bars. Next, the following text is shown for about 8 seconds: Setup Mode indication Various treatment options can be selected as long as this text remains visible. Important: If no button is pressed within approximately 8 seconds, the device will automatically switch from setup to treatment mode. Rev. 1.0 / 2011-10-10 User Manual Tap Water Iontophoresis System GS400 11 Hint: By pressing the ENTER key , you can directly switch to treatment mode without having to wait. 2) Once in Setup Mode, activate or deactivate the options as desired1: Option MEMO Function Symbol If Memory is activated, Active if LED is lit the unit will always save the most recent “time“ and “dose” treatment settings; otherwise the system runs in manual mode. Key Important: The Setup Mode is generally activated only direct after switching on the device. If you left the Setup mode, you must turn off the device shortly and then again, must switch on in order to alter the above treatment options. 1 12 Adjust the system in accordance with your doctor’s instructions. User Manual Tap Water Iontophoresis System GS400 Rev. 1.0 / 2011-10-10 Begin Treatment (Treatment Mode) After completion of the initial setup, the unit will automatically switch to treatment mode after about 8 seconds or when the ENTER button is pressed. Depending on user selection or memory function, the intended treatment time and dose will be displayed. Before you start the actual treatment session, you need to check and/or set the “time” and “dose” treatment parameters. 1) Setting treatment parameters: If you have deactivated the memory function (LED is not lit) or if no user has been selected (none of the three LEDs is lit), the main display will show the following: On the left, the display indicates the scheduled treatment duration in minutes, and on the right, the preselected treatment dose in Volts. The colon blinks during this phase! Select the desired treatment dose1 with buttons and , and the desired treatment duration with buttons and . Each time you push one of these buttons, the corresponding treatment parameter is increased or decreased by one Volt or one minute, respectively. Hint: By holding one of the push buttons down, you can continuously in- or decrease the corresponding treatment parameter. Special function MEMO If the memory function is active the device proposes the corresponding saved treatment parameters (time and dose). You can adjust these to your needs by pushing the respective buttons. The system saves these settings. When another treatment session is started, the device will automatically suggest the latest settings. If you adjust treatment parameters during a treatment session, the system will automatically save these changes as well. 1 Select the dose in accordance with your doctor’s orders or use the table of factorypreset treatment parameters for guidance (see page 14 in this manual). Rev. 1.0 / 2011-10-10 User Manual Tap Water Iontophoresis System GS400 13 In the factory, your HIDREX system is preset as follows: Option MEMO Parameter DOSIS: TIME: 0 Volt 15 minutes In order to avoid skin irritation by excessive dose settings, we recommend that you assess your individual direct current thresholds before you start the first treatment session. To conduct axillary treatments, the dose should not be raised above 15, because the sensitive skin may otherwise get burnt. 2) Treatment start: When treating hands or feet, place each hand or foot onto the towels laying in the tap water filled hard shell cases (carrying case) or ergonomic treatment trays . Make sure that your skin does not touch the electrodes directly. Do not forget to remove any jewellery! To conduct an axillary treatment, pack the soaked axillary applicators into your armpits. The well soaked face mask1 and special applicators are secured with hook and loop fasteners. Make sure the applicators fit well and apply even pressure to maximize the contact area. When the integral “immersion monitoring” system recognizes that the circuit is closed, the Dive-LED lights up to indicate that treatment has started (with face mask nonstop!). The colon expires during the Treatment! On the display, the dose setting changes from the desired setting to zero, before it slowly increases to the desired value2. Important: If you perceive much localized pain during a treatment, you need to interrupt the session and cover the painful area with petrolatum. By pressing an arbitrary button, the automatic rising of the treatment dose can be interrupted 1 Important: choose „manual mode“! Because of the leading conjunction across the mask itself, the Dive-LED shines durably and the therapy would start automatically. 2 Heed to this also the hint about "current limitation" on the next sides. 14 User Manual Tap Water Iontophoresis System GS400 Rev. 1.0 / 2011-10-10 3) Adjusting treatment parameters: At any time throughout the treatment session, you can change treatment time and dose settings by pressing the respective push buttons. If you interrupt the treatment by removing your hands or feet from the bath, the Dive-LED goes off and the treatment timer is halted. The display shows the remaining treatment time and the selected dose. When you continue the treatment, the Dive-LED will light up again and the dose display changes to zero, before it slowly increases to the desired value. 4) Ending a treatment session: When the treatment time is up, the treatment dose is automatically lowered to zero. Please keep your hands and feet in the water bath (or the axillary applicators in place, respectively) until the dose display reads “End“. Switch the device off. Rev. 1.0 / 2011-10-10 User Manual Tap Water Iontophoresis System GS400 15 Important Advise for Conducting Treatments For your safety, your HIDREX treatment system comes equipped with several protective circuits. Immersion monitoring Until the treatment current path is closed (immersion monitoring) by immersion of the palms, the dose cannot be increased to any value above zero. The Dive-LED will light up when immersion is complete. Over-treatment protection If your skin is dryer than normal1, the dose cannot be increased (protection against over-treatment). Your HIDREX system automatically checks your specific skin conductance. If your skin conductance is beyond the preset threshold, the protection circuit is activated and locks the system. The Dive-LED does not light up, even when the treatment current path is closed. Hint: To double-check if over-treatment protection has been activated for you, simply ask another person to close the current path (this can be done without starting an actual treatment). If the Dive-LED lights up when the other person closes the current path, the system is in good working order. If over-treatment protection is activated, you should interrupt your treatment course for at least one week until excessive perspiration returns. Please contact us if the over-treatment circuit triggers although you still have excessive perspiration, a situation that may arise in rare circumstances. Current Limitation In case of very heavy sweating (therefore a low electric resistance of the skin), the maximum treatment current can be reached before the discontinued dose (volt value) is gained. A protection circuit (current limitation) intervenes in this case and stops the appliance. This doesn't have any influence on the treatment success but protects you only before burns! In course of further treatments, slowly higher dose values are gained by the abatement of the perspiration (the electric resistance of the skin rises up). 1 16 This does not relate to the water bath, but to the moisture content of the deeper skin layers, an indicator of the extent of hyperhidrosis. User Manual Tap Water Iontophoresis System GS400 Rev. 1.0 / 2011-10-10 This protection circuit seems to especially use fast by using pulsed current. However, this is not applicable. In the pulse mode, an "average" dose value, that you would have to double, for example, in the comparison to the direct current, is generally shown. However, the appliance watches the maximum current and not the average. Side Effects Mild dysesthesia (tingling or burning) can occur under therapy, as well as short-term skin irritation (reddening) after treatment. Important: Make absolutely sure to pay attention to the list of contraindications! Excessive dose settings can lead to burns! General Information This chapter contains important instructions about your HIDREX system. Special Remark Our responsibility for system safety, functionality, and reliability applies only if any maintenance and servicing is exclusively performed by ourselves or by personnel authorized by us. Our warrantee ceases and we assume no liability if any manipulation or service is performed by unauthorized personnel. Care and Maintenance HIDREX iontophoresis systems are basically maintenance-free. Squeeze the towels and axillary applicators dry rigorously after use. To prevent calcium deposits on the sheet metal, please make absolutely sure to remove any moisture from the treatment electrodes after each treatment! Important: Calcifications at the electrodes can hinder the treatment current. This deposit can be taken away with customary descaler as well as through putting the electrodes in vinegar or citric acid. A discoloration of the electrode-metal after the first therapysessions is regular. Store only quite dry accessories in the suitcase! Rev. 1.0 / 2011-10-10 User Manual Tap Water Iontophoresis System GS400 17 Purification / Cleaning (execute with demand) The control unit, treatment trays and electrodes should be cleaned with a moistened cloth or with a common detergent. Surface disinfectants* may also be used. The AX sponge cushions can be washed at 90°C; alternatively, they may be steam-sterilized or immersed in a disinfectant solution. If disinfectant is used, the sponges should be thoroughly rinsed with water before they are reused. The towels can be washed in the washer with your regular laundry - follow the specific instructions. Common disinfectant supplements for laundry detergents may be used. Calcium deposits on the electrodes can impair current flow. Use a household calcium deposit remover or immerse the electrodes in vinegar. Expect discoloration of the electrode metal after the first therapy sessions. Warning: Before cleaning, make sure the device is turned off and separated from the power line. Never use kerosene, thinner, or other solvents. * Henkel: Incidin Extra (1%), Incidin Plus (0.5%), Incidur (0.5%), Minutil (0.5%) Dr. Trippen (desomed): Biguamed B. Braun: Melesept SF (0.5%/5%), Hexaquart S (1.5%/5%), Meliseptol (undiluted) Operational Check Proceed with the following steps for an operational check of your HIDREX system: 1) Set up the therapy system as you would for a treatment. 2) Activate the main power switch to turn the control unit ON. Dose and treatment time settings should appear on the main display . 3) Now close the treatment current path by placing one electrode onto the towel that covers the other electrode, but do not let the electrodes touch. Both electrodes are now immersed in a water-filled tray and lie on top of each other, remaining separated by a towel. When testing the system with AX electrodes, directly press both water-soaked sponge cushions together. 4) The unit’s Dive-LED should now be lit. If the Dive-LED does not lit under this test although the items on the error checklist have been followed, please contact us so that we can coordinate the required steps. 18 User Manual Tap Water Iontophoresis System GS400 Rev. 1.0 / 2011-10-10 Symbol Legend Connector for treatment electrodes + = Anode (red cable) − = Cathode (black cable) Type BF1 device Device identification: Serial-No.: yy-x.x zzz yy: x.x: zzz: Year of manufacture internal product type ID consecutive number Error Checklist If prior to, during, or after a treatment session, the device does not operate in accordance with this manual, please go through the following checklist before you send the device for repair. Working through the checklist as the first step can save you considerable cost and inconvenience. Thank you. Verify that the safety wall adapter is properly connected to the control unit and to the wall outlet. Verify that the connectors on the dual connector cables are pushed far enough onto the receptacles of the treatment electrodes for establishing a reliable connection. The dose will only be increased to the selected setting after the time display shows a value of greater than 1 minute and the skin has closed the treatment current path (Dive-LED is lit). Verify that the device works properly on another person (overtreatment protection). Complete the operational check described below. Hint: In rare cases, tap water conductance may be inadequate (e.g. when tap water deionizing equipment is in use). In that case, try non-carbonated mineral or table water instead. 1 Device leakage currents comply with standards -- the system provides protection against electrical shock (Type B); device is insulated (floating) (Type F). Rev. 1.0 / 2011-10-10 User Manual Tap Water Iontophoresis System GS400 19 Shipping the Device for Repair or Maintenance The device should only be shipped in the supplied carrying case. If at all possible, use the original packaging material for shipping. Make sure the device is protected against impact inside the case and that packaging is suitable for shipping. Prior to shipping, do not forget to clean and dry the system and the accessories. Please do not ship towels, sponge cushions, or the facial mask. Please send all electrical accessories (safety wall adapter, treatment and AX electrodes, and dual connecting cable set) together with the HIDREX control unit. Applicable Regulations and Legal Requirements In accordance with addendum I and II of the MPBetreibV [Medical Device Vigilance System] , the operator of a medical device is required to maintain a Medical Device Log and to document completion of the safety inspections listed below. Important: Private persons who use the device only privately do not have to comply with these requirements. Nevertheless, we recommend periodic safety inspections in accordance with the regulations. Reconditioning and Disinfection HIDREX iontophoresis systems are reusable medical devices; reconditioning is classified as “non-critical”. The applicable joint recommendations of the “Kommission für Krankenhaushygiene und Infektionsprävention am Robert-Koch-Institut (RKI) [Robert-Koch Institute Division of Applied Infection and Hospital Hygiene]” and the “Bundesinstitut für Arzneimittel und Medizinprodukte (BfArM) [Federal Institute for Drugs and Medical Devices]” on “Anforderungen an die Hygiene bei der Aufbereitung von Medizinprodukten [Reconditioning of Medical Devices: Hygiene Requirements]”, published on August 25, 2001, need to be complied with. For reconditioning, the device has to be cleaned and disinfected in accordance with the instructions provided in the chapter on “Care and Maintenance”. The accessories towels, treatment electrodes, and treatment trays (carrying case) need to be disposed of and have to be replaced by new ones. In addition, a technical safety inspection has to be completed and documented. The medical device may be reconditioned up to 10 times. 20 User Manual Tap Water Iontophoresis System GS400 Rev. 1.0 / 2011-10-10 Technical Safety Inspection Only competent technicians trained by the HIDREX GmbH may be contracted for technical safety inspections. Suitable measuring and test equipment is mandatory. The medical device may only be operated with the accessories listed in the instruction manual. In accordance with “MPBetreibV”, HIDREX iontophoresis units require technical safety inspections every 2 years in addition to inspections after each repair or reconditioning. Technical safety inspections have to cover at least the following items: Visual check of medical device and accessories Protective conductor test in accordance with DIN EN 60601-1:1990 Leakage current test in accordance with EN 60601-1:1990 Operational check of the medical device in accordance with the instruction manual The operator is responsible to rectify any faults detected during the technical safety inspections (i.e. the user has to make arrangements for repair). Lifespan Legal reasons limit the lifespan of this medical device to 4 years. The manufacturer has to recondition the medical device not later than by the end of this term. Each successful reconditioning by the manufacturer extends the lifespan of the medical device by 2 years. If the HIDREX iontophoresis system is reconditioned for the same patient, the treatment trays or carrying case (depending on their condition) do not necessarily have to be replaced. Electric-Magnetic Compatibility Of course, the HIDREX Devices are developed after the stipulated guidelines for electromagnetic compatibility (EMV) and been manufactured. Caution: Medical-Electric-Appliances are subject to medical-electricappliances. The EMV particular precautions and must install in accordance with the EMV-Hints contained in the accompanyingpapers and in operation is taken. Wearable and mobile HFCommunication facilities, as portable phones or Pager, can influence medical-electric-appliances! Please heed the broad guidance and manufacturer declarations in this context relating to DIN EN 60601-1-2:2001, which you can consult at www.hidrex.de or order with us. Rev. 1.0 / 2011-10-10 User Manual Tap Water Iontophoresis System GS400 21 Entsorgung von Verpackung und Elektro-Altgeräten Our packages and the transportation-protection-parts were produced out of non-polluting, salvageable materials. The form parts are from PS (foamed, Polystyrol free of FCKW), foils and bags are from PE (Polyäthylen) and outside-package are of cardboard. Dispose all package-parts in an environmentally acceptable way. If the appliance can become use no more, you please dispose expertly of it. In the remainder, the national ordinances are to be heeded. Appliances that are marked with the marginal symbol cannot be disposed with the house-garbage. You are indebted to dispose of such electro and electronics-garbage separately. Please inform yourself about the possibility of the regular waste disposal with your commune. With the separate waste disposal, you supply the garbage to the recycling. You help to avoid with it that incriminating materials reach into the environment (ElektroG). WEEE-Reg.-Nr.: DE 42510094 Hersteller-Nr. Duales System Interseroh: 134502 (VerpackV) 22 User Manual Tap Water Iontophoresis System GS400 Rev. 1.0 / 2011-10-10 Technical Data GS400 Display-Tolerance Treatment Voltage (Dose) ± 2 V Treatment Time ± 1 % Dimensions 190 x 49 x 137 mm Mass (W x H x D) 0.5 kg Power input Input voltage: 12 V Max. input current: 500 mA Input power: max. 6 VA Environmental temperature Direct current output +10°C to +30°C Treatment voltage 60 V= max. Treatment current 35 mA max.(into a 1 kΩ load) Max. output power 225 mW See supplementary sheet for guidelines and factory declarations in accordance with DIN EN 60601-1-2:2001 (EMC). Safety Wall Adapter (Typ: Friwo FW 7662M/12) Input Input voltage 100-240 V~ / 50-60 Hz Max. current 400 mA Output Nominal output voltage 12 V= Output current max. 0,5 A Max. output power 6 VA Distribution / Trading United Kingdom: Avanor Healthcare Ltd Unit 19 Mahoney Green, Rackheath, Norwich, NR13 6JY, UK Phone: 0845 643 9545 www.avanor.co.uk Rev. 1.0 / 2011-10-10 User Manual Tap Water Iontophoresis System GS400 23