1
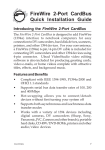
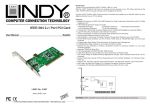
FireWire
TECHNICAL SUPPORT
QPS TECHNICAL SUPPORT
Our Customer Support staff are ready to assist you with any problem you may have with
your QPS Product.
There are many ways to contact QPS Technical Support.
E-Mail:
World Wide Web:
Technical Support:
Technical FAX:
[email protected]
http://www.qps-inc.com
(714) 692-3588
(714) 692-5516
COPYRIGHT STATEMENT
Copyright © 1998-2001 QPS Professional Solutions. All rights reserved. No part of this
publication may be reproduced or transmitted in any form by any means for any purpose
without the prior written permission of QPS Inc.
Windows is a trademark of Microsoft Corporation.
Apple, Mac OS are trademarks of Apple Computer Inc.
All other brand and product names are trademarks or
registered trademarks of their respective owners.
COPYRIGHT PROTECTION NOTICE
Replicating copyrighted material without the permission of the publisher may be unlawful.
QPS does not condone, support, or encourage the violation of copyright laws. Please obtain
proper authorization prior to replicating copyright protected material.
Note: Please refer to Que! FireWire DVDBurner Installation Manual CD for complete installation version.
CONGRATULATIONS
THANK YOU
for Choosing QPS!
Congratulations on your purchase of the
Que! FireWire DVDBurner Drive. In this manual,
you’ll find information designed to help you
understand the capability of your new drive
as well as a step-by-step explanation of how
to install your hardware and software.
1
GETTING STARTED
WHAT YOU SHOULD HAVE!
• What’s in the Package
Refer to the provided package list on the following page and verify that you have received
all of the appropriate parts.
Okay, if all the right parts were in the package, then you just need to make sure your
system will support the Que! DVDBurner Drive. Here's what you'll need.
Minimum System Requirements for PC
• Pentium III 700MHz processor (1.1 GHz processor required for real-time performance)
• MS Windows 98SE, ME and 2000
• 128 MB RAM(256 MB recommended)
• CD-ROM drive for software install
• 300 MB free hard disk space for software installation (5 GB required for DVD-R
mastering) for software install
• AGP Video Card with 8MB Video RAM
• On board FireWire ports or IEEE-1394 host controller card
Note: DVD set top players must be Generation 2 or later (circa 1992 or later). refer to
your DVD player owner's manual for verification of compatibility with General
DVD-R media.
Note: Please refer to Que! FireWire DVDBurner Installation Manual CD for complete installation version.
2
PACKAGE LIST
Carrying Bag
and Strap
Quick Start Guide
Drive
Universal Power
Supply Adapter
Power Cable
FireWire IEEE-1394 Cable
Media
Software Disc
3
PC INSTALLATION
FIREWIRE INSTALLATION
The figure below shows the front panel controls and indicator for the Que! FireWire
DVDBurner.
Disc Tray
Eject Button
Busy LED
Note:
Step 1.
Step 2.
Step 3.
The front panel may vary slightly.
Unpack the drive accessory box. The accessory box should have a disc with
the included software, a QPS DVD-R disc, a universal power adapter, a power
cable, and a FireWire/IEEE-1394 cable.
Turn off the power on your PC and all other peripherals that are attached.
Connect the FireWire/IEEE 1394 cable to the FireWire IEEE-1394 port on the
back of your PC.
Note: Please refer to Que! FireWire DVDBurner Installation Manual CD for complete installation version.
4
PC INSTALLATION
Step 4.
Attach the other end of the FireWire/IEEE-1394 interface cable to the FireWire/IEEE1394 port on the back of the Que! FireWire DVDBurner Drive.
Step 5.
Attach the power adapter to the back of the Que! FireWire DVDBurner Drive.
Plug one end of power cable to the back of the power adapter and the other
end to the grounded power outlet.
Step 6.
Congratulations! To continue, refer to the software installation procedures on
the following page.
ON
Power Adapter Plug
OFF
FireWire Ports
Note: Please refer to Que! FireWire DVDBurner Installation Manual CD for complete installation version.
5
PC INSTALLATION
OPTIONAL 1394 PCI CARD
Introducing the 1394 3-Port PCI
The 1394 3-Port PCI is designed to connect IEEE-1394 devices to the computer. It comes
with three ports to support 1394 devices with data transfer rates up to 400Mb/sec.
Key Features and Benefits
• IEEE 1394-1995, P1394a (rev. 1.1) and OHCI Interface Specification 1.0 compliant.
• Full compliant with PCI Plug-n-Play 2.1.
• Hot Plug-and-Play feature allows you to connect/disconnect devices without powering
down the system.
• Supports serial bus data transfer rates of 100, 200 and 400Mb/ sec.
• Adds 3 IEEE 1394 (FireWire) ports to your PC for high-speed, flexible connectivity and
the ability to link up to 63 devices.
• Physical write posting buffer for enhancing the serial
bus performance.
• Allows you to connect DVD-R, DVD-RAM, CDRW, DV
camcorder, hard disk drive, printer and other 1394
audio/video devices including TV, VCR, DVD to your
computer.
Note: Please refer to Que! FireWire DVDBurner Installation Manual CD for complete installation version.
6
PC INSTALLATION
OPTIONAL FIREWIRE PCI CARD INSTALLATION
Step 1.
Shut down your desktop computer and any other connected peripherals.
Step 2.
Remove the front cover of your PC. If you are uncertain how to open your
computer, refer to the PC User’s Manual that accompanied your system.
Note:
Static Discharge – Before you proceed to Step 3, it is important to discharge
your body with electrostatic discharge (ESD). You can do this by touching the
frame of your computer while it is OFF and the power cord plugged-in to the
wall outlet or if available, you can also use static wrist guard with the end of
the clip attached to the frame of your computer.
Step 3.
Remove the PCI card from its static-proof bag. Select an open PCI slot.
Remove the PCI port cover from the back inside of the computer for the slot
you will use for the PCI FireWire Card.
Step 4.
Firmly hold the edges of the PCI
FireWire Card and firmly seat it into
the slot selected. Screw down the
card with the screw that was holding
the PCI cover plate in place.
Step 5.
Replace the computer lid and restart
the system.
Remove the Slot Bracket
Install the 1394 3-Port PCI
Note: Please refer to Que! FireWire DVDBurner Installation Manual CD for complete installation version.
7
SOFTWARE INSTALLATION
SOFTWARE INSTALLATION
Step 1.
Put installation disc into CD-ROM drive.
Step 2.
Double click on “My Computer” icon.
Step 3.
Double click on “Que! DVDBurner” icon.
Step 4.
Inside you will find folders that contain your software. Please double click on
the “install.txt” file to follow the detailed installation instructions.
Note: Please refer to Que! FireWire DVDBurner Installation Manual CD for complete installation version.
8
HANDLING
HANDLING GUIDELINES
Media Insertion and Removal
Step 1.
To insert the DVD-R media or DVD-RAM cartridge, press the EJECT button.
Step 2.
Once the disc tray has fully extended, place the disc or DVD-RAM cartridge
into the center of the tray. Press the eject button to have the drive accept the
DVD-R media or DVD-RAM cartridge.
Note: The disc surface must
be clean and the label
should be facing upward.
Note: Please refer to Que! FireWire DVDBurner Installation Manual CD for complete installation version.
9
HANDLING
Note:
Location of the drive LED's may differ from that which is shown here.
Step 3.
The busy lamp will light and or change colors for a few seconds to indicate
that a disc or cartridge has been loaded and the drive has accepted the disc.
Step 4.
To eject and insert the disc or DVD-RAM cartridge, press the EJECT button.
Note :
Some software prohibits the use of the EJECT button, so a disc can not be
ejected in this way. Please refer to the instructions supplied with your software.
Step 5.
Once it has been ejected, remove the disc by hand and return it to its jewel case
or sleeve.
Note :
The disc cannot be ejected while the drive is reading or writing a DVD-R media
or DVD-RAM cartridge.
Note: Please refer to Que! FireWire DVDBurner Installation Manual CD for complete installation version.
10
HANDLING
The NUMBER ONE cause of premature disc failure with recordable recordable media is
contamination of the recording surface before recording is completed. To minimize disc
failure, use the following disc-handling guidelines.
• Keep the media in its sealed package until you are ready to record.
• Keep the disc as clean and dust-free as possible. DO NOT touch the
recording surface, and do not expose the disc to dust or dirt.
• DO NOT BLOW ON THE DISC to remove dust or dirt. To remove dust
from the recording surface use a camera lens cleaner, a lint free cloth
or use compressed air. Wipe the disc from the center to the outer
edge. NEVER wipe the disc in a circular motion.
• Always record in a dust-free environment. If the disc is to be removed
from the DVDBurner drive, store the disc in a clean, dust-free environment.
• Never bend or flex the disc. This may warp the disc and leave it
unusable.
• Never scratch off the reflective top surface of recordable media..
Without the reflective surface the disc is completely unusable.
• If you must write on the recordable media disc surface, read the
back of the media jewel case or sleeve for instructions.
Note: Please refer to Que! FireWire DVDBurner Installation Manual CD for complete installation version.
11
NOTES
12
NOTES
13
neoDVD serial #
W4JYA 0389V HCXA EBJ80 YHZZA
For Customer Use:
Enter below the Model Number and
Serial Number which are located either
on the rear, bottom or side of the unit.
QPS Inc.
8015 East Crystal Drive
Anaheim, CA 92807
http://www.qps-inc.com
Model No._____________________
Serial No._____________________
Appearance and specifications of the actual
mechanism could differ based on your order.