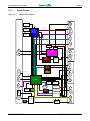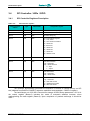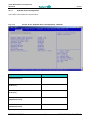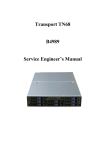
1
CPC503 6U CompactPCI Processor Module User Manual Rev. 001b E June 2014 The product described in this manual is compliant with all related CE standards. Product Title: Document name: Manual version: Ref. docs: CPC503 CPC503 User Manual 001b E CPC503-UM-v0.02-R (IMES.421459.503 RE) Copyright © 2014 Fastwel Co. Ltd. All rights reserved. Revision Record Rev. Index Brief Description Product Index Date 001 Initial version CPC503 June 2012 001a Changes in the delivery checklist CPC503 December 2012 001b Description of key parameters and BIOS for СРС503-02 has been addded. CPC503 June 2014 Contact Information Fastwel Co. Ltd Fastwel Corporation US 108 Profsoyuznaya st., Moscow 117437, Russian Federation 55 Washington St. #310 Tel.: +7 (495) 232-1681 +1 (718) 554-3686 Fax: +7 (495) 232-1654 +1 (718) 797-0600 Address: Brooklyn, NY 11201 USA Toll free: E-mail: [email protected] Web: http://www.fastwel.com/ +1 (877) 787-8443 (1-877-RURUGGED) CPC503 Table of Contents List of TablesTable of Contents ............................................................................................................................... 1 List of Tables............................................................................................................................................................ 1 List of Figures .......................................................................................................................................................... 3 Notation Conventions ............................................................................................................................................... 4 General Safety Precautions ..................................................................................................................................... 5 Unpacking, Inspection and Handling ........................................................................................................................ 6 Three Year Warranty ............................................................................................................................................... 7 1 2 3 Introduction ............................................................................................................................................ 8 1.1 System Overview .......................................................................................................................................... 8 1.2 General Description of the Module ............................................................................................................... 8 Product General Information ................................................................................................................ 9 2.1 CPC503 Key Parameters ............................................................................................................................. 9 2.2 CPC503 Versions ....................................................................................................................................... 12 2.3 CPC503 Package Contents ........................................................................................................................ 13 2.4 CPC503 Packaging Information.................................................................................................................. 13 2.5 Possibilities of the System Expansion ........................................................................................................ 13 2.5.1 PMC/XMC Modules ................................................................................................................... 13 2.5.2 Rear I/O RIO587 Expansion Module ......................................................................................... 13 2.6 System Information ..................................................................................................................................... 14 2.7 CPC503 Diagrams ...................................................................................................................................... 14 2.7.1 Block Diagram ........................................................................................................................... 15 2.7.2 Module Appearance ................................................................................................................... 16 2.7.3 Module Layout ........................................................................................................................... 17 2.7.4 Module Dimensions ................................................................................................................... 18 Detailed Description ............................................................................................................................ 19 3.1 Functional Nodes Operation Features ........................................................................................................ 19 3.2 Module Interfaces ....................................................................................................................................... 21 3.2.1 C P C 5 0 3 PMC/XMC Interface ................................................................................................................... 21 3.2.1.1 XMC Interface ........................................................................................................... 21 3.2.1.2 PMC Interface ........................................................................................................... 23 3.2.2 SATA Interface .......................................................................................................................... 25 3.2.3 Connectors on CPC503 Front Panel ......................................................................................... 25 3.2.3.1 USB .......................................................................................................................... 25 3.2.3.2 Gigabit Ethernet ........................................................................................................ 26 3.2.3.3 DVI-I.......................................................................................................................... 27 3.2.3.4 DisplayPort................................................................................................................ 28 3.2.4 LED Indicators on CPC503 Front Panel .................................................................................... 28 3.2.5 CompactPCI Interface................................................................................................................ 29 U se r 3.2.5.1 Operation in the System Slot (System Master) ......................................................... 29 3.2.5.2 Operation in the Peripheral Slot (Slave Mode) .......................................................... 30 3.2.5.3 Packet Switching Backplane PICMG 2.16 ................................................................ 30 3.2.5.4 Handle switch............................................................................................................ 30 3.2.5.5 Power supply mode LED (SYS) ................................................................................ 30 M a n u a l 1 © 2 0 1 2 F a s t w e l V e r . 0 0 1 a E CPC503 3.2.6 3.3 CompactPCI Connectors ........................................................................................................... 31 3.2.6.1 CompactPCI Connector Color Coding ...................................................................... 32 3.2.6.2 CompactPCI Connectors XS17 and XS16 Pinouts ................................................... 33 3.2.6.3 CompactPCI Input/Output Connectors ХР9, XS15 and XS14 (J3 - J5) and Designation of Their Pins .......................................................................................... 35 Timers ......................................................................................................................................................... 38 3.3.1 Watchdog Timer ........................................................................................................................ 38 I/O Registers of the WDT Controller .......................................................................................... 39 3.4 4 5 SPI Controller / LEDs / GPIO ...................................................................................................................... 41 3.4.1 SPI Controller Registers Description.......................................................................................... 41 3.4.2 SPI device programming............................................................................................................ 42 3.4.3 FRAM......................................................................................................................................... 43 3.5 Local SMBus Devices ................................................................................................................................. 43 3.6 Battery ........................................................................................................................................................ 43 3.7 NAND Flash ................................................................................................................................................ 43 Installation ............................................................................................................................................ 44 4.1 Safety Regulations...................................................................................................................................... 44 4.2 CPC503 Installation Procedure................................................................................................................... 45 4.3 Module Removal Procedure ....................................................................................................................... 46 4.4 CPC503 Peripheral Devices Installation ..................................................................................................... 46 4.4.1 USB Devices Installation............................................................................................................ 47 4.4.2 Connection of devices to Rear I/O module ................................................................................ 47 4.4.3 Battery Replacement ................................................................................................................. 47 Configuration ....................................................................................................................................... 48 5.1 Resetting BIOS Setup parameters, using XP2 jumper ............................................................................... 48 6 CPC503 module troubleshooting ....................................................................................................... 49 7 Power consumption ............................................................................................................................ 50 8 Environmental exposure .................................................................................................................... 51 9 8.1 Temperature mode ..................................................................................................................................... 51 8.2 CPC503 operating conditions and MTBF ................................................................................................... 51 Useful Abbreviations, Acronyms and Short-cuts .............................................................................. 53 10 AMI Aptio BIOS Setup (CPC503-02)……………………………………………………………………………55 10.1 10.2 10.3 10.4 10.5 10.6 10.7 BIOS Setup start……………………………………………………………………………………..………….55 Main…………………………………………………………………………………………………….………...55 Advanced………………………………………………………………………………………………..……….56 Chipset…………………………………………………………………………………………………….……..69 Boot………………………………………………………………………………………………………….…...79 Security……………………………………………………………………………………………………….….84 Save & Exit……………………………………………………………………………………………………....85 List of tables Table 2-1: Table 3-1: Table 3-2: Table 3-3: Table 3-4: Table 3-5: Table 3-6: Table 3-7: Table 3-8: Table 3-9: C P C 5 0 3 System Information ........................................................................................................................................... 14 Designation of XMC XS8 (P15) Connector Pins on CPC503 Module Plate ....................................................... 22 Designation of XMC XS9 (P16) Connector Pins on CPC503 Module Plate ....................................................... 22 PMC Connectors XS10 (P11), XS11 (P13), XS12 (P12) and XS13 (P14) Pinouts ............................................. 24 SATA Connector XP7 Pinout............................................................................................................................. 25 USB Connectors Pinouts................................................................................................................................... 26 Pinouts of Gigabit Ethernet Connectors............................................................................................................. 26 DVI Connector XS5 Pinout ................................................................................................................................ 27 DisplayPort Connector XS6 Pinout .................................................................................................................... 28 CPC503 Module SYS LED State ....................................................................................................................... 29 U se r M a n u a l 2 © 2 0 1 2 F a s t w e l V e r . 0 0 1 a E CPC503 Table 3-10: Table 3-11: Table 3-12: Table 3-13: Table 3-14: Table 3-15: Table 3-16: Table 3-17: Table 6-1: Table 7-1: Table 7-2: Table 8-1: Table 8-2: Table 8-3: CompactPCI Connector Coding Colors ............................................................................................................. 32 CompactPCI Bus Connector J1 (XS17) System Slot Pinout .............................................................................. 33 64-bit CompactPCI Bus Connector J2 (XS16) System Slot Pinout .................................................................... 34 J3 Connector (ХР9) Pinout................................................................................................................................ 35 J4 Connector (XS15) Pinout .............................................................................................................................. 36 J5 Connector (XS14) Pinout .............................................................................................................................. 37 SPI controller registers ...................................................................................................................................... 41 SMBus Devices................................................................................................................................................. 43 CPC503 malfunctions reasons and ways of their elimination ............................................................................. 49 Supply voltage +5 V,+3.3 V,+12 V,-12 V from CPCI bus ................................................................................... 50 Modules consumption current ........................................................................................................................... 50 CPU frequency as a function of the temperature (CPC503-01) ......................................................................... 51 CPU frequency as a function of the temperature (CPC503-02)……………………………………………………...51 Environmental exposure.................................................................................................................................... 52 List of Figures Figure 2-1: Figure 2-2: Figure 2-3: Figure 2-4: Figure 2-5: Figure 2-6: Figure 3-1: Figure 3-2: Figure 3-3: Figure 3-4: Figure 3-5: Figure 3-6: Figure 3-7: Figure 3-8: Figure 10-1: Figure 10-2: Figure 10-3: Figure 10-4: Figure 10-5: Figure 10-6: Figure 10-7: Figure 10-8: Figure 10-9: Figure 10-10: Figure 10-11: Figure 10-12: Figure 10-13: Figure 10-14: Figure 10-15: Figure 10-16: Figure 10-17: Figure 10-18: Figure 10-19: Figure 10-20: Figure 10-21: Figure 10-22: Figure 10-23: Figure 10-24: Figure 10-25: Figure 10-26: Figure 10-27: CPC503 Versions ............................................................................................................................................. 12 CPC503 Block Diagram .................................................................................................................................... 15 CPC503 Module Appearance with R1 Heatsink ................................................................................................ 16 CPC503 Module Layout: Top Side .................................................................................................................... 17 CPC503 Module Dimensions. CPC503 4HP Front Panel .................................................................................. 18 CPC503 8HP Front Panel ................................................................................................................................. 18 XMC XS8 (P15) and XS9 (P16) Connectors ..................................................................................................... 21 PMC XS10 (P11), XS11 (P13), XS12 (P12) and XS13 (P14) Connectors ......................................................... 23 USB Connectors on CPC503 Front Panel ......................................................................................................... 25 RJ45 Gigabit Ethernet Connectors .................................................................................................................... 26 DVI-I Connector on CPC503 Front Panel .......................................................................................................... 27 DisplayPort Connector ...................................................................................................................................... 28 LED Indicators on CPC503 Front Panel ............................................................................................................ 29 CompactPCI connectors (J1 – J5 in accordance with the CompactPCI specification) ........................................ 31 Screen of the “Main” menu tab……………………………………………………………………………………………55 Screen of the “Advanced” menu tab……………………………………………………………………………………...56 Screen of the “Onboard Device Configuration” submenu……………………………………………………………...57 Screen of “PCI Subsystem settings” menu tab………………………………………………………………………….58 Screen of “ACPI settings” menu tab……………………………………………………………………………………...60 Screen of “CPU Configuration” menu tab………………………………………………………………………………..61 Screen of “SATA configuration” menu tab……………………………………………………………………………….62 Screen of the “Thermal Configuration” menu tab……………………………………………………………………….63 Screen of the “USB Configuration” menu tab……………………………………………………………………………64 Screen of the “Super IO Configuration” menu tab………………………………………………………………………66 Screen of the “Serial port console redirection” menu tab………………………………………………………………67 Screen of the “Console Redirection Settings menu tab………………………………………………………………..68 Screen of the “CPU PPM Configuration” menu tab…………………………………………………………………….69 Screen of the “Chipset” menu tab………………………………………………………………………………………...70 Screen of the “System Agent (SA) configuration” menu tab…………………………………………………………...71 Screen of the “Graphics Configuration” menu tab………………………………………………………………………72 Screen of the “LCD control” menu tab……………………………………………………………………………………73 Screen of the “NB PCIe Configuration” menu tab………………………………………………………………………74 Screen of the “Memory Configuration” manu tab……………………………………………………………………….75 Screen of the “PCH-IO Configuration” menu tab………………………………………………………………………..76 Screen of the “USB Configuration” menu tab……………………………………………………………………………78 Screen of the “Boot” menu tab…………………………………………………………………………………………….79 Screen of the “Hard Drive BBS Priorities” menu tab……………………………………………………………………81 Screen of the “CSM16 Parameters” menu tab…………………………………………………………………………..82 Screen of the “CSM parameters” menu tab……………………………………………………………………………..83 Screen of the “Security” menu tab………………………………………………………………………………………..84 Screeen of the “Save & Exit” menu tab……………………………………………………………………………….….85 All information in this document is provided for reference only, with no warranty of its suitability for any specific purpose. This information has been thoroughly checked and is believed to be entirely reliable and consistent with the product that it describes. However, Fastwel accepts no responsibility for inaccuracies, omissions or their consequences, as well as liability arising from the use or application of any product or example described in this document. Fastwel Co. Ltd. reserves the right to change, modify, and improve this document or the products described in it, at Fastwel's discretion without further notice. Software described in this document is provided on an “as is” basis without warranty. Fastwel assumes no liability for consequential or incidental damages originated by the use of this software. This document contains information, which is property of Fastwel Co. Ltd. It is not allowed to reproduce it or transmit by any means, to translate the document or to convert it to any electronic form in full or in parts without antecedent written approval of Fastwel Co. Ltd. or one of its officially authorized agents. Fastwel and Fastwel logo are trademarks owned by Fastwel Co. Ltd., Moscow, Russian Federation. CompactPCI is a trademark of the PCI industrial Computers Manufacturers Group. Ethernet is a registered trademark of Xerox Corporation. IEEE is a registered trademark of the Institute of Electrical and Electronics Engineers Inc. Intel is a trademark of Intel Corporation. Pentium M and Celeron M are trademarks of Intel Corporation. Microsoft is a trademark of the Microsoft corporation. In addition, this document may include names, company logos and trademarks, which are registered trademarks and, therefore, are property of their respective owners. Fastwel welcomes suggestions, remarks and proposals regarding the form and the content of this Manual. C P C 5 0 3 U se r M a n u a l 3 © 2 0 1 2 F a s t w e l V e r . 0 0 1 a E CPC503 Notation Conventions Warning, ESD Sensitive Device! This symbol draws your attention to the information related to electro static sensitivity of your product and its components. To keep product safety and operability it is necessary to handle it with care and follow the ESD safety directions. Warning! This sign marks warnings about hot surfaces. The surface of the heatsink and some components can get very hot during operation. Take due care when handling, avoid touching hot surfaces! Caution: Electric Shock! This symbol warns about danger of electrical shock (> 60 V) when touching products or parts of them. Failure to observe the indicated precautions and directions may expose your life to danger and may lead to damage to your product. Warning! Information marked by this symbol is essential for human and equipment safety. Read this information attentively, be watchful. Note... This symbol and title marks important information to be read attentively for your own benefit. C P C 5 0 3 U se r M a n u a l 4 © 2 0 1 2 F a s t w e l V e r . 0 0 1 a E CPC503 General Safety Precautions This product was developed for fault-free operation. Its design provides conformance to all related safety requirements. However, the life of this product can be seriously shortened by improper handling and incorrect operation. That is why it is necessary to follow general safety and operational instructions below. Warning! All operations on this device must be carried out by sufficiently skilled personnel only. Warning! When handling this product, special care must be taken not to hit the heatsink (if installed) against another rigid object. Also, be careful not to drop the product, since this may cause damage to the heatsink, CPU or other sensitive components as well. Please, keep in mind that any physical damage to this product is not covered under warranty. Note: This product is guaranteed to operate within the published temperature ranges and relevant conditions. However, prolonged operation near the maximum temperature is not recommended by Fastwel or by electronic chip manufacturers due to thermal stress related failure mechanisms. These mechanisms are common to all silicon devices, they can reduce the MTBF of the product by increasing the failure probability. Prolonged operation at the lower limits of the temperature ranges has no limitations. Caution, Electric Shock! Before installing this product into a system and before installing other devices on it, always ensure that your mains power is switched off. Always disconnect external power supply cables during all handling and maintenance operations with this module to avoid serious danger of electrical shock. C P C 5 0 3 U se r M a n u a l 5 © 2 0 1 2 F a s t w e l V e r . 0 0 1 a E CPC503 Unpacking, Inspection and Handling Please read the manual carefully before unpacking the module or mounting the device into your system. Keep in mind the following: ESD Sensitive Device! Electronic modules and their components are sensitive to static electricity. Even a non-perceptible by human being static discharge can be sufficient to destroy or degrade a component's operation! Therefore, all handling operations and inspections of this product must be performed with due care, in order to keep product integrity and operability: Preferably, unpack or pack this product only at EOS/ESD safe workplaces. Otherwise, it is important to be electrically discharged before touching the product. This can be done by touching a metal part of your system case with your hand or tool. It is particularly important to observe anti-static precautions when setting jumpers or replacing components. If the product contains batteries for RTC or memory back-up, ensure that the module is not placed on conductive surfaces, including anti-static mats or sponges. This can cause shortcircuit and result in damage to the battery and other components. Store this product in its protective packaging while it is not used for operational purposes. Unpacking The product is carefully packed in an antistatic bag and in a carton box to protect it against possible damage and harmful influence during shipping. Unpack the product indoors only at a temperature not less than +15°C and relative humidity not more than 70%. Please note, that if the product was exposed to the temperatures below 0°C for a long time, it is necessary to keep it at normal conditions for at least 24 hours before unpacking. Do not keep the product close to a heat source. Following ESD precautions, carefully take the product out of the shipping carton box. Proper handling of the product is critical to ensure correct operation and long-term reliability. When unpacking the product, and whenever handling it thereafter, be sure to hold the module preferably by the front panel, card edges or ejector handles. Avoid touching the components and connectors. Retain all original packaging at least until the warranty period is over. You may need it for shipments or for storage of the product. Initial Inspection Although the product is carefully packaged, it is still possible that shipping damages may occur. Careful inspection of the shipping carton can reveal evidence of damage or rough handling. Should you notice that the package is damaged, please notify the shipping service and the manufacturer as soon as possible. Retain the damaged packing material for inspection. After unpacking the product, you should inspect it for visible damage that could have occurred during shipping or unpacking. If damage is observed (usually in the form of bent component leads or loose socketed components), contact Fastwel's official distributor from which you have purchased the product for additional instructions. Depending on the severity of the damage, the product may even need to be returned to the factory for repair. DO NOT apply power to the product if it has visible damage. Doing so may cause further, possibly irreparable damage, as well as result in a fire or electric shock hazard. If the product contains socketed components, they should be inspected to make sure they are seated fully in their sockets. C P C 5 0 3 U se r M a n u a l 6 © 2 0 1 2 F a s t w e l V e r . 0 0 1 a E CPC503 Handling In performing all necessary installation and application operations, please follow only the instructions supplied by the present manual. In order to keep Fastwel’s warranty, you must not change or modify this product in any way, other than specifically approved by Fastwel or described in this manual. Technical characteristics of the systems in which this product is installed, such as operating temperature ranges and power supply parameters, should conform to the requirements stated by this document. Retain all the original packaging, you will need it to pack the product for shipping in warranty cases or for safe storage. Please, pack the product for transportation in the way it was packed by the supplier. When handling the product, please, remember that the module, its components and connectors require delicate care. Always keep in mind the ESD sensitivity of the product. Three Year Warranty Fastwel Co. Ltd. (Fastwel), warrants that its standard hardware products will be free from defects in materials and workmanship under normal use and service for the currently established warranty period. Fastwel’s only responsibility under this warranty is, at its option, to replace or repair any defective component part of such products free of charge. Fastwel neither assumes nor authorizes any other liability in connection with the sale, installation or use of its products. Fastwel shall have no liability for direct or consequential damages of any kind arising out of sale, delay in delivery, installation, or use of its products. If a product should fail through Fastwel's fault during the warranty period, it will be repaired free of charge. For out of warranty repairs, the customer will be invoiced for repair charges at current standard labor and materials rates. Warranty period for Fastwel products is 36 months since the date of purchase. The warranty set forth above does not extend to and shall not apply to: 1. Products, including software, which have been repaired or altered by other than Fastwel personnel, unless Buyer has properly altered or repaired the products in accordance with procedures previously approved in writing by Fastwel. 2. Products, which have been subject to power, supply reversal, misuse, neglect, accident, or improper installation. Returning a product for repair 1. Apply to Fastwel company or to any of the Fastwel's official representatives for the Product Return Authorization. 2. Attach a failure inspection report with a product to be returned in the form, accepted by customer, with a description of the failure circumstances and symptoms. 3. Carefully package the product in the antistatic bag, in which the product had been supplied. Failure to package in antistatic material will VOID all warranties. Then package the product in a safe container for shipping. 4. The customer pays for shipping the product to Fastwel or to an official Fastwel representative or dealer. C P C 5 0 3 U se r M a n u a l 7 © 2 0 1 2 F a s t w e l V e r . 0 0 1 a E Introduction 1 CPC503 Introduction 1.1 System Overview The CompactPCI (CPCI) processor module described in this Manual supports the PCI architecture. It gives a possibility to work with a wide range of equipment. To get the details about the CompactPCI standard, please refer to PCI and CompactPCI specifications. The Internet site of the PCI Industrial Computer Manufacturers Group (PICMG) provides information related to these standards (http://www.picmg.org/). 1.2 General Description of the Module CPC503 is a processor module based on the latest Intel Core i7 2nd generation processor (2/4 Cores). Low power consumption is one of the Core i7 2nd generation (2/4 Cores) advantages when at the same time it can operate at frequencies from 1.5 to 2 GHz. CPC503 utilizes the PCH QM67 chipset, including the standard peripherals of the IBM PC AT platform. It gives the module great possibilities when operating with graphics via VGA, Displayport, DVI or LVDS interfaces. Four Gigabit Ethernet ports are used for networking. Also, CPC503 is equipped with the following set of interfaces: 12 USB 2.0 ports, 4 SATA ports, Audio interface and standard J1-J5 CompactPCI connectors at the rear edge of the board for connection to CompactPCI bus. The module supports XMC/PMC expansion modules and RIO modules. The module may have on board up to 4 Gb of DDR3 SDRAM memory with ECC, operating at 1333 MHz. CPC503 supports one 64-bit 66 MHz CompactPCI interface. The module interacts with the CompactPCI bus via the integrated PCI-E<->PCI bridge. One of the features of the CPC503 module is its support of the PICMG CompactPCI Packet Switching Backplane Specification 2.16. When installed in a backplane which supports packet switching, CPC503 can communicate via both of its Gigabit Ethernet ports with other peripherals or with the system master board which also supports this mode. The CPC503 module operational consistency allows using it in all industrial applications. The components of CPC503 are carefully selected according to the criteria of applicability in embedded systems and long-term availability on the market. This makes this module an ideal device, based on which the systems with long life cycle can be built. CPC503 is compatible with Windows 7, QNX 6.5.0, and Linux® 2.6 operating systems. C P C 5 0 3 U se r M a n u a l 8 © 2 0 1 2 F a s t w e l V e r . 0 0 1 a E Product General Information 2 CPC503 Product General Information 2.1 CPC503 Key Parameters CPC503 is a 6U CompactPCI processor module built on the basis of Intel Core i7 2nd generation, specifically designed for application in highly integrated platforms for industrial purposes. CPC503 key parameters For CPC503-01: Intel Core i7 2nd generation processor (2/4 Cores): Core i7-2715QE: Cache 6 MB, 4 C, 2.1 GHz, SV 45 W; Core i7-3555LE 4 MB 2C 2.5 GHz LV 25 W; Core i7-2610UE: Cache 4 Mbyte, 2 C, 1.5 GHz, ULV 17 W. For CPC503-02: Core i7-3612QE 6 MB 4C 2.1 GHz SV 35 W; Core i7-2655LE: Cache 4 Mbyte, 2 C, 2.2 GHz, LV 25 W; Core i7-3517UE 4 MB 2C 1.7 GHz ULV 17 W. PCH QM67 chipset: Highly integrated interface controller, including standard peripherals of IBM PC AT platform. Random access memory: For CPC503-01: DDR3 SDRAM 1333 MHz with ECC up to 4 GB, soldered, dual channel. For CPC503-02: DDR3L SDRAM 1600 MHz with ECC up to 8 GB, soldered, dual channel. Video output: DVI-I interface is routed to the front panel (VGA 2048x1536@75 Hz or DVI-D 920х1200@60 Hz); DVI-D interface is routed to RIO module (through DisplayPort eDP (embedded)); DisplayPort interface (resolution up to 2560х1600@60 Hz) is routed to the front panel; DisplayPort interface (resolution up to 2560х1600@60 Hz) is routed to RIO module (to the XS10 interface for connection of mezzanine expansion module); Simultaneous operation of two interfaces is possible (for CPC503-01); Simultaneous operation of three interfaces is possible (for CPC503-02); PCI bus: routed to Compact PCI J1/J2 connectors 64 bit / 66 MHz; realized on the PI7C9X130 PCI-E->PCI-X bridge; non-system slot operation (Non-Transparent Bridge mode). LPC bus: routed to P16 XMC connector; routed to RIO module. PCI-E bus (for CPC503-01): PCI-E 2.0 support (up to 5 GT/s); routed to P15 XMC connector, supporting up to x8 devices; routed to CPCI J3 connector, supporting up to x4 devices; C P C 5 0 3 U se r M a n u a l 9 © 2 0 1 2 F a s t w e l V e r . 0 0 1 a E Product General Information CPC503 XMC conforms to ANSI/VITA 42.3 specification. PCI-E bus (for CPC503-02): -PCI-E 3.0 (up to 8 GT/s) routed to P15 XMC connector, supporting up to x8 devices; -PCI-E 2.0 (up to 5 GT/s) routed to CPCI J3/P3 connector, supporting up to х4 devices; XMC, compatible with ANSI/VITA 42.3 specification.; SMBUS: conforms to 2.0 specification; speed up to 100 Kbit/s. FLASH BIOS: 64 Mbit SPI-Flash. NAND FLASH-disc: integrated 4-channel NAND controller (up to 100 MB/s); connected to SATA4 interface. NAND soldered: 4 GB (CPC503-01), 8 GB (CPC503-02); SATA interface: one channel is available at P16 XMC connector; one channel is used for connection of 1.8" HDD (in the scope of delivery is not included); two channels are available via RIO module. SPI interface: support of FRAM; frequency up to 25 MHz. Four LAN 10/100/1000 Mbit ports on PCI-E x4 Gen2: two ports switchable between P16 XMC connector and RIO module; two ports available at the front panel; PICMG 2.16 support; server network adapter. USB ports: support of USB 1.1 (12 Mbit/s), USB 2.0 (480 Mbit/s); connection of up to 4 devices via front panel interfaces; 2x interfaces are routed to P16 XMC connector; 2x USB 3.0 interfaces are routed to P16 XMC (for CPC503-02); 6x interfaces are routed to RIO module. FRAM memory: 32 KB: 1 KB for BIOS Setup parameters storage and 31 KB for storage of user data; realized on SPI bus. Real-time clock: power supply from CR2032 battery (3 V); Audio support: HD Audio interface is available at P16 XMC connector and RIO module. Watchdog timer: Integrated programmable watchdog timer. Hardware monitor: realized via PECI/SMBUS interfaces; three power voltages monitoring; C P C 5 0 3 U se r M a n u a l 10 © 2 0 1 2 F a s t w e l V e r . 0 0 1 a E Product General Information CPC503 CPU temperature monitoring; PCB temperature monitoring. XMC/PMC expansion modules support: one XMC/PMC expansion module can be installed; PCI X 64 bit/133 MHz bus is routed to P11-P14 PMC connectors (ANSI/VITA 39, PCI-X on PMC); PMC I/O P14 are routed to RIO modules (PICMG 2.0); PCI-E x8 Gen2 bus is routed to P15 XMC connector (ANSI/VITA 42.3, XMC PCI Express Protocol Standard); -PCI-E bus x8 Gen3 routed to P15 XMC connector (ANSI/VITA 42.3, XMC PCI Express Protocol Standard) (for CPC503-02); additional interfaces (1xSATA, 2xUSB, LPC, HD-Audio, 2xEthernet) are routed to P16 XMC connector. For CPC503-02: 2x USB 3.0 Indication: two-color light-emitting diode of the module startup diagnostic (green) / power supply mode indicator (blue); LED indicator of SATA drives activity; overheat indicator; program-controlled red-green (user) LED. Software compatibility with OS Linux 2.6; QNX 6.5.0; Windows 7 (Windows embedded standard 7). Supply voltage: supply voltage +5 V, +3.3 V, +12 V, -12 V from CPCI bus. Operating temperature: industrial performance: from -40C up to +85C; commercial performance: from 0C up to +70 оC. Tolerance to single shocks/vibration: 30g/2g;. Module dimensions: 266,1 mm х 212,5 mm × 21 mm (with R1 heat-sink); 266,1 mm х 212,5 mm × 42 mm (with R2 heat-sink). Maximum weight: - With R1 heat-sink: no more than 0,700 kg; with R2 heat-sink: no more than 0,960 kg Mean time between failures (MTBF): not less than 60,000 hours. CPC503 conforms to the fillowing PICMG/VITA specifications PICMG 2.0 Compact PCI r3.0 PICMG 2.3 PMC I/O r.1.0 PICMG 2.16 Packet Switching Backplane r.10 ANSI/VITA 39, PCI-X on PMC ANSI/VITA 42.0, XMC ANSI/VITA 42.3, XMC PCI Express Protocol Standard C P C 5 0 3 U se r M a n u a l 11 © 2 0 1 2 F a s t w e l V e r . 0 0 1 a E Product General Information 2.2 CPC503 CPC503 Versions At the present time, the module is offered in flexible configuration. Other configuration options are available upon request. The customer can choose necessary configuration options using the following template: Figure 2-1: CPC503 Versions Example: CPC503 – 01 – i72C1.5 – RAM4G – R1 – C - options 6U CompactPCI processor module, Core i7-2610UE CPU (Cache 4 MB, 2 C, 1.5 GHz, ULV 17 W), 4 GB soldered DDR3 SDRAM, Low profile heatsink (4HP), Commercial operating temperature range, 0C to +70C. Other options: Protective coating, Linux 2.6. Delivery checklist: 1. CPC503 Module 2. Fastening elements for installing HDD: - Fixing device . . . . . . . . . . . . . . 1 pcs. DIN7985 M2 screw 5×6 . . . . . . 2 pcs. DIN6798A washer 2,5 . . . . . . . 2 pcs. 3. C P C 5 0 3 Package U se r M a n u a l 12 © 2 0 1 2 F a s t w e l V e r . 0 0 1 a E Product General Information 2.3 CPC503 CPC503 Package Contents CPC503 package includes: CPC503 module; Hard drive mounting kit: 1. Gasket 1 pce. 2. Chuck 1 pce. 3. M2,5 screw – 2 pcs. 4. M2,5 Washer – 2 pcs. 2.4 CPC503 Packaging Information CPC503 module is supplied in a box with 350х260х70 mm dimensions. 2.5 Possibilities of the System Expansion Number of interfaces routed from CPC503 module can be expanded by means of: installation of XMC/PMC expansion module; connection of RIO587 module. 2.5.1 PMC/XMC Modules CPC503 module PMC/XMC interface supports XMC/PMC expansion modules, allowing easily and pliably adapting CPC503 to the requirements of various applications (see subsection 3.2.1 PMC/XMC). 2.5.2 Rear I/O RIO587 Expansion Module RIO587 module expands CPC503 input/output functionality and capabilities, when mounted at the back of the system chassis. C P C 5 0 3 U se r M a n u a l 13 © 2 0 1 2 F a s t w e l V e r . 0 0 1 a E Product General Information 2.6 Table 2-1: CPC503 System Information System Information Subject Comment Operation in the system slot as the System Master CPC503 module is designed for use as the system master. It can support up to seven peripheral boards via the 64-bit 33/66 MHz bus. It may, however, be operated in a peripheral slot. In this case CPC503 is connected to PCI bus via the “nontransparent” bridge. Operation in the system peripheral slot When installed in the system peripheral slot, CPC503 module is connected to PCI bus via the “nontransparent” bridge. CPC503 receives power from the backplane and can be operated with Rear I/O and in the packets switching mode (if the system supports this mode), supporting up to two Gigabit Ethernet channels. Operating systems CPC503 can work in the following operating systems: Linux 2.6; QNX 6.5.0; Windows 7 (Windows embedded standard 7). 2.7 CPC503 Diagrams The diagrams in this section give visual information about the CPC503 module design, its appearance, connectors and components layout. The diagrams may not reflect insignificant differences between the CPC503 versions. C P C 5 0 3 U se r M a n u a l 14 © 2 0 1 2 F a s t w e l V e r . 0 0 1 a E Product General Information 2.7.1 CPC503 Block Diagram CPC503 Block Diagram Gigabit Ethernet Figure 2-2: IMVP-7 VR PECI PCI-E X4 PCI-E x4 Gen2 Switch PCI-E/PCI-X Bridge PI7C9x130 eDP Hot-Swap Buffers CPCI J1/J2 DisplayPort USB SATA PCI _E x4 FDI DMI PCI Bus 64bit/66Mhz Quad Gigabit Ethernet i82580 Eth2 Front Panel Power Switch Eth1 PCI-E x4 Gen1 SATA 0,1 CPCI J3 PCI-E x8 Gen2 Core i7 2 generation ECC CPU 2C/4C BGA nd USB 6-11 Ports Ch2 Soldered DDR3 SDRAM 2 GB Gigabit Ethernet Ch1 Soldered DDR3 SDRAM 2 GB SSD Controller SM2242 DisplayPort NAND 4 GB DisplayPort _B+VGA DisplayPort LVDS DisplayPort D PCH QM67 SMBUS USB 0-3 USB 0-3 SATA 2 Hardware Monitor LM87 PECI<->I2C Translator PECI 1.8" HDD Connector PCI-E/PCI-X Bridge PI7C9x130 XMC Connector P15 PCI-X 64Bit/66Mhz PMC Connector P11-P14 SATA 3 LPC Interface Edjector Switch XMC Connector P16 LPC SPI FRAM M a n u a l +V3.3S Power +5VS FPGA XC3S250 Power Switches 15 CPCI J5 4xLED SPI BIOS 64 Mbit PCI-E x4 Gen1 XMC2 SPI USB 4,5 U se r HD AUDIO Link HDAUDIO DisplayPort C CK505 C P C 5 0 3 CPCI J4 LVDS SD Interface PMC I/O 64 DVI-I SATA 4 © 2 0 1 2 F a s t w e l V e r . 0 0 1 a E Product General Information 2.7.2 CPC503 Module Appearance Figure 2-3: CPC503 Module Appearance with R1 Heatsink The appearance may vary for different versions of the module. This photo shows CPC503 with R1 heatsink installed (4HP). C P C 5 0 3 U se r M a n u a l 16 © 2 0 1 2 F a s t w e l V e r . 0 0 1 a E Product General Information 2.7.3 CPC503 Module Layout Figure 2-4: CPC503 Module Layout: Top Side The layout may slightly differ for various versions of the module. C P C 5 0 3 U se r M a n u a l 17 © 2 0 1 2 F a s t w e l V e r . 0 0 1 a E Product General Information 2.7.4 CPC503 Module Dimensions Figure 2-5: CPC503 Module Dimensions. CPC503 4HP Front Panel The appearance may vary for different versions of the module. Figure 2-6: C P C 5 0 3 U se r CPC503 8HP Front Panel M a n u a l 18 © 2 0 1 2 F a s t w e l V e r . 0 0 1 a E Detailed Description 3 CPC503 Detailed Description 3.1 Functional Nodes Operation Features Intel Core i7 2nd generation processor 64-bit Intel microprocessor is designed according to the 32 nm technology. It represents a highly integrated solution, combining 2/4 processor cores, as well as the SDRAM/DDR3 two-channel controller with ECC memory support and graphics adapter with 3D/2D acceleration. Microprocessor is oriented on the embedded systems market and is made in BGA chassis. PCH QM67 chipset The highly integrated interfaces controller includes the standard IBM PC AT platform peripherals: USB, SATA, SPI, LPC, SMBUS, Audio, DisplayPort, VGA, DVI. Random access memory The module may have up to 4 Gb of DDR3-1333 memory with ECC (two-channel). No memory expansion module installation is applicable. BIOS SPI bus-based 64 Mbit Flash microchip (or two 32 Mbit chips) is used for BIOS. RTC, CMOS The real-time clock is embedded into PCH. When the supply is off, the clock operability is ensured by a lithium battery installed on board. BIOS Setup settings are saved in FRAM. FRAM Non-volatile 32 KB memory, can be used for storage of user data and for BIOS SETUP parameters. 1 Kb for BIOS Setup parameters storage; 31 Kb for storage of user data; Realized on SPI bus. NAND Flash 4 GB SSD is implemented on board on SATA interface. integrated 4-channel NAND controller (up to 100 MB/s); connected to SATA4 interface. Ethernet CPC503 module contains 4 integrated Gigabit Ethernet interfaces. Two of them are switched between P16 XMC connector or backplane (PICMG 2.16). The switching is performed in BIOS Setup menu. Two controllers are routed to the front panel. The interfaces are implemented on Intel i82580, the high-speed server controller. Note If the Gigabit Ethernet channel output is configured for the backplane (PICMG 2.16), the Gigabit Ethernet interfaces on P16 XMC, corresponding to this channel, will be disabled. C P C 5 0 3 U se r M a n u a l 19 © 2 0 1 2 F a s t w e l V e r . 0 0 1 a E Detailed Description CPC503 USB 2.0 The module has 12 USB 2.0 channels: 4 channels are routed to USB type A interfaces on the front panel, 2 channels are routed to XMC and 4 – to RIO module. SATA Four interfaces for connection of drives: one interface is routed to P16 XMC connector. One interface is routed to a socket for connection of 1.8" HDD. Two interfaces are routed to RIO module. DVI-I The port is designed for connection of VGA analog monitor (2048x1536@75 Hz) or DVI-D digital monitor (1920х1200@60 Hz). It is located on the front panel. DisplayPort Interfaces are designed for connection of digital monitors with 2,560х1,600@60 Hz resolution. One interface is routed to the front panel, two interfaces – to RIO module. PCI-E PCI-E Gen2 bus is routed to P15 XMC connector according to ANSI/VITA 42.3 standard. The interface allows connecting XMC expansion modules with x1, х2, х4, х8 links set (up to 5 GT/s). PCI PCI bus is implemented on the Pericom PI7C9X130 bridge microchip connected to PCI-E x4 bus. The following operating modes are supported: PCI 32bit/33Mhz, PCI 64bit/66Mhz. Operations can be carried out both in the system and in the peripheral slots. SPI Interface is implemented in FPGA on LPC bus. FRAM microchip is supported (located on board). Maximum clock speed – 25 MHz. Audio Support can be realized via RIO or XMC module. Indication LED indicators of startup, overheat, drives activity, user-defined indicators are routed to the front panel: Diagnostic indicator (SYS, two-color green/blue) allows distinguishing 4 module states: power off, power on, BIOS startup, BIOS closure (OS startup), see subsection 3.2.4. Drives (SA) activity indicator informs of SATA drives activity. Program-controlled GP LED is intended for user-defined purposes (two-color red/green). Overheat indicator (OVH). Watchdog Hardware reset timer is implemented in FGPA on LPC bus. Power reset and monitoring Microprocessor reset signal is generated from the following sources: from supervisor at power-up; from “Reset” button (located in Ejector Switch handle); from watchdog timer; from PCI bus Reset# signal (in Slave mode). Switches (jumpers) X2 switch is implemented on board: resetting BIOS Setup to defaults. C P C 5 0 3 U se r M a n u a l 20 © 2 0 1 2 F a s t w e l V e r . 0 0 1 a E Detailed Description 3.2 3.2.1 CPC503 Module Interfaces PMC/XMC Interface On the top side of CPC503 module plate there are connectors for PMC/XMC expansion modules (see Figure CPC503 Module Layout: Top Side). CPC503 supports one XMC/PMC expansion module: 64-bit/133MHz PCI-X bus is routed to P11-P14 PMC connectors (ANSI/VITA 39, PCI-X on PMC); PMC I/O P14 is routed to RIO module (PICMG 2.0); PCI-E x8 Gen2 bus is routed to P15 XMC connector (ANSI/VITA 42.3, XMC PCI Express Protocol Standard); Additional interfaces (1xSATA, 2xUSB, LPC, HD-Audio, 2xEthernet) are routed to P16 XMC connector. 3.2.1.1 XMC Interface For XMC expansion module CPC503 plate has XS8 (P15) and XS9 (P16) connectors on board. Figure 3-1: XMC XS8 (P15) and XS9 (P16) Connectors XMC connector pinouts follow on next page. C P C 5 0 3 U se r M a n u a l 21 © 2 0 1 2 F a s t w e l V e r . 0 0 1 a E Detailed Description Table 3-1: CPC503 Designation of XMC XS8 (P15) Connector Pins on CPC503 Module Plate P15 Pin A B C D E F 1 RX0+ RX0- +3.3V RX1+ RX1- +5V 2 GND GND TRST# GND GND PCIRST# 3 RX2+ RX2- +3.3V RX3+ RX3- +5V 4 GND GND TCK GND GND RSTO# 5 RX4+ RX4- +3.3V RX5+ RX5- +5V 6 GND GND TMS GND GND +12V 7 RX6+ RX6- +3.3V RX7+ RX7- +5V 8 GND GND TDI GND GND -12V 9 NC NC NC NC NC +5V 10 GND GND NC GND GND GA0 11 TX0+ TX0- GA1 TX1+ TX1- +5V 12 GND GND GND GND GND PRSNT# 13 TX2+ TX2- +3.3V_SBY TX3+ TX3- +5V 14 GND GND GA2 GND GND MSDA 15 TX4+ TX4- NC TX5+ TX5- +5V 16 GND GND MVMRO GND GND MSCL 17 TX6+ TX6- NC TX7+ TX7- NC 18 19 GND CLK0+ GND CLK0- NC NC GND WAKE# GND ROOT# NC NC Table 3-2: Designation of XMC XS9 (P16) Connector Pins on CPC503 Module Plate P16 Pin A B C D E F 1 MDI_4_0- MDI_4_0+ LED_2_0 NC NC +5V 2 GND GND LED_2_1 GND GND +5V 3 MDI_4_1- MDI_4_1+ LED_2_2 NC NC +3.3V 4 GND GND LED_2_3 GND GND +3.3V 5 MDI_4_2- MDI_4_2+ LED_3_0 SATA3_RX- SATA3_RX+ LPC_AD0 6 GND GND LED_3_1 GND GND LPC_AD1 7 MDI_4_3- MDI_4_3+ LED_3_2 SATA3_TX- SATA3_TX+ LPC_AD2 8 GND GND LED_3_3 GND GND LPC_AD3 9 MDI_3_0- MDI_3_0+ ACT_LED# NC NC LPC_FRAME# 10 GND GND USB_OC45# GND GND DRQ#0 11 MDI_3_1- MDI_3_1+ HDA_DOCK_EN# NC NC DRQ#1 12 GND GND HDA_DOCK_RST# GND GND SERIRQ 13 MDI_3_2- MDI_3_2+ HDA_BIT_CLK# NC NC PCIRST# 14 GND GND HDA_SYNC GND GND A20_GATE 15 MDI_3_3- MDI_3_3+ HDA_SDOUT NC NC LPC_CLK 16 GND GND HDA_RST# GND GND RC_IN# 17 USB4- USB4+ HDA_SDIN0 NC NC SIO_CLK 18 GND GND HDA_SDIN1 GND GND SUSCLK 19 USB5- USB5+ HDA_SPKR NC NC LPCBOOT C P C 5 0 3 U se r M a n u a l 22 © 2 0 1 2 F a s t w e l V e r . 0 0 1 a E Detailed Description 3.2.1.2 CPC503 PMC Interface PMC expansion modules are inserted into XS10 (P11), XS11 (P13), XS12 (P12) and XS13 (P14) connectors. Figure 3-2: PMC XS10 (P11), XS11 (P13), XS12 (P12) and XS13 (P14) Connectors 64-bit PCI bus lines are routed to PMC connectors. User-defined input/output signals are supported, they are also routed to the CompactPCI J5 connector. PMC interface complies with the IEEEP1386.1 specification which defines PCI electric interface for the boards of CMC (Common Mezzanine Cards) form factor. CPC503 allows operation of PCI bus with PMC 3.3 V. In order to reduce consumption currents, PMC modules support can be disabled in BIOS Setup. Note: PMC input/output signal are sent to the CompactPCI J5 connector which pins designation is described below in this chapter. PMC connector pinouts follow on next page. C P C 5 0 3 U se r M a n u a l 23 © 2 0 1 2 F a s t w e l V e r . 0 0 1 a E Detailed Description Table 3-3: CPC503 PMC Connectors XS10 (P11), XS11 (P13), XS12 (P12) and XS13 (P14) Pinouts Pin XS10 Signal (P11) C P C 5 0 3 Pin XS12 (P12) Signal Pin XS11 (P13) Signal Pin XS13 (P14) Signal P1_1 TCK P2_1 +12V P3_1 NC P4_1 PMC_I/O P1_2 -12V P2_2 TRST# P3_2 GND P4_2 PMC_I/O P1_3 GND P2_3 TMS P3_3 GND P4_3 PMC_I/O P1_4 INTD# P2_4 TDO P3_4 C_BE7# P4_4 PMC_I/O P1_5 INTE# P2_5 TDI P3_5 C_BE6# P4_5 PMC_I/O P1_6 INTF# P2_6 GND P3_6 C_BE5# P4_6 PMC_I/O P1_7 NC P2_7 GND P3_7 C_BE4# P4_7 PMC_I/O P1_8 VCC P2_8 NC P3_8 GND P4_8 PMC_I/O P1_9 INTG# P2_9 NC P3_9 VIO P4_9 PMC_I/O P1_10 NC P2_10 NC P3_10 PAR64 P4_10 PMC_I/O P1_11 GND P2_11 PULL_UP P3_11 AD63 P4_11 PMC_I/O P1_12 NC P2_12 +3.3V P3_12 AD62 P4_12 PMC_I/O P1_13 PCICLK P2_13 PCIRST# P3_13 AD61 P4_13 PMC_I/O P1_14 GND P2_14 PULL_DOWN P3_14 GND P4_14 PMC_I/O P1_15 GND P2_15 +3.3V P3_15 GND P4_15 PMC_I/O P1_16 GNT# P2_16 PULL_DOWN P3_16 AD60 P4_16 PMC_I/O P1_17 REQ# P2_17 PME# P3_17 AD59 P4_17 PMC_I/O P1_18 VCC P2_18 GND P3_18 AD58 P4_18 PMC_I/O P1_19 VIO P2_19 AD30 P3_19 AD57 P4_19 PMC_I/O P1_20 AD31 P2_20 AD29 P3_20 GND P4_20 PMC_I/O P1_21 AD28 P2_21 GND P3_21 VIO P4_21 PMC_I/O P1_22 AD27 P2_22 AD26 P3_22 AD56 P4_22 PMC_I/O P1_23 AD25 P2_23 AD24 P3_23 AD55 P4_23 PMC_I/O P1_24 GND P2_24 +3.3V P3_24 AD54 P4_24 PMC_I/O P1_25 GND P2_25 IDSEL(AD19) P3_25 AD53 P4_25 PMC_I/O P1_26 C_BE3# P2_26 AD23 P3_26 GND P4_26 PMC_I/O P1_27 AD22 P2_27 +3.3V P3_27 GND P4_27 PMC_I/O P1_28 AD21 P2_28 AD20 P3_28 AD52 P4_28 PMC_I/O P1_29 AD19 P2_29 AD18 P3_29 AD51 P4_29 PMC_I/O P1_30 VCC P2_30 GND P3_30 AD50 P4_30 PMC_I/O P1_31 VIO P2_31 AD16 P3_31 AD49 P4_31 PMC_I/O P1_32 AD17 P2_32 C_BE2# P3_32 GND P4_32 PMC_I/O P1_33 FRAME# P2_33 GND P3_33 GND P4_33 PMC_I/O P1_34 GND P2_34 IDSELB(AD20) P3_34 AD48 P4_34 PMC_I/O P1_35 GND P2_35 TRDY# P3_35 AD47 P4_35 PMC_I/O P1_36 IRDY# P2_36 +3.3V P3_36 AD46 P4_36 PMC_I/O P1_37 DEVSEL# P2_37 GND P3_37 AD45 P4_37 PMC_I/O P1_38 VCC P2_38 STOP# P3_38 GND P4_38 PMC_I/O P1_39 GND P2_39 PERR# P3_39 VIO P4_39 PMC_I/O P1_40 LOCK# P2_40 GND P3_40 AD44 P4_40 PMC_I/O P1_41 SCL P2_41 +3.3V P3_41 AD43 P4_41 PMC_I/O P1_42 SDA P2_42 SERR# P3_42 AD42 P4_42 PMC_I/O P1_43 PAR P2_43 C_BE1# P3_43 AD41 P4_43 PMC_I/O P1_44 GND P2_44 GND P3_44 GND P4_44 PMC_I/O P1_45 VIO P2_45 AD14 P3_45 GND P4_45 PMC_I/O P1_46 AD15 P2_46 AD13 P3_46 AD40 P4_46 PMC_I/O P1_47 AD12 P2_47 M66EN P3_47 AD39 P4_47 PMC_I/O P1_48 AD11 P2_48 AD10 P3_48 AD38 P4_48 PMC_I/O P1_49 AD9 P2_49 AD8 P3_49 AD37 P4_49 PMC_I/O P1_50 VCC P2_50 +3.3V P3_50 GND P4_50 PMC_I/O P1_51 GND P2_51 AD7 P3_51 GND P4_51 PMC_I/O P1_52 C_BE0# P2_52 NC P3_52 AD36 P4_52 PMC_I/O P1_53 AD6 P2_53 +3.3V P3_53 AD35 P4_53 PMC_I/O P1_54 AD5 P2_54 NC P3_54 AD34 P4_54 PMC_I/O P1_55 AD4 P2_55 NC P3_55 AD33 P4_55 PMC_I/O P1_56 GND P2_56 GND P3_56 GND P4_56 PMC_I/O P1_57 VIO P2_57 NC P3_57 VIO P4_57 PMC_I/O P1_58 AD3 P2_58 EREADY P3_58 AD32 P4_58 PMC_I/O P1_59 AD2 P2_59 GND P3_59 NC P4_59 PMC_I/O P1_60 AD1 P2_60 RSTOUT# P3_60 NC P4_60 PMC_I/O P1_61 AD0 P2_61 ACK64# P3_61 NC P4_61 PMC_I/O P1_62 VCC P2_62 +3.3V P3_62 GND P4_62 PMC_I/O P1_63 GND P2_63 GND P3_63 GND P4_63 PMC_I/O P1_64 REQ64# P2_64 NC P3_64 NC P4_64 PMC_I/O U se r M a n u a l 24 © 2 0 1 2 F a s t w e l V e r . 0 0 1 a E Detailed Description 3.2.2 CPC503 SATA Interface XP7 connector (located on the top side of CPC503 module plate, see Figure CPC503 Module Layout: Top Side) allows connecting the 1.8” drive with SATA interface to CPC503 module. It is possible to install a 5 mm-high drive together with PMC/MMC expansion module. Table 3-4: SATA Connector XP7 Pinout XP7 3.2.3 Pin Signal S1 GND S2 TX+ S3 TX- S4 GND S5 RX- S6 RX+ S7 GND P1 +3.3V P2 +3.3V P3 GND P4 GND P5 +5V P6 +5V P7 NC P8 NC P9 NC Connectors on CPC503 Front Panel 3.2.3.1 USB CPC503 contains 12 USB 2.0 ports, four of which are located on the front panel, see Figure CPC503 Module Dimensions. CPC503 4HP Front Panel and Figure CPC503 8HP Front Panel. All ports support high-speed, full-speed, and low-speed operation. Hi-speed USB 2.0 supports data transfer rate of up to 480 Mb/s. One USB device may be connected to each port. To connect more than eight USB devices use an external hub. The USB power supply is protected by a self-resettable 500 mA fuse. Figure 3-3: USB Connectors on CPC503 Front Panel 1234 C P C 5 0 3 U se r M a n u a l 25 © 2 0 1 2 F a s t w e l V e r . 0 0 1 a E Detailed Description Table 3-5: 3.2.3.2 CPC503 USB Connectors Pinouts Pin Signal Function 1 VCC VCC signal 2 UV0- Differential USB- 3 UV0+ Differential USB+ 4 GND GND signal Gigabit Ethernet The CPC503 board includes two 10Base-T/100Base-TX/1000Base-T Ethernet ports based on i82580 Gigabit Ethernet controller. (see Figure CPC503 Module Dimensions. CPC503 4HP Front Panel and Figure CPC503 8HP Front Panel). The interfaces provide auto-detection and switching between 10Base-T, 100Base-TX and 1000Base-T operation modes. Figure 3-4: RJ45 Gigabit Ethernet Connectors Act Link 1 1 Using BIOS setup program or user program, each of the two Ethernet channels can be independently disabled for releasing the system resources. Table 3-6: Pinouts of Gigabit Ethernet Connectors 10Base-T 100Base-TX 1000Base-T Pin I/O Signal I/O Signal I/O Signal 1 O TX+ O TX+ I/O BI_DA+ 2 O TX– O TX– I/O BI_DA– 3 I RX+ I RX+ I/O BI_DB+ 4 – – – – I/O BI_DC+ 5 – – – – I/O BI_DC– 6 I RX– I RX– I/O BI_DB– 7 – – – – I/O BI_DD+ 8 – – – – I/O BI_DD– Integrated Ethernet LEDs Line (green): This LED indicates network connection. The LED lights up when the line is connected. C P C 5 0 3 U se r M a n u a l 26 © 2 0 1 2 F a s t w e l V e r . 0 0 1 a E Detailed Description CPC503 Act (green): This LED monitors network activity. The LED lights up when network packets are sent or received through the RJ45 port. When this LED is not lit, it means that the computer is not sending or receiving network data. 3.2.3.3 DVI-I DVI-I interface on CРC503 front panel (see Figure CPC503 Module Dimensions. CPC503 4HP Front Panel and Figure CPC503 8HP Front Panel) s designed for connection of VGA analog monitor (2048x1536@75 Hz) or DVI-D digital monitor (1920х1200@60 Hz). Figure 3-5: DVI-I Connector on CPC503 Front Panel Table 3-7: DVI Connector XS5 Pinout XS5 (DVI) C P C 5 0 3 U se r M a n u a l Pin Signal 1 2 3 4 5 6 7 8 9 10 11 12 13 14 15 16 17 18 19 20 21 22 23 24 25 26 27 28 29 DATA2DATA2+ GND NC NC DDC_CLK DDC_DAT VSYNC DATA1DATA1+ GND NC NC +5V GND HP_DETECT DATA0DATA0+ GND NC NC GND CLOCK+ CLOCKRED GREEN BLUE HSYNC GND 27 © 2 0 1 2 F a s t w e l V e r . 0 0 1 a E Detailed Description 3.2.3.4 CPC503 DisplayPort DisplayPort interface on CРC503 front panel (see Figure CPC503 Module Dimensions. CPC503 4HP Front Panel and Figure CPC503 8HP Front Panel) is designed for connection of digital monitors with the 2,560х1,600@60Hz resolution. The interface also allows connecting DVI-D monitors via the passive adapter. Figure 3-6: DisplayPort Connector Table 3-8: DisplayPort Connector XS6 Pinout XS6 (DP) 3.2.4 Pin Signal 1 LANE0+ 2 GND 3 LANE0- 4 LANE1+ 5 GND 6 LANE1- 7 LANE2+ 8 GND 9 LANE2- 10 LANE3+ 11 GND 12 LANE3- 13 AUX_EN# 14 CONFIG2 15 AUX+ 16 GND 17 AUX- 18 HP_DETECT 19 GND 20 +3.3V LED Indicators on CPC503 Front Panel The following light-emitting diodes are located on CРC503 front panel (Figure CPC503 Module Dimensions. CPC503 4HP Front Panel and Figure CPC503 8HP Front Panel): Diagnostic indicator (SYS, two-color green/blue) allows distinguishing 4 module states: power off, power on, BIOS startup, BIOS closure (OS startup). Drives (SA) activity indicator informs of SATA drives activity. C P C 5 0 3 U se r M a n u a l 28 © 2 0 1 2 F a s t w e l V e r . 0 0 1 a E Detailed Description CPC503 Program-controlled GP LED is intended for user-defined purposes (two-color red/green). See subsection 3.4 SPI Controller / LEDs / GPIO. Overheat indicator (OVH). Figure 3-7: LED Indicators on CPC503 Front Panel Table 3-9: CPC503 Module SYS LED State SYS LED State Off Power to the module is not supplied Light blue The module is powered up, the PCI bus is disabled, the processor stopped Blinking blue Module in the process of disconnection Blinks green ~8Hz The processor is running on the execution of the BIOS Blinks green ~1Hz The processor executes the POST Light green The POST is completed, you are booting the OS SYS LED indicates of CPC503 module malfunctions to user (see subsection 6 CPC503 module troubleshooting). 3.2.5 CompactPCI Interface CPC503 has a flexible configurable CompactPCI interface. If the module plate is installed in the system slot, the PCIE-PCI bridge operates in the PCI bus master mode, and if the module plate is installed in the peripheral slot, the bridge operates in the nontransparent mode. If the support of the CompactPCI bus exchange is not required, for the purpose of reduction of consumption currents the bridge can be disabled in BIOS Setup. 3.2.5.1 Operation in the System Slot (System Master) Being installed in the system slot, CPC503 can exchange information with all other CompactPCI modules via the 64-bit Pericom PI7C9X130 PCIE-PCI bridge, operating at 33\66 Mhz. The module supports operation with maximum seven CompactPCI devices via the passive backplane (for 33 MHz), in the BUS Master mode 6 devices can work. The module supports 3.3 V and 5 V PCI bus levels. The module fully conforms to PCI Local Bus Specification Rev. 3.0. C P C 5 0 3 U se r M a n u a l 29 © 2 0 1 2 F a s t w e l V e r . 0 0 1 a E Detailed Description 3.2.5.2 CPC503 Operation in the Peripheral Slot (Slave Mode) In the peripheral slot the bridge operates in the nontransparent mode, herewith providing a possibility of data exchange via PCI bus. 3.2.5.3 Packet Switching Backplane PICMG 2.16 Two Gigabit Ethernet ports are available on the CPC503 ХР9 (J3) connector in accordance with the PICMG specification for CompactPCI module backplanes with packets switching (CompactPCI Packet Switching Backplane Specification PICMG 2.16, version 1.0). These two nodes (Gigabit Ethernet 1 and 2) are connected in the chassis via the CompactPCI packets switching backplane to the “A” and “B” Fabric slots respectively. These PICMG 2.16 features can be used both in the system and in the peripheral slots. If the backplane 2.16 is not used, Ethernet can be switched to XMC P16 connector. 3.2.5.4 Handle switch The microswitch is located in the lower handle of CPC503 front panel. It is routed to XP1 connector on the board. Opening the handle leads to actuation of the module switch-off procedure. Shortterm pressing on the microswitch leads to the module reset. The switch operation mode can be changed in BIOS Setup. 3.2.5.5 Power supply mode LED (SYS) Located on the CPC503 front panel, the blue SYS LED is intended for indication of the module power supply mode. It is used for information that the shutdown process is completed and the module plate is ready to be removed from the slot, see Table CPC503 Module SYS LED State. C P C 5 0 3 U se r M a n u a l 30 © 2 0 1 2 F a s t w e l V e r . 0 0 1 a E Detailed Description 3.2.6 CPC503 CompactPCI Connectors CompactPCI connectors (J1 – J5 in accordance with the CompactPCI specification) Figure 3-8: 22 The complete set of CompactPCI connectors consists of five connectors (from J1 to J5). Their functional are as follows: XS14 (J5) 1 25 J1 and J2: 64-bit CompactPCI interface, including PCI bus signals, arrangement of access to the bus, synchronization and power. J3 has Rear I/O and PICMG 2.16 interface functionality. J4 and J5 ensure additional functions of Rear I/O interface. The CPC503 module is designed in accordance with CompactPCI bus architecture. The CompactPCI standard is electrically identical to the PCI local bus, however, these systems are improved to allow their use in harsh industrial environment with increased number of expansion connectors. XS15 (J4) 1 19 XP9 (J3) 1 22 XS16 (J2) 1 25 XS17 (J1) Note: Pinrows F and Z are GND pins C P C 5 0 3 1 F E DC BA Z U se r M a n u a l 31 © 2 0 1 2 F a s t w e l V e r . 0 0 1 a E Detailed Description 3.2.6.1 CPC503 CompactPCI Connector Color Coding Guide lugs on CompactPCI connectors serve to ensure a correct mating of connectors. A proper mating is guaranteed also by the use of color coded keys for 3.3V and 5V operation. Color coded keys prevent accidental installation of a 5V module into a 3.3V slot. CompactPCI backplane connectors' keying depends always on the signaling (VIO) level. CPC503 is a universal module with 3.3V or 5V signalling voltage level. Table 3-10: CompactPCI Connector Coding Colors Voltage Level Key Color 3.3 V Cadmium Yellow 5V Brilliant Blue Universal module (5V and 3.3V) None CompactPCI connector pinouts appear on the following pages. C P C 5 0 3 U se r M a n u a l 32 © 2 0 1 2 F a s t w e l V e r . 0 0 1 a E Detailed Description 3.2.6.2 CPC503 CompactPCI Connectors XS17 and XS16 Pinouts CPC503 is equipped with two 22 mm pitch female CompactPCI bus connectors – XS17 and XS16. Table 3-11: CompactPCI Bus Connector J1 (XS17) System Slot Pinout XS17 Pin Z A B C D E F 25 GND 5V REQ64# ENUM# 3.3V 5V GND 24 GND AD[1] 5V LNG_VIO AD[0] ACK64# GND 23 GND 3.3V AD[4] AD[3] LNG_5V AD[2] GND 22 GND AD[7] GND LNG_3.3V AD[6] AD[5] GND 21 GND 3.3V AD[9] AD[8] M66EN C/BE[0]# GND 20 GND AD[12] GND VIO AD[11] AD[10] GND 19 GND 3.3V AD[15] AD[14] LNG_GND AD[13] GND 18 GND SERR# GND 3.3V PAR C/BE[1]# GND 17 GND 3.3V IPMB_SCL IPMB_SDA LNG_GND PERR# GND 16 GND DEVSEL# GND VIO STOP# LOCK# GND 15 GND 3.3V FRAME# IRDY# SHRT_GND TRDY# GND 14 GND GND 13 GND GND 12 GND GND 11 GND AD[18] AD[17] AD[16] LNG_GND C/BE[2]# GND 10 GND AD[21] GND 3.3V AD[20] AD[19] GND 9 GND C/BE[3]# SHRT_GND AD[23] LNG_GND AD[22] GND 8 GND AD[26] GND VIO AD[25] AD[24] GND 7 GND AD[30] AD[29] AD[28] LNG_GND AD[27] GND 6 GND REQ0# GND LNG_3.3V CLK0 AD[31] GND 5 GND BRSVP1A5 BRSVP1B5 RST# LNG_GND GNT0# GND 4 GND IPMB_PWR HEALTHY# LNG_VIO INTP INTS GND 3 GND INTA# INTB# INTC# LNG_5V INTD# GND 2 GND TCK 5V TMS TDO TDI GND 1 GND 5V -12V TRST# +12V 5V GND C P C 5 0 3 U se r M a n u a l 33 © 2 0 1 2 F a s t w e l V e r . 0 0 1 a E Detailed Description Table 3-12: CPC503 64-bit CompactPCI Bus Connector J2 (XS16) System Slot Pinout XS16 Pin Z A B C D E F 22 GND GA4 GA3 GA2 GA1 GA0 GND 21 GND CLK6 GND RSV RSV RSV GND 20 GND CLK5 GND RSV GND RSV GND 19 GND GND GND RSV RSV RSV GND 18 GND BRSVP2A18 BRSVP2B18 BRSVP2C18 GND BRSVP2E18 GND 17 GND BRSVP2A17 GND PRST# REQ6# GNT6# GND 16 GND BRSVP2A16 BRSVP2B16 DEG# GND BRSVP2E16 GND 15 GND BRSVP2A15 GND FAL# REQ5# GNT5# GND 14 GND AD[35] AD[34] AD[33] GND AD[32] GND 13 GND AD[38] GND VIO AD[37] AD[36] GND 12 GND AD[42] AD[41] AD[40] GND AD[39] GND 11 GND AD[45] GND VIO AD[44] AD[43] GND 10 GND AD[49] AD[48] AD[47] GND AD[46] GND 9 GND AD[52] GND VIO AD[51] AD[50] GND 8 GND AD[56] AD[55] AD[54] GND AD[53] GND 7 GND AD[59] GND VIO AD[58] AD[57] GND 6 GND AD[63] AD[62] AD[61] GND AD[60] GND 5 GND C/BE[5]# GND VIO C/BE[4]# PAR64 GND 4 GND VIO BRSVP2B4 C/BE[7]# GND C/BE[6]# GND 3 GND CLK4 GND GNT3# REQ4# GNT4# GND 2 GND CLK2 CLK3 SYSEN# GNT2# REQ3# GND 1 GND CLK1 GND REQ1# GNT1# REQ2# GND C P C 5 0 3 U se r M a n u a l 34 © 2 0 1 2 F a s t w e l V e r . 0 0 1 a E Detailed Description CPC503 CompactPCI Input/Output Connectors ХР9, XS15 and XS14 (J3 - J5) and Designation of Their Pins 3.2.6.3 On CPC503 a part of I/O signals is transmitted via ХР9, XS15 and XS14 connectors. The module plate provides additional possibilities for connection of peripheral I/O devices in special-purpose compact systems. Special backplane is required for the use of Rear I/O module. CPC503 module and its ХР9, XS15 and XS14 connectors are compatible with all standard 6U CompactPCI backplanes with I/O support via corresponding connectors in the system slot. Designation of the ХР9 (J3) connector pinouts complies with the PICMG 2.16 standard. Table 3-13: J3 Connector (ХР9) Pinout XP9 Pin A B C D E F 1 GND GND +5V GND GND GND 2 SATA0_RX+ SATA0_RX- GND SATA1_RX+ SATA1_RX- GND 3 SATA0_TX+ SATA0_TX- GND SATA1_TX+ SATA1_TX- GND 4 GND GND +5V GND GND GND 5 PCIE_RX5+ PCIE_RX5- GND PCIE_RX6+ PCIE_RX6- GND 6 PCIE_TX5+ PCIE_TX5- GND PCIE_TX6+ PCIE_TX6- GND 7 PCIE_RX7+ PCIE_RX7- GND PCIE_RX8+ PCIE_RX8- GND 8 PCIE_TX7+ PCIE_TX7- GND PCIE_TX8+ PCIE_TX8- GND 9 PCIE_CLK- PCIE_CLK+ GND GND GND GND 10 GND GND USB_OC10_11# USB8- USB8+ GND 11 USB11- USB11+ GND USB9- USB9+ GND 12 USB7- USB7+ GND USB10+ USB10- GND 13 USB6+ USB6- GND USB_OC_6_7# USB_OC_8_9# GND 14 NC NC PCIERST# NC NC GND 15 ETH2_1+ ETH2_1- GND ETH2_3+ ETH2_3- GND 16 ETH2_0+ ETH2_0- GND ETH2_2+ ETH2_2- GND 17 ETH1_1+ ETH1_1- GND ETH1_3+ ETH1_3- GND 18 ETH1_0+ ETH1_0- GND ETH1_2+ ETH1_2- GND 19 NC NC WAKE# NC NC GND C P C 5 0 3 U se r M a n u a l 35 © 2 0 1 2 F a s t w e l V e r . 0 0 1 a E Detailed Description Table 3-14: CPC503 J4 Connector (XS15) Pinout XS15 Pin A B C D E F 1 GND GND DP_HPD GND GND GND 2 DP_LANE3+ DP_LANE3- GND eDP_TX0- eDP_TX0+ GND 3 DP_LANE2+ DP_LANE2- GND eDP_TX1- eDP_TX1+ GND 4 DP_LANE1+ DP_LANE1- GND eDP_TX2- eDP_TX2+ GND 5 DP_LANE0+ DP_LANE0- GND eDP_TX3- eDP_TX3+ GND 6 DP_AUX- DP_AUX+ GND eDP_AUX- eDP_AUX+ GND 7 DP_CTRL_CLK DP_CTRL_DAT GND GND GND GND 8 GND GND eDP_HPD LVDSB_CLK- LVDSB_CLK+ GND 9 LVDSA_CLK- LVDSA_CLK+ GND LVDSB_D0- LVDSB_D0+ GND 10 LVDSA_D0- LVDSA_D0+ GND LVDSB_D1- LVDSB_D1+ GND 11 LVDSA_D1- LVDSA_D1+ GND LVDSB_D2- LVDSB_D2+ GND 12 GND 13 GND 14 GND 15 LVDSA_D2- LVDSA_D2+ GND LVDSB_D3- LVDSB_D3+ GND 16 LVDSA_D3- LVDSA_D3+ GND GND GND GND 17 GND GND BKLT_CTRL CTRL_CLK CTRL_DAT GND 18 BKLT_EN VDD_EN GND GND GND GND 19 LVDS_DDC_CLK LVDS_DDC_DAT GND HAD_SDIN1 HDA_SPKR GND 20 GND GND SDIN0 HAD_SDIN2 HDA_RST# GND 21 HDA_SDOUT HDA_SDIN3 GND GND GND GND 22 HDA_BIT_CLK HDA_SYNC GND GPIO0 GPIO3 GND 23 RIO_LED RSTIN# +5V GPIO1 GPIO4 GND 24 GND GND +3.3V GPIO2 GPIO5 GND 25 NC LAN1_DISABLE# LAN2_DISABLE# NC NC GND C P C 5 0 3 U se r M a n u a l 36 © 2 0 1 2 F a s t w e l V e r . 0 0 1 a E Detailed Description Table 3-15: CPC503 J5 Connector (XS14) Pinout XS14 Pin A B C D E F 1 LPC_AD0 GND +3.3V GND +5V_IN GND 2 LPC_AD1 GND +3.3V GND +5V_IN GND 3 LPC_AD2 GND +5V GND +5V_IN GND 4 LPC_AD3 GND +5V GND +5V_IN GND 5 LPC_FRAME# GND SUSCLK GND +5V_IN GND 6 DRQ0# GND SIOCLK GND +5V_IN GND 7 DRQ1# GND A20GATE GND +5V_IN GND 8 SERIRQ GND LPCCLK GND +5V_IN GND 9 PCIRST# GND RCIN# GND +5V_IN GND 10 +VI/O PMC_IO63 PMC_IO62 PMC_IO61 PMC_IO60 GND 11 PMC_IO59 PMC_IO58 PMC_IO57 PMC_IO56 PMC_IO55 GND 12 PMC_IO54 PMC_IO53 PMC_IO52 PMC_IO51 PMC_IO50 GND 13 PMC_IO49 PMC_IO48 PMC_IO47 PMC_IO46 PMC_IO45 GND 14 PMC_IO44 PMC_IO43 PMC_IO42 PMC_IO41 PMC_IO40 GND 15 PMC_IO39 PMC_IO38 PMC_IO37 PMC_IO36 PMC_IO35 GND 16 PMC_IO34 PMC_IO33 PMC_IO32 PMC_IO31 PMC_IO30 GND 17 PMC_IO29 PMC_IO28 PMC_IO27 PMC_IO26 PMC_IO25 GND 18 PMC_IO24 PMC_IO23 PMC_IO22 PMC_IO21 PMC_IO20 GND 19 PMC_IO19 PMC_IO18 PMC_IO17 PMC_IO16 PMC_IO15 GND 20 PMC_IO14 PMC_IO13 PMC_IO12 PMC_IO11 PMC_IO10 GND 21 PMC_IO9 PMC_IO8 PMC_IO7 PMC_IO6 PMC_IO5 GND 22 PMC_IO4 PMC_IO3 PMC_IO2 PMC_IO1 PMC_IO0 GND C P C 5 0 3 U se r M a n u a l 37 © 2 0 1 2 F a s t w e l V e r . 0 0 1 a E Detailed Description 3.3 CPC503 Timers CPC503 is equipped with the following timers: RTC – Real-Time Clock PCH includes the battery-powered real-time clock. Watchdog Timer 3.3.1 Watchdog Timer Programmable the watchdog timer is realized in FPGA and an LPC bus device. WDT is enabled and IRQ is selected in BIOS Setup. WDT consists of the counter register [Timer Current Value Register] decremented with 32.768 KHz frequency, and initial value register [Timer Initial Value Register]. It is possible to set the timeout period from 0 to 512 seconds with increments of 30.52 s by changing the value in this register. On zeroing the counter either an interrupt is generated or the Reset of the module occurs on double zeroing. By default, WDT is inactive. The equation below can be used to calculate the timeout TWD in s as a function of the decimal value in the WD register (KWD): TWD [s] = KWD * 106 / 215 For example, decimal value "1" of KWD (000001h) corresponds to the timeout of 30.52 s, and KWD = 16777215 (FFFFFFh) – 512 seconds. WDT is reset in different ways: 1) Write any value to the counter register [Timer Current Value Register] 2) Write any value to 80h port (the mode is enabled in BIOS Setup and is active only if access cycles to the port 80h are translated to LPC bus.) After the first expiry of the timeout the TMF flag is set, after the second timeout expiry – STF flag. WDT is controlled via I/O registers: 1) Stop countdown 2) Write the timeout value to [Timer Initial Value Register] 3) Initialize the WDT register by any of the reset methods (i.e. by writing any value to [Timer Current Value Register]). This leads to wring the initial value from [Timer Initial Value Register] to [Timer Current Value Register]. 4) Start decrementing the counter and, if necessary, enable auto reset of the module. 5) Then, with a period less than timeout perform regular strobing of the WDT. In case WDT was not srobed, TMF flag is set after first timeout expiry and an interrupt occurs. After the second timeout expiry STF flag is set and the second interrupt is issued or the module will be Reset if this is enabled. C P C 5 0 3 U se r M a n u a l 38 © 2 0 1 2 F a s t w e l V e r . 0 0 1 a E Detailed Description CPC503 I/O Registers of the WDT Controller Timer Current Value Register [23:0] Base+0h Bit Name Description 7:0 Timer_Current_Value[7:0] Write/read: Bits 7:0 of the current counter value Bit Name Description 7:0 Timer_Current_Value[15:8] Write/read: Bits 15:8 of the current counter value Bit Name Description 7:0 Timer_Current_Value[23:16] Write/read: Bits 23:16 of the current counter value Base+1h Base+2h Timer Initial Value Register [23:0] Base+3h Bit Name Description 7:0 Timer_Initial_Value[7:0] Write/read: Bits 7:0 of the initial counter value Bit Name Description 7:0 Timer_Initial_Value[15:8] Write/read: Bits 15:8 of the initial counter value Bit Name Description 7:0 Timer_Initial_Value[23:16] Write/read: Bits 23:16 of the initial counter value C P C 5 0 3 U se r Base+4h Base+5h M a n u a l 39 © 2 0 1 2 F a s t w e l V e r . 0 0 1 a E Detailed Description CPC503 Status Register Base+6h Bit Name Description 7:3 - Reserved 2 STF Write/read: Second timeout flag. Is set "1" provided TMF=1. An interrupt is generated on this flag. If the module Reset is enabled (RSTE=1), Reset occurs. Cleared by writing "1" into this bit. 1 - Reserved 0 TMF Write/read: First timeout flag. Is set to "1" on zeroing the counter. An interrupt is generated on this flag. Cleared by writing "1" into this bit or by writing to 80h port, if enabled. Control Register Base+7h Bit Name Description 7:2 - Reserved 1 CNTE Write/read: Countdown 1 – Enabled 0 – Disabled 0 RSTE Write/read: Reset on timeout 1 – Reset enabled 0 – Reset disabled C P C 5 0 3 U se r M a n u a l 40 © 2 0 1 2 F a s t w e l V e r . 0 0 1 a E Detailed Description CPC503 3.4 SPI Controller / LEDs / GPIO 3.4.1 SPI Controller Registers Description Table 3-16: SPI controller registers Input/output port address Type HARD RESET Configuration register Base+0 R/W 00h FRAM address value [7:0] Base+1 R/W 00h FRAM address value [14:8] Base+2 R/W 00h SPI data value [7:0] Base+3 R/W 00h SPI Control/Status register [7] – busy status [6] – last 1K fram lock status [5] – Reserved [4] - Reserved [3] – Reserved [2] – Reserved [1] – Reserved [0] – BURST mode Base+4 R/W 00h Reserved Base+5 R/W 00h RIO GPIO Direction [7:6] – Reserved [5:0] – GPIO Direction 0 – input 1 – output Base+6 R/W 00h RIO GPIO DATA [7:6] – Reserved [5:0] – GPIO DATA Base+7 R/W 00h User LEDs control [7:2] – Reserved [2] – RIO LED On/oFF [1] – GREEN LED On/Off [0] – RED LED On/off The controller automatically generates the sequence of access to FRAM memory on SPI bus (address from BASE+0, BASE+1 registers, read/write mode and data – BASE+2 register). The last kilobyte out of 32 KB is reserved for storage of BIOS Setup parameters. <0> bit in the control register (Base+3) includes the mode of automatic address increase, when reading/writing the data register (Base+2). Upon completion of packets exchange it should be reset. C P C 5 0 3 U se r M a n u a l 41 © 2 0 1 2 F a s t w e l V e r . 0 0 1 a E Detailed Description 3.4.2 CPC503 SPI device programming Operations with FRAM are conducted in the I/O area at the following addresses: 310h-313h. Writing the data byte (32h) in FRAM at the address (144h) MOV MOV OUT MOV MOV OUT MOV MOV OUT DX, 310H AL, 44H DX, AL DX, 311H AL, 01H DX, AL DX, 312h AL, 32h DX,AL Reading the data byte from FRAM at the address (101h) MOV DX, 310H MOV AL, 01H OUT DX, AL MOV DX, 311H MOV AL, 10H OUT DX, AL MOV DX, 312h IN AL,DX Reading the packet of three data bytes from FRAM, starting from the address 208h MOV DX, 310H MOV AL, 08H OUT DX, AL MOV DX, 311H MOV AL, 20H OUT DX, AL MOV DX,313h MOV AL, 01H OUT MOV IN … IN … IN … MOV MOV OUT C P C 5 0 3 U se r DX, AL ; switching packet mode on DX, 312h AL,DX ; reading the data byte at the address 208h AL,DX ; reading the data byte at the address 209h AL,DX ; reading the data byte at the address 20Ah DX,313h AL, 00H DX, AL M a n u a l ; switching packet mode off 42 © 2 0 1 2 F a s t w e l V e r . 0 0 1 a E Detailed Description 3.4.3 CPC503 FRAM The FRAM memory microchip with sequential access on SPI bus is installed on the module. This non-volatile memory is used for storage of BIOS settings and user parameters. Access to the microchip is provided through SPI controller registers (see subsection 3.4.1). Microchip size – 32 KB, last kilobyte is reserved for storage of service data and BIOS Setup parameters (not available for user). 3.5 Local SMBus Devices The CPC503 incorporates a System Management Bus to access several system monitoring and control devices via a two-wire I2C™ bus interface. The following table presents functions and addresses of onboard SMBus devices. Table 3-17: № SMBus Devices SMB Address Device 1 04CH Memory temperature sensor 2 0A4H 2 SPD Memory module 3 0A0H 1 SPD Memory module 4 0C4H PCI-E Bridge PMC 5 0C2H PCI-E Bridge Compact PCI 6 02AH PECI-SMBUS Bridge 7 02EH LM87 Hardware monitor 3.6 Battery The CPC503 utilizes a 3.0 V lithium battery for the RTC and CMOS memory backup. Use Renata, Panasonic BR2032 or compatible. Batteryless operation is possible with no RTC function. 3.7 NAND Flash The high capacity NAND drive (4 GB) is installed on the module. The drive is connected to SATA interface. The drive can be disconnected, using the BIOS Setup parameters. C P C 5 0 3 U se r M a n u a l 43 © 2 0 1 2 F a s t w e l V e r . 0 0 1 a E Installation 4 CPC503 Installation The CPC503 is easy to install. However, it is necessary to follow the procedures and safety regulations below to install the module correctly without damage to the hardware, or harm to personnel. The installation of the peripheral drivers is described in the accompanying information files. For details on installation of an operating system, please refer to the relevant software documentation. 4.1 Safety Regulations The following safety regulations must be observed when installing or operating the CPC503. Fastwel assumes no responsibility for any damage resulting from infringement of these rules. Warning! When handling or operating the module, special attention should be paid to the heatsink, because it can get very hot during operation. Do not touch the heatsink when installing or removing the module. Moreover, the module should not be placed on any surface or in any kind of package until the module and its heatsink have cooled down to ambient temperature. Caution! Switch off the system power before installing the module in a free slot. Disregarding this requirement could be harmful for your life or health and can damage the module or entire system. ESD Sensitive Equipment! This product comprises electrostatically sensitive components. Please follow the ESD safety instructions to ensure module's operability and reliability: Use grounding equipment, if working at an anti-static workbench. Otherwise, discharge yourself and the tools in use before touching the sensitive equipment. Try to avoid touching contacts, leads and components. When carrying out operations at the a workplace with anti-static protection, do not omit the opportunity to use it. Extra caution should be taken in cold and dry weather. C P C 5 0 3 U se r M a n u a l 44 © 2 0 1 2 F a s t w e l V e r . 0 0 1 a E Installation 4.2 CPC503 CPC503 Installation Procedure To install CPC503 in a system, follow the instructions below. The following procedure is related to installation of CPC503 into the system. The procedure for removal operations is provided in other chapters. To install the module into the system, follow the below procedure: 1. Keep to the safety requirements specified in chapter 4.1. Attention! Failure to comply with the following instruction may damage the module or result in incorrect system operation. 2. Information on installation of peripheral devices and I/O devices is provided in the next section of Chapter 4.4. Attention! Perform the following operations with care in order not to damage CPC503 or other system modules. 3. To install CPC503, perform the following: 1. Make sure no power is connected to the system. Attention! While carrying out the following operation, do not apply force for insertion of CPC503 into the backplane slot. To install it, use the handles on the front panel. 4. C P C 5 0 3 2. Carefully insert the module into the chosen slot, moving it along the guide ways, until it touches the backplane connectors. 3. Using both handles on the front panel, insert CPC503 into the backplane slot. The module is engaged completely, when the handles are locked. 4. Fix the module with the two front panel retaining screws. 5. Connect all required external interfacing cables to the module. 6. Make sure that the module and all connected cables are properly fixed. CPC503 is now ready for operation. For further instructions, refer to software, devices and system manuals. U se r M a n u a l 45 © 2 0 1 2 F a s t w e l V e r . 0 0 1 a E Installation 4.3 CPC503 Module Removal Procedure To remove the module, perform the following: 1. Unlock both handles on the front panel. The lower handle herewith affects the microswitch. To do this, only a slight move of the handle is required, see subsection 3.2.5.4 Handle switch. Note The blue SYS light-emitting diode should start flashing shortly. This means that the system has recognized the start of the “switch off” operation and informs the operator that the module is waiting for the system programs closure. 2. The SYS light-emitting diode must be on steadily. After that, one may proceed with further removal of the module. 3. Switch the power off. 4. Disconnect of interfacing cables from the module. 5. Make sure that the safety requirements specified in chapter 4.1 are complied with. Pay special attention to the warning concerning the heatsink temperature! Attention! Perform the following operations with care in order not to damage CPC503 or other system modules. 6. Unscrew the front panel retaining screws. Attention! While handling the module, be careful, since the cooling heatsink may be very hot. Do not touch the heatsink, when replacing the module. 7. Using the front panel handles, pull out the module out of the backplane slot and carefully remove it from the system. 4.4 CPC503 Peripheral Devices Installation A lot of different peripheral devices can be connected to CPC503. Their installation methods may differ significantly. The following sections provide only the general installation guidelines and not the detailed algorithms. C P C 5 0 3 U se r M a n u a l 46 © 2 0 1 2 F a s t w e l V e r . 0 0 1 a E Installation 4.4.1 CPC503 USB Devices Installation CPC503 supports the use of any computer Plug&Play peripheral USB devices (e.g. keyboard, mouse, printers etc.). Note... All USB devices can be connected and disconnected while the power of such devices and the main system is on. 4.4.2 Connection of devices to Rear I/O module In order to make COM1-6 and Ethernet ports operating properly on Rear I/O module, they should be set up to be used via Rear I/O module, using the BIOS Setup program. For details on installation of devices operating via Rear I/O module, refer to the documents of these devices. 4.4.3 Battery Replacement The lithium battery must be replaced with Panasonic BR2032 or a battery with similar characteristics. The expected life of a 190 mAh battery in case of operation for 8 hours a day at 30C is about 5 years. However, this typical value may vary because battery life depends on the operating temperature and the shutdown time of the system in which the battery is installed. Note... It is recommended to replace the battery after approximately 4 years to be sure it is operational. Important: Replacing the battery, make sure the polarity is correct ("+" up). Dispose of used batteries according to the local regulations. C P C 5 0 3 U se r M a n u a l 47 © 2 0 1 2 F a s t w e l V e r . 0 0 1 a E Configuration 5 CPC503 Configuration 5.1 Resetting BIOS Setup parameters, using XP2 jumper The module XP2 jumper (see Figure CPC503 Module Layout: Top Side) is intended for resetting BIOS Setup parameters to factory defaults, if the system fails to start (e.g. due to errors in the BIOS setup or because of incorrect password). To reset the BIOS parameters, perform the following: 1. 2. 3. 4. C P C 5 0 3 Switch the system power off Install XP2 jumper Wait for 5 seconds Remove XP2 jumper U se r M a n u a l 48 © 2 0 1 2 F a s t w e l V e r . 0 0 1 a E CPC503 module troubleshooting 6 CPC503 CPC503 module troubleshooting Before addressing to the service center, please, read the information on troubleshooting, since the problem may be connected not with the device breakage. Table 6-1: CPC503 malfunctions reasons and ways of their elimination PROBLEM The module fails to start, SYS LED is off REASON ELIMINATION No supply voltage +5V,+3.3V, +12V Check supply voltage on the backplane The module is not completely inserted into the backplane Make sure that the module is inserted into the backplane up to the stop. Ejector handle is not fixed, or the button in the ejector handle is pressed Check the ejector handle. The module is not completely inserted into the backplane Make sure that the module is inserted into the backplane up to the stop. The module is inserted into the peripheral slot, and RESET# signal is active on PCI bus Make sure of the operability of the module inserted into the system slot. The module fails to start, SYS LED flashes green quickly (~8 Hz) 1) BIOS is absent or corrupted Refer to service center. The module fails to start, SYS LED flashes slowly (~1 Hz), the module emits acoustic signals 1) BIOS execution failed before starting the OS, INT19H. The module fails to start, SYS LED is blue C P C 5 0 3 U se r M a n u a l 2) The module is out of order 1) Reset the BIOS Setup parameters, using XP2 jumper. 2) Refer to service center. 2) BIOS is corrupted 49 © 2 0 1 2 F a s t w e l V e r . 0 0 1 a E Power consumption 7 CPC503 Power consumption The modules power supply should be carried out from the external direct current source with the following characteristics: Table 7-1: Supply voltage +5 V,+3.3 V,+12 V,-12 V from CPCI bus Voltage (V) Minimum (V) Maximum (V) +5 4.75 5.25 +12 11.4 12.6 -12 -12.6 -11.4 +3.3 3.15 3.46 The modules consumption current (without regard to supply of external circuits) does not exceed the values specified in the table below. Table 7-2: Modules consumption current Module type C P C 5 0 3 U se r Consumption current, A, not more than +3,3 V +5 V +12 V -12 V CPC503-I72C1.5 4 6 0.1 - CPC503-I72C2.2 4 8 0.1 - CPC503-I74C2.1 4 13 0.1 - M a n u a l 50 © 2 0 1 2 F a s t w e l V e r . 0 0 1 a E Environmental exposure 8 CPC503 Environmental exposure 8.1 Temperature mode If CPC503 operates in normal operating conditions with sufficient air circulation, the processor operates at its maximum capacity. If the environmental parameters are not optimal (high ambient temperature and no air circulation), the system continues working due to SpeedStep®, but with reduced processor capacity. Emergency shutdown actuates only in case of critical conditions, given substantial overheat of the processor, allowing to avoid damaging thereof. CPU frequency as a function of the temperature is provided in the table below. Table 8-1: CPU frequency as a function of the temperature (for CPC503-01) Temperature (‘C) Forced air cooling CPU frequency (MHz) CPC503-01 1.5Ghz 2C 4HP +70(*) ~ 1.7 CFM 1500 +85 ~300 CPC503-01 2.2Ghz 2C 4HP +65(*) 2200 +70 ~1700 +85 ~230 Module CPC503-01 2.1Ghz 4C 8HP +55(*) ~2.2 CFM 2100 +70 ~1600 +85 ~230 (*) – The maximum temperature at which there is no reduction of CPU operating frequency. During measurements, the module was installed in the CPCI 6U Schroff chassis with deflector. Note: The results provided were received upon running the artificial tests, ensuring the CPU maximum heat development (TDP). Table 8-2: CPU frequency as a function of the temperature (for CPC503-02) Temperature (‘C) CPU frequency (MHz) CPC503-02 (1.7 GHz, 2C, 4HP) +70(*) +85 1700 ~230 CPC503-02 (2.5 GHz, 2C, 4HP) +55(*) 2500 +70 ~800 +85 ~230 +65(*) 2100 +70 ~1100 Module CPC503-02 (2.1 GHz, 4C, 8HP) +85 ~230 (*) – The maximum temperature at which there is no reduction of CPU operating frequency. During measurements, the module was installed in the CPCI 6U Schroff chassis with deflector. 8.2 CPC503 operating conditions and MTBF The product keeps its operability upon the following climatic and mechanical actions: C P C 5 0 3 U se r M a n u a l 51 © 2 0 1 2 F a s t w e l V e r . 0 0 1 a E Environmental exposure Table 8-3: CPC503 Environmental exposure Type of exposure Change of temperatures at relative humidity up to 80% without moisture condensation Sinusoidal vibration Single shocks Multiple shocks Parameter description Parameter value Low temperature - 40C (0*) High temperature + 85C (+70*) Frequency range (Hz) 10...500 Acceleration, g 2 Peak acceleration, g 50 Peak acceleration, g 30 Number of shocks Document GOST 28209-89 (IEC 68-2-14-84) GOST 28203-89 (IEC 68-2-6-82) GOST 28213-89 (IEC 68-2-27-87) GOST 28215-89 (IEC 68-2-29-87) 1,000 *For commercial design version. The CPC503 module’s mean time between failures (MTBF) is not less than 60,000 hours. C P C 5 0 3 U se r M a n u a l 52 © 2 0 1 2 F a s t w e l V e r . 0 0 1 a E Useful Abbreviations, Acronyms and Short-cuts 9 CPC503 Useful Abbreviations, Acronyms and Short-cuts Abbreviation Meaning ACPI Advanced Configuration and Power Interface AGP Accelerated Graphics Port AGTL Advanced Gunning Transceiver Logic PSB (Processor Side Bus) signal exchange specification AHA Accelerated Hub Architecture GMCH and ICH communication bus specification BIOS Basic Input-Output System BMC Baseboard Management Controller BT interface Block Transfer interface Block transfer interface for communication between control software and BMC CMC Common Mezzanine Card cPCI CompactPCI Industrial automation systems standard CRT-display Cathode Ray Tube Display DAC Digital-Analog Converter DDR SDRAM Double Data Rate Synchronous Dynamic Random Access Memory DMA Direct Memory Access DVMT Dynamic Video Memory Technology ECC Error Correction Code Data error correction technology used in memory modules ECP/EPP Extended Capabilities Port / Enhanced Parallel Port Parallel port specifications EEPROM Electrically Erasable Programmable Read-Only Memory EHCI Enhanced Host Controller Interface (Universal Serial Bus specification) EIDE Enhanced Integrated Drive Electronics Mass storage devices interface EOS Electrical Overstress ESD Electrostatically Sensitive Device Electrostatic Discharge FDD Floppy Disk Drive FWH Firmware Hub Nonvolatile memory chip, part of Intel chipset, used for main and reserve BIOS copies in CPC503 GMCH Graphics and Memory Controller Hub C P C 5 0 3 U se r M a n u a l 53 © 2 0 1 2 F a s t w e l V e r . 0 0 1 a E Useful Abbreviations, Acronyms and Short-cuts CPC503 Abbreviation Meaning HDD Hard disk drive 2 I C™ Inter Integrated Circuit Two-thread serial protocol, used in SMB and IPMI IPMB Intelligent Platform Management Bus IPMI Intelligent Platform Management Interface KCS interface Keyboard Controller Style interface Interface for communication between control software and BMC, similar to a keyboard controller interface LPC Low Pin Count External devices communication interface LVDS Low Voltage Differential Signal Digital monitors communication specification MDI Media Dependent Interface Interface with connection type automatical detection NAND Flash Not And (electronic logic gate) Flash memory specification PC Personal Computer PICMG PCI Industrial Computer Manufacturers Group PIO Programmed Input/Output EIDE: Directly processor controlled data exchange PLCC Plastic Leaded Chip Carrier PM Peripheral Management Controller PMC PCI (Peripheral Component Interconnect) Mezzanine Card POST Power On Self Test PWM output Pulse-Width Modulation Cooling fan control technique RAMDAC Random Access Memory Digital-to-Analog Converter Rear I/O Board Rear Input-Output Board Auxiliary interface board, which is connected to the cPCI backplane rear connectors RTC Real Time Clock SMB System Management Bus SODIMM Small Outline Dual In-Line Memory Module SSD Solid State Disk TTL Transistor-Transistor Logic UART Universal Asynchronous Receiver-Transmitter UHCI Universal Host Controller Interface USB Host Controller Interface UTP Unshielded Twisted Pair USB Universal Serial Bus C P C 5 0 3 U se r M a n u a l 54 © 2 0 1 2 F a s t w e l V e r . 0 0 1 a E Useful Abbreviations, Acronyms and Short-cuts 10 CPC503 . AMI Aptio BIOS Setup (CPC503-02) 10.1 BIOS Setup start For more information on BIOS Setup start, see Section 6.1. 10.2 Main This BIOS Setup screen is the main screen upon entering. In this tab’s menu it is possible to set system clok and date and switch between menu entries in order to adjust module’s settings, as well as display information related to BIOS. Screen of the “Main” menu tab Fig.10-1: Note Time is set in 24-h format. C P C 5 0 3 U se r M a n u a l 55 © 2 0 1 2 F a s t w e l V e r . 0 0 1 a E Useful Abbreviations, Acronyms and Short-cuts CPC503 10.3 Advanced This tab enables to perform additional module’s settings. The Figure below shows screen of the “Advanced” menu tab. Screen of the “Advanced” menu tab Fig. 10-2: Function Purpose PCI Subsystem Settings PCI and PCIE bus settings ACPI Settings Settings for ACPI – compatible operating systtems CPU Configuration CPU configuration Onboard Device Setting of module’s onboard devices SATA Configuration Configuration of SATA controllers and discs Thermal Configuration Setting temperature-depending parameters USB Configuration USB configuration Super IO Configuration Configuring devices available on RIO board. Serial port console redirection Serial port console redicretion CPU PPM Configuration Configuration of CPU power-saving modes Intel (R) 82580 (82574L) Gigabit Network Connection Informaation on network controllers Then you can open menus described in the below sections. C P C 5 0 3 U se r M a n u a l 56 © 2 0 1 2 F a s t w e l V e r . 0 0 1 a E Useful Abbreviations, Acronyms and Short-cuts 10.3.1 CPC503 Onboard Device Configuration The screen of this submenu is shown below. Fig. 10-3: Screen of the “Onboard Device Configuration” submenu Function Defualt value Onboard Gigabit 4-port LAN [Enabled/Disabled] Enabled Onboard Gigabit LAN1 Direction [PICMG 2.16/XMC] PICMG 2.16 Onboard Gigabit LAN2 Direction [PICMG 2.16/XMC] PICMG 2.16 Onboard RIO Gigabit LAN 0 [Enabled/Disabled] Enabled Onboard RIO Gigabit LAN 1 Enabled [Enabled/Disabled] C P C 5 0 3 U se r M a n u a l 57 © 2 0 1 2 F a s t w e l V e r . 0 0 1 a E Useful Abbreviations, Acronyms and Short-cuts CPC503 Autostart Mode [Enabled/Disabled] Enabled PCI Clock Slave [33 MHz/ 66MHz] 33 MHz Onboard NAND disk [Enabled/Disabled] Enabled Backplane Bridge [Enabled/Disabled] Enabled PMC Bridge [Enabled/Disabled] Enabled External WatchDog [Enabled/Disabled] Disabled Ejector Switch Function [PWR Button+Reset/ PWR Button/Disabled] PWR Button+Reset 10.3.2 PCI Subsystem settings The “PCI Subsystem settings” submenu enables to set PCI and PCIE bus. Screen of “PCI Subsystem settings” menu tab Fig.10-4: C P C 5 0 3 U se r M a n u a l 58 © 2 0 1 2 F a s t w e l V e r . 0 0 1 a E Useful Abbreviations, Acronyms and Short-cuts CPC503 Function Default value PCI Bus Driver Version V 2.05.02 PCI 64bit Resources Handling - Above 4G Decoding Disabled PCI Common Settings - PCI Latency Timer [32 PCI Bus Clocks, 64 PCI Bus Clocks, 96 PCI Bus Clocks, 128 PCI Bus Clocks, 160 PCI Bus Clocks, 192 PCI Bus Clocks, 224 PCI Bus Clocks, 248 PCI Bus Clocks] 32 PCI Bus Clocks VGA Palette Snoop [Enabled/Disabled] Disabled PERR# Generation [Enabled/Disabled] Disabled SERR# generation [Enabled/Disabled] Disabled PCI Express settings PCI Express Device Register settings This submenu makes it possible to perform settigns for PCI Express. C P C 5 0 3 U se r M a n u a l 59 © 2 0 1 2 F a s t w e l V e r . 0 0 1 a E Useful Abbreviations, Acronyms and Short-cuts CPC503 Function Default value Relaxed Ordering Disabled Extended Tag [Enabled/Disabled] Disabled No snoop [Enabled/Disabled] Enabled Maximum Payload [Auto/128 Bytes/256 Bytes/ 512 Bytes/1024 Bytes/ 2048 Bytes/4096 Bytes] Auto Maximum Read Request [Auto/128 Bytes/256 Bytes/512 Bytes/1024 Bytes/2048 Bytes/4096 Bytes] Auto 10.3.3 ACPI Settings The “ACPI settings” submenu makes it possible to perform settings for ACPI – compatible operating systems. Screen of “ACPI settings” menu tab Fig.10-5: Function Default value Enable Hibernation [Enabled/Disabled] Enabled C P C 5 0 3 U se r M a n u a l 60 © 2 0 1 2 F a s t w e l V e r . 0 0 1 a E Useful Abbreviations, Acronyms and Short-cuts 10.3.4 CPC503 CPU Configuration Screen of “CPU Configuration” menu tab Fig.10-6: Function Default value CPU Signature - Microcode Patch - Max CPU Speed - Min CPU Speed - CPU Speed - Processor Cores - Intel HT Technology - Intel VT-x Technology - Intel SMX Technology - 64-bit - L1 Data Cache - L1 Code Cache - L2 Cache - L3 Cache - Hyper-threading [Enabled/Disabled] Enabled C P C 5 0 3 U se r M a n u a l 61 © 2 0 1 2 F a s t w e l V e r . 0 0 1 a E Useful Abbreviations, Acronyms and Short-cuts CPC503 Active Processor Cores [All/1] All Limit CPUID Maximum [Enabled/Disabled] Disabled Execute Disable Bit [Enabled/Disabled] Enabled Intel virtualization technology [Enabled/Disabled] Disabled Hardware Prefetcher [Enabled/Disabled] Enabled 10.3.5 SATA configuration SATA configuration – configuration of SATA controllers and discs. Screen of “SATA configuration” menu tab Fig.10-7: Function Defualt value SATA Сontroller(s) [Enabled/Disabled] Enabled C P C 5 0 3 U se r M a n u a l 62 © 2 0 1 2 F a s t w e l V e r . 0 0 1 a E Useful Abbreviations, Acronyms and Short-cuts CPC503 SATA Mode Selection [IDE/AHCI/] AHCI SATA Test Mode [Enabled/Disabled] Disabled Aggressive LPM Support [Enabled/Disabled] Enabled Sata Controller Speed Default Serial ATA Port 0/1/2/3 - Software Preserve - Port 0/1/2/3 [Enabled/Disabled] Enabled External SATA [Enabled/Disabled] Disabled SATA Device Type [Hard Disk Driver/Solid State Drive] Hard Disk Driver 10.3.6 Thermal Configuration Screen of the “Thermal Configuration” menu tab Fig.10-8: Function C P C 5 0 3 U se r Default value M a n u a l 63 © 2 0 1 2 F a s t w e l V e r . 0 0 1 a E Useful Abbreviations, Acronyms and Short-cuts CPC503 Critical Trip Point [POR/15 C/23 C/31 C/39 C/47 C/55 C/63 C/71 C/79 C/87 C/95 C/103 C/111 C/119 C] POR Passive Trip Point [Disabled/15 C/23 C/31 C/39 C/47 C/55 C/63 C/71 C/79 C/87 C/95 C/103 C/ 111 C/ 119 C] 95 C Passive TC1 Value TC1=1 Passive TC2 Value TC2=5 Passive TSP Value TSP=10 PCH Thermal Device [Enabled/Disabled] Enabled PCH Temp Read [Enabled/Disabled] Enabled CPU Energy Read [Enabled/Disabled] Enabled CPU Temp Read [Enabled/Disabled] Enabled 10.3.7 Fig.10-9: C P C 5 0 3 USB Configuration Screen of the “USB Configuration” menu tab U se r M a n u a l 64 © 2 0 1 2 F a s t w e l V e r . 0 0 1 a E Useful Abbreviations, Acronyms and Short-cuts CPC503 Function Значение по умолчанию Legacy USB support [Enabled/Disabled/Auto] Enabled USB Devices: 1 Keyboard, 1 Mouse, 2 Hubs - USB 3.0 Support Enabled XHCI Hand-off [Disabled/Enabled] Enabled EHCI Hand-off [Disabled/Enabled] Disabled USB Mass Storage Driver Support Enabled USB hardware delays and time-outs - USB transfer time-out [1 sec/5 sec/10 sec/20 sec] 20 sec Device reset time-out [10 sec/20 sec/30 sec/40 sec] 20 sec Device power-up delay[Auto/Manual] Auto 10.3.8 Super IO Configuration “Serial port IO Configuration” menu is available when the RIO587 board is installed. C P C 5 0 3 U se r M a n u a l 65 © 2 0 1 2 F a s t w e l V e r . 0 0 1 a E Useful Abbreviations, Acronyms and Short-cuts CPC503 Screen of the “Super IO Configuration” menu tab Fig.10-10: Function Default value Super IO Chip SMSC SCH3116 Serial Port 0/1/2/3/4/5 Configuration - Parallel Port Configuration - Serial port XX configuration: Function Default value Serial port [Enabled/Disabled] Enabled Change settings - Device mode[Standard/IrDA Mode/ASK-IR Mode] Standard Parallel port configuration: Function Default value Parellel port[Enabled/Disabled] Enabled Change settings - C P C 5 0 3 U se r M a n u a l 66 © 2 0 1 2 F a s t w e l V e r . 0 0 1 a E Useful Abbreviations, Acronyms and Short-cuts CPC503 Device mode [STD Printer Mode/ SPP Mode/ EPP1.9 and SPP Mode/ EPP-1.7 and SPP Mode/ECP Mode/ECP and EPP 1.9 Mode/ECP and EPP 1.7 Mode] 10.3.9 STD Printer Mode Serial port console redirection “Serial port console redirection» menu is available when the RIO587 board is installed. Screen of the “Serial port console redirection” menu tab Fig.10-11: Function Default value COM 0/1/2/3/4/5 - Console Redirection [Enabled/Disabled] Enabled Console Redirection Settings - C P C 5 0 3 U se r M a n u a l 67 © 2 0 1 2 F a s t w e l V e r . 0 0 1 a E Useful Abbreviations, Acronyms and Short-cuts 10.3.9.1. CPC503 Console Redirection Settings Fig.10-12: Screen of the “Console Redirection Settings menu tab Function Default value Termainal type[VT100/VT100+/VT-UTF8/ANSI] ANSI Bits per second [9600/19200/38400/57600/115200] 115200 Data bits[7/8] 8 Parity[None/Even/Odd/Mark/Space] None Stop bits[1/2] 1 Flow Control[None/”Hardware RTS/CTS”] None Recorder Mode[Disabled/Enabled] Disabled Resolution 100x31[Disabled/Enabled] Enabled Legacy OS Redirection Resolution [80x24/80x25] 80 х 24 Serial Port for Out-of-Band Management/Windows Emergency Management Services(EMS) [Disabled/Enabled] Disabled C P C 5 0 3 U se r M a n u a l 68 © 2 0 1 2 F a s t w e l V e r . 0 0 1 a E Useful Abbreviations, Acronyms and Short-cuts 10.3.10 CPC503 CPU PPM Configuration The “CPU PPM Configuration” – setting the Processor Power Management modes. Fig.10-13: Screen of the “CPU PPM Configuration” menu tab Function Default value EIST [Enabled/Disabled] Enabled Turbo Mode [Disabled/Enabled] Disabled CPU C3 report [Enabled/Disabled] Enabled CPU C6 report [Enabled/Disabled] Enabled CPU C7 report [Enabled/Disabled] Enabled 10.4 Chipset “Chipset” – configuring system logic components. C P C 5 0 3 U se r M a n u a l 69 © 2 0 1 2 F a s t w e l V e r . 0 0 1 a E Useful Abbreviations, Acronyms and Short-cuts CPC503 Screen of the “Chipset” menu tab Fig.10-14: 10.4.1 System Agent (SA) configuration System Agent (SA) configuration – memory and graphics subsystem confoguration. C P C 5 0 3 U se r M a n u a l 70 © 2 0 1 2 F a s t w e l V e r . 0 0 1 a E Useful Abbreviations, Acronyms and Short-cuts CPC503 Screen of the “System Agent (SA) configuration” menu tab Fig.10-15: Function Default value System Agent Bridge Name IvyBridge System Agent RC Version 1.8.0.0 VT-d Capability Supported VT-d [Enabled/Disabled] Enabled Enable NB CRID [Disabled/Enabled] Disabled 10.4.1.1 Graphics Configuration Graphics configuration – Graphics subsystem configuration. C P C 5 0 3 U se r M a n u a l 71 © 2 0 1 2 F a s t w e l V e r . 0 0 1 a E Useful Abbreviations, Acronyms and Short-cuts Fig.10-16: CPC503 Screen of the “Graphics Configuration” menu tab Function Purpose Default value Primary Display [Auto/IGFX/PEG/PCI/SG] Selection of the main graphics card in the system. IGFX – integrated into CPU, PEG/PCI – external graphics devices with PCI or PCI Express buses. IGFX Internal Graphics [Auto/Disabled/Enabled] Possibility to switch off the CPU integrated graphics card. Auto – the graphics card is switched off only when the display is connected. Auto GTT Size[1MB/2MB] Window size within RAM for direct access by graphics card. 2 MB Aperture Size [128MB/256MB/512MB] RAM capacity, backed up for video memory 256MB DVMT Pre-Allocated [0MB/32MB/64MB/96MB/128MB/ 160MB/192MB/224MB/256MB/288MB/ 320MB/352MB/384MB/416MB/ 448MB/480MB/512MB] Minimum backup RAM capacity required for video subsystem operation 64 MB DVMT total Gfx Mem[128M/256M/MAX]- Maximum available RAM capacity used by video subsystem driver 256M C P C 5 0 3 U se r M a n u a l 72 © 2 0 1 2 F a s t w e l V e r . 0 0 1 a E Useful Abbreviations, Acronyms and Short-cuts CPC503 Gfx Low Power Mode[Enabled/Disabled]- Reducing graphics kernel heat dissipation due to the loss of efficiency. Enabled LCD control –configuration of LVDS displays Fig.10-17: Screen of the “LCD control” menu tab Function Default value Primary IGFX boot display [VBIOS Default/CRT/EFP/LFP/ EFP3/EF{2/LFP2] VBIOS Default LCD Panel Type [640x480/800x600/1024x768/ 1280x1024/1400x1050/1600x1200/1366x768/ 1680x1050/1920x1200/1440x900/ 1920x1080/2048х1536] VBIOS Default SDVO-LFP Panel Type VBIOS Default Panel Scaling [Auto/Off/Force Scaling] Auto Active LFP [No LVDS/Int-LVDS/SDVO LVDS/eDP Port-A/ eDP Port-D] No LVDS Panel Color Depth [18 bit/24bit] 18 bit 10.4.1.2 NB PCIe Configuration NB PCIe configuration – PCI Express bus configuration. C P C 5 0 3 U se r M a n u a l 73 © 2 0 1 2 F a s t w e l V e r . 0 0 1 a E Useful Abbreviations, Acronyms and Short-cuts Fig.10-18: CPC503 Screen of the “NB PCIe Configuration” menu tab Function Purpose Default value PEG0 PCIe operation mode. - PEG1/2 PCIe operation mode. х4 Gen2/1 PEG0/1/2 – Gen X [Auto/Gen1/ Gen2] Possibility to manually specify th speed of communication with PCIE device Auto Detect Non-Compliance Device The “Enabled” setting makes it possible to solve problems using non-standard devices Disabled De-emphasis Control [-3.5 dB/-6 dB] Possibility to select amplification coefficient for reducing BER (Bit Error Rate) - 3.5 dB 10.4.1.3 Memory Configuration Memory configuration – Information and memory settings. C P C 5 0 3 U se r M a n u a l 74 © 2 0 1 2 F a s t w e l V e r . 0 0 1 a E Useful Abbreviations, Acronyms and Short-cuts CPC503 Screen of the “Memory Configuration” manu tab Fig.10-19: Function Purpose Default value Memory RC Version Version 1.8.0.0 Memory Frequency Frequency 1600 Mhz Total Memory Total memory 6144 MB (DDR3) DIMM# 0/1/2/3 Location of the installed memory - CAS Latency (tCL) Delay in cycles between CAS signal generation and data reading start 11 Minimum delay time Minimum delay time - CAS to RAS (tRCDmin) Time of delay between CAS and RAS signals. 11 Row Precharge (tRPmin) 1. Number of cycles for the repeated RAS signal generation 11 Active to Precharge (tRASmin) 2. Number of cycle of opening and closing of the same storage bank 28 XMP Profile ½ 3. Not supported Not Supported C P C 5 0 3 U se r M a n u a l 75 © 2 0 1 2 F a s t w e l V e r . 0 0 1 a E Useful Abbreviations, Acronyms and Short-cuts CPC503 ECC support [Enabled/Disabled] ECC mode activation. Enabled Max TOLUD [Dynamic/1GB/1.25GB/1.5GB/ 1.75GB/2GB/2.25GB/2.5GB/2.75GB/ 3GB/3.25GB] Possibility to choose the upper RAM limit Dynamic Memory Remap [Enabled/Disabled] Has to be activated if 4 GB RAM or more is installed Enabled 10.4.2 PCH-IO Configuration PCH-IO configuration – Southbridge configuration. Screen of the “PCH-IO Configuration” menu tab Fig.10-20: Function Purpose Default value USB Configuration USB configuration - PCH Azalia Configuration Audio codec configuration - SB CRID [Disabled/Enabled] Possibility to change the southbridge identifier for compatability with obsolete software Disabled High Precision Event Timer Configuration HPET configuration - C P C 5 0 3 U se r M a n u a l 76 © 2 0 1 2 F a s t w e l V e r . 0 0 1 a E Useful Abbreviations, Acronyms and Short-cuts CPC503 High Precision Timer [Enabled/Disabled] Possibility to switch off the HPET timer, integrated into the chipset. Enabled Function Purpose Default value Azalia [Auto/Enabled/Disabled] Possibility to switch off the audio codec Auto 10.4.2.1 PCH Azalia Configuration 10.4.2.2 USB Configuration USB configuration C P C 5 0 3 U se r M a n u a l 77 © 2 0 1 2 F a s t w e l V e r . 0 0 1 a E Useful Abbreviations, Acronyms and Short-cuts Fig.10-21: CPC503 Screen of the “USB Configuration” menu tab Function Purpose Default value XHCI Pre-Boot Driver Support of USB 3.0 at BIOS level Enabled USB 3.0 operating mode in BIOS: Smart Auto Disabled: all the ports are in USB 2.0 mode Enabled: All the ports are in USB 3.0 mode – operating system driver support is required Auto – USB 2.0 mode at the BIOS stage, then - USB 3.0, if there is support from operating system driver. xHCI Mode Smart Auto – USB 2.0 mode at cold start. If operating system has USB 3.0 support, the ports will remain to be in the USB 3.0 mode after reboot. HS Port #1/2/3/4 Switchable Individual switching of the ports from USB 3.0 to USB 2.0 modes Enabled Additional buffering support for high-speed USB 3.0 storage devices Enabled xHCI Streams C P C 5 0 3 U se r M a n u a l 78 © 2 0 1 2 F a s t w e l V e r . 0 0 1 a E Useful Abbreviations, Acronyms and Short-cuts CPC503 EHCI1 [Enabled/Disabled] Possibility to switch off EHCI1 controller Enabled EHCI2 [Enabled/Disabled] Possibility to switch off EHCI2 controller. Enabled USB Ports Per-Port Disable Control [Disabled/.Enabled] Possibility to individually switch off USB ports. Disabled 10.5 Boot Tab for configuring module boot devices. Screen of this menu tab is shown on the Figure below. Screen of the “Boot” menu tab Fig. 10-22: 10.5.1 Boot Configuration This menu tab enables to set separate system features at the time of booting. C P C 5 0 3 U se r M a n u a l 79 © 2 0 1 2 F a s t w e l V e r . 0 0 1 a E Useful Abbreviations, Acronyms and Short-cuts 10.5.1.1 CPC503 Setup Prompt Timeout Set the number of seconds for activation waiting time. Value 65535 (0XFFFF) means that the waiting period is indefinite. 10.5.1.2 Bootup NumLock State Setting this value enables to change the “Number Lock” settings upon booting. An optimal default adjustment for this value is “On” Option Description Off This option disables the “Number Lock” automatic keyboard mode. Press Number Lock key button located in the upper left corner of keyboard digital panel in order to use keyboard’s set of numeric characters. “Number Lock” LED starts flashing when the “Number Lock” key button is pressed. On This parameter automatically enables the “Number Lock” mode on the keyboard during system boot process. This makes possible a direct use of the digital panel located in the right side of the keyboard. The “Number Lock” on the keyboard will be activated. This parameter value is a default value. 10.5.1.3 Quiet Boot Setting this value makes it possible to change the nature of screen messages during the boot process. An optimal and default parameter is “Disabled”. Option Description Disabled Select this parameter value for system to generate POST messages. Enabled Select this parameter value for the system to generate “OEM logo” messages. This parameter value is a default value. 10.5.1.4 Fast Boot 4. Activation of this mode enables to speed up the BIOS boot process by skipping initialization of a part of the hardware. An optimal and default parameter is “Disabled”. Option Description Disabled Select this parameter value in order to switch off the Fast Boot mode Enabled Select this parameter value, to speed up the BIOS boot process by skipping initialization of a part of the hardware. C P C 5 0 3 U se r M a n u a l 80 © 2 0 1 2 F a s t w e l V e r . 0 0 1 a E Useful Abbreviations, Acronyms and Short-cuts 10.5.2 CPC503 Boot Option Priorities This submenu entry shows the priorities of boot options. User can change priorities by selecting a separate boot option. The boot option marked as #1 will have the top priority, the next will be second, third etc. 10.5.3 Hard Drive BBS Priorities Fig. 10-23: Screen of the “Hard Drive BBS Priorities” menu tab This entry contains a list of devices to determine computer boot priority. Boot Option #1 has the top priority. C P C 5 0 3 U se r M a n u a l 81 © 2 0 1 2 F a s t w e l V e r . 0 0 1 a E Useful Abbreviations, Acronyms and Short-cuts 10.5.4 CPC503 CSM16 Parameters 5. This entry is used for setting additional boot parameters. Screen of the “CSM16 Parameters” menu tab Fig. 10-24: Function Purpose CSM16 Module Version Version 07.70 GateA20 Active A20 gate control Upon Request Option ROM Messages Output of OPROM BIOS data Force BIOS INT19 Trap Response Control of the trapped INT19 Immediate 10.5.4.1 Default value Option ROM Messages While using this parameter, the “Option ROM” messages are displayed. Option Description Force BIOS Set this parameter value to allow the system displaying the “Optional ROM” messages. Keep Current Set this parameter value to disable system display of the “Optional ROM” parameters. C P C 5 0 3 U se r M a n u a l 82 © 2 0 1 2 F a s t w e l V e r . 0 0 1 a E Useful Abbreviations, Acronyms and Short-cuts CPC503 10.5.4.2 INT19 Trap Responce The “INT19 Trap Response” – control of the Int 19h vector trap process. Option Decription Immediate Immediately run the trapped int 19h Postponed Run the trapped int 19h during legacy booting. 10.5.5 CSM parameters 6. This submenu enables to set additional boot parameters. Screen of the “CSM parameters” menu tab Fig. 10-25: Function Purpose Default valuee Launch CSM Activation of Legacy BIOS compatibility Enabled Boot option filter Support of booting from UEFI storage devices. Legaсy only Launch PXE OpROM policy Activation of booting via network: UEFI or Legacy Do not launch Launch Storage OpROM policy Booting from PCI storage devices: UEFI or Legacy Legaсy only C P C 5 0 3 U se r M a n u a l 83 © 2 0 1 2 F a s t w e l V e r . 0 0 1 a E Useful Abbreviations, Acronyms and Short-cuts CPC503 Launch Video OpROM policy Support of UEFI graphics cards: UEFI or Legacy Legaсy only Other PCI device ROM policy Initialization of the OpROM installed boards: UEFI or Legacy Legacy OpROM 10.6 Security This tab allows setting the module’s protective functions. 10.6.1 Password setting Two password protection levels “Security” settings allow Administrator and User passwords. IF both of the passwords are used, Administrator password should be entered first. The system should be configured in such a way that all the users could enter password each time the system is booted or when the “Setup” procedure is performed, using Administrator or User passwords. Administrator and User passwords allow two levels of password protection. If you selected the “Password” submenu, you’ll be asked to set the password containing from 3 to 20 characters. Type the password from keyboard. Password will not be displayed during entering. Confirm the password below. If you forget your password, you’ll have to reset all the BIOS settings. 10.6.2 Security Setup Fig. 7-26: C P C 5 0 3 U se r Screen of the “Security” menu tab M a n u a l 84 © 2 0 1 2 F a s t w e l V e r . 0 0 1 a E Useful Abbreviations, Acronyms and Short-cuts CPC503 Option Description User Password This option enables setting User password for BIOS Administrator Password This option enables setting Administrator password for BIOS Option Purpose Default value Minimum Length Minimum number of symbols 3 Maximum Length Maximum number of symbols 20 Option Description Secure Boot menu Mechanism of protection against the unsigned boot loader for UEFI BIOS. HDD Security Configuration Enables to set the password for accessing to storage devices. 10.7 Save & Exit Tab of BIOS Setup exit parameters. Screen of this menu tab is shown below. Fig. 7-27: C P C 5 0 3 U se r Screeen of the “Save & Exit” menu tab M a n u a l 85 © 2 0 1 2 F a s t w e l V e r . 0 0 1 a E Useful Abbreviations, Acronyms and Short-cuts 10.7.1 CPC503 Save Changes and Exit When you’ve made changes to the system, select this option for saving the configuration and exiting the AptioTM TSE, so the configuration could be used further. The following window will appear after selecting “Save Configuration and Exit” option: Select “Yes” to save changes and exit AptioTM TSE. 10.7.2 Discard Changes and Exit Select this option to exit AptioTM TSE without saving the changes. The following window will appear after selection of the “Discard Changes and Exit” option. Select “Yes” to discard changes and exit AptioTM TSE. 10.7.3 Save Changes and Reset When you’ve made changes to the system, select this option for saving configuration and system reboot in order to use the other parameter configuration in the future. The following window will appear after selection of the “Save Changes and Reset” option: Select “Yes” to save changes and reboot. C P C 5 0 3 U se r M a n u a l 86 © 2 0 1 2 F a s t w e l V e r . 0 0 1 a E Useful Abbreviations, Acronyms and Short-cuts 10.7.4 CPC503 Discard Changes and Reset Choose this option for reset without saving the changes made during configuration process. The following window will appear after selection of the “Discard Changes and Reset” option: 10.7.5 Save Options Options for saving/ discarding changes made are described below. 10.7.5.1 Save Changes When you’ve made changes to the system, select this option for saving changes while operation continues. For separate options it is required to reboot the system to enable using the new parameter configuration. Select “Yes” for saving changes while operation continues. 10.7.5.2 Discard Changes Select this option to discard the changes made. Select “Yes” for loading the previous values while operation continues. C P C 5 0 3 U se r M a n u a l 87 © 2 0 1 2 F a s t w e l V e r . 0 0 1 a E Useful Abbreviations, Acronyms and Short-cuts CPC503 10.7.5.3 Restore Defaults Restoring default settings for all the options Select “Yes” to restore the default settings. 10.7.5.4 Save as User Defaults Save the changed values as user default settings. Select “Yes” in order to save the changes made while operation continues. 10.7.5.5 Restore User Defaults Restore user settings for all the options. Select “Yes” for restoring user settings while operation continues. 10.7.6 Boot Over ride This menu entry displays all possible load options from the “Boot Option List”. User can choose a device for loading directly from BIOS SETUP. C P C 5 0 3 U se r M a n u a l 88 © 2 0 1 2 F a s t w e l V e r . 0 0 1 a E