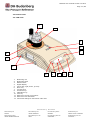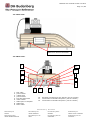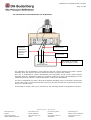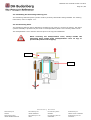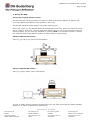
1
DPG10A User manual Version 10.2010 Page 1 / 82 DPG 10-A (DPG8 II) User's Manual Absolute Digital Piston Gauge DH Budenberg Worldwide DH Budenberg SA FRANCE DH Budenberg LTD UNITED KINGDOM DH Budenberg Gmbh GERMANY DH Budenberg Inc UNITED STATE of AMERICA DH Budenberg FZCO UNITED ARABES EMIRATES DH Budenberg PV LTD INDIA DH Budenberg PTE LTD SINGAPORE DH Budenberg PTY LTD AUSTRALIA DPG10A User manual Version 10.2010 Page 2 / 82 DPG10A 07/2010 – Software version 5.00 Dear user, We would like first to thank you for your confidence in our expertise and products when buying our DPG10A. We have made every effort to ensure the accuracy of the contents of this manual. Should you detect any errors, we would greatly appreciate receiving suggestions to improve the quality of the contents of this manual. The above notwithstanding, we can assume no responsibility for any errors in this manual or their eventual consequences. We reserve the right to make modifications to this manual without any further notice. For more detailed technical data about the DPG10A, please contact us. DH-Budenberg SA © Copyright 2010 DH, “Desgranges & Huot” and the DH logotype are registered trademarks of DH-Budenberg SA. The trademarks mentioned in this manual are the ownership of their respective companies. DPG10A, EMM and ACF are trademarks of DH-Budenberg. DH Budenberg Worldwide DH Budenberg SA FRANCE DH Budenberg LTD UNITED KINGDOM DH Budenberg Gmbh GERMANY DH Budenberg Inc UNITED STATE of AMERICA DH Budenberg FZCO UNITED ARABES EMIRATES DH Budenberg PV LTD INDIA DH Budenberg PTE LTD SINGAPORE DH Budenberg PTY LTD AUSTRALIA DPG10A User manual Version 10.2010 Page 3 / 82 1. PURPOSE AND OPERATING PRINCIPLE. ................................................................ 6 1.1 Purpose. ......................................................................................................... 6 1.2 Operating principles. ........................................................................................ 6 1.2.1 Measuring principle........................................................................................ 6 1.2.2 Auto-Calibrating Function. .............................................................................. 7 1.2.3 Environment Monitoring Module. ..................................................................... 8 1.3 Measuring ranges ............................................................................................. 9 2. DESCRIPTION. ................................................................................................ 10 2.1 The base. ...................................................................................................... 11 2.2 The measuring head. ...................................................................................... 11 2.3 The accessories. ............................................................................................ 11 2.4 General view. ................................................................................................ 12 2.4.1 3D view. .................................................................................................... 12 2.4.2 Side view. .................................................................................................. 13 2.4.3 Rear view. .................................................................................................. 13 2.4.4 Top view. ................................................................................................... 14 2.4.5 Connection of the lubrication box P/N 60593................................................... 15 2.5 Measurement display and keyboard. ................................................................. 16 2.5.1 Interpreting a reading in measure mode. ....................................................... 16 2.5.2 Keyboard. .................................................................................................. 17 3. INSTALLATION. ............................................................................................... 18 3.1 Unpacking. .................................................................................................... 18 3.2 Setting up. .................................................................................................... 18 3.2.1 Locating the DPG10A. .................................................................................. 18 3.2.2 Levelling the DPG10A. ................................................................................. 19 3.2.3 Installing the measuring head top part. .......................................................... 20 3.2.3.1 Measuring head. ....................................................................................... 20 3.2.3.2 Base. ...................................................................................................... 21 3.2.3.3 Install the measuring head on the base. ...................................................... 22 3.2.5 Powering up. .............................................................................................. 23 4. Zeroing the DPG. ............................................................................................. 24 4.1 Zeroing in gauge pressure mode. ..................................................................... 24 4.2 Zeroing in Absolute pressure mode .................................................................. 26 4.3 Calibrating DPG under vacuum. ....................................................................... 27 4.3.1 Use of the Auto calibration function. .............................................................. 27 5. Running an external calibration. ........................................................................ 30 5.1 Setting up. .................................................................................................... 30 5.2 Running the external calibration....................................................................... 30 5.2.1 Calibration time. ......................................................................................... 31 5.2.2 End of calibration. ....................................................................................... 31 6. MENU MODE.................................................................................................... 32 6.1 Introducing the menu mode. ........................................................................... 32 6.1.1 Operating principles. .................................................................................... 32 6.2 Accessing a function in menu mode. ................................................................. 32 6.3 Changing the pressure unit. ............................................................................ 33 6.3.1 Choosing an engineering unit ........................................................................ 33 6.3.2 Defining a user unit ..................................................................................... 33 6.3.3 Editing the user unit coefficient ..................................................................... 34 6.3.4 Editing the user unit label ............................................................................. 34 6.3.5 Quitting and/or confirming the modifications................................................... 35 6.3.6 Quitting and/or saving the modifications. ....................................................... 35 6.4 Setting pressure measurement parameters ....................................................... 35 6.4.1 Modifying the resolution. .............................................................................. 36 6.4.2 Modifying the stability. ................................................................................. 36 DH Budenberg Worldwide DH Budenberg SA FRANCE DH Budenberg LTD UNITED KINGDOM DH Budenberg Gmbh GERMANY DH Budenberg Inc UNITED STATE of AMERICA DH Budenberg FZCO UNITED ARABES EMIRATES DH Budenberg PV LTD INDIA DH Budenberg PTE LTD SINGAPORE DH Budenberg PTY LTD AUSTRALIA DPG10A User manual Version 10.2010 Page 4 / 82 6.4.3 Modifying the filter. ..................................................................................... 6.4.4 Modifying the vacuum. ................................................................................. 6.4.5 Quitting and/or saving the modifications. ....................................................... 6.5 Knowing the ambient conditions....................................................................... 6.6 Selecting a measuring head............................................................................. 6.6.1 Modifying the head parameters. .................................................................... 6.6.2 Modifying the measuring head serial number. ................................................. 6.6.3 Modifying the piston-cylinder assembly serial number. ..................................... 6.6.4 Modifying the piston-cylinder assembly conversion coefficient. .......................... 6.6.5 Modifying the head temperature probe value. ................................................. 6.6.6 Selecting the measuring head. ...................................................................... 6.6.7 Quitting and/or saving the modifications. ....................................................... 6.7 Customizing the DPG10A. ............................................................................... 6.7.1 Displaying/modifying date and time. .............................................................. 6.7.2 Defining a password. ................................................................................... 6.7.2.1 Operating principle and use of the password. ............................................... 6.7.2.2 Cancelling and modifying the password ....................................................... 6.7.3 Selecting the calibration mode. ..................................................................... 6.7.4 Selecting the RS232C communication rate...................................................... 6.7.5 Identifying the DPG10A. ............................................................................... 6.7.6 Measuring cell configuration. ........................................................................ 6.7.7 Activating a beeper. .................................................................................... 6.7.8 Changing the displaying language. ................................................................ 6.7.9 Quitting and/or saving the modifications. ....................................................... 6.8 Modifying the constant parameters. .................................................................. 6.8.1 Modifying the gravity. .................................................................................. 6.8.2 Modifying the mass density. ......................................................................... 6.8.3 Modifying the barometer serial number. ......................................................... 6.8.4 Quitting and/or saving the modifications. ....................................................... 7. REMOTE OPERATION. ....................................................................................... 7.1 Configuration. ................................................................................................ 7.2 Command list. ............................................................................................... 7.3 Syntax .......................................................................................................... 8. COMMAND DESCRIPTION .................................................................................. 9. METROLOGY. ................................................................................................... 9.1 Fundamental principle – Calculation of a pressure with the general formula. .......... 9.2 Automatic pressure corrections. ....................................................................... 9.2.1 Kn determination. ....................................................................................... 9.2.2 Local gravity correction. ............................................................................... 9.2.3 Air buoyancy correction................................................................................ 9.2.4 Measuring head temperature correction. ........................................................ 9.2.5 Piston cylinder pressure distortion correction. ................................................. 9.2.6 Remaining Pressure in vacuum chamber. ....................................................... 10. TECHNICAL DATA. .......................................................................................... 10.1. Dimensions/Weight/Power supply. ................................................................. 10.2 Power supply. .............................................................................................. 10.3 Measurement cell. ........................................................................................ 10.4 Environment Monitoring Module. .................................................................... 10.5 CE Declaration. ............................................................................................ 11. MAINTENANCE. .............................................................................................. 11.1 General Maintenance. ................................................................................... 11.2 Cleaning...................................................................................................... 11.2.1 Cleaning the Piston Cylinder Assembly. ........................................................ 11.3 Piston cylinder assembly tool. ........................................................................ 11.4 Changing the components. ............................................................................ DH Budenberg 36 36 36 36 37 37 39 39 40 41 41 41 42 42 45 45 45 46 46 47 47 47 47 48 48 49 50 50 51 52 52 53 55 56 66 66 66 67 67 67 67 68 68 69 69 69 69 69 69 70 70 70 70 71 73 Worldwide DH Budenberg SA FRANCE DH Budenberg LTD UNITED KINGDOM DH Budenberg Gmbh GERMANY DH Budenberg Inc UNITED STATE of AMERICA DH Budenberg FZCO UNITED ARABES EMIRATES DH Budenberg PV LTD INDIA DH Budenberg PTE LTD SINGAPORE DH Budenberg PTY LTD AUSTRALIA DPG10A User manual Version 10.2010 Page 5 / 82 11.4.1 Changing the fuses. ................................................................................... 11.5 Calibration................................................................................................... 11.5.1 Standard's calibration. ............................................................................... 11.5.1.1 Frequency. ............................................................................................. 11.5.1.2 Method and means. ................................................................................ 11.5.2 Ambient conditions sensors calibration ......................................................... 11.5.3 Atmospheric pressure sensor calibration. ...................................................... 11.3.2.2 Relative humidity sensor calibration. ......................................................... 11.3.2.3 Temperature sensor calibration. ............................................................... 11.3.2.4. Vacuum sensor calibration. ..................................................................... 12. MOVING & SHIPPING. ..................................................................................... 13. TROUBLESHOOTING. ...................................................................................... Appendix 1 – CE DECLARATION ............................................................................. Appendix 2 - ADAPTATION KIT FOR GAUGE MEASURING HEAD. ................................ DH Budenberg 73 74 74 74 74 74 75 76 77 78 79 79 80 81 Worldwide DH Budenberg SA FRANCE DH Budenberg LTD UNITED KINGDOM DH Budenberg Gmbh GERMANY DH Budenberg Inc UNITED STATE of AMERICA DH Budenberg FZCO UNITED ARABES EMIRATES DH Budenberg PV LTD INDIA DH Budenberg PTE LTD SINGAPORE DH Budenberg PTY LTD AUSTRALIA DPG10A User manual Version 10.2010 Page 6 / 82 1. PURPOSE AND OPERATING PRINCIPLE. 1.1 Purpose. The DPG10A standard is a digital primary pressure standard, which combines the metrological performances of fundamental pressure balances with the convenience of digital transfer standards. The measuring principle of the DPG10A is based on the association of a piston-cylinder assembly, similar to those used in pressure balances, with an electronic measuring cell. The new DPG10A has been specifically designed for the calibration of last generation electronic pressure measuring instruments: automatic controllers, pressure calibrators, transmitters and sensors. Its measuring principle and its high-level performances enable it to be integrated in an accredited calibration chain. Moreover, the DPG10A’s pressure ranges are quickly interchangeable which ensures an easy and accurate adaptation of the standard to any calibration application, from vacuum to 20 bar / 2 Mpa gauge and absolute. 1.2 Operating principles. 1.2.1 Measuring principle. The DPG10A’s measuring principle lies on the fundamental equation, which defines pressure: P = F/A It is based on the association of a piston-cylinder assembly, whose surface area A is perfectly known, with a high accuracy electronic measuring cell, which measures the force F. Pressure is applied on the piston, which turns it linearly into a perfectly proportional force that is transferred to the measuring cell. The measuring cell permanently measures and interpolates the pressure-generated force. It uses the magnetic pot technology: the force, which is applied to the measuring cell, creates an imbalance in a magnetic field. An electric power is generated to restore the magnetic field’s balance: the measurement is based on the electric intensity, which is needed to find back the balance. Then the microprocessor calculates the force-corresponding pressure, sets it according to the environmental parameters and finally displays it. DH Budenberg Worldwide DH Budenberg SA FRANCE DH Budenberg LTD UNITED KINGDOM DH Budenberg Gmbh GERMANY DH Budenberg Inc UNITED STATE of AMERICA DH Budenberg FZCO UNITED ARABES EMIRATES DH Budenberg PV LTD INDIA DH Budenberg PTE LTD SINGAPORE DH Budenberg PTY LTD AUSTRALIA DPG10A User manual Version 10.2010 Page 7 / 82 Therefore, the measurement is directly linked with the primary physical units of mass, length and time. As a result, the DPG10A can offer metrological performances that no transfer system is able to match. The measuring cell is located in a reference chamber which can be evacuated for absolute pressure measurements or vented to ambient pressure for gauge pressure measurement. 1.2.2 Auto-Calibrating Function. The DPG10A’s Auto-Calibrating Function is equipped with an automatic-loading internal calibration mass. The user can easily load the mass by pressing the [CAL] key located on the front panel of the DPG10A. By applying this calibration mass, the user readjusts the deviation of the measuring cell, which appears when there is a drift between two reference points (zero and the full scale value of the measuring cell). The DPG10A’s measuring cell may drift with time. This drift is due to the evolution of the measuring cell’s response according to the environmental parameters. The main influence parameters are the ambient temperature and the relative humidity. The use of the ACF enables the measuring cell to free from this drift by readjusting the deviation of the measuring cell according to the new environmental conditions. It is also possible to command the ACF from a remote computer. DH Budenberg Worldwide DH Budenberg SA FRANCE DH Budenberg LTD UNITED KINGDOM DH Budenberg Gmbh GERMANY DH Budenberg Inc UNITED STATE of AMERICA DH Budenberg FZCO UNITED ARABES EMIRATES DH Budenberg PV LTD INDIA DH Budenberg PTE LTD SINGAPORE DH Budenberg PTY LTD AUSTRALIA DPG10A User manual Version 10.2010 Page 8 / 82 1 2 3 4 1. 2. 3. 4. Measuring cell Internal standard mass Computer connection EMM The user can optionally use a set of external calibration masses to replace the internal ACF in order to check the measuring cell linearity. It is also possible to use these masses to run an external calibration. 1.2.3 Environment Monitoring Module. The measuring cell measurement changes according to the evolution of ambient conditions. The use of the Auto-Calibrating Function ensures the easy adaptation of the measurement according to the new environment conditions, whenever it deems it necessary. Thereby, the DPG10A is equipped with an Environment Monitoring Module, which enables to determine whether it is worthy to use the ACF. The EMM is fitted with 3 sensors for ambient temperature, relative humidity and atmospheric pressure, and their electronic components. When the ACF is in use, the environment conditions for, which the measurements carried out by the measuring cell are valid are measured by the EMM and stored in the internal memory. After the calibration, the EMM keeps on monitoring the evolution of the ambient conditions in real time. Whenever these conditions vary in proportions that might noticeably alter the measuring performance, the DPG10A displays the CAL warning flag to advise the user to command the ACF in order to readjust the measuring cell to the new operating conditions. The EMM warns the user according to the evolution of the environment conditions. Therefore, it monitors the difference between the conditions that were stored during the calibration, at t0, and the conditions measured at t+1, when the operation took place. Consequently, the sensors with, which the EMM is fitted, are used for their sensitivity and short-term repeatability, and not for their accuracy. The warning flag is also sent to the command software when the DPG10A is operated from a remote computer. DH Budenberg Worldwide DH Budenberg SA FRANCE DH Budenberg LTD UNITED KINGDOM DH Budenberg Gmbh GERMANY DH Budenberg Inc UNITED STATE of AMERICA DH Budenberg FZCO UNITED ARABES EMIRATES DH Budenberg PV LTD INDIA DH Budenberg PTE LTD SINGAPORE DH Budenberg PTY LTD AUSTRALIA DPG10A User manual Version 10.2010 Page 9 / 82 1.3 Measuring ranges The DPG10A’s measuring range depends on two parameters: - The measuring head piston-cylinder assembly Kn, - The electronic cell measuring range (100000 g). The various Kn make it possible to obtain several measuring ranges up to 5000 mbar. The measuring heads are interchangeable, which ensures an accurate adaptation of the DPG10A according to the range of the instruments to be calibrated. DESIGNATION DPG10A-A02 RANGE RESOLUTION 0-2000 hPa (0-29 psi) Kn/PC -6 0.2 Pa (29 E psi) -7 psi) 200 hPa/kg (2.9 psi) DPG10A-A05 0-5000 hPa (0-72.5 psi) 0.5 Pa (725 E 500 hPa/kg (7.25 psi) DPG10A-A10 0- 1 MPa (0-145 psi) 1 Pa (1.45 E-6 psi) 0.1 Mpa/kg (14.5 psi) DPG10A-A20 0 – 2 Mpa (0-290psi) 2 Pa (2.9 E-6 psi) 0.2 Mpa/kg (29 psi) Note: The Kn nominal coefficient is a conversion coefficient, which is specific to each type of piston-cylinder assembly, whose surface area is such that the piston-cylinder assembly converts a Kn.bar pressure in 1 Kg, in normal operating conditions. The exact K will have to be defined. There is two different model of DPG10A, the LP version and the HP version. The LP version can works up to 10 bar maximum. This DPG is equipped with an integrated automatic switching lubrication circuit module The HP version can works above 10 bar. This DPG is equipped with an external automatic switching lubrication module (P/N 60593). DH Budenberg Worldwide DH Budenberg SA FRANCE DH Budenberg LTD UNITED KINGDOM DH Budenberg Gmbh GERMANY DH Budenberg Inc UNITED STATE of AMERICA DH Budenberg FZCO UNITED ARABES EMIRATES DH Budenberg PV LTD INDIA DH Budenberg PTE LTD SINGAPORE DH Budenberg PTY LTD AUSTRALIA DPG10A User manual Version 10.2010 Page 10 / 82 2. DESCRIPTION. The DPG10A pressure standard is composed of: (example of assy.) One base, One or several measuring heads, Accessories. An external lubrication commutation module (for the HP version). 1 – The measuring head. 2 – Reference vacuum isolation valve. 3 – Measuring head vacuum isolation valve. 4 – Submicron filter. 5 – Instrument under test isolation valve. 6 – Vacuum pump. 7 – Vacuum Te connection DH Budenberg Worldwide DH Budenberg SA FRANCE DH Budenberg LTD UNITED KINGDOM DH Budenberg Gmbh GERMANY DH Budenberg Inc UNITED STATE of AMERICA DH Budenberg FZCO UNITED ARABES EMIRATES DH Budenberg PV LTD INDIA DH Budenberg PTE LTD SINGAPORE DH Budenberg PTY LTD AUSTRALIA DPG10A User manual Version 10.2010 Page 11 / 82 2.1 The base. The base is composed of: - The measuring cell, which measures the force applied by the measuring head piston-cylinder assembly, - The Auto-Calibrating Function. - The Environment Monitoring Module. Electronic components, which ensure the calculation of the applied pressure, the display and keyboard control as well as the RS232C communications. 2.2 The measuring head. The measuring head is designed for containing, operating and protecting the piston-cylinder assembly. Upper flange O-ring Main body O-ring Cylinder Piston Piston head DPG10A measuring heads are designed to operate with clean gas as the pressurized and piston lubricating medium. The measuring head is coupled to its base by the mean of 3 screws and can be dismantled in a few seconds. It is possible to combine a measuring cell with several measuring heads, each of, which being equipped with a piston-cylinder assembly with a different surface area, to meet various application fields. 2.3 The accessories. The accessories delivered with the DPG10A are: - A A A A A user’s manual, calibration certificate, RS232C cable, power cable, vacuum tubing kit DH Budenberg Worldwide DH Budenberg SA FRANCE DH Budenberg LTD UNITED KINGDOM DH Budenberg Gmbh GERMANY DH Budenberg Inc UNITED STATE of AMERICA DH Budenberg FZCO UNITED ARABES EMIRATES DH Budenberg PV LTD INDIA DH Budenberg PTE LTD SINGAPORE DH Budenberg PTY LTD AUSTRALIA DPG10A User manual Version 10.2010 Page 12 / 82 2.4 General view. 2.4.1 3D view. 13 12 3 1 5 2 7 11 10 1 2 3 4 5 6 7 8 9 10 11 12 13 9 8 4 6 Measuring cell Measuring head Bubble-levels Digital display Cursor left, right, down, up keys Enter key Leveling feet Function keys Calibration key Tare key Reference vacuum connections Reference level indication Connection flange to instrument under test DH Budenberg Worldwide DH Budenberg SA FRANCE DH Budenberg LTD UNITED KINGDOM DH Budenberg Gmbh GERMANY DH Budenberg Inc UNITED STATE of AMERICA DH Budenberg FZCO UNITED ARABES EMIRATES DH Budenberg PV LTD INDIA DH Budenberg PTE LTD SINGAPORE DH Budenberg PTY LTD AUSTRALIA DPG10A User manual Version 10.2010 Page 13 / 82 2.4.2 Side view. Reference vacuum connection 2.4.3 Rear view. 1 12 11 9 2 8 3 7 4 6 1. 2. 3. 4. 5. 6. 7. 8. 9. PRT cable power switch voltage fuse power socket fuse and spare fuse motor switch COM1 port to computer COM2 port Motor cable 5 10 10. 11. 12. Electrical connection for the lub box (For HP version) Connection to lubricate the piston. (For HP version) Connection to lubricate the piston. (For HP version) DH Budenberg Worldwide DH Budenberg SA FRANCE DH Budenberg LTD UNITED KINGDOM DH Budenberg Gmbh GERMANY DH Budenberg Inc UNITED STATE of AMERICA DH Budenberg FZCO UNITED ARABES EMIRATES DH Budenberg PV LTD INDIA DH Budenberg PTE LTD SINGAPORE DH Budenberg PTY LTD AUSTRALIA DPG10A User manual Version 10.2010 Page 14 / 82 2.4.4 Top view. Bubble Level DH Budenberg Worldwide DH Budenberg SA FRANCE DH Budenberg LTD UNITED KINGDOM DH Budenberg Gmbh GERMANY DH Budenberg Inc UNITED STATE of AMERICA DH Budenberg FZCO UNITED ARABES EMIRATES DH Budenberg PV LTD INDIA DH Budenberg PTE LTD SINGAPORE DH Budenberg PTY LTD AUSTRALIA DPG10A User manual Version 10.2010 Page 15 / 82 2.4.5 Connection of the lubrication box P/N 60593. Electrical connection between the DPG and the box Test pressure Lubrication Connection to external drive air supply (7 bar) The lubrication box P/N 60593 is used with the DPG HP version whatever the piston cylinder assembly used (HP version required if maximum pressure is higher than 10 bar). This box is dedicated to switch automatically the lubrication circuit of the piston-cylinder assembly from the atmosphere (when the pressure measured is below the atmosphere) to the measured pressure (when the measured pressure is above the atmosphere). The box is constituted of 2 main valves (pneumatically actuated) and 1 low pressure electro pilot to drive the 2 main. The electrical power is given by the DPG and the box is piloted by the DPG. There is no human action. For the DPG LP version, there is no external box, the switching module is integrated in the DPG. DH Budenberg Worldwide DH Budenberg SA FRANCE DH Budenberg LTD UNITED KINGDOM DH Budenberg Gmbh GERMANY DH Budenberg Inc UNITED STATE of AMERICA DH Budenberg FZCO UNITED ARABES EMIRATES DH Budenberg PV LTD INDIA DH Budenberg PTE LTD SINGAPORE DH Budenberg PTY LTD AUSTRALIA DPG10A User manual Version 10.2010 Page 16 / 82 2.5 Measurement display and keyboard. 2.5.1 Interpreting a reading in measure mode. After the user has powered up the standard, the display indicates the measured pressure as well as the following operating parameters: 1 2 3 4 5 6 7 8 9 10 Bar graph : indicates the measuring range that has been used Pressure stability Number of in-use measuring head Filter setting indication REM is displayed if remote mode Action in progress or the residual pressure in vacuum Recalibration warning message Selected engineering unit (G)auge (A)bsolute pressure mode Measured pressure Note 1: A black star is displayed in area 2, when the pressure is stable. When the measuring cell is at zero the star is displayed in inverse video Note 2: The A indicator is displayed in area 9, when the residual vacuum goes below 20 Pa. It is displayed in inverse video mode when the residual vacuum is added to the pressure measurement of the measuring cell. Never apply any pressure during the initialization of the standard. If they are different measuring heads, the user must select the head he wants to use in the HEADS menu (Cf.7.6). Each time the user powers up the standard, it goes back to the latest-stored configuration. DH Budenberg Worldwide DH Budenberg SA FRANCE DH Budenberg LTD UNITED KINGDOM DH Budenberg Gmbh GERMANY DH Budenberg Inc UNITED STATE of AMERICA DH Budenberg FZCO UNITED ARABES EMIRATES DH Budenberg PV LTD INDIA DH Budenberg PTE LTD SINGAPORE DH Budenberg PTY LTD AUSTRALIA DPG10A User manual Version 10.2010 Page 17 / 82 2.5.2 Keyboard. TARE CAL F1 F2 F3 F4 measuring cell zeroing measuring cell calibration UNITS menu short cut HEADS menu short cut SETTINGS menu short cut absolute and gauge mode validation (it is only possible to work in absolute pressure measurement mode if the barometer is connected and activated) ENTER main screen entry ∧ and ∨ contrast adjustment (+ and -) < and > back-lighting (off and on) The back-lighting switches on automatically when the user powers up the standard. The back-lighting stops automatically if the user does not press any key during 10 minutes. Press the > key to switch on the back-lighting. DH Budenberg Worldwide DH Budenberg SA FRANCE DH Budenberg LTD UNITED KINGDOM DH Budenberg Gmbh GERMANY DH Budenberg Inc UNITED STATE of AMERICA DH Budenberg FZCO UNITED ARABES EMIRATES DH Budenberg PV LTD INDIA DH Budenberg PTE LTD SINGAPORE DH Budenberg PTY LTD AUSTRALIA DPG10A User manual Version 10.2010 Page 18 / 82 3. INSTALLATION. 3.1 Unpacking. The DPG10A pressure standard is delivered in a custom container especially designed to maintain the performances of the instrument in normal transportation conditions. It is recommended to keep this container for any further transportation. The base, the measuring head and the accessories are located in specific places, ready for use. Each element has been carefully checked and tested by the DH-BUDENBERG SA COFRAC accredited laboratory. However, should you notice any damage when unpacking, contact DH-BUDENBERG or their representatives immediately. 3.2 Setting up. The set up instructions are similar for the first and further set ups. 3.2.1 Locating the DPG10A. The location selected for the use of high-level performance pressure standards determines the quality of the measuring results. Select, a solid, stable support located in a place, which is far away from any vibration, draught, doors, windows, heating systems and air conditioning vents. Avoid any vibration. The standard cannot be usable in unstable environments. However, to provide accurate results, make appropriate adjustment of the vibration adapter in the SYSTEM menu, CONF. Avoid any direct fluctuations. solar rays and any significant temperature Use DPG10A pressure balances exclusively in closed premises. Do not use DPG10A standards in explosive atmospheres. Never use DPG10A environments. standards DH Budenberg in permanently humid or dusty Worldwide DH Budenberg SA FRANCE DH Budenberg LTD UNITED KINGDOM DH Budenberg Gmbh GERMANY DH Budenberg Inc UNITED STATE of AMERICA DH Budenberg FZCO UNITED ARABES EMIRATES DH Budenberg PV LTD INDIA DH Budenberg PTE LTD SINGAPORE DH Budenberg PTY LTD AUSTRALIA DPG10A User manual Version 10.2010 Page 19 / 82 3.2.2 Levelling the DPG10A. To obtain repeatable measurement results at any time, it is absolutely necessary to place the standard on a stable surface, in a position, which is as close as possible to horizontal. Leveling feet and two bubble levels ensure the adjustment of the instrument according to the working surface. Screw the leveling feet at the maximum, then unscrew the foot (or the feet), which is (are) opposed to the bubble and to the level centre. The DPG10A is in the correct horizontal position when the air bubbles are right in the middle of the levels. Several leveling stages are usually necessary to reach a horizontal position. Take time to do it accurately will warranty adequate pressure measurements. The description below pertains to start-up with the piston-cylinder already installed. Position the standard accurately in using the 2 leveling feet and the bubble-levels. DH Budenberg Worldwide DH Budenberg SA FRANCE DH Budenberg LTD UNITED KINGDOM DH Budenberg Gmbh GERMANY DH Budenberg Inc UNITED STATE of AMERICA DH Budenberg FZCO UNITED ARABES EMIRATES DH Budenberg PV LTD INDIA DH Budenberg PTE LTD SINGAPORE DH Budenberg PTY LTD AUSTRALIA DPG10A User manual Version 10.2010 Page 20 / 82 3.2.3 Installing the measuring head top part. The measuring head and piston cylinder must be perfectly clean before being installed. For cleaning instructions, refer to chapter 11.1. 3.2.3.1 Measuring head. The measuring head top part is attached to its base by the mean of 3 screws. At delivery, the piston cylinder assembly is protected by the mean of a transportation plastic cover fixed by those screws. This transportation cover must be removed prior to the top part installation. When removing the transportation cover, always handle the measuring head upside down (transportation cover on top) to prevent the piston from dropping. Cover Head DH Budenberg Worldwide DH Budenberg SA FRANCE DH Budenberg LTD UNITED KINGDOM DH Budenberg Gmbh GERMANY DH Budenberg Inc UNITED STATE of AMERICA DH Budenberg FZCO UNITED ARABES EMIRATES DH Budenberg PV LTD INDIA DH Budenberg PTE LTD SINGAPORE DH Budenberg PTY LTD AUSTRALIA DPG10A User manual Version 10.2010 Page 21 / 82 Once the piston protection cover has been removed the piston head can be seen. The piston head is equipped with one ball bearing designed to drive the piston in rotation. One matching slot in the driving mechanism enclosed in the measuring head base is machined to receive this ball bearing. Screw Piston head Screw Ball bearing Screw 3.2.3.2 Base. At delivery, the measuring head base is protected with a white transportation protection cover. Remove this cover in order to install the measuring head. Cover removed Measuring head base DH Budenberg Worldwide DH Budenberg SA FRANCE DH Budenberg LTD UNITED KINGDOM DH Budenberg Gmbh GERMANY DH Budenberg Inc UNITED STATE of AMERICA DH Budenberg FZCO UNITED ARABES EMIRATES DH Budenberg PV LTD INDIA DH Budenberg PTE LTD SINGAPORE DH Budenberg PTY LTD AUSTRALIA DPG10A User manual Version 10.2010 Page 22 / 82 Once the cover has been removed, the drive mechanism can be seen. O-ring Piston drive 3.2.3.3 Install the measuring head on the base. Insert carefully the ball bearing in the driving slot. It is now possible to place the measuring head top part on its base. Always exert great care during this operation to prevent the piston from dropping Screw in the 3 attachment screws. The DPG10A is now ready for operation. Never install the measuring head on the base when the motor is operating. DH Budenberg Worldwide DH Budenberg SA FRANCE DH Budenberg LTD UNITED KINGDOM DH Budenberg Gmbh GERMANY DH Budenberg Inc UNITED STATE of AMERICA DH Budenberg FZCO UNITED ARABES EMIRATES DH Budenberg PV LTD INDIA DH Budenberg PTE LTD SINGAPORE DH Budenberg PTY LTD AUSTRALIA DPG10A User manual Version 10.2010 Page 23 / 82 3.2.5 Powering up. - Select the appropriate voltage with the voltage switch (DPG8 II only).DPG10 is equipped with universal power supply. - After you have installed the measuring head, connect the motor power cable and the temperature probe cable to the rear panel connectors. A rear panel power switch ensures the power up of the instrument. - During the start-up, the front panel display indicates the initialization of the DPG10A. At the end of the initialization, the standard automatically steps to the measurement mode, with the latest stored configuration. - Do not forget to select the voltage before powering up the standard (DPG8 II). - Do not forget to connect the standard only to an earthed socket. - The DPG10A must be connected to the mains with the power cable provided with it or with a similar cable. - Protect the plug and the socket against humidity. After the DPG10A is properly set up and running, it must be zeroed in order to adapt its measurement to current ambience conditions (see chapter 4). After the DPG10A is properly set up, running and zeroed, it must be calibrated in order to adapt it to ambience conditions of operation (see chapter 5). If the user wants to make high-level accuracy measurements, within particular applications, it is recommended to take the following precautions before starting each pressure measurement cycle or before calibrating the DPG10A: - Power up the standard at least 4 hours before the beginning of the measurements, - Place the standard in premises where the temperature is stable. - Stress the force sensor by applying a force to it, several times, one after the other. - Stress the measuring head by exerting a pressure on it, several times, one after the other operation enables to stress simultaneously the force sensor), - Do not move the standard while the measurement is being done. DH Budenberg (this Worldwide DH Budenberg SA FRANCE DH Budenberg LTD UNITED KINGDOM DH Budenberg Gmbh GERMANY DH Budenberg Inc UNITED STATE of AMERICA DH Budenberg FZCO UNITED ARABES EMIRATES DH Budenberg PV LTD INDIA DH Budenberg PTE LTD SINGAPORE DH Budenberg PTY LTD AUSTRALIA DPG10A User manual Version 10.2010 Page 24 / 82 4. Zeroing the DPG. 4.1 Zeroing in gauge pressure mode. The user uses this zeroing procedure only when he wants to operate the DPG10A in gauge mode. To zero the DPG10A for absolute mode operation, refer to 4.2. The DPG10A standard is fitted with a 10 Kg range measuring cell. During the power up, the DPG10A detects and displays the zero from, which the maximum range can be reached. If the user notices a slight drift, which is due to one of the phenomena that are described below, he can “zero” the standard by pressing TARE. This operation consists in setting the measuring head to atmospheric pressure to make pressure measurements. Setup for DPG10A LP version: Valve (2), (3) and (5) are open to the atmosphere. Setup for DPG10A HP version: Valve (2) is open, head is open to atmosphere. In order to obtain accurate pressure measurements, the user must check that the display indicates stable zero, 0, before he starts any measurement. DH Budenberg Worldwide DH Budenberg SA FRANCE DH Budenberg LTD UNITED KINGDOM DH Budenberg Gmbh GERMANY DH Budenberg Inc UNITED STATE of AMERICA DH Budenberg FZCO UNITED ARABES EMIRATES DH Budenberg PV LTD INDIA DH Budenberg PTE LTD SINGAPORE DH Budenberg PTY LTD AUSTRALIA DPG10A User manual Version 10.2010 Page 25 / 82 Several parameters may get the zero drifting: - Temperature drifts after the power up, Ambient temperature variations, No use of the measuring cell during a certain period of time, No use of the measuring head during a certain period of time, Change in the location of the standard and/or leveling adjustment. If the measuring head has been installed after the powering up, the DPG10A standard’s range will be reduced by the piston weight. To get the maximum range, the user can determine an original zero, which corresponds to the piston’s weight by pressing CAL. The display is: Press F1 to launch the CAL procedure. - If the load exceeds 0, the message WARNING: ZERO ERROR displays. - If the cell's measurement is unstable, the message WARNING: UNSTABLE displays. - Calibration can take about 1 or 2 minutes (according to the stability). - Wait until the calibration is finished. A “beep” can be heard at the end of the calibration and the display indicates whether the calibration has been successful (COMPLETE displays) or not (ABORT displays). It is not possible to interrupt a calibration, which is in progress. The user must wait to be in the measurement mode, i.e. about 1 minute maximum after the beginning of the process. - The calibration cannot be run when the measurement is not stable (vibrations, draughts...) In this case, the user must protect the DPG10A from the environment disturbances and start again the procedure. - The display goes back to the measurement mode by pressing F4 (ESC). Once it is finish, close valve (2) and (3). The DPG is now ready for gauge measurements. DH Budenberg Worldwide DH Budenberg SA FRANCE DH Budenberg LTD UNITED KINGDOM DH Budenberg Gmbh GERMANY DH Budenberg Inc UNITED STATE of AMERICA DH Budenberg FZCO UNITED ARABES EMIRATES DH Budenberg PV LTD INDIA DH Budenberg PTE LTD SINGAPORE DH Budenberg PTY LTD AUSTRALIA DPG10A User manual Version 10.2010 Page 26 / 82 4.2 Zeroing in Absolute pressure mode To perform absolute pressure measurement it is necessary to first zero the DPG10A with vacuum applied on both sides of the piston cylinder assembly and then calibrate the force sensor to the ambient condition. DPG10A reference chamber is equipped with 2 vacuum ports. One port is used to connect a vacuum pump while the second one can be used to connect a vacuum-measuring instrument, a controlled leak valve or a plug. Connect the standard as shown bellow. Setup for the DPG10A LP version : Valve (3) and valve (5) must be closed to isolate the DPG from atmosphere. Valve (2) must be open to apply vacuum with the vacuum pump (6) in the reference chamber as well as on top of the piston cylinder inside the measuring head (1). Start up the vacuum pump and wait for at least 1 hour for a good reference vacuum to be established on both sides of the piston and for the electronics to stabilize under vacuum conditions. The first time you vacuum the DPG10A, or after a long usage in gauge mode or in differential mode, it can take several hours before getting very small residual vacuum value. We recommend achieving a residual vacuum between 2 and 4 Pascal. Residual vacuum below 2 Pa is not recommended and may create perturbation and or instability of the DPG. When established, pressing the TARE button can zero the instrument. DH Budenberg Worldwide DH Budenberg SA FRANCE DH Budenberg LTD UNITED KINGDOM DH Budenberg Gmbh GERMANY DH Budenberg Inc UNITED STATE of AMERICA DH Budenberg FZCO UNITED ARABES EMIRATES DH Budenberg PV LTD INDIA DH Budenberg PTE LTD SINGAPORE DH Budenberg PTY LTD AUSTRALIA DPG10A User manual Version 10.2010 Page 27 / 82 Setup for the DPG10A HP version : Valve (2) is open. 4.3 Calibrating DPG under vacuum. Once the DPG has been tarred (zeroed), it must be calibrated. 4.3.1 Use of the Auto calibration function. One of the unique features of DPG10A is that it is possible to perform an internal calibration of the measuring cell under vacuum condition hence to correct for any effect vacuum may have on the electronics performance. To proceed with internal calibration in absolute pressure mode, set up the DPG10A as described in 4.2. DH Budenberg Worldwide DH Budenberg SA FRANCE DH Budenberg LTD UNITED KINGDOM DH Budenberg Gmbh GERMANY DH Budenberg Inc UNITED STATE of AMERICA DH Budenberg FZCO UNITED ARABES EMIRATES DH Budenberg PV LTD INDIA DH Budenberg PTE LTD SINGAPORE DH Budenberg PTY LTD AUSTRALIA DPG10A User manual Version 10.2010 Page 28 / 82 Press the CAL button to Enter in the CAL menu. Press F1 -> EXE to launch the calibration procedure. - If the load exceeds 0, the message WARNING: ZERO ERROR displays. - If the cell's measurement is unstable, the message WARNING: UNSTABLE displays. - Calibration can take about 1 or 2 minutes (according to the stability). - Wait until the calibration is finished. A “beep” can be heard at the end of the calibration and the display indicates whether the calibration has been successful (COMPLETE displays) or not (ABORT displays). - The calibration cannot be run when the measurement is not stable (vibrations, draughts...) In this case, the user must protect the DPG10A from the environment disturbances and start again the procedure. - The display goes back to the measurement mode by pressing F4 (ESC). Once it is done, the user must prepare the DPG to absolute measurement by removing the vacuum on the piston cylinder and keep the vacuum in the reference chamber. To do that with the DPG10A LP version: - First, close the vacuum chamber isolation valve (2) to keep the vacuum in the reference chamber. - Then slowly open valve (3) to go back to atmosphere. The filter (4) will avoid sucking dust or impurities. - Open valve (5). - Close valve (3). DH Budenberg Worldwide DH Budenberg SA FRANCE DH Budenberg LTD UNITED KINGDOM DH Budenberg Gmbh GERMANY DH Budenberg Inc UNITED STATE of AMERICA DH Budenberg FZCO UNITED ARABES EMIRATES DH Budenberg PV LTD INDIA DH Budenberg PTE LTD SINGAPORE DH Budenberg PTY LTD AUSTRALIA DPG10A User manual Version 10.2010 Page 29 / 82 To do that with the DPG10A HP version: - First, close the vacuum chamber isolation valve (2) to keep the vacuum in the reference chamber. - Physically disconnect the vacuum tube on top of the head and replace it by the instrument under test line. The DPG is now ready for absolute measurement. Valve (2) must remain always closed during absolute measurement and the vacuum pump running. Take care to maintain continuously a reference vacuum between 2 and 4 Pa. DH Budenberg Worldwide DH Budenberg SA FRANCE DH Budenberg LTD UNITED KINGDOM DH Budenberg Gmbh GERMANY DH Budenberg Inc UNITED STATE of AMERICA DH Budenberg FZCO UNITED ARABES EMIRATES DH Budenberg PV LTD INDIA DH Budenberg PTE LTD SINGAPORE DH Budenberg PTY LTD AUSTRALIA DPG10A User manual Version 10.2010 Page 30 / 82 5. Running an external calibration. The zeroing procedure described in chapter 4 describe the use of the internal auto calibration function (which is recommended), it is however possible to calibrate the DPG using an external mass set. 5.1 Setting up. Place the mass carrier then zero the standard according to the above procedure. (If ordered separately). External calibration requires a set of standard masses and a mass carrier optionally available from DH-Budenberg. Do not execute an external calibration with masses that do not have the proper uncertainty and are not properly adjusted to nominal value as this would damage the measurement quality of the DPG10A. 1. 2. 3. 4. 5. Enter the density of the masses in the DPG10A menu (see 7.8) Select “External Calibration” in the system menu (see 7.7.3) Place the mass carrier, then zero the DPG10A by pressing the TARE button. Install the cover to protect from any perturbation. (Option, must be ordered separately.) Follow the screen requirements. 5.2 Running the external calibration Press CAL. The display is: DH Budenberg Worldwide DH Budenberg SA FRANCE DH Budenberg LTD UNITED KINGDOM DH Budenberg Gmbh GERMANY DH Budenberg Inc UNITED STATE of AMERICA DH Budenberg FZCO UNITED ARABES EMIRATES DH Budenberg PV LTD INDIA DH Budenberg PTE LTD SINGAPORE DH Budenberg PTY LTD AUSTRALIA DPG10A User manual Version 10.2010 Page 31 / 82 Press -> F1 (EXE) runs the calibration procedure. - If the load exceeds 0, the message WARNING : ZERO ERROR displays. - If the cell's measurement is unstable, the message WARNING: UNSTABLE displays. - Load the required mass as instructed on the display. (800 g.) Press F2 -> (TST) test of the calibration. Only available with internal calibration. Press F4 -> (ESC) goes back to the measurement mode, before or after the calibration has taken place. 5.2.1 Calibration time. Follow the displayed instructions and load the masses until the amount corresponds to the value indicated on the screen. 5.2.2 End of calibration. A “beep” can be heard at the end of the calibration and the display indicates whether the calibration has been successful (COMPLETE displays) or not (ABORT displays). The calibration cannot be run when the measurement is not stable (vibrations, draughts, ...). In this case, the user must protect the DPG10A from the environment disturbances and start again the procedure. The display goes back to the measurement mode by pressing F4 (ESC). It is not possible to interrupt a calibration, which is in progress. The user must wait to be in the measurement mode, i.e. about 1 minute at the most after the beginning of the procedure. DH Budenberg Worldwide DH Budenberg SA FRANCE DH Budenberg LTD UNITED KINGDOM DH Budenberg Gmbh GERMANY DH Budenberg Inc UNITED STATE of AMERICA DH Budenberg FZCO UNITED ARABES EMIRATES DH Budenberg PV LTD INDIA DH Budenberg PTE LTD SINGAPORE DH Budenberg PTY LTD AUSTRALIA DPG10A User manual Version 10.2010 Page 32 / 82 6. MENU MODE. 6.1 Introducing the menu mode. 6.1.1 Operating principles. After the user has powered up and initialized the DPG10A from the measurement mode, ENTER steps the user through the main run screen. This key also gives access to the other menus from the main run screen. The ∧, ∨, <, > keys enable to move within a menu. They also enable to select a figure from the numeric pad or a letter from the alphabetic pad by moving the cursor when one of these two pads is displayed. ENTER then displays the selected figure or letter. According to the menu in use, F1, F2, F3 and F4 have a specific action. The display then indicates the function of each key. F1 usually stores a value, which has been edited with the pad or steps back to the measurement mode by quitting the menu mode and saves the modifications. F4 usually steps back to the previous screen; from the main run screen, this key also enables to quit the menu mode without saving the modifications. 6.2 Accessing a function in menu mode. After the user has powered up and initialized the DPG10A from the measurement mode, ENTER steps the user through the main run screen. The main run screen displays: Select one of the six menus with the ∧, ∨, <, > keys then press ENTER again to access the selected menu . F1 (SAV) quits the menu mode and saves all the modifications that have been edited in each of the menus. SAVE displays and you step back to the measurement mode. F4 (ESC) quits the menu mode and steps back to the measurement mode without saving the modifications. DH Budenberg Worldwide DH Budenberg SA FRANCE DH Budenberg LTD UNITED KINGDOM DH Budenberg Gmbh GERMANY DH Budenberg Inc UNITED STATE of AMERICA DH Budenberg FZCO UNITED ARABES EMIRATES DH Budenberg PV LTD INDIA DH Budenberg PTE LTD SINGAPORE DH Budenberg PTY LTD AUSTRALIA DPG10A User manual Version 10.2010 Page 33 / 82 6.3 Changing the pressure unit. From the measurement mode, F1 gives the user direct access to the UNITS menu, but he can also press ENTER to access the main run screen, select the UNITS menu with ∧, ∨, <, >, then confirm his choice by pressing ENTER again. In these two cases, the display is: Correspondences table in Pa : 1 mmHg = 1.333222 x 10² Pa 1 bar = 1.000000 x 10⁵ Pa 1 inHg = 3.386384 x 10³ Pa 1 psi = 6.894757 x 10³ Pa 4 1 kg/cm2 = 9.806650 x 10 Pa 1 mH2O = 9.806650 x 10³ Pa 1 inH2O = 2.490889 x 10² Pa √ appears in front of the active unit (the default pressure unit is the mbar). 6.3.1 Choosing an engineering unit Select a new engineering unit with ∧, ∨, <, >. F3 (VAL) confirms the pressure unit you have selected. The sign √ appears in front of the newly selected unit. 6.3.2 Defining a user unit The user unit function enables to program a unit, which differs from the default pressure units, for example hPa. F2 (USR) edits a user unit. The following screen displays with Coef = 1 and Label = USER as standard values: The coefficient is written: Coef = a.[x] with x = 1 Pa. ex 1 : if the applied pressure is 1 bar, the Coef is 2 and the Label = USER, the 1 bar pressure, which is displayed in the user unit is equivalent to 50 000 USER. ex 2 : if the applied pressure is 1 bar, the Coef is 500 and the Label = UNIT, the 1 bar pressure, which is displayed in the user unit is equivalent to 200 UNIT. DH Budenberg Worldwide DH Budenberg SA FRANCE DH Budenberg LTD UNITED KINGDOM DH Budenberg Gmbh GERMANY DH Budenberg Inc UNITED STATE of AMERICA DH Budenberg FZCO UNITED ARABES EMIRATES DH Budenberg PV LTD INDIA DH Budenberg PTE LTD SINGAPORE DH Budenberg PTY LTD AUSTRALIA DPG10A User manual Version 10.2010 Page 34 / 82 6.3.3 Editing the user unit coefficient F2 (CFT) edits the coefficient. The display is: Select a figure from the numeric pad with ∧, ∨, <, > to edit a new value. Press ENTER: the selected figure displays above the cursor. Repeat the operation until you obtain the desired value. F3 (DEL) erases the latest user-edited figure. F2 (DEF) displays the default user unit coefficient (1.000000). F1 (SAV) saves the coefficient and steps back to the previous screen. DATA SET displays. F4 (ESC) steps back to the previous menu without saving the modification. 6.3.4 Editing the user unit label F3 (LBL) edits the user unit label. The user can define a 4-character-long name for this new unit. The following display is : Select a letter from the alphabetic pad with ∧, ∨, <, > to edit a new label. ∧ and ∨ make a 5-letter displacement respectively to the left and to the right. Press ENTER : the selected letter displays above the cursor. Repeat the operation until you obtain the desired label. F3 (DEL) erases the latest user-edited letter. F2 (DEF) displays the default user unit label (USER). F1 (SAV) saves the label and steps back to the previous screen. DATA SET displays. F4 (ESC) steps back to the previous screen without saving the modification. DH Budenberg Worldwide DH Budenberg SA FRANCE DH Budenberg LTD UNITED KINGDOM DH Budenberg Gmbh GERMANY DH Budenberg Inc UNITED STATE of AMERICA DH Budenberg FZCO UNITED ARABES EMIRATES DH Budenberg PV LTD INDIA DH Budenberg PTE LTD SINGAPORE DH Budenberg PTY LTD AUSTRALIA DPG10A User manual Version 10.2010 Page 35 / 82 6.3.5 Quitting and/or confirming the modifications. F1 (VAL) steps back to the previous screen and confirm the user unit , which has been thus defined. √ appears in front of USR in the UNITS menu. F4 (ESC) steps back to the previous screen without confirming the user unit. 6.3.6 Quitting and/or saving the modifications. F1 (SAV) steps back to the measurement mode and save the modifications. SAVE displays. F4 (ESC) steps back to the main run screen. The user will also be able to save the modifications by pressing F1 (SAV) when he quits the main run screen. 6.4 Setting pressure measurement parameters From the measurement mode, F3 gives the user direct access to the SETTINGS menu, but the user can also press ENTER to access the main run screen, select the SETTINGS menu with ∧, ∨, <, >, and then confirm his choice by pressing ENTER again. In these 2 cases, the following display appears with the default settings for a 1 bar/kg Kn : This menu adapts the display and the transmission of the pressure values to the measurement conditions (especially pressure generator instabilities) and to the required accuracy. RESOLUTION 0.0001000 (mbar) - resolution of the unit displayed pressure value in the selected unit. STABILITY 0.0001 (mbar) - criterion, which commands * in chapter 2.5.1 (parameter 2), and that defines the pressure stability area. It is expressed in ± x unit/second. FILTER NONE LOW MEDIUM HIGH - criterion, which commands 0, 1, 2 4.1.1 (parameter 7). NONE means that there is no filter. LOW, HIGH respectively display the pressure value as being the average 5 and 10 latest pressure values. ON OFF – the reading of the residual vacuum measured by the sensor is added (ON) or not (OFF). VACUUM and 3 in chap. MEDIUM, and result of the 3, Pirani vacuum Select the criterion with ∧ and ∨. DH Budenberg Worldwide DH Budenberg SA FRANCE DH Budenberg LTD UNITED KINGDOM DH Budenberg Gmbh GERMANY DH Budenberg Inc UNITED STATE of AMERICA DH Budenberg FZCO UNITED ARABES EMIRATES DH Budenberg PV LTD INDIA DH Budenberg PTE LTD SINGAPORE DH Budenberg PTY LTD AUSTRALIA DPG10A User manual Version 10.2010 Page 36 / 82 6.4.1 Modifying the resolution. F2 («) and F3 (») respectively increase and decrease the digits number after the dot. 6.4.2 Modifying the stability. F2 («) and F3 (») respectively increase and decrease the stability criterion x value. < and > respectively decrease and increase in a magnitude of 10 the criterion value. Setting the stability to its minimal value (for example, 0.01 mbar when the unit is the mbar and the Kn is 1) allows to associate the * stability indication with the measuring cell configuration, which is defined in the SYSTEM menu, CONF (Cf 7.7.6). 6.4.3 Modifying the filter. F2 («) and F3 (») move respectively towards NONE and HIGH. 6.4.4 Modifying the vacuum. F2 («) and F3 (») move respectively towards ON and OFF. OFF should be selected if the user uses its own vacuum sensor. The user must add the value of the vacuum sensor to the pressure indicated by the DPG. When ON is selected the residual vacuum measured by the Pirani sensor is automatically added to the pressure measurement. The A indicator on the main screen is displayed in normal (inverse) video when OFF (ON) is selected. 6.4.5 Quitting and/or saving the modifications. F1 A (SAV) step back to the measurement mode and saves the modifications. SAVE displays. F4 (ESC) steps back to the main run screen. The user will also be able to save the modifications by pressing F1 (SAV) when he quits the main run screen. 6.5 Knowing the ambient conditions. From the measurement mode, press ENTER to access the main run screen, select the EMM menu with ∧, ∨, <, >, then confirm your choice by pressing ENTER again. The display is : DH Budenberg Worldwide DH Budenberg SA FRANCE DH Budenberg LTD UNITED KINGDOM DH Budenberg Gmbh GERMANY DH Budenberg Inc UNITED STATE of AMERICA DH Budenberg FZCO UNITED ARABES EMIRATES DH Budenberg PV LTD INDIA DH Budenberg PTE LTD SINGAPORE DH Budenberg PTY LTD AUSTRALIA DPG10A User manual Version 10.2010 Page 37 / 82 Ta Tb Hum Patm Mvol Air temperature at the level of the internal calibration mass in °C Piston-cylinder assembly temperature in °C Relative humidity in % Atmospheric pressure in hPa Air mass density in kg/m3 F4 (ESC) steps back to the main run screen. With F2, the user has the ability to calibrate the atmospheric pressure sensor by editing the atmospheric pressure value displayed by the reference barometer. The barometric pressure sensor is thus calibrated. The user also has the ability to calibrate the relative humidity sensor by editing the value displayed by a reference instrument. The user also has the ability to calibrate the temperature sensor by editing the value displayed by a reference instrument. 6.6 Selecting a measuring head. From the measurement mode, F2 gives the user direct access to the HEADS menu, but he can also press ENTER to access the main run screen, select the HEADS menu with ∧, ∨, <, >, then confirm his choice by pressing ENTER again. The display is: Head 1 serial number and head measuring range (in bar, psi, kPa or MPa) √ appears in front of the active head (head 1 is the default head). 6.6.1 Modifying the head parameters. Select the head you wish to modify with ∧, ∨, <, >. F2 (EDT) modifies the parameters of the head you have selected. The following display is : DH Budenberg Worldwide DH Budenberg SA FRANCE DH Budenberg LTD UNITED KINGDOM DH Budenberg Gmbh GERMANY DH Budenberg Inc UNITED STATE of AMERICA DH Budenberg FZCO UNITED ARABES EMIRATES DH Budenberg PV LTD INDIA DH Budenberg PTE LTD SINGAPORE DH Budenberg PTY LTD AUSTRALIA DPG10A User manual Version 10.2010 Page 38 / 82 Head Num. P/C Num. Kn λ Pt100 Head serial number Piston-cylinder assembly serial number Piston-cylinder assembly conversion coefficient expressed in the coefficient unit Piston-cylinder assembly pressure distortion coefficient in 10-7/bar Head temperature probe value in Ohm at 0°C F4 (ESC) steps back to the previous screen. F2 (EDT) modifies one of the 4 measuring head parameters previously selected with ∧, ∨, <, >. If a password has been defined (Cf. 7.7.2), and if the user has not still modified any other password-protected element (PARAMETERS menu, RESET, ATMOSPHERIC PRESSURE and RELATIVE HUMIDITY sub-menus), the four MEASURING HEADS menu parameters are protected by password. The following display appears as soon as you press F2, for any of the four features: The user must then enter the password. To enter his password, select a letter from the alphabetic pad with ∧, ∨, <, >. ∧ and ∨ make a 5letter displacement respectively to the left and to the right. Press ENTER: the selected letter displays above the cursor. Repeat the operation until you obtain the desired password. The edited letters are displayed with asterisks * * * *. F3 (DEL) erases the latest user-edited letter. F2 (DEF) displays the default password and enables to cancel the password (Cf.7.7.2.2). F1 (SAV) confirms the password and steps back to the previous screen. DATA SET displays if the password is correct. DATA NOT SET displays if the password is not correct. F4 (ESC) steps back to the previous screen without saving the password. After he has edited the password, the user steps back to the MEASURING HEADS menu and then he can press F2 (EDT) again to modify the features he wishes to change. DH Budenberg Worldwide DH Budenberg SA FRANCE DH Budenberg LTD UNITED KINGDOM DH Budenberg Gmbh GERMANY DH Budenberg Inc UNITED STATE of AMERICA DH Budenberg FZCO UNITED ARABES EMIRATES DH Budenberg PV LTD INDIA DH Budenberg PTE LTD SINGAPORE DH Budenberg PTY LTD AUSTRALIA DPG10A User manual Version 10.2010 Page 39 / 82 6.6.2 Modifying the measuring head serial number. Press F2 after having selected Head Num. and entered the password as explained. The display is: Select a figure from the numeric pad with ∧, ∨, <, > to edit a new number. Press ENTER: the selected figure displays above the cursor. Repeat the operation until you obtain the desired number. F3 (DEL) erases the latest user-edited figure. F2 (DEF) displays the usual head serial number (NONE). F1 (SAV) saves the new number and steps back to the previous screen. DATA SET displays. F4 (ESC) steps back to the previous menu without saving the modification. 6.6.3 Modifying the piston-cylinder assembly serial number. Press F2 after having selected P/C Num. and entered the password as explained. The display is: Select a figure from the numeric pad with ∧, ∨, <, > to edit a new number. Press ENTER: the selected figure displays above the cursor. Repeat the operation until you obtain the desired number. F3 (DEL) erases the latest user-edited figure. F2 (DEF) displays the usual piston-cylinder assembly serial number (NONE). F1 (SAV) saves the new number and steps back to the previous screen. DATA SET displays. F4 (ESC) steps back to the previous menu without saving the modification. DH Budenberg Worldwide DH Budenberg SA FRANCE DH Budenberg LTD UNITED KINGDOM DH Budenberg Gmbh GERMANY DH Budenberg Inc UNITED STATE of AMERICA DH Budenberg FZCO UNITED ARABES EMIRATES DH Budenberg PV LTD INDIA DH Budenberg PTE LTD SINGAPORE DH Budenberg PTY LTD AUSTRALIA DPG10A User manual Version 10.2010 Page 40 / 82 6.6.4 Modifying the piston-cylinder assembly conversion coefficient. Press F2 after having selected Kn and entered the password as explained. The display is : Select a figure from the numeric pad with ∧, ∨, <, > to edit a new value. Press ENTER: the selected figure displays above the cursor. Repeat the operation until you obtain the desired value. F3 (DEL) erases the latest user-edited figure. F2 (DEF) displays the usual piston-cylinder assembly conversion coefficient (1). F4 (ESC) steps back to the previous menu without saving the modification. F1 (SAV) saves the new value and steps back to the previous screen. DATA SET displays and a new screen appears : Select with F1 (bar/Kg), F2 (psi/Kg), F3 (kPa/Kg) and F4 (MPa/Kg) the unit you wish to use. Then you step back to the previous screen. DH Budenberg Worldwide DH Budenberg SA FRANCE DH Budenberg LTD UNITED KINGDOM DH Budenberg Gmbh GERMANY DH Budenberg Inc UNITED STATE of AMERICA DH Budenberg FZCO UNITED ARABES EMIRATES DH Budenberg PV LTD INDIA DH Budenberg PTE LTD SINGAPORE DH Budenberg PTY LTD AUSTRALIA DPG10A User manual Version 10.2010 Page 41 / 82 6.6.5 Modifying the head temperature probe value. Press F2 after having selected Pt100 and entered the password as explained. The display is: Select a figure from the numeric pad with ∧, ∨, <, > to edit a new value. Press ENTER: the selected figure displays above the cursor. Repeat the operation until you obtain the desired value. F3 (DEL) erases the latest user-edited figure. F2 (DEF) displays the usual head temperature probe value (100.00). F1 (SAV) saves the new value and steps back to the previous screen. DATA SET displays F4 (ESC) steps back to the previous menu without saving the modification. 6.6.6 Selecting the measuring head. F3 (VAL) select the measuring head you wish to use, then display in front of the newly selected measuring head. The user must previously enter the measuring head serial number before selecting it 6.6.7 Quitting and/or saving the modifications. F1 (SAV) steps back to the measurement mode and saves the modifications. SAVE displays. F4 (ESC) steps back to the main run screen. The user will also be able to save the modifications by pressing F1 (SAV) when he quits the main run screen. DH Budenberg Worldwide DH Budenberg SA FRANCE DH Budenberg LTD UNITED KINGDOM DH Budenberg Gmbh GERMANY DH Budenberg Inc UNITED STATE of AMERICA DH Budenberg FZCO UNITED ARABES EMIRATES DH Budenberg PV LTD INDIA DH Budenberg PTE LTD SINGAPORE DH Budenberg PTY LTD AUSTRALIA DPG10A User manual Version 10.2010 Page 42 / 82 6.7 Customizing the DPG10A. From the measurement mode, press ENTER to access the main run screen, select the SYSTEM menu with ∧, ∨, <, >, then confirm your choice by pressing ENTER again. The display is : DATE RESET PASSW CAL COM IDN CONF BEEP LANG Display and modification of the date and time Reset of the DPG10A to its default values Definition of a password to protect the sensitive data √indicates that a password has been defined) Selection of the DPG10A’s calibration mode Selection of the RS232C communication rate Identification of the DPG10A Modification of the measuring cell’s configuration Activation of the beeper √indicates that the beeper is activated) Selection of the displaying language Select the date you wish to modify with ∧, ∨, <, >. The functions of F2 and F3 depend on the selected parameter. 6.7.1 Displaying/modifying date and time. F2 (EDT) displays the standard’s date and time after you have selected DATE in the SYSTEM menu. The following display appears with the date and time: DATE TIME dd-mm-yyyy hh-mm-ss F2 (DAT) modifies the date. DH Budenberg Worldwide DH Budenberg SA FRANCE DH Budenberg LTD UNITED KINGDOM DH Budenberg Gmbh GERMANY DH Budenberg Inc UNITED STATE of AMERICA DH Budenberg FZCO UNITED ARABES EMIRATES DH Budenberg PV LTD INDIA DH Budenberg PTE LTD SINGAPORE DH Budenberg PTY LTD AUSTRALIA DPG10A User manual Version 10.2010 Page 43 / 82 The display is: Select a figure from the numeric pad with ∧, ∨, <, > to edit a new date. Press ENTER: the selected figure displays above the cursor. Repeat the operation until you obtain the desired date. F3 (DEL) erases the latest user-edited figure. F2 (DEF) displays the date format. F1 (SAV) saves the new date and steps back to the previous screen. DATA SET displays. F4 (ESC) steps back to the previous menu without saving the modification. Make sure of using the right format when editing the date: dd-mm-yyyy. If the user does not respect this format, DATA NOT SET will display when he saves the modification with F1. F3 (TIM) modifies the time. The display is : Select a figure from the numeric pad with ∧, ∨, <, > to edit a new time. Press ENTER: the selected figure displays above the cursor. Repeat the operation until you obtain the desired time. F3 (DEL) erases the latest user-edited figure. F2 (DEF) displays the time format. F1 (SAV) saves the new date and steps back to the previous screen. DATA SET displays. F4 (ESC) steps back to the previous menu without saving the modification. Make sure of using the right format when you edit the time: hh-mm-ss. If the user does not respect this format, DATA NOT SET will display when he saves the modification with F1. DH Budenberg Worldwide DH Budenberg SA FRANCE DH Budenberg LTD UNITED KINGDOM DH Budenberg Gmbh GERMANY DH Budenberg Inc UNITED STATE of AMERICA DH Budenberg FZCO UNITED ARABES EMIRATES DH Budenberg PV LTD INDIA DH Budenberg PTE LTD SINGAPORE DH Budenberg PTY LTD AUSTRALIA DPG10A User manual Version 10.2010 Page 44 / 82 F4 (ESC) steps back to the previous screen. F3 (VAL) resets the standard to its default values after you have selected RESET in the SYSTEM menu. If a password has been defined (Cf. 7.7.2), and if the user has not still modified any other password-protected element (MEASURING HEADS and PARAMETERS menus, ATMOSPHERIC PRESSURE and RELATIVE HUMIDITY sub-menus), the RESET menu is protected by password. The following display appears as soon as you press F3: The user must then enter his password. To enter the password, select a letter from the alphabetic pad with ∧, ∨, <, >. ∧ and ∨ make a 5letter displacement respectively to the left and to the right. Press ENTER: the selected letter displays above the cursor. Repeat the operation until you obtain the desired password. The edited letters are displayed with asterisks * * * *. F3 (DEL) erases the latest user-edited letter. F2 (DEF) displays the default password and enables to cancel the password. F1 (SAV) confirms the password and steps back to the previous screen. DATA SET displays if the password is correct. DATA NOT SET displays if the password is not correct. F4 (ESC) steps back to the previous screen without saving the password. After having edited the password, the reset is actually run only if the user quits the menu mode by confirming the reset with F1. Only qualified people with knowledge of reset consequences should use the reset function since it changes the current settings to factory default values. The reset function should never be used « experimentally ». DH Budenberg Worldwide DH Budenberg SA FRANCE DH Budenberg LTD UNITED KINGDOM DH Budenberg Gmbh GERMANY DH Budenberg Inc UNITED STATE of AMERICA DH Budenberg FZCO UNITED ARABES EMIRATES DH Budenberg PV LTD INDIA DH Budenberg PTE LTD SINGAPORE DH Budenberg PTY LTD AUSTRALIA DPG10A User manual Version 10.2010 Page 45 / 82 6.7.2 Defining a password. F2 (EDT) enables to define a 4-letter-long password after you have selected PASSW in the SYSTEM menu. The display is : To define the password, select a letter from the alphabetic pad with ∧, ∨, <, >. ∧ and ∨ make a 5letter displacement respectively to the left and to the right. Press ENTER: the selected letter displays above the cursor. Repeat the operation until you obtain the desired password. The edited letters are displayed with asterisks * * * *. F3 (DEL) erases the latest user-edited letter. F2 (DEF) displays the default password and enables to cancel the password (Cf. 7.7.2.2). F1 (SAV) confirms the password and steps back to the previous screen. DATA SET displays if the password is correct. F4 (ESC) steps back to the previous screen without saving the password. 6.7.2.1 Operating principle and use of the password. Defining a password enables to prevent the access to a certain number of sensitive data: MEASURING HEAD parameters – RESET – ATMOSPHERIC PRESSURE – RELATIVE HUMIDITY – TEMPERATURE – PARAMETERS menu. The user is asked this password each time he first tries to modify one of these protected data. The previous screen displays, the user edits his password then confirms it by pressing F1 (SAV). DATA SET displays if the password is correct. DATA NOT SET displays if the password is not correct. The password, which is edited for the first modification remains valid and the user does not need to edit it again for the other modifications as long as he has not quitted the menu. 6.7.2.2 Cancelling and modifying the password In order to cancel a password, the user first has to edit it (same procedure as for the definition) and confirms it by pressing F1 (SAV). Then he just has to edit the default password by pressing F2 (DEF) to cancel it, and finally confirms the cancellation by pressing F1 (SAV). In order to modify a password, the user first has to edit it (same procedure as for the definition) and confirms it by pressing F1 (SAV). Then he just has to edit a new password as for the definition, and finally confirms the modification by pressing F1 (SAV). DH Budenberg Worldwide DH Budenberg SA FRANCE DH Budenberg LTD UNITED KINGDOM DH Budenberg Gmbh GERMANY DH Budenberg Inc UNITED STATE of AMERICA DH Budenberg FZCO UNITED ARABES EMIRATES DH Budenberg PV LTD INDIA DH Budenberg PTE LTD SINGAPORE DH Budenberg PTY LTD AUSTRALIA DPG10A User manual Version 10.2010 Page 46 / 82 6.7.3 Selecting the calibration mode. F3 (VAL) changes the DPG10A’s calibration mode after you have selected CAL in the SYSTEM menu. The display is (internal calibration selected by default) : Select the calibration mode you wish to run with < and >. √ appears in front of the active mode. F3 (VAL) confirms the newly-selected mode. F1 (SAV) steps back to the measurement mode and saves the modifications. SAVE displays. F4 (ESC) steps back to the previous screen. 6.7.4 Selecting the RS232C communication rate. F2 (EDT) selects the RS232C communication rate after the user has selected COM in the SYSTEM menu. The screen appears with the default values : Start No Parity 300 600 1200 2400 8 Data Bits 1 Stop fixed program message format 4800 9600 adjustable rate in baud √ indicates the active rate. Select a new communication rate with ∧, ∨, <, >. F3 (VAL) confirms the user-selected rate. √ appears in front of the newly selected rate. F1 (SAV) steps back to the measuring mode and saves the modifications. SAVE displays. F4 (ESC) steps back to the previous screen. DH Budenberg Worldwide DH Budenberg SA FRANCE DH Budenberg LTD UNITED KINGDOM DH Budenberg Gmbh GERMANY DH Budenberg Inc UNITED STATE of AMERICA DH Budenberg FZCO UNITED ARABES EMIRATES DH Budenberg PV LTD INDIA DH Budenberg PTE LTD SINGAPORE DH Budenberg PTY LTD AUSTRALIA DPG10A User manual Version 10.2010 Page 47 / 82 6.7.5 Identifying the DPG10A. F3 (VAL) identifies the DPG10A after the user has selected IDN in the SYSTEM menu. A display appears with the standard’s name, the software version and the serial number. 6.7.6 Measuring cell configuration. This function enables the users to look at a certain number of DPG10A’s highly-advanced parameters. Those parameters cannot be modified by the user. The screen appears with the default values: 6.7.7 Activating a beeper. F2 (ON) and F3 (OFF) respectively activate and deactivate the ‘BEEP’, which is heard each time you press a key on the DPG10A’s pad, after you have selected BEEP in the SYSTEM menu. 6.7.8 Changing the displaying language. F2 (EDT) selects the menu displaying language after you have selected LANG in the SYSTEM menu. The display is (with French as default language): √ indicates the active language. Select a new language with ∧, ∨, <, >. F3 (VAL) confirms the language you wish to use. √ appears in front of the newly selected language. F1 (SAV) steps back to the measurement mode and saves the modifications. SAVE displays. F4 (ESC) steps back to the previous screen. DH Budenberg Worldwide DH Budenberg SA FRANCE DH Budenberg LTD UNITED KINGDOM DH Budenberg Gmbh GERMANY DH Budenberg Inc UNITED STATE of AMERICA DH Budenberg FZCO UNITED ARABES EMIRATES DH Budenberg PV LTD INDIA DH Budenberg PTE LTD SINGAPORE DH Budenberg PTY LTD AUSTRALIA DPG10A User manual Version 10.2010 Page 48 / 82 6.7.9 Quitting and/or saving the modifications. F1 (SAV) steps back to the measurement mode and saves the modifications. SAVE displays. F4 (ESC) steps back to the main run screen. The user will also be able to save the modifications by pressing F1 (SAV) when he quits the main run screen. 6.8 Modifying the constant parameters. From the measurement mode, press ENTER to access the main run screen, select the PARAMETERS menu with ∧, ∨, <, >, then confirm your choice by pressing ENTER again. The display is: Gravity Mass dens. Barometer Local gravity Calibration masses material density, for external calibration Serial number (which has to be previously edited before connecting the barometer) Select the parameter you wish to modify with ∧ and ∨. F2 (EDT) edits a new value for the selected parameter. If a password has been defined , and if the user has not still modified any other password-protected element (MEASURING HEADS menu, ATMOSPHERIC PRESSURE, RELATIVE HUMIDITY and RESET sub-menus), the PARAMETERS menu is protected by password. The following display appears as soon as you press F2: The user must then enter his password. To enter the password, select a letter from the alphabetic pad with ∧, ∨, <, >. ∧ and ∨ make a 5letter displacement respectively to the left and to the right. Press ENTER: the selected letter displays above the cursor. Repeat the operation until you obtain the desired password. The edited letters are displayed with asterisks * * * *. DH Budenberg Worldwide DH Budenberg SA FRANCE DH Budenberg LTD UNITED KINGDOM DH Budenberg Gmbh GERMANY DH Budenberg Inc UNITED STATE of AMERICA DH Budenberg FZCO UNITED ARABES EMIRATES DH Budenberg PV LTD INDIA DH Budenberg PTE LTD SINGAPORE DH Budenberg PTY LTD AUSTRALIA DPG10A User manual Version 10.2010 Page 49 / 82 F3 (DEL) erases the latest user-edited letter. F2 (DEF) displays the default password and enables to cancel the password. F1 (SAV) confirms the password and steps back to the previous screen. DATA SET displays is the password is correct. DATA NOT SET displays if the password is not correct. F4 (ESC) steps back to the previous screen without saving the password. After the user has edited the password, he steps back to the PARAMETERS menu and then he can press F2 (EDT) again to modify the parameters he wishes to change. 6.8.1 Modifying the gravity. Press F2 after having selected Gravity and entered the password as explained. The display is : Select a figure from the numeric pad with ∧, ∨, <, > to edit a new value. Press ENTER: the selected figure displays above the cursor. Repeat the operation until you obtain the desired value. F3 (DEL) erases the latest user-edited figure. F2 (DEF) displays the gravity default value (9.80665). F1 (SAV) saves the new number and steps back to the previous screen. DATA SET displays. F4 (ESC) steps back to the previous menu without saving the modification. DH Budenberg Worldwide DH Budenberg SA FRANCE DH Budenberg LTD UNITED KINGDOM DH Budenberg Gmbh GERMANY DH Budenberg Inc UNITED STATE of AMERICA DH Budenberg FZCO UNITED ARABES EMIRATES DH Budenberg PV LTD INDIA DH Budenberg PTE LTD SINGAPORE DH Budenberg PTY LTD AUSTRALIA DPG10A User manual Version 10.2010 Page 50 / 82 6.8.2 Modifying the mass density. Press F2 after having selected Mass dens. and entered the password as explained. The display is: Select a figure from the numeric pad with ∧, ∨, <, > to edit a new value. Press ENTER: the selected figure displays above the cursor. Repeat the operation until you obtain the desired value. F3 (DEL) erases the latest user-edited figure. F2 (DEF) displays the mass set mass density default value (7920). F1 (SAV) saves the new number and steps back to the previous screen. DATA SET displays. F4 (ESC) steps back to the previous menu without saving the modification. 6.8.3 Modifying the barometer serial number. Press F2 after having selected Barometer and entered the password as explained. The display is: Select a figure from the numeric pad with ∧, ∨, <, > to edit a new value. Press ENTER: the selected figure displays above the cursor. Repeat the operation until you obtain the desired value. F3 (DEL) erases the latest user-edited figure. F2 (DEF) displays the barometer serial number (NONE). F1 (SAV) saves the new number and steps back to the previous screen. DATA SET displays. F4 (ESC) steps back to the previous menu without saving the modification. DH Budenberg Worldwide DH Budenberg SA FRANCE DH Budenberg LTD UNITED KINGDOM DH Budenberg Gmbh GERMANY DH Budenberg Inc UNITED STATE of AMERICA DH Budenberg FZCO UNITED ARABES EMIRATES DH Budenberg PV LTD INDIA DH Budenberg PTE LTD SINGAPORE DH Budenberg PTY LTD AUSTRALIA DPG10A User manual Version 10.2010 Page 51 / 82 6.8.4 Quitting and/or saving the modifications. F1 (SAV) steps back to the measurement mode and saves the modifications. SAVE displays. F4 (ESC) steps back to the main run screen. The user will also be able to save the modifications by pressing F1 (SAV) when he quits the main run screen. DH Budenberg Worldwide DH Budenberg SA FRANCE DH Budenberg LTD UNITED KINGDOM DH Budenberg Gmbh GERMANY DH Budenberg Inc UNITED STATE of AMERICA DH Budenberg FZCO UNITED ARABES EMIRATES DH Budenberg PV LTD INDIA DH Budenberg PTE LTD SINGAPORE DH Budenberg PTY LTD AUSTRALIA DPG10A User manual Version 10.2010 Page 52 / 82 7. REMOTE OPERATION. The host computer can communicate with the DPG10A using the RS232C port. The RS232C port between the computer and the standard’s external connector is directly configured, the cable is provided by DH-BUDENBERG. The computer is the master and the standard is the slave. The pin designation is as follow: PC DPG DB – 9 Female DB – 9 Male TxD 3 3 RxD RxD 2 2 TxD GnD 5 5 GnD 7.1 Configuration. Modulation rate : 9600 baud (by default) Message length : 8 bits Start bit :1 Stop bit :1 Parity : none This configuration is the default configuration when the user initializes the DPG10A. He can only change the communication rate with the SYSTEM menu, COM or with the COM function described below. DH Budenberg Worldwide DH Budenberg SA FRANCE DH Budenberg LTD UNITED KINGDOM DH Budenberg Gmbh GERMANY DH Budenberg Inc UNITED STATE of AMERICA DH Budenberg FZCO UNITED ARABES EMIRATES DH Budenberg PV LTD INDIA DH Budenberg PTE LTD SINGAPORE DH Budenberg PTY LTD AUSTRALIA DPG10A User manual Version 10.2010 Page 53 / 82 7.2 Command list. COMMAND ABS OBJECT Test if absolute or gauge mode UNIT ATM Ambient atmospheric pressure EMM sensor measurement hPa TYPICAL REPLY ABS = ON or ABS = OFF ABS= ON if DPM connected (DPG5) or vacuum < 20Pa (DPG10A) 1013 hPa BLC = Measuring head number 2 BRM = Initialisation of the external barometer BRM = 0 or BRM = 1 Calibration CAL = S or CAL = N CAL COM = RS232 communication rate DAT = Date (dd-mm-yyyy) 12-05-1997 DIG = Selection of the number of digits 2 ERR (2) Error code ERR = 0 ESC Cancellation of the modifications ESC = Y or ESC = N FIL Selection of the filter 0 HUM Relative ambient humidity EMM sensor measurement Identification of the standard, version of the internal software and serial number Configuration of the measuring cell to work with the cell maximum range Return to local mode IDN INI LCL MCL = MPB Baud % 9600 68.3 % DPG - Ver 3.15 - 9707 OK LCL = OK Internal or external calibration mode I (internal) or E (external) MPI Barometric pressure external sensor measurement Immediate pressure measurement Pa 101325 Pa MPR Repeated pressure measurement MPS Next stable pressure measurement MPV Reading of the residential vacuum Pa S (stable) 8952.31 mbar I (unstable) 8952.31 mbar MPR : mbar 8952.31 8953.24 MPS : mbar 8952.31 2.03 Pa MVC Air mass density during the calibration kg/m3 1.19 kg/cm3 MVL Instantaneous air mass density kg/m3 1.22 kg/cm3 NBA = External barometer serial number 9918 NBC = Measuring head serial number 99101 NPC = P/C assembly serial number 7658 OPI = Offset of the Pirani 0.02 PAC Coefficient Pa of the DPM DH Budenberg Worldwide DH Budenberg SA FRANCE DH Budenberg LTD UNITED KINGDOM DH Budenberg Gmbh GERMANY DH Budenberg Inc UNITED STATE of AMERICA DH Budenberg FZCO UNITED ARABES EMIRATES DH Budenberg PV LTD INDIA DH Budenberg PTE LTD SINGAPORE DH Budenberg PTY LTD AUSTRALIA DPG10A User manual Version 10.2010 Page 54 / 82 PAS = PMC PUN Password confirmation Coefficient PM of the DPM = Pressure unit 4 0.07 bar RPC = DPG measuring range according to the selected measuring block. Head temperature probe resistance RST = Reset to default values RNG SAV SGL Ohm 100.02 Modifications saving = SI (1) SAV = Y or SAV = N Local gravity value m/s2 Measuring cell measured value g kg/m3 SMV SPC = = External calibration masses density Piston-cylinder Kn SPI STS (3) = Span Pirani DPG status T (1) Cell tarring TAM TAR = Ambient temperature EMM sensor measurement Standard's tarring TIM = Time (hh-mm-ss) TPC Piston temperature TST Calibration test 9.80665 S* 809.27 g 7920 20.000123 1.03 (DPG10A only) STS = 1 (busy) if CAL, TAR, BRM STS = 0 (not busy) TA (ok) or TL (not ok) °C 23.2 °C TAR = S 15-56-22 °C 24.6 °C TST = S TST = 0.00 UPC = Kn unit (bar or psi) 0 (bar/kg), 1 (psi/kg) UUC = User unit coefficient 0.5 UUN = User unit label USER WNG ZST Calibration indication = Pressure stability selection (P/s unit) 0,01 (mbar/s) (1) Commands, which are 20000-series compatible. The commands, which are indicated with ‘=’ can be used either to read or to determine a value: Example: PUN : 4 (the selected unit is the mbar) PUN = 5 : 5 (the newly selected unit is the psi) As soon as the user transmits the first command, REM displays and the keyboard is locked. The command LCL must be used in order to have access to the keyboard. DH Budenberg Worldwide DH Budenberg SA FRANCE DH Budenberg LTD UNITED KINGDOM DH Budenberg Gmbh GERMANY DH Budenberg Inc UNITED STATE of AMERICA DH Budenberg FZCO UNITED ARABES EMIRATES DH Budenberg PV LTD INDIA DH Budenberg PTE LTD SINGAPORE DH Budenberg PTY LTD AUSTRALIA DPG10A User manual Version 10.2010 Page 55 / 82 (2) Error code. 0 1 2 3 4 5 6 7 8 - no error - RS232 (communication error – bad command) - Cell instable (tare and calibration impossible) - Cell not at zero (calibration impossible) - Initialization of the external barometer unsuccessful - Cell overload - Cell under load – Pressure reading while in menu mode - Test of the calibration unsuccessful (3) Status of the DPG When the DPG is performing the calibration, the zeroing or the configuration of the DPM, no other command are valid. The DPG answer STS=1 until the action in progress is finished. The command STS can be used to check if one the action mentioned is completed (STS=0) or not (STS=1). The command ERR should be used to check if the action succeed (ERR=0) or not (see 2). 7.3 Syntax Carriage Return (CR) and Line Feed (LF) characters must follow each command. Therefore, the message is a character chain, with CR and LF marking the end of the chain. The CR and LF characters follow each return message. When a command is not supported, the received message is answered back and followed by ? ex: SXD.. SXD ? DH Budenberg Worldwide DH Budenberg SA FRANCE DH Budenberg LTD UNITED KINGDOM DH Budenberg Gmbh GERMANY DH Budenberg Inc UNITED STATE of AMERICA DH Budenberg FZCO UNITED ARABES EMIRATES DH Budenberg PV LTD INDIA DH Budenberg PTE LTD SINGAPORE DH Budenberg PTY LTD AUSTRALIA DPG10A User manual Version 10.2010 Page 56 / 82 8. COMMAND DESCRIPTION ABS Description: DPG in absolute or gauge. Example: Sent: ABS Reply: ABS=ON ATM Description: Atmospheric pressure value EMM internal sensor measurement, in Pa. Example: Sent: ATM Reply: 101325 Pa BLC Description: Selected measuring head number. Remark: The user previously has to choose from the 3 existing heads the measuring head with, which he wants to read and modify one or several features. Examples: Sent: BLC Query: BLC = 2 Sent: BLC = 3 Query: 3 Sent: BLC = 4 Query: ? because the head ≠ [1 ,2, 3] BRM Description: Initialization of the external barometer. Remark: When BRM = 1, the displayed pressure value corresponds to the addition of the pressure given by the barometer with the DPG10A pressure. The user previously has to enter the barometer serial number (NBA). Examples: Sent: BRM Query: BRM = 0 (initialization not OK) Sent: BRM = 1 Query: 1 (initialization start) (ERR=4 if unsuccessful) CAL Description: Running of the calibration procedure. Examples: Sent: CAL Reply: CAL = S (beginning of the calibration) Sent: CAL (ERR=3) Reply: CAL = N (calibration impossible – not at zero) STS=1 during calibration process. When STS=0, check ERR to know if calibration succeed (ERR=0) or not (ERR=2 or ERR=3) DH Budenberg Worldwide DH Budenberg SA FRANCE DH Budenberg LTD UNITED KINGDOM DH Budenberg Gmbh GERMANY DH Budenberg Inc UNITED STATE of AMERICA DH Budenberg FZCO UNITED ARABES EMIRATES DH Budenberg PV LTD INDIA DH Budenberg PTE LTD SINGAPORE DH Budenberg PTY LTD AUSTRALIA DPG10A User manual Version 10.2010 Page 57 / 82 COM Description: RS232 communication rate in baud. Examples: Sent: COM Reply: COM = 9600 Sent: COM = 2400 Reply: 2400 Sent: COM = 3000 Reply: ? rate is ≠ [300, 600, 1200, 2400, 4800, 9600] DAT Description: Date of the operation. Examples: Sent: DAT Reply: DAT = 16-04-1997 Sent: DAT= 16- 04-1997 Reply: 16-04-1997 Sent: DAT= 16041997 Reply: ? because the format is incorrect DIG Description: Selection of the resolution according to the number of digits. Remarks: The resolution of the pressure value is displayed in the selected unit. The minimal digit is 0 and the maximal digit is 7. Examples: Sent: DIG Reply: DIG = 2 Sent: DIG = 3 Reply: 3 Sent: DIG = 9 Reply: ? because the figure ≠ [0... 7] ERR Description: Check error code. Examples: Sent: ERR Reply: ERR = 0 (no error) Sent: ERR Reply: ERR = 1 (communication problem) The error code is reset when it is read. ESC Description: Cancellation of the modifications made after the latest saving. Examples: Sent: ESC Reply: ESC = Y (reading OK) Sent: ESC Reply: ESC = N (reading not OK) DH Budenberg Worldwide DH Budenberg SA FRANCE DH Budenberg LTD UNITED KINGDOM DH Budenberg Gmbh GERMANY DH Budenberg Inc UNITED STATE of AMERICA DH Budenberg FZCO UNITED ARABES EMIRATES DH Budenberg PV LTD INDIA DH Budenberg PTE LTD SINGAPORE DH Budenberg PTY LTD AUSTRALIA DPG10A User manual Version 10.2010 Page 58 / 82 FIL Description: Selection of the filter for the pressure measurement. Remark: The equivalence figure-filter is: 0 - NONE, 1 - LOW, 2 - MEDIUM, 3 - HIGH. Examples: Sent: FIL Reply: FIL = 0 Sent: FIL = 2 Reply: 2 Sent: FIL = 5 Reply: ? because the figure ≠ [0, 1, 2 , 3] HUM Description: Relative ambient humidity EMM sensor measurement in %. Example: Sent: HUM Reply: 52.4 % IDN Description: Identification of the standard, version of the internal software and serial number. Example: Sent: IDN Reply: DPG10A – Ver 2.51 - 9732 INI Description: Configuration of the measuring cell to work with the cell maximum range. Example: Sent: INI Reply: OK LCL Description: Return to local mode and give access to the keyboard Example: Sent: LCL Reply: LCL = OK MCL Description: Internal or external calibration mode. Example: Sent: MCL Reply: MCL = I (internal) Sent: MCL Reply: MCL = E (external) DH Budenberg Worldwide DH Budenberg SA FRANCE DH Budenberg LTD UNITED KINGDOM DH Budenberg Gmbh GERMANY DH Budenberg Inc UNITED STATE of AMERICA DH Budenberg FZCO UNITED ARABES EMIRATES DH Budenberg PV LTD INDIA DH Budenberg PTE LTD SINGAPORE DH Budenberg PTY LTD AUSTRALIA DPG10A User manual Version 10.2010 Page 59 / 82 MPB Description: Barometric pressure external reference measurement in Pa. Remark: This measurement is given by an external barometer, which is connected to the standard. Example: Sent: MPB Reply: 99997 Pa MPI Description: Immediate pressure measurement. Remark: S = stable and I = unstable Example: Sent: MPI Reply: S:1.03542 bar (stable) Sent: MPI Reply: I:1.03542 bar (unstable) MPR Description: Repeated pressure measurement. Remark: It is possible to stop the procedure by sending any command. Example: Sent: MPR Reply: MPR : mbar (selected unit) 1013.52 (value) 1107.68 ..... MPS Description: Stable pressure measurement. Reply message: First stable pressure value. Remark: There is no answer as long as the pressure is unstable. Example: Sent: MPS Reply: MPS : psi 20.5432 MPV Description: vacuum measurement form the pirani sensor Remark: Pressure in Pascal Example: Sent: MPV Reply: 2.03 Pa MVC Description: Air mass density EMM measurement during the last calibration, in Kg/m3 . Example: Sent: MVC Reply: 1.19 Kg/m3 DH Budenberg Worldwide DH Budenberg SA FRANCE DH Budenberg LTD UNITED KINGDOM DH Budenberg Gmbh GERMANY DH Budenberg Inc UNITED STATE of AMERICA DH Budenberg FZCO UNITED ARABES EMIRATES DH Budenberg PV LTD INDIA DH Budenberg PTE LTD SINGAPORE DH Budenberg PTY LTD AUSTRALIA DPG10A User manual Version 10.2010 Page 60 / 82 MVL Description: Instantaneous air mass density EMM measurement, in Kg/m3 . Example: Sent: MVL Reply: 1.19 Kg/m3 NBA Description: External barometer serial number. Examples: Sent: NBA Reply: NBA = 9732 Sent: NBA = 11832 Reply: 11832 NBC Description: Selected measuring head serial number. Examples: Sent: NBC Reply: NBC = 9732 Sent: NPC = 99101 Reply: 99101 NPC Description: Selected piston-cylinder assembly serial number. Examples: Sent: NPC Reply: NPC = 9879 Sent: NPC = 9979 Reply: 9979 OPI Description: Offset of the Pirani sensor (in Pascal) Example: Sent: OPI Reply: OPI = 0.5 Sent: OPI=0.3 Reply: O.3 PAC Description: Coefficient PA of the DPM (in Pascal) Example: Sent: PA Reply: 0.32157 DH Budenberg Worldwide DH Budenberg SA FRANCE DH Budenberg LTD UNITED KINGDOM DH Budenberg Gmbh GERMANY DH Budenberg Inc UNITED STATE of AMERICA DH Budenberg FZCO UNITED ARABES EMIRATES DH Budenberg PV LTD INDIA DH Budenberg PTE LTD SINGAPORE DH Budenberg PTY LTD AUSTRALIA DPG10A User manual Version 10.2010 Page 61 / 82 PAS Description: Password validation. Remark: It is not possible to define a password by RS. If a password has been defined, it is necessary to confirm it in order to be able to modify a protected datum. The password is valid as long as SAV or ESC has not been executed. Examples: Sent: PAS Reply: PAS = 1 (password defined) Sent: PAS = ABCD Reply: PAS = 1 (password confirmed) Sent: PAS Reply: PAS = 0 (password not defined) Sent: PAS = ABCD Reply: PAS = 0 (password not defined or incorrect) PMC Description: Coefficient PM of the DPM Example: Sent: PM Reply: 1.00203 PUN Description: Pressure unit value. Remark: The equivalence figure-unit is: 0 - Pa, 1 - kPa, 2 - Mpa, 3 - bar, 4 - mbar, 5 - psi, 6 mmHg, 7 - inHg, 8 - mH20, 9 - inH20, 10 - kg/cm², 11 - Cnts, 12 - User Exemples : Sent: PUN Reply: PUN = 4 Sent: PUN = 3 Reply: 3 Sent: PUN = 15 Reply: ? because the number is >12 RNG Description: Standard measuring range according to the selected measuring block. Example: Sent: RNG Reply: RNG = 100 RPC Description: Head’s temperature probe resistance in Ohm. Remark: This is the probe resistance value, at 0° , for the selected head. Examples: Sent: RPC Reply: RPC = 99.98 Sent: RPC = 99.99 Reply: 99.99 DH Budenberg Worldwide DH Budenberg SA FRANCE DH Budenberg LTD UNITED KINGDOM DH Budenberg Gmbh GERMANY DH Budenberg Inc UNITED STATE of AMERICA DH Budenberg FZCO UNITED ARABES EMIRATES DH Budenberg PV LTD INDIA DH Budenberg PTE LTD SINGAPORE DH Budenberg PTY LTD AUSTRALIA DPG10A User manual Version 10.2010 Page 62 / 82 RST Description: Standard reset to its default values. Example: Sent: RST Reply: RST = Y SAV Description: Modifications saving. Examples: Sent: SAV Reply: SAV = Y (saving OK) Sent: SAV Reply: SAV = N (saving not OK) SGL Description: Local gravity value in m/s2. Examples: Sent: SGL Reply: GL = 9.81000 Sent: SGL = 9.80732 Reply: 9.80732 SI Description: Cell’s measured value in counts (20000-series compatible). Example: Sent: SI Reply: ::::::1058.3 (* if stable) Sent: SI Reply: ::::::1058.3 SMV Description: External calibration mass material density in Kg/m3 . Examples: Sent: SMV Reply: MV 7920 Sent: SMV = 8000 Reply: 8000 SPC Description: Selected piston-cylinder Kn. Remark: Do not forget to define UPC. Examples: Sent: SPC Reply: SPC = 1.000000 Sent: SPC = 20.000000 Reply: 20.000000 DH Budenberg Worldwide DH Budenberg SA FRANCE DH Budenberg LTD UNITED KINGDOM DH Budenberg Gmbh GERMANY DH Budenberg Inc UNITED STATE of AMERICA DH Budenberg FZCO UNITED ARABES EMIRATES DH Budenberg PV LTD INDIA DH Budenberg PTE LTD SINGAPORE DH Budenberg PTY LTD AUSTRALIA DPG10A User manual Version 10.2010 Page 63 / 82 SPI Description: Span of the Pirani sensor Example: Sent: SPI Reply: 1.02453 Sent: SPI=0.99875 Reply: 0.99875 STS Description: DPG10A status. Remark: The DPG reply STS = 1 to any command sent while the DPG is busy Examples: Sent: STS Reply: STS = 1 (busy) Sent: STS Reply: STS = 0 (OK) Sent: IDN Reply: STS = 1 (busy) T Description: Cell tarring. Remark: This command is 20000-series standards compatible. TAR command should be used instead of T for the DPG. Examples: Sent: T Reply: TA (tarring OK) Sent: T Reply: TL (tarring not OK) TAM Description: Ambient temperature EMM sensor measurement in °C. Example: Sent:TAM Reply: 23.8°C TAR Description: Standard’s tarring. Examples: Sent: TAR Reply: TAR = Y (tarring OK) Sent: TAR Reply: TAR = N (tarring not OK) DH Budenberg Worldwide DH Budenberg SA FRANCE DH Budenberg LTD UNITED KINGDOM DH Budenberg Gmbh GERMANY DH Budenberg Inc UNITED STATE of AMERICA DH Budenberg FZCO UNITED ARABES EMIRATES DH Budenberg PV LTD INDIA DH Budenberg PTE LTD SINGAPORE DH Budenberg PTY LTD AUSTRALIA DPG10A User manual Version 10.2010 Page 64 / 82 TIM Description: Time at the moment of the measurement. Examples: Sent: TIM Reply: TIM = 16-56-32 Sent: TIM = 18-59 Reply: 18-59 Sent: TIM = 1859 Reply: ? because the format is incorrect TPC Description: Piston temperature in °C. Example: Sent:TPC Reply: 23.43°C TST Description: Perform the calibration test Remark: The value returned is the difference between the last calibration and the test. A value in [-1 ; +1] means that the current calibration is OK. Otherwise, a new calibration should be performed. Example: Sent: TST Reply: TST = S Reply: TST = N (error: instabilities, pressure applied..) Reply: TST = 2 UPC Description: Kn unit in bar, psi, kPa or MPa. Remark: The equivalence figure-unit is: 0 - bar/Kg, 1 - psi/Kg, 2 - kPa/Kg, 3 - MPa/Kg. Examples: Sent: UPC Reply: UPC = 0 Sent: UPC = 2 Reply: 2 Sent: UPC = 5 Reply: ? because the figure ≠ [0, 1, 2, 3] UUC Description: User unit coefficient. Remark: Coef = a. [x] and x = 1 Pa Examples: Sent: UUC Reply: UUC = 20.420000 Sent: UUC = 7.42 Reply: 7.4200000 DH Budenberg Worldwide DH Budenberg SA FRANCE DH Budenberg LTD UNITED KINGDOM DH Budenberg Gmbh GERMANY DH Budenberg Inc UNITED STATE of AMERICA DH Budenberg FZCO UNITED ARABES EMIRATES DH Budenberg PV LTD INDIA DH Budenberg PTE LTD SINGAPORE DH Budenberg PTY LTD AUSTRALIA DPG10A User manual Version 10.2010 Page 65 / 82 UUN Description: User unit label. Examples: Sent: UUN Reply: UUN = USER Sent: UUN = USER Reply: USER WNG Description: Calibration indication. Examples: Sent: WNG Reply: WNG = 0 (the calibration does not have to be run) Sent: WNG Reply: WNG = 1 (the calibration has to be run) ZST Description: Pressure stability selection in P/s Remark: ZST has to be within 1 and 1000 times the displaying resolution (digits number). Examples: Sent: ZST Reply: ZST = 0.01 Sent: ZST = 0.04 Reply: 0.04 Sent: ZST = 2 Reply: ? because the area is too large or too small DH Budenberg Worldwide DH Budenberg SA FRANCE DH Budenberg LTD UNITED KINGDOM DH Budenberg Gmbh GERMANY DH Budenberg Inc UNITED STATE of AMERICA DH Budenberg FZCO UNITED ARABES EMIRATES DH Budenberg PV LTD INDIA DH Budenberg PTE LTD SINGAPORE DH Budenberg PTY LTD AUSTRALIA DPG10A User manual Version 10.2010 Page 66 / 82 9. METROLOGY. 9.1 Fundamental principle – Calculation of a pressure with the general formula. Pressure measurement using a DPG10A pressure standard directly derives from the fundamental definition of pressure. It is defined as being the ratio of a force to an area. F P= A F is the force. A is the piston-cylinder surface area determined by the DH-BUDENBERG’s metrological laboratory. The piston-cylinder assembly measuring performance first of all depends on the geometry of the constituents (good piston and cylinder, thin clearance between the two elements) but also on the influence of the environment on A and F. 9.2 Automatic pressure corrections. The DPG10A is equipped with a system, which enables to take into account the external parameters, constant and variable, that affect the displayed pressure calculation. Pressure in normal conditions P = Kn × Measuring head temperature correction, calculated according to the sensor’s indications ρ − ρm g N × l × ( 1 − α PC × ( t − 20)) × ac N k gn ρ an − ρ m Gravity correction, calculated according to the user-entry data Kn N Nk gl gn αPC t ρac ρm ρan λP Pvac Piston-cylinder pressure distortion correction x (1 – λ P) } +P vac Air buoyancy correction, calculated according to the indications of the atmospheric pressure, humidity and ambient temperature sensors → specific piston-cylinder assembly coefficient → measuring cell indication in counts → sensitivity of the measuring cell → local gravity → normal gravity → piston-cylinder assembly dilation coefficient → piston-cylinder assembly temperature in °C → air mass density during the calibration → calibration mass density → air normal mass density → piston-cylinder pressure distortion coefficient → remaining pressure in vacuum chamber DH Budenberg Worldwide DH Budenberg SA FRANCE DH Budenberg LTD UNITED KINGDOM DH Budenberg Gmbh GERMANY DH Budenberg Inc UNITED STATE of AMERICA DH Budenberg FZCO UNITED ARABES EMIRATES DH Budenberg PV LTD INDIA DH Budenberg PTE LTD SINGAPORE DH Budenberg PTY LTD AUSTRALIA DPG10A User manual Version 10.2010 Page 67 / 82 9.2.1 Kn determination. The Kn conversion coefficient is determined by the DH-BUDENBERG’s laboratory. It depends on the piston-cylinder assembly surface area and temperature, and also depends on pressure itself, as far as high pressures are concerned. The pressure calculation takes into account the force measurement, which is applied on the measuring cell. This measurement depends on the local gravity and the air buoyancy during the calibration. The correction of these external parameters is compulsory in order to authenticate the results. 9.2.2 Local gravity correction. The A piston-cylinder surface area allows the pressure calculation with the formula P = F / A. Since the F force is measured by the cell with F = m . gl and the local gravity is only taken into account during the calibration, it is necessary to correct the mass value, which is displayed by the cell with the gl / gn coefficient. 9.2.3 Air buoyancy correction. The air buoyancy plays an important part in the standard’s calibration since the standard does not measure a mass but measures a force. The air buoyancy depends on the temperature, the relative humidity and the ambient atmospheric pressure. These three parameters are measured through sensors, which are integrated in the Environment Monitoring Module. This allows an automatic correction as well as a real-time air buoyancy influence compensation during the calibration. Therefore, we increase the accuracy of the pressure measurements obtained with the measuring cell. The M conventional mass of the internal calibration mass is calculated in normal conditions (ρan =1.2 kg/m3, gn = 9.80665, t = 20 °C) m = M . (1 - ρan / ρM) During the calibration, the air buoyancy is ρa and the measured mass is m = M . (1 - ρa / ρM). The air buoyancy corrected mass is then mcor = m . (1 - ρa / ρm) / (1 - ρan / ρm) so mcor = m . (ρm - ρa) / (ρm - ρan). Notes : The internal mass density is 7900 kg/m 3. The DH calibration mass density is 7920 kg/m3 . 9.2.4 Measuring head temperature correction. The piston-cylinder assembly’s surface area depends on the pressure and the temperature: dilation of the piston and cylinder’s material. 1 - (α p + α c) (t – 20) stands for the temperature correction. α p and α c are the piston and cylinder’s linear dilation coefficients. t is the piston-cylinder assembly’s temperature in °C. DH Budenberg Worldwide DH Budenberg SA FRANCE DH Budenberg LTD UNITED KINGDOM DH Budenberg Gmbh GERMANY DH Budenberg Inc UNITED STATE of AMERICA DH Budenberg FZCO UNITED ARABES EMIRATES DH Budenberg PV LTD INDIA DH Budenberg PTE LTD SINGAPORE DH Budenberg PTY LTD AUSTRALIA DPG10A User manual Version 10.2010 Page 68 / 82 In order to know the piston-cylinder assembly temperature, each measuring head is equipped with a Pt100 probe. In the 0 – 40°C field, the temperature is proportional to the variation of the platinum sensitive element resistance according to the equation: θ= Where θ Rθ Ro Rθ - Ro 0,3896 temperature in Celsius degrees sensitive element temperature resistance (measured value) sensitive element 0°C temperature resistance (determined by DH-BUDENBERG’s laboratory) 0,3896 ohms conversion coefficient in Celsius degrees To obtain accurate measurements, the Pt100 probe resistance value measurement is a 4-wire measurement. 9.2.5 Piston cylinder pressure distortion correction. (1 - λ P) is the correction term for the piston-cylinder pressure distortion. λ is called the distortion coefficient. The DPG10A has a re-entrant mounting, the λ is thus experimentally determined. 9.2.6 Remaining Pressure in vacuum chamber. Pvac is the remaining pressure in the vacuum chamber. The value of Pvac is measured by a built-in Pirani Gauge and displayed on the bottom line of the front display. This value is added to the pressure only if the option has been selected in the menu (see 7.4) DH Budenberg Worldwide DH Budenberg SA FRANCE DH Budenberg LTD UNITED KINGDOM DH Budenberg Gmbh GERMANY DH Budenberg Inc UNITED STATE of AMERICA DH Budenberg FZCO UNITED ARABES EMIRATES DH Budenberg PV LTD INDIA DH Budenberg PTE LTD SINGAPORE DH Budenberg PTY LTD AUSTRALIA DPG10A User manual Version 10.2010 Page 69 / 82 10. TECHNICAL DATA. 10.1. Dimensions/Weight/Power supply. Dimensions (L x W x H): 60 x 50 x 50 cm. (Operational configuration.) Power supply: 110/230 V – 50/ 60 Hz Weight: 25 kg 10.2 Power supply. The DPG10A is equipped with a socket, which integrates a CEE2 standards socket, a 5 x 20 mm, 2 fuses compartment and a bipolar power switch. A voltage selector enables the adaptation of the DPG10A to each country’s voltage. That is the reason why the DPG10A is delivered with a power cable and 2 fuses adapted to the voltage of the country (Cf. illustration 3.2.5). Do not forget to connect the DPG10A only to an earthed socket. Protect the plug and the socket against humidity. 10.3 Measurement cell. The DPG10A pressure standard’s principle consists in measuring the pressure-generated force on a piston-cylinder whose surface area is known. The balance measures the force, its resolution is 1 000 000 dots/kg i.e. = 10 mg. 10.4 Environment Monitoring Module. The internal sensors integrated in the Environment Monitoring Module allow a measurement of the ambient conditions (temperature, relative humidity, atmospheric pressure) and determine the air buoyancy on the calibration mass (during the calibration). The characteristics of these sensors are : - Temperature: Pt100 probe, ± 0.2 °C, - Relative humidity: capacity sensor, ± 5%, - Atmospheric pressure: strain gauge, ± 2 mbar. - Pirani Gauge ± 10% of reading. 10.5 CE Declaration. Please refer to Appendix 1 at the end of this manual. DH Budenberg Worldwide DH Budenberg SA FRANCE DH Budenberg LTD UNITED KINGDOM DH Budenberg Gmbh GERMANY DH Budenberg Inc UNITED STATE of AMERICA DH Budenberg FZCO UNITED ARABES EMIRATES DH Budenberg PV LTD INDIA DH Budenberg PTE LTD SINGAPORE DH Budenberg PTY LTD AUSTRALIA DPG10A User manual Version 10.2010 Page 70 / 82 11. MAINTENANCE. 11.1 General Maintenance. No particular maintenance is to be performed if the DPG10A standard is used in accordance with the operating instructions described in this manual. However, a regular maintenance made by an authorized After Sales Service technician contributes to the constant accuracy of the DPG10A and increases its lifetime. 11.2 Cleaning. Clean the instrument with a humid cloth with a common cleaning product. Never forget to disconnect the standard before cleaning it. 11.2.1 Cleaning the Piston Cylinder Assembly. A good cleaning technique should remove all foreign material, leave no residue, polish the critical surfaces of the piston and cylinder and remove remaining dust and lint before piston-cylinder assembly. The following procedure is recommended: 1 - Clean the piston and the cylinder in hot water with a detergent that does not leave impurities. Never immerse the piston head in the water. 2 - Rinse the piston and the cylinder with pure and warm water, then wipes each element with a clean and non-fluffy cloth. Dry accurately the piston and the cylinder. Never re-assemble or put in contact the piston with the cylinder when not perfectly dry. The tungsten carbide particles of this material are kept together with cobalt metal that can be corroded. Use leather gloves, never put in contact human skin with tungsten carbide polished surfaces. 3 - Install carefully the piston into the cylinder 4 - Immerse separately the piston and the cylinder disassembled in a solvent exempt of chlorine and do a backward and forward motion. 5 - Remove the measuring elements from the solvent. 6 - Wipe the piston and the cylinder with a dry, clean and non-fluffy cloth. 7 - Dry the piston and the cylinder with a clean nitrogen spray, control that the pieces are perfectly dry and set them together. 8 –Before installing the measuring element in its measurement head, rotate gently in your fingers the piston in its cylinder. If the piston rotates delicately well, install the measuring element in its measurement head. 9 - If the piston does not rotate well or stalls, repeat the cleaning operation starting at 4. DH Budenberg Worldwide DH Budenberg SA FRANCE DH Budenberg LTD UNITED KINGDOM DH Budenberg Gmbh GERMANY DH Budenberg Inc UNITED STATE of AMERICA DH Budenberg FZCO UNITED ARABES EMIRATES DH Budenberg PV LTD INDIA DH Budenberg PTE LTD SINGAPORE DH Budenberg PTY LTD AUSTRALIA DPG10A User manual Version 10.2010 Page 71 / 82 11.3 Piston cylinder assembly tool. P/N 60417 for 0.2 bar/kg PCA & P/N 60864 for 0.5 bar/kg PCA. Tool 123- Put the piston on a table. Put the tool on the cylinder and hold it with one hand. With the other hand, insert the piston in the cylinder. DH Budenberg Worldwide DH Budenberg SA FRANCE DH Budenberg LTD UNITED KINGDOM DH Budenberg Gmbh GERMANY DH Budenberg Inc UNITED STATE of AMERICA DH Budenberg FZCO UNITED ARABES EMIRATES DH Budenberg PV LTD INDIA DH Budenberg PTE LTD SINGAPORE DH Budenberg PTY LTD AUSTRALIA DPG10A User manual Version 10.2010 Page 72 / 82 1- Put the measuring head on a table. 2- Put the tool on the measuring head as shown in the hereafter drawing and hold it with one hand. 3- With your other hand, insert the piston in the cylinder. 4- Do not release the piston until the head is in contact with the cylinder. Tool DH Budenberg Worldwide DH Budenberg SA FRANCE DH Budenberg LTD UNITED KINGDOM DH Budenberg Gmbh GERMANY DH Budenberg Inc UNITED STATE of AMERICA DH Budenberg FZCO UNITED ARABES EMIRATES DH Budenberg PV LTD INDIA DH Budenberg PTE LTD SINGAPORE DH Budenberg PTY LTD AUSTRALIA DPG10A User manual Version 10.2010 Page 73 / 82 11.4 Changing the components. 11.4.1 Changing the fuses. Remove the fuses compartment from the power socket located on the rear panel (Cf. illustration 3.2.5). Replace the damaged fuse(s) with fuse(s) of equivalent type and value. 0.315 Amp Temporized. Replace the fuses compartment. - Never forget to disconnect the standard before changing the fuses. - Make sure that the fuses be replaced with identical fuses. - If the new fuses melt again after a short period of time, it means that the standard’s electric connection is damaged. You then must disconnect the standard and have it mended by an authorized After Sales Service technician. Never try, in any case, to mend it by yourself. DH Budenberg Worldwide DH Budenberg SA FRANCE DH Budenberg LTD UNITED KINGDOM DH Budenberg Gmbh GERMANY DH Budenberg Inc UNITED STATE of AMERICA DH Budenberg FZCO UNITED ARABES EMIRATES DH Budenberg PV LTD INDIA DH Budenberg PTE LTD SINGAPORE DH Budenberg PTY LTD AUSTRALIA DPG10A User manual Version 10.2010 Page 74 / 82 11.5 Calibration. 11.5.1 Standard's calibration. 11.5.1.1 Frequency. The frequency of the DPG10A’s calibration has to be chosen by the user according to the Metrological and Quality Assurance Standards, which he wishes to conform or, which are in use in his company. The experience, the operating conditions, and the level of measurement performance, which is desired, usually determine it. For information only, the DH-BUDENBERG’s experience reasonably recommends the user to recalibrate the standard every 3 years in normal operating conditions. Remember that, when he wishes, the user can very easily externally calibrate the DPG10A and by this way perpetuate the accuracy of its measurements. 11.5.1.2 Method and means. The DPG10A’s calibration consists in: - Determining the Kn specific coefficient converting the measuring head piston-cylinder assembly pressure in mass, and evaluating the associated uncertainty by comparison with a reference pressure standard, then evaluating the uncertainty, which is associated with the DAC internal mass calibration by comparison with external standard masses, finally evaluating the DPG10A’s global measurement uncertainty by comparison with a reference pressure standard. Note : Should you need any further details, do not hesitate to contact us. 11.5.2 Ambient conditions sensors calibration The user has the ability to calibrate the atmospheric pressure and relative humidity sensors by editing the values displayed by the reference instruments. From the measurement mode, press ENTER to access the main run screen, select the EMM menu with ∧, ∨, <, >, then confirm your choice by pressing ENTER again. The display is : Ta Tb Hum Patm Mvol Air temperature at the level of the internal calibration mass in °C Piston-cylinder assembly temperature in °C Relative humidity in % Atmospheric pressure in hPa Air mass density in kg/m3 DH Budenberg Worldwide DH Budenberg SA FRANCE DH Budenberg LTD UNITED KINGDOM DH Budenberg Gmbh GERMANY DH Budenberg Inc UNITED STATE of AMERICA DH Budenberg FZCO UNITED ARABES EMIRATES DH Budenberg PV LTD INDIA DH Budenberg PTE LTD SINGAPORE DH Budenberg PTY LTD AUSTRALIA DPG10A User manual Version 10.2010 Page 75 / 82 11.5.3 Atmospheric pressure sensor calibration. Select Patm from the EMM menu. F4 (ESC) steps back to the main run screen. F2 (EDT) edits the atmospheric pressure value, which is given by the reference barometer. If a password has been defined (Cf. 7.7.2), and if the user has not still modified any other password-protected element (MEASURING HEADS and PARAMETERS menu, RESET and RELATIVE HUMIDITY sub-menus), editing the reference atmospheric pressure is protected by password. The following display appears as soon as you press F2 : The user must then enter his password. To enter the password, select a letter from the alphabetic pad with ∧, ∨, <, >. ∧ and ∨ make a 5letter displacement respectively to the left and to the right. Press ENTER: the selected letter displays above the cursor. Repeat the operation until you obtain the desired password. The edited letters are displayed with asterisks * * * *. F3 (DEL) erases the latest user-edited letter. F2 (DEF) displays the default password and enables to cancel the password. F1 (SAV) confirms the password and steps back to the previous screen. DATA SET displays if the password is correct. DATA NOT SET displays if the password is not correct. F4 (ESC) steps back to the previous screen without saving the password. DH Budenberg Worldwide DH Budenberg SA FRANCE DH Budenberg LTD UNITED KINGDOM DH Budenberg Gmbh GERMANY DH Budenberg Inc UNITED STATE of AMERICA DH Budenberg FZCO UNITED ARABES EMIRATES DH Budenberg PV LTD INDIA DH Budenberg PTE LTD SINGAPORE DH Budenberg PTY LTD AUSTRALIA DPG10A User manual Version 10.2010 Page 76 / 82 After the user has edited the password, he steps back to the EMM menu and then he can press F2 (EDT) again to run the pressure sensor calibration. The following display is : The pressure value is expressed in Pa. Select a figure from the numeric pad with ∧, ∨, <, > to edit a new value. Press ENTER: the selected figure displays above the cursor. Repeat the operation until you obtain the desired value. F3 (DEL) erases the latest user-edited figure. F2 (DEF) displays the default atmospheric pressure value (101325). F1 (SAV) saves the new pressure value and steps back to the previous screen. DATA SET displays. F4 (ESC) steps back to the previous menu without saving the modification 11.3.2.2 Relative humidity sensor calibration. Select Hum from the EMM menu. F4 (ESC) steps back to the main run screen. F2 (EDT) edits the relative humidity percentage, which is given by the reference instrument. If a password has been defined , and if the user has not still modified any other password-protected element (MEASURING HEADS and PARAMETERS menu, RESET and ATMOSPHERIC PRESSURE sub-menus), editing the reference atmospheric pressure is protected by password. Refer to 11.3.2.1 to set the password. DH Budenberg Worldwide DH Budenberg SA FRANCE DH Budenberg LTD UNITED KINGDOM DH Budenberg Gmbh GERMANY DH Budenberg Inc UNITED STATE of AMERICA DH Budenberg FZCO UNITED ARABES EMIRATES DH Budenberg PV LTD INDIA DH Budenberg PTE LTD SINGAPORE DH Budenberg PTY LTD AUSTRALIA DPG10A User manual Version 10.2010 Page 77 / 82 After the user has edited the password, he steps back to the EMM menu and then he can press F2 (EDT) again to run the relative humidity sensor calibration. The following display is: The humidity value is expressed in %. Select a figure from the numeric pad with ∧, ∨, <, > to edit a new value. Press ENTER: the selected figure displays above the cursor. Repeat the operation until you obtain the desired value. F3 (DEL) erases the latest user-edited figure. F2 (DEF) displays the default relative humidity (50 %). F1 (SAV) saves the new value and steps back to the previous screen. DATA SET displays. F4 (ESC) steps back to the previous menu without saving the modification 11.3.2.3 Temperature sensor calibration. Select Ta or Tb from the EMM menu. F4 (ESC) steps back to the main run screen. F2 (EDT) edits the relative humidity percentage, which is given by the reference instrument. If a password has been defined, and if the user has not still modified any other password-protected element (MEASURING HEADS and PARAMETERS menu, RESET and ATMOSPHERIC PRESSURE sub-menus), editing the reference atmospheric pressure is protected by password. After the user has edited the password, he steps back to the EMM menu and then he can press F2 (EDT) again to run the ambient temperature sensor calibration. The following display is: DH Budenberg Worldwide DH Budenberg SA FRANCE DH Budenberg LTD UNITED KINGDOM DH Budenberg Gmbh GERMANY DH Budenberg Inc UNITED STATE of AMERICA DH Budenberg FZCO UNITED ARABES EMIRATES DH Budenberg PV LTD INDIA DH Budenberg PTE LTD SINGAPORE DH Budenberg PTY LTD AUSTRALIA DPG10A User manual Version 10.2010 Page 78 / 82 The temperature value is expressed in °C. Select a figure from the numeric pad with ∧, ∨, <, > to edit a new value. Press ENTER: the selected figure displays above the cursor. Repeat the operation until you obtain the desired value. F3 (DEL) erases the latest user-edited figure. F2 (DEF) displays the default relative humidity (50 %). F1 (SAV) saves the new value and steps back to the previous screen. DATA SET displays. F4 (ESC) steps back to the previous menu without saving the modification Note : The temperature probe of the head must be used to set the new calibration data. Remove the probe from the head and place it close to your own reference. Wait until the temperature has stabilized and then set the value of the reference. The ambient temperature is the temperature inside the DPG (where the internal mass is located). It is normal to 3 to 5 degrees Celsius difference between the internal temperature sensor of the DPG and the temperature of the room. 11.3.2.4. Vacuum sensor calibration. The internal vacuum sensor (Pirani) can be recalibrated but the user’s reading must be correct. A better accuracy sensor like a Baratron for example, should be used to recalibrate the internal Pirani. In order to recalibrate the Pirani, the user must perform a calibration cycle between 0.5 to 20 Pa and then determinate an offset and a span. The DPG will do the following correction : P_new = (P_old - offset) / span. The offset and the span can only be set via the RS232. The commands are OPI (offset in Pa) and SPI (span). If the internal Pirani has already been calibrated, the user should set OPI = 0 and SPI = 1 prior to the calibration cycle. If the user wants to use the readings from his sensor, he must set VACUUM OFF in the menu SETTINGS (so no automatic addition of the internal Pirani is made in the software) but there, it is not possible to connect the external sensor to the DPG and add this value to pressure reading. (it is not possible to do it automatically if another sensor is used instead of the Pirani). DH Budenberg Worldwide DH Budenberg SA FRANCE DH Budenberg LTD UNITED KINGDOM DH Budenberg Gmbh GERMANY DH Budenberg Inc UNITED STATE of AMERICA DH Budenberg FZCO UNITED ARABES EMIRATES DH Budenberg PV LTD INDIA DH Budenberg PTE LTD SINGAPORE DH Budenberg PTY LTD AUSTRALIA DPG10A User manual Version 10.2010 Page 79 / 82 12. MOVING & SHIPPING. If the user has to move the DPG10A or to ship it for being recalibrated, it is absolutely necessary to put the standard back in its original container, which has been especially designed to maintain the standard‘s performances after transportation (Cf. 3.1). 13. TROUBLESHOOTING. SYMPTOM POSSIBLE CAUSE The display does not step to the measurement mode at the end of the initialization: It is not possible to TARE the standard: The RS232 communication not work: The motor work: port does does not It is not possible to reach the maximum range (10 Kg x Kn) : It is not possible to pump down 5 Pa SOLUTION The load is too light. The instability important. is The instability important. is ➙ Install the coupling system. ➙ Remove the measuring head too and install it back after you have stepped to the measurement mode. too ➙ Clean the piston-cylinder. The RS cable is damaged. The communication rate is faulty. ➙ Use a direct cable. ➙Change the communication rate. The piston-cylinder is not ➙ Clean the piston-cylinder. mobile. ➙lCheck the connection and The connection does not the power switch. work. The piston-cylinder weight ➙ Start the initialization is too heavy. procedure again from the CALIBRATION menu, which appears by pressing CAL. There is a leak in the ➙ Make sure that all connection system are closed. The capacity of the pump ➙ Used a higher capacity vacuum is not high enough pump. DH Budenberg Worldwide DH Budenberg SA FRANCE DH Budenberg LTD UNITED KINGDOM DH Budenberg Gmbh GERMANY DH Budenberg Inc UNITED STATE of AMERICA DH Budenberg FZCO UNITED ARABES EMIRATES DH Budenberg PV LTD INDIA DH Budenberg PTE LTD SINGAPORE DH Budenberg PTY LTD AUSTRALIA DPG10A User manual Version 10.2010 Page 80 / 82 Appendix 1 – CE DECLARATION CONFORMITY CE DECLARATION DH.BUDENBERG S.A. We 56, rue des Ecoles - BP 125 93303 AUBERVILLIERS Cedex FRANCE declare that the product DIGITAL PISTON GAUGE (DPG) complies with the clauses of the Directive of the Council Directive Compatibilité Electromagnétique (Electromagnetic Compatibility Directive) th - n° 89/336/CEE dated May 3 , 1989 modified by the n° 92/31/CEE directive dated th th May 12 , 1992 and by the n° 93/68/CEE directive dated July 22 , 1993. Directive Basse Tension (Low Tension Directive) th - n° 73/23/CEE dated February 19 , 1973 modified by the directive 93/68/CEE th dated July 22 , 1993. and is in conformity with the following norm(s) or other normative document(s): - EN 50082-1 Ed.92 (Emission with the 89/336/CEE directive) - EN 55022 B Class Ed. 87 (Immunity with the 89/336/CEE directive) - EN 61010 (Safety rules for the use of measuring, regulating and laboratory electric instruments with the 73/23/CEE directive) Further information: Emission and immunity tests made at EMITECH (France) Year of CE labelling: 97 Aubervilliers, October 23 th , 1997 G. SPARKES – General Manager DH Budenberg Worldwide DH Budenberg SA FRANCE DH Budenberg LTD UNITED KINGDOM DH Budenberg Gmbh GERMANY DH Budenberg Inc UNITED STATE of AMERICA DH Budenberg FZCO UNITED ARABES EMIRATES DH Budenberg PV LTD INDIA DH Budenberg PTE LTD SINGAPORE DH Budenberg PTY LTD AUSTRALIA DPG10A User manual Version 10.2010 Page 81 / 82 Appendix 2 - ADAPTATION KIT FOR GAUGE MEASURING HEAD. It is now possible to use the DPG5 and DPG10G head with the DPG10A base. Two kits are available: - P/N 61497 allows using the old type 110/111/410/710 head. - P/N 61453 allows using NB series of 110/111/410/710 head. The kit is composed of an adaptation bloc and a special coupling rod to “link” the piston cylinder of the gauge head to the DPG10A measuring cell. It allows to extend the range of the DPG 10A up to 500 bar. 410 NB HEAD ADAPTATION BLOC DH Budenberg Worldwide DH Budenberg SA FRANCE DH Budenberg LTD UNITED KINGDOM DH Budenberg Gmbh GERMANY DH Budenberg Inc UNITED STATE of AMERICA DH Budenberg FZCO UNITED ARABES EMIRATES DH Budenberg PV LTD INDIA DH Budenberg PTE LTD SINGAPORE DH Budenberg PTY LTD AUSTRALIA DPG10A User manual Version 10.2010 Page 82 / 82 DH-Budenberg SA 56 Rue des Ecoles BP 125 93303 Aubervilliers-France Tel : (33)1.48.39.83.00 Fax :(33)1.48.33.65.90 [email protected] DH-Budenberg Ltd 2 Gilchrist Road Northbank Industrial Estate Irlam M44 5AY – MANCHESTER UNITED KINGDOM Tel : (44).870.787.73.70 Fax :(44)870.787.73.69 [email protected] DH-Budenberg Gmbh Raiffeisenstrasse 2, D-63110 Rodgau -DUDENHOFEN Germany Tel :49 (0) 6106 82 940 Fax :49 (0) 6106 82 9417 [email protected] DH-Budenberg Inc 300 CM ALLEN PARKWAY SUITE 212B San MARCOS – TEXAS 78666 USA Toll free :00.1.877.713.2733 Tel :00.1.512.3535.3133 Fax :00.1.512.353.3106 [email protected] DH-Budenberg Instrumentation PVT.Ltd 299-300, 2nd lain Road,Nehru Nagar Old Mahabalipuram Road Chennai – 600 096 India Tel :00.91.44.2448.2014 Fax :00.91.44.2448.2862 [email protected] DH-Budenberg FZCO 4a 114 DUBAI AIRPORT FREE ZONE PO BOX 54639 DUBAI EMIRATS ARABES UNIS Tel :00.97.142.045.104 Fax :00.97.142.045.103 [email protected] DH Budenberg PTE LTD 10 C Stanley Street 068729 SINGAPORE Tel : 00.788.777.1249 Fax :00.656.826.4101 [email protected] DH-Budenberg PTY LTD 65 SEASPRAY CRESCENT 6036 JANDALEE WAA AUSTRALIA Tel :61.8.9562.7150 Fax :61.8.6102.1776 [email protected] DH Budenberg Worldwide DH Budenberg SA FRANCE DH Budenberg LTD UNITED KINGDOM DH Budenberg Gmbh GERMANY DH Budenberg Inc UNITED STATE of AMERICA DH Budenberg FZCO UNITED ARABES EMIRATES DH Budenberg PV LTD INDIA DH Budenberg PTE LTD SINGAPORE DH Budenberg PTY LTD AUSTRALIA