1
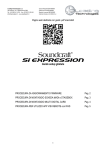
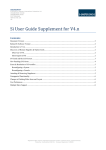
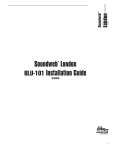
SOUNDCR AFT
A Division o f Har ma n Int ernational Indust ries Ltd
CRANB OR NE HO USE
CRANB OR NE RO AD
PO TTERS BAR
HERTS E N6 3 JN
UK
Si Series Option Slot & Card User Guide
Contents
Version: ...................................................................................................................................................................... 2
Supported Cards: ........................................................................................................................................................ 2
Card Installation and Removal: ................................................................................................................................... 2
Introduction: ............................................................................................................................................................... 3
Theory of Operation:................................................................................................................................................... 3
Example Configurations:............................................................................................................................................. 3
Card Switch Settings:.................................................................................................................................................. 5
Si Series MADI Cards................................................................................................................................................. 6
Si Series AES Cards ................................................................................................................................................... 8
Si AVIOM® Card........................................................................................................................................................ 9
Si CobraNet™ Card .................................................................................................................................................. 10
Si-Series CobraNet™ Card Setup Guide.................................................................................................................... 11
Si-Series BLU Link Card Setup Guide ...................................................................................................................... 11
Registered Office: Harman International Industries Limited, Cranborne House, Cranborne Road,
Potters Bar, Hertfordshire EN6 3JN. Company Registration 1485558
Version:
V1.1
V1.2
V1.2.1
V1.3.0
V2.0
Added AES.
Added Aviom® & CobraNet™.
For initial release.
Added extra CN info and Installation of hot plugging.
Added BLU Link card
Supported Cards:
MADI, MADI HD, AES, CobraNet™, AVIOM® ,Multi Digital, BLU Link, Dante
Card Installation and Removal:
The option card connectors are located behind blank panels on the rear of the console, use a hex key or Posidrive™
screwdriver to release the cover and retain this for future use.
When installing or removing a card ensure to observe the following:
· Do not over-tighten card retaining screws.
· Observe best practice regarding ESD (electrostatic discharge) before inserting or removing any option card.
· Ensure the console is switched off and all AC power cords are removed before installing or removing any
option card.
· Do not use force; if the card does not locate and plug-in easily contact your distributor or Soundcraft Customer
Service in the UK.
FAILURE TO OBSERVE THESE PRECAUTIONS MAY RESULT IN DAMAGE TO THE CONSOLE AND /
OR THE OPTION CARD.
Si Option Slot and Option Card User Guide V2.0 0413
Introduction:
The Si 1,2 3 including ‘+’ series of consoles feature a versatile 128 channel expansion bus offering 64 discrete
additional input sources and 64 additional output patches that may be used in parallel to fan-out to multiple
destinations. Routing from the cards to the processing channels and from channels or buses to the option card buses is
achieved via the ‘Patching’ functionality; see the console user guide for details.
IMPORTANT: Setting of DIP switches on Si 1,2,3 including ‘+’ variants is critical since the console option slots
share an expansion bus. Setting of dip switches on Si Performer, Si Compact and Si Expression is not critical as there is
an expansion bus dedicated to each option slot.
Theory of Operation:
Inputs – All of the 64 expansion bus inputs are present at all expansion slot positions; any card may route to any
expansion bus however only one card may be set to route to any one bus at any one time, as an example if you require
64 inputs from a MADI card then no routing from other input cards may be active at the same time; see ‘DIP SWITCH
SETTINGS’ for your option cards for details on how to activate / de-activate routing to the expansion bus.
NOTE: There is a clear distinction between patching & routing; patching is the act action of assigning an available
signal source to a processing channel whilst option card whilst routing is the action of enabling / disabling outputs of
an option card to the expansion bus for where it may then be patched to a DSP channel.
Example Configurations:
An example of a valid configuration:
64 Channel
Input
Expansion
Bus
< Card #1(AES) INPUTS 1-8 active
< Card #2(AES) INPUTS 9-16 active
< Card #3 (MADI) INPUTS 17-32 active
< Card #4 (MADI) INPUTS 33-64 active
This configuration uses all four slots found in an Si3 / Si2 but no two cards are trying to route to the same bus.
NOTE: Si1 has only two option slots but the same principles apply.
Si Option Slot and Option Card User Guide V2.0 0413
An example of an invalid configuration:
64 Channel
Input
Expansion
Bus
< Card #1(AES) INPUTS 1-8 active
< Card #2(MADI) INPUTS 1-64 active
In this example there is a clash between the two cards as both are trying to ‘route’ to buses 1-8 and the conflict must be
resolved by resetting of the routing dip switches on one or other of the cards.
Outputs – The operation of the outputs is slightly different; whilst it is the case that only one audio source in the
console may feed any given output or expansion bus any or all of the cards may ‘listen’ to what has been patched to
the expansion bus. This topology allows great versatility when you are required as an example to direct outputs to
multiple destinations simultaneously.
The DIP switches on the option cards may still be used to limit or choose which signals the card uses in the event you
do not wish all cards to re-transmit all channels.
A typical example of an output configuration:
64 Channel
Output
Expansion
Bus
> Card 1(AES) Outputs 1-8 Active
> Card 2 (MADI) Outputs 1-32 Active
>Card 3 (MADI) Outputs 1-64 Active
Si Option Slot and Option Card User Guide V2.0 0413
Card Switch Settings:
IMPORTANT: Setting of DIP switches on Si 1,2,3 including ‘+’ variants is critical since the console option slots
share an expansion bus. Setting of dip switches on Si Performer, Si Compact and Si Expression is not critical as there is
an expansion bus dedicated to each option slot.
Each Si option card features 8 DIP switches arranged as two groups of four, these enable or disable inputs to or outputs
from the option card and expansion bus. The table below illustrates the function of the DIP switches found on the Si
Series option cards:
Setting any given input switch shall enable routing of the INPUTS TO THE OPTION CARD to the given channels on
the expansion bus.
Setting any given output switch shall enable routing of the SIGNALS ON THE EXPANSION BUS (outputs from the
console) TO THE OPTION CARD.
It is important to remember that the patching of I/O signals to / from the expansion bus is unrelated to the setting of the
physical switches on option cards; the card switches dictate only which channels of the option card bus the expansion
card can monitor / route to.
NOTE: There are some exceptions to the above, please refer to the Switch Settings section of each card type for full
details.
Si Option Slot and Option Card User Guide V2.0 0413
Si Series MADI Cards
The Soundcraft® Si MADI HD cards establish a 64-channel MADI input and output link between a console and a
remote device such as a Soundcraft Mini Stagebox 32 or other MADI device equipped with an appropriate MADI
input.
The cards are available in the following forms:
Single Port CAT5 (non redundant link)
Dual Port CAT5 (redundant link)
Dual Port Multi-Mode SC Optical (redundant link)
and
Dual Port Single-Mode SC Optical (redundant link)
NOTE: Stagebox compatibility with any given console depends on the console series and software running on that
console. Please refer to the latest user manual for the Mini Stagebox or similar accessory to which you wish to connect.
NOTE: The Si MADI HD variant cards must not be installed in consoles.
Specifications
Max. cable length single-mode fibre 1300 nm <15 km 8.3/125µm
Max. cable length multi-mode fibre 1300 nm <2 km 62.5/125µm (compatible with 50/125µm)
Max cable length of Soundcraft supplied CAT5 cable 100m
Input frequencies 48 kHz ±3 ppm
Current consumption (3.3 V) 0.4A
(5 V) 0.4A
Operating temperature 0...45° C
Switch Settings:
Input Switches Settings:
CH IN 1-8 – MADI channels 1-8 feed expansion bus inputs 1-8
CH IN 9-16 – MADI channels 9-16 feed expansion bus inputs 9-16
CH IN 17-32 – MADI channels 17-32 feed expansion bus inputs 17-32
CH IN 33-64 – MADI channels 33-64 feed expansion bus inputs 33-64
Output Switches Settings:
The switches have no function; all expansion bus outputs feed MADI channels 1-64
Si Option Slot and Option Card User Guide V2.0 0413
Si Option Slot and Option Card User Guide V2.0 0413
Si Series AES Cards
The AES I/O cards offer standard AES inputs and outputs conforming to the AES 3 specification. The card is available
in two versions either 4ch IN and 4ch OUT on XLR connectors or 8ch IN and 8ch OUT on a 25w SUB-D female
connector.
Specifications
Input/output impedance 110 Ω
Input sensitivity min. 0.2 V
Output level (into 110 Ω) 3.3 V
SFC range 22...108 kHz
Operating temperature 0...45° C
Pin Configurations - SUB-D Connector
Pin Configurations - XLR Connectors:
PIN#1 GND
PIN#2 HOT
PIN#3 COLD
Input Switch Settings:
CH IN 1-8 – AES channels 1-8 [1-4] feed expansion bus inputs 1-8[1-4]
CH IN 9-16 – AES channels 1-8 [1-4] feed expansion bus inputs 9-16 [9-12]
CH IN 17-32 – AES channels 1-8 [1-4] feed expansion bus inputs 17-24 [17-20]
CH IN 33-64 – AES channels 1-8 [1-4] feed expansion bus inputs 33-40 [33-36]
Output Switches Settings:
CH OUT 8 – Expansion bus outputs 1-8 feed AES outputs 1-8 [1-4]
CH OUT 9-16 – Expansion bus outputs 9-16 feed AES outputs 1-8 [1-4]
CH OUT 17-32 – Expansion bus outputs 17-24 feed AES outputs 1-8 [1-4]
CH OUT 33-64 – Expansion bus outputs 33-40 feed AES outputs 1-8 [1-4]
NOTE: Numbers in [Square Brackets] relate to the XLR version of the card
NOTE: Although an AES card may have fewer channels than the expansion bus group enabling the switch occupies all
the channels within the expansion bus group to which it is enabled e.g. if enabling group 17-32 there will be no audio
on expansion bus channels 25-32 [21-32].
Si Option Slot and Option Card User Guide V2.0 0413
Si AVIOM® Card
This card allows implementing the head of an AVIOM® A-Net Pro-16 chain, with this standard, 16 mono signals can
be fed to an infinite number of AVIOM® personal mixers (such as the A-16 II) may be connected in a daisy chain
configuration; The Si A-Net card will be the start of the chain and provide the audio and synchronization data to the
chain.
DIP switches on the front panel allow grouping two adjacent channels to one stereo channel and generating a test tone.
This card works at sampling frequencies of 44.1 or 48 kHz only.
For more information on AVIOM® visit their web site http://www.aviom.com/
Input Switch Settings:
CH IN 1-8 – No function, set to ‘OFF’
CH IN 9-16 – No function, set to ‘OFF’
CH IN 17-32 – No function, set to ‘OFF’
CH IN 33-64 – No function, set to ‘OFF’
Output Switch Settings:
CH OUT 8 – Expansion bus outputs 1-8 feed AVIOM® outputs 1-8
CH OUT 9-16 – Expansion bus outputs 9-16 feed AVIOIM® outputs 9-16
CH OUT 17-32 – Expansion bus outputs 17-24 feed AVIOM® outputs 1-16
CH OUT 33-64 – Expansion bus outputs 33-40 feed AVIOM® outputs 1-16
Specifications
Operating temperature 0...40° C
Si CobraNet™ Card
This card allows sending and receiving of up to 32 audio channels to/from a CobraNet™ network. DIP switches on the
card allow setting the number of input or output channels seen by the console. Default setting is 32 output and 32 input
channels. By default, the module is configured to be the conductor (synchronization master) and providing multicast
bundles 1...4 to the CobraNet™ network. This setting is ideal for e.g. providing audio channels to a PA, installed
sound, or monitoring system using CobraNet™.
For further information on CobraNet™ please visit their web site http://www.CobraNet.info
Input Switch Settings:
CH IN 1-8
– CobraNet™ channels 1-8 feed expansion bus inputs 1-8
CH IN 9-16
– CobraNet™ channels 9-16 feed expansion bus inputs 9-16
CH IN 17-32
– CobraNet™ channels 1-16 feed expansion bus inputs 17-32
CH IN 33-64
– CobraNet™ channels 1-32 feed expansion bus inputs 33-48
Output Switch Settings:
CH OUT 8
– Expansion bus outputs 1-8 feed CobraNet™ outputs 1-8
CH OUT 9-16 – Expansion bus outputs 9-16 feed CobraNet™ outputs 9-16
CH OUT 17-32 – Expansion bus outputs 17-24 feed CobraNet™ outputs 1-16
CH OUT 33-64 – Expansion bus outputs 33-40 feed CobraNet™ outputs 1-32
Specifications
Operating temperature 0...40° C
Si-Series CobraNet™ Card Setup Guide
This guide describes typical setup of a laptop or PC and running of the CobraNet™ Discovery® utility, to configure the
settings of the Si series CobraNet™ card.
NOTE: The exact configuration and screen shots will be dictated by your network setup, laptop / PC setup and/or other
devices connected to the network therefore it is not possible to give exact details for individual parameters, but this
guide shows how to access and edit those parameters.
It is recommended that setting up a CobraNet™ network is carried out by an experienced person, but if more
information is required, useful documents can be downloaded from the CobraNet™ website, on http://CobraNet.info
Tested Configuration:
Si Compact V1.1.5
CobraNet™ Module CM1 2.21.0 rev 4
CobraNet™ Discovery V4.0.3
Installing CobraNet™ Discovery software to allow configuration of Si-Series CobraNet™ card
CobraNet™ Discovery® is a free utility provided by the manufacturers of CobraNet™ hardware, Cirrus Logic. Version
of the program V4.0.2 or above allow not only the monitoring of CobraNet™ device parameters, but also the
configuration of settings such as bundle numbers, latency and bit depth.
The program can be downloaded from the website http://www.CobraNet.info – follow the Downloads link on this page.
If you have an older version of CobraNet™ Discovery remove this and install the latest version.
Setting up the Ethernet port on the Laptop / PC
The Laptop / PC needs to have its network port configured to have a fixed IP address in order to communicate with the
CobraNet™ card:
1. On the Laptop / PC:
· Start > Control Panel > Network Connections.
· Right-click the network connection you are going to use.
· Select Properties.
2. From the General tab select Internet Protocol (TCP/IP) and click
on Properties
3. Select Use the following IP address and type in the IP address and subnet mask as shown.
If you are only connecting to the Si CobraNet™ card it does not really matter what the actual IP address is, but it is
recommended to set it as above.
Click OK to close the TCP/IP dialogue box.
Si Option Slot and Option Card User Guide V2.0 0413
4. In the Local Area Connection box, select the Advanced tab at the top, and then click the Windows Firewall
Settings button:
Make sure the firewall is set to Off.
Click OK on all dialogues to exit the Local Area Connection properties.
Note: You may have to reverse the above settings 1-4 if you subsequently need to connect the laptop to a business
LAN, so it is best to use a separate network port if available.
Setting up CobraNet™ Discovery to configure the Si series CobraNet™ card
1. Start the Si console and connect the laptop or PC Ethernet port to the Primary port on the CobraNet™ card; this
should be done with a crossover Ethernet cable. Both LEDs on the CobraNet™ card should start flashing when
correctly connected to the laptop or PC.
Note: Depending on the laptop, a ‘straight’ cable may be used, if the laptop supports both cable types or use a switch
between the laptop / PC and CobraNet™ card. Using a switch enables other CobraNet™ devices to be connected at the
same time and their configuration inspected and changed if necessary to match the Si (Note: do not change a BSS
London’s CobraNet™ parameters using CobraNet™ Discovery).
2. Start the CobraNet™ Discovery program and select Tools>Options.
In the Network Adaptor dialogue, select the network controller that your laptop or PC is using for connection to the
CobraNet™ card.
In the IP Address range fields enter values as above, and then check the ‘Enable Auto Assignment box’. Click OK to
return to the main Discovery window.
Si Option Slot and Option Card User Guide V2.0 0413
Note: this procedure is normally only required the first time you connect to the Si card.
3. The CobraNet™ Discovery should now see the Si CobraNet™ module in the Discovery window, with a green ‘tick’
icon on the left and an IP address similar to that shown:
The IP address is only used for the purposes of connecting to the configuration computer, so what the actual address is
does not matter, as long as it is in the same subnet as the laptop or PC’s Ethernet port.
4. To configure the CobraNet™ card right-click on the Si CobraNet™ device to select it, then choose
Tools>Configure.
The Configuration box appears, showing the current bundle number setup.
You will need to change the bundle configuration of either the Si card or the external equipment so as the transmit
number of one matches the receive number of the other, in order to pass audio.
.
Si Option Slot and Option Card User Guide V2.0 0413
5. The bundle numbers can now be changed as required by either directly editing the bundle number fields, or selecting
one of the four transmit or receive bundles and clicking the ‘Configure’ button, which opens a more detailed
Configuration dialogue box:
IMPORTANT
The Si CobraNet™ card is set from the factory to have 4 transmit
bundles (32 channels) and 4 receive bundles active.
The number of transmit and receive channels is also set on the
CobraNet(tm) card PCB via DIP switches. These switches
determine how many channels are available in the Si6 Input and
Output patching touch screens,
If the number of transmit and/or receive channels is changed
from the default, the DIP switches on the CobraNet™ card
should also be changed to match.
The SubFormat parameter allows the bit depth to be changed to
match the network but if changed to 24 bits, it is not possible to
use all 8 channels in the bundle.
6. Changing the Latency, sample rate and card name
The Advanced Configuration dialogue box is used to set the
Latency and Sample rate of the Si CobraNet™ card (this is the
parameter called modeRate Control).
These must match the other devices in the network, otherwise the
system will not work.
Note: With latency setting of 1.33ms, only 7 channels per bundle
are allowed.
IMPORTANT
The Conductor Priority parameter must be left at / set to a value of
255. This is the highest priority and indicates that the Si console
will always be the clock master for the entire network.
If necessary, the Name, Location and Contact fields can be
changed to identify the console in more detail.
Do not change any other fields!
In particular, the ‘Persistence’ box must not be unchecked,
otherwise all setup data will be erased.
For more information on CobraNet™ parameters, see the website
www.CobraNet(tm).info
Si BLU Link Card User Guide
The Soundcraft® BLU Link card is a 32 x 32 interface between an Si series
console*1 and the Soundweb London digital audio bus, informally known as
BLU Link. The card allows connection to a wide variety of Harman products
equipped with a BLU Link interface such as BSS London BLU 800, dbx® PMC
or Crown® PIP-BLU interfaces amongst others.
BLU Link is a low latency, fault tolerant digital audio bus of 256 channels which
using standard CAT 5e cabling gives a distance of 100m between compatible
BLU Link enabled devices. To increase the distance between devices the BSS
Audio MC-1 fibre optic media converter can be used to span over 10km (6.2
miles) using single mode fibre.
Additional information about the Soundweb London BLU Link digital audio bus
may be found on the BSS web site www.bssaudio.com
*1 Not Si1, 2, 3 or ‘plus’ variants
Si Option Slot and Option Card User Guide V2.0 0413
Configuring The BLU Link Card
Before the BLU Link card may be used the switches that define master / slave status and channel assignment must be
configured:
‘On Ramp’
switches
‘Off Ramp’
switches
‘Master/Slave
switch
The master / slave status determines the clock source for the BLU Link network.
·
·
When set as master (switch set in) the BLU Link card clocks from the console word clock.
When ‘another’ device is set as the master you will need to operate in slave mode (switch set out).
When not in master mode provision must be made to clock the console from the BLU link network by selecting the
external BNC or option card word clock option from the console SYSTEM menu*2..
*2 Option Slot clocking option expected summer 2013
Channel Assign Switches
The channel assign switches dictate which group of channels on the BLU Link network the card ‘listens’ to and ‘speaks’
to. Looking directly at the dip-switch block are six switches numbered 1-6 (left to right). The leftmost three switches
(switches 1-3) are used to select the on-ramp (card speaks to BLU Link) bank. The rightmost three switches (switches
4-6) are used to select the off-ramp (card listens to BLU -Link) bank. Channels not used by the Si BLU Link card are
simply passed ‘thru’.
SW1
SW2
SW3
OFF
OFF
OFF
OFF
ON
ON
ON
ON
OFF
OFF
ON
ON
OFF
OFF
ON
ON
OFF
ON
OFF
ON
OFF
ON
OFF
ON
SW4
SW5
SW6
OFF
OFF
OFF
OFF
ON
ON
ON
ON
OFF
OFF
ON
ON
OFF
OFF
ON
ON
OFF
ON
OFF
ON
OFF
ON
OFF
ON
BLU Link On Ramp
Binary
Selected
Value
Bank
0
1
1
2
2
3
3
4
4
5
5
6
6
7
7
8
BLU Link Off Ramp
Binary
Selected
Value
Bank
0
1
1
2
2
3
3
4
4
5
5
6
6
7
7
8
Selected Channels
1-32
32-64
65-96
97-128
129-160
161-192
193-224
225-256
Selected Channels
1-32
32-64
65-96
97-128
129-160
161-192
193-224
225-256
NOTE: Whenever the On Ramp and Off Ramp selections match no audio is extracted from BLU Link,
rather the output audio out from the BLU Link card (going to the Si console) will match exactly the audio
being inserted onto BLU Link from the console.
BLU Link LED Indicators
Each BLU Link port features two LED’s indicating status:
·
·
Yellow LED - The state of the yellow LEDs indicate the following conditions:
1. One LED On: When connected to a BLU link ring, this state indicates the BLU-Si card is not
configured as BLU link master and identifies the port which is receiving the BLU link master clock.
2. Both LEDs On: Indicates the BLU-Si card is configured as the BLU link master.
3. Alternately Flashing: Indicates the console clock is not detected by the BLU-Si card or the BLU
link network sample rate differs from the console's internal sample rate.
Green LED - lights when it is connected correctly to another BLU Link device.
Connecting BLU Link Devices
BLU Link devices interconnect using standard CAT5 UTP Ethernet cable. Connections must be made from the OUT of
one device to the IN of the next.
Redundancy is achieved by linking the OUT of the last device to the IN of the 1st device as shown below.