1
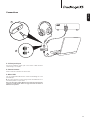
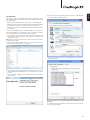
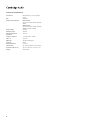
2 Your music + our passion ENGLISH USB DAC User's manual Contents Connections..........................................................................................................3 Make sure you register your purchase. Visit: support.cambridgeaudio.com By registering, you'll be the first to know about: Future product releases Software upgrades News, events and exclusive offers plus competitions! This guide is designed to make installing and using this product as easy as possible. Information in this document has been carefully checked for accuracy at the time of printing; however, Cambridge Audio's policy is one of continuous improvement, therefore design and specifications are subject to change without prior notice. This document contains proprietary information protected by copyright. All rights are reserved. No part of this manual may be reproduced by any mechanical, electronic or other means, in any form, without prior written permission of the manufacturer. All trademarks and registered trademarks are the property of their respective owners. © Copyright Cambridge Audio Ltd 2014. Cambridge Audio and the Cambridge Audio logo are trademarks of Cambridge Audio. Other brands mentioned are trademarks of their respective owners and are used for reference purposes only. This device complies with part 15 of the FCC Rules. Operation is subject to the following two conditions: (1) This device may not cause harmful interference, and (2) this device must accept any interference received, including interference that may cause undesired operation. NOTE: This equipment has been tested and found to comply with the limits for a Class B digital device, pursuant to part 15 of the FCC Rules. These limits are designed to provide reasonable protection against harmful interference in a residential installation. This equipment generates, uses and can radiate radio frequency energy and, if not installed and used in accordance with the instructions, may cause harmful interference to radio communications. However, there is no guarantee that interference will not occur in a particular installation. If this equipment does cause harmful interference to radio or television reception, which can be determined by turning the equipment off and on, the user is encouraged to try to correct the interference by one or more of the following measures: — Reorient or relocate the receiving antenna. — Increase the separation between the equipment and receiver. — Connect the equipment into an outlet on a circuit different from that to which the receiver is connected. — Consult the dealer or an experienced radio/TV technician for help. The user or any other party is not permitted to change or modify this device as this could void the user’s authority to operate the equipment. 2 Operating instructions.........................................................................................4 LED colours/flashes.............................................................................................4 LED colours..........................................................................................................4 USB Class.............................................................................................................4 For Mac.................................................................................................................4 For Windows.........................................................................................................5 Technical Specifications......................................................................................6 ENGLISH Connections 1 L R OR 2 - + 3 1. 3.5mm jack input Plug in the headphone 3.5mm jack or the 3.5mm to RCA connector (if connecting to an amplifier) 2. Volume buttons Press to increase or decrease the volume level. 3. Micro USB Use the supplied MicroUSB cable to connect the DacMagic XS to the PC’s USB input. 4. Go to your computer’s ‘Sound’ settings and set ‘CA USB Audio 1.0’ as the default speaker or output device. Note : You will need to enable USB Class 2.0 to play files at sample rates greater than 24-bit/96kHz. Please see page 4 onwards for details of USB Class 2.0 operation. 3 Operating instructions For Mac Allows you to play up to 24-bit/192kHz audio files through the DacMagic XS. (USB Class 1.0 supports a maximum of only 24-bit/96kHz). Connect the DacMagic XS to an available USB port on your Mac. Switch the DacMagic XS into Class 2.0 mode by pressing and holding both volume buttons until the LED flashes pink three times. 1. Go to System Preferences > Sound. Select CA DacMagic XS 2.0 as the output: Important note: The DacMagic XS will get hot when in normal use. LED colours/flashes Max volume Press and hold the Vol+ button until the LED flashes red. The volume will also stop increasing at this point, indicating maximum volume output. Warning! Listening at high volume through your headphones for long periods may damage your hearing. Mute Press and hold the Vol– button until the LED starts flashing. The volume will also stop decreasing at this point, indicating minimum volume output. 2. Go to Applications > Utilities > Audio MIDI Setup. Note: The colour of LED flashing will depend on the current sample rate input. LED colours Below are the LED colours corresponding to the sample rate input. 44.1kHz/48kHz 88.2kHz/96kHz 176.4kHz/192kHz (only available via USB Class 2.0) USB Class 1.0 3. Set the audio output to the desired sample rate. Following the steps in the supplied Quick Start Guide, you will be able to improve the sound from your computer by using the DacMagic XS in its default USB Class 1.0 mode. Instead of connecting your headphones or 3.5mm cable directly to your computer, you will instead be connecting them to the DacMagic XS. By doing this, you are bypassing the computer’s own internal soundcard and allowing the DacMagic XS to perform the Digital to Analogue conversion in far higher quality, resulting in a much better sound. USB Class 2.0 To improve the sound even further, it is possible to use the DacMagic XS in USB Class 2.0 mode. Press and hold both Volume buttons to switch between USB Class 1.0 and 2.0: Note: – Switching between USB Class modes during playback is not recommended. – Always stop any playback before switching between USB Class modes. Press and hold both volume buttons for approx. 5 seconds. x 3 = Class 1.0 USB x 3 = Class 2.0 USB The benefits of USB Class 2.0 are as follows; 4 Note: There are 3rd party apps available (eg. BitPerfect) that will dynamically adjust this output for you, depending on the resolution of the audio file being played at any given time. Allows you to install the Cambridge Audio Class 2.0 USB driver. Using this dedicated USB driver replaces the standard Windows USB driver and consequently; 6. Go to the Sound menu in Control Panel, and ensure that CA DacMagic XS 2.0 is set as the playback device. – Delivers better audio performance (lower jitter) to the DacMagic XS. – Allows you to play up to 24-bit/192kHz audio files through the DacMagic XS. (USB Class 1.0 supports a maximum of only 24-bit/96kHz). – Allows you to use ASIO – see Audiophiles Guide to USB Audio, available on our website. 1. Connect the DacMagic XS to an available USB port on your computer. Switch the DacMagic XS into Class 2.0 mode by pressing and holding both volume buttons until the LED flashes pink three times. 2. The DacMagic XS uses the latest Cambridge Audio Class 2.0 USB driver. Visit the Cambridge Audio support website to download the latest USB 2.0 driver. Note: Before installing the latest driver, uninstall any previous versions of the CA USB 2.0 driver. 3. Download and unzip the driver. Save this to a known location on your PC, such as the Desktop. Click on 'setup.bat'. 7. Go to the Speakers Properties of the DacMagic XS and choose the sample rate output. 4. Click Next to install the new USB driver, then click Install to start the update. Note: The CA DacMagic XS must be connected and in Class 2 mode. 5. Allow the update to progress, then click Next and Finish to complete the installation. You are now ready to enjoy your Cambridge Audio DacMagic XS in Class 2.0 mode! To use ASIO, please see the Windows 7 ASIO setup guide on our website for an example installation. 5 ENGLISH For Windows Technical specifications ConnectionsMicro-USB input, 3.5mm analogue output DACESS9023 Sample rates supported USB 1.0 mode: 16/24-bit, 44.1kHz, 48kHz, 88.2kHz, 96kHz USB 2.0 mode: 16/24-bit, 44.1kHz, 48kHz, 88.2kHz, 96kHz, 176.4kHz, 192kHz Output voltage 2V RMS Maximum power 150mW Minimum headphone impedance 12 Ohms Frequency response +/-0.2dB 20Hz – 20kHz THD + N<0.004% SNR @ 1K 103 dBr (unweighted) Cross talk 66dB Output impedance 0.5 Ohms Volume steps 53 steps (54 different volume levels) Dimensions (W x H x D) 30 x 10 x 53.5mm (1.2 x 0.4 x 2.1’’) Weight100g (3.5oz) 6 Cambridge Audio is a brand of Audio Partnership Plc Registered Office: Gallery Court, Hankey Place London SE1 4BB, United Kingdom Registered in England No. 2953313 © 2014 Cambridge Audio Ltd AP33096/2 www.cambridge-audio.com