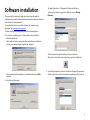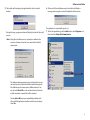
1
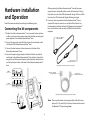
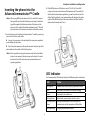
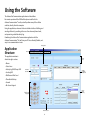
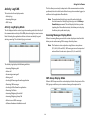
AdvanceTec
AdvanceCommunicator™
Desktop Communication Kit
User Manual
for iDEN Condor (i60c, i90c and i95cl) and Falcon (i730, i830, i833 and i860) phone models
Contents
General ....................................................................... 1
First Start .........................................................................................14
AdvanceCommunicator™ Components ............................................ 1
Communication Initialization ............................................................15
System Requirements ........................................................................ 1
Application Phone Book ...................................................................15
Adding Records to the Phone Book ..............................................15
Hardware installation and Operation ...................... 2
Deleting Phone Book Record ........................................................18
Connecting the kit components ........................................................ 2
Importing the Phone's Contacts List..............................................18
Inserting the phone to the AdvanceCommunicator™ Cradle ............. 3
Phone Book Contents ...................................................................19
LED Indicator..................................................................................... 3
Phone Calls ..................................................................................... 20
Phone Operation in AdvanceCommunicator™ .................................. 4
Dial ............................................................................................. 20
Placing Phone Calls........................................................................ 4
Turbo Dial .................................................................................... 20
Receiving Phone Calls .................................................................... 4
Answering Calls ...........................................................................21
Ending a Call ................................................................................. 4
Private and Group Calls ....................................................................21
Sending Call Alert.......................................................................... 5
Call Alert ......................................................................................21
Placing Private and Group Calls ..................................................... 5
Making Private and Group Calls................................................... 22
Volume Control ............................................................................. 5
SMS Messages ................................................................................ 22
Recording Calls ................................................................................. 5
Sending SMS message to a single recipient .................................. 22
Sending SMS message to SMS Group .......................................... 23
Software installation ................................................. 6
Reading and Managing SMS Messages ........................................ 24
History ............................................................................................ 25
Using the Software .................................................... 9
Displaying the Activity Log History ............................................... 25
Application Structure ........................................................................ 9
Exporting Activity Log History ...................................................... 25
Menus ..........................................................................................10
Updating the Hardware Software .................................................... 26
Status Lines ..................................................................................11
Activity Log/SMS...........................................................................12
Dial Box/Alert Send .......................................................................13
Phone Book/History ......................................................................13
General section ............................................................................14
On-Screen Keypad ........................................................................14
Troubleshooting ....................................................... 27
General
• Earpiece cable for phone-to-base audio connection (for Falcon phone
models only)
• AdvanceTec Communicator application
• Hand microphone (Motorola part # HMN4058A) (replacing the hand set
supplied with the kit)
• External antenna. The external antenna will improve reception and
coverage, and should comply with the compatibility standards of the
service provider.
AdvanceCommunicator™ is a desktop communication kit for iDEN Condor
(i60c, i90c, and i95cl) and Falcon (i730, i830, i833 and i860) cellular phone
models, that enables easy and convenient cellular communication at home
or at the office.
AdvanceCommunicator™ will allow you:
• To make phone calls, private and group calls using the built-in speaker
phone.
• To make phone calls, private and group calls using the phone hand set.
• To charge the phone's battery.
• To record private/group calls (incoming and outgoing), and phone calls
(incoming only).
• To improve the signal strength and coverage of the cellular phone.
• To remote operate the cellular phone, using the included PC application,
allowing a convenient and enhanced way to utilize most of the phone's
features, and transforms the communication kit into a computerized
communication station.
System Requirements
• iDEN Condor or Falcon phone.
Condor Series Phones
Models
i60, i90c, i95cl
SIM No.
XXXXXXXXXXXX300
Falcon Series Phones
AdvanceCommunicator™
Components
Models
i730, i830, i833, i860
SIM No.
XXXXXXXXXXXX310
• IBM PC compatible computer with a free serial (COM) port.
• Operating System: Windows 98/NT/2000/XP
• Electrical power connection for the communication kit.
The AdvanceCommunicator™ kit includes the following components:
• Base station with a suitable cradle for iDEN Condor (i60c, i90c, and i95cl)
and Falcon (i730, i830, i833 and i860) cellular phone models
• Phone hand set
• 12VDC Power adaptor
• Local antenna
Optional components:
• RS232 data cable (Motorola part # NKN6544) to connect the base station
to a PC computer (for Condor phone models only)
• DB15 data cable to connect the base station to a PC computer (for
Falcon phone models only)
1
Hardware installation
and Operation
After connecting the AdvanceCommunicator™ base to the power
supply, the base station will perform a series of internal tests. During
these tests, the color of the LED indicator will change. At the end of the
test series, the LED indicator will display a flashing red signal.
5 In order to remote operate the AdvanceCommunicator™ from a
standard PC computer, connect one end of the Data Cable to the
Communication Socket at the back of the AdvanceCommunicator™
base, and the other, to a free serial port (COM) at the back of the
computer.
Install the communication kit according to the following steps:
Connecting the kit components
1 Position the AdvanceCommunicator™ in a convenient location at home
or office, next to an electric power supply that will allow connecting the
power adaptor to the AdvanceCommunicator™ base.
Connect to computer
serial port (COM)
2 Connect the plug at the end of the handset cord to the handset socket
at the back of the AdvanceCommunicator™ base.
3 Connect the local antenna to the antenna port at the back of the
AdvanceCommunicator™ base.
4 Connect the power supply adaptor included in the kit to an electrical
socket next to the AdvanceCommunicator™ base location. Connect the
plug at the end of the power adaptor cord to the power socket, located
next to the handset socket, at the back of the AdvanceCommunicator™
base.
Connect to base
Communication socket
Data Cable for Condor Phones (i60, i90c and i95cl)
Condor
Connect to computer
serial port (COM)
(i60, i90c and i95cl)
Connect to base
Communication socket
Handset Power Comm. Antenna
Port
Socket Socket Socket
Handset
Plug
Falcon
(i730, i830, i833 and i860)
Data Cable for Condor Phones (i730, i830, i833 and i860)
Note: Please note that when connecting the Data Cable for Condor
phones (i60, i90c and i95cl) to the base Communication socket,
the Motorola "M" logo is facing down.
Power Adaptor
LED
Indicator
2
Hardware Installation and Operation
Inserting the phone into the
AdvanceCommunicator™ Cradle
2 If the iDEN phone is of the Falcon series (i730, i830, i833 and i860)
and you intend to use the AdvanceTecCommunicator™ base with the
AdvanceTec Communicator application, you will need to connect the
Audio Cable (included in your communication kit) between the audio
socket of the iDEN phone and the audio socket at the left side of the
AdvanceTecCommunicator™ base.
Note: When using iDEN Condor phones (i60, i90c and i95cl), remove
the logo lable on the back of the phone and replace it with the
logo lable supplied to allow connection of the phone to the
antenna in the cradle of the AdvanceCommunicator™. This will
provide access to the antenna connection socket of the phone.
1 Insert the phone into the AdvanceCommunicator™ cradle the same way
you insert it into the car kit cradle.
A Line up the connector in the cradle with the connector receptable
on the bottom of the phone.
B Press the phone down onto the cradle connector and the top of the
phone back into the cradle until it lock into place.
Note: If the logo lable covering the antenna socket at the back of the
phone is not removed, the phone may not lock into it's correct
position in the cradle, and may cause communication and
operating problems.
LED Indicator
The Communicator LED Indicator, display's the following status indications:
LED
Status
Flashing Red
Communicator cradle is empty, No phone inserted.
Red
The phone in the cradle is off. Battery charging.
Green
The phone in the cradle is on.
Flashing Green
Bidirectional communication mode is active.
Flashing Red and Adequate communication exists between the
Green
Communicator and the computer via Data Cable.
Flashing Orange
3
Changing communication mode
Hardware Installation and Operation
Phone Operation in
AdvanceCommunicator™
Note: When using the handset, you can switch to Bidirectional
communication mode by pressing the PTT button at the front
of the AdvanceCommunicator™ or on the back of handset while
picking up the handset.
Once the phone is inserted into the AdvanceCommunicator™ cradle, you
will be able to operate it without the application software included.
The voice transfer from the speaker to the handset will take
2 seconds, during which the LED indicator will change to
orange. After the transfer is completed, the LED indicator
will change to flashing green.
Placing Phone Calls
To place a phone call while the phone is in the AdvanceCommunicator™:
1 Dial the phone number using the key pad, speed dial, voice, or any
other dialling option supported by your phone.
It is advisable to use this mode only for phone calls.
2 If the AdvanceCommunicator™ handset is resting in place, the call will
be conducted using the built-in speaker phone.
This mode is not active when the AdvanceCommunicator™
is in remote operation by the application.
3 Talk to the general direction of the microphone, located at the front of
the AdvanceCommunicator™ base. The voice of the person on the other
side of the line, will be heard through the speaker located under the
handset.
Receiving Phone Calls
To receive a phone call while the phone is in the AdvanceCommunicator™:
1 Open the phone flip -orPress on the PTT button at the front of the AdvanceCommunicator™.
PTT
Note: If the PTT button is pressed for too long, the incoming call will
be disconnected.
Speaker
2 Talk in the general direction of the microphone, located at the front of
the AdvanceCommunicator™ base. The voice of the person on the other
side of the line, will be heard through the speaker located under the
handset.
3 At any point during the call, you will be able to pick up the handset and
continue as if it was a standard phone.
PTT
Ending a Call
Microphone
To end a call:
4 At any point during the call, you will be able to pick up the handset and
continue as if it was a standard phone.
1 Press on the PTT button at the front of the AdvanceCommunicator™ for
at least 2 seconds, -orPress e on the phone's key pad, -orClose the phone's flip.
4
Hardware Installation and Operation
Sending Call Alert
To send a call alert:
1 Select the Phonebook entry you would like to send the alert to, -orInsert the Private ID you wish to send the call alert.
2 To send the alert, press either the PTT button on the front of the
AdvanceCommunicator™, or the PTT button on the back of the handset.
Recording Jack
Placing Private and Group Calls
To place private and group calls:
Using the Speaker Phone
1 Press and hold the PTT button at the front of the
AdvanceCommunicator™ and talk into the microphone.
2 After you have finished talking, release the PTT button and listen.
Using the Handset
1 Pick up the handset, press and hold the PTT button on the back of the
handset, and talk into the handset.
2 After you have finished talking, release the PTT button and listen.
Volume Control
You can control the volume level of the AdvanceCommunicator™ by using
the phone's volume control buttons located on the left side of the phone.
Recording Calls
The AdvanceCommunicator™ allows you to record phone calls as well as
private and group calls, by connecting a recording device to the 3.5mm
recording jack located on the back of the AdvanceCommunicator™ base,
just below the power socket.
Using the recording jack will allow you:
• To record incoming and outgoing private and group calls.
• To record only incoming phone calls (only the person on the other side
of the line).
5
Software installation
This section of the manual will guide you step by step through the
installation process of the AdvanceTec Communicator application included
in the Advance Communicator kit.
The default location is: C:\Program Files\AdvanceTecPhone\
To change the location suggested as default,, press on Change
Directory.
To download the latest version of the AdvanceTec Communicator
application go to: www.advancetec.com.
1 Before starting the install process, close all active applications.
2 To start the installation process, double click on the installer file
ATecPhoneInstall.exe.
The installer will start preparing the files needed for the installation
process, and a welcoming message will be displayed.
At the displayed navigation window, select your location.
After you've selected the desired location, press the install button.
Please confirm that all applications are terminated and press OK to
continue.
4 You will be prompted to select the Start Menu Program Group where a
shorcut to the AdvanceTec Communicator application will be created.
3 Select the install location.
6
Software Installation
5 The installer will start coping the application files to the selected
location.
6 At the end of the installation process, the installer will display a
message announcing the successful completion of the process.
The application is now ready for you to use.
During this stage, a progress window will display the status of the install
process.
7 To start the application, go to the Start button, select Programs, and
then select the AdvanceTec Communicator.
Note: During the installation process, you may be notified on the
existence of newer version for one or more of the installed
components.
The displayed message prompts you to select whether to save
the newer version, or replace it with the installed component.
Press Yes to keep the newer version' or No to replace it. You
can also select No to All, in order to define that each time the
installer encounters a newer file it will be replaced.
Selecting No to All may cause compatibility problems with
other installed application, therefore we advise you to always
select Yes.
7
Software Installation
Creating a Shortcut on the Desktop
You can create a shortcut on the desktop or in the application bar that will
enable you a faster way of starting the application.
To create a shortcut:
1 Go to the Start button.
After the Start menu is displayed, release the mouse button.
2 Go into Programs, and select AdvaceTec Communicator.
3 Using the right mouse button, grab and drag the AdvanceTec
Communicator label from the menu to the Desktop or into the
Application Bar at the bottom.
4 Release the right mouse button, and from the popup menu that
appears, select Copy Here or Create Shortcut(s) Here.
The operating system will create the shortcut to the application in the
selected location.
8
Using the Software
The AdvanceTec Communicator application included allows
for remote operation of the iDEN cellular phone installed in the
AdvanceCommunicator™ cradle, and will perform many of the cellular
activities, directly from the computer.
Using the application, enhances the basic cellular activities of dialling, and
sending call alerts, by enabling to the use of an enhanced phone book,
and presenting a detailed activity log.
Combining the AdvanceTec Communicator application with the
AdvanceCommunicator™ kit, will turn your PC into a friendly, flexible, and
easy to use communication center.
Application
Structure
Sending SMS
Menus
The application window is
divided to eight sections:
• Menus
• Status Lines
• Activity Log/SMS/Group SMS
• Sending SMS
• Dial Box and Alert Send
• Phone Book/History
• General
Status
Lines
Dial Box/
Send Alert
Activity
Log/SMS/
Group SMS
• On-Screen Keypad
Phone
Book/
History
On-Screen
Keypad
General Section
9
Using the Software
Menus
Note: You can import and append entries from several iDEN phones
use by you organization to the application Phone Book.
The six application menus will allow you to perform the following
operation:
Phone Info
Options Menu
This menu does not drop down, but acts like a button. Pressing it,
will display the user information of the iDEN phone installed in the
AdvanceCommunicator™ cradle. The information will be displayed in the
General Section.
The Options menu gives you access to the following commands:
• Settings - This sub-menu displays the application's settings groups.
• Communication Channel - Displays the serial port (COM) used
by the software to communicate with the hardware. By using the
Communication Channel sub-menu, you can change the settings and
set it to a different serial port.
• Software Version - Displays the current software version.
• Hardware Version - Displays the current hardware version of the
AdvanceCommunicator™ connected to the computer.
• SMS Service > Set Service Number - Allows you to set the MO SMS
Service Number of your phone, in order to enable the SMS features of
both the phone and the application. Selecting Set Service Number
will display the Update MO SMS Service Number section over the
Sending SMS section (see "Setting the MO SMS Service Number").
• Hardware Software Update - By using this command, you will be
able to update the AdvanceCommunicator™ software, according to
the system requirements. Software updates will be supplied by the
hardware vendor, as part of the application update package.
• Exit - Closes the application.
When the user information is displayed, the menu mane will change
to Hide Phone Info. Pressing the menu name again, will hide the user
information.
Phone Info will automatically hide about 20 seconds after shown.
History Menu
The History menu gives you access to the following commands:
Phone Book Menu
• Show History - Changes the Phone Book section to the display of the
Activity Log History display.
• Display History for Print - Exports the Activity Log History of a
specified activity day, selected in the History section, to a text file (.txt)
and opens the file, to display its contents, using Notepad. This command
can be used only after the Activity Log History was displayed.
• Display History in Excel - Exports the Activity Log History of a
specified activity day, selected in the History section, to a Microsoft
Excel spreadsheet (.xls) and opens the file, to dispaly its contents, using
Microsoft Excel. This command can be used only after the Activity Log
History was displayed.
The Phone Book menu gives you access to the following commands:
• Add Contact - Adding a new contact record to the application Phone
Book.
• Add Group - Adding a new group record to the application Phone Book.
Note: You can not synchronize contact and group entries added to
the application Phone Book with the phone's Contacts.
• Import Phone Contact List - Using this command will import all
the phone book entries from your phone, and append them to the
application Phone Book entries.
10
Using the Software
Language Menu
Please Wait
When communication status is being
checked.
SMS Menu
Wait for
Initialization
While initializing communication with the
installed phone.
The SMS menu gives you access to the following commands:
Phone Ready
After initialization completed and the kit is
ready for use.
Phone Not Placed
When no phone is installed in the cradle.
Phone is Off
When the phone installed in the cradle is off.
No Communication
When communication between the phone
and cradle is lost.
The Language menu allows you to select the language of the application
interface. The available languages are: English, Spanish and French.
• Incoming Messages - Changes the Activity Log section to the display of
the phone's Incoming SMS messages interface.
Note: This feature is active only when using Falcon series phones
(i730, i830, i833 and i860). SMS messages can not be imported
and read from Condor series phones (i60, i90c and i95cl).
• Add Group - Used to create a new mailing group for SMS messages.
• Show Group - Displays a sub-menu of th SMS groups that were defined
in the application. Each of these groups, allows you to send an SMS
message to all the group members at once.
• Date and Time - The current date and time, as defined by the settings in
the operating system.
• Error Messages - Under the previous three status fields, stretch's
another status field that will display messages for errors and failed
activities during operation.
For example: Trying to dial when communication with the hardware is
down, will display the following message: "Can not Send Commands, No
Communications".
Help Menu
This menu gives you access to the User Manual. The manual is in Acrobat
PDF format, and requires that Adobe Acrobat Reader be installed in order
to be displayed.
If Acrobat Reader or any other PDF reader tool associated with the PDF
format is not yet installed, a message to this effect will be displayed in the
status line.
Status Lines
The Status Lines section is located at the top of the window, and includes
four status fields:
• Communication Status - This field displays the communication status
between the application and the hardware. When communication with
the hardware is down, the field will light up in red, and "No Reply from
Hardware" message will be displayed.
• Phone Status - This field displays the status of the phone installed in the
cradle.
11
Using the Software
Activity Log/SMS
This list allows you not only to keep track of the communication activities
performed, but also to dial/send call alert to any phone number logged, or
add them to the application Phone Book.
This section has three display modes:
• Activity Log
• Incoming Messages
• SMS Group
Note: The application Activity Log is saved for each activity day.
You can browse the Activity Log History by usin the History >
Show History command. This will display the History section
(replacing the Phone Book section), that allows you to display
the History of a spcific activity day.
Activity Log Display Mode
The list displayed at this section, logs in descending order (last to first), all
the communication activity of the iDEN phone during the current session.
Incoming Messages Display Mode
Note: Restarting the application will erase the current activity log and
starting a new log. The old activity log is not saved.
When in Incoming Messages mode this section displays an interface that
allows you to read incoming SMS messages from the phone.
Note: This feature is active only when using Falcon series phones
(i730, i830, i833 and i860). SMS messages can not be imported
and read from Condor series phones (i60, i90c and i95cl).
The Activity Log displays the following activities:
• Incoming/Outgoing calls
• Active call
• Answering incoming call
• Ending a call
• Sending SMS messages from the application
• Receiving SMS messages
• Sending Call Alert from the application
• Receiving Call Alerts
• Incoming/Outgoing Private Call
• Incoming/Outgoing Group Call
• Failure to send SMS messages
• Software-Hardware initialization result
SMS Group Display Mode
When in SMS Group mode this section displays the list of recipients of the
SMS group, and allows you to create and manage the recipients list.
12
Using the Software
Dial Box/Alert Send
The fields in this section allow you to dial any phone number or send a Call
Alert to any subscribed user, either listed in the Phone Book entries or not.
Activity Log History Display Mode
When in Activity Log History mode, this section displays the Activity Log of
a specific day. The default display when accessing this mode is the activity
of the current day.
Phone Book/History
This section has three display modes:
• Phone Book and Turbo Dial
• Phone Book Record Details
• Activity Log History
Phone Book Display Mode
When in Phone Book and Turbo Dial Mode, this section displays the Phone
Book entries list, and 12 Turbo Dial buttons, to which you can assign any
phone, private or group number from the Phone Book records.
Record Details Display Mode
When in Record Details mode, this section displays the record details of the
selected record, and allows browsing and editing them.
13
Using the Software
General section
The displayed information in this section varies according to the activity
mode of the application.
Just as any regular touch tone phone, pressing the numeric dial buttons
will produce the appropriate sound signals. These sound signals will be
heard only from the computer audio interface (sound card).
Mode
Displayed Info
First Start
General
SMS and Voice messages counters are displayed
at the bottom of the section
Turbo Dial editing
Fields for the Turbo Dial record details
When the application is started for the first time, a red shaded section
will appear, prompting you to select the serial port that will be used to
communicate with the hardware.
Dial/Call
Information on the current activity
Phone Info display
Signal strength, Battery charge status, IMEI, SIM
ID, Phone Number of Line 1, Private ID
Mode
Displayed Info
Turbo Dial editing
Fields for the Turbo Dial record details
Dial/Call
Information on the current activity
Phone Info display
Signal strength, Battery charge status, IMEI, SIM
ID, Phone Number of Line 1, Private ID
You need to select the computer's serial port to which the Data Cable was
connected.
After you've selected one of the four displayed options and pressed
Continue, the section display will disappear.
On-Screen Keypad
Note: If you selected the wrong port, you can always change the
settings by accessing Options > Settings > Communication
Channel, and selecting the correct serial port.
A diagram of the iDEN phone keypad, that allows you to enter phone
numbers, dial, end a call, send call alerts, and operate the PTT button,
directly from the application, using only the mouse.
14
Using the Software
Communication Initialization
Whenever you start the application or install a phone to the
AdvanceCommunicator™ cradle, the application will initialize the
communication into the hardware.
During the initialization process, the Phone Status line will display the
message Please Wait, and then Wait for Initialization. At the end of the
initialization process, the message Phone Ready will display.
If the iDEN phone used is of the Falcon series (i730, i830, i833 and i860),
you must connect the audio cable included in the communication kit. For
details on how to install the audio cable, see "Inserting the phone into the
AdvanceCommunicator™ Cradle". If the audio cable is not connected, the
status line will display a Please connect the Audio Cable message.
2 At the Record Details fields displayed in the Phone Book section, enter
the appropriate record details:
• Name - The name of the person, or any identifying name that you
would like to assign the record.
You can not assign the same name to two Phone Book records. Trying
to do so will not allow saving the record, and will display a Name Exist
message.
• Private ID - The Private ID of a subscriber is divided into three
numerical strings, named Urban, Fleet, and Private. These three
strings, appear under My Info > Private of the iDEN phone, as a
single string, separated by an asterisk. For Example: in the Private ID
2000*22800*12, Urban is 2000, Fleet is 22800, and Private is 12.
The icon is displayed next to the Private ID fields.
• Mobile Numbers - Three fields for mobile cellular phone numbers.
Each of these fields consists of a list that allows selecting the
appropriate type to the phone number, and an edit field for the
phone number. The list includes the names of popular cellular service
providers (Nextel and AT&T), and also allows entering any other name/
type when needed, up to ten characters long.
The icon is displayed next to each of these Mobile fields.
• Phone Numbers - Four fields for phone numbers. Each of these
fields consists of a list that allows selecting the appropriate type to
the phone number, and an edit field for the phone number. The list
includes popular types (Work1, Work2, Home1, Home2, Office, Office1,
and Else), and also allows entering any other name/type when needed,
up to ten characters long.
Sometimes, during the installation of a phone in the cradle, the application
may encounter a problem of faulty communication with the phone. In a
situations like this, the application will perform a complete initialize of the
communication, during which it will turn the iDEN phone off and back on.
Note: If the phone security or SIM security are active, the initialization
process will complete setting the communication between
the application and hardware, but no cellular activity will be
permitted until the security code is entered.
Application Phone Book
Adding Records to the Phone Book
New Contact Record
To add a new contact to the application Phone Book:
1 From the menus, select Phone Book > Add Contact, -orIn the Phone Book section, press the Add Contact Button
15
The icon is displayed next to each of these Mobile fields.
• Picture - Ability to define an image file to the record, that will display
whenever receiving an incoming call from a number stored in this
record.
To select an image file, press the Picture button, navigate to the image
file, and select it.
Note: The image file dimensions should be 190x150 pixels, and saved
as BMP, JPG, or GIF format.
After selecting the image file, you will be prompted to name and save
it. In the save dialog, the default saving location is in the Pictures
directory, under the application directory, and the default name
assigned to the image file is the name of the record it is being assign
to.
Note: When assigning an image file to a record, the application may
loose communication with the phone. Communication will be
restored at the end of the process.
To display the image from within the Record Details, press on the
icon next to the Picture field. To Hide the image, click on it.
• Sound - Ability to define a sound file to the record, that will be played
through the computer's audio interface (sound card) whenever
receiving an incoming call from a number stored in this record.
Note: The sound file should be in WAV format.
After selecting the sound file, you will be prompted to name and
save it. In the save dialog, the default saving location is in the Sounds
directory, under the application directory, and the default name
assigned to the image file is the name of the record it is being assign
to.
Note: When assigning a sound file to a record, the application may
loose communication with the phone. Communication will be
restored at the end of the process.
To display the image from within the Record Details, press on the
icon next to the Sound field. The sound will be heard through the
computer's audio interface (sound card). To stop playing the sound,
click on the mute icon .
• Note - A textual note line assigned to the record.
• Exit - Exits the Record Details mode back to the Phone Book display,
without saving the changes.
If changes were made to this record, pressing this button will display a
confirmation message for exiting without saving the changes.
• Delete - Deleting the current record from the application Phone Book.
Pressing this button will display a confirmation message to the delete.
The Delete button will only appear when editing an existing record.
• Store - Saving the changes made to the current record. The Store
button will become active only if and when changes were made to the
current record.
Using the Software
New TalkGroup Record
assigned to the image file is the name of the record it is being assign
to.
To add a new TalkGroup record to the application Phone Book:
1 From the menus, select Phone Book > Add Group, -or-
Note: When assigning an image file to a record, the application may
loose communication with the phone. Communication will be
restored at the end of the process.
In the Phone Book section, press the Add Group Button
To display the image from within the Record Details, press on the
icon next to the Picture field. To Hide the image, click on it.
• Note - A textual note line assigned to the record.
• Exit - Exits the Record Details mode back to the Phone Book display,
without saving the changes.
If changes were made to this record, pressing this button will display a
confirmation message for exiting without saving the changes.
• Delete - Deleting the current record from the application Phone Book.
Pressing this button will display a confirmation message to the delete.
The Delete button will only appear when editing an existing record.
• Store - Saving the changes made to the current record. The Store
button will become active only if and when changes were made to the
current record.
2 At the Record Details fields displayed in the Phone Book section, enter
the appropriate record details:
• Name - The name of the group, or any identifying name that you
would like to assign the record.
You can not assign the same name to two Phone Book records. Trying
to do so will not allow saving the record, and will display a Name Exist
message.
• Group - The TalkGroup number.
The icon is displayed next to the group number field.
• Wide area/Local - The coverage area of the group.
• Picture - Ability to define an image file to the record, that will display
whenever receiving an incoming call from this TalkGroup.
To select an image file, press the Picture button, navigate to the image
file, and select it.
Adding a New Record from the Activity Log
To add a Phone, ID, or Group number, that appears in the Activity Log:
1 Double-click on the Activity Log row containing a Phone, ID, or Group
number, that has an empty Name field
2 Select whether to save the number as a new record, or add it to an
existing record.
In order to save the number in an existing record, locate the target
record in the Name List of the Phone Book, double-click on the record
to display the Record Details, then drag and drop the number from the
Activity Log to an empty number field in the record.
Note: The image file dimensions should be 190x150 pixels, and saved
as BMP, JPG, or GIF format.
3 Fill in the rest of the information for this number.
4 When finished, press Store, then press Exit.
After selecting the image file, you will be prompted to name and save
it. In the save dialog, the default saving location is in the Pictures
directory, under the application directory, and the default name
17
Using the Software
Editing Phone Book Record
3 The application will import all the contact entries from the iDEN phone.
To modify an existing Phone Book record:
1 Locate the record in the Name List of the Phone Book.
In case the Phone Book list contains a large number of records, use the
Search field located above the Name List to locate the record.
2 After the record is located, double-click on it.
The section display will change and display the Record Details.
3 Modify the record details.
4 When finished, press Store to save the changes.
5 To return to the Phone Book display, press Exit.
Deleting Phone Book Record
To delete a record from the application Phone Book:
1 Locate the record in the Name List of the Phone Book.
In case the Phone Book list contains a large number of records, use the
Search field located above the Name List to locate the record.
The imported records will be displayed in a separate list over the top
section of the application window. The import progress will display in
the Communication Status line.
2 After the record is located, double-click on it.
The section display will change and display the Record Details.
3 Press the Delete button. A confirmation message will be displayed.
Press Yes to delete the record, or No to cancel and keep the record.
Importing the Phone's Contacts List
The AdvanceTec Communicator application lets you to import the contacts
from the iDEN phone installed in the AdvanceCommunicator™ cradle.
To import the contact entries from the iDEN phone:
1 Make sure the iDEN phone is on and not blocked, and communication
is established between the application and hardware.
2 From the application menus, select Phone Book > Import Phone
Contact List.
Note: The Import Phone Contact List command will be active only
30 seconds after the communication initialization process is
finished.
18
Using the Software
Saving All the Imported Entries in the Phone Book
Note: The imported contact entries are not saved in the application
Phone Book. After closing and starting the application, you will
need to import them again.
To save all the imported contact entries from the iDEN phone in the
application Phone Book:
4 To hide the Contacts from Phone Memory list, press the book icon
above it.
1 Import the contact entries from the iDEN phone (see Importing the
Phone's Contacts List).
5 To display the Contacts from Phone Memory list, press the icon at
the right side of the application window, above the Activity Log.
2 After the import process ends, press the Save All Contacts button at
the bottom of the section.
If the
icon is not displayed, phone contacts were not imported.
To change the display sort of the Contacts from Phone Memory list:
If contacts that use the same name are found during the save process in
the application Phone Book, the following message will be displayed at the
end of the process: the remaining contacts already exist in the Phone
Book.
1 Press on the column title according to which you would like to sort the
list.
If the process was completed with no problems to report the message All
contacts Saved to the Phone Book.
• Number - By the entry number
• Name - By the entry name
2 Press again on the column title' to set the sorting in descending order
(from last to first).
Phone Book Contents
The imported records can be sorted by their numerical order (the speed
dial number), or in alphabetical order.
To display the contents count of the application Phone Book, click on the
Phone Book icon . When clicked, the number of Phone Book records will
be displayed next to the icon.
3 To return the sort to ascending order, press again on the column title.
Note: Unlike in the contents counter of the iDEN phone book, the
number of records displayed does not represent the number
of phone numbers stored in Phone Book, but the number of
records stored in the Name List of the Phone Book. Each of
these records can contain more than one phone number.
Deleting Imported Contacts
To delete contact entries from the Contacts from Phone Memory list:
1 Select and highlight the entry row in the list.
2 Press the Delete key of the computer to delete the entry.
Saving Imported Entry in the Phone Book
To save an imported contact entry from the iDEN phone in the application
Phone Book:
1 Select and highlight the entry row in the list.
2 Double-click on the entry row, to display the entry details in the section
below the list.
If you need to edit the entry details, you can do it now.
3 Press the Store button, the press Exit.
A saved entry, will be designated as Saved in the Number column of the
Contacts from Phone Memory list.
19
Using the Software
Phone Calls
1 Place the mouse cursor in the phone number field of the Dial Box
section (the bottom field of the section) -or-
Dial
Using the mouse, enter the phone number by clicking the numeric keys
of the On-Screen Keypad.
The AdvanceTec Communicator application allows you several methods of
entering the phone number you would like to call:
To delete the last digit entered, click the button. To clear the number
field, double-click or click and hold the button
• Selecting from the application Phone Book
• Selecting from the Activity List
• Manually by typing directly into the number field
• Manually by using the On-Sceen Keypad
2 Press s in the On-Screen Keypad.
Turbo Dial
The AdvanceTec Communicator application lets you define 12 Turbo Dial
buttons, that will enable you to place a call to the assigned phone number
with a single mouse click, directly from the application.
Entering a Phone Number from the Phone Book
To enter a phone number stored in the application Phone Book:
Setting Turbo Dial
1 In the Phone Book section, select the record containing the phone
number in the Name List.
To assign a phone number to Turbo Dial:
In case the Phone Book list contains a large number of records, use the
Search field located above the Name List to locate the record..
1 Right-click the Turbo Dial button you like to set.
The Turbo Dial fields will be displayed in the General Section, to the
left of the Turbo Dial buttons.
2 After the record is located, double-click on it.
The section display will change and display the Record Details.
2 From the Name List of the Phone Book, select the record that contains
the phone number.
3 Press on the icon next to the phone number, in order to feed the
number into the phone number field of the Dial Box section.
In case the Phone Book list contains a large number of records, use the
Search field located above the Name List to locate the record.
4 Press s in the On-Screen Keypad.
Entering a Phone Number from the Activity List
3 Double-click the record to display the Record Details.
To enter a phone number from the Activity List:
4 To enter the phone number to the selected Turbo Dial field, click on the
icon next to the phone number ( , , or )
1 In the Activity Log section, select the activity row containing the
phone number.
5 If necessary, edit the text in the Key Name field to set the label
displayed on the Turbo Dial button.
2 Right-click on the row, in order to enter the phone number that appears
in it into the phone number field of the Dial Box section.
6 Click on Save, to save settings of the Turbo Dial button, -orClick on Cancel, to cancel the button settings.
3 Press s in the On-Screen Keypad.
Entering a Phone Number Manually
Turbo Dialling
To enter a phone number that is not stored in the Phone Book or logged
in the current Activity Log:
To Turbo Dial a phone number:
Click on the Turbo Dial button assigned to the phone number.
To Turbo Dial a Private ID or TalkGroup:
20
Using the Software
1 Click on the Turbo Dial button assigned to the Private ID or TalkGroup.
Answering Calls
2 In the On-Screen Keypad, click the PTT key, -or-
To answer incoming calls:
Press the PTT button at the front of the AdvanceCommunicator™ base,
-or-
Open the flip, -or-
Press the PTT button on the back of the AdvanceCommunicator™
handset.
Click the s key in the On-Screen Keypad, -or-
If the phone flip is open, press s or B under Yes, -orPress the Space Key of the computer keyboard.
To send a Call Alert using Turbo Dial:
1 Click on the Turbo Dial button assigned to the Private ID or TalkGroup.
Private and Group Calls
2 Click the Alert key of the On-Screen Keypad.
Call Alert
3 To send the Call alert, in the Alert Send section above the On-Screen
Keypad, click on the Send button, -or-
Entering a Private ID from the Phone Book
Press the Space Key of the computer keyboard.
To enter a Private ID from the application Phone Book:
Editing Turbo Dial
1 From the Name List of the Phone Book, select the record that contains
the phone number.
To edit the phone number assigned to a Turbo Dial button, display the
Record Details of the record containing the phone number and edit the
phone number (see Editing Phone Book Record)
In case the Phone Book list contains a large number of records, use the
Search field located above the Name List to locate the record.
To edit the Turbo Dial button label text:
2 Double-click the record to display the Record Details.
1 Right-click the Turbo Dial button you would like to set.
3 To enter the Private ID number to the Dial Box fields, click the
next to the Private ID fields.
The Turbo Dial fields will be displayed in the General Section, to the
left of the Turbo Dial buttons.
icon
Entering a Private ID from the Activity List
2 Edit the text in the Key Name field.
To enter a Private ID from the Activity Log:
3 Click the Save button
1 In the Activity Log section, select the activity row containing the
Private ID.
Deleting Turbo Dial
To clear an assigned Turbo Dial number:
2 Right-click on the row, in order to enter the Private ID that appears in it
into the Private ID fields of the Dial Box section.
1 Right-click the Turbo Dial button you like to set.
The Turbo Dial fields will be displayed in the General Section, to the
left of the Turbo Dial buttons.
Sending a Call Alert
To send a Call Alert to the entered Private ID:
2 To delete the assigned phone number, click the Delete button.
1 Click the Alert key of the On-Screen Keypad.
3 Click the Save button.
The Dial Box section will change to Alert Send.
2 Click on the Send button, or Cancel to abort.
21
Using the Software
Receiving Call Alerts
Talk into the microphone at the front of the AdvanceCommunicator™
base.
When you receive a Call Alert, the application logs it in the Activity Log and
displays a flashing message at the top of the On-Screen Keyboard section,
above the Alert button. The displayed message indicated the number of
alerts received.
3 When finished talking, release the PTT and listen.
Note: During a Private or Group call, the Space key of the computer
keyboard can also be used as a PTT button.
SMS Messages
Note: This feature depends on the availability of the MO SMS service
from you cellular service provider.
Sending an SMS message from the phone, is a routine activity, but not
a very convenient one to perform. The AdvanceTec Communicator
application allows you to:
• Send SMS message to a single recipient
• Send SMS message to a predefined group of recipients
• Read and manage SMS messages received by the phone
To dismiss the alerts message, click on it.
Making Private and Group Calls
Sending SMS message to a single recipient
To make Private and Group calls:
The Sending SMS section, provides you with a simple interface, that allows
you to send an SMS message of up to 70 characters, to any cellular phone.
1 Enter the Private ID or TalkGroup number into the Dial Box fields.
To send SMS message:
You can enter the number:
1 Into the Phone field, enter the phone number of the recipient, or
import it from the application Phone Book, Activity Log.
• From the application Phone Book
• From the Activity Log
• By direct typing into the fields
• By using the On-Screen Keypad
• By using an assigned Turbo Dial button
2 To talk, click and hold the PTT key of the On-Sceen Keypad, -or-
Note: Clicking the icon next to the phone number in the Phone Book
Record Details, will enter the number to phone number fields
of both the Dial Box and Sending SMS sections.
2 At the next field, type your message.
Press the PTT button at the front of the AdvanceCommunicator™ base,
-or-
Note: Note to the characters counter under the message field. This
counter displays the number of characters left that can be
added to the mesage.
Press the PTT button on the back of the AdvanceCommunicator™
handset, -or-
3 When finished, press Send.
22
Using the Software
Sending SMS message to SMS Group
Creating a new SMS Group
To create a new SMS Group:
1 Select SMS > Add Group.
The Activity Log display is replaced by recipient list display of the new
SMS Group. The default name assigned to the new group is Group # (#
is the group number).
2 To assign a name to the recipient group, edit the name in the Display
Group field.
3 To log the change, click the Update Group button.
Adding recipient to SMS Group
Note: Only names that were stored in the application Phone Book can
be added to the SMS Group list.
To add a recipient to the SMS Group:
1 If the recipients group list is not displayed, display it by selecting SMS >
Display Group.
5 To log in the new recipient, click the Update Group button.
2 In the Phone Book section of the application (under the recipient list
section), locate the record where the phone number you would like to
add to the recipient list is stored.
To send a message to all the recipients of the SMS Group::
Sending SMS message to the SMS Group
1 If the recipients group list is not displayed, display it by selecting SMS >
Display Group.
In case the Phone Book list contains a large number of records, use the
Search field located above the Name List to locate the record.
2 Using the computer keyboard, type your message in the message field
of the Sending SMS section (to the left of the recipients list).
3 Double-click the record to display the Record Details.
4 Using drag and drop, drag the mobile phone number ( ) or the phone
number ( ) from the Record Details section, and drop it into the
recipients list in the Group SMS section.
Note: Note to the characters counter under the message field. This
counter displays the number of characters left that can be
added to the mesage.
The phone number and record name will be added to the recipients list
of the SMS Group.
3 When finished, click on the Send SMS Group button under the
recipients list.
Deleting recipient from the SMS Group
To delete a recipient from the SMS Group:
1 If the recipients group list is not displayed, display it by selecting SMS >
Display Group.
23
Using the Software
2 Select the recipient record you would like to delete.
Reading SMS Messages
3 Press the Delete key of the computer keyboard.
To read the contents of SMS message in the Incoming Messages list:
Deleting SMS Group
From the Incoming Messages list, select the message you would like to
read. The contents of the selected message will be displayed in the text
field at the bottom of the section.
To delete a complete SMS Group:
1 Display the SMS Group by selecting it from the SMS > Display Group
sub-menu.
Deleting SMS Messages
To delete a message from the Incoming Messages list:
2 Make sure that the group name that appears in the Display Group
field, is the name of the group you would like to delete.
1 From the Incoming Messages list, select the message you would like to
delete.
3 Select and erase the group name in the Display Group field. The
Update Group button in the section will change to Delete Group.
2 To delete the selected message, click the Delete Selected Message
button.
4 Click the Delete Group button.
Note: The delete action will also delete the SMS message from phone
memory.
Reading and Managing SMS Messages
You can import SMS messages that were sent to you and received by the
iDEN phone into the Incoming Messages list of the application, in order to
comfortably read and manage them from your desktop computer.
Entering the recipient information
You can enter the message sender information displayed in the Incoming
Messages list to the fields in the Sending SMS section, in order to send a
reply.
Importing SMS Messages from the phone
Note: You can not import SMS messages from iDEN Condor phones
(i60, i90c and i95cl).
To enter the sender information:
1 Right click on the message line in the Incoming Messages list.
To import SMS messages that were received by the phone:
The sender name and phone number will be entered in the Name and
Phone fields of the Sending SMS section.
1 If the Incoming Messages list is not displayed, display it by selecting
SMS > Incoming Messages.
2 Type your message in the message field of the Sending SMS section.
2 To read the SMS messages from the iDEN phone, click the Import
Phone Messages button.
Note: Note to the characters counter under the message field. This
counter displays the number of characters left that can be
added to the mesage.
While importing the SMS messages from the phone, the Import Phone
Messages button will change to Abort Messages Import. Click this
button to abort the import process.
3 When finished, click Send
3 The SMS messages list will be imported and displayed in the Incoming
Messages list.
24
Using the Software
History
Exporting History to Text file
To export the History of the selected activity day to text file (.txt):
The AdvanceTec Communicator application automatically saves your daily
Activity Log records. At any time, you can display the saved activity log
history of a specific activity day, browse it and export it as plain text file or
a Microsoft Excel spreadsheet.
Select History > View/Print History.
Exportin History to Excel
To export the History of the selected activity day to Microsoft Excel
spreadsheet (.xls):
Displaying the Activity Log History
Select History > Export to Excel.
To display the Activity Log History:
Select History > Display History
The History section will be displayed over the Phone Book section.
The default activity log history displayed in the section will be of the
current activity day.
Displaying the Activity Log of a specified day
To display the Activity Log History of a spcific activity day:
1 If the History section is not yet displayed, select History > Display
History.
The History section will be displayed over the Phone Book section.
The default activity log history displayed in the section will be of the
current activity day.
2 Using the Day, Month and Year lists at the bottom of the section, select
the date for which you would like to display the Activity Log History.
If you select a date that doesn't have a saved history, the field
containing the wrong date value will be marked in red, and a No
history for this date message will be displayed next to it.
Exporting Activity Log History
You can export the history log of the activity day selected to display in the
History section as a plain text file (.txt) for print, or as a Microsoft Excel
spreadsheet that will allow you to perform addition management of the
activity.
To export the history log of a specific activity day, you will first need to
select and display it in the History section (see "Displaying the activity log
of a specified day").
25
Using the Software
Updating the Hardware Software
To install software updates of the AdvanceCommunicator™ hardware:
1 From the application menus select Options > Hardware Software
Update.
2 In the Program Update window displayed, select Update > Start
Update.
5 At the end of the update process the message Update Succeeded,
Please Wait will be displayed and the application will initialize the
communication with the hardware.
3 In the displayed Open dialog, select the update file. The default location
displayed in the dialog is the HardwareUpdate directory under the
application directory.
4 To start the update process, disconnect the power adaptor from the
AdvanceCommunicator™ base, then re-connect it.
26
Troubleshooting
Problem
Possible Reason
Possible Solution
The power adaptor is not connected to the power Make sure the power adaptor is connected to the
supply
power supply
The accessories connector is not clean
Remove the phone from the cradle and clean the
accessories connector
Phone security or SIM security are active,
Enter the security code to the phone
and the phone was turned off and on during
communication initialization
The iDEN phone is installed in the
The phone is not properly installed in the cradle
Remove the phone from the cradle and install it
properly
AdvanceCommunicator™ cradle, but the
application reports Phone Not Placed
The accessories connector is not clean
Remove the phone from the cradle and clean the
accessories connector
The application can not turn the phone off during The phone’s flip is closed
Open the phone’s flip and press the power
button
initialization
During communication initialization you get a
message to manually turn off the phone
Sound is not transferred to handset
The handset plug is not properly connected to
Unplug the handset from the
the AdvanceCommunicator™ base
AdvanceCommunicator™ base then plug back
until locked in place
A rattling noise is heard from the computer
The antenna location is not optimal
Change the antenna direction or move it away
speakers or other devices next to the computer
from the device that makes the rattling sound
The Data Cable is not connected to the computer Connect the Data Cable to the serial port (COM)
The application reports a No Reply from
of the computer
Hardware message
The Data Cable is not connected to the
Connect the Data Cable to the communication
AdvanceCommunicator™ base
port of the AdvanceCommunicator™ base
The wrong serial port (COM) was set in the
Go to Options > Settings > Communication
application
Channel, and change the serial port set for use by
the application, -or-
The LED indicator in the AdvanceCommunicator™
base is off
The iDEN phone turns off after installing in the
AdvanceCommunicator™ cradle
The application reports Phone Ready but all
activities produce errors
Connect the Data Cable to the correct serial port
(COM) of the computer
27
Microsoft and Windows are registered trademarks of Microsoft.
AdvanceCommunicator™ is a registered trademark of AdvanceTec.
All other product names or services mentioned in this user’s guide are the
property of their respective trademark owners.
28