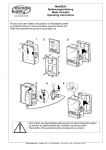
1
XELIA User’s Manual Version 1.1 © 2009 NeoMedia Europe AG, Würselen (Germany) While the information in this manual has been compiled with great care, it may not be deemed an assurance of product characteristics. NeoMedia Europe AG shall be liable only to the degree specified in the terms of sale and delivery. Trademarks NeoMedia is a registered trademark of NeoMedia Technologies, Inc. XELIA® is a registered trademark of NeoMedia Europe AG. Windows®, Windows NT® and Windows Vista® are registered trademarks of Microsoft, Corp. All other names mentioned may be trademarks or registered trademarks of their respective owners. Subject to change without notice. No liability for technical errors or omissions. NeoMedia Europe AG Jens-Otto-Krag-Str. 11 52146 Würselen Germany T: +49 2405 499 22-0 F: +49 2405 499 22-99 [email protected] www.neom.com Table of contents – Page 3 Table of contents ABOUT THIS MANUAL 5 CHAPTER 1 INTRODUCTION 6 XELIA short description XELIA scanner models XELIA optional accessories 7 8 8 UNPACKING AND CONNECTING XELIA 9 CHAPTER 2 CHAPTER 3 CHAPTER 4 Packaging contents Installing and connecting XELIA Connecting XELIA using the USB port Connecting XELIA using the serial port Installing XELIA-E using the Ethernet port CPR Manager 10 11 11 11 12 13 SETUP TOOL 14 Installation requirements Operating systems Installing the XELIA Setup Tool Starting the XELIA Setup Tool Exiting the XELIA Setup Tool Removing the XELIA Setup Tool 15 15 16 17 18 19 CONFIGURING XELIA 20 Menu bar RS-232 Output EAN/JAN-13 EAN/JAN-8 UPC-A 21 22 23 24 25 26 NeoMedia Europe AG Jens-Otto-Krag-Str. 11 52146 Würselen Germany T: +49 2405 499 22-0 F: +49 2405 499 22-99 [email protected] www.neom.com Page 4 - Table of contents UPC-E0 Code 128 Interleaved 2 of 5 2D symbologies Additional Commands A P P E N D I X A TRIGGER COMMANDS Trigger commands A P P E N D I X B DIVERSE Warranty conditions of NeoMedia Europe AG 1. Warranty coverage 2. Warranty period 3. Warranty procedure 4. Suspension of the warranty 5. Operating mistakes 6. Additional regulations A P P E N D I X C TECHNICAL DATA Data sheet ASCII conversion chart XELIA/XELIA-E Connector Pin-out XELIA Connectors XELIA-E Connectors XELIA / XELIA-E Connector Pin-out XELIA / XELIA-E Connector Pin-out NeoMedia Europe AG Jens-Otto-Krag-Str. 11 52146 Würselen Germany T: +49 2405 499 22-0 F: +49 2405 499 22-99 [email protected] www.neom.com 27 28 29 30 31 32 33 34 35 35 35 35 36 36 36 38 39 41 43 43 43 43 44 About this manual – Page 5 About this manual Thank you for placing your trust in our XELIA desktop scanner! This manual contains all important information you will need to configure and operate your XELIA. For instance, how to physically install the unit in its intended location, how to set it up to operate on your specific network and according your user-specific reading parameters, how to get optimal reading results? The accompanying setup tool will be described, and you will find detailed information on its basic functions and features. The following information addresses to experienced users with knowledge of the hardware and software configuration. If you have further questions or need additional help, please contact our support: NeoMedia Europe AG Jens-Otto-Krag-Str. 11 52146 Würselen Germany Phone Fax E-Mail +49 2405 49922-50 +49 2405 49922-99 [email protected] Remark: Please collect the version number of the Setup Tool software, the device information of your XELIA device (code reader and Ethernet tabs) before asking for technical support. NeoMedia Europe AG Jens-Otto-Krag-Str. 11 52146 Würselen Germany T: +49 2405 499 22-0 F: +49 2405 499 22-99 [email protected] www.neom.com Page 6 - Introduction CHAPTER 1 Introduction This chapter provides general information about the XELIA desktop scanner and its optional accessories. XELIA short description XELIA different scanner models XELIA optional accessories NeoMedia Europe AG Jens-Otto-Krag-Str. 11 52146 Würselen Germany T: +49 2405 499 22-0 F: +49 2405 499 22-99 [email protected] www.neom.com Introduction – XELIA short description - Page 7 XELIA short description XELIA is a versatile desktop scanner that incorporates Honeywell Adaptus® Imaging Technology 5.0 to enable high-performance reading of 2D codes from mobile phone displays. Thanks to its high-speed processor, XELIA automatically recognizes 2D codes sent as text messages (SMS, EMS) or MMS messages as well as printed 1D barcodes. It rapidly processes codes with extreme accuracy. Equipped with various communication interfaces, XELIA can be easily integrated into an existing system in order to provide increased flexibility for mobile phone-based applications at the point-of-sale (shopping malls, grocery stores, and offices) or point-of-access (concert venues, theme parks, movie theatres, sporting events). Its compact size and sleek design make XELIA ideal for counter-top use at a point-of-sale or service desk. It can also be used for sweepstakes, mobile advertising (tickets and coupons) and boarding passes. NeoMedia Europe AG Jens-Otto-Krag-Str. 11 52146 Würselen Germany T: +49 2405 499 22-0 F: +49 2405 499 22-99 [email protected] www.neom.com Page 8 - Introduction – XELIA scanner models XELIA scanner models XELIA exists in two versions – with and without Ethernet connectivity. The model without Ethernet (XELIA) has two interfaces: a USB port to allow you to connect your XELIA scanner directly to you PC using the included USB cable (a power supply is not required since the scanner is powered via the USB port in this connection method), and a serial port to connect your XELIA scanner to any serial device. The serial cable with power supply is not included in the package (refer to XELIA optional accessories on page 8). The model with Ethernet (XELIA-E) possesses an Ethernet interface in addition to the USB and serial ports. The USB-cable is provided with this scanner model. The serial cable with power supply and the Ethernet cable are not included in the package (refer to XELIA optional accessories on page 8). Remark: XELIA in the scope of this manual refers to XELIA and XELIA-E. If a feature or function is related to only one of the two models, this manual refers to “XELIA only” or “XELIA-E only”. XELIA optional accessories The following optional accessories for XELIA and XELIA-E are currently available at NeoMedia Europe: Serial cable with power supply for XELIA and XELIA-E to connect your XELIA/XELIA-E to a wide variety of serial devices or to run XELIA-E in Ethernet connection mode. NeoMedia Europe AG Jens-Otto-Krag-Str. 11 52146 Würselen Germany T: +49 2405 499 22-0 F: +49 2405 499 22-99 [email protected] www.neom.com Unpacking and connecting XELIA - Page 9 CHAPTER 2 Unpacking and connecting XELIA This chapter provides an overview on the XELIA components and includes instructions on how to install and connect the XELIA scanner to a PC for evaluation. Packaging contents Installing and connecting XELIA NeoMedia Europe AG Jens-Otto-Krag-Str. 11 52146 Würselen Germany T: +49 2405 499 22-0 F: +49 2405 499 22-99 [email protected] www.neom.com Seite 10 - Unpacking and connecting XELIA – Packaging contents Packaging contents Please check the completeness of your XELIA package. The package consists of: 1 XELIA 1 Configuration CD 1 USB cable NeoMedia Europe AG Jens-Otto-Krag-Str. 11 52146 Würselen Germany T: +49 2405 499 22-0 F: +49 2405 499 22-99 [email protected] www.neom.com Unpacking and connecting XELIA – Installing and connecting XELIA - Page 11 Installing and connecting XELIA The XELIA scanner can be connected to a PC for evaluation and individual configuration. XELIA can be connected via USB, serial or Ethernet port. Connecting XELIA using the USB port Switch on your computer. First install the software driver provided on the configuration CD if your PC is running under Windows, and be sure to follow the instructions. The software driver creates a virtual COM port which can be used like any other standard COM port on your PC. Remark: Linux operating systems don’t require an extra driver installation. Default serial over USB driver will be used. Connect one end of the included interface cable to the XELIA (leftmost port) and the other end of the cable to the matching USB port of your PC. Power supply is not required. The scanner emits a beep sequence via the built-in speaker and the scanning illumination starts to flicker. Connecting XELIA using the serial port Switch on your computer. Connect one end of the serial interface cable to XELIA (middle port) and the other end of the cable to the matching serial port of your PC. Then, plug the power supply unit into an electrical outlet. The scanner emits a beep sequence via the built-in speaker and the scanning illumination starts to flicker. Remark: You don’t need to install a software driver for a serial communication. If connecting the XELIA scanner using an RS-232 interface, all communication parameters between XELIA and terminal must match for correct data transfer through the serial port using RS-232 protocol. The default settings for the Xelia serial port are 38.400 Bit/s, No Parity, 8 Data Bits, 1 Stop Bit, RTS/CTS Handshake. NeoMedia Europe AG Jens-Otto-Krag-Str. 11 52146 Würselen Germany T: +49 2405 499 22-0 F: +49 2405 499 22-99 [email protected] www.neom.com Seite 12 - Unpacking and connecting XELIA – Installing and connecting XELIA Installing XELIA-E using the Ethernet port Connect one end of the Ethernet cable to the Ethernet port (rightmost port) on the back of the XELIA-E scanner and the other end of the cable to an Ethernet port of your network. For the power supply connection of your XELIA-E, plug the provided power supply unit into an electrical outlet. Now install the software provided on the configuration CD and be sure to follow the instructions for your specific operating system. NeoMedia Europe AG Jens-Otto-Krag-Str. 11 52146 Würselen Germany T: +49 2405 499 22-0 F: +49 2405 499 22-99 [email protected] www.neom.com Unpacking and connecting XELIA – CPR Manager - Page 13 CPR Manager Open the CPR Manager. Click Add/Remove. Select a free COM port and click OK to create a virtual COM port. Mark the new COM port by clicking on it. Click Search For Devices to scan your network for available XELIAs. Right click on the correct XELIA device in the device list at the bottom and choose Add To Settings. Click Save and close the CPR Manager. Remark: You need administrator rights to create a virtual COM port using the CPR Manager. NeoMedia Europe AG Jens-Otto-Krag-Str. 11 52146 Würselen Germany T: +49 2405 499 22-0 F: +49 2405 499 22-99 [email protected] www.neom.com Seite 14 - Setup Tool CHAPTER 3 Setup Tool The XELIA Setup Tool is a program designed to configure your XELIA in order to achieve optimal reading results. With this program, you can carry out all necessary parameterizations and main settings, adapt them to your specific needs and suit your individual area of application. In most cases, the default settings are sufficient. In this chapter, you will learn how to install, remove, start and exit the XELIA Setup Tool. Installing the XELIA Setup Tool Removing the XELIA Setup Tool Starting the XELIA Setup Tool Exiting the XELIA Setup Tool NeoMedia Europe AG Jens-Otto-Krag-Str. 11 52146 Würselen Germany T: +49 2405 499 22-0 F: +49 2405 499 22-99 [email protected] www.neom.com Setup Tool – Installation requirements - Page 15 Installation requirements To install and run the XELIA Setup Tool, your computer must fulfill the following requirements: Operating systems To install the XELIA Setup Tool, following operating systems are required: Windows 2000 Windows XP (32-bit versions only) Windows Vista (32-bit versions only) Should you use other operating systems, please contact our support (contact address on page 5). NeoMedia Europe AG Jens-Otto-Krag-Str. 11 52146 Würselen Germany T: +49 2405 499 22-0 F: +49 2405 499 22-99 [email protected] www.neom.com Page 16 - Setup Tool – Installing the XELIA Setup Tool Installing the XELIA Setup Tool Switch on your computer and wait until Windows is started. Insert the provided configuration CD into the CD-ROM disk drive. The Install program will start automatically. (If the auto-start function is disabled, start setup manually by double-clicking on SETUP.EXE in the CD root directory). Confirm the next installation dialogue with Next. Remark: If needed, log in with administration rights for the local computer. Install the Setup Tool using an administrator account. Select the destination folder to install the Setup Tool and click then on Next. Click again on Next to confirm and start the installation. The successful installation is complete and a corresponding dialogue message appears. Click on Close. NeoMedia Europe AG Jens-Otto-Krag-Str. 11 52146 Würselen Germany T: +49 2405 499 22-0 F: +49 2405 499 22-99 [email protected] www.neom.com Setup Tool – Starting the XELIA Setup Tool - Page 17 Starting the XELIA Setup Tool Switch on your computer and wait until Windows is started. Select Start t Programs t XELIA Setup Tool Select the appropriate connection according to the way you have connected XELIA to your PC – Network, RS-232 or USB. Remark: If connecting the XELIA scanner using an RS-232 interface, all communication parameters between XELIA and terminal must match for correct data transfer through the serial port using RS-232 protocol. Click on OK. Connection will be established. NeoMedia Europe AG Jens-Otto-Krag-Str. 11 52146 Würselen Germany T: +49 2405 499 22-0 F: +49 2405 499 22-99 [email protected] www.neom.com Page 18 - Setup Tool – Exiting the XELIA Setup Tool Exiting the XELIA Setup Tool Go to Connection in the menu bar of the XELIA Setup Tool and select the menu item Disconnect, or click on the icon Disconnect below the menu bar. Connection to the device will be disconnected. Close the window by clicking on the cross in the upper right corner or selecting Connection > Quit from the menu bar. NeoMedia Europe AG Jens-Otto-Krag-Str. 11 52146 Würselen Germany T: +49 2405 499 22-0 F: +49 2405 499 22-99 [email protected] www.neom.com Setup Tool – Removing the XELIA Setup Tool - Page 19 Removing the XELIA Setup Tool Switch on your computer and wait until Windows is started. Remark: If needed, log in with administration rights for the local computer. Select Start t Settings t Control Panel and open the Software directory. Locate the XELIA Setup Tool program already installed on your system and click the button “Change / Remove”. Confirm the next dialogue with OK. Close the window “Software” NeoMedia Europe AG Jens-Otto-Krag-Str. 11 52146 Würselen Germany T: +49 2405 499 22-0 F: +49 2405 499 22-99 [email protected] www.neom.com Page 20 - Configuring XELIA CHAPTER 4 Configuring XELIA This chapter describes the XELIA Setup Tool, how to configure the XELIA scanner according to your specific needs, how to set up the decoding methods and how to define the communication between XELIA and host system. NeoMedia Europe AG Jens-Otto-Krag-Str. 11 52146 Würselen Germany T: +49 2405 499 22-0 F: +49 2405 499 22-99 [email protected] www.neom.com Configuring XELIA - Menu bar - Page 21 Menu bar Menu: Connection Connect establishes a connection to the XELIA. Disconnect closes the connection to the XELIA. Quit closes the setup tool application. Menu: Configuration Default sets all parameters in the setup tool to default values and writes them directly to the XELIA scanner’s EEPROM. Apply writes the current parameter set of the XELIA scanner to EEPROM. (Important: if you do not apply, all your parameters will be lost in case of a power interruption). Open loads a parameter set from a file into the setup tool and transmits it to the XELIA. Click on Apply to have them saved and written to EEPROM. Save saves the current parameter set from the setup tool to a file. Menu: Image Snapshot creates automatically a snapshot image from the XELIA scanner and displays this image in a separate window. Menu: Help About displays version numbers and Copyright information. NeoMedia Europe AG Jens-Otto-Krag-Str. 11 52146 Würselen Germany T: +49 2405 499 22-0 F: +49 2405 499 22-99 [email protected] www.neom.com Page 22 - Configuring XELIA – RS-232 RS-232 Baud Rate defines the data transmission rate from the XELIA scanner to the terminal via the serial interface. Host terminal must be set to the same baud rate as the XELIA. Default Baud Rate = 38400 BPS. RTS/CTS defines the data exchange between XELIA and host terminal (RS-232 handshaking). If checking the box RTS/CTS, XELIA issues always an active RTS signal to the receiving device. XELIA waits to send its data until it detects an active CTS signal from the receiving device. XELIA then sends its data while checking the CTS signal before the transmission of each data character. If an inactive CTS signal is detected at any time, the XELIA halts transmission until it detects another active CTS signal. Default = RTS/CTS activated. NeoMedia Europe AG Jens-Otto-Krag-Str. 11 52146 Würselen Germany T: +49 2405 499 22-0 F: +49 2405 499 22-99 [email protected] www.neom.com Configuring XELIA - Output - Page 23 Output Reread Delay sets the time period before the XELIA can read the same bar code a second time. Longer delays are effective in minimizing accidental rereads at the point of sale. Use shorter delays in applications where repetitive barcode scanning is required. Default delay = Off. Prefix and Suffix characters are data characters that can be sent before and after scanned data. Prefix Scanned data Suffix 1-11 Alpha numeric characters Variable length 1-11 Alpha numeric characters You can specify if prefix and suffix characters should be sent with all symbologies. Remark: Prefix and suffix should be added according to the hex values from the ASCII conversion chart on page 41. Prefix defines the prefix that will be sent before the scanned data. Enter here the hex values determined from the ASCII conversion chart on page 41. Default Prefix = none. Suffix defines the suffix that will be sent after the scanned data. Enter here the hex values determined from the ASCII conversion chart on page 41. Default Suffix = none. NeoMedia Europe AG Jens-Otto-Krag-Str. 11 52146 Würselen Germany T: +49 2405 499 22-0 F: +49 2405 499 22-99 [email protected] www.neom.com Page 24 - Configuring XELIA – EAN/JAN-13 EAN/JAN-13 Enabled enables/disables the decoding of EAN/JAN-13 barcodes. Default = activated. Addenda required allows you to specify whether the check digit should be transmitted at the end of the scanned data or not. If you checked this box, only EAN/JAN-13 barcodes with a check digit at the end will be decoded. The ones without addenda will be ignored. Default = inactivated. 2 Digit Addenda enables the decoding of EAN/JAN-13 barcodes with 2 digits at the end. Default = inactivated. 5 Digit Addenda enables the decoding of EAN/JAN-13 barcodes with 5 digits at the end. Default = inactivated. NeoMedia Europe AG Jens-Otto-Krag-Str. 11 52146 Würselen Germany T: +49 2405 499 22-0 F: +49 2405 499 22-99 [email protected] www.neom.com Configuring XELIA - EAN/JAN-8 - Page 25 EAN/JAN-8 Enabled enables/disables the decoding of EAN/JAN-8 barcodes. Default = activated. Addenda required allows you to specify whether the check digit should be transmitted at the end of the scanned data or not. If you checked this box, only EAN/JAN-8 barcodes with a check digit at the end will be decoded. The ones without addenda will be ignored. Default = inactivated. 2 Digit Addenda enables the decoding of EAN/JAN-8 barcodes with 2 digits at the end. Default = inactivated. 5 Digit Addenda enables the decoding of EAN/JAN-8 barcodes with 5 digits at the end. Default = inactivated. NeoMedia Europe AG Jens-Otto-Krag-Str. 11 52146 Würselen Germany T: +49 2405 499 22-0 F: +49 2405 499 22-99 [email protected] www.neom.com Page 26 - Configuring XELIA – UPC-A UPC-A Enabled enables/disables the decoding of UPC-A barcodes. Default = activated. Addenda required allows you to specify whether the check digit should be transmitted at the end of the scanned data or not. If you checked this box, only UPC-A barcodes with a check digit at the end will be decoded. The ones without addenda will be ignored. Default = inactivated. 2 Digit Addenda enables the decoding of UPC-A barcodes with 2 digits at the end. Default = inactivated. 5 Digit Addenda enables the decoding of UPC-A barcodes with 5 digits at the end. Default = inactivated. NeoMedia Europe AG Jens-Otto-Krag-Str. 11 52146 Würselen Germany T: +49 2405 499 22-0 F: +49 2405 499 22-99 [email protected] www.neom.com Configuring XELIA - UPC-E0 - Page 27 UPC-E0 Enabled enables/disables the decoding of UPC-E0 barcodes. Default = activated. Addenda required allows you to specify whether the check digit should be transmitted at the end of the scanned data or not. If you checked this box, only UPC-E0 barcodes with a check digit at the end will be decoded. The ones without addenda will be ignored. Default = inactivated. 2 Digit Addenda enables the decoding of UPC-E0 barcodes with 2 digits at the end. Default = inactivated. 5 Digit Addenda enables the decoding of UPC-E0 barcodes with 5 digits at the end. Default = inactivated. NeoMedia Europe AG Jens-Otto-Krag-Str. 11 52146 Würselen Germany T: +49 2405 499 22-0 F: +49 2405 499 22-99 [email protected] www.neom.com Page 28 - Configuring XELIA – Code 128 Code 128 Enabled enables/disables the decoding of Code 128 barcodes. Default = inactivated. Min. Message length defines the minimum length of a Code 128 barcode that will be accepted once scanned. The length varies from 0 to 80 characters. Check the box Enabled to define the minimum length. Minimum Default = 0. Max. Message length defines the maximum length of a Code 128 barcode that will be accepted once scanned. The length varies from 0 to 80 characters. Check the box Enabled to define the maximum length. Maximum Default = 80. NeoMedia Europe AG Jens-Otto-Krag-Str. 11 52146 Würselen Germany T: +49 2405 499 22-0 F: +49 2405 499 22-99 [email protected] www.neom.com Configuring XELIA - Interleaved 2 of 5 - Page 29 Interleaved 2 of 5 Enabled enables/disables the decoding of Interleaved 2 of 5 barcodes. Default = inactivated. Check Digit allows the XELIA to read and transmit barcode data with or without check digit. Check the box Enabled to set this function. − When Check Digit is set to No Check Digit, XELIA reads and transmits barcode data with or without check digit. − When Check Digit is set to Validate, but Don’t Transmit, XELIA only reads Interleaved 2 of 5 barcodes printed with a check digit, but will not transmit the check digit with the scanned data. − When Check Digit is set to Validate and Transmit, XELIA only reads Interleaved 2 of 5 barcodes printed with a check digit, and will transmit this digit at the end of the scanned data. Default = No Checked Digit. Min. Message length defines the minimum length of an Interleaved 2 of 5 barcode that will be accepted once scanned. The length varies from 2 to 80 characters. Check the box Enabled to define the minimum length. Minimum Default = 4. Max. Message length defines the maximum length of an Interleaved 2 of 5 barcode that will be accepted once scanned. The length varies from 2 to 80 characters. Check the box Enabled to define the maximum length. Maximum Default = 80. NeoMedia Europe AG Jens-Otto-Krag-Str. 11 52146 Würselen Germany T: +49 2405 499 22-0 F: +49 2405 499 22-99 [email protected] www.neom.com Page 30 - Configuring XELIA – 2D symbologies 2D symbologies QR enables/disables the decoding of QR codes. Default = inactivated. Data Matrix enables/disables the decoding of Data Matrix codes. Default = activated. Aztec enables/disables the decoding of Aztec codes. Default = inactivated. PDF417 enables/disables the decoding of PDF417 codes. Default = inactivated. NeoMedia Europe AG Jens-Otto-Krag-Str. 11 52146 Würselen Germany T: +49 2405 499 22-0 F: +49 2405 499 22-99 [email protected] www.neom.com Configuring XELIA - Additional Commands - Page 31 Additional Commands This window is for maintenance purposes only. NeoMedia technical support might be responding to your special requests by sending you a set of special commands to be entered here. These additional commands can configure the scanner behaviour in a wider scope than the standard commands in the graphical user interface above. NeoMedia Europe AG Jens-Otto-Krag-Str. 11 52146 Würselen Germany T: +49 2405 499 22-0 F: +49 2405 499 22-99 [email protected] www.neom.com Trigger Commands - Page 32 APPENDIX A Trigger Commands XELIA is usually running in Presentation Mode. This means that it continuously captures images and tries to decode existing bar and 2D codes. No triggering of the code reading is necessary. If an application however wants to disable code reading for a certain period of time, the code reading can be disabled and re-enabled using dedicated command syntax as described on the following page. Trigger Commands - Trigger commands - Page 33 Trigger commands Disable Code Reading This command is used to disable code reading until the reading is re-enabled via the Enable Code Reading command (as described below) or the scanner has been switched off and on again. Send the following command to the scanner via the hardware interface the scanner and the controlling device are connected with: Three ASCII characters: SYN M CR (ASCII 22,77,13), followed by the ASCII command TRGMOD0! (the closing exclamation mark is part of the command sequence and has to be present). Enable Code Reading This command is used to re-enable code reading until the reading is disabled via the Disable Code Reading command (as described above). Send the following command to the scanner via the hardware interface the scanner and the controlling device are connected with: Three ASCII characters: SYN M CR (ASCII 22,77,13), followed by the ASCII command TRGMOD3! (the closing exclamation mark is part of the command sequence and has to be present). Responses The scanner responds to these commands with the command (TRGMODx), one of three responses as follows and the exclamation mark to close the response: ACK Indicates a good command which has been processed. ENQ or NAK Indicates an invalid command (this means that there most probably was a typing error in the command syntax). Example: TRGMOD0ACK! NeoMedia Europe AG Jens-Otto-Krag-Str. 11 52146 Würselen Germany T: +49 2405 499 22-0 F: +49 2405 499 22-99 [email protected] www.neom.com Page 34 - Diverse APPENDIX B Diverse This chapter contains information on: Warranty conditions NeoMedia Europe AG Jens-Otto-Krag-Str. 11 52146 Würselen Germany T: +49 2405 499 22-0 F: +49 2405 499 22-99 [email protected] www.neom.com Diverse – Warranty conditions of NeoMedia Europe AGWarranty conditions of NeoMedia Europe AG - Page 35 Warranty conditions of NeoMedia Europe AG 1. Warranty coverage a) The warranty covers the equipment delivered and all its parts. Parts will, at NeoMedia Europe's sole discretion, be replaced or repaired free of charge if, despite proven proper handling and adherence to the operating instructions, these parts became defective due to fabrication and/or material defects. Alternatively, NeoMedia Europe reserves the right to replace the defective product with a comparable product with the same specifications and features. Operating manuals and possibly supplied software are excluded from the warranty. b) Material and service charges shall be covered by NeoMedia Europe, but not shipping and handling costs involved in transport from the buyer to the service station and/or to NeoMedia Europe. c) Replaced parts become property of NeoMedia Europe. d) NeoMedia Europe is authorized to carry out technical changes (e.g. firmware updates) beyond repair and replacement of defective parts in order to bring the equipment up to the current technical state. This does not result in any additional charge for the customer. A legal claim to this service does not exist. 2. Warranty period The warranty period for this NeoMedia Europe product is twelve months. The warranty period begins at the day of delivery. Warranty services carried out by NeoMedia Europe do not result in an extension of the warranty period nor do they initiate a new warranty period. The warranty period for installed replacement parts ends with the warranty period of the device as a whole. 3. Warranty procedure a) If defects appear during the warranty period, the warranty claims must be made immediately, at the latest within a period of 7 days. b) In the case of any externally visible damage arising from transport (e.g. damage to the housing), the person carrying out the transportation and the sender should be informed immediately. On discovery of damage which is NeoMedia Europe AG Jens-Otto-Krag-Str. 11 52146 Würselen Germany T: +49 2405 499 22-0 F: +49 2405 499 22-99 [email protected] www.neom.com Page 36 - Diverse – Warranty conditions of NeoMedia Europe AG not externally visible, the transport company and the sender are to be immediately informed in writing, at the latest within 3 days of delivery. c) Transport to and from the location where the warranty claim is accepted and/or the repaired device is exchanged, is at the purchaser's own risk and cost. d) Warranty claims are only valid if a copy of the original purchase receipt is returned with the device. 4. Suspension of the warranty All warranty claims will be deemed invalid a) if the label with the serial number has been removed from the device, b) if the device is damaged or destroyed as a result of acts of nature or by environmental influences (moisture, electric shock, dust, etc.), c) if the device was stored or operated under conditions not in compliance with the technical specifications, d) if the damage occurred due to incorrect handling, especially to nonobservance of the system description and the operating instructions, e) if the device was opened, repaired or modified by persons not contracted by NeoMedia Europe, f) if the device shows any kind of mechanical damage, g) if the warranty claim has not been reported in accordance with 3a) or 3b). 5. Operating mistakes If it becomes apparent that the reported malfunction of the device has been caused by unsuitable hardware, software, installation or operation, NeoMedia Europe reserves the right to charge the purchaser for the resulting testing costs. 6. Additional regulations a) The above conditions define the complete scope of NeoMedia Europe's legal liability. b) The warranty gives no entitlement to additional claims, such as any refund in full or in part. Compensation claims, regardless of the legal basis, are excluded. This does not apply if e.g. injury to persons or damage to private property are specifically covered by the product liability law, or in cases of intentional act or culpable negligence. NeoMedia Europe AG Jens-Otto-Krag-Str. 11 52146 Würselen Germany T: +49 2405 499 22-0 F: +49 2405 499 22-99 [email protected] www.neom.com Diverse – Warranty conditions of NeoMedia Europe AG - Page 37 c) Claims for compensation of lost profits, indirect or consequential detriments, are excluded. d) NeoMedia Europe is not liable for lost data or retrieval of lost data in cases of slight and ordinary negligence. e) In the case that the intentional or culpable negligence of NeoMedia Europe employees has caused a loss of data, NeoMedia Europe will be liable for those costs typical to the recovery of data where periodic security data backups have been made. f) The warranty is valid only for the first purchaser and is not transferable. g) The court of jurisdiction is located in Aachen, Germany in the case that the purchaser is a merchant. If the purchaser does not have a court of jurisdiction in the Federal Republic of Germany or if he moves his domicile out of Germany after conclusion of the contract, NeoMedia Europe's court of jurisdiction applies. This is also applicable if the purchaser's domicile is not known at the time of institution of proceedings. h) The law of the Federal Republic of Germany is applicable. The UN commercial law does not apply to dealings between NeoMedia Europe and the purchaser. NeoMedia Europe AG Jens-Otto-Krag-Str. 11 52146 Würselen Germany T: +49 2405 499 22-0 F: +49 2405 499 22-99 [email protected] www.neom.com Seite 38 - Technical Data APPENDIX C Technical Data This chapter contains information on: Data sheet ASCII conversion chart XELIA/XELIA-E Connector Pin-out NeoMedia Europe AG Jens-Otto-Krag-Str. 11 52146 Würselen Germany T: +49 2405 499 22-0 F: +49 2405 499 22-99 [email protected] www.neom.com Technical Data – Data sheet - Page 39 Data sheet Supported codes Code types 2d: 1d: Data Matrix ECC200, QR, Aztec, PDF417 UPC/EAN/JAN, 2/5 Interleaved, Code 128 (various other codes on request) Optical Data Imager Reading direction Field of view Depth of field Electrical Data Honeywell Adaptus® Imaging Technology Omni-directional On glass level, approx. 55x45 mm From glass to approximately 5 cm above glass Powered via USB or via optional wall power supply (100-240V AC, 0.6A max.) Interfaces Interface type USB − powered via the USB connection RS-232 − 4.800-115.200 Bit/s − 8 Bit, no parity − HW handshake Ethernet (only on XELIA-E): − − − − − Configuration via built-in Web Server 10/100Base-T/TX (auto-sensing) IP-Address via DHCP client or fixed Full TCP/IP stack, UDP support Virtual serial port device driver for Windows Connections 1 input 1 output Display Beeper for successful reading NeoMedia Europe AG Jens-Otto-Krag-Str. 11 52146 Würselen Germany T: +49 2405 499 22-0 F: +49 2405 499 22-99 [email protected] www.neom.com Page 40 - Technical Data –Data sheet XELIA/XELIA E Connector Pin-out Mechanical Data Housing Weight Dimensions Aluminum / thermoplastic 450 g − − − Height: 110-125 mm Width: 84 mm Depth: 93 mm Environmental Data Operating Storage 0°C - 40°C (32°F – 104°F) -40°C…70° C (-40°F – 158°F); non-condensing NeoMedia Europe AG Jens-Otto-Krag-Str. 11 52146 Würselen Germany T: +49 2405 499 22-0 F: +49 2405 499 22-99 [email protected] www.neom.com Technical Data – ASCII conversion chart - Page 41 ASCII conversion chart Remark: This table applies to U.S. style keyboards. Certain characters may differ depending on your Country Code/PC regional settings. NeoMedia Europe AG Jens-Otto-Krag-Str. 11 52146 Würselen Germany T: +49 2405 499 22-0 F: +49 2405 499 22-99 [email protected] www.neom.com Page 42 - Technical Data –ASCII conversion chart XELIA/XELIA E Connector Pin-out NeoMedia Europe AG Jens-Otto-Krag-Str. 11 52146 Würselen Germany T: +49 2405 499 22-0 F: +49 2405 499 22-99 [email protected] www.neom.com Technical Data – XELIA/XELIA-E Connector Pin-out - Page 43 XELIA/XELIA-E Connector Pin-out XELIA Connectors USB Power & I/O XELIA-E Connectors USB Power & I/O Ethernet NeoMedia Europe AG Jens-Otto-Krag-Str. 11 52146 Würselen Germany T: +49 2405 499 22-0 F: +49 2405 499 22-99 [email protected] www.neom.com Page 44 - Technical Data – XELIA/XELIA E Connector Pin-out XELIA / XELIA-E Connector Pin-out USB Standard USB-B connector to connect scanner to a USB host device via the supplied USB cable Power & I/O RJ45 socket with NeoMedia proprietary pin-out as follows: 1 2 Direction1 Pin Type Signal 1 RS232 RTS OUT 2 RS232 CTS IN 3 RS232 TX OUT 4 RS232 RX IN 5 RS232, I/O, Power GND 6 I/O GOODREAD 7 I/O TRIGGER 8 Power VCC Remark OUT 3.3V against GND IN 3.3V against GND 12V 500 mA max. Direction seen from scanner, XELIA is DTE in RS232 mode For GOODREAD and TRIGGER signals please refer to the command description of the „Good Read“ and „Trigger“ commands in the Setup Tool Ethernet (only available on XELIA-E) Standard RJ45 Ethernet Port for 10BASE-T and 100BASE-TX connection NeoMedia Europe AG Jens-Otto-Krag-Str. 11 52146 Würselen Germany T: +49 2405 499 22-0 F: +49 2405 499 22-99 [email protected] www.neom.com