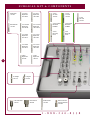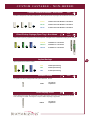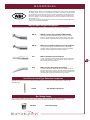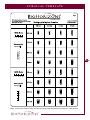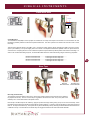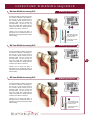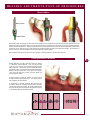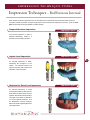
1
internal
Product Catalog and Technique Manual
Science
Simplicity
Value
O R D E R I N G & WA R R A N T Y I N F O R M A T I O N
Product Support Specialist:
fax:
cell phone:
BioHorizons USA
Customer Care/Servicio al Cliente: 888-246-8338/205-967-7880
BioHorizons Canada
Customer Care/Service à la Clientèle: 866-468-8338/905-944-1700
BioHorizons Ibérica
Atención al Cliente: +34 91 713 10 84
BioHorizons No Exceptions Warranty:
Our warranty policies are a tangible expression of our belief in the excellence and simplicity of our products, as well as our commitment to our
customers. We will repair or replace any of our products if they fail or cause problems within the warranty period for any reason, without exception.
Lifetime Warranty on Implants and Prosthetics:
BioHorizons implants and prosthetic attachments carry a Lifetime Warranty. We will provide a replacement for any BioHorizons implant or
prosthetic attachment if removal of that product is required for any reason, at any time.
Warranties on Instruments, Surgical Drills, Taps and Torque Wrenches:
BioHorizons warranties instruments, surgical drills and taps and torque wrenches for the period specified for each in (1) & (2) below. During the
1
specified warranty period we will replace or repair any product with a defect in material or workmanship.
(1) Instruments: The warranty on BioHorizons instruments extends for a period of one (1) year from the date of initial invoice. The instruments
covered by this warranty include drivers, sinus lift components, implant site dilators and other BioHorizons tools used in the placement or
restoration of our implants, with the exception of surgical drills and taps, which are specified below (2). Torque wrenches require recalibration
every 12 months. Our Customer Care Department can provide information on where to send your wrenches for recalibration and service.
(2) Surgical Drills and Taps: The warranty on surgical drills and taps extends for a period of 90 days from the date of initial invoice. Surgical
drills and taps should be replaced when they are worn, dull, corroded or in any way compromised. Smaller diameter drills, used more often than
larger diameter drills, should be replaced with greater frequency. BioHorizons recommends the replacement of drills after 12 to 20 osteotomies.
Return Policy:
All returns of product require a Return Authorization Form, which can be acquired by calling Customer Care at 888-246-8338. Please include
a copy of the Return Authorization Form with the product. Special regulations for tissue products - AlloDerm and AlloDerm GBR may not be
exchanged or returned for credit. Grafton must be exchanged or returned within ten (10) days of receipt.
Product may be returned for full credit up to 60 days after the date of shipment provided: (1) it is returned to BioHorizons freight prepaid and
(2) it is in its original un-opened package. Under no circumstances can BioHorizons accept product for return or exchange that has been used
clinically. Product returned 61-120 days after shipment from BioHorizons will be assessed a restocking charge of 15%. Please contact your
product support specialist for returns of product beyond 120 days from date of shipment.
BioHorizons strongly recommends completion of post-graduate dental implant education and strict adherence to the instructions for use (IFU)
that accompany our products. Treatment planning and use of the products are solely your responsibility. BioHorizons is not responsible for
incidental or consequential damages or liability relating to use of our products alone or in combination with other products, other than replacement
or repair under our warranties. BioHorizons continually strives to improve its products and therefore reserves the right to improve, modify, change
specifications or discontinue products at any time.
1 - 8 8 8 - 2 4 6 - 8 3 3 8
TA B L E O F C O N T E N T S
Ordering and warranty information
BioHorizons Internal system overview
inside front cover
3-4
Product Catalog
Implants
5-6
Healing Abutments and emergence profile
7-8
Surgical kit and components
9-10
Abutment selection flowchart
11-12
Abutment dimensions
13-14
Cement-retained restorations
15-16
Custom-castable restorations
17-18
Screw-retained abutment-level restorations
19-20
Ball Abutment restorations
21-22
Ancillary surgical and prosthetic instruments
23-24
W&H surgical motors and handpieces
25-26
Education and marketing materials
27
Surgical Manual
Icon legend
28-29
Surgical template
29-30
Surgical instruments
31-34
Osteotomy sequence
35-38
Implant packaging
39
Implant placement
39-40
Abutment removal/Cover Cap placement
41
Bone Profiler
42
Healing Abutment placement
42
Cleaning
43
Instructions for use
44
Post-operative Instructions
45
Impression Techniques
Impression technique overview
46-47
Closed Tray (Indirect) Transfer Impression, implant level
48-50
Open Tray (Direct) Pick-up Impression, implant level
51-53
References
54
2
S Y S T E M O V E RV I E W
...the implant system that blends the time-proven biomechanical
modified square-thread design with the advantages and security
of an internal-hex connection.
A safe, strong connection.
The 1.5mm deep internal hex connection is
enhanced by the use of Spiralock® screw
technology; the same design used by NASA and
in orthopedics to guard against screw-loosening
in high load environments.1
The connection forms an intimate mating of the
abutment and implant for a tight biologic seal at
this critical junction.
3
BioHorizons Internal implants and prosthetic
components are color-coded by the diameter of
the prosthetic platform to ensure confusion-free
restorations.
Abutments and Abutment Screws utilize the
standard .050” Hex Driver and are torqued to
30Ncm which eliminates the need for multiple
drivers and wrenches.
Utilizes industry
standard tooling: .050”
hex and 30Ncm torque.
Biologic seal and leadin bevel at the implant/
abutment interface.
Precision machining
and 1.5mm hex
connection ensure
correct abutment
seating every time.
Spiralock® threadlocking internal
geometry virtually
eliminates screw
loosening.
Free esthetic abutment with every implant.
Are you tired of paying a la carte for your abutments? With the patented 3inOne
Abutment, you don’t have to.
TM
Included free with each implant, it serves as a prepable titanium abutment, as well as a
surgical mount and impression coping (when used with a ball-top screw). It features an
esthetic margin profile and a gold-hued, titanium nitride coating for tissue esthetics. The
natural taper allows for easy restoration with minimal modification.
Use of the 3inOne abutment maximizes simplicity and value, while minimizing inventory
requirements and cost. Providing the restoring dentist with the final abutment is a strong
marketing tool for specialists looking to expand their practice.
1 - 8 8 8 - 2 4 6 - 8 3 3 8
S Y S T E M O V E RV I E W
Surface treatment & Surface area. Quality & Quantity.
Surface treatment and bone-to-implant contact are important in promoting rapid osseointegration. Why then do most companies
choose to put their surfaces on implants that, by design, limit the amount of surface area? BioHorizons’ thread design increases
surface area up to 150% over conventional v-thread designs, while also enhancing the bone response.2
A recent randomized, prospective animal study of various thread
designs showed that square-thread implants had more bone-to-implant
contact and higher reverse torque values than v-thread and reverse
buttress thread implants at 12 weeks post-surgery evaluation.10 The
study concluded that the square-thread design may be more effective
for endosseous implants than alternative designs.
In vivo human and animal histological research on implants with the
BioHorizons thread design indicates lamellar bone formation apposing
the implants to be similar to that found adjacent to natural teeth.2-5
Healthy bone leads to healthy soft tissue and better esthetic results.
The modified square-thread design is based on the principle that bone
is strongest under compressive loading and weakest under shear
loading. It has shown a 99.4% success rate in a 5-year, prospective,
multi-clinic trial.6
Square threads transmit 10 times more compressive load to the bone
than conventional v-threads, while minimizing destructive shear loads.
This attribute has become increasingly important with the emergence
of early and immediate load protocols.4-5
The titanium alloy used throughout the system is the strongest in the
industry. It is 4 times stronger than commercially pure titanium, and
1.6 times stronger than Grade 4 Titanium.1
Nomarsky microscopy
showing bone apposition
to the implant. Concentric
lamellae of the forming
osteons and interstitial
lamellae are apparent.3
Photomicrograph of the
implant bone interface of
an immediately loaded
maxillary posterior implant
removed one year after
function demonstrating
more than 80% bone
contact.4
Photograph courtesy of
Dr. Marco Degidi and Dr.
Adriano Piattelli
Two surface treatment options to address various conditions.
Unlike other systems that blast their implants with aluminum oxide, BioHorizons uses
RBT technology to create the optimal surface texture (75µ Ra average) without the
chance of leaving imbedded particles on the implant. The biocompatible calcium
phosphate used in the blast process is dissolved during the passivation phase of
manufacturing, leaving an ideal roughness profile on a pure titanium oxide surface.7
Resorbable Blast Texturing (RBT)
BioHorizons pioneered the use of RBT in 1997, and it has been proven to improve
bone cell contact as compared to a machined titanium surface.8
HA coating and improved thread-form create an unbeatable combination for rapid
integration, initial stability and long-term success. These factors are increasingly
important when working in soft bone and/or areas high load.
Multiple clinical studies document the improved success rates of HA-coated
implants in compromised bone.9
Hydroxylapatite (HA)
4
IMPLANT COLOR CODE LEGEND
BioHorizons Internal components have a
prosthetic platform-specific color code for
easy identification. Parts that are crosscompatible between platforms are not
color-coded.
Ø3.5mm Prosthetic Platform
Ø4.5mm Prosthetic Platform
Ø5.7mm Prosthetic Platform
Each implant is packaged with the 3inOne
Abutment, Cover Cap and Abutment Screw.
5
All Internal Implants have a 0.5mm
polished collar between the implant/
abutment interface and the top of the RBT
or HA surface treatment.
Ø3.5mm
Please note that Ø5.0mm and Ø6.0mm diameter implants
share the Ø5.7mm prosthetic platform; therefore blue colorcoded prosthetic components are cross-compatible between
these two implant diameters. However, the surgical
instruments specific to Ø5.0mm implants are color-coded
blue, whereas instruments for Ø6.0mm implants are colorcoded purple.
Ø4.5mm
Ø5.7mm
Ø5.7mm
Ø4.0mm
Ø5.0mm
Ø6.0mm
0.5mm
Ø3.5mm
1 - 8 8 8 - 2 4 6 - 8 3 3 8
IMPLANTS
BioHorizons Internal Implants
STERILE
R
Each implant is packaged with the 3inOne Abutment, Cover Cap and Abutment Screw. Choice of RBT or HA surface treatment.
Diameter and Length
RBT Surface
HA Surface
PYR3509
PYH3509
∅3.5mm x 9mm
PYR35105
PYH35105
∅3.5mm x 10.5mm
PYR3512
PYH3512
∅3.5mm x 12mm
PYR3515
PYH3515
∅3.5mm x 15mm
PGR4009
PGH4009
∅4.0mm x 9mm
PGR40105
PGH40105
∅4.0mm x 10.5mm
PGR4012
PGH4012
∅4.0mm x 12mm
PGR4015
PGH4015
∅4.0mm x 15mm
PBR5009
PBH5009
∅5.0mm x 9mm
PBR50105
PBH50105
∅5.0mm x 10.5mm
PBR5012
PBH5012
∅5.0mm x 12mm
PBR5015
PBH5015
∅5.0mm x 15mm
PBR6009
PBH6009
∅6.0mm x 9mm
PBR60105
PBH60105
∅6.0mm x 10.5mm
PBR6012
PBH6012
∅6.0mm x 12mm
PBR6015
PBH6015
∅6.0mm x 15mm
Surgical Cover Cap
6
STERILE
R
.050 Hex
Low Profile - for use during submerged surgical healing. Packaged FREE with each implant system. Utilizes a .050” Hex Driver.
PYCC
3.5mm Cover Cap
PGCC
4.5mm Cover Cap
PBCC
5.7mm Cover Cap
HEALING ABUTMENT LEGEND
Healing Abutments and Emergence Profile
Healing Abutments are used for tissue healing at second-stage uncovery, or as the transmucosal element for a
single-stage procedure. The Suture Groove allows the surgeon to apically position the soft tissue flap and retain it in
this position for improved esthetic results. Three factors should be considered when ordering Healing Abutments:
diameter, height and emergence profile.
The diameter of the Healing Abutment must be the same as the prosthetic platform width of the corresponding
implant, either Ø3.5mm, Ø4.5mm or Ø5.7mm.
The height of the Healing Abutment is typically chosen based upon the soft tissue thickness. Available heights are
1mm, 3mm and 5mm.
The emergence profiles offered are: narrow, regular and wide. They should be chosen based upon the
desired emergence of the final restoration. For example: if the final restoration calls for a Wide Emergence Profile
Abutment, the Healing Abutment and Impression Coping used should also be Wide Emergence. Following this
protocol will make the seating of prosthetic components much easier by contouring the soft tissue away from the
prosthetic platform. Custom Cast Abutments do not specify an emergence since the emergence will be determined
by the contour of the final restoration.
7
Narrow
Regular
Wide
N
R
W
4.5
4.5
4.5
1 - 8 8 8 - 2 4 6 - 8 3 3 8
HEALING ABUTMENTS
Healing Abutments
STERILE
R
.050 Hex
Available in three heights to accommodate various tissue thickness: 1mm, 3mm and 5mm. Emergence (Narrow, Regular
or Wide) should be chosen based upon the desired emergence of the final restoration. Utilizes a .050” Hex Driver.
PYNHA1
3.5mm Narrow Healing Abutment, 1mm Height
PYNHA3
3.5mm Narrow Healing Abutment, 3mm Height
PYNHA5
3.5mm Narrow Healing Abutment, 5mm Height
R
PYRHA3
3.5mm Regular Healing Abutment, 3mm Height
3.5
PYRHA5
3.5mm Regular Healing Abutment, 5mm Height
W
PYWHA3
3.5mm Wide Healing Abutment, 3mm Height
3.5
PYWHA5
3.5mm Wide Healing Abutment, 5mm Height
PGNHA1
4.5mm Narrow Healing Abutment, 1mm Height
PGNHA3
4.5mm Narrow Healing Abutment, 3mm Height
PGNHA5
4.5mm Narrow Healing Abutment, 5mm Height
R
PGRHA3
4.5mm Regular Healing Abutment, 3mm Height
4.5
PGRHA5
4.5mm Regular Healing Abutment, 5mm Height
W
PGWHA3
4.5mm Wide Healing Abutment, 3mm Height
4.5
PGWHA5
4.5mm Wide Healing Abutment, 5mm Height
PBNHA1
5.7mm Narrow Healing Abutment, 1mm Height
PBNHA3
5.7mm Narrow Healing Abutment, 3mm Height
PBNHA5
5.7mm Narrow Healing Abutment, 5mm Height
R
PBRHA3
5.7mm Regular Healing Abutment, 3mm Height
5.7
PBRHA5
5.7mm Regular Healing Abutment, 5mm Height
N
3.5
N
4.5
N
5.7
8
SURGICAL KIT & COMPONENTS
Starter Drill
122-103
Drill Extender
122-100
9
2.0 x 9mm
Depth Drill
122-12009
2.5 x 9mm
Depth Drill
122-12509
2.0 x 10.5mm
Depth Drill
122-120105
2.5 x 10.5mm
Depth Drill
122-125105
2.0 x 12mm
Depth Drill
122-12012
2.5 x 12mm
Depth Drill
122-12512
2.0 x 15mm
Depth Drill
122-12015
2.5 x 15mm
Depth Drill
122-12515
2.0mm
Depth Drill
122-220
2.5mm
Depth Drill
122-225
4x Straight
144-100
.050” Hex Driver
135-351
3.0mm
W.I. Drill
122-230
3.2mm
W.I. Drill
122-232
3.5mm Crestal
Bone Drill
PCBD35
4mm Crestal
Bone Drill
PCBD40
3.5mm
Bone Tap
PT35
4mm
Bone Tap
PT40
3.7mm
W.I. Drill
122-237
2x Angled
144-200
Hand Wrench
300-400
#6 Round Bur
122-106
Ratchet & Hand
Wrench Extender
300-205
1 - 8 8 8 - 2 4 6 - 8 3 3 8
SURGICAL KIT & COMPONENTS
4.2mm
W.I. Drill
122-242
4.7mm
W.I. Drill
122-247
5.2mm
W.I. Drill
122-252
5mm Crestal
Bone Drill
PCBD50
6mm
Crestal
Bone Drill
PCBD60
5mm
Bone Tap
PT50
6mm
Bone Tap
PT60
Ratchet
130-000
Implant
Spacer/
Depth Probe
144-300
10
Handpiece
Adapter
PHA
3.5/4.0mm
Insertion Tool
PYGIT
Ratchet & Hand
Wrench Adapter
PRA
5.0/6.0mm
Insertion Tool
PBIT
ABUTMENT SELECTION FLOWCHART
Single Tooth
Multiple Units
Screw-Retained
Screw-Retained
3.5
4.5
5.7
3.5
4.5
5.7
Custom Cast Abutments
Non-Hexed
page 18
Custom Cast Abutments
Hexed
page 17
11
Cement-Retained
N
N
N
R
R
R
W
W
R
R
R
3.5
4.5
5.7
3.5
4.5
5.7
3.5
4.5
3.5
4.5
5.7
Narrow Emergence
Abutments
3inOne Abutments
(Regular Emergence)
Wide Emergence
Profile Abutments
Angled Abutments
(Regular Emergence)
page 15
page 15
page 15
page 15
1 - 8 8 8 - 2 4 6 - 8 3 3 8
ABUTMENT SELECTION FLOWCHART
Overdentures
N
N
N
3.5
4.5
5.7
3.5
4.5
5.7
N
N
N
3.5
4.5
5.7
Abutment-Retained
Overdenture
Implant-Level, Bar-Retained
Overdenture
Abutment-Level, Bar-Retained
Overdenture
page 21
page 18
page 19
The Abutment Selection Flow Chart is provided to aid in the proper selection of the abutment(s) needed based on the
final prosthetic option desired. Simply determine if the case is for a single tooth, multiple unit or overdenture restoration. Next, select the desired abutment(s) based on cement-retained or screw-retained fixation. For an overdenture
prosthesis, select the desired abutment based on either a bar-retained or abutment-retained denture.
12
ABUTMENT DIMENSIONS
Ø3mm
Ø3.5mm
2.4°
Ø4.7mm
5°
5°
10mm
Ø4.5mm
Narrow
Abutments
PGNEA
PYNEA
Ø3.5mm
PBNEA
Ø4.5mm
Ø3.5mm
Ø5.7mm
Ø3.7mm
2°
Ø3.9mm
5°
8°
4mm
8mm
3inOne
Abutments
1.5mm
PYREA
PGREA
Ø4.2mm
Regular Emergence
PBREA
Ø5.3mm
Ø3.4mm
Abutment
Screw (PXAS)
Ø6.3mm
Ø3.8mm
5°
5°
P
10mm
13
Wide
Emergence
Abutments
2.3mm
above
implant
platform
for all
abutments
Ø2.3mm
PYWEA
PXAS
PGWEA
Ø5.5mm
Ø6.5mm
20°
20°
20°
10mm
Angled
Abutments
6mm
4.8mm
4.3mm
PYRAA
Ø4.2mm
PGRAA
Ø5.3mm
PYCAH
PYCAN (not shown)
PBRAA
Ø6.3mm
PBCAH
PBCAN (not shown)
PGCAH
PGCAN (not shown)
10mm
3.6mm (top of alloy coping)
Custom
Cast
Abutments
Ø4.2mm
Ø4.5mm
Ø5.7mm
0.75mm
*parts shown not to scale
1 - 8 8 8 - 2 4 6 - 8 3 3 8
ABUTMENT DIMENSIONS
Abutment-level
Screws
P
ABT
Ø2.5mm
ABT
17.5mm
P
PXABSL
1mm
1, 3 or 5mm
PXABCC
PGAFS1
PGAFS3
PGAFS5
12mm
P
ABT
Ø5.7mm
2.7mm
PYAFS1
PYAFS3
PYAFS5
11mm
10mm
Ø4.5mm
16mm
5mm
5.3mm
PXABS
Ø4.2mm
Abutment for Screw
PBAFS1
PBAFS3
P
ABT
Ø4.2mm
Ø4.2mm
Ø4.7mm
Ø4.7mm
PXABIC
PXABDC
PXABGC
PXABPC
Ball Abutments
Ø2.5mm
Ø5.0mm
Ø6.3mm
3.2mm
3.5mm
2.7mm
14
5mm
1, 3 or 5mm
PYBA1
PYBA3
PYBA5
PGBA1
PGBA3
PGBA5
Ø3.5mm
Ø4.5mm
PBBA1
PBBA3
260-100
Ø5.7mm
Direct Pick-up Copings
Indirect Transfer Copings
Ø3.8mm
3mm
BCAS
P
17.5mm
P
P
8.5mm
9mm
11mm
8mm
3mm
5mm
*Diameters of Impression Copings are .25mm greater than the associated abutment. The Ø4.5mm platform is shown here as an example. Height
measurements are equal for all prosthetic platforms. The 3inOne abutment may be used with the Ball-top Screw as an indirect transfer coping with
regular emergence.
*parts shown not to scale
C E M E N T- R E T A I N E D R E S T O R A T I O N S
Abutments for Cement-Retained Restorations - Hexed
STERILE
R
30 Ncm
.050 Hex
Indicated for single and multiple unit cement-retained restorations. All two-piece abutments are packaged with the
Abutment Screw (PXAS).
N
N
N
3.5
4.5
5.7
R
R
R
3.5
4.5
5.7
W
W
3.5
4.5
R
R
R
3.5
4.5
5.7
15
PYNEA
3.5mm Narrow Emergence Abutment
PGNEA
4.5mm Narrow Emergence Abutment
PBNEA
5.7mm Narrow Emergence Abutment
PYREA
3.5mm 3inOne Abutment (Regular Emergence)
PGREA
4.5mm 3inOne Abutment (Regular Emergence)
PBREA
5.7mm 3inOne Abutment (Regular Emergence)
PYWEA
3.5mm Wide Emergence Profile Abutment
PGWEA
4.5mm Wide Emergence Profile Abutment
PYRAA
3.5mm Angled Abutment (Regular Emergence)
PGRAA
4.5mm Angled Abutment (Regular Emergence)
PBRAA
5.7mm Angled Abutment (Regular Emergence)
Ball-top Screw
STERILE
R
Hand
Tighten
.050 Hex
Used with the 3inOne Abutment for closed-tray, hexed-timed transfers. Hand-tighten.
P
P
P
PXBT
One size fits
all platforms
May also be used
to extend length of
Indirect Transfer
Copings by 3mm
Implant Analogs
3.5
4.5
5.7
PYIA
3.5mm Implant Analog
PGIA
4.5mm Implant Analog
PBIA
5.7mm Implant Analog
1 - 8 8 8 - 2 4 6 - 8 3 3 8
C E M E N T- R E T A I N E D R E S T O R A T I O N S
Direct Pick-up Copings (Open Tray) - Hexed
Hand
Tighten
STERILE R
.050 Hex
Used to take an open-tray, implant-level, hexed-timed impression. Packaged with the extended Direct Coping Screw (PXDCS).
R
W
3.5
3.5
3.5
N
R
W
4.5
4.5
4.5
N
R
5.7
5.7
3.5mm Narrow - Hexed
PYRDC
3.5mm Regular - Hexed
PYWDC
3.5mm Wide - Hexed
PGNDC
4.5mm Narrow - Hexed
PGRDC
4.5mm Regular - Hexed
PGWDC
4.5mm Wide - Hexed
PBNDC
5.7mm Narrow - Hexed
PBRDC
5.7mm Regular - Hexed
Indirect Transfer Copings (Closed Tray) - Hexed
P
P
IMP
N
PYNDC
Direct Pick-up Copings are
packaged with the Direct Coping
Screw (PXDCS)
STERILE
R
Hand
Tighten
.050 Hex
Used to take a closed-tray, implant-level, hexed-timed impression. Packaged with the Abutment Screw (PXAS).
N
R
W
3.5
3.5
3.5
N
R
W
4.5
4.5
4.5
N
R
5.7
5.7
PYNIC
3.5mm Narrow
PYRIC
3.5mm Regular
PYWIC
3.5mm Wide
PGNIC
4.5mm Narrow
PGRIC
4.5mm Regular
PGWIC
4.5mm Wide
PBNIC
5.7mm Narrow
PBRIC
5.7mm Regular
Abutment Screw
P
16
Indirect Transfer Copings are
packaged with the Abutment
Screw (PXAS)
STERILE
R
30 Ncm
.050 Hex
Low profile screw head. Packaged with all two-piece abutments. 30 Ncm.
P
PXAS
One size fits
all platforms
Direct Coping Screw
STERILE
R
.050 Hex
Used to extend through tray with a Direct Pick-up Coping. May also be used in place of the Abutment Screw (PXAS)
when extra length is needed. Hand-tighten or torque to 30Ncm depending on application.
P
PXDCS
One size fits
all platforms
C U S T O M C A S TA B L E - H E X E D
Custom Castable Abutments - Hexed
30 Ncm
.050 Hex
Indicated for single and multiple unit screw-retained or custom abutment cement-retained restorations. All two-piece
abutments are packaged with the Abutment Screw (PXAS).
3.5
4.5
5.7
PYCAH
3.5mm Custom Cast Abutment - Hexed
PGCAH
4.5mm Custom Cast Abutment - Hexed
PBCAH
5.7mm Custom Cast Abutment - Hexed
Direct Pick-up Copings (Open Tray) - Hexed
STERILE
R
Hand
Tighten
.050 Hex
Used to take an open-tray, implant-level, hexed-timed impression. Packaged with the extended Direct Coping Screw
(PXDCS).
PYNDC
3.5mm Narrow - Hexed
R
W
3.5
3.5
3.5
N
R
W
4.5
4.5
4.5
N
R
5.7
5.7
PYRDC
3.5mm Regular - Hexed
PYWDC
3.5mm Wide - Hexed
PGNDC
4.5mm Narrow - Hexed
PGRDC
4.5mm Regular - Hexed
PGWDC
4.5mm Wide - Hexed
PBNDC
5.7mm Narrow - Hexed
PBRDC
5.7mm Regular - Hexed
P
P
IMP
N
Direct Pick-up Copings are
packaged with the Direct
Coping Screw (PXDCS)
17
Indirect Transfer Copings (Closed Tray) - Hexed
STERILE
R
Hand
Tighten
.050 Hex
Used to take a closed-tray, implant-level, hexed-timed impression. Packaged with the Abutment Screw (PXAS).
N
R
W
3.5
3.5
3.5
N
R
W
4.5
4.5
4.5
N
R
5.7
5.7
PYNIC
3.5mm Narrow
PYRIC
3.5mm Regular
PYWIC
3.5mm Wide
PGNIC
4.5mm Narrow
PGRIC
4.5mm Regular
PGWIC
4.5mm Wide
PBNIC
5.7mm Narrow
PBRIC
5.7mm Regular
Ball-top Screw
P
Indirect Transfer Copings
are packaged with the
Abutment Screw (PXAS)
STERILE
R
Hand
Tighten
.050 Hex
Used with the 3inOne Abutment for closed-tray, hexed-timed transfers. Hand-tighten.
P
P
P
PXBT
One size fits
all platforms
May also be used
to extend length of
Indirect Transfer
Copings by 3mm
1 - 8 8 8 - 2 4 6 - 8 3 3 8
C U S T O M C A S TA B L E - N O N - H E X E D
Custom Castable Abutments - Non-Hexed
30 Ncm
.050 Hex
Indicated for multiple unit, screw-retained restorations. All two-piece abutments are packaged with the Abutment Screw (PXAS).
3.5
4.5
5.7
PYCAN
3.5mm Custom Cast Abutment - Non-Hexed
PGCAN
4.5mm Custom Cast Abutment - Non-Hexed
PBCAN
5.7mm Custom Cast Abutment - Non-Hexed
Direct Pick-up Copings (Open Tray) - Non-Hexed
STERILE
R
Hand
Tighten
.050 Hex
3.5
4.5
5.7
PYNDCN
3.5mm Narrow - Non-Hexed
PGNDCN
4.5mm Narrow - Non-Hexed
PBNDCN
5.7mm Narrow - Non-Hexed
IMP
Used to take an open-tray, implant-level, non-hexed impression. Packaged with the extended Direct Coping Screw (PXDCS).
Implant Analogs
18
Implant replicas for use in stone models.
4.5
3.5
5.7
PYIA
3.5mm Implant Analog
PGIA
4.5mm Implant Analog
PBIA
5.7mm Implant Analog
Abutment Screw
STERILE
R
30 Ncm
.050 Hex
Low profile screw head. Packaged with all two-piece abutments. 30 Ncm.
P
PXAS
One size fits
all platforms
Direct Coping Screw
STERILE
R
.050 Hex
Used to extend through tray with a Direct Pick-up Coping. May also be used in place of the Abutment Screw (PXAS)
when extra length is needed. Hand-tighten or torque to 30Ncm depending on application.
P
PXDCS
One size fits
all platforms
S C R E W- R E TA I N E D A B U T M E N T L E V E L
Abutment for Screw
STERILE
R
30 Ncm
Hex Adapter
Indicated for multiple unit restorations including: screw-retained restorations at the abutment level, cast alloy bars for
overdentures and fixed/detachable (hybrid) restorations. Comes packaged with the Cover Cap (PXABCC).
N
3.5
N
4.5
N
5.7
PYAFS1
3.5mm Abutment for Screw, 1mm Collar
PYAFS3
3.5mm Abutment for Screw, 3mm Collar
PYAFS5
3.5mm Abutment for Screw, 5mm Collar
PGAFS1
4.5mm Abutment for Screw, 1mm Collar
PGAFS3
4.5mm Abutment for Screw, 3mm Collar
PGAFS5
4.5mm Abutment for Screw, 5mm Collar
PBAFS1
5.7mm Abutment for Screw, 1mm Collar
PBAFS3
5.7mm Abutment for Screw, 3mm Collar
Hex Adapter, Abutment for Screw
Hex Adapter
Required for placement of Abutment for Screw. May be driven by either Hand Wrench, Torque Wrench or AS123 Hand Unit.
19
P
3.5
4.5
5.7
PXHA
Gold Coping, Abutment for Screw
30 Ncm
.050 Hex
Machined gold alloy base with Delrin waxing sleeve. May be trimmed for height. Packaged with the Screw (regular),
Abutment for Screw (PXABS).
ABT
3.5
4.5
5.7
PXABGC
Plastic Coping, Abutment for Screw
30 Ncm
.050 Hex
Delrin waxing sleeve. May be trimmed for height. Packaged with the Screw (regular), Abutment for Screw (PXABS).
ABT
3.5
4.5
5.7
PXABPC
Cover Cap, Abutment for Screw
Hand Tighten
.050 Hex
Packaged with all Abutments for Screw. Uses .050” hex. Hand-tighten.
3.5
4.5
5.7
PXABCC
1 - 8 8 8 - 2 4 6 - 8 3 3 8
S C R E W- R E TA I N E D A B U T M E N T L E V E L
Impression Copings, Abutment for Screw
Hand Tighten
Used to make a direct pick-up impression (open-tray) at the abutment level. Packaged with
the Screw (long), Abutment for Screw (PXABSL). Used only with the Abutment for Screw.
ABT
P
P
ABT
3.5
4.5
5.7
P
P
ABT
PXABDC
Impression Copings, Abutment for Screw
.050 Hex
Hand Tighten
Used to make an indirect transfer (closed-tray) impression at the abutment level.
Used only with the Abutment for Screw.
P
ABT
P
ABT
3.5
4.5
5.7
PXABIC
Analog, Abutment for Screw
20
Used to represent the Abutment for Screw/Implant assembly in the lab model.
Not for use with implant level impressions.
P
ABT
P
ABT
3.5
4.5
5.7
PXABA
Screw, (regular) Abutment for Screw
30 Ncm
.050 Hex
Used to retain bars and abutments fabricated with the Abutment for Screw Copings.
Used only with the Abutment for Screw.
ABT
3.5
4.5
5.7
PXABS
Screw, (long) Abutment for Screw
5 pack
Hand Tighten
Used in the lab when a longer screw is desired. Used only with the Abutment for Screw.
ABT
P
3.5
4.5
5.7
PXABSL
5 pack
.050 Hex
B A L L A B U T M E N T R E S T O R AT I O N S
Ball Abutments
STERILE
R
30 Ncm
.050 Hex
Ball Abutments are indicated for retention of tissue-supported overdentures. They are recommended for relatively
parallel implants. See facing page for attachment options. Ball Abutments may be used as indirect transfer copings for
production of a lab model.
N
3.5
N
4.5
PYBA1
3.5mm Ball Abutment, 1mm Collar
PYBA3
3.5mm Ball Abutment, 3mm Collar
PYBA5
3.5mm Ball Abutment, 5mm Collar
PGBA1
4.5mm Ball Abutment, 1mm Collar
PGBA3
4.5mm Ball Abutment, 3mm Collar
PGBA5
4.5mm Ball Abutment, 5mm Collar
PBBA1
5.7mm Ball Abutment, 1mm Collar
PBBA3
5.7mm Ball Abutment, 3mm Collar
21
N
5.7
Ball Abutment Analogs
Used to represent the Ball Abutment/Implant assembly in the lab model. Only used in conjunction with Ball Abutments.
3.5
4.5
PYGBAA
3.5/4.5mm Ball Abutment Analog
PBBAA
5.7mm Ball Abutment Analog
5.7
1 - 8 8 8 - 2 4 6 - 8 3 3 8
B A L L A B U T M E N T R E S T O R AT I O N S
Ball Attachment System
The Ball Attachment system offers several advantages over traditional O-ring attachments. It requires less mesial/distal/
buccal/lingual space and offers four (4) different levels of retention. The retention inserts can be easily changed chairside.
Ball Attachment Set
BCAS
BCAHT
Includes: (1) Titanium Housing, (3) Female Nylon Inserts - white (more retention),
pink (less retention), black (lab processing) and (1) Protective Disk (tissue
protector for impression taking and chair-side denture pick-up)
Attachment Housings – Titanium
BCCBP
Castable Ball Pattern
BCIST
Insert Seating Tool
BCR
Reamer
Burn-out component used by the
lab for fabrication of a custom
bar with ball attachments. 2 balls
per pattern.
For Resin pickup or Soldering. 2 per package.
BCIB
Black Nylon Insert
Lab Processing and Chair-side Denture
Pick-up. 2 per package.
BCIG
Used to seat nylon inserts
in attachment housings.
Green Nylon Insert
Clinical - Elastic. 2 per package.
BCIY
Yellow Nylon Insert
Clinical - Extra Soft. 2 per package.
BCIP
Used to adjust retention of
nylon inserts.
22
Pink Nylon Insert
Clinical - Soft. 2 per package.
BCIW
BCPT
Paralleling Tool
BCS
Set of 3 tools
A laboratory tool used on
a surveyor to position and
wax castable balls on a bar.
White Nylon Insert
Clinical - Standard. 2 per package.
BCDR
Directional Rings
Used for obtaining parallelism.
0°, 7° and 14° rings. Set of 3.
Insert Seating Tool, Reamer
and Paralleling Tool.
O-Ring Attachment System
Standard O-ring attachment.
260-100
O-Ring Attachment Set
O-Ring encapsulator
2 Processing O-rings
2 Clinical O-rings
260-210
Clinical O-Ring
260-220
Processing O-Ring
Used for clinical applications.
Silicone. 12 per package.
Used for lab processing.
applications. Buna. 12 per package.
260-300
O-Ring Encapsulator
Female receptacle processed into
denture. Titanium. 2 per package.
A N C I L L A RY S U R G I C A L I N S T R U M E N T S
Extended Shank Drills
Extended Shank Drills are 3mm longer than our standard drills. They have the same depth marks and cutting geometry as our standard
drills. They allow you to work next to long clinical crowns without having to use the drill extension. They are an optional purchase and are
not included in the BioHorizons Internal Surgical Kit (PSKC).
122-420
Ø2.0mm Depth Drill - Extended Shank
122-425
Ø2.5mm Depth Drill - Extended Shank
122-430
Ø3.0mm Width Increasing Drill - Extended Shank
122-432
Ø3.2mm Width Increasing Drill - Extended Shank
122-437
Ø3.7mm Width Increasing Drill - Extended Shank
122-442
Ø4.2mm Width Increasing Drill - Extended Shank
122-447
Ø4.7mm Width Increasing Drill - Extended Shank
122-452
Ø5.2mm Width Increasing Drill - Extended Shank
2.0mm Lindemann Bone Cutter
Side cutting drill used to correct eccentric osteotomy preparations.
122-110
Ø2.0mm Lindemann Bone Cutter
Tissue Punches
PG
23
BioHorizons Tissue Punches are designed to be used in a latch-type handpiece and are used to remove the soft tissue from the crest of
the ridge prior to osteotomy preparation in a flapless surgical procedure. Available in 3 platform diameters.
PYTP
Ø3.5mm Tissue Punch
PGTP
Ø4.5mm Tissue Punch
PBTP
Ø5.7mm Tissue Punch
Bone Profiling Burs
Used at implant uncovery to contour crestal bone to accommodate abutments when the implant is subcrestal. For use in latch-type
reduction handpieces. The Profiler’s internal geometry matches the geometry of the included Profiler Guide. The Guide is screwed into
the implant and then aligns the Profiler for precise removal of tissue surrounding the platform. Comes in 3 sizes corresponding to the 3
Internal prosthetic platforms.
P
PYBP
Ø3.5mm Bone Profiling Bur and Guide
PGBP
Ø4.5mm Bone Profiling Bur and Guide
PBBP
Ø5.7mm Bone Profiling Bur and Guide
Clean-out Tap Tool
Used to re-thread implants where the internal threads have become damaged. Requires a standard surgical Ratchet (130-000) or Hand
Wrench (300-400) as a drive mechanism.
P
PXCT
BioHorizons Internal Implant Clean-out Tap Tool
1 - 8 8 8 - 2 4 6 - 8 3 3 8
PROSTHETIC INSTRUMENTS
Implant Analog Handles
Used to hold abutments for chairside or laboratory preparation, these handles mimic the implant/analog hex geometry. Abutments are
secured to the handle with the standard Abutment Screw (PXAS). Comes in two platform sizes: Ø3.5/4.5mm and Ø5.7mm.
PYGAH
Ø3.5/4.5mm Platform Analog Handle
PBAH
Ø5.7mm Platform Analog Handle
Abutment Clamp
Used to apply counter-torque during torque delivery, shielding the bone/implant interface from potentially damaging stresses.
HF-IMPAH
Abutment Clamp
Prosthetic Instrumentation System
320-000
.050"
HEX
RATCHET
EXTENDER
.050"
HEX
LONG
SPARE
Includes AS123 Hand Unit, Hand Wrench, 30 Ncm
Torque Wrench, .050” Hex Driver, .050” Hex Driver,
Long, Hex Adapters for Abutment for Screw, Square
Drive Extension and Sterilization Tray
HEX ADAPTERS
HAND
WRENCH
3.5MM /4MM
5MM
300-070
TORQUE
WRENCH
SPARE
Complete Prosthetic Instrumentation
System
24
Prosthetic Sterilization Tray
Autoclavable tray for prosthetic instrumentation
(included with the 320-000).
PXHA
300-100
AS123 Hand Unit
Provides improved vision and easy access to prosthetic
components in posterior regions of the mouth. Hand
Wrench and Drivers must be purchased separately.
May also be purchased as part of the 320-000 Complete
Prosthetic Instrumentation System (see above).
300-430
300-350 regular
300-351 long
P
PXHA
300-400
30 Ncm Torque Wrench
Used to deliver final torque to all prosthetic components.
.050” Hex Driver Regular and Long
Used to drive all surgical and prosthetic components
with the exception of the Abutment for Screw.
.050” Hex
Hex Adapter, Abutment for Screw
Required for placement of Abutment for Screw. May be driven
by either Hand Wrench, Torque Wrench or AS123 Hand Unit.
Hex Adapter
Hand Wrench
Used on drive end of AS123 Hand Unit .
Also fits individual Hex Drivers/Adapters and Bone Taps.
*products shown not to scale.
MOTORS
W&H ImplantMed 110 Starter Kit
The ImplantMed 110 is designed for use in dental implantology and provides the surgeon with a high quality power unit that is easy and
safe to operate. Maximum motor speed is 40,000 rpm. The motor comes with the WS-75 20:1 handpiece, testing gauge, spray cap,
irrigation spike and service oil.
WH-110
W&H ImplantMed 110 Starter Kit
Re-order items:
WH-ST (10 PK)
WH-110CLP (5 PK)
WH-110PTWC
WH-110RPT (3 PK)
WH-110ISAWRC
WH-110RC
WH-110MC
Green Single-Use Spray Tubes (10 pack)
Set of Spray Tube Clamps (5 pack)
Pump Tube (85mm) with Connectors
Replacement Pump Tubes (85mm) (3 pack)
Irrigation Spike Assembly with Roller Clamp
Flow Regulating Roller Clamp
Motor Cable - 1.8 meter
W&H ElcoMed SA-200 Professional Kit
The ElcoMed SA-200 combines power, performance and intelligence to support the surgeon in maxillofacial surgery, implantology,
microsurgery and small bone surgery. Maximum motor speed is 50,000 rpm. The SA-200 also permits the storage of torque characteristics
of a treatment stage, which can then be saved on a DOC card for archiving purposes. The kit also includes the WS-75 20:1 handpiece,
testing gauge, spray cap, irrigation spike and service oil.
WH200
25
W&H ElcoMed SA-200 Professional Kit
Re-order items:
WH-ST (10 PK)
WH-CLP (10 PK)
WH-200PTWC
WH-200RPT (3 PK)
WH-200INI
WH-200DOC
WH-200MC
Green Single-Use Spray Tubes (10 pack)
Set of Spray Tube Clamps (10 pack)
Pump Tube (190mm) with Connectors
Replacement Pump Tubes (190mm) (3 pack)
INI Cards (3 pack)
DOC Cards (3 pack)
Motor Cable -1.8 meter
ElcoMed 100 - Legacy Re-order Items
WH-ST (10 PK)
WH-CLP (10 PK)
WH-100PTWC
WH-100RPT (5 PK)
WH-100MC
Green Single-Use Spray Tubes (10 pack)
Set of Spray Tube Clamps (10 pack)
Pump Tube with Connectors (65mm)
Replacement Pump Tubes (65mm) (5 pack)
Motor Cable -1.8 meter
Universal W&H Re-order Items
WH-ST (10 PK)
WH-ISA
WH-ITWOS
WH-MD400
WH-OSC
WH-SP
Green Single-Use Spray Tubes (10 pack)
Irrigation Spike Assembly (autoclavable)
Irrigation Tubing w/o Spike (autoclavable)
MD-400 Service Oil-F1
Oil Spray Cap
Sterilization Plug for Motor Cable
1 - 8 8 8 - 2 4 6 - 8 3 3 8
HANDPIECES
IMPORTANT NOTE: W&H motors and handpieces are distinguished by their precision craftsmanship
and reliability and are covered by a 1-year manufacturer’s warranty. Instructions for required cleaning
and maintenance are outlined in each product’s user manual, and adherence to these procedures is
essential for proper function and longevity of the products. BioHorizons assumes no liability for the
failure of, or damage to, motors and handpieces that are not properly maintained or used contrary to
the instructions for use.
Please contact your product support specialist or Customer Care at 888-246-8338 (866-468-8338 in
Canada) if you need additional information.
W&H ElcoMed Surgical Handpieces
W&H has designed a series of straight and contra-angle handpieces for maxillofacial surgery, implantology and microsurgery.
WS-75
W&H 20:1 Contra-Angle Handpiece WS-75 E/KM
WS-92
W&H 1:2.7 Contra-Angle Speed Increasing Handpiece
S-11
W&H 1:1 Straight Surgical Handpiece
Contra-Angle Handpiece with speed reduction ratio of 20:1 (2,500 rpm
maximum). Equipped with both internal cooling & external cooling. Pushbutton bar release. Trapezoidal profile. Safe grip, particularly with gloves.
1:2.7 speed-increasing ratio - 135,000 rpm maximum. Contra-Angle
Handpiece suitable for high speed preparation and tissue augmentation
procedures. External irrigation port. Uses friction grip burs.
1:1 ratio - 50,000 rpm maximum. Suitable for bone harvesting, third molar
extractions and osteoplasty. Easily dismantled for cleaning. Uses 45mm
friction grip surgical burs (∅2.35mm).
S-12
W&H 1:2 Contra-Angle Surgical Handpiece
1:2 speed increasing ratio - 80,000 rpm maximum. Suitable for surgical
procedures such as bone smoothing, third molar extractions and osteotomy
site drilling. High precision bearings ensure that the unit runs vibration free.
Uses friction grip surgical burs at least 65mm long (∅2.35mm).
Hex Driver for Latch-Type Reduction Handpieces
Used with right angle latch connection handpieces for installation and removal of Cover Caps, Healing Abutments, Abutments and
Abutment Screws.
134-350
.050" Handpiece Hex Driver
Bur Testing Gauge
Used to verify the condition of latch-type burs. Burs in proper condition will fit into larger diameter hole, but will not fit into the smaller hole
(marked red). Burs that fail either of these criteria are unfit for use, and may cause damage to the handpiece if used.
WH-BTG
Bur Testing Gauge
26
E D U C AT I O N & M A R K E T I N G
BioHorizons Internal Prosthetic Manual
ML0118
This guide walks the clinician and staff through impression making techniques
and prosthetic/lab procedures with the BioHorizons Internal System. Step-by-step
written instructions are coupled with detailed graphics to illustrate procedures and
help identify the accompanying prosthetic and lab components.
Regeneration Specialty Catalog
ML0203
27
P4XIM
This catalog contains information on AlloDerm®, Grafton DBM®, MinerOss CCC,
the Bone Fixation Screw Kit and AutoTac® Titanium Tack System. Also shown
are a wide range of bone and soft tissue grafting instruments including: Implant
Site Dilators, SA-2 Osteotomes and other sinus grating instruments.
BioHorizons Internal 4x Scale Model
This 4-times scale model includes the implant, Abutment Screw, Healing
Abutment, Cover Cap, implant driver and Hex Driver. Excellent for demonstrating
implant components to the patient.
L0114
i nt e rn a l
Radiographic Implant Template (overlay)
L0114
ML0103
Designed to aid the clinician in the pre-operative determination of options for
implant length and diameter. The clear overlay template shows all sizes of
BioHorizons Internal system implants in 100% and 125% scale. Please refer to
page 29-30 for detailed instructions for use.
Patient Education – Dental Implants… The Path
Back to Your Smile.
This four-fold brochure helps the implant candidate understand the rationale and
the advantages of implant therapy compared to traditional treatment methods.
The message focuses on the positives of implants rather than attacking other
treatment options.
1 - 8 8 8 - 2 4 6 - 8 3 3 8
SURGICAL MANUAL
Surgical Manual - BioHorizons Internal
This Surgical Manual serves as a reference for use of the BioHorizons Internal system implants and surgical
instrumentation. It is intended solely to provide instructions on the use of BioHorizons products. It is not
intended to describe the methods or procedures for diagnosis, treatment planning, or placement of implants, and
it does not replace clinical training or a clinician’s best judgment about the needs of each patient. BioHorizons
recommends appropriate training as a prerequisite for the placement of implants and associated treatment.
Surgical Tray Legend
1
Starter
Drill
2 Depth Drills
2.0mm
x 9mm
Drill
Extender
2.5mm
x 9mm
2.0mm
2.5mm
x 10.5mm x 10.5mm
2.0mm
x 12mm
2.5mm
x 12mm
2.0mm
x 15mm
2.5mm
x 15mm
2.0mm
2.5mm
3.0mm
3.2mm
Crestal
Bone Drill
Crestal
Bone Drill
3.5mm
Tap
3.5mm
28
i nt er n a l
3 Width Increasing Drills
3.7mm
4.2mm
4.7mm
5.2mm
Crestal
Bone Drill
Crestal
Bone Drill
4mm
Tap
5mm
Tap
6mm
Tap
4mm
5mm
6mm
4
Implant Placement
Paralleling Pins
Ratchet
Spare
Spare
Depth Probe
Spare
Handpiece Adapter
3.5/4.0mm
Insertion Tool
Spare
.050" Hex
Driver
Hand
Wrench
#6 Round
Bur
Spare
Ratchet &
Hand Wrench
Extender
Spare
Spare
Ratchet &
Hand Wrench
Adapter
5.0/6.0mm
Insertion Tool
This surgical manual contains easy to follow icons to demonstrate the location of the surgical component being
discussed. The location of the instrument is highlighted on the surgical tray icon so the location of that instrument can
be found quickly and easily.
ICON LEGEND
Color Code Legend
1
Starter
Drill
Ø3.5mm diameter
2.0mm
x 9mm
Drill
Extender
Ø4mm diameter
2 Depth Drills
2.5mm
x 9mm
2.5mm
2.0mm
x 10.5mm x 10.5mm
2.0mm
x 12mm
2.5mm
x 12mm
2.0mm
x 15mm
2.5mm
x 15mm
2.0mm
i nternal
3 Width Increasing Drills
3.0mm
3.2mm
Crestal
Bone Drill
Crestal
Bone Drill
3.5mm
Tap
3.5mm
3.7mm
4.2mm
4.7mm
5.2mm
Crestal
Bone Drill
Crestal
Bone Drill
4mm
Tap
5mm
Tap
6mm
Tap
4mm
5mm
6mm
4
2.5mm
Implant Placement
Paralleling Pins
Ratchet
Spare
Spare
Depth Probe
Spare
Handpiece Adapter
3.5/4.0mm
Insertion Tool
Ø5mm diameter
Spare
.050" Hex
Driver
Hand
Wrench
#6 Round
Bur
Spare
Ratchet &
Hand Wrench
Extender
Spare
Spare
Ratchet &
Hand Wrench
Adapter
5.0/6.0mm
Insertion Tool
Ø6mm diameter
In addition to the tray icons, this manual contains color coded dots that indicate which implant diameter uses the
instrument being described. For example, the Starter Drill is used when placing all diameter implants; therefore, yellow
(Ø3.5mm), green (Ø4mm), blue (Ø5mm) and purple (Ø6mm) dots are used in conjunction with the tray icon. The 5.2mm
Width Increasing Drill is used only with 6.0mm implants; therefore, only a purple dot is shown.
29
Radiographic Template
Designed to aid the clinician in the pre-operative determination of options for implant length and diameter. The clear
overlay template shows all sizes of BioHorizons Internal system implants in 100% and 125% scale. This template has
several unique and important features:
• All implants are shown at 100% scale and 125% scale (for panoramic radiography). Be aware that
panoramic radiography varies in magnification from 15% to 35%.
• 5mm circular representations are shown at 100% and 125% for the radiographic ball technique. This
technique uses radiographic marking balls embedded in a plastic template prior to radiographic examination
of the patient. These marking balls will be visible on the radiographic image.
• Measurements can be taken to determine the precise magnification factor of the radiograph and help
the practitioner accurately determine the amount of available bone for implant placement. The following
example shows the calculation of a distortion factor and the subsequent determination of available bone:
♦ The radiographic marking ball has a known diameter of 5mm.
♦ Assume the marking ball appears on the radiograph to have a diameter of 6mm.
♦ The distortion factor is calculated as: 5 ÷ 6 = 0.833.
♦ Assume that the distance between the crest of the ridge and the superior aspect of
the mandibular nerve canal appears on the radiograph to have a length of 15mm.
♦ The actual distance between the crest of the ridge and the mandibular canal would
be calculated as: 15mm x 0.833 = 12.5mm.
1 - 8 8 8 - 2 4 6 - 8 3 3 8
S U R G I C A L T E M P L AT E
L0114
i nter na l
30
Always consider that a margin of safety should be factored into treatment planning when adjacent to a vital structure.
SURGICAL INSTRUMENTS
Implant Spacer/Depth Probe
Starter
Drill
1
2.5mm
x 9mm
2.0mm
x 9mm
int er nal
3 Width Increasing Drills
2 Depth Drills
2.5mm
2.0mm
x 10.5mm x 10.5mm
Drill
Extender
2.0mm
x 12mm
2.5mm
x 12mm
2.0mm
x 15mm
2.5mm
x 15mm
2.0mm
2.5mm
3.0mm
3.2mm
Crestal
Bone Drill
Crestal
Bone Drill
3.5mm
Tap
3.5mm
3.7mm
4.2mm
4.7mm
5.2mm
Crestal
Bone Drill
Crestal
Bone Drill
5mm
Tap
6mm
Tap
5mm
6mm
4mm
Tap
4mm
4
Implant Placement
Paralleling Pins
Ratchet
Spare
Spare
Spare
Spare
Spare
Spare
Handpiece Adapter
Depth Probe
3.5/4.0mm
Insertion Tool
Hand
Wrench
.050" Hex
Driver
#6 Round
Bur
Ratchet &
Hand Wrench
Extender
Spare
Ratchet &
Hand Wrench
Adapter
5.0/6.0mm
Insertion Tool
Use of the Implant Spacer/Depth Probe
The Implant Spacer/Depth Probe is a measurement instrument for osteotomy depth
determination, implant spacing and general length determination. Diagram A indicates
the relative positioning of the depth determination bands. Note that each band is 1mm
in height and ranges from 9mm to 16mm.
16MM
9MM
Diagram A
The rectangular end of the device provides measurement markings for implant
spacing and ridge width. Diagram B shows recommended implant-to-implant spacing
for BioHorizons Internal implants using the Implant Spacer.
Ø5mm and
Ø6mm
Ø4mm
31
Recommended edge-to-edge implant spacing is approximately 3mm.
The
measurement should be taken from the widest diameter of the implant, which is the
prosthetic platform for BioHorizons Internal implants. Therefore, the centerline-tocenterline distance for a Ø3.5mm, Ø4mm, Ø5mm and Ø6mm implant is approximately
6.5mm, 7.5mm and 8.7mm, respectively. The Ø5mm and Ø6mm implants share the
same prosthetic platform. The measurement markings on the side of the rectangle
can be used to measure available ridge width.
Ø3.5mm
The recommended spacing between an implant and a natural tooth is 1.5mm to 2mm,
measured from the contact of the tooth to the edge of the implant. Be careful of
situations where the tooth root is beyond the contact region of the crown, as in angled
or tipped teeth.
Diagram B
Paralleling Pins
2 Depth Drills
2.0mm
x 9mm
2.5mm
x 9mm
2.5mm
2.0mm
x 10.5mm x 10.5mm
2.0mm
x 12mm
2.5mm
x 12mm
2.0mm
x 15mm
2.5mm
x 15mm
2.0mm
2.5mm
i nte rn a l
3 Width Increasing Drills
3.0mm
3.2mm
Crestal
Bone Drill
Crestal
Bone Drill
Crestal
Bone Drill
Crestal
Bone Drill
3.5mm
Tap
4mm
Tap
5mm
Tap
6mm
Tap
3.5mm
3.7mm
4.2mm
4mm
4.7mm
5.2mm
5mm
4
6mm
Implant Placement
Paralleling Pins
Ratchet
Spare
Spare
Spare
Handpiece Adapter
3.5/4.0mm
Insertion Tool
Spare
.050" Hex
Driver
Hand
Wrench
#6 Round
Bur
Spare
Ratchet &
Hand Wrench
Extender
Spare
Spare
Ratchet &
Hand Wrench
Adapter
5.0/6.0mm
Insertion Tool
Depth Probe
2.5
Starter
Drill
Drill
Extender
2.0
1
Paralleling Pins (Force Direction Indicators)
Following the Ø2.0mm Depth Drill, the Paralleling Pins may be
used to evaluate any minor changes needed to improve implant
angulation and position. The Paralleling Pins are provided straight
or with a 20° angle that corresponds to the angulation of the 20°
angled abutments. The large end of the paralleling pin may be
used again after the osteotomy is enlarged to Ø2.5mm.
Clinicians may wish to initiate all osteotomies with the Ø2.0 x 9mm
9mm Depth Drill, as this is the length of each side of the pin. After visual
and radiographic verification of positioning is made, the osteotomy
can be taken to depth with the appropriate Ø2.0mm Depth Drill.
Note:
The mid-section of each paralleling pin has a small pass-through hole. To
avoid accidental dislodging and swallowing, it is recommended that silk
suture be placed through the hole prior to use.
1 - 8 8 8 - 2 4 6 - 8 3 3 8
SURGICAL INSTRUMENTS
Design of BioHorizons surgical drills
BioHorizons surgical drills are high efficiency, low-chatter instruments made of surgical grade stainless steel. The drill series consists
of a Starter Drill, Depth Drills (Ø2.0mm and Ø2.5mm diameter) and Width Increasing Drills (Ø3.0mm through Ø5.2mm diameter). The
patent-pending system incorporates a series of dental burs that allows the doctor to drill into the bone to a pre-determined depth and
width to create an osteotomy for receipt of the dental implant.
BioHorizons surgical twist drills are externally irrigated. This design allows for proper channeling of the irrigant to the base of the
osteotomy while eliminating the possibility of irrigant restriction from blockage in an internal drill lumen. Externally irrigated drills are
much easier to clean and provide a decreased risk of cross-contamination between patients.
Every drill (Starter Drill through Ø5.2mm diameter drill) is labeled with highly visible, dark contrast marks and grooves. These grooves
are easier to see in surgery than flush surface marks when blood and tissue are present. Also, the glare of light used during surgery
does not affect the visualization of these grooves when compared to other typical surface markings.
Each drill reference mark of the Depth Drills prepares the bone to receive an implant of corresponding length. The stated length of a
BioHorizons Internal implant is measured from the apex of the implant up to the level of the prosthetic platform; therefore, drill to the
9mm depth mark to place a 9mm implant. Internal implants have 0.5mm polished collars. Placing an implant subcrestal (countersinking)
requires that the surgeon drill to the next incremental 1mm marking.
Drilling Technique
It is recommended that copious amounts of refrigerated sterile irrigant be used in any osseous drilling procedure. With BioHorizons
surgical drills, this irrigant must be applied externally and adjacent to the drill shaft. Many commercially available handpieces are
equipped with an external irrigation port.
Drilling Speed
The speed of the drill may be adjusted in relation to the quality of the bone being prepared. Harder bone usually requires up to 2500
rpm to proceed without exerting excessive pressure. Intermittent pressure of 1 second on the bone and 1 to 2 seconds off the bone is
recommended. Enough pressure should be used to proceed at least 2mm per second. If this is not achieved, new drills are indicated for
each preparation. Note: Heat generation in bone is a function of both drill speed and pressure. The correct combination of speed and
pressure will reduce the possibility of thermal necrosis of surrounding tissues.
Thread Forming
Thread forming (tapping) may be indicated in dense bone. Tap the bone at a maximum speed of 30 rpm. Note that the tap must engage
the osteotomy and proceed at an axial rate of speed relative to the rotational speed (rpm) of the tap. Example: The tap will proceed
slower into the osteotomy at a tap speed of 10 rpm versus 30 rpm. Please note that stripping of the thread form created in the osteotomy
is more likely to occur at a higher rpm.
Starter Drill
Starter Drill
The Starter Drill has a unique pointed tip,
making it an excellent drill for beginning
an osteotomy. The design prevents the
drill from “walking” during the creation
of the osteotomy and facilitates precise
placement of the Ø2mm Depth Drill.
14mm
12mm
10mm
15mm
1
Starter
Drill
2 Depth Drills
2.0mm
x 9mm
13mm
Drill
Extender
11mm
2.5mm
x 9mm
2.5mm
2.0mm
x 10.5mm x 10.5mm
2.0mm
x 12mm
2.5mm
x 12mm
2.0mm
x 15mm
2.5mm
x 15mm
2.0mm
2.5mm
int e r n a l
3 Width Increasing Drills
3.0mm
3.2mm
Crestal
Bone Drill
Crestal
Bone Drill
3.5mm
Tap
3.5mm
3.7mm
4.2mm
4.7mm
5.2mm
Crestal
Bone Drill
Crestal
Bone Drill
5mm
Tap
6mm
Tap
4mm
Tap
4mm
5mm
4
6mm
Implant Placement
Paralleling Pins
Spare
Spare
Ratchet
Depth Probe
Ratchet
Depth Probe
Spare
Handpiece Adapter
3.5/4.0mm
Insertion Tool
9mm
Spare
.050" Hex
Driver
Hand
Wrench
#6 Round
Bur
Spare
Ratchet &
Hand Wrench
Extender
Spare
5.0/6.0mm
Ratchet &
Hand Wrench
Adapter
Spare
Insertion Tool
7mm
Depth markings
#6 Round Bur
#6 Round Bur (optional)
These burs are designed to prevent lateral perforations
because they will “roll” away from the inner wall of the
harder cortical plate and stay within the soft trabecular
bone. The use of the #6 bur is optional and is primarily
used for marking the implant recipient site and to
determine spacing. It can also be used to stretch the
initial osteotomy in any direction to improve final position
prior to use of the surgical twist drills.
1
Starter
Drill
2 Depth Drills
2.0mm
x 9mm
Drill
Extender
2.5mm
x 9mm
2.5mm
2.0mm
x 10.5mm x 10.5mm
2.0mm
x 12mm
2.5mm
x 12mm
2.0mm
x 15mm
2.5mm
x 15mm
2.0mm
2.5mm
int er n a l
3 Width Increasing Drills
3.0mm
3.2mm
Crestal
Bone Drill
Crestal
Bone Drill
3.5mm
Tap
3.5mm
3.7mm
4.2mm
4.7mm
5.2mm
Crestal
Bone Drill
Crestal
Bone Drill
5mm
Tap
6mm
Tap
5mm
6mm
4mm
Tap
4mm
4
Implant Placement
Paralleling Pins
Spare
Spare
Spare
Spare
Spare
Spare
Handpiece Adapter
3.5/4.0mm
Insertion Tool
.050" Hex
Driver
Hand
Wrench
#6 Round
Bur
Ratchet &
Hand Wrench
Extender
Spare
Ratchet &
Hand Wrench
Adapter
5.0/6.0mm
Insertion Tool
32
SURGICAL INSTRUMENTS
Depth Drills
1
Starter
Drill
2 Depth Drills
2.0mm
x 9mm
Drill
Extender
2.5mm
x 9mm
2.5mm
2.0mm
x 10.5mm x 10.5mm
2.0mm
x 12mm
2.5mm
x 12mm
2.0mm
x 15mm
2.5mm
x 15mm
2.0mm
2.5mm
i nt er nal
3 Width Increasing Drills
3.0mm
3.2mm
Crestal
Bone Drill
Crestal
Bone Drill
3.5mm
Tap
3.5mm
3.7mm
4.2mm
4.7mm
5.2mm
Crestal
Bone Drill
Crestal
Bone Drill
5mm
Tap
6mm
Tap
5mm
6mm
4mm
Tap
4mm
4
Implant Placement
Paralleling Pins
Ratchet
Spare
Spare
Depth Probe
Spare
Handpiece Adapter
3.5/4.0mm
Insertion Tool
Spare
.050" Hex
Driver
Hand
Wrench
#6 Round
Bur
Spare
Spare
Spare
Ratchet &
Hand Wrench
Extender
5.0/6.0mm
Ratchet &
Hand Wrench
Adapter
Insertion Tool
No depth-stop
9mm stop
10.5mm stop
12mm stop
15mm stop
Depth Drills
The Depth Drills are designed to increase the depth of the osteotomy. The drills are supplied in two diameters, Ø2.0mm and Ø2.5mm, with
four depth gauging options. The cutting geometry of the drills is an optimized tri-fluted twist drill. The drill tip geometry is configured such
that the drill has end-cutting capabilities. The Depth Drill is used after the Starter Drill to set the osteotomy depth.
No Depth-Stop Option: This drill has standard depth grooves ranging from 7mm to 15mm. The clinician must manually stop the drill at
the desired depth based on the corresponding depth marks on the shaft of the drill. This drill is used if the prosthetic platform is submerged
below the crest at final implant placement.
33
Depth-Stop Option: These Depth Drills have a circular ring set at a pre-determined distance along the length of the drill that acts as a
“stop” that prevents the surgeon from drilling beyond a pre-determined depth. The depth stop is set to correspond with the length of the
dental implant being placed (9mm, 10.5mm, 12mm and 15mm). The use of this drill allows the implant prosthetic platform to be placed
flush with the crestal bone.
Width Increasing Drills
1
Starter
Drill
2 Depth Drills
2.0mm
x 9mm
Drill
Extender
2.5mm
x 9mm
2.5mm
2.0mm
x 10.5mm x 10.5mm
2.0mm
x 12mm
2.5mm
x 12mm
2.0mm
x 15mm
2.5mm
x 15mm
2.0mm
2.5mm
int er nal
3 Width Increasing Drills
3.0mm
3.2mm
Crestal
Bone Drill
Crestal
Bone Drill
3.5mm
Tap
3.5mm
3.7mm
4.2mm
4.7mm
5.2mm
Crestal
Bone Drill
Crestal
Bone Drill
5mm
Tap
6mm
Tap
4mm
Tap
4mm
5mm
4
6mm
Implant Placement
Paralleling Pins
Ratchet
Spare
Spare
Depth Probe
Spare
Handpiece Adapter
3.5/4.0mm
Insertion Tool
Spare
.050" Hex
Driver
Hand
Wrench
#6 Round
Bur
Spare
Ratchet &
Hand Wrench
Extender
Spare
Spare
Ratchet &
Hand Wrench
Adapter
5.0/6.0mm
Insertion Tool
15mm
12mm
10.5mm
9mm
Width Increasing Drills
A series of drills follows the Depth Drills in order to increase the width of the osteotomy to correspond to the diameter of the dental implant
being placed. These drills are the “Width Increasing” (WI) drills.
The WI drills have a tri-fluted twist, side-cutting geometry. The tip of the drill lacks the end-cutting geometry of the Depth Drill, thereby
creating a “built-in” stop. This feature prevents the surgeon from increasing the osteotomy depth when subsequent drills are used in the
drill series and reduces the need for the doctor to rely on the depth markings of each drill to reach the desired depth.
The drill diameters of the WI drills increase in small increments until the final desired osteotomy diameter is reached. By using this
sequence of drills, the surgeon has better control over the angulation of the osteotomy. Furthermore, an incremental step in the drill
sequence reduces excess heat and helps prevent thermal necrosis of the surrounding tissue.
1 - 8 8 8 - 2 4 6 - 8 3 3 8
SURGICAL INSTRUMENTS
Crestal Bone Drills
Level 3
1
Starter
Drill
2 Depth Drills
2.0mm
x 9mm
Drill
Extender
2.5mm
x 9mm
2.5mm
2.0mm
x 10.5mm x 10.5mm
2.0mm
x 12mm
2.5mm
x 12mm
2.0mm
x 15mm
2.5mm
x 15mm
2.0mm
2.5mm
i nter n a l
3 Width Increasing Drills
3.0mm
3.2mm
Crestal
Bone Drill
Crestal
Bone Drill
Crestal
Bone Drill
Crestal
Bone Drill
3.5mm
Tap
4mm
Tap
5mm
Tap
6mm
Tap
4mm
5mm
6mm
3.5mm
3.7mm
4.2mm
4
4.7mm
Level 2
5.2mm
Implant Placement
Paralleling Pins
Ratchet
Spare
Spare
Spare
Spare
Spare
Spare
Handpiece Adapter
Depth Probe
3.5/4.0mm
Insertion Tool
.050" Hex
Driver
Hand
Wrench
#6 Round
Bur
Ratchet &
Hand Wrench
Extender
5.0/6.0mm
Ratchet &
Hand Wrench
Adapter
Spare
Insertion Tool
Level 1
Crestal Bone Drill
The Crestal Bone Drill (CBD) is used to prepare the crestal bone for receipt of the implant crest module. The crest module is the area
beneath the prosthetic platform and above the implant threaded area. This drill is optional in less dense bone which also lacks a crestal
bone ridge.
There are three significant levels on the CBD. Level 1 is where the cutting geometry begins. Engaging the CBD in the bone to Level 2
opens up the osteotomy to accept the slightly wider crest module on the implants and allows the polished collar to be placed above the
crest of the bone. Preparing the bone to Level 3 allows the implant to be placed with the prosthetic platform level with the crestal ridge. As
shown in the recommended drilling sequence, the Crestal Bone Drills should be used at the following stages of osteotomy preparation:
Ø3.5mm Crestal Bone Drill:
Ø4.0mm Crestal Bone Drill:
Ø5.0mm Crestal Bone Drill:
Ø6.0mm Crestal Bone Drill:
Following the Ø3.0mm Depth Drill
Following the Ø3.2mm Depth Drill
Following the Ø4.2mm Depth Drill
Following the Ø5.2mm Depth Drill
34
Bone Taps
1
Starter
Drill
2 Depth Drills
2.0mm
x 9mm
Drill
Extender
2.5mm
x 9mm
2.5mm
2.0mm
x 10.5mm x 10.5mm
2.0mm
x 12mm
2.5mm
x 12mm
2.0mm
x 15mm
2.5mm
x 15mm
2.0mm
2.5mm
i nt e rn a l
3 Width Increasing Drills
3.0mm
3.2mm
Crestal
Bone Drill
Crestal
Bone Drill
3.5mm
Tap
3.5mm
3.7mm
4.2mm
4.7mm
5.2mm
Crestal
Bone Drill
Crestal
Bone Drill
5mm
Tap
6mm
Tap
5mm
6mm
4mm
Tap
4mm
4
Implant Placement
Paralleling Pins
Ratchet
Spare
Spare
Spare
Spare
Spare
Spare
Handpiece Adapter
Depth Probe
3.5/4.0mm
Insertion Tool
.050" Hex
Driver
Hand
Wrench
#6 Round
Bur
Ratchet &
Hand Wrench
Extender
Spare
Ratchet &
Hand Wrench
Adapter
5.0/6.0mm
Insertion Tool
Ratchet &
Ratchet Extender
Bone Tap (Thread Former)
The osteotomy should be tapped in dense bone. Dense bone typically requires that the full length of the osteotomy
be prepared with the tap. The use of a Bone Tap is suggested in less dense bone when one (or two) sides of the
osteotomy are in contact with a lateral cortical plate of bone.
Hand Wrench &
Ratchet Extender
Hand Wrench
Place the tip of the Bone Tap into the osteotomy, apply firm pressure and begin rotating slowly (30 rpm or less is recommended). When
the threads engage, allow the thread former to feed without excessive pressure. To remove, switch the handpiece to the reverse mode and
back out. Do not pull on the Bone Tap. The implant site may also be threaded by hand by attaching the Ratchet Extender and Hand Wrench
or Ratchet to the tap. The Hand Wrench or Ratchet may also engage the thread former without the Ratchet Extender.
O S T E O T O M Y S TA R T E R S E Q U E N C E
IMPORTANT
Peri-operative oral rinses with a 0.12% Chlorhexidine Digluconate solution have been shown to significantly
lower the incidence of post-implantation infectious complications.11 A pre-operative 30-second rinse is
recommended, followed by twice daily rinses for two weeks following surgery.
Drilling must be done under a constant stream of sterile irrigation. A pumping motion should be employed
to prevent over-heating the bone. Drills that cannot advance 2mm per second in the osteotomy have
become dull and should be replaced.
There is a risk of injury to the mandibular nerve associated with surgical drilling in lower posterior regions.
To minimize the risk of nerve injury, it is imperative that the clinician understand the drill depth markings in
order to correlate implant length with the actual drilling depth to produce the desired vertical placement of
the implant.
Starter Sequence
1
Starter
Drill
1
2 Depth Drills
2.0mm
x 9mm
Drill
Extender
2.5mm
x 9mm
2.5mm
2.0mm
x 10.5mm x 10.5mm
2.0mm
x 12mm
2.5mm
x 12mm
2.0mm
x 15mm
2.5mm
x 15mm
2.0mm
2.5mm
i nt er nal
3 Width Increasing Drills
3.0mm
3.2mm
Crestal
Bone Drill
Crestal
Bone Drill
3.5mm
Tap
3.7mm
4.2mm
4.7mm
5.2mm
Crestal
Bone Drill
Crestal
Bone Drill
5mm
Tap
6mm
Tap
5mm
6mm
4mm
Tap
3.5mm
4mm
4
Implant Placement
Paralleling Pins
Ratchet
Spare
Spare
Spare
Spare
Spare
Handpiece Adapter
Depth Probe
3.5/4.0mm
Insertion Tool
Spare
.050" Hex
Driver
Hand
Wrench
#6 Round
Bur
Ratchet &
Hand Wrench
Extender
Starter Drill
5.0/6.0mm
Ratchet &
Hand Wrench
Adapter
Spare
Center the Starter Drill in the desired area
of the osteotomy and drill to the appropriate
depth reference mark.
Insertion Tool
35
Starter Sequence
2
1
Starter
Drill
2 Depth Drills
2.0mm
x 9mm
Drill
Extender
2.5mm
x 9mm
2.5mm
2.0mm
x 10.5mm x 10.5mm
2.0mm
x 12mm
2.5mm
x 12mm
2.0mm
x 15mm
2.5mm
x 15mm
2.0mm
2.5mm
i nt er nal
3 Width Increasing Drills
3.0mm
3.2mm
Crestal
Bone Drill
Crestal
Bone Drill
3.5mm
Tap
3.5mm
3.7mm
4.2mm
4.7mm
5.2mm
Crestal
Bone Drill
Crestal
Bone Drill
4mm
Tap
5mm
Tap
6mm
Tap
4mm
5mm
6mm
4
Implant Placement
Paralleling Pins
Ratchet
Spare
Spare
Spare
Spare
Spare
Spare
Handpiece Adapter
3.5/4.0mm
Insertion Tool
.050" Hex
Driver
Hand
Wrench
#6 Round
Bur
Ratchet &
Hand Wrench
Extender
Ø2.0mm Depth Drill
Spare
Ratchet &
Hand Wrench
Adapter
5.0/6.0mm
Insertion Tool
Depth Probe
Using either the No Depth-stop Option
or Depth-stop Option drill (described on
page 33), drill to the appropriate depth as
indicated by the reference marks or depthstop.
Note: The surgical kit is supplied with four
different lengths of the Depth-stop Option
Depth Drills (9mm, 10.5mm, 12mm and
15mm). Each drill has a positive stop that
is specific to the length of the implant being
placed.
1 - 8 8 8 - 2 4 6 - 8 3 3 8
O S T E O T O M Y S TA R T E R S E Q U E N C E
Paralleling Pins
1
Starter
Drill
2 Depth Drills
2.0mm
x 9mm
2.5
Drill
Extender
2.5mm
x 9mm
2.5mm
2.0mm
x 10.5mm x 10.5mm
2.0mm
x 12mm
2.5mm
x 12mm
2.0mm
x 15mm
2.5mm
x 15mm
2.0mm
2.5mm
i nt er n a l
3 Width Increasing Drills
3.0mm
3.2mm
Crestal
Bone Drill
Crestal
Bone Drill
3.5mm
Tap
3.7mm
4.2mm
4.7mm
5.2mm
Crestal
Bone Drill
Crestal
Bone Drill
5mm
Tap
6mm
Tap
4mm
Tap
3.5mm
4mm
5mm
4
6mm
Implant Placement
Paralleling Pins
Ratchet
Spare
Spare
3
Depth Probe
Spare
Handpiece Adapter
3.5/4.0mm
Insertion Tool
Spare
Spare
.050" Hex
Driver
#6 Round
Bur
Hand
Wrench
Spare
Spare
Ratchet &
Hand Wrench
Extender
5.0/6.0mm
Ratchet &
Hand Wrench
Adapter
Insertion Tool
2.0
Place the paralleling pin in the osteotomy
(Ø2.0mm side) to ascertain the angulation of
the osteotomy. A radiograph may be taken
to help determine the osteotomy’s proximity
to anatomic landmarks. Adjustments may
be made at this point with a Lindemann bur
or the Depth Drills.
Starter Sequence
Ø2.5mm Depth Drill
Starter Sequence
1
Using either the No Depth-stop Option
or Depth-stop Option drill (described on
page 33), drill to the appropriate depth as
indicated by the reference marks.
Starter
Drill
2 Depth Drills
2.5mm
x 9mm
2.0mm
x 9mm
Drill
Extender
2.5mm
2.0mm
x 10.5mm x 10.5mm
2.0mm
x 12mm
2.5mm
x 12mm
2.0mm
x 15mm
2.5mm
x 15mm
2.0mm
2.5mm
i nt e r n a l
3 Width Increasing Drills
3.0mm
3.2mm
Crestal
Bone Drill
Crestal
Bone Drill
3.5mm
Tap
3.7mm
4.2mm
4.7mm
5.2mm
Crestal
Bone Drill
Crestal
Bone Drill
5mm
Tap
6mm
Tap
5mm
6mm
4mm
Tap
3.5mm
4
4mm
4
Implant Placement
Paralleling Pins
Ratchet
Spare
Spare
Spare
Spare
Spare
Spare
Handpiece Adapter
Depth Probe
3.5/4.0mm
Insertion Tool
.050" Hex
Driver
Hand
Wrench
#6 Round
Bur
Ratchet &
Hand Wrench
Extender
Spare
5.0/6.0mm
Ratchet &
Hand Wrench
Adapter
Insertion Tool
Note: The surgical kit is supplied with four
different lengths of the Depth-stop Option
Depth Drills (9mm, 10.5mm 12mm and
15mm). Each drill has a positive stop that
is specific to the length of the implant being
placed.
36
Optional: Use an implant site dilator of
appropriate size or substitute the drill as a
site dilator by pressing the drill to final depth
without rotating.
Paralleling Pins
Starter Sequence
1
Starter
Drill
2 Depth Drills
2.0mm
x 9mm
Drill
Extender
2.5mm
x 9mm
2.5mm
2.0mm
x 10.5mm x 10.5mm
2.0mm
x 12mm
2.5mm
x 12mm
2.0mm
x 15mm
2.5mm
x 15mm
2.0mm
2.5mm
i nt er n a l
3 Width Increasing Drills
3.0mm
3.2mm
Crestal
Bone Drill
Crestal
Bone Drill
3.5mm
Tap
3.5mm
3.7mm
4.2mm
4.7mm
5.2mm
Crestal
Bone Drill
Crestal
Bone Drill
5mm
Tap
6mm
Tap
4mm
Tap
4mm
5mm
4
6mm
Implant Placement
Paralleling Pins
2.0
Place the paralleling pin in the osteotomy
(Ø2.5mm side) to ascertain the angulation of
the osteotomy. A radiograph may be taken
to help determine the osteotomy’s proximity
to anatomic landmarks. Adjustments may
be made at this point with a Lindemann bur
or the Depth Drills.
Ratchet
Spare
Spare
Spare
Handpiece Adapter
3.5/4.0mm
Insertion Tool
Spare
.050" Hex
Driver
Hand
Wrench
#6 Round
Bur
Spare
Ratchet &
Hand Wrench
Extender
5
Spare
Spare
Ratchet &
Hand Wrench
Adapter
5.0/6.0mm
Insertion Tool
Depth Probe
2.5
OSTEOTOMY WIDENING SEQUENCE
Widening Sequence
1
1
Starter
Drill
2.5mm
x 9mm
2.0mm
x 9mm
i nt er nal
3 Width Increasing Drills
2 Depth Drills
2.5mm
2.0mm
x 10.5mm x 10.5mm
Drill
Extender
2.0mm
x 12mm
2.5mm
x 12mm
2.0mm
x 15mm
2.5mm
x 15mm
2.0mm
2.5mm
3.0mm
3.2mm
Crestal
Bone Drill
Crestal
Bone Drill
Crestal
Bone Drill
Crestal
Bone Drill
3.5mm
Tap
4mm
Tap
5mm
Tap
6mm
Tap
3.5mm
3.7mm
4.2mm
4mm
4.7mm
5.2mm
5mm
4
6mm
Implant Placement
Paralleling Pins
Ratchet
Spare
Spare
Depth Probe
Spare
Handpiece Adapter
3.5/4.0mm
Insertion Tool
Spare
Spare
#6 Round
Bur
Hand
Wrench
.050" Hex
Driver
Spare
Ratchet &
Hand Wrench
Extender
5.0/6.0mm
Ratchet &
Hand Wrench
Adapter
Spare
Insertion Tool
Use Crestal Bone Drill
for 3.5mm implant
after the 3.0mm drill.
Ø3.0mm Width Increasing Drill
The Ø3.0mm Width Increasing Drill is used
to increase the diameter of the osteotomy.
The blunt tip on this drill will prevent it
from increasing depth; therefore, the final
osteotomy depth must be created with the
Depth Drills. The blunt tip may not stop in
poor quality bone; please exercise caution
in D3 or D4 bone. Depth marks are included
on the drills as a reference.
Optional: Use an implant site dilator of
appropriate size or substitute the drill as a
site dilator by pressing the drill to final depth
without rotating.
Follow with 3.5mm
Bone Tap, if desired.
Widening Sequence
2
1
Starter
Drill
2.0mm
x 9mm
2.5mm
x 9mm
2.0mm
x 12mm
2.5mm
x 12mm
2.0mm
x 15mm
2.5mm
x 15mm
2.0mm
2.5mm
i nt er nal
3 Width Increasing Drills
2 Depth Drills
2.5mm
2.0mm
x 10.5mm x 10.5mm
Drill
Extender
3.0mm
3.2mm
Crestal
Bone Drill
Crestal
Bone Drill
3.5mm
Tap
3.7mm
4.2mm
4.7mm
5.2mm
Crestal
Bone Drill
Crestal
Bone Drill
5mm
Tap
6mm
Tap
5mm
6mm
4mm
Tap
3.5mm
4mm
4
Implant Placement
Paralleling Pins
Ratchet
Spare
Spare
Spare
Spare
Spare
Handpiece Adapter
Depth Probe
3.5/4.0mm
Insertion Tool
Spare
.050" Hex
Driver
#6 Round
Bur
Hand
Wrench
Ratchet &
Hand Wrench
Extender
Ø3.2mm Width Increasing Drill
Ratchet &
Hand Wrench
Adapter
Spare
5.0/6.0mm
Insertion Tool
37
Use Crestal Bone Drill
for 4.0mm implant
after the Ø3.2mm drill.
The Ø3.2mm Width Increasing Drill is used
to increase the diameter of the osteotomy.
The blunt tip on this drill will prevent it
from increasing depth; therefore, the final
osteotomy depth must be created with
the Depth Drills. The blunt tip may not
stop in poor quality bone; please exercise
caution in D3 or D4 bone. Depth marks are
included on the drills as a reference.
Optional: Use an implant site dilator of
appropriate size or substitute the drill as a
site dilator by pressing the drill to final depth
without rotating.
Follow with 4mm
Bone Tap if desired.
Widening Sequence
3
1
Starter
Drill
2 Depth Drills
2.0mm
x 9mm
Drill
Extender
2.5mm
x 9mm
2.5mm
2.0mm
x 10.5mm x 10.5mm
2.0mm
x 12mm
2.5mm
x 12mm
2.0mm
x 15mm
2.5mm
x 15mm
2.0mm
2.5mm
i nt er nal
3 Width Increasing Drills
3.0mm
3.2mm
Crestal
Bone Drill
Crestal
Bone Drill
Crestal
Bone Drill
Crestal
Bone Drill
3.5mm
Tap
4mm
Tap
5mm
Tap
6mm
Tap
3.5mm
3.7mm
4.2mm
4mm
4.7mm
5.2mm
5mm
4
6mm
Implant Placement
Paralleling Pins
Ratchet
Spare
Spare
Spare
Handpiece Adapter
3.5/4.0mm
Insertion Tool
Spare
.050" Hex
Driver
Hand
Wrench
#6 Round
Bur
Spare
Ratchet &
Hand Wrench
Extender
Spare
Spare
Ratchet &
Hand Wrench
Adapter
5.0/6.0mm
Insertion Tool
Depth Probe
Ø3.7mm Width Increasing Drill
The Ø3.7mm Width Increasing Drill is used
to increase the diameter of the osteotomy.
The blunt tip on this drill will prevent it
from increasing depth; therefore, the final
osteotomy depth must be created with
the Depth Drills. The blunt tip may not
stop in poor quality bone; please exercise
caution in D3 or D4 bone. Depth marks are
included on the drills as a reference.
Optional: Use an implant site dilator of
appropriate size or substitute the drill as a
site dilator by pressing the drill to final depth
without rotating.
1 - 8 8 8 - 2 4 6 - 8 3 3 8
OSTEOTOMY WIDENING SEQUENCE
Ø4.2mm Width Increasing Drill
Widening Sequence 4
The Ø4.2mm Width Increasing Drill is used
to increase the diameter of the osteotomy.
The blunt tip on this drill will prevent it
from increasing depth; therefore, the final
osteotomy depth must be created with
the Depth Drills. The blunt tip may not
stop in poor quality bone; please exercise
caution in D3 or D4 bone. Depth marks are
included on the drills as a reference.
1
Starter
Drill
2 Depth Drills
2.0mm
x 9mm
Drill
Extender
2.5mm
x 9mm
2.5mm
2.0mm
x 10.5mm x 10.5mm
2.0mm
x 12mm
2.5mm
x 12mm
2.0mm
x 15mm
2.5mm
x 15mm
2.0mm
2.5mm
i nt e r n a l
3 Width Increasing Drills
3.0mm
3.2mm
Crestal
Bone Drill
Crestal
Bone Drill
3.5mm
Tap
3.7mm
4.2mm
5.2mm
Crestal
Bone Drill
5mm
Tap
6mm
Tap
5mm
6mm
4mm
Tap
3.5mm
4.7mm
Crestal
Bone Drill
4mm
4
Implant Placement
Paralleling Pins
Ratchet
Spare
Spare
Spare
Spare
Spare
Spare
Handpiece Adapter
Depth Probe
3.5/4.0mm
Insertion Tool
.050" Hex
Driver
Optional: Use an implant site dilator of
appropriate size or substitute the drill as a
site dilator by pressing the drill to final depth
without rotating.
#6 Round
Bur
Hand
Wrench
Ratchet &
Hand Wrench
Extender
5.0/6.0mm
Ratchet &
Hand Wrench
Adapter
Spare
Insertion Tool
Use Crestal Bone Drill
for 5.0mm implant after
the Ø4.2mm drill.
Follow with 5mm Bone
Tap if desired.
Ø4.7mm Width Increasing Drill
Widening Sequence 5
1
The Ø4.7mm Width Increasing Drill is used
to increase the diameter of the osteotomy.
The blunt tip on this drill will prevent it
from increasing depth; therefore, the final
osteotomy depth must be created with
the Depth Drills. The blunt tip may not
stop in poor quality bone; please exercise
caution in D3 or D4 bone. Depth marks are
included on the drills as a reference.
Starter
Drill
2 Depth Drills
2.0mm
x 9mm
Drill
Extender
2.5mm
x 9mm
2.5mm
2.0mm
x 10.5mm x 10.5mm
2.0mm
x 12mm
2.5mm
x 12mm
2.0mm
x 15mm
2.5mm
x 15mm
2.0mm
2.5mm
i nt er n al
3 Width Increasing Drills
3.0mm
3.2mm
Crestal
Bone Drill
Crestal
Bone Drill
3.5mm
Tap
3.5mm
3.7mm
4.2mm
4.7mm
5.2mm
Crestal
Bone Drill
Crestal
Bone Drill
5mm
Tap
6mm
Tap
4mm
Tap
4mm
5mm
4
6mm
Implant Placement
Paralleling Pins
Ratchet
Spare
Spare
Depth Probe
Spare
Handpiece Adapter
3.5/4.0mm
Insertion Tool
Spare
.050" Hex
Driver
Hand
Wrench
#6 Round
Bur
Spare
Ratchet &
Hand Wrench
Extender
Spare
5.0/6.0mm
Ratchet &
Hand Wrench
Adapter
Spare
Insertion Tool
38
Optional: Use an implant site dilator of
appropriate size or substitute the drill as a
site dilator by pressing the drill to final depth
without rotating.
Ø5.2mm Width Increasing Drill
The Ø5.2mm Width Increasing Drill is used
to increase the diameter of the osteotomy.
The blunt tip on this drill will prevent it
from increasing depth; therefore, the final
osteotomy depth must be created with
the Depth Drills. The blunt tip may not
stop in poor quality bone; please exercise
caution in D3 or D4 bone. Depth marks are
included on the drills as a reference.
Optional: Use an implant site dilator of
appropriate size or substitute the drill as a
site dilator by pressing the drill to final depth
without rotating.
Widening Sequence 6
1
Starter
Drill
2 Depth Drills
2.0mm
x 9mm
Drill
Extender
2.5mm
x 9mm
2.5mm
2.0mm
x 10.5mm x 10.5mm
2.0mm
x 12mm
2.5mm
x 12mm
2.0mm
x 15mm
2.5mm
x 15mm
2.0mm
2.5mm
i nt er n a l
3 Width Increasing Drills
3.0mm
3.2mm
Crestal
Bone Drill
Crestal
Bone Drill
3.5mm
Tap
3.5mm
3.7mm
4.2mm
4.7mm
5.2mm
Crestal
Bone Drill
Crestal
Bone Drill
5mm
Tap
6mm
Tap
5mm
6mm
4mm
Tap
4mm
4
Implant Placement
Paralleling Pins
Ratchet
Spare
Spare
Spare
Spare
Spare
Spare
Handpiece Adapter
Depth Probe
3.5/4.0mm
Insertion Tool
.050" Hex
Driver
Hand
Wrench
#6 Round
Bur
Ratchet &
Hand Wrench
Extender
Spare
Ratchet &
Hand Wrench
Adapter
5.0/6.0mm
Insertion Tool
Use Crestal Bone Drill
for 6.0mm implant after
the Ø5.2mm drill.
Follow with 6mm Bone
Tap if desired.
I M P L A N T PA C K A G I N G
Implant Packaging
BioHorizons Internal implant packages
have color-coded labels for easy
identification of contents. Inner vial caps
are also color-coded for easy reference.
Implant surface treatment
and dimensions label
Abutment emergence and
prosthetic platform label
BioHorizons Internal implants are packaged in sterile blister trays and vials. When the lid of the tray is removed, the implant vial is
exposed. The vial is then placed in the sterile field. The vial cap is removed by rotating it counter-clockwise. At this point, the implant
and the patented 3inOne Abutment are exposed. This 3inOne Abutment is used to place the implant, eliminating the need to purchase
a separate implant mount that has no additional value. Two different types of surgical placement adapters (handpiece or ratchet) are
provided that interface with the 3inOne Abutment to facilitate surgical placement.
39
Remove the inner vial from the outer packaging. The peel-and-stick
label on the outer blister tray packaging should be placed in the
patient’s chart as a record of the device(s) used.
Be certain to hold the inner vial upright when the cap is
removed so the implant will not fall out of the vial.
Placement Options
1
1
Starter
Drill
2 Depth Drills
2.0mm
x 9mm
Drill
Extender
2.5mm
x 9mm
2.5mm
2.0mm
x 10.5mm x 10.5mm
2.0mm
x 12mm
2.5mm
x 12mm
2.0mm
x 15mm
2.5mm
x 15mm
2.0mm
2.5mm
i nt ernal
3 Width Increasing Drills
3.0mm
3.2mm
Crestal
Bone Drill
Crestal
Bone Drill
Crestal
Bone Drill
Crestal
Bone Drill
3.5mm
Tap
4mm
Tap
5mm
Tap
6mm
Tap
5mm
6mm
3.5mm
3.7mm
4.2mm
4mm
4
4.7mm
5.2mm
Implant Placement
Paralleling Pins
Ratchet
Spare
Spare
Spare
Spare
Spare
Spare
Handpiece Adapter
3.5/4.0mm
Depth Probe
Implant Placement with Handpiece
One of the four flat sides on the end of the surgical Handpiece
Adapter is aligned with the flat side of the 3inOne Abutment.
Seat the adapter in the 3inOne Abutment before the implant is
removed from the inner vial. Do not touch the implant.
Insertion Tool
.050" Hex
Driver
Hand
Wrench
#6 Round
Bur
Ratchet &
Hand Wrench
Extender
Spare
Ratchet &
Hand Wrench
Adapter
5.0/6.0mm
Insertion Tool
Using firm apical pressure, thread the implant into position at
a rotational speed similar to the Bone Tap speed (less than
30 rpm is recommended). Paralleling Pins may be used in
adjacent sites to guide the implant in at the correct angulation.
Do not overtighten the implant in the osteotomy as osseous
microfracture may occur. Too much pressure at the crest may
also compromise final surgical results.
Note: If the final restoration will use an Angled Abutment,
orient the implant with the abutment flat indexed to the
facial/buccal. Doing so will properly align the Angled
Abutment for the angulation correction. Failure to do so
may require the use of a Custom Castable Abutment to
make the required correction.
1 - 8 8 8 - 2 4 6 - 8 3 3 8
IMPLANT PLACEMENT
Placement with Ratchet
Placement Options 2
One of the four flat sides on the end of the
Ratchet Adapter is aligned with the flat side
of the 3inOne Abutment. Seat the adapter
in the 3inOne Abutment before the implant
is removed from the inner vial. Do not
touch the implant.
1
Starter
Drill
2 Depth Drills
2.5mm
x 9mm
2.0mm
x 9mm
Drill
Extender
2.5mm
2.0mm
x 10.5mm x 10.5mm
2.0mm
x 12mm
2.5mm
x 12mm
2.0mm
x 15mm
2.5mm
x 15mm
2.0mm
2.5mm
i nt er n a l
3 Width Increasing Drills
3.0mm
3.2mm
Crestal
Bone Drill
Crestal
Bone Drill
3.5mm
Tap
3.7mm
4.2mm
5.2mm
Crestal
Bone Drill
5mm
Tap
6mm
Tap
5mm
6mm
4mm
Tap
3.5mm
4.7mm
Crestal
Bone Drill
4mm
4
Implant Placement
Paralleling Pins
Ratchet
Spare
Spare
Spare
Spare
Spare
Spare
Handpiece Adapter
Depth Probe
3.5/4.0mm
Insertion Tool
.050" Hex
Driver
#6 Round
Bur
Hand
Wrench
Ratchet &
Hand Wrench
Extender
5.0/6.0mm
Ratchet &
Hand Wrench
Adapter
Spare
Insertion Tool
Using firm apical pressure, thread the
implant into position. Paralleling Pins
may be used in adjacent sites to guide the
implant in at the correct angulation. Do not
overtighten the implant in the osteotomy
as osseous microfracture may occur.
Too much pressure at the crest may also
compromise final surgical results.
Final implant seating via the Ratchet
Adapter may be desired to gain a tactile
sense of implant stability. If too much
resistance is felt during insertion, the
implant may be rotated clockwise three
revolutions, then reversed one revolution
counter-clockwise, until the implant is seated
into place. The implant site may require
tapping if too much resistance is felt.
Placement with Insertion Tool
The Insertion Tools are used for implant
placement between teeth with long clinical
crowns. They allow for a narrower path of
insertion as compared to placement via the
3inOne Abutment.
Placement with Hand Wrench
Placement Options 3
1
Starter
Drill
2 Depth Drills
2.0mm
x 9mm
Drill
Extender
2.5mm
x 9mm
2.5mm
2.0mm
x 10.5mm x 10.5mm
2.0mm
x 12mm
2.5mm
x 12mm
2.0mm
x 15mm
2.5mm
x 15mm
2.0mm
2.5mm
i nt er n a l
3 Width Increasing Drills
3.0mm
3.2mm
Crestal
Bone Drill
Crestal
Bone Drill
3.5mm
Tap
3.5mm
3.7mm
4.2mm
4.7mm
5.2mm
Crestal
Bone Drill
Crestal
Bone Drill
5mm
Tap
6mm
Tap
5mm
6mm
4mm
Tap
4mm
4
Implant Placement
Paralleling Pins
Ratchet
Spare
Spare
Spare
Spare
Spare
Spare
Handpiece Adapter
Depth Probe
3.5/4.0mm
Insertion Tool
While the implant is still in the vial, the
3inOne Abutment is removed from the
implant. The Insertion Tool is then mated
with the internal hex of the implant and
lightly screwed into place. The implant
can then be placed with the Hand Wrench
and/or Ratchet.
The Insertion Tools may also be used
to adjust the implant’s rotational position
after the removal of the 3inOne Abutment.
Simply mate the Insertion Tool with the
internal hex of the implant and lightly screw
into place. The implant can then be rotated
using the Hand Wrench and/or Ratchet.
.050" Hex
Driver
Hand
Wrench
#6 Round
Bur
Ratchet &
Hand Wrench
Extender
Spare
Ratchet &
Hand Wrench
Adapter
5.0/6.0mm
Insertion Tool
The tool’s
hex engages
the implant’s
internal hex.
The screw
secures the
tool to the
implant.
40
A B U T M E N T R E M O VA L / C O V E R C A P P L A C E M E N T
Implant Placement Level
The implant is advanced into the prepared
site until the bottom of the polished collar is
flush with the crestal ridge.
Soft bone: implant
platform level with
osseous crest
Hard bone:
polished collar
left above
osseous crest
If there is concern that premature loading
during the healing phase may occur,
advance the implant into the site until the
top of the prosthetic platform is flush with
the crestal bone (refer to use of the CBD).
In dense bone, it may be possible to leave
the prosthetic platform slightly higher than
the crest of the osseous ridge.
3inOne Abutment Removal
1
Starter
Drill
2 Depth Drills
2.5mm
x 9mm
2.0mm
x 9mm
Drill
Extender
2.5mm
2.0mm
x 10.5mm x 10.5mm
2.0mm
x 12mm
2.5mm
x 12mm
2.0mm
x 15mm
2.5mm
x 15mm
2.0mm
2.5mm
3 Width Increasing Drills
3.0mm
3.2mm
Crestal
Bone Drill
Crestal
Bone Drill
Crestal
Bone Drill
Crestal
Bone Drill
3.5mm
Tap
4mm
Tap
5mm
Tap
6mm
Tap
5mm
6mm
3.5mm
3.7mm
4.2mm
4mm
4.7mm
5.2mm
TM
S U R G I C A L
4
K I T
Implant Placement
Paralleling Pins
Ratchet
Spare
Spare
Spare
Spare
Spare
Handpiece Adapter
Depth Probe
3.5/4.0mm
Insertion Tool
Spare
.050" Hex
Driver
Hand
Wrench
#6 Round
Bur
Ratchet &
Hand Wrench
Extender
5.0/6.0mm
Ratchet &
Hand Wrench
Adapter
Spare
Insertion Tool
41
The .050" Hex Driver is used for removal of the Abutment
Screw. In less dense bone, or when the implant lacks initial
stability, a hemostat or abutment holder should be used to
grasp the outside of the abutment to provide counter-torque
during the loosening of the Abutment Screw. The 3inOne
Abutment may be removed once the Abutment Screw has
been completely loosened.
The 3inOne Abutment and the Abutment Screw should be
retained with the patient’s chart. It can later be used as an
impression post (when used with the Ball-top Screw) and as a
temporary or final abutment for cement retention.
Cover Cap Placement
1
Starter
Drill
2 Depth Drills
2.0mm
x 9mm
Drill
Extender
2.5mm
x 9mm
2.5mm
2.0mm
x 10.5mm x 10.5mm
2.0mm
x 12mm
2.5mm
x 12mm
2.0mm
x 15mm
2.5mm
x 15mm
3 Width Increasing Drills
3.0mm
3.2mm
Crestal
Bone Drill
Crestal
Bone Drill
3.5mm
Tap
3.5mm
3.7mm
4.2mm
4.7mm
5.2mm
Crestal
Bone Drill
Crestal
Bone Drill
5mm
Tap
6mm
Tap
5mm
6mm
4mm
Tap
4mm
TM
2.0mm
2.5mm
S U R G I C A L
K I T
4
Implant Placement
Paralleling Pins
Ratchet
Spare
Spare
Spare
Spare
Spare
Spare
Handpiece Adapter
3.5/4.0mm
Insertion Tool
.050" Hex
Driver
Hand
Wrench
#6 Round
Bur
Ratchet &
Hand Wrench
Extender
Spare
Ratchet &
Hand Wrench
Adapter
5.0/6.0mm
Insertion Tool
Depth Probe
Following removal of the 3inOne Abutment, the implant
should be thoroughly irrigated to remove blood and other
debris. When a submerged healing technique (two-stage) is
desired, the low-profile surgical Cover Cap is used to seal the
prosthetic platform of the implant. This Cover Cap, included
with each implant, is unscrewed from its holder and inserted
into the implant body via the .050” Hex Driver.
Do not overtighten the Cover Cap. The torque applied during
the tightening process will be transferred to the surrounding
bone and may cause movement of the implant in less dense
bone. An antibacterial paste may be placed on the end of the
Cover Cap to help seal the Cover Cap with the implant body
and decrease the risk of bacterial growth within the implant
body during the healing phase. Following placement of the
Cover Cap, the surgical site should be irrigated and the soft
tissue adapted in a normal surgical fashion.
Caution: Take precautions to prevent the Cover Cap from
being aspirated by the patient.
1 - 8 8 8 - 2 4 6 - 8 3 3 8
H E A L I N G A B U T M E N T S / P O S T- O P P R O C E D U R E S
Bone Profilers
Bone Profiler
Profiler Guide
Bone Profiling Burs are designed to remove and contour excess bone and soft tissue from the area of the prosthetic platform prior to the
seating of a healing or prosthetic abutment. There are three sizes of bone profiling burs, one for each of the three prosthetic platforms:
Ø3.5mm, Ø4.5mm and Ø5.7mm. Their use requires the removal of the surgical Cover Cap from the implant and placement of the profiler
guide (both use the .050” Hex Driver), which will help align the Bone Profiler and protect the implant from damage. The Profiler bur is
used in a latch-type, reduction handpiece under copious amounts of sterile irrigation.
Bone Profilers and guides are not included in the surgical kit. Ordering information can be found on page 23.
Healing Abutment Placement
Healing Abutments are often used after initial bone healing
in a two-stage surgical approach. They may also be used
in lieu of a Cover Cap for a non-submerged healing (singlestage) approach. BioHorizons Internal Healing Abutments
are specific to each of the three prosthetic platform diameters:
Ø3.5mm, Ø4.5mm and Ø5.7mm. They come in three heights
(1mm, 3mm and 5mm) and a choice of narrow, regular and
wide emergence profiles.
A Healing Abutment should be selected so that it extends
through the tissue approximately 1mm. The tissues may be
approximated in the usual fashion.
A gingivectomy or apically positioned flap technique may
be used to reduce the soft tissue thickness and to decrease
sulcular depth around the implant. An apically positioned flap
technique can be easier to accomplish using the suture groove
on the Healing Abutment (see diagram below).
42
CLEANING
Surgical Kit Cleaning
All BioHorizons surgical instruments are provided non-sterile and must be cleaned and sterilized prior to use. Always remove instruments
from the packaging prior to sterilization, and remove and discard packaging materials used to stabilize and secure kits during shipment.
Double-check your surgical instruments to ensure their functionality prior to surgery. Verify the dimensional accuracy of drill shanks using
a Bur Testing Gauge (see facing page). It is recommended to have back-up sterile drills available prior to any surgical procedures.
Cleaning procedure for Surgical Tray and Instrumentation
1. Disassemble the surgical kit and wash the tray using a broad spectrum cleaning or disinfecting agent such as Hu-Friedy Enzymax®
(800-483-7433) or equivalent. Rinse the tray with water and dry thoroughly.
2. Place the instruments in a beaker of detergent solution and sonicate for 10 minutes. Rinse thoroughly.
3. Remove any visible debris or bone fragments with a soft bristle brush. Rinse thoroughly.
4. Rinse instruments with alcohol to remove any soap residue and minerals (important to help prevent corrosion).
5. Blot instruments with a towel and allow them to air dry completely.
6. Check latch-type burs with the bur testing gauge to verify fitness for future use (see facing page). Discard and replace unfit burs.
7. Return instruments to the appropriate location in the surgical tray.
8. Wrap the kit in a double layer of autoclave-approved paper.
9. Use one of three qualified steam sterilization cycles:
a. Pre-vacuum Steam: 132°C (270°F) for five minutes minimum.
b. Gravity Steam: 132°C (270°F) for thirty minutes minimum.
c. Gravity Steam: 121°C (250°F) for fifty minutes minimum.
43
Dry for 20 to 50 minutes as needed. Do not remove the surgical kit from the autoclave until the dry cycle is complete.
Caution: The use of hydrogen peroxide or other oxidizing agents will cause damage to the surface of the instruments. Towel or air-dry all
instrumentation before sterilizing. Drills and taps should be replaced when wear is noticed, such as a decrease in cutting efficiency or when
signs of discoloration appear. BioHorizons recommends replacing the drills after approximately 12 to 20 osteotomy cycles, depending on
the bone density.
It is also recommended that proper testing, cleaning and calibration of sterilization equipment occur frequently to assure that the units are in
proper working order. Equipment operating conditions vary and it is the responsibility of each dental office to ensure that proper sterilization
technique for instrumentation is followed.
Lay out all the surgical instruments into the sterile field in the order of use prior to surgery. This assures a natural progression through the
surgical sequence. The surgical kit is set up in this fashion.
1 - 8 8 8 - 2 4 6 - 8 3 3 8
INSTRUCTIONS FOR USE
Bur Testing Gauge
Also called a “Go/No-Go Gauge”, the Bur Testing Gauge is used to verify the
dimensional accuracy of drill shanks of latch-type burs. Burs in proper condition WILL
fit into the larger diameter hole, but WILL NOT fit into the smaller hole (marked red).
Burs that fail either of these criteria are unfit for use and may become stuck in the
handpiece if used. The gauge is included with all W&H starter packages, and may also
be ordered from page 26.
Instructions For Use
Indications
BioHorizons dental implants may be used in the mandible and maxilla for use as an artificial root structure for single tooth replacement or
as abutments for bridgework and denture retention.
Contraindications
BioHorizons dental implants should not be used in patients who have contraindicating systemic or uncontrolled local diseases such as blood
dyscrasias, diabetes, hyperthyroidism, oral infections or malignancies, renal disease, uncontrolled hypertension, liver problems, leukemia,
severe vascular heart disease, hepatitis, immunosuppressive disorder, pregnancy and/or collagen and bone diseases. Dental implants are
contraindicated in patients where ridge dimensions are insufficient to accommodate proper implant placement without ridge augmentation.
Relative contraindications may include habits such as tobacco use, alcohol consumption, poor oral hygiene, bruxism, nail biting, pencil biting
and/or improper tongue habits depending on severity.
Warnings and Precautions
Implant surgery is a complex dental procedure. Appropriate training in proper technique is strongly recommended prior to implant use.
Improper techniques can result in implant failure and/or loss of supportive bone.
Appropriate x-ray films should be utilized to determine if adequate bone is available, and to determine the location of important anatomical
landmarks, such as the mandibular canal, maxillary sinuses and adjacent teeth.
Implants can break during function for a number of reasons including overloading due to improper occlusion, metal fatigue and/or
overtightening of the implant during insertion. An adequate number of implants should be used to provide support and to distribute the
load to the abutments. A certain percentage of implants may fail to achieve or maintain osseointegration, as demonstrated by mobility, and
should be removed. Potential causes of abutment fracture include, but are not limited to: casting beyond a 30° angle, casting titanium above
2010°F, inadequate implant support when attached to periodontically compromised teeth, non-passive fit of superstructure, overloading due
to improper occlusion, incomplete seating of a cemented abutment, too long a span of bridge and excessive cantilevering of pontics.
Peri-operative oral rinses with a 0.12% Chlorhexidine Digluconate solution have been shown to significantly lower the incidence of
post-implantation infectious complications. (The Influence of 0.12% Chlorhexidine Digluconate Rinses on the Incidence of Infectious
Complications and Implant Success. Lambert, Paul M., et al, J Oral Maxillofacial Surgery 55:25-30, 1997, Suppl 5.) A pre-operative 30second rinse is recommended, followed by twice-daily rinses for two weeks following surgery.
Complications and Adverse Effects
The risks and complications with BioHorizons dental implants are similar to those of other dental implants and include, but are not limited
to: (1) infection requiring revision of the dental implant; (2) nerve damage that could cause permanent weakness, numbness and/or pain;
(3) allergic reaction(s) to the implant material; (4) histologic responses possibly involving macrophages and/or fibroblasts; (5) formation of
fat emboli; (6) perforation of the maxillary sinus; (7) perforation of the labial and lingual plates; (8) breakage of the implant or abutment; (9)
loosening of the implant requiring revision surgery; (10) loosening of the Abutment Screw and/or retaining screw; (11) bone loss possibly
resulting in revision or removal.
Handling and Sterilization
The implants are supplied sterile and should be considered sterile unless the package has been opened or damaged. Using accepted
sterile technique, remove from the package only after the correct size has been determined and the operative site has been prepared for
final implantation. Always handle the products with powder-free gloves, and avoid contact with hard objects that may damage the surface of
the implant. Surgical components and metal laboratory components can be cleaned and then re-sterilized using an appropriate autoclave
cycle. Implants are single use only, and re-use should not be attempted. BioHorizons assumes no responsibility for attempted re-use or
re-sterilization of dental implants.
44
P O S T- O P E R A T I V E I N S T R U C T I O N S
Post-Operative Instructions
A period of unloaded healing time is often recommended. This is dependent on individual patient healing rates and bone quality of the
implant site. Each case must be independently evaluated. This unloaded healing period allows for integration between the bone and
implant surface.
The patient must be instructed to follow a post-surgical regimen including cold packs for 24 hours post-implantation. The patient’s diet
should consist of soft foods and possibly dietary supplements. Pharmacological therapy should be considered as the patient’s condition
dictates.
If a removable prosthesis is used during the initial healing phase, it is recommended that a soft re-line be used to prevent pressure on the
surgical site. This soft re-line should be relieved over the implant sites. The patient should be checked periodically to monitor healing
of the soft tissues and bone using radiographic evaluations.
Notes:
45
1 - 8 8 8 - 2 4 6 - 8 3 3 8
IMPRESSION TECHNIQUE TYPES
Impression Techniques - BioHorizons Internal
Stone models made from impressions form the foundation for the restoration, and care must be taken ensure as
accurate a transfer as possible. Doing so will prevent the loss of time and the expensive of re-works. There are three
types of impression techniques utilized in implant dentistry:
Prepared Abutment Impression
Impression types 1
P
An intra-oral impression is made of
prepared abutment(s), similar to a
standard crown & bridge impression.
Implant Level Impression
Impression types 2
P
An intra-oral impression is made,
transferring the emergence of the
implant. The implant’s location and
angle are recorded; with or without the
orientation of the internal hex.
Abutment for Screw Level Impression
An intra-oral impression is made
recording the position of Abutments for
Screw that have been placed onto the
implants. Abutments for Screw location
and angle are recorded for fabrication
of a screw retained prosthesis. See
the BioHorizons Internal Prosthetic
Manual for details regarding Abutment
Level impressions.
46
P
Impression types 3
P
ABT
IMPRESSION METHODS
There are two methods for making Implant Level and Abutment for Screw Level Impressions:
(1) Closed Tray (Indirect) Transfer Technique or (2) Open Tray (Direct) Pick-up Technique.
Note: Prepared Abutment impressions are always made using the Closed Tray technique.
The method chosen is dependent on the treatment plan and the degree of accuracy needed to fabricate the final
restoration. The Open Tray Technique is more accurate than the Closed Tray Technique, and is recommended in
multiple unit restorations.
1
Impression Methods
Closed Tray (Indirect) Transfer
This indirect impression technique records the soft tissue profile
as well as the implant’s location. The implant’s internal hex
orientation is transferred when using the 3inOne Abutment with
a Ball-top Screw or any of the Indirect, Hexed (Closed Tray)
Copings. If the hex location is not needed for the prosthesis
fabrication, the Direct Pick-up, Non-hexed (Open Tray) Coping
may be used.
In this technique, the Indirect Transfer Coping remains in the
mouth after the impression is removed from the mouth. The
coping is then removed from the mouth and connected with
the appropriate Implant Analog. The coping/analog assembly is
then indexed (transferred) into its corresponding position in the
impression. A working model is poured in dental stone, providing
a replica of the implant’s location in the patient’s mouth.
47
2
Impression Methods
Open Tray (Direct) Pick-up
This impression technique records the soft tissue profile as well
as the implant’s location. The implant’s internal hex orientation
is transferred when using the Direct Pick-up Hexed (Open Tray)
Copings. If the hex location is not needed for the prosthesis
fabrication, the Direct Pick-up Non-Hexed (Open Tray) Copings
are used.
In the open tray transfer technique, the Direct Pick-up Coping
remains in the impression when it is removed from the mouth.
For this technique, a custom tray or modified stock tray with a
screw access hole in the area above the implant is required.
The Direct Coping Screw that holds the Direct Pick-up Coping
in place while the impression is made is removed through the
access hole after the material sets. The impression is removed
with the Direct Pick-up Coping embedded within the impression.
The Implant Analog is connected to the embedded coping and a
working model is poured in dental stone, providing a replica of
the implant’s location in the patient’s mouth.
1 - 8 8 8 - 2 4 6 - 8 3 3 8
C L O S E D T R AY I N D I R E C T T R A N S F E R
Implant Level Impression (Hexed)
Closed Tray,
Indirect Transfer Technique
Remove Healing Abutment
Clinical
1
Remove the Healing Abutment with the .050” Hex Driver. Make
sure that the implant prosthetic platform is free of bone and soft
tissue.
The emergence of the impression coping selected should
match the emergence of the Healing Abutment and the
intended final abutment (either Narrow, Regular or Wide).
Custom Cast emergence will be determined by the lab
prescription.
Helpful Hint
When placing impression copings on multiple implants,
remove one Healing Abutment at a time, replacing it
immediately with the impression coping. This prevents
the possibility of soft tissue collapsing onto the implant.
Work from the posterior to the anterior.
48
Place impression coping
Option A - Seat the 3inOne Abutment and secure it with a Balltop Screw (hand-tighten).
Option B - Seat the Indirect Transfer Coping and secure it with
the included screw (hand-tighten).
If practical, orient the flat side of the abutment/coping to the facial
for easier indexing.
Take a radiograph along the long axis of the implant to ensure
the coping is fully seated.
Clinical
Option A
Option B
2
C L O S E D T R AY I N D I R E C T T R A N S F E R
3
Block out screw access hole
Clinical
Option A
Block out the hex hole on top of the Ball-top Screw (Option A); or
the screw access hole of the Indirect Transfer Coping (Option B)
with a material of choice.
Option B
4
Clinical
49
Apply impression material
Syringe a light or medium-bodied impression material around the
coping assembly and record a full-arch impression with a medium
or heavy-bodied material.
Remove the coping assembly after the tray has been removed.
Replace the Healing Abutment immediately to prevent soft tissue
collapse.
Send to Lab
• Impression
• Impression coping, either:
• 3inOne/Ball-top Screw Combo, or
• Indirect Transfer Coping
• Abutment Screw (comes with 3inOne)
• Implant Analog
• Bite registration
• Opposing model or impression
• Shade
1 - 8 8 8 - 2 4 6 - 8 3 3 8
C L O S E D T R AY I N D I R E C T T R A N S F E R
Assemble analog
Option A - Assemble the 3inOne Abutment with the appropriate
diameter Implant Analog using the Ball-top Screw.
Lab
Option A
5
Option B
Option B - Assemble the Indirect Transfer Coping with the
appropriate diameter Implant Analog using the included screw
with the .050” Hex Driver.
Insert the coping assembly into the corresponding location in the
impression, ensuring that the flat of the coping aligns with the
corresponding indice in the impression.
Create soft tissue model
Lab
6
50
A soft tissue model material is recommended around the implant;
verify analogs are seated properly and apply lubricant around the
analogs where soft tissue needs to be added.
Fabricate stone model
Fabricate a working cast. Articulate according to normal laboratory
procedures.
Lab
7
O P E N T R AY D I R E C T T R A N S F E R
Implant Level Impression (Hexed and Non-hexed)
Open Tray,
Direct Pick-up Technique
IMPORTANT
Open Tray Direct Pick-up Impression Technique
The Direct Pick-up impression technique requires the use of a custom tray or modified stock tray with screw access holes over
the area of the implants. The holes allow the long screws to protrude through the top of the tray. See the BioHorizons Internal
Prosthetic Manual for custom tray fabrication. It is available through Customer Care (888-246-8338) or viewed in .pdf format at
www.biohorizons.com.
1
Clinical
Remove Healing Abutment
Remove the Healing Abutment with the .050” Hex Driver. Make
sure that the implant prosthetic platform is free of bone and soft
tissue.
The emergence of the impression coping selected should
match the emergence of the Healing Abutment and the
intended final abutment (either Narrow, Regular or Wide).
Custom Cast abutment emergence will be determined by
laboratory prescription.
51
Helpful Hint
When placing impression copings on multiple implants,
remove one Healing Abutment at a time, replacing it
immediately with the selected impression coping. This
prevents the possibility of soft tissue collapsing onto the
implant. Work from the posterior to the anterior.
2
Clinical
Place impression coping
Place the appropriate diameter Direct Pick-up Coping (either
hexed or non-hexed) on the implant body and retain with the
included Direct Pick-up Coping Screw (hand-tighten).
These screws feature a knurled top to aid in manual insertion, as
well as a .050” hex access hole for insertion with the Hex Driver.
Take a radiograph along the long axis of the implant to ensure the
coping is fully seated.
1 - 8 8 8 - 2 4 6 - 8 3 3 8
O P E N T R AY D I R E C T T R A N S F E R
Try in impression tray
Clinical
3
Clinical
4
Try in the impression tray to verify that the coping screw
protrudes through the tray.
The custom tray is fabricated using a tray material of choice.
A window is cut out of the tray over the area of the implant to
allow clearance for the coping screw.
Alternatively, a stock impression tray may be modified to
accommodate the coping screw which will protrude through
the top of the tray.
Make an impression
Syringe a light or medium-bodied impression material around
the coping assembly. Load the impression tray with a medium
or heavy-bodied impression material and seat it in the mouth.
Wipe excess impression material off the coping screw before
it sets.
52
Remove coping screws
After the impression material has set, first remove the coping
screw, and then remove the tray from the mouth. Verify that the
impression material is completely adapted around the pick-up
copings.
Replace the Healing Abutment immediately to prevent soft tissue
collapse.
Send to Lab
• Impression with coping inside
• Coping screw
• Implant Analog
• Abutment and screw (if chosen)
• Bite registration
• Opposing model or impression
• Shade
Clinical
5
6
Lab
Assemble analog
Assemble the appropriate diameter Implant Analog to the Direct
Pick-up Coping with the coping screw.
A soft tissue model material is recommended around the implant;
verify analogs are seated properly and apply lubricant around the
analogs where soft tissue needs to be added.
7
53
Lab
Fabricate stone model
Fabricate a working cast. Articulate according to normal laboratory
procedures.
1 - 8 8 8 - 2 4 6 - 8 3 3 8
NOTES & REFERENCES
Notes:
54
References
1. Data on file, BioHorizons Implant Systems, Inc.
2. Case Report and Literature Review: A Bioengineered Implant for a Predetermined Bone Cellular Response to Loading Forces. Misch CE, Bidez MW
and Sharawy M. J Periodontology, September 2001
3. Preliminary Evaluation of a New Dental Implant Design in Canine Models. Bumgardner et.al Implant Dentistry, Vol 3, No.3, 2000
4. Five-Year Prospective Study of Immediate/Early Loading of Fixed Prostheses in Completely Edentulous Jaws with a Bone Quality-Based Implant
System. Misch CE and Degidi M. Clinical Implant Dentistry and Related Research, 17-27, Vol. 5 No. 1, 2003
5. Immediate Functional and Non-Functional Loading of Dental Implants: a 2- to 60-Month Follow-Up Study of 646 Titanium Implants. Degidi M and
Piattelli A. J. Periodontology, February 2003
6. A Prospective Multicenter Clinical Investigation of a Bone-Quality Based Implant System. Kline R, Hoar J, Beck G, Hazen R, Resnik R and Crawford
E. Implant Dentistry, 224-234, Vol. 11 No. 3, 2002
7. Imbedded Particulate Contaminates in Textures Metal Implant Surfaces, Ricci JL, Lummer FJ, Alexander H and Casar RS. J. Applied. Bio., Vol. 3,
1992
8. Histomorphometric Analysis of the Bone-Implant Contact Obtained with 4 Different Implant Surface Treatments Placed Side by Side in the Dog
Mandible. Novaes, A.B., Souza, Sergio L.S., de Olive ria, P.T. Souza, Adriana M. M.S. The International Journal of Oral and Maxillofacial Implants, 17:
337-383, 2002.
9. Survival of Hydroxyapatite-Coated Implants: A Meta-Analysis Review. Lee JJ, Rouhfar L and Beirne OR. Oral Maxillofacial Surgery, 58:1372-1379,
2000
10. Effects of Implant Thread Geometry on Percentage of Osseointegration and Resistance to Reverse Torque in the Tibia of Rabbits. Steigenga J,
Al-Shammari K, Misch C, Nociti F and Wang H-L, J Periodontology, September 2004
11. The Influence of 0.12%Chlorhexidine Digluconate Rinses on the Incidence of Infectious Complications and Implant Success. Lambert P, Morris
H and Shigeru O. J Oral Maxillofac Surg, 1997, 55:25-30 Suppl 5
BioHorizons USA
One Perimeter Park South
Birmingham, AL 35243
Customer Care / Servicio al Cliente:
888-246-8338 or 205-967-7880
Shipping Options / Elección de Envíos:
UPS Next Day Early AM
UPS Next Day Air
UPS Next Day Air Saver
UPS 2nd Day Air AM
UPS 3 Day Select
UPS Ground
(by 8:30 am)*
(by 10:30 am next day)*
(by 4:30 pm next day)*
(by 12:00 pm 2nd day)
(by 5:00 pm 3rd day)
BioHorizons products may also be ordered by fax 800-236-1271, or through your Product Support Specialist. We process and ship all orders received by noon Central Time
the same day. For your convenience we accept Visa, MasterCard, American Express, Money Orders, Certified Checks, or C.O.D. Standard payment terms are net 30 days
from invoice date.
Los productos de BioHorizons se pueden también pedir por FAX 1-800-236-1271, o a través de su representante de la compañía. Procesamos y enviamos todas las
órdenes recibidas el mismo día, siempre y cuando las mismas lleguen antes de las 12 del mediodía zona Central. Para su conveniencia aceptamos tarjetas de crédito
Visa, MasterCard, American Express, giro postal, cheques certificados o C.O.D. Los términos de pago normal son 30 días netos de la fecha de la factura.
BioHorizons Canada
21 Amber Street, Unit # 7
Markham, Ontario L3R 4Z3
Customer Care / Service à la Clientèle:
866-468-8338 or / ou 905-944-1700
Shipping Options / Options de Livraison:
UPS Next Day Early AM
UPS Next Day Air
UPS Next Day Air Saver
UPS 2nd Day Air AM
UPS 3 Day Select
UPS Ground
(by / avant 8:30am next day / le lendemain matin)*
(by / avant 10:30am next day / le lendemain matin)*
(by / avant 4:30pm next day / le lendemain)*
(by / avant 12:00pm 2nd day / le 2e jour)
(by / avant 5:00pm 3rd day / le 3e jour)
BioHorizons products may also be ordered by fax 905-944-1894, or through your Product Support Specialist. We process and ship all orders received by noon Central
Time the same day. For your convenience we accept Visa, MasterCard, American Express, Money Orders, Certified Checks, or C.O.D. Standard payment terms are net
30 days from invoice date.
Vous pouvez commander les produits BioHorizons par télécopieur en composant le 905-944-1894 ou en consultant votre représentant spécialisé. Nous livrons le jour
même toutes les commandes reçues au plus tard à midi, heure centrale. De plus, les paiments peuvent être réglés par cartes de crédit Visa, MasterCard et American
Express ou par mandat-poste, chèque certifié ou payable sur livraison. Le paiement doit être effectué dans les trente (30) jours suivant la date de commande retrouvée sur
la facture.
BioHorizons Ibérica
Bocángel, 38
28028 Madrid, España
Opciones de Envío
BioHorizons Ibérica dispone de una amplia variedad de
métodos de envío. Para más información, contacte por
favor con nuestro departamento de Atención al Cliente.
Atención al Cliente:
+34 91 713 10 84
Los productos BioHorizons se pueden solicitar por teléfono, +34 91 713 10 84, por fax, +34 91 355 83 75, a través de uno de nuestros Especialistas de Producto o por
correo electrónico: [email protected].
BioHorizons products are cleared for sale in the European Union under the EU Medical Device Directive 93/42/EEC. BioHorizons is also proud to be
registered to ISO 13485:2003, the international quality management system standard for medical devices.
All Rights Reserved. Patent# 6,083,004, 5,628,630, 5,927,979, 5,954,504, 5,823,777, 6,045,361, 6,068,480, 6,402,759 & Patents Pending.
© 2005 BioHorizons Implant Systems, Inc. ML0115 JUL 2005
w w w . b i o h o r i z o n s . c o m