1
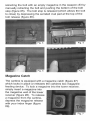
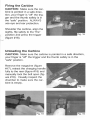
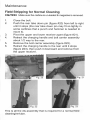
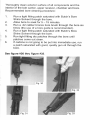
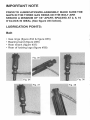
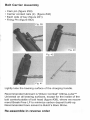
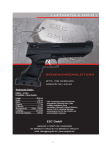
Wilson Combaf
AR Style Tactical Carbine
Operation and Maintenance Manual
WARNING
• Every gun is ALWAYS loaded!
• NEVER let the muzzle cover anything which you are not willing
to destroy!
• Keep your finger OFF the trigger till your sights are ON THE
TARGET!
• ALWAYS be sure of your target!
Operation:
Safety
The carbine is equipped with a manual thumb operated safety
that is located on the left side of the lower receiver. When the
safety is in the "safe" position (figure #1) the trigger action is
blocked and the carbine will not fire. Note: The trigger pull
adjustment on models with JP trigger groups can be damaged if
you try to force the thumb safety to the "safe" position with the
hammer in the forward (fired) position. To fire the carbine flip the
safety lever down and forward to the "fire" position (figure #2).
Bolt Stop
The carbine is equipped with a bolt stop (figure #3) which locks
the bolt to the rear after the last shot in the magazine has been
fired (figure #4). The bolt stop can be engaged in three ways.
#1 by firing the last shot in the magazine; #2 by manually
retracting the bolt with an empty magazine in the weapon; #3 by
manually retracting the bolt and pushing the bottom of the bolt
stop (figure #5). The bolt stop is released (which allows the bolt
to close) by depressing the serrated oval pad at the top of the
bolt release (figure #6).
Magazine Catch
The carbine is equipped with a magazine catch (figure #7)
which locks in place or releases the carbines box magazine
feeding device. To lock a magazine into the lower receiver,
simply insert a magazine into
the magazine well of the lower
receiver (figure #8). To release
a magazine from the carbine,
depress the magazine release
with your index finger (figure
#9).
Ejection Port Cover
The carbine is equipped with an ejection port cover (figure #10
& #11) to keep debris out of the action when the carbine is not
being fired. The ejection port cover can be closed with the bolt
in either the open or closed position and will snap open when
the bolt is either opened or closed.
Collapsible Butt Stock
The carbine may be fitted with a 6 position collapsible butt stock
(figure #12). To close or retract —
the stock, depress the lock lever
and slide the rear portion of the
stock in or out. Releasing the
lock lever will allow the stock to
lock in any of the 6 length posi
tions.
Fig. 12
Charging Handle
The carbine is equipped with a charging handle (figure #13) to
retract the bolt carrier assembly and load and un-load the car
bine. To retract the bolt, depress the charging handle latch on
the left front of the charging handle and retract to the rear (fig
ure #14). To close the bolt, simply release the charging handle
and allow the bolt carrier assembly/charging handle to move
forward.
Fig. 14
Loading the Carbine
CAUTION: Make sure the carbine is pointed in a safe direction,
your finger is "off' the trigger and the thumb safety is in the
"safe" position.
The carbine can be loaded with the bolt in either the open or
closed position. To load with the bolt open, insert a loaded
magazine (figure #15) into the lower receiver and make sure it
locks into place by pulling down on it. Release the bolt stop
with either your left hand thumb or the open palm of your left
hand. To load with the bolt
closed, insert a loaded maga
zine (figure #15) and make sure
it is locked into place. Retract
the charging handle fully to the
rear and release then pull on
the right rear of the charging
handle to make sure it is locked.
Fig. 15
Firing the Carbine
CAUTION: Make sure the car
bine is pointed in a safe direc
tion, your finger is "off' the trig
ger and the thumb safety is in
the "safe" position. ALWAYS
use eye and ear protection.
Shoulder the carbine, align the
sights, flip safety to the "fire"
position and press the trigger
(figure #16).
ig. 16
Unloading the Carbine
CAUTION: Make sure the carbine is pointed in a safe direction,
your finger is "off' the trigger and the thumb safety is in the
"safe" position.
Remove the magazine (figure
#17), retract the charging handle
fully to the rear (figure #18) and
manually lock the bolt open (fig
ure #19). Visually inspect the
chamber to make sure the car
bine is empty.
Fig. 19
Accuracy Guarantee/Recommended Ammunition:
1 MOA or 2 MOA accuracy guarantees are based on the rifles
ability to place 3 consecutive shots (center to center) into the
guaranteed group size from a distance of 100 yards by at least
one of the following ammunition types. This is based on an
experienced shooter using a 10x or higher power optic, shoot
ing from a double sandbag benchrest on a calm day.
Federal Gold Metal 69gr HPBT Match
Federal Premium 55gr HPBT Match
Winchester 53gr HP
Hornady 55gr V-Max
Hornady 53gr HP Match
Black Hills 52gr BTHP Match
Black Hills 68gr BTHP Match
Black Hills 69gr HPBT Match
Remington 62gr HP Match
Handloads:
24.5gr AA2460, 69gr Sierra HPBT Match* or 68gr Hornady BTHP
24.5gr Win 748, 69gr Sierra HPBT Match or 68gr Hornady BTHP
26gr Win 748, 52gr Hornady BTHP Match*
For CQB training ammunition we recommend the Federal
American Eagle 55gr FMJ load.
* We have found these two loads to be extremely accurate in
our carbines.
NOTE: Your Wilson Combat® carbine is a high quality precision
product, please DO NOT feed it cheap Russian or Chinese
ammunition. In addition we have found some of this "non-corro
sive" ammunition to be mildly corrosive and will damage your
carbine if it is not cleaned promptly after use.
Maintenance:
Field Stripping for Normal Cleaning
CAUTION: Make sure the carbine is un-loaded &magazine is removed.
Close the bolt.
Push the rear take down pin (figure #20) from left to right
until it stops (the rear take down pin may fit so tightly in
some carbines that a punch and hammer is needed to
move it).
Pivot the upper and lower receiver apart (figure #21).
Retract the charging handle and bolt carrier assembly
about 1/2 way to the rear.
Remove the bolt carrier assembly (figure #22).
Retract the charging handle to the rear until it stops
(figure #23), then push it downward and remove from
the upper receiver.
Fig. 23
This is all the dis-assembly that is required for a normal field
cleaning/re-lube.
For a thorough cleaning, you will need to dis-assemble the bolt
carrier assembly.
1.
2.
3.
4.
5.
Remove the firing pin retaining pin at the left/center of
the bolt carrier (figure #24).
Remove the firing pin (figure #25).
Depress the bolt head fully to the rear, turn the cam pin
90° and remove (figure #26).
The bolt head can now be removed by pulling it out of
the front of the bolt carrier (figure #27).
Push the extractor pin in on the right of bolt (figure #28)
and pull extractor pin out on the left of the bolt, and then
remove the extractor from the bolt
(figure #29).
Fig. 26
Fig. 28
••••••••I
Fig. 27
Fig. 29
Thoroughly clean exterior surface of all components and the
interior of the bolt carrier, upper receiver, chamber and bore.
Recommended bore cleaning procedure:
1.
Run a tight fitting patch saturated with Butch's Bore
Shine Solvent through the bore.
2.
Allow bore to soak for 5 - 15 minutes.
3.
Run a .22 caliber bronze bore brush through the bore six
times (the use of a bore guide is recommended).
Run a tight fitting patch saturated with Butch's Bore
Shine Solvent through the bore.
Run tight fitting dry patches through the bore until
4.
5.
patches come out clean.
6.
If carbine is not going to be put into immediate use, run
a patch saturated with good, quality gun oil through the
bore.
See figure #30 thru figure #33.
Fig. 33
IMPORTANT NOTE
PRIOR TO LUBRICATION/RE-ASSEMBLY, MAKE SURE THE
GAPS IN THE THREE GAS RINGS ON THE BOLT ARE
SPACED A MINIMUM OF 1/8" APART, SPACING AT 2, 6,10
O'CLOCK IS IDEAL (See figure #34 below).
LUBRICATION POINTS:
Bolt
•
•
•
•
Gas rings (figure #34 & figure #35)
Bearing band (figure #36)
Rear shank (figure #37)
Rear of locking lugs (figure #38)
Fig. 37
Fig. 38
Bolt Carrier Assembly
•
•
•
•
Cam pin (figure #39)
Carrier contact rails (4) (figure #40)
Each side of key (figure #41)
Firing Pin (figure #42)
Fig. 39
Fig. 41
Lightly lube the bearing surface of the charging handle.
Recommended lubricant is Wilson Combat® Ultima-Lube™
Universal on all bearing surfaces, except for the inside of the
bolt carrier/outside of bolt head (figure #39), where we recom
mend Break-Free LP to minimize carbon deposit build-up.
Recommended bore solvent is Butch's Bore Shine.
Re-assemble in reverse order
Magazines
The magazine is one of the most critical components of the ARstyle system. The best quality carbines, using the best quality
ammunition will NOT function reliably with poor quality maga
zines. We recommend the use of genuine US Gl contract alu
minum or H&K steel magazines only. We have found the 20
round US Gl and H&K 30 round magazines to be the most reli
able. Earlier production Colt magazines were of high quality, but
we have had problems with current production units. We do not
recommend the use of steel aftermarket magazines such as the
ProMag or USA brands.
NOTE: To assure optimum reliability all 20 and 30 round maga
zines should be downloaded by two (2) rounds (18 or 28 rounds
respectively).
Cleaning the magazine
1)
Remove all ammunition from magazine
2)
Use a small screwdriver or punch to pry the base plate
away from the body (figure #43)
3)
Push the base plate rearward slowly and carefully
(figure #44)
WARNING Be ready to control the spring as the base plate is
removed.
4)
Remove the spring and follower from the magazine
(figure #45).
5)
Clean all the components before wiping them with a
lightly oiled cloth.
6)
Wipe dry with dry cloth.
Re-assemble in reverse order
Manufacturer recommended Maintenance Schedule
For the Wilson Combat® AR Style Tactical Carbines
Definitions:
Normal Use: Shooting the tactical rifle in regular weather con
ditions and temperature ranges with jacketed factory ammuni
tion, such as M855 Ball, allowing the rifle barrel to cool properly
after rapid fire shots. Normal use can be further defined as fir
ing 1000 rounds of ammunition over the course of a calendar
year in at least 4 different shooting sessions.
Heavy Use: Shooting the tactical rifle in Adverse
Environmental Conditions or with Special Ammunition.
Prolonged rapid fire shooting drills and some types of CQB
training are also considered heavy use.
Adverse Environmental Conditions: Extremely hot, cold,
humid or wet weather conditions.
Inspection: Examining the rifle component described to evalu
ate it for signs of wear, misuse or breakage.
Magazine: Critical part of the cartridge feeding system that
must be maintained just like the carbine.
Special Ammunition: Ammunition designed for special appli
cations. Some special ammunition's are Simunitions, tracers,
incendiary, etc.
Field Clean: Wipe clean critical parts such as bolt carrier and
bolt face. Clean inside of upper receiver, chamber and barrel.
Detail Clean: Complete field strip, degrease and clean all parts
specified and clean chamber & barrel of entire weapon. Inspect
parts for abnormal wear or breakage.
Recommended Maintenance Schedule:
Normal Use and Regular Ammunition
Number of rounds
Field Clean &
Detail Clean &
Fired
Re-lubricate
Re-lubricate
Weapon
Weapon
200
Inspect Weapon
Magazines
X
X
X
X
500
Field Strip &
Magazines
Heavy Usage and Special Environmental Conditions
• These recommendations are meant as guidelines only.
Before using your Tactical Carbine with Special Ammunition or
in Adverse Environmental Conditions, you should inspect the
weapon carefully after every 50 rounds to establish ideal main
tenance intervals for your specific conditions.
Number of rounds
Re-lubricate
Detail Clean &
Fired
Weapon
Re-lubricate
Inspect Weapon
Magazines
Field Strip &
Magazines
Weapon
100
X
150
X
200
X
X
X
Part Replacement Schedule:
Part Name:
Replace After:
Extractor
10,000 rounds
Extractor Spring & O-ring
5,000 rounds
Bolt Cam Pin
10,000 rounds
Bolt Head
15,000 rounds
Magazine Assembly
1,500 rds per mag. or damage
evident
j
NOTE: All cleaning and maintenance supplies mentioned in this
manual are available from Brownell's, phone # (641) 623-5401.
Wilson Combat®
On Your Side®
2234 CR 719
Berryville, AR 72616-4573
1-800-955-4856
www.wilsoncombat.com • [email protected]
Copyright © 2005/2006


![2013 Gun List internet copy[2]](http://vs1.manualzilla.com/store/data/005851443_1-16b4e1bd3fc391c408d2005c48a2e336-150x150.png)