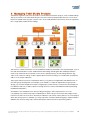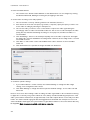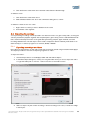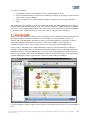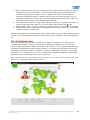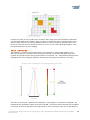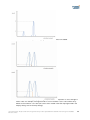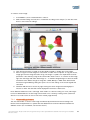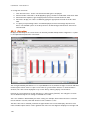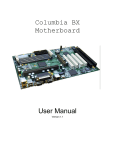
1
UserManual
Tobii ® Technology
Software Release 2.2
This document contains information proprietary to Tobii Technology AB . The contents are confidential and any disclosure to
persons other than officers, employees, agents or subcontractors of the owner or licensee of this document, without the
prior written consent of Tobii Technology AB, is strictly prohibited. No part of this publication may be reproduced, stored in
retrieval system, or transmitted in any form or by any means, electronic or mechanical, including photocopying and
recording, without the prior consent of the copyright holder.
Manual release 1.0, September 2010
Tobii Technology AB reserves the right to change the content of this manual without prior notice. Changes due to
typographical errors, innacuracies or modifications in programs and/or equipment might be implemented at any time.
Please check the Tobii web site www.tobii.com for updated versions of this document.
All rights reserved.
© Tobii Technology AB
www.tobii.com
Preface
Tobii StudioTM 2.2
Tobii StudioTM offers a comprehensive platform for the recording and analysis of eye gaze data, facilitating
the interpretation of human behavior, consumer responses, and psychology. Combining an easy
preparation for testing procedures and advanced tools for visualization and analysis, eye tracking data is
easily processed for useful comparison, interpretation, and presentation. A broad range of studies is
supported, from usability testing and market research to psychology and ocular-motor physiological
experiments. The Tobii Studio’s™ intuitive workflow, along with its advanced analysis tools, allow for both
large and small studies to be carried out in a timely and cost-efficient way, without the need for extensive
training.
Tobii Studio™ supports a large variety of stimuli and allows both multiple and different stimuli types to be
combined into a single recording. A holistic view of behavior is achieved by integrating the recording of
eye tracking data with user video, sound, keystrokes, mouse clicks, and other data sources into a single
solution.
Usability studies
Tobii Studio™ is very well suited for evaluating user experience in regard to:
•
•
•
•
•
•
Websites
Software
Computer games
Interactive TV
Handheld devices
Other physical products
Advertising testing
Tobii Studio™ is ideal for testing advertising design on a variety of media:
•
•
•
•
•
Packaging and retail shelf design and placement
Web advertising
TV commercials
Print advertising, digitally scanned and presented on a monitor
Print advertising, using the actual physical print
Psychology & physiology research
Tobii Studio™ is suitable for a wide range of psychological and physiological experiments, such as:
•
•
•
•
•
Infant research
General psychological response studies, including the use of scan-paths, gaze distribution, gaze
response times, and manual response times
Studies of autism, ADHD, and schizophrenia
Reading studies
Studies of ocular-motor behavior and vision deficiencies
A valid license key is needed to run Tobii Studio™. The license can be found on the Tobii Studio™ CD
cover. It can also be obtained from Tobii by contacting Tobii Support.
i
Offline help can be accessed by clicking the question mark icon in the different views in Tobii Studio™.
The online help can also be reached from the Help menu.
Internet Resources
Tobii StudioTM related material, such as release notes, manuals and detailed system recommendations can
be downloaded from the Support & Download section at www.tobii.com. To download the available
material, you need to use your product license key or contact Tobii Support for login details.
You can also find other Tobii StudioTM materials at various social media sites, such as YouTube.com (Tobii
StudioTM demo and short tips videos), Scribd.com and SlideShare.net. To access those materials, go to
the respective website and search for TobiiEyeTracking, Tobii, or Tobii Eye Trackers, or visit the Products
& Services section at www.tobii.com.
Additional Publications and Resources
For additional information on how to use Tobii StudioTM you can watch the video walkthrough and practice
with the Tobii StudioTM Tutorial Project that is included on the Tobii StudioTM Installation CD, or
downloaded from www.tobii.com (Products & Services section).
Information on different configurations for the Tobii TX Series Eye Tracker setups can be found in the eye
tracker user manual that is shipped with the eye tracker. If the manual has been misplaced or lost, you can
download a PDF version of the manual from the Support & Download section at www.tobii.com.
Detailed documentation on Tobii StudioTM timing of stimulus display, as well as Tobii Eye Trackers sample
timing information, is available upon request. Contact Tobii Support or your sales representative in your
area to obtain a copy of the Timing Guide for Tobii Eye Trackers and the Eye Tracking Software
whitepaper.
E-Prime® Extensions for Tobii combine E-Prime® Professional Stimulus Presentation Software with the
ease of use of Tobii Eye Trackers and Tobii Studio’s visualizations and AOI analysis. The E-Prime®
Extensions for Tobii includes the script necessary to integrate E-Prime with Tobii Eye Tracking
Technology. E-Prime® Extensions for Tobii documentation can be downloaded from www.tobii.com
(Support & Download section) and http://www.pstnet.com/eprime.cfm (Support section). To download
the documents you need to have valid licenses for E-Prime®, E-Prime® Extensions for Tobii and Tobii
StudioTM. Contact Tobii Support and register at the PST Web Support Site.
Training
Tobii Technology provides Tobii StudioTM online and onsite training. Our training solutions are tailored to fit
our clients’ knowledge levels and needs, and cover everything from how to use our products, to basic
understanding of eye tracking methodology. For more details on the available courses, visit the Products &
Services section at www.tobii.com or contact the Tobii sales representative in your area. Alternatively, you
can also send an e-mail to [email protected].
Technical Support
Tobii Technology Technical Support services are available to customers with a valid support and upgrade
contract. Customers may contact Tobii Technical Support for assistance in installing and using Tobii
StudioTM and Tobii Eye Trackers and to obtain information on recommended and supported hardware and
OS environments. To reach Technical Support, use the following contact phone numbers and e-mail
addresses.
ii
Germany and Eastern Europe
Languages: German and English
Phone: +49 69 24 75 03 427
Email: [email protected]
North America and Mexico
Language: English
Phone: +1 703 738 1320
Email: [email protected]
Japan
Language: Japanese
Phone: +81 3 5793 3316
Email: [email protected]
Sweden & Rest of the World
Languages: Swedish, English, German, French and Spanish
Phone: +46 8 6636003
Email: [email protected]
Tobii StudioTM Editions
Tobii StudioTM is available in three editions: Basic, Professional and Enterprise. The table below shows the
features available in each of the Tobii StudioTM editions.
Features
Test Design
Instruction stimuli
Image stimuli
Basic
Professional
Enterprise
•
•
•
•
•
•
•
•
•
•
•
•
•
•
•
•
•
•
•
•
•
•
•
•
•
•
•
•
•
•
•
•
•
•
•
•
•
•
•
•
•
•
•
•
•
•
Movie stimuli
Web stimuli
PDF stimuli
Questionnaire stimuli
Scene camera
External video
Recording
Eye gaze
Independent variables
Stimuli-related events
Keystrokes and mouse clicks
•
•
•
•
Web page transitions and scrolling (Internet Explorer)
Event Logging
User video and sound
Local live viewer
Remote live viewer over IP
Retrospective Think Aloud (RTA)
Replay
Gaze replay
•
•
•
•
•
•
•
•
•
•
•
•
•
•
•
Video clips
Visualization
Gaze plot
Heat map
Areas of Interest (AOIs)
Automatic cluster AOIs
Beeswarm
Statistics
Descriptive statistics tables and charts
Data Filters
Fixation filters
Raw data visualization & export (unfiltered gaze data)
iii
Tobii StudioTM Non-Recording Version
A Non-Recording version of Tobii StudioTM is also available for purchase. This version allows you to
import, replay, edit, and analyze projects recorded with a full version of Tobii StudioTM. The replay and
analysis features available in the Non-Recording rversion of Tobii StudioTM are tied to the features of the
Tobii StudioTM edition (Basic, Professional or Enterprise) used to perform the recordings.
If you wish to have more information on the Tobii StudioTM Non-Recording version, contact your sales
representative.
iv
Contents 1 Installing and Updating Tobii Studio ............................................................................................................................ 5 1.1 1.1.1 Install Microsoft .NET and DirectX ........................................................................................................... 5 1.1.2 Install the driver for the eye tracker built-in user camera .................................................................... 5 1.1.3 Install the TET server for the Tobii -50 Series Eye Trackers ............................................................. 6 1.2 2 Before installation ............................................................................................................................................. 5 Installing Tobii Studio....................................................................................................................................... 6 1.2.1 License key activation ................................................................................................................................. 7 1.2.2 License deactivation .................................................................................................................................... 9 1.2.3 How to change the license key information ........................................................................................... 9 1.3 Connecting Tobii Studio to a Tobii Eye Tracker...................................................................................... 10 1.4 Eye tracker firmware upgrade ...................................................................................................................... 11 1.5 Updating Tobii Studio .................................................................................................................................... 11 Managing Tobii Studio Projects ................................................................................................................................... 13 2.1 Creating a new project .................................................................................................................................. 14 2.2 Opening an existing project ......................................................................................................................... 15 2.3 Linking a project to the project library........................................................................................................ 15 2.4 Exporting and importing projects ................................................................................................................ 16 2.5 Merging Tobii Studio projects ..................................................................................................................... 17 2.6 Deleting and removing projects from the project library........................................................................ 18 3 Database Backup ................................................................................................................................................................ 19 4 Designing and Recording Tests ................................................................................................................................... 20 4.1 Creating and editing tests ............................................................................................................................ 21 4.1.1 Adding media to a test.............................................................................................................................. 21 4.1.2 Media element types ................................................................................................................................. 22 4.1.3 Editing an existing test .............................................................................................................................. 41 4.1.4 Randomizing the presentation order of media elements .................................................................. 41 4.1.5 Unlocking Tobii Studio Tests for editing .............................................................................................. 43 4.1.6 Test preview ................................................................................................................................................ 43 4.1.7 Creating new tests .................................................................................................................................... 43 4.2 Managing participants and independent variables ................................................................................. 44 4.2.1 Creating participants ................................................................................................................................. 44 4.2.2 Creating independent variables.............................................................................................................. 46 4.3 Calibrating and recording participants ...................................................................................................... 47 4.3.1 Calibration settings .................................................................................................................................... 48 4.3.2 Making recordings ..................................................................................................................................... 52 © 2010 Tobii Technology - All rights reserved. Tobii Technology and the Tobii logo are either registered trademarks or trademarks of Tobii Technology in the United States
and/or other countries.
1
User Manual - Tobii Studio 2.X
5 Replaying and Editing Recordings .............................................................................................................................. 56 5.1 5.1.1 Customizing the recordings list .............................................................................................................. 57 5.1.2 Changing the timeline scale detail and playback speed .................................................................. 57 5.1.3 Customizing the view of the Replay tab ............................................................................................... 58 5.2 Performing a Retrospective Think Aloud recording ................................................................................ 59 5.3 Managing and logging events ...................................................................................................................... 61 5.3.1 Logging events ........................................................................................................................................... 62 5.3.2 Filtering events............................................................................................................................................ 63 5.4 Auto-generating segments ...................................................................................................................... 64 5.4.2 Generating segments manually .............................................................................................................. 65 5.4.3 Exporting segments as videos ................................................................................................................ 65 Creating scenes from dynamic content..................................................................................................... 67 5.5.1 Creating scenes ......................................................................................................................................... 67 5.5.2 Editing scenes ............................................................................................................................................ 68 5.6 7 Creating video segments .............................................................................................................................. 64 5.4.1 5.5 6 Playback settings ............................................................................................................................................ 57 Exporting Recordings .................................................................................................................................... 69 5.6.1 Exporting recordings as videos .............................................................................................................. 69 5.6.2 Exporting the recordings as gaze data text files ................................................................................. 70 Defining fixations ................................................................................................................................................................. 76 6.1 ClearView Fixation Filter ................................................................................................................................ 77 6.2 Tobii Fixation Filter .......................................................................................................................................... 78 Visualizing Eye Tracking Data ....................................................................................................................................... 80 7.1 Selecting media............................................................................................................................................... 81 7.1.1 7.2 Selecting recordings ...................................................................................................................................... 84 7.2.1 Using independent variables to filter recordings ................................................................................ 85 7.3 Selecting data from a time interval ............................................................................................................. 86 7.4 Creating gaze plots ........................................................................................................................................ 87 7.4.1 7.5 Customizing gaze plots ............................................................................................................................ 88 Creating heat maps ........................................................................................................................................ 89 7.5.1 Customizing heat maps ............................................................................................................................ 90 7.5.2 How are heat maps calculated? ............................................................................................................. 92 7.6 Creating clusters ............................................................................................................................................. 96 7.6.1 Customizing clusters ................................................................................................................................. 97 7.6.2 How are clusters calculated? ................................................................................................................. 98 7.7 Exporting gaze plots, heat maps and clusters ...................................................................................... 101 7.7.1 2
Grouping web pages ................................................................................................................................ 82 Batch export ............................................................................................................................................. 101 7.7.2 7.8 Displaying AOI overlays on gaze plots, heat maps and clusters ...................................................... 105 7.9 Creating bee swarm videos....................................................................................................................... 105 7.9.1 8 9 Animated visualizations .......................................................................................................................... 102 Customizing Bee Swarms .................................................................................................................... 106 Creating and Managing Areas of Interest ............................................................................................................ 108 8.1 Creating AOIs ............................................................................................................................................... 108 8.2 Editing AOIs .................................................................................................................................................. 109 8.3 Creating AOI groups ................................................................................................................................... 110 Calculating eye tracking metrics and statistics ................................................................................................ 113 9.1 Choosing media for the analysis .............................................................................................................. 113 9.2 Selecting data ............................................................................................................................................... 115 9.2.1 Choosing recordings.............................................................................................................................. 115 9.2.2 Selecting Areas of Interest ................................................................................................................... 117 9.3 Building tables and charts ......................................................................................................................... 118 9.3.1 Configuring tables and charts.............................................................................................................. 118 9.3.2 Update and zoom options ..................................................................................................................... 125 9.4 Eye tracking metric definitions .................................................................................................................. 125 9.4.1 Descriptive statistics .............................................................................................................................. 126 9.4.2 Time to First Fixation - seconds........................................................................................................... 126 9.4.3 Fixations Before - count ........................................................................................................................ 128 9.4.4 First Fixation Duration - seconds......................................................................................................... 129 9.4.5 Fixation Duration - seconds .................................................................................................................. 130 9.4.6 Total Fixation Duration - seconds........................................................................................................ 131 9.4.7 Total Fixation Duration (zeros) - seconds.......................................................................................... 133 9.4.8 Fixation Count - count ........................................................................................................................... 133 9.4.9 Fixation Count (zeros) - count.............................................................................................................. 134 9.4.10 Visit Duration - seconds ................................................................................................................... 134 9.4.11 Total Visit Duration - seconds ......................................................................................................... 135 9.4.12 Total Visit Duration (zeros) - seconds ........................................................................................... 137 9.4.13 Visit Count - count ............................................................................................................................. 137 9.4.14 Visit Count (zero) - count ................................................................................................................. 138 9.4.15 Percentage Fixated - % .................................................................................................................... 138 9.4.16 Percentage Clicked - % ................................................................................................................... 139 9.4.17 Mouse Click Count - count ............................................................................................................. 140 9.4.18 Mouse Click Count (zero) - count.................................................................................................. 142 9.4.19 Time to First Mouse Click - seconds............................................................................................. 142 9.4.20 Time to First Mouse Click (Across media) (seconds) ............................................................... 143 9.4.21 Time from First Fixation to Next Mouse Click - seconds .......................................................... 144 © 2010 Tobii Technology - All rights reserved. Tobii Technology and the Tobii logo are either registered trademarks or trademarks of Tobii Technology in the United States
and/or other countries.
3
User Manual - Tobii Studio 2.X
9.4.22 Time from First Fixation to Next Mouse Click (Across media) - seconds ............................. 146 9.5 Copying tables and charts to the clipboard .......................................................................................... 147 9.6 Table and chart export ................................................................................................................................ 147 10 Tobii Studio Logger .................................................................................................................................................... 149 10.1 Installing Tobii Studio Logger ................................................................................................................... 150 10.2 Tobii Studio Logger computer setup ...................................................................................................... 150 10.3 Connecting Studio logger ......................................................................................................................... 151 10.4 Controlling the recording and remotely logging events...................................................................... 153 11 General Settings........................................................................................................................................................... 155 11.1 Computer settings ....................................................................................................................................... 155 11.1.1 Setting up display resolution ........................................................................................................... 155 11.1.2 Configuring a dual-screen computer setup ................................................................................. 156 11.2 Tobii Studio Global Settings dialog box................................................................................................. 158 11.2.1 Screen and video capture settings ................................................................................................ 158 11.2.2 Eye Tracker browser and hardware settings ............................................................................... 160 11.2.3 Calibration Settings ........................................................................................................................... 161 11.2.4 Fixation filter settings ......................................................................................................................... 162 11.2.5 Recording settings ............................................................................................................................. 163 11.2.6 Miscellaneous settings...................................................................................................................... 164 12 Tobii Studio media limitations .............................................................................................................................. 165 13 Tobii Studio critical timing information ............................................................................................................ 166 13.1 4
Recommendations ....................................................................................................................................... 167 1 Installing and Updating Tobii Studio
The objective of this chapter is to instruct you in how to install and update Tobii Studio on the computer
you are going to use to record eye tracking data. For details on how to set up Tobii Eye Trackers or Eye
Tracking hardware, please see the respective user manuals.
For optimal performance, Tobii Studio should be installed on a computer that follows the Tobii Studio and
Tobii Eye Trackers System Recommendations. This document is available at www.tobii.com (Support &
Downloads section), or can be obtained from your local sales representative.
Tobii Studio software can be used to incorporate much more than just recording of eye tracking data.
Various video and audio streams and integration with other software and hardware may also be utilized.
Make sure that when you use additional components, such as video capture cards and cameras, that you
have the correct drivers installed on your system.
1.1 Before installation
Tobii Studio uses Windows programming components, drivers, and eye tracking firmware (e.g. APIs and
frameworks) to display and record the eye tracking data and stimulus. These components must be
installed on the computer before installing Tobii Studio.
Tobii Studio is compatible with Windows XP, Vista and 7 (32- and 64-bit versions).
1.1.1 Install Microsoft .NET and DirectX
Microsoft .NET framework 3.5 SP1 must be installed on the computer. If it is not installed, install from the
folder on the installation CD or from the Support & Downloads section at www.tobii.com.
DirectX version 9 or higher must be installed on the target computer. It is installed with the operating
system (Windows XP or Vista).
To check the DirectX version on your computer:
1. Click the Start menu.
2. Type dxdiag in the search field (Windows Vista) or in the run field
(Windows XP) and click ENTER.
3. The current DirectX version can be found under the System tab, in the DirectX Diagnostic Tool
dialog box.
If Direct X version 9 or higher is not installed, download it from the Microsoft Download center
http://www.microsoft.com/Downloads/Search.aspx. If you are using Windows XP, you need to install
DirectX 9. If you are using Windows Vista install DirectX 10.
1.1.2 Install the driver for the eye tracker built-in user camera
Additionally, if the eye tracker has a built-in user camera (Tobii T –Series Eye Trackers) and its serial
number is equal to or lower than TTXXX-204-XXXXXXXX you need to manually install the user camera
driver. This driver is not compatible with Windows 64-bit versions.
To manually install the driver in Windows Vista:
1.
2.
3.
4.
Insert the Tobii Studio CD (close any autoplay window).
On the Windows taskbar, click the Start button.
Locate and open the Control Panel.
Open Hardware and Sound > Device Manager, or if you are using the Control Panel’s Classic
View, open the Device Manager directly.
© 2010 Tobii Technology - All rights reserved. Tobii Technology and the Tobii logo are either registered trademarks or trademarks of Tobii Technology in the United States
and/or other countries.
5
User Manual - Tobii Studio 2.X
5. On the Device Manager menu bar, open the Action menu then select Add Legacy Hardware to
open the Add Hardware Wizard dialog box.
6. In the Add Hardware Wizard dialog box, click Next.
7. Select “Install the hardware that I manually select from a list (Advanced)” and click Next.
8. In the devices list box, click “Show All Devices” and then click Next.
9. Click Have Disk.
10. In the Install From Disk dialog box, click Browse.
11. Click Computer and double-click the DVD drive.
12. Open the Drivers and Utilities folder > T60, T120, X60, X120 folder > Drivers and Utilities
folder > UserCam Driver (T60 and T120) folder > Version 1.
13. Select the snp2std.inf file and click Open.
14. Click OK in the Install From Disk dialog; the driver is installed.
15. Click Cancel to exit the Add Hardware dialog box and close the Device Manager program and
Control Panel window.
1.1.3 Install the TET server for the Tobii -50 Series Eye Trackers
In order to use Tobii Studio with the Tobii -50 Series (1750, X50, 2150), you need to install the Tobii Eye
Tracker (TET) Server on the computer (single computer setup). The TET Server installation file can be
found on the Tobii Studio CD.
To install TET Server:
1. Open the Tobii Studio CD folder > Drivers and Utilities > 1750, x50, 2150.
2. Double-click TETServer 2.9.16 (Windows XP) or 2.9.18 (Windows Vista) to run the
installer package.
3. Follow the on-screen prompts and instructions to complete the installation.
Note: TETServer 2.9.16 (Windows XP) and 2.9.18 (Windows Vista) are not compatible with Windows 7.
1.2 Installing Tobii Studio
To install Tobii Studio you need the Tobii Studio CD and a software license key. The license key is used to
activate Tobii Studio after it is installed on the computer. Tobii offers single-user and multiple-user
licenses. A single-user license includes a key for each copy purchased. A multi-user license includes one
key with entitlement to install the software on multiple workstations.
License activation can be conducted when first running Tobii Studio or up to 5 days later, if you are not
able to connect to the Internet during the installation.
The Tobii Studio license key is located inside the Tobii Studio CD cover. Use manual activation if you have
problems activating your license or do not have an Internet connection.
To install Tobii Studio:
1.
2.
3.
4.
Insert the Tobii Studio CD in your computer.
Open the Tobii Studio CD folder.
Double-click TobiiStudio_installer_###.exe (### represents the Tobii Studio version number).
Follow the on-screen prompts and instructions to complete the installation.
Start Tobii Studio by clicking the icon on your desktop to launch Tobii Studio. Alternatively, click Start
menu > All Programs > Tobii. From the Tobii menu, select Studio and then click the Tobii Studio
application.
The first time you run Tobii Studio, you will need to provide the license key to run the software.
6
To uninstall Tobii Studio:
1.
2.
3.
4.
Open the Windows Start menu and select All Programs.
Click Tobii > Studio.
Click Uninstall Tobii Studio.
Follow the on-screen prompts and instructions to remove Tobii Studio.
1.2.1 License key activation
When you use Tobii Studio for the first time, start by typing the license key in the License key text field.
After typing the license key, you have the option of selecting either Activate Now or Activate Later:
•
•
If your computer is connected to the Internet, type your organization name and an e-mail address
in the respective fields and then click Activate Now. The activation process is initiated and you
can start using Tobii Studio once it is completed.
If you do not have an Internet connection, regardless of whether not you will in the future, click
Activate later.
By clicking Activate Later, you have a grace period of 5 days to activate Tobii Studio. The License Data
dialog box will appear every time when you start Tobii Studio until it has been activated. If the software has
not been activated within the 5 days, you will not be able to run Tobii Studio without activating it.
Automatic activation can also be used after you have started Tobii Studio. Open the Help menu in Tobii
Studio’s main menu and click Activate License - Automatic.
If an error occurs, a message will appear stating that you were not able to activate Tobii Studio. Click the
Yes button to continue to the manual activation or click No to activate automatically at a later stage.
To activate the license key manually:
1. Start Tobii Studio. In the License Data dialog box, click the Activate Later button. A dialog box
opens informing you that “Your Tobii Studio software must be activated in 5-1 days”.
2. Create a new project or open an existing project (for details, see sections 2.1 and 2.2 of this
manual, pages 14-15).
3. Open the Help menu on Tobii Studio’s main menu and click Activate License – Manual... to open
the Manual activation dialog box.
© 2010 Tobii Technology - All rights reserved. Tobii Technology and the Tobii logo are either registered trademarks or trademarks of Tobii Technology in the United States
and/or other countries.
7
User Manual - Tobii Studio 2.X
4. In the Manual Activation Information box, you can find the information needed to activate your
license. You can save that information in a text file by clicking the Save as file button.
5. You can then choose between three methods to activate your license:
a. Open your web browser and go to the activation page
http://StudioHelp.tobii.org/Activate (if possible on a different computer) and enter the
license key, machine ID and organization information in the designated fields on the page
and click Activate.
b. Send an e-mail to [email protected]. The e-mail should contain the company name,
license key and machine ID (eye tracker ID).
c. Call Tobii support at one of the phone numbers shown in the manual activation window.
6. An activation code is obtained from the web page or from support.
7. Enter the activation code in the Enter Manual Activation Code field. If successful, the following
message should appear: Thank you for activating Tobii Studio. You may now start using it.
8. Click OK to start using Tobii Studio.
If the activation is not successful, an error message will be shown. Contact support and provide them with
the information shown in the error message.
8
1.2.2 License deactivation
Tobii Studio’s license key policy also allows single license keys to be deactivated and reactivated more
than once, allowing you to install Tobii Studio on multiple computers and then switch between the
computers. However, each license key can only be activated on one computer at a time.
To deactivate the Tobii Studio license key:
1. Connect the computer to the Internet.
2. Start Tobii Studio.
3. Create a new project or open an existing project (for details, see sections 2.1 and 2.2 of this
manual, pages 14-15).
4. Click Help on Tobii Studio’s menu bar and then click Deactivate License.
5. Click Yes in the warning dialog box and wait until it connects to the server.
6. Click OK and Tobii Studio exits.
7. If you start Tobii Studio again, you will be prompted to enter a license activation key.
8. Click the Activate Now button if you wish to reactivate your license.
1.2.3 How to change the license key information
The License Data dialog box displays the license key and Tobii Studio edition information, together with
your organization name and contact e-mail address.
To check the license key reference and the Tobii Studio edition:
1. Start Tobii Studio.
2. Open an existing project or create a new project (for details, see sections 2.1 and 2.2 of this
manual, pages 14-15).
3. Click Help on Tobii Studio’s menu bar and then click About Tobii Studio.
4. The About Tobii Studio dialog box displays information about the Tobii Studio version, edition,
license key and whether it is activated or not.
5. To change the license key, click the Enter license key… button to open the License Data dialog
box.
© 2010 Tobii Technology - All rights reserved. Tobii Technology and the Tobii logo are either registered trademarks or trademarks of Tobii Technology in the United States
and/or other countries.
9
User Manual - Tobii Studio 2.X
6. In the License key field, select the existing license key and press DELETE.
7. Type the new license key.
8. Click Activate Now or Activate later to close the License Data dialog box.
1.3 Connecting Tobii Studio to a Tobii Eye Tracker
To verify that the Tobii Studio computer and your Tobii Eye Tracker are correctly configured, check if you
are able to connect Tobii Studio to the eye tracker.
10
To test the connection:
1. Start Tobii Studio by clicking the icon on your desktop.
2. Open an existing project or create a new project and test (for details, see sections 2.1 and 2.2 of
this manual, pages 14-15).
3. On the Design and Record tab, click Setup and select Settings…. This will open the Global
Settings dialog box.
4. Select the Eye Tracker tab and click the eye tracker in the eye tracker list.
5. Click Test selected eye tracker to test the connection and click OK to connect and close the
Global Settings dialog box. Tobii Studio is now connected to the eye tracker.
Earlier eye tracker models (e.g. 1750 and X50) are not detected automatically by Tobii Studio. If you are
using a Tobii -50 Series Eye Tracker you need to set up the connection manually.
To set up the connection manually (For Tobii -50 Series Eye Trackers):
1. Type the IP address of the computer running the TET Server in the Host field, or type 127.0.01
address if the TET Server is running on the same computer as Tobii Studio.
2. Type a name for the eye tracker in the Name field. This step is optional; the name can be used to
easily identify the eye tracker in eye trackers list.
3. Click Add eyetracker to connect to the eye tracker and display it in the list.
For details on how to set up the Tobii Studio computer and your Tobii Eye Tracker, see the Tobii Eye
Trackers user manuals.
1.4 Eye tracker firmware upgrade
When you start Tobii Studio and connect a Tobii Eye Tracker, Tobii Studio will automatically detect if the
eye tracker has the latest Tobii Eye Tracker Firmware installed. If the Tobii Eye Tracker has an old version
of the firmware a message window is displayed prompting you to upgrade the eye tracker firmware. Click
Yes if you wish to upgrade the eye tracker firmware or No if you wish to keep the old version of the
firmware.
To upgrade the eye tracker firmware manually in Tobii Studio,
1. Open the Eyetracker Selector dialog box/tab by either clicking the connection status button on
the Design and Record tab or by opening the Global Settings dialog box and selecting the Eye
Tracker tab.
2. Select the eye tracker by clicking the eye tracker row in the Available Eyetrackers list.
3. Click the Upgrade eye tracker button. The EyeTracker Browser dialog box will open and the
upgrade process will start immediately.
4. When the upgrade process is completed, click OK to close the Eyetracker Selector dialog box or
Global Settings dialog box.
Firmware upgrades can improve the eye tracker’s performance and set of features. Upgrading the eye
tracker’s firmware may fix bugs, resolve connection and trackability issues, or improve compatibility with
new operating systems.
1.5 Updating Tobii Studio
Tobii is committed to complying with the dynamic requirements of its clients, and releases several version
updates of Tobii Studio each year. Customers with a valid Support & Upgrade contract are entitled to free
software updates and free technical support.
© 2010 Tobii Technology - All rights reserved. Tobii Technology and the Tobii logo are either registered trademarks or trademarks of Tobii Technology in the United States
and/or other countries.
11
User Manual - Tobii Studio 2.X
To update Tobii Studio:
1. Click Help on Tobii Studio menu bar.
2. Select Check for Updates.
3. If an update has been released, it will be displayed in the Check For Update dialog box, under
Available updates to download.
4. Download the release notes by clicking the Release notes link. Release notes contain important
updates and complementary information to this user manual. Please read the release notes before
installing the new version of Tobii Studio.
5. Click the Download link and in the Download dialog box and then click Save file to start
downloading the installation file for the new version of Tobii Studio.
6. When the download is complete, browse to the folder where the installation file was downloaded
and click the installation file.
7. Follow the on-screen prompts and instructions to complete the installation.
Tobii Studio upgrades improve program performance and the feature set. They also fix bugs, resolve
connection and timing issues, and improve compatibility with new operating systems. Check for updates
on a regular basis.
12
2 Managing Tobii Studio Projects
Tobii Studio organizes and stores information on three hierarchical levels: Projects, Tests, and Recordings.
The top-most level is the Tobii Studio Project. This level contains participant data and one or more tests.
Each test created within a project contains one or more media elements (the stimuli), which are organized
into a single linear timeline and recordings.
The test also contains information on how the different media are presented to the test participant, such as
the order and the duration of each media element. Recordings include gaze data, media presentation
events (e.g. media start and stop times, mouse clicks, and key presses), and recording elements (e.g.,
videos from screen recordings or video capture devices). Each recording is associated with a participant
and his or her unique calibration.
The project and test structure of Tobii Studio allows you to perform an experiment with different tests on
the same group of participants. For example, if you wanted to conduct an experiment using a factorial
design, you can have multiple tests within a single project, where each test contains the same media, but
in a different order. Or, for A/B comparison testing, each test could contain different media representing
the different alternatives.
Visualizations are created based on the recordings belonging to their respective tests. You can
consequently only create a heat map for individual tests within a project, even if the same image can be
found in more than one of the tests. However, the Statistics tab can be used to perform cross-test analysis
within the same project. For example, you can group Areas of Interest (AOI) belonging to media located in
different tests and use that group to extract descriptive statistics based on eye tracking metrics.
© 2010 Tobii Technology - All rights reserved. Tobii Technology and the Tobii logo are either registered trademarks or trademarks of Tobii Technology in the United States
and/or other countries.
13
User Manual - Tobii Studio 2.X
2.1 Creating a new project
In order to start designing an eye tracking test, you first need to create a new project in Tobii Studio.
To create a new project:
1. Start Tobii Studio. This opens the Tobii Studio Project Library.
2. Click the Create New Project button. The Create new project dialog box opens.
3. Name the project by typing the name in the Project Name field.
4. Click Browse… to select the folder where the project should be saved. If the folder path is not
changed, the project will be saved in the default folder: Documents\Tobii Studio Projects.
Description and Author are optional fields. Click Next when done.
14
5. Now give the first test a test name and if desired, add a description. In the next step, the first test
is created. Type a name for the test in the Test Name field. The description that can be added is
optional.
6. Click Create and you are ready to start designing your test.
If at a later point you wish to change the project information (Project Name, Description, and Author) in the
Project Library, click the Edit icon on the row of the project you would like to modify.
2.2 Opening an existing project
Once a project has been created, it is listed in the Tobii Studio Project Library dialog box.
To open an existing project from the project list:
1. Start Tobii Studio to display the Tobii Studio Project Library dialog box.
2. In the project list, double-click a project to open it. Alternatively, click the project to highlight it and
then click Open.
2.3 Linking a project to the project library
You can copy and paste Tobii Studio projects between different computers or disk drives and link them to
the Tobii Studio Project Library. This feature allows you, for example, to store your projects on an external
hard drive while Tobii Studio is running on your computer hard drive.
To link a project to the project library:
1.
2.
3.
4.
5.
Click the Link Project to Library button to open Windows Explorer.
Browse to the appropriate project folder.
Double-click the project folder to open it in Windows Explorer.
Click the database file .db3 and then click Open to add it to the project list.
You can now open the project within the Tobii Studio Project Library
© 2010 Tobii Technology - All rights reserved. Tobii Technology and the Tobii logo are either registered trademarks or trademarks of Tobii Technology in the United States
and/or other countries.
15
User Manual - Tobii Studio 2.X
Note: When you link a project to the Tobii Studio Project Library, only a link is created in the library, while
the project archive (tests, stimuli, and recording database) remains in its original location. The project
location is listed in the Tobii Studio Project Library’s project list under the Path column.
2.4 Exporting and importing projects
Projects can also be exported as a single, compressed file (.nas) and imported into another copy of Tobii
Studio running on a different computer. These files contain all the information and elements included in the
original project and once the file is imported into another Tobii Studio workstation, it can be used to
perform the same tests as the original.
To export a project:
1. Start Tobii Studio.
2. Open the project to be exported (for details, see section 2.2 of this manual, page 15).
3. On the File menu, select Export Project Archive. The Export Project dialog box will open.
4. Select the tests and files to export and click the Export button.
5. In the next window, browse and select the export location and type a file name.
6. When the export is finished, a confirmation dialog box will appear. Click OK to exit the export
process.
To import a project:
1. Start Tobii Studio. The Project Library dialog box opens.
2. Click Import Project Archive.
16
3. Click Browse… to open the Windows Explorer dialog box and browse to the file to import.
4. Click the file to select it and then click Open.
5. After loading, you can select or unselect specific tests or files by clicking Show archive contents
and selecting the files to be imported.
6. The project name, description, author, and new location can be changed by expanding the Show
project details.
7. Once the appropriate files and settings have been chosen, click Import. If a project with the same
project ID already exists, there are two options: save the project as a new project or merge it with
the old. See the following section – Merging Tobii Studio projects (see section 2.5 of this manual,
pages 17-18). The project will appear in the project list when the import is finished.
2.5 Merging Tobii Studio projects
Tobii Studio allows you to create a project with one or more tests (the "parent" project) and then export
this project to other Tobii Studio workstations where the test recordings can be carried out in parallel. The
recordings and eye tracking data can then be merged back into the original project for analysis. A project
with the same name must exist in the project list in order to merge two projects.
Note: To ensure that the recordings are merged into the correct test, do not make any changes to the test
design and details in the secondary projects.
© 2010 Tobii Technology - All rights reserved. Tobii Technology and the Tobii logo are either registered trademarks or trademarks of Tobii Technology in the United States
and/or other countries.
17
User Manual - Tobii Studio 2.X
To merge two projects:
1. Start Tobii Studio to open the Tobii Project Library dialog box.
2. Click Import Project Archive.
3. Click Browse… to open the Windows Explorer dialog box and browse to the file you want to
merge.
4. Click the file to select it and then click Open.
5. After loading, you can select or unselect specific tests or files by clicking Show archive contents
and selecting the files to be imported.
6. If there are any conflicts, a new dialog box opens. This dialog box displays the merging options
and the projects that can be merged. Select Merge on import into the following project and select
which project to merge with.
If you are not sure if you should merge the project, select Save as a new project in the library
instead. The two projects will then be kept as two distinct projects in the database.
7. Click OK when you are ready to merge or save the two projects.
2.6 Deleting and removing projects from the project library
In the Tobii Studio Project Library, you can choose between either deleting a project from your disk, or
removing the project from the project list but without deleting it from the disk.
To delete a project from the disk:
1. Start Tobii Studio.
2. From the Projects list in the Tobii Studio Project Library, click the Delete icon
on the same row
as the Project you wish to delete.
3. Confirm you wish to delete the project by clicking Yes in the confirmation dialog box.
Note: When you choose to delete the project, it will be permanently deleted from the disk
To remove a project from the project list:
1.
2.
3.
4.
18
Start Tobii Studio to view the Project Library.
Right-click the project you want to remove.
On the context menu, click Remove From Library...
Confirm that you want to remove the project by clicking Yes in the confirmation dialog box.
3 Database Backup
Data backup is as important as the data you store on your system. Backups are for your peace of mind
and save you a lot of time and expense if your original data files should be damaged. Your data is
important for the operation of your business or research and data backup should be valued as an
important procedure in your workflow.
In its basic form, a backup is a copy of your data files to a disk or some other storage device, to provide a
working copy of your data that can be restored if your original data is lost, damaged or corrupted. This can
happen in a surprising number of different ways: computer virus infections, power failures, power spikes,
system crashes, and other unexpected external events. It is thus recommended that you create a backup
of your data regularly. In Tobii Studio, there are several ways you can backup your project database; for
example, you can export the project or you can copy and paste the project folder from its original location
to another disk. However, the easiest way is to use the Tobii Studio’s Backup Database feature.
To back up a Tobii Studio project:
1. Start Tobii Studio and open the project you wish to back up.
2. On the File menu, select Backup Database...
3. To set the location of the backup, type the target path or click the Browse dialog box button (…)
and find and select the desired location.
4. Click the Create sub-folder using today’s date radio button to copy the project into a folder
named with the date you are performing the backup. This helps to keep track of when the last
backup was made.
5. Click Start Backup and your project is then copied to the chosen location.
To access and open your project backup in Tobii Studio:
1.
2.
3.
4.
Start Tobii Studio to open the Tobii Studio Project Library.
Click the button Link Project to Library and locate the backup file.
Click the file to select it and then click Open to add it to the project list.
Double-click the project to open it.
It is advisable that you regularly back up your Tobii Studio projects.
© 2010 Tobii Technology - All rights reserved. Tobii Technology and the Tobii logo are either registered trademarks or trademarks of Tobii Technology in the United States
and/or other countries.
19
User Manual - Tobii Studio 2.X
4 Designing and Recording Tests
Tobii Studio procedures for test design, recording, and analysis are organized in an intuitive way that
allows you to perform both small and large studies in a timely, cost-efficient manner without extensive
training. The process is as follows: you start by designing and recording the test on the Design and
Record tab; under the Replay tab, you can view and edit the recording as well as code events;
visualizations and Areas of Interest can be created under the Visualization tab; and finally, calculate and
display eye tracking metrics based on AOI’s using the Statistics tab. In this chapter, we will focus on how
to design and record tests using the Design and Record tab.
After you have created a project and test, you are presented with the Design and Record tab. This tab
contains efficient timesaving tools for designing tests, managing participant data, performing calibrations
and recording eye gaze, as well as media presentation data.
20
4.1 Creating and editing tests
Tobii Studio tests are composed of media elements that are organized along a presentation timeline. A
large number of media types are available: images, PDF documents, screen recordings, websites, movies,
physical objects (using a scene camera), external video, and instruction stimuli. This facilitates studies in a
range of different research fields.
4.1.1 Adding media to a test
Media is added to the test by dragging the media element from the media toolbar to the timeline. For
example, you can quickly place a series of pictures, AVI movies, or add a screen or web recording, in the
same test (except when using external video and scene camera media). For more information on Tobii
Studio media limitations, please see chapter 12 of this manual, page 165).
To add a media element to the test:
1. Drag the media element icon to the test workspace/timeline (indicated by the gray arrow in the
user interface). The media setup dialog box opens.
2. Set up your element by changing the settings in the media setup dialog box (see information on
how to set up different media elements, see section 4.1.2 of this manual, pages 22-41).
3. Click OK to accept the settings and close the dialog box.
4. The media is now visible as a slide icon in the center of the test workspace. The line behind the
media element represents the timeline and the arrow represents the direction of the test. Right
above the media element is the position number of that element in the current test.
© 2010 Tobii Technology - All rights reserved. Tobii Technology and the Tobii logo are either registered trademarks or trademarks of Tobii Technology in the United States
and/or other countries.
21
User Manual - Tobii Studio 2.X
4.1.2 Media element types
Tobii Studio integrates different types of media for analysis. The different media elements can also be
referred to as stimuli.
Media element types (stimuli):
Instruction: Text elements that can be used to display instructions or describe tasks to the
participant.
Image: Presents picture or graphic elements (i.e. BMP, GIF, JPG, JPEG, TIF, TIFF, PNG).
Movie: Presents video in AVI or ASF format (only formats accepted).
Web: Websites added by entering the URL or web address of the website (viewed in Windows
Internet Explorer browser).
Screen Rec: Used to record stimuli that are presented by an external software application (or the
software itself) and shown on the local screen.
External Video: Records the video output of software, games or a program running on an external
device (e.g. a second computer or TV). Requires a video capture card installed on the computer
running Tobii Studio.
Scene Camera: Used to analyze how people observe and interact with physical objects or
external scenes. The scene or object is integrated into Tobii Studio through an external camera.
Questionnaire: Allows you to create and display multiple-choice questionnaires that require a
single answer during a recording. The answers can be used to filter and compare data sets in the
Tobii Studio visualizations and statistics tools.
PDF Element: Allows participants to navigate through a PDF document and move back and forth
between the pages, facilitating display of print ads, newspaper spreads, and other study objects
in a more natural manner of interaction.
4.1.2.1 Instruction
An Instruction element is a text element that can be used to describe a task (e.g. “four images will be
shown…”) or to provide instructions to a participant during a test (e.g. which key to click to move to the
next slide). An instruction can be placed anywhere on the timeline and is displayed as text on a
customizable background.
To name the Instruction element:
1. Type a name in the Element Name field
To add and edit text:
1. Type the text in the Preview field (Add your text here...).
2. To the right of the field is a preview of the Instruction element.
3. Change the font and color of the text by clicking the Font... button and choosing from the color
drop-down list.
4. Select the element’s background by selecting the Color option and selecting a color from the list,
or by selecting the Image option and locating an image file on your computer.
22
To choose how the instruction ends and moves to the next element, select one of the following options
from the Properties area:
•
•
•
View time: The Instruction screen will be displayed until the set-time has expired. To set
the duration, select a predetermined time value (in seconds) in the View Time field.
Mouse click: The Instruction screen will be displayed until the mouse is clicked by either
the test participant or the test leader.
Key press: The Instruction screen will be displayed until a key on the keyboard is clicked
by either the test participant or the test leader. Click the Key press drop-down list and
select a key from the list.
Select the Show Mouse Cursor check box to display the mouse cursor on the screen during presentation
of the Instruction.
Select Enable for visualizations to enable eye-tracking during the presentation of the Instruction element.
During the test recording, an image file of the Instruction is created. This is used to create heat maps, gaze
plots, and more. As a result, selecting this option will make the project larger.
4.1.2.2 Image
An Image element is a media element that is used to present image files to the participant during a test.
During the presentation, images are shown in actual size, up to the screen’s current resolution.
© 2010 Tobii Technology - All rights reserved. Tobii Technology and the Tobii logo are either registered trademarks or trademarks of Tobii Technology in the United States
and/or other countries.
23
User Manual - Tobii Studio 2.X
To name the Image element:
1. The software uses the image file name, minus the extension, once the file is added to the element.
You can change the element name by clicking in the Element Name field, deleting the existing
text, and typing a new name.
To add an image file to an Image element:
1. Click the Browse… button to open Windows Explorer and browse to the image file you want to
add to the test.
2. Click the image file and then select Open to add the file to the Image element. A preview of the
image is shown below the Image Name field. Select the Show Mouse Cursor check box if you
wish to display the mouse cursor on the screen during presentation of the image.
3. If the image does not take up the entire screen, you can change the background color of the
element by selecting a color from the Background color drop-down list.
4. Select the Mark as dummy media check box if you wish to exclude the image from analysis. In
other words, the image will be shown during the presentation, but it will not be possible to create
a gaze plot or heat map for the image.
To set the Image element transition during presentation, select one of the following options:
24
•
•
•
View time: The display duration of the element is set by typing or selecting a time value
(in seconds) in the View Time field. At the end of the selected period, the next element on
the timeline will be shown.
Mouse click: The images are shown until the mouse is clicked. This can be done by the
test participant or the test leader. Thereafter, the next media on the timeline will be
shown.
Key press: The images are shown until any key on the keyboard is pressed. This can be
done by the test participant or the test leader. Thereafter, the next media on the timeline
will be shown.
During the test, the image is presented in actual size, but limited to the eye tracker’s screen resolution. For
example, if you are using a Tobii T60 or T120 Eye Tracker, the maximum image size is 1280×1024 pixels,
while with a Tobii T60XL Eye Tracker, the maximum is 1920×1200 pixels. Images larger than the eye
tracker’s screen resolution will be cropped for the presentation with the center of the image remaining at
the center of the screen.
Use an image-editing application, such as Microsoft Office Picture Manager, Microsoft Paint, Photoshop
Elements, or Photopad Image Editor, to resize an image.
To resize an image using Microsoft Office Picture Manager:
1. Open Microsoft Office Picture Manager (can be found under Windows Start > All Programs >
Microsoft Office > Microsoft Office Tools).
2. Locate the image you wish to resize and select it.
3. Open the Picture menu from the menu bar and select Resize.
4. In the Resize task pane, select Custom width x height.
5. Type the new width and height with values in pixels.
6. Click OK.
7. Open the File menu and select Save as... to save a new image file with the new size.
To resize an image using Microsoft Paint:
1.
2.
3.
4.
5.
6.
Open Microsoft Paint (can be found under Windows Start > All Programs > Accessories).
Open the picture you would like to resize.
Click Resize.
Select the Pixels radio button and type the new horizontal and vertical values.
Click OK.
Open the File menu and select Save as… to save a new image file with the new size.
You can also add multiple images (as well as movies) at the same time by copying them to the test
timeline directly from Windows Explorer.
To add multiple images:
1. Browse to the folder in Windows Explorer that contains the images to be added.
2. Select all the images you wish to add to the study, for example, by pressing and holding the CTRL
key as you click each file.
3. Right-click the selection and in the context menu select Copy.
4. Return to Tobii Studio. Under the Design and Record tab, right-click the timeline and select
Paste.
5. In the Add Multiple Images dialog box, there is a list of the file names. You can preview each file
by clicking the file name. You can also add or remove files from this screen by clicking the Add...
or Remove buttons.
© 2010 Tobii Technology - All rights reserved. Tobii Technology and the Tobii logo are either registered trademarks or trademarks of Tobii Technology in the United States
and/or other countries.
25
User Manual - Tobii Studio 2.X
6. Change the order of the files by selecting the file to move and clicking the arrow button for the
desired direction (located to the right of the list).
7. Choose the viewing properties in the Properties box.
8. Select Randomize Images if you wish to randomize the order in which the images are presented.
9. Click OK to add the images to the test.
4.1.2.3 Movie
A Movie element is a media element that is used to present video files to participants. During the
presentation, videos are shown in actual size.
To name the Movie element:
1. The software uses the video file name, minus the extension, once the file is added to the element.
You can change the element name by clicking in the Element Name field, deleting the existing
text, and typing a new name.
To add a video file to the element:
1. Click the Browse button and locate the video file you want to add.
2. Click the video file and then select Open to add the file to the Movie element.
3. Select the Mark as dummy media check box if you wish to exclude the movie from analysis. In
other words, the video will be shown during the presentation, but it will not be possible to create a
heat map or bee swarm for the video.
26
To set the Movie element transition during the presentation, select one of the following options:
•
•
•
Movie end: The duration of the media element presentation is set to the end of the video
playback, i.e. the next element on the timeline is shown when the video ends.
Mouse click: The video will be shown until the mouse is clicked. This can be done by the
test participant or the test leader. Thereafter, the next media on the timeline will be
shown.
Key press: The video will be shown until any key on the keyboard is clicked. This can be
done by the test participant or the test leader. Thereafter, the next media on the timeline
will be shown.
Select the Show Mouse Cursor check box if you wish to display the mouse cursor on the screen during
presentation of the video.
During the test, the video is presented in actual size, but limited to the eye tracker’s screen resolution. For
example, if you are using a Tobii T60 or T120 Eye Tracker, the maximum video size is 1280×1024 pixels,
while with a Tobii T60XL Eye Tracker, the maximum is 1920×1200 pixels. Videos larger than the eye
tracker’s screen resolution will be cropped during the media element’s presentation. Use a video-editing
application, such as Adobe Premiere or VirtualDub to resize a video.
A video media file generally consists of a video data package containing a video header block and a video
data block. This type of file format is often called a container or wrapper (e.g. AVI is a commonly used
container for video media in Windows). The videos added to a Tobii Studio test must be in AVI or ASF
format.
AVI is a multimedia container format introduced by Microsoft in November 1992 as part of its Video for
Windows technology. AVI files contain both audio and video data, as well as information on audio-video
synchrony. The first frame in each recording is time-stamped and the remaining frames are recorded
without timestamp information. AVI containers often suffer from frame losses during coding and
processing of video data. The absence of time-stamped frames can lead to a loss of synchrony between
the audio and video streams during playback. To cope with frame losses, Tobii Studio’s replay tool
© 2010 Tobii Technology - All rights reserved. Tobii Technology and the Tobii logo are either registered trademarks or trademarks of Tobii Technology in the United States
and/or other countries.
27
User Manual - Tobii Studio 2.X
stretches the video tracks (by repeating some frames) to the full duration of the playback that is stored in
the database. As long as the video device doesn't drop frames during the replay this approach works
very well.
Advanced Systems Format (formerly Advanced Streaming Format or Active Streaming Format) is
Microsoft's proprietary digital audio/digital video container format, especially intended for streaming media.
ASF is part of the Windows Media framework and contains a timestamp for each media frame, facilitating
media synchronization, even in situations when frames have been dropped during recording. In this case,
synchronization will still be maintained as best as possible by trying to match each frame timestamp with
the data timestamp. The frames that are dropped are replaced by the previous frame during playback of
the recording.
The video data block contains video and audio and can be encoded using different codecs. A codec is
software or a device capable of encoding and decoding video data In Tobii Studio, this process is
accomplished using Microsoft Windows’ media framework DirectShow. DirectShow is a multimedia
framework and API (programming interface) responsible for performing various operations with media files
or streams in a Windows environment, such as encoding or decoding some common media file formats.
Microsoft Video 1 and MP3 are standard codecs installed on all Microsoft computers. The Tobii Studio
installation includes the Techsmith codec. If you wish to use other codecs, you must ensure that the
correct video codecs are installed.
Tobii Studio does not support installation of codec packages.
4.1.2.4 Web
The Web media element is used to display websites to participants. In order to use this element during a
recording, your computer needs to be connected to the Internet or the websites need to be stored locally
on your computer. Tobii Studio uses the website’s URL or a local address to open the
site in Internet Explorer and automatically records all mouse clicks, key strokes, and websites visited
during the test.
Currently, Internet Explorer is the only browser supported by Tobii Studio’s Web element.
To name the Web element:
1. The software uses “Web Element” as the default name. You can change it by clicking in the
Element Name field, deleting the existing text, and typing a new name.
To add a start URL and change the browser settings:
1. Click the Start URL field and type a URL or a local computer address (you do not need to type
http://).
2. Select whether you want to launch the browser using a fixed browser size or in full-screen mode.
Skip steps 3 and 4 if you select Fullscreen.
3. Set the browser’s starting location by typing values in pixels. The top-left point of the screen has
the coordinates (0, 0), and the browser’s origin is the top-left point of the window.
For example, by typing Left=0 and Top=0, the top-left corner of the browser is in the top-left
corner of the screen.
4. Type the width and height of the browser window in pixels.
28
To specify how to stop the Web element recording:
1. Select the End recording after check box to set a time limit for the Web element session (in
seconds).
2. If you choose not to select End recording after, you move to the next media element during the
test by pressing F10 on your keyboard. Click OK once the selection has been made.
Since not all web pages are fully compatible with Internet Explorer 8, before starting the recording you
need to set Internet Explorer 8 to run in compatibility mode.
To turn on the Internet Explorer 8 compatibility mode:
1. Open Internet Explorer.
2. Click the Tools menu and then select Compatibility View Settings.
© 2010 Tobii Technology - All rights reserved. Tobii Technology and the Tobii logo are either registered trademarks or trademarks of Tobii Technology in the United States
and/or other countries.
29
User Manual - Tobii Studio 2.X
3. In the Compatibility View Settings dialog box, select the option “Display all websites in
Compatibility View”.
4. Click Close to accept the changes and close the dialog box.
4.1.2.5 Screen Recording
The Screen Recording media element is used to record the screen and gaze activity of the participants
when using an application on the computer running Tobii Studio. It is intended for use with low-intensity
graphics applications such as word processors or PowerPoint. For applications that are more graphicintensive, such as high-quality movies or computer games, use the Movie or External Video media element
instead. During a screen recording, the subject is free to use any type of application on the computer.
To name the Screen Recording element:
1. The software uses “Screen Recording Element” as the default name. You can change it by
clicking in the Element Name field, deleting the existing text, and typing a new name.
To select the application you want to test:
1. Select the Run command check box. Type the target path of the executable file of the program
you want to run, or click the Browse... button to open Windows Explorer and select the
executable file or program you want to run.
2. Type the path of the folder where the executable file is located in the Start in: field. This step is
optional.
3. When the Run command check box is checked, two more settings become available. Select End
screen recording when external application is closed to stop the Screen Recording element when
the participant exits the application. Or select Close external application when screen recording
ends. In this case, the element is ended by pressing F10 on your keyboard or stopping the test
with ESC. If none of the options above are selected, the element is ended with F10 and the
application is closed separately.
4. If the Run command is left unchecked, the application has to be started by the test participant or
the test leader. When the recording starts, Tobii Studio is minimized and the Windows desktop or
any program that is opened on the desktop is displayed.
Note: If the Run command is not selected, press F10 to move to the next element or ESC to stop the test.
30
While the Screen Recording element is active, Tobii Studio records gaze data, a video of the screen
content, keystrokes, and mouse clicks. The video is recorded in the screen’s resolution.
4.1.2.6 External Video
The External Video media element is used to present and record video and sound from an external device.
Tobii Studio records the video input from these devices as a video file, along with gaze data, keystrokes,
and mouse clicks. This media element cannot be combined with other elements in the timeline.
This media element type is recommended for presenting stimuli that have complex graphics or are
resource-intensive applications, such as video games, interactive television, and computer games played
on another computer.
The recordings are made via:
•
•
•
•
•
Analog video capture cards for VCR input
VGA or DVI capture cards for input from another computer
VGA-to-USB converter to capture VGA signal from another computer via USB (should be used
only with low resource graphics applications)
FireWire (T/X-series) for digital cameras
USB streaming from video or web cameras
Before adding the External Video element to a test, make sure the hardware is set up properly. The video
source needs to be connected with a video capture card, FireWire cable, or USB cable to the computer
where Tobii Studio is running. Install the correct drivers and codecs on the computer to avoid possibly
compromising recording performance.
Please refer to the system recommendations document (available at www.tobii.com) or contact Tobii
support for information on recommended video capture cards and setups.
To name the External Video element:
1. The software uses “External Video Element” as the default name. You can change it by clicking
the Element Name field, deleting the existing text and typing a new name.
© 2010 Tobii Technology - All rights reserved. Tobii Technology and the Tobii logo are either registered trademarks or trademarks of Tobii Technology in the United States
and/or other countries.
31
User Manual - Tobii Studio 2.X
To set the video source and properties:
1. Choose the video source by selecting a device form the Video Source drop-down list.
2. If the device has more than one input (e.g. S-video and composite), specify the input you want to
use for the video recording by selecting it in the Inputs drop-down list.
3. Choose the codec you want to use to convert and/or compress the video signal during the
recording by select a codec from the Video Codec drop-down list. The choice of codec will
impact the video quality, file size, and CPU load during recording. For most purposes, the
Microsoft Video 1 codec is recommended.
4. Click the Settings... button to set the Temporal Quality Ratio of the video compression. The higher
the quality ratio, the better the video quality will be but the more CPU resources will be
consumed.
5. Click Edit... to enable codecs. Select the codec from the disabled list and click the left direction
arrow to add the codec to the Video Codec drop-down list. Do the opposite to remove a codec.
6. Click the Preview box to preview the video streamed from the device.
To set device-specific settings:
1. If your external device is a video camera, click Camera Settings to change the video image
settings, such as brightness and contrast.
2. Click Video Settings to change other device-specific hardware settings, such as video size and
frame rate.
To display the video input on the eye tracker screen during the recording, select the Use video as stimulus
check box.
Notes: In most cases when capturing video, the video signal needs to first be converted from analog to
digital. It then needs to be captured and compressed into a movie. Because of this process, delays may
occur, affecting the precision of the video synchronization. At high CPU load, some video capture devices
occasionally drop video frames. This means that although gaze data and trigger data are timed with the
same precision as for all other Tobii Studio media types, the synchronization of gaze data in relation to the
captured video may be degraded. Make sure you use a high-performance computer.
32
Recommended computers, video capture cards, and codecs can be found in the system
recommendations document (available at www.tobii.com).
4.1.2.7 Scene Camera
The Scene Camera media element is used in combination with Tobii X50, X60, and X120 Eye Trackers
setups. It combines video data collected from a stand-alone camera and gaze data. In addition to the
video device settings, the Scene Camera element contains a perspective calibration tool to compensate
for the scene camera’s position relative to the stimulus and the user. This media element cannot be
combined with other elements in the timeline.
The typical setup consists of the following items:
•
•
•
•
•
Some sort of physical stimulus, such as a collection of objects that is moved around on a table
or a panel with instruments and knobs. For proper gaze recording, stimuli should be positioned or
moved along a 2-dimensional plane. Any deviations from the plane caused by the depth of the
objects placed on the plane, for example, will cause parallax errors in the gaze estimate.
A calibration grid, which is placed on the same surface that is being tracked. This grid is used to
calibrate the participants and to align the calibration of the scene camera perspective.
A scene camera, which is used to record a video stream of the scene presented to the test
participant. The video from the scene camera is recorded in Tobii Studio.
A Tobii X50, X60 or X120 Eye Tracker and the correct settings in the configuration tool. For
details on the eye tracker setups and settings, see the system recommendations document and
the Tobii X120 & X60 Eye Tracker User Manual
A computer with Tobii Studio Professional or Enterprise
Before adding the Scene Camera media element to the test, make sure the hardware is set up properly.
The video source needs to be connected to a video capture card, FireWire or USB port on the computer
where Tobii Studio is running. Please refer to the system recommendations document (available for
download at www.tobii.com) or contact Tobii Support for information on recommended video capture
cards and setups.
© 2010 Tobii Technology - All rights reserved. Tobii Technology and the Tobii logo are either registered trademarks or trademarks of Tobii Technology in the United States
and/or other countries.
33
User Manual - Tobii Studio 2.X
To name the media element:
1. The software uses “Scene Camera Element” as the default name. You can change it by clicking
the Element Name field, deleting the existing text, and typing a new name.
To set the video recording source and properties:
1. Choose the video source by selecting a device form the Video Source list
2. If the device has more than one input (e.g. S-video, composite), specify the input you want to use
for the video recording by selecting it in the Inputs list
3. Choose the codec you want to use to convert and/or compress the video signal during the
recording by select a codec from the Video Codec list. The choice of codec will impact the video
quality, file size, and CPU load during recording. For most purposes, the Microsoft Video 1 is
recommended.
4. Click the Settings... button to set the temporal quality ratio of the video compression. The higher
the quality ratio, the more detailed the recording will be. However, the recording will also consume
more CPU resources.
5. Click Edit... to select which codecs are enabled. These codecs are then shown in the Video
Codec list.
6. Click the Preview box to preview the image streamed from the device.
To set device-specific settings:
1. If your external device is a video camera, click Camera Settings to change the video image
settings, such as brightness and contrast.
2. Click Video Settings to change other device-specific hardware settings, such as video size and
frame rate.
Notes: In most cases when making a video recording, the video signal needs to be converted from analog
to digital. This is done by using codecs. Because of this, delays are induced affecting the precision of the
video synchronization. Furthermore, at high CPU load, some video capture devices occasionally lose video
frames. This means that although gaze data and trigger data are timed with the same precision as for all
other Tobii Studio media types, the synchronization of gaze data in relation to the scene camera video may
be degraded. Make sure you use a high performance computer.
34
Since the stimulus that is being eye-tracked is a physical object, the calibration points need to be
displayed on a separate calibration grid. The calibration grid must have the same shape as the calibration
pattern used in Tobii Studio and include either five or nine dots. The calibration dots can be drawn on a
paper, marked on a calibration board, or on the object itself.
It is also good to include a 25% larger active display area around the grid to make it easier to measure the
parameters required in the X Series Configuration Tool (see the Tobii X120 & X60 Eye Tracker User
Manual). Make sure that the corners of the calibration grid are exactly 90 degrees and that the center point
is exactly in the middle of the grid. How to calculate the 25% larger active display area, which needs to be
added in the X Series Configuration Tool, is described in the figure below.
Note: All values in the X Series Configuration Tool must be measured and added correctly to ensure data
accuracy (see the Tobii X120 & X60 Eye Tracker User Manual for more information).
To access the X Series Eye Trackers Configuration Tool in Tobii Studio:
1. Click the Tools menu and select Settings.
2. In the Global Settings dialog box, select the Eye Tracker tab and click the X Series Config Tool...
button.
To compensate for the scene camera perspective:
1. Use the Preview image to adjust the camera’s position so that it shows an image of the surface
you want to eye-track and then secure the camera to avoid any accidental shift in position.
2. Place the calibration grid on the object’s surface
3. In the Perspective Calibration section, click New. A snapshot of the camera video feed is shown
in the Calibration Image box along with a polygon with five calibration points.
© 2010 Tobii Technology - All rights reserved. Tobii Technology and the Tobii logo are either registered trademarks or trademarks of Tobii Technology in the United States
and/or other countries.
35
User Manual - Tobii Studio 2.X
4. Adjust the five points of the polygon so that their positions match the position of the five dots on
the calibration grid. Do so by dragging each point over the respective calibration grid dot. To
ensure that the points are placed correctly over the calibration dots, click the Zoom button to
open the Calibration Image dialog box containing an enlarged version of the calibration image.
5. Click OK to accept the changes and close the dialog box.
During the recording, Tobii Studio records the video feed from the scene camera, gaze data, keystrokes,
and mouse clicks. The gaze data X and Y coordinate space corresponds to the calibration grid area,
where its values range from (0.0) to the image size of the scene camera video.
The perspective calibration is intended to compensate for the difference in angle between the subject’s
perspective of the calibration grid and the scene camera. However, this only compensates for angles on
the stimulus plane. If three-dimensional physical objects are used as stimuli and these have a certain
height or depth that takes them far away from the stimulus plane, this will cause a parallax error. The size
of this error is related to the difference in point of view from the scene camera and the test subject.
36
To minimize parallax errors, it is therefore recommended that you place the scene camera at an angle fairly
close to that of the test subject, such as slightly behind and to the side of the subject or immediately over
the subject’s head.
4.1.2.8 Questionnaire
The Questionnaire media element can be used to present multiple choice questions to which the
participant may only select one answer to each question. The answers to the questionnaire can later be
used as independent variables, which can be used to filter the eye tracking data for visualizations and
descriptive statistics reports.
To name the Questionnaire element:
1. The software uses “Questionnaire Element” as the default name. You can change it by clicking in
the Element Name field, deleting the existing text, and typing a new name.
To create a Questionnaire element:
1. Click the Add Question button to open the Question Setup dialog box.
2. In the Question field, type the question you want the participant to see.
3. Add the multiple choice answer choices to the Answers section, by selecting Create new or Use
values from existing Independent Variable.
a. After selecting the Create new radio button, type the desired variable name. Click the first
row in the Answers list box twice so that the cursor blinks and type one of the answer
texts. Press ENTER and click the next row to add another answer.
b. After selecting Use values from an existing Independent Variable, choose the variable
from the Variable Name drop-down list. These variables are managed under the
© 2010 Tobii Technology - All rights reserved. Tobii Technology and the Tobii logo are either registered trademarks or trademarks of Tobii Technology in the United States
and/or other countries.
37
User Manual - Tobii Studio 2.X
4.
5.
6.
7.
8.
9.
10.
11.
Independent Variables tab of Manage Participants, but can be edited for the
questionnaire.
Change the order of the answers by selecting the answer to move and clicking the arrow button
for the desired direction (located to the right of the list).
Select the Use eye tracking check box if you wish to record the gaze data and allow the
questionnaire to be used as media in the Visualizations view.
Click the Preview button to preview the slide.
Click Close to save the question slide and return to the Questionnaire element setup dialog box.
If desired, add more questions to the same element by repeating steps 1-7. Each question with
answers will be displayed on its own slide.
To change the order of the question slides, select the question to move and click the arrow button
for the desired direction (located to the right of the Question list).
Click the Edit button
to modify the question slide, or click the Delete button
to delete it.
Click OK to save and close the Questionnaire element setup dialog box or click Cancel to discard
the changes and close the dialog box.
To copy and paste one or more questions from Excel to the Questionnaire element:
1.
2.
3.
4.
38
In Excel, type the question text in the first column.
In the same row, type the answers, separated by a comma, in the second column.
Type a name for the variable in the same row, in a third column.
Select the three cells and copy them.
5. In the Questionnaire element setup dialog box in Tobii Studio, click in the Question list frame.
6. Use your keyboard shortcut keys to paste (CTRL+V) the question into the Questions list. Multiple
rows of questions can be added from Excel at the same time.
4.1.2.9 PDF
The PDF media element is used to display PDF documents, facilitating the display of magazine spreads,
printed ads, newspaper spreads and other documents that can be converted to PDF. The PDF element
allows participants to navigate through the PDF document, using the left and right key to move back and
forth between the pages, in a very natural way of interaction. Interactive features in an interactive PDF are
not supported by the PDF element.
To name the PDF element:
1. The software uses “PDF Element” as the default name. You can change it by clicking in the
Element Name field, deleting the existing text, and typing a new name.
To add a file to the PDF element:
1. Click the Browse button to open the Open dialog box.
2. Locate the PDF file you want to add and click it.
3. Click Open to add the file to the element screen. A preview of the document is shown below the
PDF file name field.
4. Specify whether the PDF should be presented as single-paged or as double-paged side-by-side
(Magazine).
5. Skip this step if you have selected Single paged. Select the Show front page as single page
check box to display the first page of the PDF as a single page, or like a book cover.
6. Click the Advanced... button to open the PDF Advanced Settings dialog box to change the
background color and to select whether or not to Show page numbers during the PDF
presentation (select Show page numbers).
© 2010 Tobii Technology - All rights reserved. Tobii Technology and the Tobii logo are either registered trademarks or trademarks of Tobii Technology in the United States
and/or other countries.
39
User Manual - Tobii Studio 2.X
To set the image element transition during the presentation:
1. Select one of the following options to set your element transition:
a. Browse until last page: The element will be displayed until the test participant reaches
the last page of the PDF.
b. Browse until F10 or ESC is pressed: The PDF is displayed until F10 is pressed.
Thereafter, the next media on the timeline will be shown. If ESC is pressed, the recording
is stopped.
c. Time limited: The PDF element is displayed for a certain amount of time (in seconds). The
display time can be changed by typing or selecting a time value in the Time limited box.
By default, Tobii Studio displays the PDF document in actual size (Zoom %: 100). It may therefore happen
that the size of the PDF document does not match the test screen’s size, and if presented in actual size,
some parts of the document will not be displayed. Use the Size options to adjust the PDF size for optimal
viewing.
To set the PDF document size:
1.
2.
3.
40
Under Size, on the PDF Element Setup screen, select the Zoom option to manually set the
size of the PDF as a percentage of the original, or select Scale to Screen Resolution to
automatically have the size set to match the screen resolution.
Click the Preview button in the lower-left corner of the Setup screen to see how the stimuli
will be presented during the test.
Press ESC on the keyboard to exit the preview. If the size is not ideal, repeat the two previous
steps.
4.1.3 Editing an existing test
After adding elements to the test timeline, you can change the initial test design by easily deleting or
editing existing media elements.
To delete a media element:
1. Right-click the media element.
2. Select Delete from the context menu.
3. Click OK in the confirmation dialog box if you are sure you want to delete the element.
To copy a media element:
1. Select the media element or elements to copy. To select multiple media elements, click and hold
the CTRL key while you click each media element. To select many consecutive elements, click the
first element in the sequence and then press and hold the SHIFT key while clicking the last one.
All the elements between the two clicks are selected, including the two clicked.)
2. Right-click the media element.
3. Select Copy from the context menu.
4. Click the media element in the timeline that you would like to paste after (to the right of) and
select Paste from the context menu.
To change the position of a media element in the timeline:
1. Select the media element or elements.
2. Drag the media to the new position in the timeline.
To edit the media element presentation properties:
1.
2.
3.
4.
Right-click the media element
Select Edit in the context menu. The Media Element Setup dialog box opens.
Make the necessary changes to the media element.
Click OK to accept the changes and close the dialog box.
4.1.4 Randomizing the presentation order of media elements
The Randomize feature in Tobii Studio allows you to counterbalance the presentation order of the media
elements during the recordings. Tobii Studio does this by arranging the media elements selected for
randomization – according to a Latin Square method – and holding all other media elements in their fixed
position.
The Latin Square method allows you to control for order effects introduced by the media presentation
order and position, by ensuring that:
•
•
•
Each recording contains every media element.
With the appropriate number of recordings, every media element can be found in all possible
positions (1st, 2nd, …, ith).
Each media element is followed by each of the other media elements the same number of times.
Further down in this section, there is a detailed description of the Latin Square design implementation in
Tobii Studio.
Note: To counterbalance for presentation order for an even number of media elements, the number of
recordings should be equal to, or a multiple of the number of randomized media elements. For an odd
number of media elements you need to use twice as many, or a multiple of “twice as many”, recordings as
media elements.
© 2010 Tobii Technology - All rights reserved. Tobii Technology and the Tobii logo are either registered trademarks or trademarks of Tobii Technology in the United States
and/or other countries.
41
User Manual - Tobii Studio 2.X
To randomize the presentation order between two or more media elements:
1.
2.
3.
4.
Right-click the media elements you want to randomize.
Select Randomize on the context menu.
Repeat steps 1 and 2 for the other media elements you wish to randomize.
Or right-click the media timeline and select Randomize all to randomize all the media elements on
the timeline.
To remove the randomization:
1. Right-click the media element.
2. Click Randomize to remove the check mark. The media is now deselected from the randomization
procedure.
Notes: If you only select randomization of one media element, no randomization will take place. If you
choose to quit a recording while you are performing a test, the next recording will use the next sequence
for the media presentation.
4.1.4.1 Tobii Studio Latin Square implementation
The Randomize feature uses a Latin Square method to construct x number of sequences of the
presentation, depending on n number of media selected to be randomized. If n is even x=n and if n is odd
x=2n. Each Latin Square sequence xn is translated into a recording. To conduct a fully counterbalanced
study, the number of recordings must be equal to x or a multiple of x. If not enough participants can be
tested, the study is still pseudo-randomized but not fully counterbalanced.
Latin Square procedure:
If the number of treatments is even, then the first sequence of the Latin Square is calculated as follows:
1, 2, n, 3, n – 1, 4, n – 2, 5, n – 3, …, i, n-i
where the sequence 1, n, n – 1, n – 2, n – 3, …, n-i alternates with the sequence 2, 3, 4, 5, …, i
For example, with n = 4 media elements, the first sequence of the Latin Square is:
Recording 1 = 1 2 4 3 (each number represents a media element)
Since the number of media elements is even, n=4, then the number of sequences needed is equal to x=4.
The remaining sequences are obtained by adding 1 to each value in the previous sequence. In this
example, if the value is 4 in the first sequence, the next sequence will have the value of 1.
In this example, we thus obtain the following sequences:
4 x 4 Square
Recording 1
Recording 2
Recording 3
Recording 4
1
2
3
4
2
3
4
1
4
1
2
3
3
4
1
2
We see that in this Latin Square, media element 1 follows immediately after media elements 2, 3, and 4,
one time each. Similarly, media element 2 immediately follows media elements 1, 3, and 4, one time each;
media element 3 immediately follows media elements 1, 2, and 4, one time each; and media element 4
immediately follows media elements 1, 2, and 3, one time each.
42
If the number of media elements is odd, we need to create twice as many sequences as media elements
(x = 2n). We first start by following the same equation as when the number of media elements is even and
go through the n sequences. When this is done, we reverse the first set of sequences to create a second
set.
For example, when 5 media elements are randomized, the first sequence of the first set is equal to 1, 2, 5,
3, 4 and the first sequence of the second set is equal to 4, 3, 5, 2, 1 (where each number represents a
media element).
5 x 5 Square
Recording 1
Recording 2
Recording 3
Recording 4
Recording 5
1
2
3
4
5
2
3
4
5
1
5
1
2
3
4
3
4
5
1
2
4
5
1
2
3
5 x 5 Square
Recording 6
Recording 7
Recording 8
Recording 9
Recording 10
4
5
1
2
3
3
4
5
1
2
5
1
2
3
4
2
3
4
5
1
1
2
3
4
5
The reason for doubling is that we need to make sure that each media element is followed by each of the
other media elements the same number of times to counterbalance for order effects. In the first set, media
element 2 is followed by 3 twice and by 5 twice, but isn’t followed by 1 or 4 at all. Therefore, the second
set is created and 2 is followed by 1 twice and by 4 twice.
4.1.5 Unlocking Tobii Studio Tests for editing
After you have performed a recording, the test will become locked. This is to prevent any accidental
modifications during the test sessions. If you want to modify the test, you first need to unlock it.
To unlock the test:
1. Click the lock icon located in the upper-right part of the media element toolbar.
2. Click Yes in the confirmation dialog box to confirm the procedure.
4.1.6 Test preview
The Preview Test feature allows you to preview the media elements on the timeline as if it was a real test,
but without creating a recording. This way, you can verify that the media elements are setup correctly with
the right content and settings, and that the transitions between the different elements are as desired.
To preview a test:
1. Click the Preview Test button, located next to the red Start Recording button at the bottom of the
window, to preview the test starting with the first element. If you wish to start previewing the test
from a specific element and onwards, right-click that element on the timeline and select Preview
Test from the context menu.
2. You can press the F10 key to override the settings and move on to the next media element or
press the ESC key to end the preview.
To preview individual media elements:
1. Right-click the media element.
2. Select Preview Element from the context menu.
3. Press the ESC key to end the preview.
Note: You can only preview instruction, image, movie, and PDFs individually.
4.1.7 Creating new tests
Tobii Studio projects can contain multiple tests. These tests can be used to present different tasks to the
same participants or to present the same media in different orders, useful for factorial design experiments.
© 2010 Tobii Technology - All rights reserved. Tobii Technology and the Tobii logo are either registered trademarks or trademarks of Tobii Technology in the United States
and/or other countries.
43
User Manual - Tobii Studio 2.X
To create a new test:
1. Click Add New Test, after either having clicked File on the menu bar or having clicked the Test
drop-down button - the folder symbol, which is in the upper-left corner and displays the current
test’s name.
2. Type a name for the new test in the Test Name field and click Create. The description is optional.
To change between existing tests:
1. Click the Test button to see the Tests in the current project (available under all tabs except
Statistics).
2. Click the test you want to work with.
To copy media elements between tests, but within the same project:
1. Under the Design and Record tab, view the test you want to copy the media element from.
2. Right-click the media element (you can have multiple elements selected before right-clicking) and
select Copy on the context menu.
3. Select the test where you want to paste the media element. Right-click the media element on the
timeline that is to the left of where you want to paste the object and select Paste on the context
menu.
To delete an existing test:
1. Open the test you want to delete.
2. Either click the Test drop-down menu or go to File on the menu bar and click Delete Test.
3. Click Yes in the confirmation dialog box to confirm the deletion.
4.2 Managing participants and independent variables
Each Tobii Studio recording is associated with a participant and his/her respective calibration data.
Participant data can be created and managed, before or after the recording has been performed. This data
consists of a name, which is used to identify the participant, and user-generated independent variables
such as gender and age. These variables can be used to create participant groups and filter the eye
tracking data by these groups when producing visualizations or metric-based descriptive statistics.
4.2.1 Creating participants
Participant data is stored under the project level in the Tobii Studio hierarchical system. Participant
information thus only needs to be entered once and a certain participant would be able to have multiple
recordings and take different tests, as long as the tests belong to the same Tobii Studio project.
Participant data can be exported as a tab-delimited TXT file and this file can then be imported into
Microsoft Excel.
To create participants before performing the recording:
1. Either go to Tools on the menu bar, click Participants, and then click Manage Participants, or,
click the Setup drop-down button (next to the Test button) and then click Manage Participants.
2. In the Manage Participants dialog box, under the Participants tab, click New...
44
3. In the Create Participant dialog box, in the Participant Name field, type the participant’s name or
other form of identification that you will use to refer to the participant.
4. If you have already created independent variables and know the information about the participant,
select the correct values from the drop-down list for the respective independent variables.
5. Click OK to add the participant and his/her information to the participants list in the Manage
Participants dialog box.
To generate an arbitrary list of participants (no information besides name):
1. In the Manage Participants dialog box, under the Participants tab, click Auto Generate...
2. Now enter the number of participants you wish to generate and click OK.
© 2010 Tobii Technology - All rights reserved. Tobii Technology and the Tobii logo are either registered trademarks or trademarks of Tobii Technology in the United States
and/or other countries.
45
User Manual - Tobii Studio 2.X
3. The participants are displayed in the participants list and are automatically named Pn-x1 to Pn
(where n is the total number of participants and x is the number you generated). You can add up
to 500 participants at a time with this feature.
To edit an existing participant:
1. In the participants list, double-click a participant, or click the participant and then click Edit.
2. You can change the participant name or the independent variable values in the Edit Existing
Participant dialog box.
3. Click OK to accept the changes.
4.2.2 Creating independent variables
Participant-independent variables and values can be generated in two different ways in Tobii Studio. You
can directly create the variable name and values in the Manage Participants dialog box or by adding a
Questionnaire media element to the test and letting the participant select the values. In the latter case, the
variable name entered in the Question Setup is the variable and the possible answers are the values, of
which the participant can only select one for each question.
To add a new independent variable using the Manage Participants dialog box:
1. Go to the Independent Variables tab in the Manage Participants dialog box by clicking the Setup
drop-down button.
2. Click Manage Participants and then the Independent Variables tab.
3. Click New...
4. In the Add New Participant Variable dialog box, type the variable name (e.g. gender) in the
Variable Name field.
5. Click an empty row in the Values list until you see the cursor blinks. Type a value (e.g. male,
female).
6. Repeat step 4 until you have entered all the values.
46
7. Click OK to save the variable and values to the variables list in the Manage Participants dialog
box.
For more information on how to create participant-independent values using participant interaction, see
the Questionnaire media element section of this manual (section 4.1.2.8, pages 37-39).
To learn how to create participant groups and filter recordings, see sections 7.2.1 and 9.2.1.1 of this
manual (pages 85-86 and 115-117, respectively).
4.3
Calibrating and recording participants
Recordings are initiated by clicking the Start Recording button located at the bottom of the window on the
Design and Record tab. In order to start a recording, you need to create a new, or select an existing,
participant and perform a calibration. The calibration process ensures that the eye tracker “learns” the
characteristics of the subject’s eyes and accurately calculates the direction of his/her gaze on the surface
of the screen or object. Before starting the recording session, make sure that Tobii Studio is connected to
the eye tracker and that the study design and settings are set correctly.
To check the connection status between the eye tracker and Tobii Studio:
1. Below the Start Recording button there is an indicator that shows the serial number ID of the eye
tracker and whether it is connected or not (Connection OK/No Connection). Click this serial
number ID.
2. In the Eyetracker Selector dialog box, click the eye tracker row to select it.
© 2010 Tobii Technology - All rights reserved. Tobii Technology and the Tobii logo are either registered trademarks or trademarks of Tobii Technology in the United States
and/or other countries.
47
User Manual - Tobii Studio 2.X
3. Click Test selected eye tracker to complete the connection.
4. Click OK to accept the settings and close the dialog box.
Extended desktop, dual screen setups are often used to enable a test leader to control a test using one
display, while presenting the stimulus to the test subject on another.
To configure an extended desktop, dual screen setup:
1. In the lower-left corner of the Design and Record tab, click the Identify button. Text is displayed
on the screen where the presentation will be displayed.
2. Press ESC to return to the Design and Record tab.
3. If you wish to change the display, click the Presentation screen drop-down list and select Display
1 or Display 2. The stimulus will be presented on the display that you select.
4. Make sure the local Live Viewer is enabled. Click the Setup icon on the Design and Record
header and select Settings.
5. Towards the bottom of the Screen and Video Capture tab, select Enable live viewing.
6. Click the Setup icon again, but this time click Show Live Viewer.
7. The Live Viewer window opens on the primary monitor. Drag the window to the display that is
used to monitor the recording (see section 11.1.2, of this manual, pages 156-158, to find out
more on how you can configure your system to support a dual screen setup).
To check if the user camera and user sound are enabled/disabled:
1. Click the Setup icon on the Design and Record header and select Settings.
2. Under the Screen and Video Capture tab, select the Record user camera and Record user sound
check boxes (see section 11.2.1, of this manual, pages 158-160 for details on how to set the
user camera and sound).
Click the Preview Test icon to verify that the media is presented correctly (see section 4.1.6 of this
manual, page 43, to learn how to preview a Tobii Studio test).
Make sure that you have the correct calibration settings (see the section below)
4.3.1 Calibration settings
Before an eye tracking recording is started, the user is taken through the calibration procedure. During this
procedure, the eye tracker measures characteristics of the user’s eyes and uses them together with an
internal, physiological 3D eye model to calculate gaze data. This model includes information about shapes,
light refraction and reflection properties of the different parts of the eyes (e.g. cornea and placement of the
fovea). During calibration, the user is asked to look at specific points on the screen, also known as
calibration dots, while several images of the eyes are collected and analyzed. The resulting information is
then integrated with the eye model and the gaze point for each image sample is calculated.
The default calibration process in Tobii Studio consists of a presentation of five calibration dots on a plain,
colored background. The dots are presented successively and the participant must focus his or her visual
attention on the center of the dots. You can customize various features of the calibration procedure such
as changing the number and color of the dots, the background color and the type of calibration stimuli,
and you can also perform the calibration manually.
48
To access the calibration settings:
1.
2.
3.
4.
Click the Setup icon in the Design and Record tab.
Select Settings.
In the Global Settings dialog box, click the Calibration tab.
Now select a calibration type. You can choose between Regular, Manual, or Infant calibration
4.3.1.1 Regular calibration
Regular calibration is the default calibration in Tobii Studio. Other than a few specific situations, Regular
calibration should be used as the standard type of calibration procedure. The default settings for Regular
calibration are set to five calibration points – the color of the points is red, the background is gray, the
speed is set to medium and the calibration is set to use the full screen. Presentation of the dots is
sequential and fully automatic.
To change the Regular calibration settings:
1.
2.
3.
4.
5.
Click the Foreground Color drop-down list and select the color for the points.
Set the calibration speed by selecting one of the five preset speeds in the Calibration Speed list.
Set Number of calibration points to 2, 5, and 9 points
Click the Background Color list and select the color of the calibration background screen.
Click Configure... to adjust the area of the screen that will be used when performing calibrations.
This may provide a more accurate calibration if you are planning to use a small area of the screen
to show the stimulus.
Click Restore default to reset the respective calibration settings to the default value.
4.3.1.2 Manual calibration
Manual calibration is best suited for studies using the Scene Camera media element or in cases where
subjects have poor vision and have problems following the points in the regular calibration. In these cases,
Manual calibration provides the ability to conduct a more accurate calibration, step-by-step.
© 2010 Tobii Technology - All rights reserved. Tobii Technology and the Tobii logo are either registered trademarks or trademarks of Tobii Technology in the United States
and/or other countries.
49
User Manual - Tobii Studio 2.X
To change the Manual calibration settings:
1. Click the Foreground Color drop-down list and select the color for the lines forming the
calibration cross.
2. Select Show manual calibration instructions to view the calibration instructions during the
calibration procedure. Clear the check box to hide the instructions.
3. Set Number of calibration points to 2, 5, and 9 points.
4. Click the Background Color list and select the color for the calibration background screen.
6. Click Configure... to adjust the area of the screen that will be used when performing calibrations.
This may provide a more accurate calibration if you are planning to use a small area of the screen
to show the stimulus.
Click Restore default to reset the respective calibration settings to the default value.
Manual calibration is an operator-paced calibration procedure with special graphics during the calibration
procedure. The number of calibration points and their locations are by default, the same as for Regular
calibration, but instead of a pulsating dot, two lines create an intersection that is used as the calibration
point. When the space bar is pressed, the lines change color while calibration is performed and the lines
move to the next calibration point. When the participant has looked at all points, the calibration results will
be shown. If the calibration went well, click Accept and the Recording Start dialog box opens.
Important note: The calibration is performed after the space bar is pressed. Make sure that the test subject
doesn’t move his/her gaze at the sound of the space bar press.
4.3.1.3 Infant Calibration
Infant calibration is used when conducting studies on infants. Small animations (in AVI format) are
displayed where the dots normally appear. This works as an attention grabber suitable for small children. It
can also be used when it is difficult for someone to follow the calibration instructions.
50
Tobii Studio can also display different AVIs to attract the test subject’s attention if they begin to respond
poorly or grow tired of the calibration AVI. These items are called attention animation AVIs. No calibration
data is generated during the display of these AVIs.
To change the Infant calibration settings:
1. Type the calibration stimulus file path into the Calibration Animation field or Click the ... button to
locate the file you want to use. Click the file and then click Open to select it as a calibration
stimulus.
2. Type the file path into the Attention Animation field or click the ... button to locate the file you want
to use. Click the file and then click Open to select it as an attention-grabbing stimulus.
3. Select the Show infant calibration instructions check box to view the calibration instructions
during the calibration procedure. Clear the check box to hide the instructions.
4. Set Number of calibration points to 2, 5, and 9 points
5. Click the Background Color drop-down list and select the color for the calibration background
screen
6. Click Configure... to adjust the area of the screen that will be used when performing calibrations.
This may provide a more accurate calibration if you are planning to use a small area of the screen
to show the stimulus.
Click Restore default to reset the respective calibration settings to the default value.
Some sample movies are included in the installation and can normally be found in the Infant Calibration
AVIs folder (C:\ProgramData\Tobii\Studio\InfantCalibration)
Infant calibration is an interactive calibration mode where an operator uses the keyboard to control the
calibration procedure.
© 2010 Tobii Technology - All rights reserved. Tobii Technology and the Tobii logo are either registered trademarks or trademarks of Tobii Technology in the United States
and/or other countries.
51
User Manual - Tobii Studio 2.X
To show the calibration animation selected in the Global Settings dialog box, press the RIGHT ARROW
key. When the subject is watching the animation, press the RIGHT ARROW key again to start collecting
calibration data. It is assumed that the subject will focus on the center of the calibration animation. When
enough data points are collected, the calibration will move on to the next calibration point. The operator
can again press the RIGHT ARROW key to start collecting data. This is repeated until all calibration points
are completed.
The following keys are used to control the Infant calibration procedure:
•
•
•
RIGHT ARROW: Displays the calibration AVI at the next calibration point. If the calibration AVI is
already visible, a calibration is made at that point before proceeding to the next.
LEFT ARROW: Pause. Hides the calibration AVI or the full-screen attention-grabbing AVI
UP ARROW: Displays the attention grabbing AVI
4.3.2 Making recordings
Place the participant in front of the eye tracker and make sure that he or she is sitting comfortably at an
approximate distance of 64 cm. The distance depends on the hardware used; 64 cm is valid for the Tobii
TX Series Eye Trackers, whereas for the Tobii 50-series, the distance is 60 cm (see the TX Series Eye
Tracker manuals for more information).
To start a Tobii Studio recording:
1. Click the Start Recording button located at the bottom of the Design and Record tab. The Select
Participant dialog box opens.
2. Create a new participant or use an existing participant.
•
•
To create a new participant, type the participant’s name in the Name field. If you have
created independent variables, select the correct values (if known before the test) for the
participant.
To select an existing participant, click the Use Existing Participant tab and select a
participant from the participants list by clicking the participant’s row.
3. Click Continue to accept the selection and open the Calibration dialog box.
4. Use the track status box to help adjust the participant and the eye tracker position (e.g. chair
position, table or the eye tracker stand). The eyes of the participants, displayed as two white dots
in the track status box, should be in the center of the box and the distance indicator should
52
display a value between 50 and 80 cm (64 cm allows for greater head movement). The color of
the bar at the bottom of the track status box should be green.
Note: The color indicates whether the eye tracker is able to detect the participant’s pupils. Green
indicates that the trackability is good and that the eye tracker is able to detect both eyes. Yellow
indicates that the eye tracker is only able to detect one of the pupil reflections and trackability is
sub-optimal. Red indicates that the eye tracker is not able to find either eye.
5. Instruct the participant to look at the points as they move over the screen.
6. Click Start to initiate the calibration process. The first calibration point appears on the screen.
Note: The test participant does not have to keep the head still during calibration.
7. The calibration will stop automatically when all calibration points are shown.
8. When the calibration is finished, the calibration results are displayed in two vector plots in the
Calibration Result dialog box.
The calibration plot shows error vectors - green lines (the size of each green line indicates the
difference between the gaze point calculated by the eye tracker and the actual dot position).
Recalibration of certain points should be made if the lines are long or if there are no lines at all at
a certain point.
© 2010 Tobii Technology - All rights reserved. Tobii Technology and the Tobii logo are either registered trademarks or trademarks of Tobii Technology in the United States
and/or other countries.
53
User Manual - Tobii Studio 2.X
If the calibration was unsuccessful, the calibration result “Not Enough Calibration Data” will be
displayed. If this is the case, reposition the test participant in front of the eye tracker and check for
any factors that could be interfering with pupil detection (e.g. an infrared light source that is
directed at the eye tracker sensor or the participant’s eyes, dirty or scratched glasses or droopy
eyelids). Click Recalibrate to recalibrate the subject.
Optional: When you perform the test on a screen, you can also assess the quality of your
calibration by clicking the Verify button in the Accept Calibration dialog box. The participants gaze
point is displayed as a small pink dot in real-time on the screen together with an image containing
several larger colored dots. Instruct the participant to look at the center of the colored dots. If the
calibration was accurate, the gaze point should overlap the colored dots. The distribution of the
colored dots also allows you to assess calibration accuracy in different areas of the screen. Click
ESC to exit.
9. If the calibration seems to show accurate results, click the Accept button to open the Start
Recording dialog box.
54
10. In the Start Recording dialog box, enter a name for the recording (make sure to use informative
names) and look at the track status box to confirm once more that the participant is correctly
positioned in front of the eye tracker
11. Click Start Recording to show the test and record media and eye tracking data.
12. The recording concludes when all the media elements have been presented.
Note: You can override the media settings with F10 and move to the next stimuli, or stop the
recording completely with ESC.
13. Once the recording has ended, you are ready to move to the Replay tab and analyze the
recording.
© 2010 Tobii Technology - All rights reserved. Tobii Technology and the Tobii logo are either registered trademarks or trademarks of Tobii Technology in the United States
and/or other countries.
55
User Manual - Tobii Studio 2.X
5 Replaying and Editing Recordings
After the recordings have been completed, you are ready to analyze the data. The Replay tab in Tobii
Studio provides you with a way to dynamically view the eye tracking recording, perform a basic qualitative
analysis of a participant’s behavior during the test, record participant interviews (Retrospective Think
Aloud), code events, and edit recordings for further analysis. During replay, the gaze path video is overlaid
on the stimuli, regardless of the media type.
The Replay tab also integrates tools to create media elements (scenes) from video stimuli and dynamic
web content (e.g. Flash). These scenes can then be used to produce visualizations on the Visualization tab
and eye tracking metrics descriptive statistics based on Areas of Interest on the Statistics tab.
The window while under the Replay tab is divided into three main areas:
•
•
•
Replay header: Contains the Test, Generate, Export, and RTA buttons.
Recordings pane: This is where you can select and delete recordings, view a list of the different
events (Events), and see the user camera recording (User Cam).
Replay pane: This is where you can view playback of the stimuli and recording of the participant’s
gaze, view the recording timeline, control the playback, create and edit segments and scenes, and
change viewing settings
To play back a recording:
1. In the Recordings pane, click the recording you wish to view.
56
2. In the lower-left corner of the Replay pane, click the play button to start playback of the recording.
Use the rewind, forward, stop, and pause buttons to control the playback.
3. While paused, click the RIGHT and LEFT ARROW keys on your keyboard to move forward or
backwards, respectively, frame by frame.
4. Jump to different sections of the recording by dragging the marker on the Replay pane timeline,
clicking the desired location, or clicking an event in the Events list in the Recordings pane.
5.1 Playback settings
The complete test session recording can be viewed at any time, with gaze data superimposed. The Replay
tab is a flexible tool that allows you to customize different aspects of the recording playback and analysis
detail.
5.1.1 Customizing the recordings list
In the Recordings pane, there is a list of all the recordings made in the selected test. By default, Tobii
Studio displays – in the recordings list – the name of the recording, the quality of the recording as a
percentage (samples), and the participant that was recorded. You can also display more information about
the recording.
To make more information about the recording visible in the Recordings list of the Recordings pane:
1. Right-click anywhere on the recordings list.
2. Select Show in the context menu.
3. Now select, one at a time, the information you want to display in the list. The title of the column is
at the top of the list.
To sort the list by a recording detail:
1.
2.
3.
4.
Right-click anywhere on the recordings list.
Select Sort by in the context menu.
Choose the element to sort by.
Click the respective column headings to change the sort order. (You can also click the heading
you want to sort by and click again to reverse the sorting.)
Types of information that can be shown in the recordings list:
•
•
•
•
•
•
Name: ID of the recording (can be modified in the recordings list by clicking the ID)
Date: The date and time when the recording was made
Duration: The duration of the recording in seconds
Color: The color used to identify the recording on the timeline in the visualizations under the
Visualization tab (can be changed in the recordings list by double-clicking the color)
Quality: The quality of the recording is calculated by dividing the number of eye tracking samples
that were correctly identified, by the number of attempts. 100% means that both eyes were found
throughout the recording. 50% means that one eye was found for the full recording or both eyes
during half the time. Note that the eyes cannot be found when a person is looking away from the
screen; this will result in a lower percentage. If the test is performed so that the participant is
asked questions during the recording and occasionally looks at a test leader, an alternative
method should be considered.
Participant: The name of the test participant
5.1.2 Changing the timeline scale detail and playback speed
The timeline can be rescaled to show shorter time intervals. This can be useful when creating segments
from a long recording or when it is important to be able to advance the replay slowly.
© 2010 Tobii Technology - All rights reserved. Tobii Technology and the Tobii logo are either registered trademarks or trademarks of Tobii Technology in the United States
and/or other countries.
57
User Manual - Tobii Studio 2.X
Zoom in and out on the timeline by moving the pointer to the edge of the scroll bar, which is located just
below the replay timeline. When the pointer becomes a double-headed arrow (see the figure below), drag
the bar narrower for a more detailed timeline or wider for a better overview.
The playback speed can be changed to show the recording replay at a slower or faster pace. The
playback speed bar is in the lower-left corner of the Replay pane. The speed is represented by the
silhouettes of a hare and a tortoise for fast and slow.
Change the playback speed by dragging the marker on the speed bar towards the hare to increase the
speed or towards the tortoise to decrease the speed. The middle line represents the original recording
speed.
5.1.3 Customizing the view of the Replay tab
To provide a greater flexibility of analysis, the various panes and toolbars in the Replay view (Recordings,
Events, User Cam, Segments, Scenes, and Settings) can all be resized or hidden/displayed. This allows
you to customize the window so you have easy access to the functions you use most.
You can choose to hide the Recordings pane by clicking the Left Arrow button in the lower-right corner of
the Recordings pane, or if hidden, display it by clicking the Right Arrow button in the lower-left corner of
the Tobii Studio window. You can also toggle between displaying and hiding the Events and User Cam
panes by clicking their respective icons at the bottom of the Recordings pane. The same goes for
Segments, Scenes, and Settings, which have icons in the lower-left corner of the Replay pane. You can
resize any of the panes by dragging its border in the desired direction.
The recording of a test session can be viewed in fullscreen mode. Fullscreen mode replay shows the
recorded media in its original size, making it more easily viewable for qualitative analysis. The user cam and
timeline are optional in the fullscreen mode.
To view the replay in fullscreen mode:
1. In the Replay pane, right-click the video.
2. Select Fullscreen in the context menu.
58
When in fullscreen mode, the Fullscreen menu can be accessed by right-clicking the replay.
The Fullscreen menu contains the option of hiding or displaying the timeline and user camera video:
•
•
•
•
Show Timeline: To be able to use all the functions of the timeline at the bottom of the fullscreen
view (press T on your keyboard)
Exit Fullscreen: To exit the fullscreen mode (press ESC)
User Camera PiP: Shows the user camera as a picture in a picture. The window can be dragged
with the mouse to different positions (press E on your keyboard).
Increase/Decrease User Camera PiP Opacity: Increases and decreases the opacity of the user
camera image over the replay (press the UP ARROW and DOWN ARROW, respectively)
5.1.3.1 Changing the replay video settings
In the lower-left of the Replay pane is the Settings button. Click the button to toggle between displaying
and hiding some important replay Settings.
To modify the Overlay settings:
1. Clear the Draw Gaze Data and Draw Mouse Clicks check boxes to hide the gaze data and mouse
clicks during playback of the recording.
2. Drag the Opacity marker between Transparent and Opaque to adjust the opacity of data
representation.
3. Type or select the value for the gaze trail duration (in seconds) in the Trail Duration field.
4. Click the Overlay color box to open a color palette and select the desired color of the gaze
overlay.
To select which sound is played during the playback of the replay:
1. Select Replay: On, to hear the test audio during playback.
2. Select User Camera: On, to hear the audio from the user camera (a microphone must be
connected to the Tobii Studio computer and enabled during the recording).
5.2 Performing a Retrospective Think Aloud recording
Retrospective Think Aloud (RTA) is a commonly used technique in which the test leader follows up an eye
tracking test with an interview during which the subject explains his/her behavior during the test. Tobii
Studio’s RTA feature allows you to conduct and record an RTA interview while showing a playback of the
original Tobii Studio recording to the subject. Or it can also be used as an external sound recorder
replacement. The RTA recordings will be available in the recordings list in the Replay view for playback
and further analysis.
To make an RTA recording in Tobii Studio:
1. Connect a microphone to the computer and then go to the Tools menu on Tobii Studio’s menu
bar and click Settings...
2. On the Screen and Video Capture tab, enable user sound recording by selecting the Record user
sound check box and then selecting your audio source (click the Audio Source drop-down box
and select the appropriate microphone).
© 2010 Tobii Technology - All rights reserved. Tobii Technology and the Tobii logo are either registered trademarks or trademarks of Tobii Technology in the United States
and/or other countries.
59
User Manual - Tobii Studio 2.X
3. Click OK to accept the changes or Cancel to close the window and disregard the changes.
4. On the Replay tab, select the recording in the Recordings list that you wish to show the subject
during the RTA.
5. Click the RTA icon on the Replay header.
6. In the Start Retrospective Think Aloud Recording dialog box, enter a name for the recording in the
Recording Name field. If you do not enter a name for the recording, Tobii Studio will name it
automatically by using the name of the recording you have selected in step 4 and adding RTA as
a suffix.
7. Click Start Recording to start the RTA session. Above the Replay header, a light gray tab
indicates that the RTA recording mode is active. The duration of the recording is shown at the
upper-right.
60
8. During RTA recording, you can use the playback controls to move through the original recording.
Use other features in Tobii Studio, such as the Visualization tab, to display gaze plots and heat
maps, and any Windows application (Tobii Studio must be minimized).
You can right-click the recording screen and select Fullscreen to show the original recording in
fullscreen mode. In this case, use the fullscreen controls to control the playback.
9. Click the Stop button on the right side of the gray RTA bar to stop the recording, or press the
ESC or F10 key on the keyboard.
10. The RTA recording will then be available in the recordings list in the Recordings pane. Use the
playback controls to view the RTA recording.
RTA recordings can be edited and exported just like normal studio recordings. However, since no gaze
data is collected during the RTA recording, you will not be able to use these recordings to create
visualizations.
When you start an RTA session with your eye tracker disconnected, a warning dialog box opens with the
following error message: No such host is known, ignore the message and press OK to continue your RTA
recording.
5.3 Managing and logging events
Events, such as the image element’s display time and mouse clicks, are automatically registered in Tobii
Studio’s database and displayed in the Events list of the Recordings pane. These events are also
displayed on the timeline as colored bookmarks. When you hold the pointer over the bookmark, the event
details appear. If you click an event in the Events list, the timeline marker will jump to the position in the
recording where the event occurred.
You can enable or disable the types of events displayed in the list by right-clicking the list and selecting
Show…. In the Visible events and log categories dialog box, select the event boxes you wish to display in
the list.
© 2010 Tobii Technology - All rights reserved. Tobii Technology and the Tobii logo are either registered trademarks or trademarks of Tobii Technology in the United States
and/or other countries.
61
User Manual - Tobii Studio 2.X
In addition to these automatic events, you can also generate your own log events by using the coding
scheme feature in Tobii Studio. These events, such as a participant clicking a link on a web page, will also
be shown in the Events list.
During the playback of the recording, you can use these events to mark the sections in the recording that
you find of interest or are more relevant to your study. You can then use the bookmarks on the timeline or
Events list to find those sections quickly. For example, you can use the user camera to record the
reactions of the participants to the stimulus presentation and use the coding scheme to log the parts in
the recording where the participant was confused, distracted, or engaged. Later you can extract eye
tracking metrics from these sections of the recording and compare the eye movement activity during the
three behaviors.
You can also manually log events, which can be useful when creating segments. Segments can be used
to create movies or scenes and the Events list can be filtered to only show specific events in the list and in
the timeline.
5.3.1 Logging events
In addition to the automatic logging of events, events can be logged either manually on the Replay tab in
Tobii Studio or using the Tobii Studio Remote Logger during a test (see chapter 10 of this manual, pages
149–155 to learn more about this feature). However, before events can be manually logged, a coding
scheme must be defined, i.e. you need to create a set of user-defined events and associate each event to
a specific key on your keyboard.
To define a coding scheme:
1. Open the Design and Record tab.
2. Click the Setup button and select Coding Scheme...
3. Click a row in the Description column and type the name of the event.
62
4. On the Shortcut drop-down list, select the keyboard key you want to use to log the event.
5. Select Quick Logging if you want to prevent the log message dialog box from appearing when
you click the key in the Replay tab.
The New Log Message dialog box allows you to type a comment that will be associated to that
specific event, or to select another event if you pressed the wrong key. The comment will be
displayed in the Text column of the Events list.
6. Double-click the respective color to open a color palette and choose the color of the bookmark
that is placed on the timeline.
7. Repeat steps 3-6 until you have created all your events. Then click OK.
8. Click the Replay tab, select the recording you would like to playback and start logging the events.
You can also use manually logged Events to create segments to help select portions of the recordings
that can be used to create movies or scenes. In order to accomplish this, you need to create an event that
bookmarks the start of the segment (e.g. Smiling Start) and another to bookmark the end of the segment
(e.g. Smiling Stop). You can then go through your recordings and bookmark the periods where the
participants smiled and use the automatic segmentation tool to create segments using those two
bookmarks.
To edit a manually logged event:
1. Right-click the event in the Events list.
2. Select Edit Log entry...
3. In the Edit Log Message dialog box, you can select a new event type from the list or type
information in the field.
4. Click OK to accept the changes.
To delete a manually logged event:
1. Right-click the event in the Events list.
2. Select Delete Log entry...
3. Click Yes to confirm the deletion.
5.3.2 Filtering events
The Events list can be filtered to show only specific events in the list and in the timeline. This feature
allows you to locate and navigate quickly to different parts of the recordings. The filter will display events
that contain the text you typed.
To filter events:
1. Select the recording you want to work with from the Recordings list.
2. In the filter field, located in the upper part of the Events list, type the first letters you want to start
filtering by.
© 2010 Tobii Technology - All rights reserved. Tobii Technology and the Tobii logo are either registered trademarks or trademarks of Tobii Technology in the United States
and/or other countries.
63
User Manual - Tobii Studio 2.X
3. All other events in the Events list and bookmarks in the timeline that do not satisfy the filter criteria
will be hidden.
4. Click the event you wanted to locate and the timeline marker will jump to the point on the
recording when that specific event occurred.
To turn off the filter, delete the text in the filter field.
5.4 Creating video segments
A segment is a section of a Tobii Studio recording. The start and end point of the segment can be set
manually using the timeline marker, or automatically using events. Segments are commonly used to create
video exports of the gaze replay. These videos can then be viewed with external media players.
Segments can also be used to create scenes, in this case, the segment determines the section of the
recording that contains the relevant gaze data to create visualizations or calculate eye tracking metrics.
5.4.1 Auto-generating segments
Before generating the segments, you first need to identify or create the events that you will use to
determine the start and end points. See the previous section to learn how to create events.
To automatically generate segments:
1. Click the Generate icon on the Replay tab and select Segments.
2. In the Auto Generate Segments dialog box, start by typing a name that will be used to identify the
segment in the Segment name prefix field.
3. Select to generate the segments for the Current recording, for All the recordings in the current
test, or All the recordings in the project.
4. Select the segment start and stop points from the event type lists.
5. You can also choose to add a time offset to the start or end of the segment. The offset can be
used, for example, to adjust the size of the segment if you see that you are missing a small portion
of the video in some of the recordings.
6. Click OK to create the segments
7. To view the segments, select the desired recording and make sure the Segments pane is visible.
64
Note: If the start and stop events are the same type of event, for example a LeftMouseClick, the stop point
event Next LeftMouseClick has to be selected. In this example, segments will be created between all left
mouse clicks.
5.4.2 Generating segments manually
Go to the Replay view and choose the test you want to create segments for.
To create a segment manually:
1. Select the recording you wish to use to create the segment and make sure the Segments pane is
visible.
2. Drag the timeline marker to the location on the timeline where you wish to set the start of the
segment.
3. Drag the right handle of the timeline marker to the end position. The red color indicates the
section on the timeline that is currently selected.
4. Right-click the selection and select Create Segment from Selection.
5. The new segment is displayed in the Segments pane. Repeat the steps to generate more new
segments.
To edit an existing segment:
1. Click the Down Arrow located to the right of the segment name (the segment menu arrow).
2. Select Rename to change the segment’s name or Delete to delete the segment from the
recording
3. When hovering over the ends of the segment, once the pointer becomes a double-headed arrow,
you can drag the segment to change the start and stop points. (In the Settings pane, select the
Snap to time markers check box to make the segment edges snap to the timeline tick marks).
Segments can be used to repeatedly play back the same section of the recording. Click the infinity icon
located just to the right of the segment name to loop one segment at a time.
5.4.3 Exporting segments as videos
Segments can be exported into an AVI video format that can then be viewed using an external media
player.
To export a single segment to a video:
1. Select the recording you wish to take the recording from.
2. Click the segment menu arrow and select Export to AVI.
© 2010 Tobii Technology - All rights reserved. Tobii Technology and the Tobii logo are either registered trademarks or trademarks of Tobii Technology in the United States
and/or other countries.
65
User Manual - Tobii Studio 2.X
3. In the Export to video clip settings dialog box, start by enabling/disabling the user camera and
sound.
4. Select the user camera opacity and size.
5. Select the codec you want to use to produce the video and type or select the frame rate of the
video export.
6. Click Save to export the video file
7. In the Save As dialog box, type a file name and select the folder where you want to save it
8. Click Save to complete the process.
To batch export segments to videos:
1. Click the Export button on the Replay header and select Movie Export.
2. In the Batch Export Segments to AVI Clips dialog box, start by choosing the folder where you
want to export the videos to, type the folder path or click the ... button to browse to the folder
location.
66
3. Select from which recordings you want to batch export the segments in the Export Scope
section. You can also choose to export the recordings in full.
4. Enable/disable the user camera and sound in the User camera settings section.
5. Select the user camera opacity and size.
6. Select the codec you want to use to produce the video and type or select the frame rate of the
video export.
7. Click OK to initiate the batch export. A dialog box will appear when the export has completed.
When you click OK, the folder containing the videos will be opened.
5.5 Creating scenes from dynamic content
Unlike segments which are mainly used for exporting the recording, scenes are primarily used to prepare
the recording for the Visualization and Statistics tab. Recordings need to first be divided into scenes in
order to produce visualizations and to extract AOI statistics from media elements that display dynamic
content (i.e. movies, screen recordings, external video, scene camera, and web pages containing flash
elements). A scene contains two elements: a static image set by the user that is used as the background
for the visualizations, and the gaze data from the section of the recording where the image was extracted.
After being created, each scene will be available in the media list of the Visualization tab and in the media
browser on the Statistics tab.
5.5.1 Creating scenes
Scenes can be created directly in the timeline, using the timeline marker to select the period of interest, or
generated from existing segments. Creating scenes from segments is useful when using events to set the
start and end points of the section of the recording covered by the scene.
To create a scene using the timeline marker:
1. Select the recording you want to use to create the scene and make sure the Scenes pane is
visible.
2. Drag the timeline marker to the location in the timeline where you wish to set the start of the
scene.
3. Drag the right handle of the timeline marker to set the end position. The red color indicates the
section on the timeline that is currently selected. The starting and end point can be moved by
dragging their respective markers.
4. Right-click the selection and click Create Scene from Selection.
5. The new scene is displayed in the Scenes pane together with the respective recording coverage
information (indicated by a gray box).
6. Open the Scene context menu by clicking the arrow next to the default scene name.
7. Select Rename to change the name of the scene.
© 2010 Tobii Technology - All rights reserved. Tobii Technology and the Tobii logo are either registered trademarks or trademarks of Tobii Technology in the United States
and/or other countries.
67
User Manual - Tobii Studio 2.X
8. Delete the default name and type the new one. This step is important for later identifying the
scene in the media list of the Visualization tab and in the media browser on the Statistics tab.
Note: When a scene is created, the scene will be copied to the remaining test recordings without the
recording coverage information. If you wish to add the coverage information to that scene you need to
either select the interval manually (select the interval in the timeline, then right-click the selection, select
Add selection to scene, and then select the scene you want to use), or if you are creating scenes for a
movie element, open the Scene context menu and select Copy content to all Recordings.
You can also create an empty Scene by right-clicking in the Scene pane and selecting Create new scene.
To create new scenes from segments:
1. Select the recording to use for this task and make sure the Segments and Scenes panes are
visible.
2. Right-click the Scenes tab and select Create new scene.
3. Drag the segment to the desired scene. You can also drag it to an empty Scene pane which in
turn will create a scene. In addition, you can drag multiple segments to the same scene.
4. The new scene is updated and displays the same recording coverage as the segment.
5. Open the Scene context menu and select Rename to change the name of the scene.
5.5.2 Editing scenes
Several segments can be added to the same scene. This could be useful if the recording contains multiple
instances of the same or an equivalent background.
To add more selections to the same scene:
1.
2.
3.
4.
Create a new segment selection (see the previous section for details).
Right-click the new selection.
Select Add Selection to Scene and select which scene you would like to add the selection to.
The scene is updated and displays the recording coverage derived from the selection.
When a scene is created, the background image is taken from the timeline marker’s current location.
To change the background of the scene:
1. Drag the timeline marker to the section of the video recording that contains the images you wish
to use and choose the frame that is most appropriate to overlay the gaze activity.
68
2. Click the Scene context menu arrow and then select Set new Scene Image.
To delete a scene:
1. Click the Scene context menu arrow.
2. Select Delete and then click Yes in the confirmation dialog box to confirm.
To delete a content section of a scene:
1. Right-click the content you want to delete from the scene.
2. Click Delete scene segment.
5.6 Exporting Recordings
Your eye tracking recordings can be exported in two distinct formats: as a gaze overlay video, showing the
stimulus presentation playback together with the participant’s gaze overlay; and as a tab-delimited text file
that contains timestamp information of the gaze data eye tracking samples, pupil size data, and other
recording-related events. The text export can be used to analyze the data recorded by Tobii Studio in an
external analysis or statistics program such as Excel, SPSS, or Matlab.
5.6.1 Exporting recordings as videos
Recordings are exported into an AVI video format that can then be viewed using an external media player.
This export procedure is the same as exporting segments as videos.
To export the videos:
1. Click the Export button on the Replay header and select Movie Export.
2. In the Batch Export dialog box, start by choosing the folder where you want to export the videos
to. Type the folder path or click the ... button to browse to the folder location.
3. Select to export only the current recording, or all the recordings from a test, or all the recordings
in the Project.
© 2010 Tobii Technology - All rights reserved. Tobii Technology and the Tobii logo are either registered trademarks or trademarks of Tobii Technology in the United States
and/or other countries.
69
User Manual - Tobii Studio 2.X
4.
5.
6.
7.
8.
Enable/disable the user camera and sound from the video export.
Select the user camera opacity and size.
Select the codec you want to use to produce the video.
Type or select the frame rate of the video export.
Click OK to initiate the batch export of the video files.
5.6.2 Exporting the recordings as gaze data text files
The output format of the text export is a tab separated text file. This file format can be opened using Excel,
SPSS, Matlab or any text editor of your choice.
To export the data:
1. Click the Export button on the Replay header and select Text Export.
2. In the Text Export dialog box, start by choosing the folder you want to export the videos to by
typing the folder path in the Output folder field or by clicking the Browse button browsing to the
folder location.
3. Select the Project, Test, and Recording check boxes if you wish to create subfolders for each of
the three data levels.
4. In the Export scope section, specify the scope by choosing between Current recording, All the
recordings in a test, Segments in current recording, or All segments from all recordings in test.
5. On the Preset Configurations tab, select the default configurations for your text exports, or click
the Advanced tab to configure your text export.
6. Click Export to complete the process and save the files to your hard disk.
70
Default configurations:
•
•
•
•
•
All data - Exports all the data available in the Text Export options.
Event data - Exports time-stamped user events, such as key presses, mouse clicks, recording
events, start and stop times of the media presentation, and the media description.
AOI data - Exports fixation and AOI data. The export includes the timestamp of when the
fixations were initiated, fixation duration, AOI ID (reference number), AOI name, and the media
name (stimulus).
Fixation data - Exports the fixation data together with the timestamp of when the fixations
were initiated. The export includes fixation duration data, the mapped (screen) X and Y
positions of the fixation and the fixation index (or order). This export is the same as the
ClearView fixation data export.
Combined data - This export is the same as ClearView’s combined data export. It contains
gaze data, events, fixation, and AOI data together with media information.
To create an Advanced export:
1. Select the Specify a custom filename check box to use your own file name format for your data
exports. You can include the following tags to include the tag information automatically in the
export file name:
• [TN]: Name of the current test
• [RN]: Replaced with the name of the current recording
• [SN]: Replaced with the name of the current segment. If the current element is not a segment,
this part will be excluded from the file name.
• [TM]: Time when the export file was created.
© 2010 Tobii Technology - All rights reserved. Tobii Technology and the Tobii logo are either registered trademarks or trademarks of Tobii Technology in the United States
and/or other countries.
71
User Manual - Tobii Studio 2.X
2. Use the check boxes on the left to quickly select the different recording data and information you
want to include in the export:
• Select Write header to display the computer information (e.g. system properties, operating
system), recording information (e.g. name, date, time, video resolution), export date, and time,
and participant data.
• If you also select ClearView compatible, it will only display the recording date and time, the
test name (study), the participant name (subject), recording name, screen resolution and the
gaze data coordinate unit.
• Select Write column headers to display the name of the data column in the export table.
• Select Write filter header to display the name of the filter used to calculate the fixation data.
• Select Export gaze data to export the data related to the gaze point calculations (e.g. gaze X
and Y coordinates, distance, pupil size).
• Select Only fixations to limit the gaze data export to display only fixation information (for
example, the file does not include the raw gaze X and Y coordinates from the eye tracker, only
the mapped coordinates).
• Also select Print AOIs on separate rows to display each AOI on a separate row.
• Select Export events to include event data, such as key presses and mouse clicks.
• Select Exclude scenes to remove the scenes from the text export data. This is often an option
you want to leave selected. If scenes are included, fixations will be mapped to scenes instead
of the underlying media.
3. Select the data columns you want to include in your export by simply clicking the desired column
in the Available columns list and then clicking the => button to move the column to the Selected
columns list. Use the Clear All and Add All to add or remove all the available columns to the
Selected columns list. Change the order of the columns in the export file by selecting a column
from the Selected columns list and clicking the desired direction arrow located to the right of the
list.
4. If you plan to export more recordings using these Advanced settings, type a name in the Save text
export configuration field and click Save to save the configuration to the Present Configurations
tab.
5.6.2.1 Event data
The table below shows the Events and the Event Data that can be found in the text export and the Events
list on the Replay tab.
Event
Event Key
ImageStart
ImageEnd
InstructionStart
InstructionEnd
MovieStart
MovieEnd
ScreenRecStarted
ScreenRecStopped
URLStart
URLEnd
KeyPress
LeftMouseClick
RightMouseClick
LogData
8
16
2048
4096
128
256
8192
16384
512
1024
4
1
2
0
72
Data 1
Data 2
Descriptor
Image Name
Image Name
Movie Name
Movie Name
ASCII code for key pressed
X mouse coordinate
X mouse coordinate
Log name
URL/website name
URL/website name
Key name
Y mouse coordinate
Y mouse coordinate
Logging comment
5.6.2.2 Text export columns
The list below shows all the data that can be exported using the Tobii Studio Text export. The first part of
the list contains the data that is processed in the eye tracker and sent to Tobii Studio, and the second part
of the list shows the data that is further processed in Tobii Studio.
Eye tracker gaze data:
•
•
•
•
•
•
•
•
•
•
•
•
•
•
•
Timestamp: Shows the timestamp, in milliseconds, of when the gaze data was collected.
Gaze PointXLeft: Horizontal screen position of the gaze point for the left eye (0 is the left edge,
the maximum value of the horizontal screen resolution is the right edge).
GazePointYLeft: Vertical screen position of the gaze point for the left eye (0 is the bottom edge,
the maximum value of the vertical screen resolution is the right edge).
CamXLeft: Horizontal location of the left pupil in the camera image (0 is the left edge, 1 is the
right edge).
CamYLeft: Vertical location of the left pupil in the camera image (0 is the top edge, 1 is the
bottom edge).
DistanceLeft: Distance from the eye tracker to the left eye. The distance is given in mm on a
straight axis, directly out from the eye tracker plane.
PupilLeft: Pupil size (left eye) in mm. The distance and pupil size measurements are calculated to
be as close to real values as possible. However, individual differences in the eyes of subjects and
the strength of glasses/contact lenses will cause errors in these values. The measurements still
reflect changes in head position and pupil size accurately.
ValidityLeft: Validity of the gaze data. The validity is 0 if the eye is found and the tracking quality
good. If the eye cannot be found by the eye tracker, the validity code will be 4. Read more under
the Validity codes section further down.
Gaze PointXRight: The horizontal screen position of the gaze point for the right eye (0 is the left
edge, the maximum value of the horizontal resolution of the screen is the right edge).
GazePointYRight: Vertical screen position of the gaze point for the right eye (0 is the bottom
edge, the maximum value of the vertical resolution of the screen is the right edge).
CamXRight: Horizontal location of the right pupil in the camera image (0 is the left edge, 1 is the
right edge).
CamYRight: Vertical location of the right pupil in the camera image (0 is the top edge, 1 is
bottom edge).
DistanceRight: Distance from the eye tracker to the right eye. The distance is given in mm on a
straight axis, directly out from the eye tracker plane.
PupilRight: Size of the pupil (right eye) in mm. The distance and pupil size measurements are
calculated to be as close to real values as possible. However, individual differences in the eyes of
subjects and the strength of glasses/contact lenses will cause errors in these values. However,
the measurements still reflect changes in head position and pupil size accurately.
ValidityRight: Validity of the gaze data. The validity is 0 if the eye is found and the tracking quality
good. If the eye cannot be found by the eye tracker, the validity code will be 4. The value is for the
right eye. For details, see the Validity codes section further down.
Additional data processed by Tobii Studio:
•
•
•
DateTimeStamp: Timestamp recalculated using the computer date time, shown in hours, minutes,
seconds and milliseconds (hh:mm:ss:ms).
DateTimeStampStartOffset: Timestamp converted into hh:mm:ss format. The start time for the
recording is also shown in the Replay and Visualization views in Tobii Studio if the option Show
Date is selected in the Recordings field.
Number: Timestamp number (order).
© 2010 Tobii Technology - All rights reserved. Tobii Technology and the Tobii logo are either registered trademarks or trademarks of Tobii Technology in the United States
and/or other countries.
73
User Manual - Tobii Studio 2.X
•
•
•
•
•
•
•
•
•
•
•
•
•
•
•
•
•
•
•
•
•
•
•
•
74
FixationIndex: Indexes for the fixation points (values correspond to the order of the fixation).
GazePointX: Gaze PointX can be the horizontal screen position for either eye or the average for
both eyes. The value to show here is specified in Tobii Studio. This value is also used for the
fixation definition. Zero is the left edge, the maximum value of the horizontal screen resolution is
the right edge.
GazePointY: GazePointY can be the vertical screen position for either eye or the average for both
eyes. The value to show here is specified in Tobii Studio. This value is also used for the fixation
definition. Zero is the bottom edge, the maximum value of the vertical screen resolution is the right
edge.
Event: Events, automatic and logged, will show up under Events. The automatic events are start
and end events for the different media, mouse clicks and key presses. The automatic events are
listed in the event table under Event Key and Data. The logged events are the manually logged
events entered either in the replay view or from the remote logger.
EventKey: Unique event key is shown for different key presses.
Data1: Data field for the event. The contents of this field vary depending on what type of event
this is.
Data2: Data field for the event. The contents of this field vary depending on what type of event
this is.
Descriptor: Description of the event. The contents vary depending on what type of event this is.
StimuliName: The file name given to the media element when it was added to the test timeline.
StimuliID: ClearView related data column. In Tobii Studio text export, the values are set to 0.
MediaWidth: Media size in pixels.
MediaHeight: Media size in pixels.
MediaPosX: Distance from the left side of the screen to the media on the screen given in pixels.
MediaPosY: Distance from the top of the screen to the media on the screen given in pixels.
MappedFixationPointX: X coordinate for the fixation point mapped to the media coordinate
system, where the origin for the coordinate system is the top left corner of the image/media.
MappedFixationPointY: Y coordinate for the fixation point mapped to the media coordinate
system, where the origin for the coordinate system is the top left corner of the image/media.
FixationDuration: Fixation duration. The time in milliseconds that a fixation lasts.
AoiIds: ID number for the AOI, usually a counter starting at zero for the first AOI.
AoiNames: Name of the AOI or AOIs if fixations on multiple AOIs are to be written on the same
row.
WebGroupImage: File name of the image file that is used to visualize the web group.
MappedGazeDataPointX: X coordinate for the raw gaze data point mapped to the media
coordinate system where the origin for the coordinate system is the top left corner of the
image/media.
MappedGazeDataPointY: Y coordinate for the raw gaze data point mapped to the media
coordinate system where the origin for the coordinate system is the top left corner of the
image/media.
MicroSecondTimestamp: Timestamp for this export row in microseconds.
AbsoluteMicroSecondTimestamp: Time counter timestamp in microseconds.
Validity codes:
These codes are based on whether the system is able to correctly identify both eyes. It is recommended
that the validity codes always be used for data filtering to remove data points that are obviously incorrect.
Left eye
validity
code
0
4
0
3
1
2
4
Right eye
validity
code
0
0
4
1
3
2
4
Eyes found
System left and right eye identification
Both
Right
Left
Right
Left
One eye
None
Correctly identified
Correctly identified
Correctly identified
Estimated as probable
Estimated as probable
Uncertain
Uncertain
Validity codes should be used for data filtering to remove data points which are obviously incorrect. If you
export the raw data file, we recommend removing all data points with a validity code of 2 or higher.
© 2010 Tobii Technology - All rights reserved. Tobii Technology and the Tobii logo are either registered trademarks or trademarks of Tobii Technology in the United States
and/or other countries.
75
User Manual - Tobii Studio 2.X
6 Defining fixations
During a recording, Tobii T/X Series Eye Trackers collect raw eye movement data points every 16.7 or 8.3
ms (depending on whether the sampling data rate is 60Hz or 120Hz respectively). Each data point will be
identified with a timestamp and “X,Y” coordinates, and sent to Tobii Studio. In order to visualize the data,
these coordinates will then be processed further into fixations and overlaid on a video recording of the
stimuli used in the test or on a static image, or used to calculate eye tracking metrics (see the Tobii
whitepaper entitled Tobii Eye Tracking. An introduction to eye tracking and Tobii Eye Trackers to learn
more about eye movements and fixations). This process is conducted by applying a fixation filter to the
data.
Fixation filters are responsible for how fixation data, such as fixation count, duration, and location, is
calculated. This data in turn affects how gaze plots, heat maps, clusters, and eye tracking metrics are
inferred. Fixation identification is mostly a mathematical and statistical process that attempts to describe
how the eye moves. Despite the accuracy and flexibility of some of the algorithms, the limiting factor is that
there is no precise definition for the start and end of a fixation and thus the identification process still
remains partly subjective. Therefore, the best identification validation process is still to perform a test
where you compare the fixation filter data with an observer’s subjective impression on the position and
duration of the fixations. If you do not have any particular requirements in your study, regarding how
fixations should be defined, use Tobii Studio’s default fixation filters setting.
Tobii Studio uses two types of fixation filters to group the raw data into fixations: Tobii Fixation Filter and
ClearView Fixation Filter. The basic idea behind these algorithms is that if we know the eye tracker sample
rate and measure the distance between neighboring gaze data points, we can calculate changes in the
eye movement velocity for all eye movement samples. During this process the raw data points are
assigned to the same fixation if the velocity remains below a certain threshold or to a new fixation when it
rises above this threshold. The location of the fixation is then determined by finding the median or mean of
the X and Y coordinates from the raw data points belonging to the same fixation.
76
The different fixation filters can be found in the Global Settings dialog box. The settings can be changed
before or after the recording has taken place.
To choose or modify the fixation filter settings:
1. On the Design and Record tab, click Setup and select Settings… to open the Global Settings
dialog box.
2. Select the Fixation Filters tab.
3. Specify whether you want the Eye Selection Filter to use the average gaze point calculated from
the gaze data samples from both eyes, use the left eye’s gaze data only, or use the right eye’s
gaze data only. Most often you should use the gaze data from both eyes and thus select the
average.
4. Select the type of filter you want to use. Choose between Tobii fixation filter, ClearView Fixation
filter, and Raw Data. If you select Raw Data, Tobii Studio will display all the eye position samples
recorded by the eye tracker without aggregating it into fixations.
5. If desired, change the selected filter’s settings (see sections 6.1 and 6.2 of this manual for a more
in-depth view of the filters, pages 77-79).
6. Click OK to accept the changes and close the Global Settings dialog box.
As previously mentioned, the fixation filter affects how gaze plots, heat maps, clusters, and eye tracking
metrics are calculated. Choosing a fixation filter does not modify the raw gaze data recorded by Tobii
Studio and you can therefore change the filter settings without affecting the original data recorded.
6.1
ClearView Fixation Filter
The ClearView fixation algorithm is based on the I-VT (Velocity-Threshold Identification fixation filter)
outlined by Salvucci and Goldberg (2000). The velocity feature is calculated by measuring the distance
between two adjacent data points. Each point is then labeled as a fixation if the velocity is below a certain
threshold or otherwise as a saccade. The threshold is set by selecting a Velocity Threshold value, i.e. this
value represents the maximum pixel-distance between two consecutive data points for them to be
considered part of a fixation. Every point that is located above the threshold is treated as a saccade point
and discarded. This fixation filter also allows you to set a minimum fixation duration i.e. fixations with a
duration below the Duration Threshold value will be discarded from the analysis. This feature can be
used, for example, to discard “involuntary fixations” from your data set based on a duration threshold.
© 2010 Tobii Technology - All rights reserved. Tobii Technology and the Tobii logo are either registered trademarks or trademarks of Tobii Technology in the United States
and/or other countries.
77
User Manual - Tobii Studio 2.X
The location of the fixation point is determined by using the mean of the X and Y raw gaze data points. The
timestamp of the fixation is taken from the first sample included in the fixation and the duration is measured
from the elapsed time between the first and last sample included in the fixation.
The I-VT ClearView uses a velocity threshold unit that is based in pixels instead of deg/s. Consequently, if
you wish to change the Velocity Threshold setting you need to consider the sample rate of the eye
tracker as well as the image resolution when calculating the speed. For example, a 35 pixel radius will
correspond to 35/16.6=2.11 pixels/ms threshold on a 60 Hz eye tracker, while on a 50 Hz eye tracker the
threshold will be 35/20=1.75 pixels/ms.
D.D. Salvucci and J.H. Goldberg. 2000. Identifying fixations and saccades in eyetracking protocols. In
Proceedings of the 2000 symposium on Eye tracking research & applications, pp. 71–78. ACM New
York, NY, USA.
6.2 Tobii Fixation Filter
The Tobii Fixation Filter is a classification algorithm proposed by Olsson (2007) and is currently used as
the default fixation algorithm in Tobii Studio. The algorithm behaves mainly like an I-VT filter that detects
quick changes in the gaze point using a sliding window averaging method.
Assuming that the eyes move between two different fixations, the following distinctions are made:
•
•
If a segment of the signal is of constant or slowly changing mean value due to drift, we classify it
as one fixation.
If there is an abrupt change in the signal, the eyes have moved to another fixation location.
By designing an algorithm that produces a notification whenever it detects a change in the mean, we are
able to group the data into separate fixations. When this is done, we can estimate the spatial position of
each individual fixation based on the information contained within its timeframe.
Before the fixation algorithm is applied to the data, the system goes through the recording data and
identifies sections with missing data. The filter then interpolates the missing data for sections that have a
duration below 100 ms (6-7 data points at 60Hz) and breaks the recording data set into subsets when the
sections are larger than 100ms. The following steps are then applied to each data subset independently.
First, a feature, [dif], is calculated as the vector difference between two data point windows located before
and after the current gaze data point. Each window has a fixed number of [r] gaze data points and the
difference is calculated using the average X and Y coordinates of these points. Once dif has been
calculated for all the data points in the recording, we then identify peak values, i.e. the d values that are
greater than both of its two closest neighbors. Next, we go through the list of peaks once more and
remove all the peaks that are smaller than the highest peak within a window of radius r. The peaks are then
added to a list under the condition that they are at least as great as a user-defined threshold - [h] Velocity
Threshold.
The fact that the threshold is determined relative to the window size r, makes the algorithm behave like an
I-VT filter. In fact, the window size is fixed to 5 data points, so this has the same effect as if dif had been
divided by 5 and the threshold had been h x 5 (for example, if the Velocity Threshold is set to 35 pixels, it
will be equivalent to setting a threshold to (35/(16.6×5)=0.42 pixels/ms, on a 60 Hz eye tracker).
The list of peaks is then processed into fixations, where the start and end points of a fixation are set by two
consecutive peaks. The spatial positions of the fixations are calculated by taking the median of the
unfiltered data points in that interval. After the location of each fixation has been determined, the fixation
data goes through a final iteration. First the Euclidean distances between all the fixations are calculated
and if the distance between two consecutive fixations falls below a second user defined threshold [d] –
Distance Threshold, the two fixations are merged into a single fixation. The process is repeated until no
78
fixation point is closer to each other than the threshold. The fixation identification process is then
complete.
The timestamp of the fixation is taken from the first sample included in the fixation and the duration is
measured from the elapsed time between the first and last sample included in the fixation.
The Tobii Fixation Filter is both affected by the sample rate of the eye tracker and the image resolution,
since h is calculated in pixels. For example, a 35 pixel setting will correspond to 35/(16.6×5)=0.42
pixels/ms threshold on a 60 Hz eye tracker, while on a 50 Hz eye tracker the threshold will be
35/(20×5)=0.35 pixels/ms.
Due to the initial missing data interpolation, if there is no significant change in the position of the gaze data
points before and after 100 ms of the missing gaze data, the fixation will remain intact, i.e. one single
fixation. However, if the consecutive missing gaze points together account for more than 100 ms (6-7 data
points at 60 Hz) of missing data, the fixation is split into two separate fixations, irrespective of its location.
For more details and pseudo-code, see the Appendix of Olsson (2007) Master Thesis.
P. Olsson. 2007. Real-time and offline filters for eye tracking. Msc thesis, KTH Royal Institute of
Technology, April 2007.
© 2010 Tobii Technology - All rights reserved. Tobii Technology and the Tobii logo are either registered trademarks or trademarks of Tobii Technology in the United States
and/or other countries.
79
User Manual - Tobii Studio 2.X
7 Visualizing Eye Tracking Data
Being able to visualize your data in a number of ways, with gaze superimposed on any kind of stimulus,
enables you to make a visual qualitative inspection of your results. Visualizations are easily exported by
right-clicking and selecting copy, or saving as an image.
Several recording sessions from multiple test participants can be summarized in a single gaze data
visualization, helping to draw conclusions and new hypotheses from the behavior of a group of
participants. Effective tools for multi-person analysis, with an option to further filter the participants of a
group into categories, provide a time- and cost-efficient way to collect such data.
Visualizations also help to illustrate and communicate your results in research papers, reports, and
customer or conference presentations.
Some visualizations are only available if you have purchased a specific Tobii Studio version. See the
preface of this manual to see which visualizations are included in your Tobii Studio license. If a tool is not
activated, the button will be gray. If you wish to activate a visualization tool, you will need to upgrade to a
license of Tobii Studio that includes the tool.
The Visualization tab is divided into three main areas:
•
•
•
80
Visualization header: Contains the test menu, the export menu, the AOI groups tool, the Web
Groups tool, AOI tool, and the different visualization tools.
Selection pane: This is where you can select the media, recordings, and AOIs used to produce
the visualizations.
Visualization panel: This is where you can view the different visualizations, draw AOIs, view the
recording timeline, and change viewing settings.
To create a visualization:
1. In the Selection pane, from the media list, click a media element to select it.
2. Now select the Recordings check boxes to include the recordings in the analysis. Clear the check
boxes to remove the recordings.
3. Click a visualization icon on the Visualization header to display the results in the Visualization
pane.
The timeline below the visualization shows the total time the media was displayed during the recording. If
the participants have different view times (e.g. when browsing a website or a PDF document) the longest
view time is used to determine the timeline scale. The duration of each individual recording is indicated by
a colored dot that is coded with the color shown next to the recording in the Recordings list.
7.1 Selecting media
When you click the different visualization icons, the media list will only display the media elements that can
be analyzed using the selected visualization tool. For example, if you recorded video stimuli, those
elements will not be displayed in the media list when you are viewing gaze plots, heat maps or clusters.
Video media elements need to be processed into scenes first to be able to use those types of
visualizations. Read more on how to create scenes in section 5.5 of this manual, pages 67-69.
In many cases, a web page will look slightly different each time it is presented during a recording. For
example, if looping advertisements are displayed. Tobii Studio will register each view and present them in
the Web Group Tool. Using the Web Group Tool, you can group similar pages that contain the object of
interest, or group pages that contain small differences that do not impact the analysis if they are grouped
together. Web pages saved as a group will be shown as a single media in the media list.
To select a media for analysis, simply click the media row in the media list and click one of the visualization
icons.
© 2010 Tobii Technology - All rights reserved. Tobii Technology and the Tobii logo are either registered trademarks or trademarks of Tobii Technology in the United States
and/or other countries.
81
User Manual - Tobii Studio 2.X
7.1.1 Grouping web pages
The Web Groups button on the Visualization header opens the Web Group Tool dialog box. This tool is
used to group different web pages for analysis. Web pages can either be grouped using predefined
criteria, such as by URL, Size, ID, and Name, or can be grouped manually.
When the pages are grouped, the gaze data from all the pages in the group is aggregated and displayed
on a single page, selected to represent all the pages. This page is called Group Image. When grouping
images, make sure that all pages in the group contain the same data, or that they have the same content
for the areas that are important for analysis.
Once web groups are created, the groups will appear in the media list as a single item. This item can then
be used to create visualizations and statistics.
7.1.1.1 Automatic grouping using preset criteria
When you perform a web recording, each page visited is recorded automatically by the software. By
default, when you open the Visualization tab for the first time after making a recording, the web pages are
grouped by Content ID.
The Group Criteria options are located in the top section of the Web Groups Tool dialog box. Below
these options you will find two lists. Each list displays all the web frames visited during the web
recordings.
When you click a row in the list, a preview of the web page is displayed. These two lists contain exactly
the same web frames and web frame information. The two lists allow you to visually compare two web
frames and confirm whether the content is the same. This feature also allows you to manually group web
pages in a more efficient way.
82
To change the grouping criteria:
1. Select one of the Group Criteria options.
• URL: All frames with the same web address will be placed in the same group. The gaze
data for the frames will be summarized and shown on one frame. The background
image/page is specified by selecting the image/page and clicking the Set As Group
Image button.
• URL and Size: If frames have the same web address but different sizes, the frames will
be divided into different groups. Gaze data for all frames with the same web address and
the same size will be summarized and shown on one frame. The background image/page
is specified by selecting the image/page and clicking the Set As Group Image button.
• Name: Pages with the same name are grouped (pages with different URLs can have the
same name).
• Content: Pages with the same URL or name might have different content IDs. Selecting
this grouping option will group pages that have the same ID; i.e. that have the same
content, look and URL.
• Manual: The frames have to be grouped manually.
2. To confirm whether the grouping is valid, click two different web frames (one in each list)
belonging to the same group and compare the preview image. If necessary, repeat this procedure
for all frames and all the groups. If frames are misplaced and the grouping thus has a strong
impact in the quality of your analysis, use another grouping criterion.
3. Set the web group background image by clicking the web frame to select it and clicking the Set
As Group Image button.
4. By default, the name of the group is the same as the frame that is used as a background image.
Double-click the group row and type a new name for the group if you wish to change it.
5. Click OK to accept the changes and wait while Tobii Studio saves the changes.
6. Each group is displayed in the media list as a single media item.
7.1.1.2 Manual Grouping
If for some reason the frames are constantly misplaced or you want to have better control over the page
groupings, you can create the groups manually.
To assign a frame to a group:
1. Select the Manual option and click New Group. The new group appears at the bottom of the web
frame lists.
© 2010 Tobii Technology - All rights reserved. Tobii Technology and the Tobii logo are either registered trademarks or trademarks of Tobii Technology in the United States
and/or other countries.
83
User Manual - Tobii Studio 2.X
2. Rename the new group by double-clicking it, typing the new name, and then pressing ENTER on
your keyboard.
3. Select the frame you want to add to the group. The preview can be seen below the list.
4. Add the frame by dragging it to the new group.
5. Repeat steps 3-4 to add more frames to the group. Before adding another frame to the group,
you can compare its content with the frames in the group. Select one frame in each list and use
the web page preview to check if the content is the same.
6. Set the web group background image by selecting the web frame and clicking the Set As Group
Image button.
7. Click OK to accept the changes and wait while Tobii Studio saves the changes.
8. Each group is displayed in the media list as a single media item.
7.2 Selecting recordings
You can select the recordings by selecting the check boxes in each row of the Recordings list. By default,
the recordings list displays the name of the recording, the color used to identify the recording on the
timeline and in the visualizations, the quality of the recording (as a percentage), and the name of the
participant. However, you can display more information and choose the information column to sort the
recordings by.
To display more columns of information:
1. Right-click anywhere in the recordings list.
2. Select Show in the context menu.
3. Select the information you want to display on each row.
To select which column to sort by:
1. Right-click anywhere in the recordings list.
2. Select Sort by in the context menu.
3. Choose the data you want to sort the recordings in the list by.
84
4. Click the respective column heading to change the sort order.
Types of information:
•
•
•
•
•
•
Name: ID of the recording
Date: Shows the time and date when the recording was performed
Duration: The duration of the recording in seconds
Color: The color used to identify the recording on the timeline and in the visualizations on the
Visualization tab.
Samples: The quality of the recording is calculated using the number of eye tracking samples that
were correctly identified. 100% means that both eyes were found throughout the recording; 50%
that one eye was found for the full recording or both eyes during half the time. Note that the eyes
cannot be found when a person is looking away from the screen; this will result in a lower
percentage. If the test is performed so that the participant is asked questions during the recording
and occasionally looks at a test leader, an alternative method should be considered.
Participant: The name of the test participant
7.2.1 Using independent variables to filter recordings
Filtering allows you to restrict your data to a group of participants. For example, if you have created an
independent variable called gender you can produce two separate heat maps for women and men by
creating two filters, one for males and another for females. Each filter can be defined by either one
independent variable or a combination of independent variables.
You can view, select, create, and manage filters in the Recordings lists of the Visualization and Statistics
tabs, or with the Row options of the Statistics pane.
Use the Filter by: drop-down list located at the top of the Recordings list of the Selection pane to filter the
recordings according to participant groups. By default, the button will display ‘No Group Selected’ if no
groups have been selected or created.
To create a new participant group:
1. Click the Filter by: drop-down list. This opens the Participant Groups list.
2. Click Create new participant group. The New Participant Group dialog box opens.
3. Type a group name in the Participant Group Name field.
4. Click an independent variable in the Variables list and select the values you wish to include in the
participant group by selecting the check boxes in the Values list.
5. You can choose to filter by one independent variable or a combination of several independent
variables (e.g. the group young Danish women can be created by using the independent variable
© 2010 Tobii Technology - All rights reserved. Tobii Technology and the Tobii logo are either registered trademarks or trademarks of Tobii Technology in the United States
and/or other countries.
85
User Manual - Tobii Studio 2.X
combination age, nationality, and gender). In order to create a multivariable group, repeat step 4
for other variables you wish to use to describe the group.
6. Click OK to create or Cancel to dismiss the new group.
To select a participant group:
1. Click the Filter by: drop-down list button. This opens the Participant Groups list.
2. Under Participant Groups, select an existing group by clicking the group or create a new group by
clicking New Participant Group. The list of recordings will be updated automatically, showing only
the recordings that fulfill the group conditions.
To edit an existing participant group:
1. Click the Filter by: drop-down list button. This opens the Participant Groups list.
2. Click the Edit button
to the right of the group name in the Participant Groups list. This opens
the Edit Group… dialog box.
3. Change the group name in the Participant Group Name field.
4. Click an independent variable in the Variables list and select the values you wish to include or
exclude in the group definition by selecting the check boxes in the Values list.
5. Repeat step 4 for other variables you wish to change.
6. Click OK to accept or Cancel to dismiss the changes.
To delete an existing participant group:
1. Click the Delete button
to the right of the group name in the Participant Groups list.
2. Confirm the deletion by clicking Yes in the Delete Filter dialog box. If you wish to cancel the
deletion click No.
7.3 Selecting data from a time interval
You can choose to restrict the data used to create the visualization according to a time interval. For
example, you can create a heat map showing the fixations made during the first 2 seconds of the stimulus
display. The interval can be determined in two different ways. The first way is by dragging the markers on
86
the visualization timeline, and the second is by setting the Start and Length time values in the
respective fields.
To set the time interval using the timeline markers:
1. Drag the left marker to set the start of the data interval.
2. Drag the right marker to set the start of the data interval.
To set the interval using the Start and Length fields (more precise):
1. Click in the Start: field below the visualization and type the hh:mm:ss.ms values to set the start of
the interval. Alternatively, you can use the arrows in the field to increase or decrease the time
values. The time format is hours:minutes:seconds.miliseconds.
2. Set the length of the interval by clicking in the Length: field and typing the hh:mm:ss.ms values. As
in the Start: field, you can use the arrows in the field to increase or decrease the time values.
Note: By selecting a smaller time window, some recordings might be excluded from the visualization
altogether.
7.4 Creating gaze plots
The Gaze Plot visualization shows the sequence and position of fixations (dots) on a static media, (e.g. an
image or a scene). The size of the dots indicates the fixation duration and the numbers in the dots
represent the order of the fixations. Gaze Plots can be used to illustrate the gaze pattern of a single test
participant throughout the entire eye tracking session, or of several participants in a short time interval.
To create a gaze plot:
1. From the media list in the Selection pane, click a media element to select it
2. Select the Recordings check boxes to include the recordings in the visualization. Uncheck to
remove the recordings.
3. Click the Gaze Plot button, located on the Visualization header, to display the fixation plot.
© 2010 Tobii Technology - All rights reserved. Tobii Technology and the Tobii logo are either registered trademarks or trademarks of Tobii Technology in the United States
and/or other countries.
87
User Manual - Tobii Studio 2.X
4. Save or Copy the heat map into a document or folder on the computer. To copy the gaze plot,
right-click the image and select Copy. The image is copied to the clipboard and can be pasted
into a document by using the document editor Paste controls. To save the gaze plot image, rightclick the image and select Save Image as…. In the Save Image dialog box, select the folder and
the file name. Select the type of image file – JPEG, BMP, or PNG. Click Save and the Information
Legend Settings dialog box opens. Choose the settings of the gaze plot legend and click Save.
Note: The selected media has to be a still image. If the media is a screen recording or a movie, still images
have to be defined before a gaze plot can be drawn. This is done by creating scenes (read about how to
create scenes in section 5.5 of this manual, pages 67-69).
7.4.1 Customizing gaze plots
You can change the appearance of the gaze plot to customize your image or to give emphasis to a
specific part of the information displayed on the fixation dots. Most of these changes can be made in the
Settings menu, which can be accessed by clicking the Settings button in the lower-left corner of the
visualization pane.
To change the color of the gaze plot for a recording:
1. In the Recordings list, double-click the color icon next to the recording to open the color palette
dialog box.
2. Select the color and click OK to accept the change.
To change other appearance settings of the fixation dots:
1.
2.
3.
4.
88
Click the Settings button to open the gaze plot settings menu.
Drag the Opacity slider to change the fixation dot opacity.
Select the Show Number check box to display the fixation order number of the fixation dots.
Select the Same Size check box to set the size of the fixation dots so that all the dots have the
same diameter. Checking this option removes the time information (fixation duration) from the
gaze plot, but can be redisplayed by clearing the check box.
5. Select the Show Borders check box to display a line around each fixation dot. When this option is
selected, the first and the last fixation of a recording will display a thick line and fixations with
dotted lines represent periods when continuous viewing of the media was interrupted. An
interruption can take place when, for example, the eye tracker loses track of the eyes (e.g. the
participant looked away from the screen), or when the participant leaves and returns to the same
media element after viewing another media element in between.
6. Click the Border Color box to the right of Show Border to open the color palette. (The default is a
white box and white border.) Select a color for the line around the fixation and click OK.
7. Select the Show Clicks check box to display the participant’s left mouse clicks ( ) on the media.
8. Drag the Scale slider to change the size of the gaze plot fixation points. Each fixation point will be
scaled according to its relative size.
Gaze plots are dependent on the fixation filters settings. Fixation filters are responsible for determining the
size and location of the fixation dots (read more about fixation filters in chapter 6 of this manual, pages 7679).
7.5 Creating heat maps
Heat maps can be of great value when creating reports, papers or presentations, as they help you to
summarize large quantities of data in an intuitive way. A heat map uses different colors to show the
number of fixations participants made in certain areas of the image or for how long they fixated within that
area. Red usually indicates the highest number of fixations or the longest time, and green the least, with
varying levels in between. In spite of its intuitiveness, the task of interpreting a heat map is more complex
than it seems. For a critical discussion on how to interpret heat maps please read Bojko’s (2009) paper
entitled Informative or Misleading? Heatmaps Deconstructed.
Bojko A. (2009). Informative or Misleading? Heatmaps Deconstructed, in: Human-Computer Interaction, Part I, HCII
2009. Jacko J. A. (Ed.). Springer-Verlag Berlin, pp 30-39.
© 2010 Tobii Technology - All rights reserved. Tobii Technology and the Tobii logo are either registered trademarks or trademarks of Tobii Technology in the United States
and/or other countries.
89
User Manual - Tobii Studio 2.X
To create a heat map:
1. In the media list, click a media element to select it.
2. Select the Recordings check boxes to include the recordings in the analysis (or clear the boxes to
remove the recordings).
3. Click the Heat Map button, located on the Visualization header, to display the heat map.
4. Save or Copy the heat map into a document or folder on the computer. To copy the heat map,
right-click the image and select Copy. The image is copied to the clipboard and can be pasted
into a document by using the document editor Paste controls. To save the heat map image, rightclick the image and select Save Image as…. In the Save Image dialog box, select the folder and
the file name. Select the type of image file – JPEG, BMP, or PNG. Click Save and the Information
Legend Settings dialog box opens. Choose the settings for the heat map legend and click Save.
If you wish to use a higher resolution background image in your report or publication, you can also save
the heat map layer without the background image. Right-click the heat map, select Save Heatmap Layer
Image As… and save it as a PNG file to preserve the transparency.
Note: Selected media has to be a still image. If the media is a screen recording or a movie, still images
have to be defined before a heat map can be drawn. This is done by creating scenes (read more about
how to create scenes in section 5.5 of this manual, pages 67-69).
7.5.1 Customizing heat maps
Tobii Studio can produce three different types of heat maps depending on which eye movement
information you wish to focus on: Count (total number of fixations); Absolute duration (based on fixation
durations); and Relative duration (fixation duration divided by the image viewing time in each recording).
Count heat maps show the accumulated number of fixations calculated from all the selected recordings
and can be used, for example, to determine whether participants have seen different elements on a
90
stimulus image or website. Each fixation made by each participant adds a color value to the fixation map
and the value is the same regardless of its duration.
Absolute Duration heat maps display the accumulated fixation duration on different locations in the image
and can be used, for example, to measure the amount of attention, or cognitive processing, dedicated to
different elements in the image. Each fixation made by each participant adds color values to the fixation
map according to its duration (in seconds).
The Relative Duration heat map displays the accumulated fixation duration on the different elements in the
image, relative to the total image viewing time. In other words, if in recording A the subject looked at the
image for 10 seconds and at a specific object for 3 seconds, and in recording B the subject looked at the
image for 10 minutes and at the specific object for 3 minutes, then the data from recording A and
recording B will have the same weight on the final heat map. This type of heat map should be used when
the view time per stimulus is not fixed, such as during a web usability study where participants typically
spend different amounts of time on each web page. Each fixation made by each participant adds a
duration value to the fixation map and the values are divided by the participant’s view time. The relative
values for each participant are then added and the maximum value will be used to apply the color
distribution mapping (for more details see section 7.5.2 of this manual, pages 92-96).
To change the variable represented in the heat map:
1. Click the Settings button in the lower-left corner of the Visualization pane to open the heat map
settings menu.
2. In the Fixation data style area, select Count, Absolute duration, or Relative duration
To change the heat map style and color:
1. Click the Settings button to open the heat map settings menu.
2. In the Display settings area, click the Style drop-down list to select whether you want to use a
colored heat map or a gaze opacity style. The colored heat map uses a color gradient to display
the areas with more or longer fixations, while the gaze opacity heat map uses a transparency
gradient. The gaze opacity heat map shows the parts of the media with the highest counts or
longest fixations and shades the rest of the media.
3. Click the Color: gradient box to open the Color/Alpha Gradient Settings dialog box depending on
the Style. If heat map is the selected style, the Color Gradient Settings will appear. Click one of
the three color boxes to change the colors of the heat map gradient. The box on the left
represents few fixations while the box on the right represents more fixations. The Alpha Gradient
Settings dialog box will open if gaze opacity was selected. The number on the left represents few
fixations and the number on the right represents more fixations. The numbers can range from 0255 with 255 being opaque and 0 having no opacity.
4. Click in the Display settings field and type a value to change the maximum value (count or
duration) used to map the heat map color values. This setting affects the color distribution of the
heat map and has a strong impact on its interpretation. Read section 7.5.2 of this manual, pages
92-96, before you make any changes to this setting.
5. Click in the Kernel Radius field and type a value for the Kernel size (width of the color mapping
around a single fixation). The default value is 50 pixels. Read section 7.5.2 of this manual, pages
92-96, before you make any changes to this setting.
6. Drag the Opacity slider to change the heat map’s general opacity.
7. Select the Show Clicks check box to display the participant’s left mouse clicks ( ) on the media.
8. Select the Show Legend check box to display the heat map legend on the image. It can
subsequently be moved by dragging.
© 2010 Tobii Technology - All rights reserved. Tobii Technology and the Tobii logo are either registered trademarks or trademarks of Tobii Technology in the United States
and/or other countries.
91
User Manual - Tobii Studio 2.X
Like gaze plots, heat maps are dependent on the fixation filters settings. Fixation filters are responsible for
determining the number, size and location of the fixation dots. Read more about fixation filters in chapter 6
of this manual, pages 76-79.
7.5.2 How are heat maps calculated?
The heat map image can either be based on fixation data or raw data, depending on if you are using one of
the two fixation filters or the raw data filter. In both cases the data entries consist of a timestamp, duration,
and spatial location (X and Y coordinates) information.
Eye tracking raw data is composed of fixation and noise data points. The noise includes eye samples
during saccades and other small fixation-related movements. Thus a heat map based on raw data will
contain more noise and show larger areas with the high color value. When a heat map is based on raw
data, each entry corresponds to a raw gaze point from the eye tracker, sampled each 16-17 ms interval
(for the 60 Hz system). The sample interval will be 8-9 ms for a 120 Hz system and 20 ms for a 50 Hz
system. The duration values for each entry are constant as they are defined by the duration of the sampling
interval.
When the input is based on fixation data, the eye tracker will group the raw data entries into fixations and
the duration of each fixation depends on the fixation filter used to identify the fixations. The input data will
typically look like this:
Fixation: 1
Start: 132 ms
Duration: 132 ms
Location: (415,711)
Fixation: 2
Start: 264 ms
Duration: 735 ms
Location: (711,491)
Fixation: 3
Start: 999 ms
Duration: 101 ms
Location: (301,10)
.....
7.5.2.1 Basic concept
The first step in creating a heat map is to map the fixation on the image. This is done by going through all
the fixations in all the selected recordings one by one, and adding their values whenever a fixation shares
the same X and Y pixel location as another (see the figures below). If we chose Count, we add the number
of fixations at the same location. If we are using Absolute duration we add the duration of each fixation. For
Relative duration, the duration of each fixation is divided first by the media viewing time and then added.
Once all the fixations values have been added together, color values are added to all the points, with the
warmest color representing the highest value.
92
However, this basic process would result in a rather useless image, with small colored dots distributed
over the image. What we do instead is add color values to all the points within a certain distance of the
fixation location and the color values gradually decrease as we move away from the fixation point. This
process ensures that the color distribution results in a more “smooth” heat map image and gives some
biological relevance to the color mapping.
7.5.2.2 Tobii Heat Map
The distribution of values around a fixation point is accomplished by using an approximation to the
Gaussian curve that is commonly used in 2D image processing - a Cubic Hermite Spline polynomial
(cspline). The specific function of the polynomial that is used is t2(3 - 2t) – represented by the blue line in
the graph below. (The orange line represents the fixation point and thus the maximum color value.)
The radius of the function is fixed and set at 50 pixels, corresponding to a total kernel of 100 pixels. This
fixed kernel was calculated to reflect the human visual field, i.e. the fact that the human eye has the highest
visual acuity at the fovea and that the acuity decreases as we move away from this spot on the retina. For
© 2010 Tobii Technology - All rights reserved. Tobii Technology and the Tobii logo are either registered trademarks or trademarks of Tobii Technology in the United States
and/or other countries.
93
User Manual - Tobii Studio 2.X
example, when we focus on a word in a text, we are able to read the word and its immediate neighbors,
but not words a few centimeters away.
Since the kernel is fixed and set in pixels, Tobii heat maps are dependent on screen resolution and less
representative of the individual’s foveal vision if the participant varies his distance greatly to the stimulus.
The current kernel size is optimized for the Tobii T Series Eye Trackers’ standard screen resolution
(1280x1024) and the typical distance from the participant to the eye tracker screen (64 cm).
Tobii heat map calculations using fixation count (for Absolute and Relative duration the calculations are the
same, however instead of using the number o fixations as values, we use the fixation duration or fixation
duration/media viewing time, respectively):
1. The fixations are added according to their X and Y coordinates and the cubic hermite spline value
distribution is applied to each fixation
2. If different fixations fall in the same location, their values are added. This affects the height of the
distribution but not the kernel, which is kept constant at 100 pixels (see images above and
below).
94
3. If their distributions overlap, the overlapping values of the distribution are added.
4. The maximum value setting (Display settings field) for the color interpolation is set to the highest
fixation value. For example, if the highest fixation count in the data is 3, this value will be set by
default as the maximum color value (this value can be viewed in the heat map legend and in the
Display settings of the heat map settings).
© 2010 Tobii Technology - All rights reserved. Tobii Technology and the Tobii logo are either registered trademarks or trademarks of Tobii Technology in the United States
and/or other countries.
95
User Manual - Tobii Studio 2.X
5. To smooth the image and apply the color values, the peak of the highest distribution is set to 1
and all the other distributions peaks are recalculated in reference to that distribution. The color is
then linearly mapped along the distribution with the highest value 1= red, middle value 0.5 =
yellow and low value 0=green (default colors; can be changed).
6. If you change the maximum color value in the display settings (field) of the heat map, you change
how the color is mapped to each distribution. Lowering the values will produce more warm areas.
7. If you increase the Kernel value of the heat map you will expand the area of each cspline
distribution, causing more fixation color distributions to overlap, and consequently increasing the
size and number of warm areas on your heat map.
7.6 Creating clusters
The Cluster visualization is a graphic representation of areas with high concentrations of gaze data points
(clusters), superimposed on a background image. This type of visualization can be used to calculate
clusters of raw gaze data that indicate regions of interest, or similarly to Count, heat maps display the
areas with a high fixation density. The fixation data contained in each cluster can be further analyzed by
automatically generating AOIs and calculating eye tracking metrics based on those AOIs.
96
To create a cluster image:
1. In the Media list, click a media element to select it.
2. Select the Recordings check boxes to include the recordings in the analysis (or clear the check
boxes to remove the recordings).
3. Click the Cluster button, located on the Visualization header, to display the cluster image.
4. Save or Copy the cluster image into a document or folder on the computer. To copy the cluster,
image right-click the image and select Copy. The image is copied to the clipboard and can be
pasted into a document by using the document editor Paste controls. To save the cluster image,
right-click the image and select Save Image as…. In the Save Image dialog box select the folder
and the file name. Select the type of image file – JPEG, Bitmap, or PNG. Click Save and the
Information Legend Settings dialog box opens. Choose the settings of the cluster legend and
click Save.
5. Generate AOIs based on clusters by right-clicking the cluster image and selecting Export
Clusters to AOIs. The new AOIs will be displayed in the Areas of Interest list.
Note: Selected media has to be a still image. If the media is a screen recording or a movie, still images
have to be defined before a cluster image can be drawn. This is done by creating scenes (read more
about how to create scenes in section 5.5 of this manual, pages 67-69).
7.6.1 Customizing clusters
The size and number of clusters in the image are affected by the Distance threshold settings. The
Distance threshold parameter is a spatial value that determines the minimum distance between two
different clusters (for more details, see the next section).
© 2010 Tobii Technology - All rights reserved. Tobii Technology and the Tobii logo are either registered trademarks or trademarks of Tobii Technology in the United States
and/or other countries.
97
User Manual - Tobii Studio 2.X
To change the Distance threshold:
1. Click the Settings button in the lower-left corner of the Visualization pane to open the heat map
settings menu.
2. In the Distance threshold area, type a value in pixels in the field to set the Distance threshold.
To change the font of the labels:
1. Click the Change Font button, the Font dialog box opens.
2. Click on the respective lists to select the font type (Font list), style, Size, effect, and Script.
3. Click OK to close the dialog box and accept the changes.
To change the cluster image opacity and percent information:
1. Drag the Opacity slider to change the opacity of the clusters.
2. Select which Percent Display Style to display for the clusters. Participants displays the
percentage of participants that have contributed with gaze data to the cluster. Recordings
displays the percentage of recordings that have contributed with gaze data to the cluster.
Like gaze plots and heat maps, clusters are dependent on the fixation filters settings. Fixation filters are
responsible for determining the number, size, and location of the fixation dots. Read more about fixation
filters in chapter 6 of this manual, pages 76-79.
7.6.2 How are clusters calculated?
Simple clustering algorithms calculate the distance between any two points in the data and allocate them
to the same cluster if the distance is below a certain pre-determined threshold (such algorithms are known
as distance cluster algorithms). The algorithm behind the Tobii Cluster visualization is based on the robust
clustering algorithm suggested by Santella & DeCarlo (2004) for eye movement data analysis. Essentially,
the cluster algorithm tries to find spatial patterns in the distribution of the gaze data. It does so by first
moving the gaze points into denser configurations until the points are collected around mode values, and
then after a number of iterations when the distances between the mode values are larger than the distance
threshold, it assigns each gaze point located around the same mode value to the same cluster.
This procedure is summarized in the following algorithm, where σ represents the distance threshold (or
spatial scale).
Cluster calculation:
1. The distance threshold is set to σ pixels
98
2. The algorithm calculates an area based on the σ pixel radius around a gaze data point and
then calculates an average X and Y coordinate using the neighboring gaze points within that
area.
3. The gaze data point is moved to the average X and Y location.
4. Steps 2 and 3 are performed for each gaze point present in the data.
© 2010 Tobii Technology - All rights reserved. Tobii Technology and the Tobii logo are either registered trademarks or trademarks of Tobii Technology in the United States
and/or other countries.
99
User Manual - Tobii Studio 2.X
5. Once all the gaze points have been moved to their new locations, a second iteration of steps
2-4 is performed.
6. Iterations are repeated until the gaze points are densely packed around modes and the
distance between all the modes is larger than σ pixels.
7. Each gaze point located around the same mode value is assigned to the same cluster.
8. The clusters are displayed with the gaze points in their original positions.
This method of cluster determination ensures that the determination of the clusters is not heavily
influenced by noise and outliers. The other advantage of using this method is that given the choice of
threshold, its results are intuitive and predictable. For example:
•
100
Distant outliers will be represented as small clusters, or discarded if no other neighboring point is
present at the current threshold distance.
•
•
Large regions of uniform density of gaze data points will display one cluster.
In areas where there is a bimodal distribution of gaze data points, the cluster visualization will
show a single cluster if the modes for each distribution are within the selected threshold distance
and 2 clusters if the modes are further apart than the threshold distance.
A. Santella and D. DeCarlo. 2004. Robust Clustering of Eye Movement Recordings for Quantification of
Visual Interest. In Proceedings of the 2004 symposium on Eye tracking research & applications, pages 1–
8. ACM New York, NY, USA.
7.7 Exporting gaze plots, heat maps and clusters
Visualizations can be exported as image files or as animated movies that show where people have fixated
over time.
To export a visualization image:
1.
2.
3.
4.
Click the Export button on the Visualization header and select Export Current Image.
In the Save Image dialog box, select the folder and type the file name.
Select the type of image file – JPEG, BMP, or PNG – and then click Save.
In the Information Legend Settings dialog box, choose the settings for the image’s legend and
click Save.
7.7.1 Batch export
This feature can be used to batch export visualization image files with multiple participant filters from only
the current media, from all the media within a single Tobii Studio Test or all the media from all the tests
included in the current project.
To batch export visualizations:
1. Click the Export button on the Visualization header and select Batch Export.
© 2010 Tobii Technology - All rights reserved. Tobii Technology and the Tobii logo are either registered trademarks or trademarks of Tobii Technology in the United States
and/or other countries.
101
User Manual - Tobii Studio 2.X
2. In the Output folder: field, type the location where you wish to save the images. Alternatively, you
can click the Browse button (…) and browse to the folder where you wish to save the images.
3. Click Advanced… to select the information to include in each image file name and sub folders.
4. Specify the export scope by choosing Only export current media, Export from all medias in the
current test, or Export from all medias in all tests in current project.
5. Specify if you want to batch export visualizations based on different participant groups (participant
filters). Tobii Studio exports one visualization for each selected group
6. Choose the time interval (Time settings) for the export. Select Use current time to export the
visualization using the interval determined by the timeline markers in the visualization pane. Select
Use max time interval of Media to include all the possible data for the media element.
7. Select the information to be included in the visualization legend. Disable the legend by clearing
the Show legend check box. Set the position of the legend by clicking one of the Legend position
options. Specify if you want to show the media name, the participant filter, and the time interval
(Time) of the data included in the visualization. Click Choose Font… to select the font and click
the Background color: button to select the background color of the legend. Drag the Opacity
slider to change the opacity of the legend.
8. If you are batch exporting Heat Maps, set the maximum value used for the color mapping by
choosing between two different options. Select Use current set value to set the value of all
exported heat maps the same as the value of the current heat map (value can only be changed
and viewed prior to clicking Batch Export), or Recalculate max for each media to set the maximum
independent of the other heat maps being exported (exports with default values).
9. If you are batch exporting Clusters, select the cluster threshold settings. You can either use the
current setting of the Cluster viewed before clicking batch export (Use current threshold), or set
the threshold according to a fixed percentage of the image size (e.g. you can base this setting on
the sizes of the features of the image).
7.7.2 Animated visualizations
This feature is available for gaze plots, heat maps and clusters. You can create a video (AVI) with animated
gaze plots, heat maps, or clusters overlaid on a static image. This video can then be used to show or
visualize how the fixation behavior of test participants changes over time.
To create an animated visualization:
1. Click the Export button on the Visualization header and select Animated Visualization. The Movie
Settings dialog box opens.
2. Select the frame rate of the video file by clicking in the Frames per Second second field and
typing a value (alternatively you can use the arrows in the field to change the value).
3. Choose the video codec to use to compress the video file by clicking the Video codec: dropdown list and selecting the codec. Click Edit… if you want to add a new codec to the list.
4. Select how the gaze data will be plotted over time:
• Select Accumulate gaze data over frames to progressively add all the fixation data to the
image.
102
For example, the red rectangle in the image below represents the gaze data interval that
is displayed on the heat map during the first second of playback using the Accumulate
gaze data option.
After 3 seconds, the animated heat map will display accumulated gaze data from the start
of the recording to 3 seconds.
© 2010 Tobii Technology - All rights reserved. Tobii Technology and the Tobii logo are either registered trademarks or trademarks of Tobii Technology in the United States
and/or other countries.
103
User Manual - Tobii Studio 2.X
•
Select Sliding window interval length to limit the display of gaze data to a pre-determined
time interval throughout the playback. This interval is set by clicking the field and typing a
value in seconds.
For example, the red rectangle in the image below represents the gaze data interval that
is displayed on the heat map during the 2nd second of playback with the Sliding window
interval length set to 1 second.
At 4 seconds, the animated heat map will display the gaze data from the interval between
3-4 seconds (1 second window interval).
5. Click OK and in the Save As dialog box, choose the folder where you want to save the video. The
video creation progress is displayed in the Creating animation dialog box. Toggle between
104
displaying and hiding a preview of the animation while the video is being created by clicking the
Preview button.
7.8 Displaying AOI overlays on gaze plots, heat maps and clusters
The Areas of Interest (AOI) defined with the AOI tool (see chapter 8 of this manual, pages 108-112) can
be combined with the visualizations. This feature is available for gaze plots, heat maps and clusters.
To include the AOIs in visualizations:
1. Click the AOI Overlay Settings button in the lower-left corner of the visualization pane.
2. Select the Show AOI Overlay check box.
Settings such as border and opacity can be changed in the Drawing Style, Labels and Opacity sections of
the AOI Overlay Settings menu. More information on the settings can be found in the chapter AOI under
AOI Settings (see section 8.2. of this manual, pages 109-110).
7.9 Creating bee swarm videos
The bee swarm visualization is a dynamic representation of the fixations of one or a group of participants
on top of a selected media. The fixation of each participant is illustrated with a colored dot. This type of
visualization can be used to show or analyze how the overall distribution of fixations changes over time.
Bee swarm visualizations can be applied directly to video (movie) stimuli, without the need of creating a
set of scenes.
To create a bee swarm:
1. In the media list, click a media element to select it.
2. Select the Recordings check boxes to include the recordings in the analysis (or clear the check
boxes to remove the recordings).
3. Click the Bee Swarm button, located on the Visualization header, to display the video.
© 2010 Tobii Technology - All rights reserved. Tobii Technology and the Tobii logo are either registered trademarks or trademarks of Tobii Technology in the United States
and/or other countries.
105
User Manual - Tobii Studio 2.X
4. Click the play button to start the bee swarm video. Use the stop and pause buttons to control the
playback of the recording.
5. Click the export button located to the right of the of the playback buttons to export the video. In
the BeeSwarm Export Setup dialog box, specify where you want to save the video file (type the
destination path or click Browse… to open the Save BeeSwarm file as dialog box to select the
folder and type the file name). Click the Video Codec drop-down list to select the codec to use to
encode the video file and type a frame rate value in the Frame Rate field to choose the video’s
number of frames per second. Click OK to export the video file.
On the timeline in the lower part of the visualization pane, the total gaze time of all participants is
visualized with a drop-out graph. In this graph, a color dot representing each participant is shown at the
time the participant stopped viewing the media. The color of the dots corresponds to the colors in the
recordings list.
7.9.1 Customizing Bee Swarms
The size and color of bee swarms in the image can be customized to optimize your visualization.
To customize a bee swarm video:
1. Drag the Opacity slider to change the opacity of the fixation dots.
2. Drag the Dot Size slider to change the size of the fixation dots.
3. Select the color of the dots. Choose between displaying all the dots in the same color (Use
Custom Color) and displaying the dots in their respective recording color (Use Recording
Colors).
4. Select the Draw Activity Label check box to display a legend showing the ratio and percentage of
participants looking at the image/movie during a specific playback time at the top left corner of
the bee swarm visualization. This feature only works when the video is exported.
106
The activity data (recordings name and length) can be copied to the clipboard and pasted into other
programs such as Excel and PowerPoint. Right-click the timeline under the bee swarm visualization and
click Copy Activity Data to Clipboard.
© 2010 Tobii Technology - All rights reserved. Tobii Technology and the Tobii logo are either registered trademarks or trademarks of Tobii Technology in the United States
and/or other countries.
107
User Manual - Tobii Studio 2.X
8 Creating and Managing Areas of Interest
The AOI definition tool enables you to define areas of interest (AOI) within your stimuli. Instead of
interpreting your data based on the direct gaze coordinates of the test participants, you can base the
analysis on frequency and time spent looking within the AOIs.
AOIs can be grouped together, allowing for accumulation and analysis of data within and across stimuli
and tests, as well as more flexible and advanced test design and analysis.
8.1 Creating AOIs
Click the AOI Tool button on the Visualization header under the Visualization tab to open the AOI tool. You
can create multiple AOIs on any static stimuli (e.g. images, pages visited during web browsing or a static
image (scene) representing part of an AVI or screen recording.
To create a new AOI:
1.
Click a media in the media list.
Note: The media has to be a static image. If the media is a screen recording or a movie (AVI), you
need to create scenes first before the AOI Tool can be used. Read more on how to create scenes
in section 5.5 of this manual, pages 67-69.
108
2.
Click the AOI Tool button, located on the Visualization header.
3.
Add a new AOI by clicking the desired shape tool: Ellipse, Rectangle or Polygon (located towards
the lower part of the Visualization pane, in the Create section of the AOI menu).
4.
5.
6.
7.
Draw the AOI on the image by clicking around the area where the AOI should appear. Each click
will define an anchoring point for the selected geometrical shape. To quickly create an AOI that
fills the entire screen, click the Select cursor in the lower Tools menu and click a pre-drawn AOI.
Right-click the AOI and select Expand AOI to Edges from the context menu.
Select the Fill check box to color the Areas of Interest and drag the Opacity slider to change the
opacity of the color fill.
Click the Border Style: drop-down list and select the appearance of the AOI line. Change the line
thickness by typing a value in the Border Width: field (or click the arrows in the box to change the
value).
Select the Show Name Labels check box to display the AOI label. To change the label font, click
Change Font and select the font properties in the Font dialog box.
When the new AOI is added to the image, the name, color, and AOI area coverage information will be
added to the Areas of Interest list towards the lower part of the Selection pane. You can use the check
boxes in front of each entry in the list to enable or disable the AOI on the stimuli. Each entry on the list
displays the color of the AOI, the size of the AOI area as a percentage (% = AOI area/total image area),
and a settings button
.
8.2 Editing AOIs
After an AOI has been created, you can edit its shape, area, position, and appearance. AOIs can also be
copied to different media in the same test or between different tests.
To edit an AOI:
1. Click the Select cursor on the Tools menu in the lower area of the Visualization pane. Click the
AOI you wish to edit and the anchor points are displayed. (Alternatively, you can click the desired
AOI row in the Areas of Interest list).
2. Drag the anchor points to change or adjust the shape.
© 2010 Tobii Technology - All rights reserved. Tobii Technology and the Tobii logo are either registered trademarks or trademarks of Tobii Technology in the United States
and/or other countries.
109
User Manual - Tobii Studio 2.X
3. Drag the AOI to move it to a new location on the image.
4. Click outside the AOI to accept the changes and exit the edit mode.
5. In the AOI list, click the settings button
and then click Change Color… to open a color palette
and select a new color for the AOI.
6. Rename the AOI by double-clicking the AOI and typing a new name. Alternatively, you can
double-click the name in the Areas of Interest list and type a new name.
To edit an AOI that is overlapped by another AOI or AOIs (e.g. AOI A was created first and AOI B is
overlapping AOI A):
1. Select the overlapping AOI (AOI B) by clicking it (CTRL-clicking on multiple AOIs to select
multiple AOIs) and then right-clicking.
2. In the context menu, select Send to Back. The layer order of the AOIs is changed (i.e. AOI A, will
now be in front of AOI B).
3. You can now click the AOI in front (AOI A) to edit it.
Bring to Front sends the AOI layer to the front of all the other layers (AOIs). Bring Forward brings the AOI
layer one step forward in the layer order. Send Backwards sends the layer one step backward in the layer
order. Send to Back sends the AOI layer behind all other layers.
Note: When calculating eye tracking metrics, the fixations located in the overlapping zone of the two AOIs
are counted twice in the calculations (i.e. once per AOI).
To copy, paste, and delete an AOI:
1. After selecting the AOI, right-click it and in the context menu select Copy AOI (or use the
keyboard shortcut CTRL+C).
2. Right-click the media and in the context menu, select Paste AOI (or use the keyboard shortcut
CTRL+V).
3. To delete the AOI, select the AOI and then right-click it. In the context menu, select Delete AOI
(or click the AOI and use the keyboard shortcut – DELETE).
AOI data can be exported and used for further analysis in external software. The AOI Export contains the
screen coordinates of the AOIs. For rectangles and polygons, the coordinates are the corners. For
ellipses, the coordinate points are along the outer line of the ellipse.
To export the AOI coordinates:
1. Right-click the image and select Export…
2. In the Save As dialog box, select the folder and type the file name. A TXT file is created that can
be opened in a text editor or a spread sheet application (e.g. Excel).
To export the AOI image:
1. Click the Export button on the Visualization header and select Export Current Image.
2. In the Save Image dialog box, select the folder and type the file name
3. Select the type of image file – JPEG, BMP, or PNG. Now click Save.
To learn how to batch export AOI images, see section 7.7.1 of this manual, pages 101-102.
8.3 Creating AOI groups
AOI groups are used to group different AOIs within a single media as well as across multiple media and
across tests. The group is treated as a single AOI and the metrics will calculated as a single entity. AOI
groups are created and managed on the Visualization tab.
110
To create an AOI group:
1. Click the AOI Groups button on the Visualization header under the Visualization tab. The View
AOI Groups dialog box opens.
2. Click New AOI Group to create a new group. A new AOI group row is created.
3. In the field, type a name for the AOI group. This name will be used to identify the AOI group in the
Statistics tool. Click OK to create the AOI group.
© 2010 Tobii Technology - All rights reserved. Tobii Technology and the Tobii logo are either registered trademarks or trademarks of Tobii Technology in the United States
and/or other countries.
111
User Manual - Tobii Studio 2.X
To view the content of an AOI group:
1. Click the AOI Groups button on the Visualization header.
2. Expand the desired AOI group by clicking the Right Arrow button X on the left side of the AOI
group row. The names of the AOIs belonging to the AOI group are displayed below the group.
To delete an AOI group:
1. Click the AOI Groups button on the Visualization header.
2. Click the Delete button
in the AOI group row.
To create an AOI group from an AOI:
1. Right-click an AOI in the Areas of Interest list or click the settings button
for the respective
AOI.
2. Select AOI Groups in the menu and click Assign to new group. The Create new AOI Group
dialog box opens. In the field, type a name for the AOI group. This name will be used to identify
the AOI group in the Statistics tool. Click OK to confirm the creation of the AOI group.
When you click the settings button
next to an AOI name in the Areas of Interest list and select AOI
Groups from the menu, a list of the existing AOI groups will be displayed. A check mark is displayed to the
left of the group name if that AOI is included in an existing group.
To add an AOI to an AOI group:
1. Click the settings button
next to the AOI name in the Areas of Interest list.
2. Select AOI Groups in the menu and click the AOI group you want to assign the AOI to.
To remove an AOI from an AOI group:
1. Click the settings button
next to the AOI name in the Areas of Interest list.
2. Select AOI Groups in the menu and click the AOI group you want to remove the AOI from.
Tip: If the Show Name Labels check box is selected, the label will display the AOI name and the name of
any AOI groups that it belongs to.
112
9 Calculating eye tracking metrics and statistics
The Tobii Studio Statistics tool is used to calculate and display eye and mouse tracking metrics'
descriptive statistics. These metrics are calculated based on user defined Areas of Interest (AOIs) and
data selection time intervals. The data that results from the analysis is displayed in the form of a table
and/or chart.
The Tobii Studio Statistics tool supports the creation of complex tables, such as cross test tables
composed of multiple media within a single project, creation and export of multi-metric tables, and cross
tabulation using participant-independent variables or responses from questionnaires as filters to group
participants. The tool also supports the production of descriptive statistics from AOI groups.
To open the Tobii Studio Statistics tool, click the Statistics tab. The Statistics tab is divided in three main
areas:
•
•
•
Statistics header - Allows you to select media for analysis, copy tables and charts to the
clipboard, and export tables and charts.
Data Selection pane - This is where you can select recordings and chose which AOIs to include
in the analysis.
Statistics workspace - This is where you can select the metrics, create and view tables and
charts, and change the statistics settings and properties.
9.1 Choosing media for the analysis
The Select Media for Analysis in Project dialog box allows you to view and select the media for the
analysis. Only media with Areas of Interests (AOIs) will be available for analysis. To open the media
© 2010 Tobii Technology - All rights reserved. Tobii Technology and the Tobii logo are either registered trademarks or trademarks of Tobii Technology in the United States
and/or other countries.
113
User Manual - Tobii Studio 2.X
browser, click the Select Media button on the Statistics header or the Select Media button at the center of
the Statistics window.
On the media browser’s left list box, you will be able to view a list of all the media included in the current
project. The media can be displayed in 4 different views: Test, Media Type, AOI Group and Participant.
The Test view displays the media listed in folders by test; Media Type organizes the media by type of
media file (e.g. images, videos and scenes); AOI Group displays a list of user-created AOI groups and the
media that contains the AOIs that belong to those groups; and Participant displays the media viewed by
each project participant. To toggle between the different views, click the Group media by selection
buttons.
To add media to your analysis, click the Add buttons next to the items in the media list or click Add all
media … to add all the media included in the Test, Media Type, AOI Group or Participant views
(depending how the media is organized).
When the mouse pointer is placed over an item in the media list, a preview thumbnail of that item is
displayed.
When you add a media item to the analysis, it will be displayed in the Selected Media list. A media item
can be removed from the list by clicking the Remove button. To clear the Selected Media list, click
Remove All. All items selected on the left are displayed in the Select Media list.
When you are finished selecting the media, click the Analyze Selected Media button to close the browser,
or Cancel to quit the media browser without selecting a media item.
114
9.2 Selecting data
The Data Selection pane allows you to select the recordings, AOIs or AOI groups you want to include or
exclude from the analysis. For example, you can select a subset of the recordings for analysis by using
filters based on participant-independent variables. The Data Selection pane is divided into two distinct
sections – the Recordings and Areas of Interest list boxes.
9.2.1 Choosing recordings
The Recordings list is located on the Data Selection panel and displays all the recordings associated with
the selected media. The list can be used to select the recordings that will be included in the analysis. Each
recording is displayed as a row and contains the following information: participant name, recording name,
date and time, the quality of the recording as a percentage of valid eye tracking samples, and the color
assigned to the recording. By default, only information on the participant, recording, and date is displayed.
To show the Samples and Colors columns, right-click the recordings list, select Show Columns and then
select Samples and Colors. To remove a column from the Recordings list, repeat the process explained
above and then clear the check marks for the respective columns.
All the recordings are selected by default (i.e. check boxes are selected). To remove a recording from the
analysis, clear the check box in the Recordings list associated with that recording. Click the
Check/Uncheck button to toggle selection of all the recordings.
9.2.1.1 Filtering recordings by participant groups
Filtering allows you to restrict the data used to calculate the eye tracking metrics to a group of
participants. Each filter is defined by either one independent variable or a combination of independent
variables.
© 2010 Tobii Technology - All rights reserved. Tobii Technology and the Tobii logo are either registered trademarks or trademarks of Tobii Technology in the United States
and/or other countries.
115
User Manual - Tobii Studio 2.X
Use the Filter by: drop-down selection button located on the top of the Recordings list to filter the
recordings according to participant groups. By default the button will display ”No Group Selected” if no
groups have been selected.
To select a filter:
1. Click the Filter by: drop-down selection button. This opens the Participant Groups list.
2. Under Participant Groups, select an existing group by clicking the group, or create new group by
clicking Create new participant group.
3. When a participant group has been selected, the list of recordings will be updated automatically
showing only the recordings that fulfill the group conditions.
To create a new participant group:
1.
2.
3.
4.
Click the Filter by: drop-down selection button. This opens the Participant Groups list.
Click Create new participant Group. The New Participant Group dialog box opens.
Type a group name in the Participant Group Name field.
Click an independent variable in the Variables list and select the values you wish to filter the
participants by in the group by clearing the check boxes in the list under Values.
5. You can choose to filter using one independent variable or a combination of several independent
variables (e.g. the filter young Danish women can be created by using the independent variable
combination age x nationality x gender). In order to create a multivariable filter, repeat step 3 for
other variables you wish to use to describe the group.
6. Click OK to create the group or Cancel to dismiss the new group.
To edit an existing participant group:
1. Click the edit
button to the right of the group name in the Participant Groups list. This opens
the Edit Group… dialog box.
2. Change the group name in the Participant Group Name field.
3. Click an independent variable in the Variables list and select the values you wish to include or
exclude in the group definition by selecting the check boxes in the list under Values.
4. Repeat step 3 for other variables you wish to change.
5. Click OK to accept edits, or Cancel to dismiss the changes.
116
To delete an existing participant group:
1. Click the delete
button to the right of the group name in the Participant Groups list.
2. Confirm your deletion by clicking Yes in the Delete Filter dialog box. If you wish to cancel the
deletion, click No.
9.2.2 Selecting Areas of Interest
The Areas of Interest list is located in the data selection panel and displays all the Areas of Interest (AOI)
and AOI groups that were drawn on the selected media.
AOI groups are listed first and are separated from individual AOIs by a list divider. Each AOI group row
contains the name of the group, a check box where you can toggle selection of the group for analysis, and
the color used to display the group in charts. The color of an AOI group can be edited by clicking the color
button and selecting a color from the color palette.
Note: AOI groups will only be available for analysis if all the media containing the AOI groups are selected.
The individual AOIs are displayed per selected media in a two-level collapsible list. The first level contains
the media and the test names, and the second level a list of the individual AOIs belonging to that media.
Each AOI row contains the AOI name, a check box that you can select or clear for AOI analysis, and the
color used to display the AOI in charts. The color of an AOI can be edited by clicking the color button and
selecting a color from the color palette.
Click the Check/Uncheck button to toggle selection of all the AOIs. Note that clicking the Check/Uncheck
button toggles selection of the individual AOIs and does not influence the AOI groups. Selection of an
AOI group is toggled by clicking the check boxes associated with the AOI group.
© 2010 Tobii Technology - All rights reserved. Tobii Technology and the Tobii logo are either registered trademarks or trademarks of Tobii Technology in the United States
and/or other countries.
117
User Manual - Tobii Studio 2.X
Select the Show ”Not on AOI” check box to include fixation or mouse click data that is not included in any
of the AOIs in the analysis. The “not on AOI” data will be displayed per media.
9.3 Building tables and charts
The Statistics workspace consists of toolbars for defining how the data is presented in the tables and
charts. You can select AOI metrics, create and view tables and charts, and change the statistics settings
and properties. The results from your AOI analysis are displayed in the central section of the Statistics
workspace. This section is called the Statistics Display Area. The analysis output can be a descriptive
statistics table or chart and depends on the Statistics or Table and Charts toolbar settings.
By default, when you change a setting on the toolbars or toggle selection of items in the Data Selection
panel, the central section of the Statistics workspace will turn dark and you need to click the Update
button to recalculate and display the table and or chart. To change the setting to automatically update
when a setting has been changed, click Auto, next to Update in the lower-left corner of the Statistics
workspace.
9.3.1 Configuring tables and charts
The Statistics toolbar is located at the top of the Statistics workspace and displays several drop-down list
boxes. These list boxes allow you to select eye tracking metrics and set general row and column settings
related to the organization of the data in the tables and charts. In addition, you can also select which
portion (time interval) of the media view time you wish to analyze by selecting a start time and duration
value.
118
The Table and Chart toolbar is located in the top section of the Statistics workspace, just below the
Statistics toolbar. Click the Table
and Chart views.
and Chart
buttons on the toolbar to toggle between the Table
Tip: Right-click directly on the table or chart to select different customization commands, as well as to
copy and export the table or graph.
9.3.1.1 Metric
The Metric drop-down list contains eye and mouse tracking metrics that can be calculated for each AOI or
AOI group. The metric you choose for the analysis will depend on the type of research question you wish
to answer. For a detailed description of each metric, see the Metrics section (section 9.4, pages 125147).
To select one or more metrics:
1. Click the Metric drop-down list.
2. Select a metric by checking/clearing the metric’s check box.
3. Click anywhere outside the list to close the list.
Tip: Place the mouse over the metric to view a brief description.
9.3.1.2 Rows
Use the Rows drop-down option box to choose how the rows in the table are displayed, as well as the Xaxis of the charts. The rows can be set to Summary only, Recordings, Participants, or Participant Groups.
Row options:
•
•
•
•
Summary only: Displays only the row (table) or bar (chart) that contains the values that globally
summarize the data from the selected recordings and AOIs.
Recordings: Each row represents a recording.
Participants: Each row represents a participant. If the participant has two different recordings the
results will be combined into a single row.
Participant Groups: Each row represents a participant group.
To select the Rows option:
1. Click the Rows drop-down list to view the available options.
2. Select an option by clicking Summary only, Recordings, Participants or Participant Groups.
3. If you select Participant Groups from the list, select a group by checking/clearing the group check
boxes, or create a new group by clicking New Participant Group. See how to create a new group
in the Creating a new participant group section above.
4. Click anywhere outside the list to close it.
© 2010 Tobii Technology - All rights reserved. Tobii Technology and the Tobii logo are either registered trademarks or trademarks of Tobii Technology in the United States
and/or other countries.
119
User Manual - Tobii Studio 2.X
When you select Recordings, Participants or Participant Groups, a global summary row or column will be
displayed in the table or chart. Clear the Show Summary check box if you wish to hide this row (table) or
bar (chart).
9.3.1.3 Columns
The Columns drop-down list allows you to choose how the AOI data is calculated and displayed in table
columns and the X-axis of charts:
To select the Columns option:
1. Click the Columns button. The Columns list is displayed.
2. Choose a setting by selecting the AOIs per Media, AOI Media Summary, AOI Group Summary or
AOI Metric summary check boxes.
3. Click anywhere outside the list box to close it.
Column levels in tables:
AOIs per Media - Each cell contains the descriptive statistic value for a single AOI or a single AOI group.
The cell value calculation also depends on the Row option selection. The data is displayed using the
following column hierarchal order: metric>media>AOIs and/or AOI Groups>Descriptive Statistics.
Example below: 2 images (DrawAngry.JPG and DrawHappy.JPG), 4 AOIs (DrawAngryEyes,
DrawHappyEyes and 2 neutral eyes), Row option Recording
AOI Media Summary - Each cell in the AOI Media Summary columns contains the descriptive statistic
value for all the AOIs present in a single media element. The cell value calculation also depends on the
Row option selection. The data is displayed using the following column hierarchal order:
metric>media>All AOIs (groups the data from all AOIs present in each media)> Descriptive Statistics.
Example on the next page: 2 images (DrawAngry.JPG and DrawHappy.JPG), 2 AOIs (DrawAngryEyes and
neutral eyes), Row option Recordings
120
AOI Group Summary - Each cell in the AOI Group Summary columns contains the descriptive statistic
value for an AOI group calculated for all the selected media. The cell value calculation also depends on
the Row option selection. The data is displayed using the following column hierarchal order: metric>All
media (groups the data from all the selected media)>AOI Group > Descriptive Statistics.
Example below: 2 images (DrawAngry.JPG and DrawHappy.JPG), 2 AOI Groups (emotional face and
neutral faces), Row option Recordings
AOI Metric Summary - Each cell in the AOI Metric Summary columns contains the descriptive statistic
value for all AOIs and all the media. The cell value calculation also depends on the Row option selection.
The data is displayed using the following column hierarchal order: metric>All media (groups the data from
all the selected media)>All AOIs (groups the data from all AOIs present in each media)> Descriptive
Statistics.
Example below: 2 metrics (Time to First Fixation and Fixation Duration), 2 images (DrawAngry.JPG and
DrawHappy.JPG), 2 AOIs (DrawAngryEyes and neutral eyes), Row option Recordings
X-axis levels in charts:
AOIs per media: Each bar represents the data from an AOI belonging to a single media element. The bars
are organized by media, Row option selection, and then AOI.
AOI Media Summary: Each bar represents the data from all AOIs present in a single media element. The
bars are organized by media and then Row option selection.
© 2010 Tobii Technology - All rights reserved. Tobii Technology and the Tobii logo are either registered trademarks or trademarks of Tobii Technology in the United States
and/or other countries.
121
User Manual - Tobii Studio 2.X
AOI Group Summary: Each bar represents the data from an AOI group calculated for all the selected
media. The bars are organized by Row option selection and then AOI group.
AOI Metric Summary: Each column represents the data from all AOIs and all media. The bars are
organized by Row option selection.
9.3.1.4 Selecting a time interval for analysis
Use the Media time… button in the Statistics workspace to restrict the analysis to a specific time interval
of your recording. This is done by first selecting the start time of the interval and then by defining the
duration of the interval. These settings will be applied to all recordings included in the analysis. The
currently selected start time and duration are displayed to the right of the Media time… button.
To set the start time and duration for data collection:
1. Click the Media time… button. The Media Time dialog box opens.
2. Set the start time in seconds in the Start Time: field.
3. If you wish to specify the duration of the data collection, select the second option and specify the
duration in seconds in the field. Otherwise, select the Until media end option.
4. Confirm your selections by clicking Done.
Note: If the start or end time of your selection is located in the middle of a fixation, that fixation will be
entirely removed from the metrics calculations.
When the Media time… data selection is applied the metrics, Time to First Fixation, Time to First Mouse
Click and Time to First Mouse Click Across, are calculated from the start of the media display. While other
metrics, such as Fixation Duration or Visit Duration, are calculated within the selected interval only.
9.3.1.5 Table options
Tables display the AOI analyses organized by column headings, such as metrics, media, AOI and
descriptive statistics, and by row headings, such as recordings, participants or participant groups. Tables
can easily be exported to TXT files or copied to the clipboard and pasted into a document.
122
The Table columns headings are composed of 4 rows that follow a specific hierarchical order. The first
row displays the metrics columns, the second row shows the media columns, the third row displays the
different AOI and/or AOI groups columns and the fourth row shows the descriptive statistics columns.
The row’s title is displayed in the first column of the table. The heading and content of this column
changes according to the settings in the Row list box in the Statistics toolbar. The last row of data in the
table displays a summary of the data from all the table rows.
Above the table you can view a brief description of the metrics selected to generate the tables.
The Table properties are available when you click the Table
button. In the toolbar, located at the top
of the Statistics workspace, you can customize which descriptive statistics you want to display in the
table, the option to show participant variables and the table cell format.
To select the descriptive statistics:
1. Click the Calculated by: button. The Descriptive Statistics list is displayed.
2. Select descriptive statistics to include in the table by selecting the N, Mean, Max, Min, Sum,
Median or Stdev check boxes. Click anywhere outside the list box to close it.
To include participant variables:
1. Select the Participant Variables check box. This adds the participant variables to the table.
2. To select to display the participant variables as numbers instead of text, select the Values as
Numbers check box.
When the option Values as Numbers is selected for the participant variables, a table containing the
numerical translation between the values and the numbers will be displayed above the table containing the
data.
© 2010 Tobii Technology - All rights reserved. Tobii Technology and the Tobii logo are either registered trademarks or trademarks of Tobii Technology in the United States
and/or other countries.
123
User Manual - Tobii Studio 2.X
To change the cell format:
1.
2.
3.
4.
Click the Cell format… button. The Cell Format dialog box is displayed.
Set the number of decimals to be displayed by typing a number in the Number of Decimals: field.
Set the decimal separator, type the appropriate character in the Decimal Point: field.
Set what to display if no value is available by typing the appropriate character in the No value:
field.
5. To specify how percentage values should be displayed, click the Percentage drop-down list
button. The available options in the drop-down list are Percentages and Decimals. Click Done
when finished.
9.3.1.6 Chart options
Displays the AOI analyses in a chart. Charts can be easily created and exported as image files or copied
to the clipboard and pasted into a document.
The chart generated by the Statistics tool is a predefined bar chart, where the height of each bar indicates
the descriptive statistic value for a pre-chosen metric (e.g. mean fixation duration or maximum fixation
duration). This value can be displayed on top of each bar by selecting display of Point Values.
Each bar in a chart represents an AOI, AOI group, or AOI summary (all AOIs). The categories on the Xaxis are determined by the row settings in the Statistics toolbar.
The Y-axis variable is determined by the metric setting. For example, when Fixation Duration is selected
the unit will be in seconds, while with Fixation Count it will be in counts.
The title of the chart is centered just below the upper border of the chart and displays the name of the
metric and descriptive statistic used to generate the chart. The chart legend is displayed on the right side
124
of the chart area and shows the color code of the bars in the chart and the respective AOI, AOI group, or
AOI summary (all AOIs) names.
When you select participant groups, the chart will also display summary bars (all participants). This bar is
calculated using the data from all the recordings included in all the participant groups.
When you select multiple metrics, each metric will be displayed in its own chart. Use the scroll bar to view
the different charts.
Above the chart area you can view a brief description of the metrics used to generate the charts.
The chart properties are available when you click the Chart
button. On the toolbar, you can select
the descriptive statistic and customize the information displayed on the graph, such as showing the title,
legend, point values and setting a maximum value for the Y-axis.
To select the descriptive statistic:
1. Click the Calculate by: button. The Descriptive Statistics drop-down list is displayed. The
selected value is displayed by default as the header of the list.
2. Select the descriptive statistics by clicking the Mean, Max, Min, Sum or Stdev option buttons.
3. Click anywhere outside the list to close it.
You can choose not to show the title, legend and/or point values by clearing the respective check boxes.
Select the Set Max Value check box and type an integer value in the Set Max Value field to change the
maximum value of the Y-axis scale.
9.3.2 Update and zoom options
The bottom part of the Statistics workspace contains the Update and Zoom toolbar where you can
change the zoom settings, as well as toggle between automatic or manual updates of the tables and
charts display.
9.3.2.1 Update settings
The Manual and Auto buttons control the behavior of the chart and table updates when you change a
setting in the toolbars or toggle selection of items on the Data Selection panel. If Manual is selected, the
user has to click the Update button before any changes are shown in the table or charts. This allows the
user to make all selections before any calculations are made, which can speed up the selection process. If
the Auto button is clicked, all changes in settings and selections will take immediate effect and the tables
or charts recalculation process triggered.
9.3.2.2 Zoom settings
The zoom controls of the table and chart display are located in the section to the right of the Update and
Zoom toolbar. The first set of controls is a drop-down list with some commonly used preset zoom values
and a button to reset the zoom level to 100%. The second set of controls is composed of two buttons
(Zoom-out and Zoom-in) and a zoom slider. Move the slider to the left to zoom out in the display or click
the Zoom-out button (-). To zoom in, move the slider to the right or click the Zoom-in button (+).
9.4 Eye tracking metric definitions
The main eye movement measurements used in Tobii Studio are based on two basic events fixations and
mouse clicks. In order to calculate the eye movement metrics, you first have to define Areas of Interest
(AOIs) in your media. The different metrics are then calculated in relation to these AOIs, e.g. Fixation
Count on AOI A will be calculated as the number of fixations located inside the AOI A.
© 2010 Tobii Technology - All rights reserved. Tobii Technology and the Tobii logo are either registered trademarks or trademarks of Tobii Technology in the United States
and/or other countries.
125
User Manual - Tobii Studio 2.X
The calculation of the metrics based on fixations is affected by the fixation filters settings. By changing the
settings or the type of fixation filter, you change the way a single fixation is defined (i.e. how many
individual gaze points a fixation will be composed of) and as a consequence, both count and duration
values change.
9.4.1 Descriptive statistics
Descriptive statistics are used to present the data values calculated by each eye tracking metric. The
meaning and value of the descriptive statistics vary with the column, row, and metric options. Refer to the
metrics descriptions in the following sections to interpret the descriptive statistics values.
Descriptive
Statistic
N
Definition
Mean
Describes the central tendency of a set of data values. It is calculated by
summing all the data values and dividing by N (number of data values). Tobii
Studio calculates the arithmetic mean.
Max
Highest value in the data set.
Min
Lowest value in the data set.
Sum
The sum of all data values.
Median
The value that separates a data set in two halves. The value is calculated by
first arranging a finite list of data values from lowest to highest value and then
determining which data value is located at the middle of the list – the median
value. If the number of data values is even, then there is no single middle data
value, The median is then defined by the average of the two data values.
Stdev
(Standard deviation)
Describes the variability in a set of data values. The value is calculated by
square rooting the average of the squares of the deviations of each data value
from the mean. Tobii Studio calculates the sample standard deviation (N-1).
Number of data values or sample size used to calculate the Mean and Stdev
(number of recordings, fixations, visits or participants).
9.4.2 Time to First Fixation - seconds
This metric measures how long it takes before a test participant fixates on an AOI or AOI group for the first
time. The time measurement starts when the media containing the AOI is first displayed and it stops when
the participant fixates on the AOI. When using AOI groups, the time measurement stops when the
participant fixates on any of the AOIs belonging to the group.
If during the recording the same media is displayed several times, with other media in between, the Time
to First Fixation value will be calculated by adding each display time of the media containing the AOI until
the participant fixates on the AOI (the display time of other media shown in between are excluded from the
calculations).
If at the end of the recording the participant has not fixated on the AOI, the Time to First Fixation value will
not be computed and that recording will thus not be included in the descriptive statistics calculations (e.g.
when computing the N value).
Note: When browsing a website or PDF document, each visited web (URL)1 and PDF page will become a
unique media element.
1
If the Web Groups tool is used to group two or more URLs, the group and not the URL will become a
unique media element.
126
9.4.2.1 N value
This statistic describes the N value used to calculate other descriptive statistics such as the mean and
standard deviation. In the current metric, it represents the number of recordings and is calculated as
follows:
Row settings
When recordings are selected as table rows, the N value will always be equal to 1.
If participants are selected as table rows, the N value will be equal to the number of recordings that
participant has made (with the same media element).
If participant groups are selected as rows, then the N value will be equal to the number of recordings
included in the group.
Summary columns
In the AOI media summary columns, the N value represents the number of recordings x the number of
AOIs included in a single media element.
In the AOI group summary columns, the N value represents the number of recordings and follows the rules
described in the previous paragraph (row settings).
In the AOI metric summary columns, the N value represents the number of recordings x the total number of
AOIs (i.e. all AOIs included in all media elements).
9.4.2.2 Brief description
The time from the start of the media display until the test participant fixates on the AOI or AOI group for
the first time (seconds).
© 2010 Tobii Technology - All rights reserved. Tobii Technology and the Tobii logo are either registered trademarks or trademarks of Tobii Technology in the United States
and/or other countries.
127
User Manual - Tobii Studio 2.X
9.4.3 Fixations Before - count
This metric measures the number of times the participant fixates on the media before fixating on an AOI or
AOI group for the first time. The fixation count starts when the media containing the AOI is first displayed
and it stops when the participant fixates on the AOI. When using AOI groups, the fixation count stops
when the participant fixates on any of the AOIs belonging to the group.
If during the recording, the same media is displayed several times, with other media in between, only the
fixations on the media containing the AOI are counted (fixations on the other media are excluded from the
calculations).
If at the end of the recording the participant has not fixated on the AOI, the Fixation Before value will not
be computed and that recording will thus not be included in the descriptive statistics calculations (e.g.
when computing N).
Note: When browsing a website or PDF document each visited web (URL)1 and PDF page will become a
unique media element.
1
If the Web Groups tool is used to group two or more URLs, the group and not the URL will become a
unique media element.
9.4.3.1 N value
This statistic describes the N value used to calculate other descriptive statistics such as the mean and
standard deviation. In the current metric, it represents the number of recordings and is calculated as
follows:
Row settings
When recordings are selected as table rows, the N value will always be equal to 1.
128
If participants are selected as table rows, the N value will be equal to the number of recordings that
participant has made (with the same media element).
If participant groups are selected as rows, then the N value will be equal to the number of recordings
included in the group.
Summary columns
In the AOI media summary columns, the N value represents the number of recordings x the number of
AOIs included in a single media element.
In the AOI group summary columns, the N value represents the number of recordings and follows the rules
described in the previous paragraph (row settings).
In the AOI metric summary columns, the N value represents the number of Recordings x the total number
of AOIs (i.e. all AOIs included in all media elements).
9.4.3.2 Brief description
Number of times the participant fixates on the media before fixating on an AOI or AOI group for the first
time (count).
9.4.4 First Fixation Duration - seconds
This metric measures the duration of the first fixation on an AOI or an AOI group. When using AOI groups,
the measured fixation corresponds to the first fixation on any of the AOIs belonging to the group.
If at the end of the recording, the participant has not fixated on the AOI, the First Fixation Duration value
will not be computed and that participant will thus not be included in the descriptive statistics calculations
(e.g. when computing N).
© 2010 Tobii Technology - All rights reserved. Tobii Technology and the Tobii logo are either registered trademarks or trademarks of Tobii Technology in the United States
and/or other countries.
129
User Manual - Tobii Studio 2.X
9.4.4.1 N value
This statistic describes the N value used to calculate other descriptive statistics such as the mean and
standard deviation. In the current metric, it represents the number of recordings and is calculated as
follows:
Row settings
When recordings are selected as table rows, the N value will always be equal to 1.
If participants are selected as table rows, the N value will be equal to the number of recordings that
participant has made (with the same media element).
If participant groups are selected as rows, then the N value will be equal to the number of recordings
included in the group.
Summary columns
In the AOI media summary columns, the N value represents the number of recordings x the number of
AOIs included in a single media element.
In the AOI group summary columns, the N value represents the number of recordings and follows the rules
described in the previous paragraph (row settings).
In the AOI metric summary columns, the N value represents the number of recordings x the total number of
AOIs (i.e. all AOIs included in all media elements).
9.4.4.2 Brief description
Duration of the first fixation on an AOI or an AOI group (seconds).
9.4.5 Fixation Duration - seconds
This metric was previously called Fixation Length in older versions of Tobii Studio and measures the
duration of each individual fixation within an AOI (or within all AOIs belonging to an AOI group). The N
value used to calculate the descriptive statistics, such as mean and standard deviation, is based on the
number of fixations (see the N value description below for more details).
If during the recording, the participant returns to the same media element, the new fixations on the media
will also be included in the calculations of the metric.
If at the end of the recording, the participant has not fixated on the AOI, the Fixation Duration value will not
be computed and that recording will thus not be included in the descriptive statistics calculations (e.g.
when computing averages for participant groups).
9.4.5.1 N value
This statistic describes the N value used to calculate other descriptive statistics such as the mean and
standard deviation. In the current metric, it represents the number of fixations and is calculated as follows:
Row settings
When recordings are selected as table rows, N is equal to the total number of fixations on an AOI.
If participants are selected as table rows, N is equal to the total number of fixations a participant has made
on the AOI. If the participant has made more than 1 recording with the same media element, N will be
equal to the sum of the number of fixations from all the recordings.
If participant groups are selected as rows, then N will be equal to the sum of the number of fixations of all
the recordings included in the group.
130
Summary columns
In the AOI media summary column, the N value represents the total number of fixations on all AOIs
included in a single media element.
In the AOI group summary column, the N value represents the sum of the fixations on all the AOIs
belonging to the same AOI group and follows the rules described in the previous paragraph for
recordings, participants and participant groups.
In the AOI metric summary column, the N value represents the total number of fixations on all AOIs
included in all media elements.
9.4.5.2 Brief description
Duration of each individual fixation within an AOI, or within all AOIs belonging to an AOI group (seconds).
9.4.6 Total Fixation Duration - seconds
This metric measures the sum of the duration for all fixations within an AOI (or within all AOIs belonging to
an AOI group), thus the N value used to calculate descriptive statistics is based on the number of
recordings (see the N value description below for more details).
If during the recording, the participant returns to the same media element then the new fixations on the
AOI will be included in the calculations of the metric.
If at the end of the recording, the participant has not fixated on the AOI, the Total Fixation Duration will not
be computed and the recording will not be included in the descriptive statistics calculations (e.g. when
computing N and means).
Note: When browsing a website or PDF document, each visited web (URL)1 and PDF page will become a
unique media element.
© 2010 Tobii Technology - All rights reserved. Tobii Technology and the Tobii logo are either registered trademarks or trademarks of Tobii Technology in the United States
and/or other countries.
131
User Manual - Tobii Studio 2.X
1
If the Web Groups tool is used to group two or more URLs, the group and not the URL will become a
unique media element.
9.4.6.1 N value
This statistic describes the N value used to calculate other descriptive statistics such as the mean and
standard deviation. In the current metric, it represents the number of recordings and is calculated as
follows:
Row settings
When recordings are selected as table rows, the N value will always be equal to 1.
If participants are selected as table rows, the N value will be equal to the number of recordings that
participant has made (with the same media element).
If participant groups are selected as rows, then the N value will be equal to the number of recordings
included in the group.
Summary columns
In the AOI media summary columns, the N value represents the number of recordings x the number of
AOIs included in a single media element.
In the AOI group summary columns, the N value represents the number of recordings and follows the rules
described in the previous paragraph (row settings).
In the AOI metric summary columns, the N value represents the number of recordings x total number of
AOIs (i.e. all AOIs included in all media elements).
132
9.4.6.2 Brief description
Duration of all fixations within an AOI, or within all AOIs belonging to an AOI group (seconds).
9.4.7 Total Fixation Duration (zeros) - seconds
This metric is calculated in the same way as Total Fixation Duration with the exception that if at the end of
the recording the participant has not fixated on the AOI, the Total Fixation Duration will be registered as
zero and the recording will be included in the descriptive statistics calculations (e.g. when computing N
and means).
9.4.7.1 Brief description
Duration of all fixations within an AOI, or within all AOIs belonging to an AOI group (seconds).
9.4.8 Fixation Count - count
This metric measures the number of times the participant fixates on an AOI or an AOI group.
If during the recording the participant leaves and returns to the same media element, then the new
fixations on the media will be included in the calculations of the metric.
If at the end of the recording the participant has not fixated on the AOI, the Fixation Count value will not be
computed and the recording will not be included in the descriptive statistics calculations (e.g. when
computing N).
9.4.8.1 N value
This statistic describes the N value used to calculate other descriptive statistics, such as the mean and
standard deviation. In the current metric, it represents the number of recordings and is calculated as
follows:
Row settings
When recordings are selected as table rows, the N value will always be equal to 1.
© 2010 Tobii Technology - All rights reserved. Tobii Technology and the Tobii logo are either registered trademarks or trademarks of Tobii Technology in the United States
and/or other countries.
133
User Manual - Tobii Studio 2.X
If participants are selected as table rows, the N value will be equal to the number of recordings that
participant has made (with the same media element).
If participant groups are selected as rows, then the N value will be equal to the number of recordings
included in the group.
Summary columns
In the AOI media summary columns, the N value represents the number of recordings x the number of
AOIs included in a single media element.
In the AOI group summary columns, the N value represents the number of recordings and follows the rules
described in the previous paragraph (row settings).
In the AOI metric summary columns, the N value represents the number of recordings x total number of
AOIs (i.e. all AOIs included in all media elements).
9.4.8.2 Brief description
Number of times the participant fixates on an AOI or an AOI group (count).
9.4.9 Fixation Count (zeros) - count
This metric is calculated in the same way as Fixation Count with the exception that if at the end of the
recording the participant has not fixated on the AOI, the Fixation Count value will be registered as zero and
the recording will be included in the descriptive statistics calculations (e.g. when computing N and
means).
9.4.9.1 Brief description
Number of times the participant fixates on an AOI or an AOI group (count).
9.4.10 Visit Duration - seconds
This metric measures the duration of each individual visit within an AOI (or AOI group). The N value used
to calculate descriptive statistics is based on the number of visits (see the N value description below for
more details). A visit is defined as the interval of time between the first fixation on the AOI and the next
fixation outside the AOI.
If during the recording the participant returns to the same media element then the new fixations on the AOI
will be included in the calculations of the metric.
If at the end of the recording the participant has not fixated on the AOI, the Visit Duration value will not be
computed and thus that recording will not be included in the descriptive statistics calculations (e.g. when
computing averages for participant groups).
9.4.10.1 N value
This statistic describes the N value used to calculate other descriptive statistics, such as the mean and
standard deviation. In the current metric, it represents the number of visits and is calculated as follows:
Row settings
When recordings are selected as table rows, N is equal to the total number of visits to an AOI.
If participants are selected as table rows, N is equal to the total number of visits a participant has made to
the AOI. If the participant has made more than 1 recording with the same media element, N will be equal
to the sum of the number of visits in all the recordings.
134
If participant groups are selected as rows, then N will be equal to the sum of the number of visits of all the
participants included in the group.
Summary columns
In the AOI media summary column, the N value represents the total number of visits to all AOIs included in
a single media element.
In the AOI group summary column, the N value represents the sum of the visits to all the AOIs belonging
to the same AOI group and follows the rules described in the previous paragraph for recordings,
participants and participant groups.
In the AOI metric summary column, the N value represents the total number of visits to all AOIs included in
all media elements.
9.4.10.2 Brief description
Duration of each individual visit within an AOI or an AOI group (seconds).
9.4.11 Total Visit Duration - seconds
This metric was called Observation Length in older versions of Tobii Studio and measures the duration of
all visits within an AOI (or AOI group). In this case the N value used to calculate descriptive statistics is
based on the number of recordings (see the N value description below for more details). A visit is defined
as the interval of time between the first fixation on the AOI and the next fixation outside the AOI.
If during the recording the participant returns to the same media element, then the new fixations on the
media will be included in the calculations of the metric.
If at the end of the recording the participant has not fixated on the AOI, the Total Visit Duration value will
not be computed and the recording will not be included in the descriptive statistics calculations (e.g. when
computing N).
© 2010 Tobii Technology - All rights reserved. Tobii Technology and the Tobii logo are either registered trademarks or trademarks of Tobii Technology in the United States
and/or other countries.
135
User Manual - Tobii Studio 2.X
9.4.11.1 N value
This statistic describes the N value used to calculate other descriptive statistics, such as the mean and
standard deviation. In the current metric, it represents the number of recordings and is calculated as
follows:
Row settings
When recordings are selected as table rows, the N value will always be equal to 1.
If participants are selected as table rows, the N value will be equal to the number of recordings that
participant has made (with the same media element).
If participant groups are selected as rows, then the N value will be equal to the number of recordings
included in the group.
Summary columns
In the AOI media summary columns, the N value represents the number of recordings x the number of
AOIs included in a single media element.
In the AOI group summary columns, the N value represents the number of recordings and follows the rules
described in the previous paragraph (row settings).
In the AOI metric summary columns, the N value represents the number of recordings x the total number of
AOIs (i.e. all AOIs included in all media elements).
9.4.11.2 Brief description
Duration of all visits within an AOI or an AOI group (seconds).
136
9.4.12 Total Visit Duration (zeros) - seconds
This metric is calculated in the same way as Total Visit Duration with the exception that if at the end of the
recording the participant has not fixated on the AOI, the Total Visit Duration value will be registered as
zero and the recording will be included in the descriptive statistics calculations (e.g. when computing N
and means).
9.4.12.1 Brief description
Duration of all visits within an AOI or an AOI group (seconds).
9.4.13 Visit Count - count
Formerly Observation Count in older versions of Tobii Studio. This metric measures the number of visits
within an AOI or AOI group. Each individual visit is defined as the interval of time between the first fixation
on the AOI and the next fixation outside the AOI.
If during the recording the participant returns to the same media element, then the new fixations on the
media will be included in the calculations of the metric.
If at the end of the recording the participant has not fixated on the AOI, the Visit Count value will not be
computed and the recording will not be included in the descriptive statistics calculations (e.g. when
computing N).
9.4.13.1 N value
This statistic describes the N value used to calculate other descriptive statistics, such as the mean and
standard deviation. In the current metric, it represents the number of recordings and is calculated as
follows:
Row settings
When recordings are selected as table rows, the N value will always be equal to 1.
© 2010 Tobii Technology - All rights reserved. Tobii Technology and the Tobii logo are either registered trademarks or trademarks of Tobii Technology in the United States
and/or other countries.
137
User Manual - Tobii Studio 2.X
If participants are selected as table rows, the N value will be equal to the number of recordings that
participant has made (with the same media element).
When participant groups are selected as rows, then the N value will be equal to the number of recordings
included in the group.
Summary columns
In the AOI media summary columns, the N value represents the number of recordings x the number of
AOIs included in a single media element.
In the AOI group summary columns, the N value represents the number of recordings and follows the rules
described in the previous paragraph (row settings).
In the AOI metric summary columns, the N value represents the number of recordings x the total number of
AOIs (i.e. all AOIs included in all media elements).
9.4.13.2 Brief description
Number of visits within an AOI or an AOI group (count).
9.4.14 Visit Count (zero) - count
This metric is calculated in the same way as Visit Count with the exception that if at the end of the
recording the participant has not fixated on the AOI, the Visit Count value will be registered as zero and
the recording will be included in the descriptive statistics calculations (e.g. when computing N and
means).
9.4.14.1 Brief description
Number of visits within an AOI or an AOI group (count).
9.4.15 Percentage Fixated - %
This metric measures the number of recordings in which participants have fixated at least once within an
AOI or AOI group and expresses it as a fraction of the total number of recordings. It is calculated by
dividing the total number of recordings in which participants have fixated within the AOI by the total
number of recordings in the test.
9.4.15.1 N value
This statistic describes the N value used to calculate other descriptive statistics, such as the mean and
standard deviation. In the current metric, it represents the number of recordings and is calculated as
follows:
Row settings
When recordings are selected as table rows, the N value will always be equal to 1.
If participants are selected as table rows, the N value will be equal to the number of recordings that
participant has made (with the same media element).
When participant groups are selected as rows, then the N value will be equal to the number of recordings
included in the group.
Summary columns
In the AOI media summary columns, the N value represents the number of recordings x the number of
AOIs included in a single media element.
138
In the AOI group summary columns, the N value represents the number of recordings and follows the rules
described in the previous paragraph (row settings).
In the AOI metric summary columns, the N value represents the number of recordings x the total number of
AOIs (i.e. all AOIs included in all media elements).
9.4.15.2 Brief description
Percentage of recordings in which participants fixated at least once within an AOI or AOI group (%).
9.4.16 Percentage Clicked - %
This metric measures the number of recordings where participants have clicked at least once within an
AOI or AOI group and expresses it as a fraction of the total number of recordings. It is calculated by
dividing the total number of recordings where participants have clicked within the AOI by the Total number
of recordings in test.
9.4.16.1 N value
This statistic describes the N value used to calculate other descriptive statistics such as the mean and
standard deviation. In the current metric it represents the number of recordings and is calculated as
follows:
Row settings
When recordings are selected as table rows, the N value will always be equal to 1.
If participants are selected as table rows, the N value will be equal to the number of recordings that
participant has made (with the same media element).
When participant groups are selected as rows, then the N value will be equal to the number of recordings
included in the group.
© 2010 Tobii Technology - All rights reserved. Tobii Technology and the Tobii logo are either registered trademarks or trademarks of Tobii Technology in the United States
and/or other countries.
139
User Manual - Tobii Studio 2.X
Summary columns
In the AOI media summary columns, the N value represents the number of recordings x the number of
AOIs included in a single media element.
In the AOI group summary columns, the N value represents the number of recordings and follows the rules
described in the previous paragraph (row settings).
In the AOI metric summary columns, the N value represents the number of recordings x the total number of
AOIs (i.e. all AOIs included in all media elements).
9.4.16.2 Brief description
Percentage of recordings in which participants clicked at least once within an AOI or AOI group (%).
9.4.17 Mouse Click Count - count
This metric measures the number of times the participant left-clicks with the mouse on an AOI or an AOI
group.
If during the recording the participant leaves and returns to the same media element, then the new mouse
clicks on the media will be included in the calculations of the metric.
If at the end of the recording the participant has not clicked on the AOI, the Mouse Click Count value will
not be computed and the recording will not be included in the descriptive statistics calculations (e.g. when
computing N).
140
9.4.17.1 N value
This statistic describes the N value used to calculate other descriptive statistics, such as the mean and
standard deviation. In the current metric it represents the number of recordings and is calculated as
follows:
Row settings
When recordings are selected as table rows the N value will always be equal to 1.
If participants are selected as table rows, the N value will be equal to the number of recordings that
participant has made (with the same media element).
When participant groups are selected as rows, then the N value will be equal to the number of recordings
included in the group.
Summary columns
In the AOI media summary columns, the N value represents the number of recordings x the number of
AOIs included in a single media element.
In the AOI group summary columns, the N value represents the number of recordings and follows the rules
described in the previous paragraph (row settings).
In the AOI metric summary columns, the N value represents the number of recordings x the total number of
AOIs (i.e. all AOIs included in all media elements).
9.4.17.2 Brief description:
Number of times the participant left-clicks with the mouse on an AOI or an AOI group (count).
© 2010 Tobii Technology - All rights reserved. Tobii Technology and the Tobii logo are either registered trademarks or trademarks of Tobii Technology in the United States
and/or other countries.
141
User Manual - Tobii Studio 2.X
9.4.18 Mouse Click Count (zero) - count
This metric is calculated in the same way as Mouse Click Count with the exception that if at the end of the
recording the participant has not clicked on the AOI, the Mouse Click Count value will be registered as
zero,
and the recording will be included in the descriptive statistics calculations (e.g. when computing N and
means).
9.4.18.1 Brief description:
Number of times the participant left-clicks with the mouse on an AOI or an AOI group (count).
9.4.19 Time to First Mouse Click - seconds
This metric measures how long it takes before a test participant left-clicks with the mouse on an AOI or
AOI group for the first time. The time measurement starts when the media containing the AOI is first
displayed and it stops when the participant clicks on the same AOI. When using AOI groups, the time
measurement stops when the participant clicks on any of the AOIs belonging to the group.
If during the recording the same media is displayed several times, with other media in between, the
reported time will be the sum of the each time the media containing the AOI was viewed until the
participant clicks on the AOI (the other media view times are excluded from the calculations).
If at the end of the recording the participant has not clicked on the AOI, the Time to First Mouse Click
value will not be computed and that recording will thus not be included in the descriptive statistics
calculations (e.g. when computing N).
Note: When browsing a website or PDF document, each visited web (URL)1 and PDF page will become a
unique media element.
1
If the Web Groups tool is used to group two or more URLs, the group and not the URL will become a
unique media element.
9.4.19.1 N value
This statistic describes the N value used to calculate other descriptive statistics, such as the mean and
standard deviation. In the current metric it represents the number of recordings and is calculated as
follows:
Row settings
When recordings are selected as table rows, the N value will always be equal to 1.
If participants are selected as table rows, the N value will be equal to the number of recordings that
participant has made (with the same media element).
When participant groups are selected as rows, then the N value will be equal to the number of recordings
included in the group.
Summary columns
In the AOI Media Summary columns, the N value represents the number of recordings x the number of
AOIs included in a single media element.
In the AOI group summary columns, the N value represents the number of recordings and follows the rules
described in the previous paragraph (row settings).
In the AOI metric summary columns, the N value represents the number of recordings x the total number of
AOIs (i.e. all AOIs included in all media elements).
142
9.4.19.2 Brief description
The time from the start of the media display until the test participant left-clicks with the mouse on the AOI
or AOI group for the first time (seconds).
9.4.20 Time to First Mouse Click (Across media) (seconds)
This metric measures how long it takes before a test participant left-clicks with the mouse on an AOI or
AOI group for the first time. The time measurement starts when the media containing the AOI is first
displayed and stops when the participant clicks on the AOI. When using AOI groups, the time
measurement stops when the participant clicks on any of the AOIs belonging to the group.
If during the recording the participant views the same media several times, the Time to First Mouse Click
value will be calculated from the first time the media was displayed until he/she clicks on the AOI
(recording time), without excluding the view times of other media.
If at the end of the recording the participant has not clicked on the AOI, the Time to First Mouse Click
value will not be computed and that recording will thus not be included in the descriptive statistics
calculations (e.g. when computing N).
Note: When browsing a website or PDF document, each visited web (URL)1 and PDF page will become a
unique media element.
1
If the Web Groups tool is used to group two or more URLs, the group and not the URL will become a
unique media element.
9.4.20.1 N value
This statistic describes the N value used to calculate other descriptive statistics, such as the mean and
standard deviation. In the current metric it represents the number of recordings and is calculated as
follows:
© 2010 Tobii Technology - All rights reserved. Tobii Technology and the Tobii logo are either registered trademarks or trademarks of Tobii Technology in the United States
and/or other countries.
143
User Manual - Tobii Studio 2.X
Row settings
When recordings are selected as table rows the N value will always be equal to 1.
If participants are selected as table rows, the N value will be equal to the number of recordings that
participant has made (with the same media element).
When participant groups are selected as rows, then the N value will be equal to the number of recordings
included in the group.
Summary columns
In the AOI media summary columns, the N value represents the number of recordings x the number of
AOIs included in a single media element.
In the AOI group summary columns, the N value represents the number of recordings and follows the rules
described in the previous paragraph (row settings).
In the AOI metric summary columns, the N value represents the number of recordings x the total number of
AOIs (i.e. all AOIs included in all media elements).
9.4.20.2 Brief description
The time from the start of the media display until the test participant left-clicks with the mouse on the AOI
or AOI group for the first time (seconds).
9.4.21 Time from First Fixation to Next Mouse Click - seconds
This metric measure how long it takes before a participant left-clicks with the mouse on an AOI or AOI
group once he/she has fixated on it. The time measurement starts when the participant fixates on the AOI
for the first time and stops when the participant clicks on the same AOI. When using AOI groups, the time
measurement starts and stops when the participant fixates and clicks on any of the AOIs belonging to the
group.
144
If during the recording the participant views a different media between the first fixation and the mouse
click, the time spent viewing the other media element is excluded from the calculations.
If at the end of the recording the participant has not fixated and clicked on the AOI, the Time from First
Fixation to First Mouse Click value will not be computed and that recording will thus not be included in the
descriptive statistics calculations (e.g. when computing N).
Note: When browsing a website or PDF document, each visited web (URL)1 and PDF page will become a
unique media element.
1
If the Web Groups tool is used to group two or more URLs, the group and not the URL will become a
unique media element.
9.4.21.1 N value
This statistic describes the N value used to calculate other descriptive statistics, such as the mean and
standard deviation. In the current metric it represents the number of recordings and is calculated as
follows:
Row settings
When recordings are selected as table rows, the N value will always be equal to 1.
If participants are selected as table rows, the N value will be equal to the number of recordings that
participant has made (with the same media element).
When participant groups are selected as rows, then the N value will be equal to the number of recordings
included in the group.
© 2010 Tobii Technology - All rights reserved. Tobii Technology and the Tobii logo are either registered trademarks or trademarks of Tobii Technology in the United States
and/or other countries.
145
User Manual - Tobii Studio 2.X
Summary columns
In the AOI media summary columns, the N value represents the number of recordings x the number of
AOIs included in a single media element.
In the AOI group summary columns, the N value represents the number of recordings and follows the rules
described in the previous paragraph (row settings).
In the AOI metric summary columns, the N value represents the number of recordings x the total number of
AOIs (i.e. all AOIs included in all media elements).
9.4.21.2 Brief description
The time from the first fixation on an AOI until the test participant left-clicks with the mouse on the AOI or
AOI group for the first time (seconds).
9.4.22 Time from First Fixation to Next Mouse Click (Across media) - seconds
This metric measure how long it takes for a participant to left-click with the mouse an AOI or AOI group for
the first time, after he/she has fixated on that AOI. The time measurement starts when the participant
fixates on the AOI for the first time and it stops when the participant clicks on the same AOI. When using
AOI groups, the time measurement starts and stops when the participant fixates and clicks on any of the
AOIs belonging to the group.
If during the recording the participant views a different media between the first fixation and the mouse
click, the time spent viewing the other media element will not be excluded from the calculations.
If at the end of the recording the participant has not fixated and clicked on the AOI, the Time from First
Fixation to First Mouse Click value will not be computed and that recording will thus not be included in the
descriptive statistics calculations (e.g. when computing N).
Note: When browsing a website or PDF document, each visited web (URL)1 and PDF page will become a
unique media element.
1
If the Web Groups tool is used to group two or more URLs, the group and not the URL will become a
unique media element.
9.4.22.1 N value
This statistic describes the N value used to calculate other descriptive statistics, such as the mean and
standard deviation. In the current metric it represents the number of recordings and is calculated as
follows:
Row settings
When recordings are selected as table rows, the N value will always be equal to 1.
If participants are selected as table rows, the N value will be equal to the number of recordings that
participant has made (with the same media element).
When participant groups are selected as rows, then the N value will be equal to the number of recordings
included in the group.
Summary columns
In the AOI media summary columns, the N value represents the number of recordings x the number of
AOIs included in a single media element.
146
In the AOI group summary columns, the N value represents the number of recordings and follows the rules
described in the previous paragraph (row settings).
In the AOI metric summary columns, the N value represents the number of recordings x the total number of
AOIs (i.e. all AOIs included in all media elements).
9.4.22.2 Brief description
The time from the first fixation on an AOI until the test participant left-clicks with the mouse on the AOI or
AOI group for the first time (seconds).
9.5 Copying tables and charts to the clipboard
To use this function you first need to create a chart. Use the copy function to quickly copy a table or chart
into a document.
To copy a table or chart:
1. Click the Copy button to show the Copy menu.
2. Select Copy Table or Copy Chart. The table/chart is copied to the clipboard.
3. Use the paste function in your document editor, or use the paste keyboard shortcut (English
keyboards – CTRL+V) to paste the image (BMP file) or table (TXT file) content into your
document.
9.6 Table and chart export
To use this function you first need to create a table. Use the export function to save the table or chart into
a file that you can later import or add to a document.
© 2010 Tobii Technology - All rights reserved. Tobii Technology and the Tobii logo are either registered trademarks or trademarks of Tobii Technology in the United States
and/or other countries.
147
User Manual - Tobii Studio 2.X
To export a table:
1. Click the Export button to show the Export menu.
2. Select Export Table. The Save As dialog box opens.
3. Type the file name, select the location where you want to save your export, then click Save. The
table is exported as a tab-delimited TXT file.
To export a chart:
1. Click the Export button to open the Export menu.
2. Select Export Chart. The Save As dialog box opens.
3. Type the file name, select the location where you want to save your export and then click Save.
The table is exported as an image in the PNG file format.
Note: If more than one metric is chosen for analysis, the image file will contain all the generated charts.
148
10 Tobii Studio Logger
The Tobii Studio Logger is a separate software component that can be opened on a remote computer to
supervise a test and log events. The Tobii Studio Logger is only available with the Enterprise license of
Tobii Studio.
The Tobii Studio Logger displays a test screen with gaze data overlay (Live Viewer) and a user camera
image. The recordings are controlled and events can be logged from an external computer. The Tobii
Studio logger can be opened on a computer in the same or different room than where the test with the
eye tracker and Tobii Studio is taking place. It can also be used to show a recording in real-time in a
conference room.
Open the Windows Start menu, select All Programs > Tobii > Studio, then click Studio Logger to open
the Studio Logger application.
The Studio Logger window is divided into three main areas:
•
•
•
Studio Logger header: Contains the connection menu, the Test menu, and the Setup menu.
Side pane: This is where you can select from and view a list of events (Log Categories list), view
the log history list (Log History) and view the video from the user camera (User Camera). The
Side pane can be hidden by clicking the hide pane button
located below the User Camera
image box.
Remote Desktop pane: This is where you can view the image from the Tobii Studio computer,
start and stop the live viewer stream (Live Viewer button) and the recording (Start Recording
button), and control the view time of the different media (Next/Stop button).
© 2010 Tobii Technology - All rights reserved. Tobii Technology and the Tobii logo are either registered trademarks or trademarks of Tobii Technology in the United States
and/or other countries.
149
User Manual - Tobii Studio 2.X
The Studio Logger window can be customized by clicking the Log History and User Camera buttons
below the User Camera image box, to toggle between hiding and displaying the Log History list and the
User Camera image box.
10.1 Installing Tobii Studio Logger
Tobii Studio Logger is a separate application used with Tobii Studio to remotely control and monitor a
Tobii Studio recording. Install Tobii Studio Logger on the computer you wish to view the remote session
on. The Studio Logger installation file can be found on the Tobii Studio CD or downloaded from the Tobii
Updates Server: http://studiohelp.tobii.org/Updates/
To download and install the installation file:
1. Visit the website above and enter your Enterprise license key in the field and click Login.
2. Click the TobiiStudioLogger download link to download the installation file.
3. Once downloaded, run the executable file and follow the on-screen instructions.
Studio Logger can be installed on several computers without entering a license key. Studio Logger can
only connect to a Tobii Studio instance with an Enterprise license.
10.2 Tobii Studio Logger computer setup
The Studio Logger application and Tobii Studio are run on two different computers and communicate with
the Tobii Eye Tracker Server as well as with each other over a LAN network (TCP/IP protocol).
The image from the Tobii Studio computer is displayed on the Tobii Eye Tracker screen and the Tobii
Studio computer therefore needs to be connected to the display of the Tobii Eye Tracker. The computer
running Studio Logger displays the Studio Logger window that broadcasts the image from the Tobii
Studio computer via the LAN connection. The two computers therefore have to be connected to the same
network. A secondary screen can be added to the setup to enable the eye tracker operator to monitor the
progress of the test during the stimulus presentation and recording.
To make your study more portable, replace the computer in the setup drawing with a laptop or shuttle
computer.
Things to remember when setting up the two computers for remote viewing and logging:
1. Studio Logger can only be used on a local network.
Ideally, a dedicated network should be used solely for the Tobii Studio computer and the Studio
Logger computer.
150
2. The network bandwidth must be high.
Studio Logger requires at least 30 Mbps in order to work smoothly.
3. The network must be stable.
A disconnection of either the Tobii Studio computer or the Studio Logger computer might result
in difficulties reconnecting during an active recording session. Should this occur, you must close
and restart both applications.
4. The same version of Tobii Studio and Studio Logger must be installed on both computers.
5. To avoid problems, use either the Tobii Studio computer or the Remote Logger computer to
control the recording – NOT BOTH – during the same session.
For example, starting the recording with the Tobii Studio computer and administering the
calibration using the Studio Logger computer can cause program crashes.
10.3 Connecting Studio logger
Before starting a recording and adding events with Tobii Studio Logger, make sure Tobii Studio Logger is
set up properly and that the two applications are able to communicate with each other over the network.
To connect Tobii Studio and Studio Logger:
1. Open Tobii Studio.
2. In the menu bar, click Tools and then select Settings to open the Global Settings dialog box.
3. On the Screen and Video Capture tab, select the Enable remote viewing check box. If a user
camera and/or sound is to be used, this has to be enabled as well by selecting the Broadcast:
Sound and Camera image check boxes.
© 2010 Tobii Technology - All rights reserved. Tobii Technology and the Tobii logo are either registered trademarks or trademarks of Tobii Technology in the United States
and/or other countries.
151
User Manual - Tobii Studio 2.X
4.
5.
6.
7.
Note: If Tobii Studio Logger is to be used for remote viewing on more than one computer, the
Multicast option must be selected. If only one remote computer is used for logging or remote
viewing, do not select this option as it might affect the remote viewing performance.
Click OK to accept the changes.
Open the Windows Start menu, select All Programs > Tobii > Studio, then click Studio Logger to
open the Studio Logger application.
On the Studio Logger header, open the Connection drop-down menu (located to the left of the
Test menu) and then select New Connection… to enter a new IP address.
In the Connect to Server dialog box, type the IP address1 of the Tobii Studio computer and click
Connect. The connection status is displayed in the lower part of the Remote Desktop pane and
below the Start Recording button.
8. Click Live Viewer to Start Live Viewer.
9. Make sure the user camera and sound are enabled if so desired. Click the Setup button on the
Studio Logger header and click Enable user sound. The user camera is enabled in Tobii Studio’s
Global Settings dialog box (see step 3).
1
To find the IP address of the Tobii Studio computer:
•
•
If Multicast is selected and Tobii Studio Logger is being used for remote viewing on more than
one remote computer, enter the Multicast IP address displayed on the Screen and Video Capture
tab in the Global Settings dialog box.
If Tobii Studio Logger is open on only one computer, follow the instructions below to find the IP
address.
1. For Windows Vista and Windows 7, open the Start Menu and type cmd in the Start menu
search box. The Start menu will display a list of items. In the list and under the category
Programs, find and click cmd (
152
) to open the Command Prompt Window.
For Windows XP, Click the Start menu and click Run… to open the Command Prompt
Window.
2. In the Command Prompt Window, type ipconfig and press ENTER on your keyboard. The
computer IP address is displayed under Ethernet adapter Local Area Connection as the
Subnet Mask.
In the Logger Setup menu you can also:
•
•
•
•
•
Select Show Track Status in a pop-up window.
Select Hide Main Application if you wish to minimize Tobii Studio on the eye tracker screen,
during the test.
Select Gaze overlay settings to open the Overlay settings dialog box. Clear the Draw Gaze data
check box to hide the gaze overlay during remote viewing. Drag the Opacity slider to change the
opacity of the gaze overlay. Click the Overlay color box to choose the color of the gaze overlay.
Select Smooth Scaling to display a less pixilated video image.
Select Full Screen to display the Remote Desktop image in Full Screen during the recording. To
exit the full screen press F11.
10.4 Controlling the recording and remotely logging events
Before events can be logged with Studio Logger, the events and respective log keys have to be defined in
Tobii Studio using the Coding Scheme feature (read more about how to define events in section 5.3 of
this manual, pages 61-64).
To start a Tobii Studio recording from Studio Logger:
1. First verify that the user camera and user sound settings are correct (see the previous section to
learn how to set the user camera and user sound settings).
2. Start Live Viewer in Studio Logger. Click the Live Viewer button in the Remote Desktop pane.
3. Verify that the participant is properly seated in front of the eye tracker. Click the Setup button and
select Show Track Status. The Track Status window opens. The two white dots representing the
eyes should be shown in the middle of the track status window and the status color bar on the
bottom should be green.
4. Click Start Recording to start the Tobii Studio recording (the start recording procedure is the
same as starting a recording in Tobii Studio).
5. Create a new participant or select an existing participant.
• To create a new participant, type the participant’s name in the Name field. If you have
created independent variables, select the correct values (if known before the test) for the
participant.
• To select an existing participant, click the Use Existing Participant tab and select a
participant from the participants list by clicking the participant’s row.
6. Click Continue to accept the selection and open the Track Status dialog box.
7. Click Start to initiate the calibration process.
8. Before the first calibration point appears on the screen, instruct the participant to look at the
points as they move across the screen.
Note: The test participant does not have to keep his/her head still during calibration.
9. The calibration process will stop automatically when all the calibration points are shown.
10. Click Accept to accept the calibration results, or Recalibrate to recalibrate one or more calibration
points.
11. In the Start Recording dialog box, enter a name for the recording (be sure to use informative
names) and check the track status to confirm once more that the participant is correctly
positioned in front of the eye tracker.
12. Click Start Recording to show the test and record media, and eye tracking data.
© 2010 Tobii Technology - All rights reserved. Tobii Technology and the Tobii logo are either registered trademarks or trademarks of Tobii Technology in the United States
and/or other countries.
153
User Manual - Tobii Studio 2.X
13. The recording can be stopped and the media display controlled by clicking Next/Stop in the
Remote Desktop pane
To log events:
1. During the recording, press the keyboard key defined in the Coding Scheme (logging scheme) in
Tobii Studio, or click the event in the Log Category list in Tobii Studio Logger to log an event.
2. Add a comment in the Log Message window that opens when logging events. This message will
not appear if quick logging is selected in the Coding Scheme dialog box (read more about how to
define events in section 5.3 of this manual, pages 61-64).
3. Once the recordings are finished, go to the Replay tab in Tobii Studio to view the added events.
The events are listed in the Events list and added as bookmarks on the timeline.
154
11 General Settings
Prior to a test session it is important to ensure that both the Tobii Studio software and the computer have
been set up correctly. This ensures that the eye tracker will be able to communicate with Tobii Studio, that
the stimulus is correctly displayed on the screen, and that data recording and analysis are performed
according to your study objectives. This is particularly relevant if the eye tracking system is being used
simultaneously in different studies or research projects and when different users have different
requirements for their tests and analysis.
11.1 Computer settings
The Tobii T Series Eye Trackers are integrated into 17” and 24” TFT-LCD monitors, while the Tobii X
Series Eye Trackers can be used with a wide range of screen sizes. It is important that when you prepare
your eye tracking study, that you ensure that the computer running Tobii Studio is able to support the
different screen resolutions and sizes. Thus the first thing to do after installing the software and eye
tracking hardware is to ensure that the computer display settings are set correctly to run the eye tracking
tests.
Resolution based on LCD monitor size:
Monitor size (where the stimulus is shown)
17” to 19” standard ratio LCD
20” standard ratio LCD
20” to 22” widescreen LCD
24” widescreen LCD
Recommended resolution (pixels)
1280 x 1024
1600 x 1200
1680 x 1050
1920 x 1200
The precision of the timing, for example, of the offset between the stimulus presentation and data
recording can be improved by optimizing your computer settings for faster performance. See section 13.1
of this manual, pages 167-168, for information on how to optimize the eye tracking system for low offsets
during data collection.
11.1.1 Setting up display resolution
During the eye tracking study, use the same resolution and color depth on the participant screen (i.e. the
eye tracker screen for the Tobii T Series Eye Tracker, or the screen used to present the stimulus with an X
Series Eye Tracker) and the operator screen (a secondary screen connected to the Tobii Studio
computer).
To change the computer screen resolution settings:
Windows XP
1.
2.
3.
4.
5.
Open the Start menu and click Control Panel.
In the Control Panel, click Appearance, Themes, and then click Display.
On the Settings tab, under Screen resolution, drag the slider and then click Apply.
When prompted to apply the settings, click OK. Your screen will turn black for a moment.
Once your screen resolution changes, you have 15 seconds to confirm the change. Click Yes to
confirm the change; click No or do nothing to revert to your previous setting.
6. To improve the graphics card performance and reduce the hard disk load, select High (16 bit) for
Color Quality. For studies that require higher color quality, use a computer with high performance
and contact Tobii Support for recommendations.
© 2010 Tobii Technology - All rights reserved. Tobii Technology and the Tobii logo are either registered trademarks or trademarks of Tobii Technology in the United States
and/or other countries.
155
User Manual - Tobii Studio 2.X
Windows Vista
1. Open the Start menu on your computer and select Settings > Control Panel.
2. Double-click Display and then click the Settings tab.
3. Make sure that the screen resolution is set to 1024x768 or 1280x1024 for the Tobii T60 and
T120 Eye Trackers, and 1920 x 1200 (1080p) for the Tobii T60XL Eye Tracker
4. Once your screen resolution changes, you have 15 seconds to confirm the change. Click Yes to
confirm the change; click No or do nothing to revert to your previous setting.
5. To improve the graphics card performance and reduce the hard disk load, select High (16 bit) for
Color Quality. For studies that require higher color quality, use a computer with high performance
and contact Tobii Support for recommendations.
6. Click OK to accept the changes and close the Control Panel.
Windows 7
1. Open the Start menu on your computer and select Control Panel
2. In the Control Panel, find the Appearance and Personalization category and click Adjust screen
resolution.
3. Click the Display: drop-down list and select the display you want to set up.
4. Click Resolution: and make sure it is set to 1024x768 or 1280x1024 for the Tobii T60 and T120
Eye Trackers, and 1920 x 1200 (1080p) for the Tobii T60XL Eye Tracker.
5. Once your screen resolution changes, you have 15 seconds to confirm the change. Click Yes to
confirm the change; click No or do nothing to revert to your previous setting.
6. To improve the graphics card performance and reduce the hard disk load, select High Color (16
bit) for Color Quality. Click Advanced settings and then click the Monitor tab. Under Colors:
select High Color (16 bit) and then click OK. For studies that require higher color quality, use a
computer with very good performance and contact Tobii Support for recommendations
7. Click OK to accept the changes and close the Control Panel.
11.1.2 Configuring a dual-screen computer setup
This step is only required if you plan to use your system with an extra monitor to show Tobii Studio Live
Viewer and if both the eye tracker monitor and the live viewer monitor are both connected to the Tobii
Studio computer.
156
In order to use two screens, your computer must be equipped with a dual-head graphics card and you
must have two monitors connected to this card. One monitor is the eye tracker monitor, where the stimuli
are shown and one is a regular monitor for Tobii Studio Live Viewer.
To change the computer display settings:
Windows XP
1. Once the dual display graphics card is installed with the card-specific drivers and the two
screens are connected to the computer, right-click your computer desktop then select Properties.
2. In the Display Properties dialog box, click the Settings tab.
3. On the Settings tab you should see two icons representing the two monitors. Click the Display
drop-down list and select your external monitor.
4. Select the Extend my Windows desktop onto this monitor check box.
5. Click the monitor icons and drag to configure their relative position.
6. The eye tracker screen should be set as the primary screen (monitor) and the live viewer screen
as the secondary. Click Identify to see which screen is the primary screen.
7. To set the eye tracker screen as the primary monitor, select the eye tracker monitor in the Display
list and then clear the Use this device as the primary monitor check box.
Note: This check box is unavailable when you select the monitor icon that is currently set as the
primary monitor. For some graphics cards, you need to click Advanced on the Settings tab to
access this function.
8. Make sure that the screens have the same resolution. See the previous section for more
information on how to set the screen resolution.
9. Click OK or Apply to view the changes.
Note: if the Display drop-down list does not show the two monitor icons, then Windows is not detecting
the secondary monitor. Check if the cables to the monitor are plugged into the right connectors, that the
connection source is set correctly on your monitor and whether your computer’s graphics card supports
dual view. See the manual for your monitor for more information.
Windows Vista
1. Once the graphics card is installed with the card-specific drivers and the two screens are
connected to the computer, open the Start menu on your computer and select Control Panel.
2. In the Display Properties dialog box, click the Settings tab.
3. On the Settings tab you should see two icons representing the two monitors. Click the Display
drop-down list and select your external monitor.
4. Select the Extend my Windows desktop onto this monitor check box.
5. Click the monitor icons and drag to configure their relative position.
6. The eye tracker screen should be set as the primary screen (monitor) and the live viewer screen
as the secondary. Click Identify to see which screen is the primary screen.
7. To set the eye tracker screen as the primary monitor, select the eye tracker monitor in the Display
list and then select the Use this device as the primary monitor check box.
Note: This check box is unavailable when you select the monitor icon that is currently set as the
primary monitor. For some graphics cards you need to click Advanced on the Settings tab to
access this function.
8. Make sure the screens have the same resolution. See the previous section for more information
on how to set the screen resolution.
9. Click OK or Apply to view the changes.
© 2010 Tobii Technology - All rights reserved. Tobii Technology and the Tobii logo are either registered trademarks or trademarks of Tobii Technology in the United States
and/or other countries.
157
User Manual - Tobii Studio 2.X
Note: if the Display drop-down list does not show the two monitor icons, then Windows is not detecting
the secondary monitor. Check if the cables to the monitor are plugged into the right connectors, that the
connection source is set correctly on your monitor and whether your computer’s graphics card supports
dual view. See the manual for your monitor for more information.
Windows 7
1. Once the graphics card is installed with the card-specific drivers and the two screens are
connected to the computer, open the Windows Start menu and select Control Panel.
2. In the Control Panel, find the Appearance and Personalization category and click Adjust screen
resolution.
3. The Change the appearance of your display dialog box displays the information on how many
monitors you have connected to the computer and which screen is set as the primary (Display 1)
and which is set as the secondary (Display 2).
4. Click the Multiple displays drop-down list, select Extend these displays, and then click OK.
Note: If the option Multiple displays is not shown in the dialog box, Windows is not detecting the
secondary monitor. Try clicking Detect to automatically detect the monitor. If Windows still cannot
find the monitor, then check if the cables to the monitor are plugged into the right connectors and
that the connection source is set correctly. See your monitor manual for more information.
5. To set the eye tracker screen as the primary monitor, select the eye tracker monitor in the Display
list and then select the Make this my main display check box.
6. Make sure that the screens have the same resolution. See the previous section for more
information on how to set the screen resolution.
11.2 Tobii Studio Global Settings dialog box
The Global Settings dialog box contains important settings that affect data recording and analysis across
all Tobii Studio projects. Consequently, if you change the settings for one project, these changes will
affect the subsequent recordings and analyses in Tobii Studio even if you switch to a different project. If
you wish to repeat tests or analysis, or simply replicate tests from a previous Tobii Studio project, make
sure you note the different settings used in the test.
The Global Settings dialog box can be opened in two different ways: from the Design and Record tab,
click the Setup drop-down menu and select Settings; or click Tools on the Tobii Studio menu bar and
select Settings.
11.2.1 Screen and video capture settings
The first tab in the Global Settings dialog box, the Screen and Video Capture tab, has various settings for
configuring the video recordings from the screen capture and user camera, the user sound, and allows you
to enable local and remote live viewers.
The halftone video scaling option determines how the video is scaled if the live viewer window size is
changed. Halftoning is a technique used to make 24-bit color gradients look better on 256-color displays.
Halftoning normally increases the size of graphics files. If the Use halftone (smooth) video scaling check
box is selected, the video will be streamed with a better image and details will be easier to see. However,
this option requires more processor resources and can lower the computer’s performance.
Type a value in the Screen capture frame rate: field to change the frame rate of the screen recording of the
participant’s activities on the screen. In a video recording, a frame is one of the many still images that
compose the complete moving picture and is usually expressed in number of frames per second. The
higher the frame rate the more processor resources will be consumed and the larger the size of the video
file. The default value for Tobii Studio is 5 frames per second (FPS).
158
To set the user camera video capture properties:
1. Choose the video source by selecting a camera from the Video Source drop-down list.
2. If the device has more than one input (e.g. S-video and composite), specify the input you want to
use for the video recording by selecting it in the Inputs drop-down list.
3. Choose the codec you want to use to convert and/or compress the video signal during the
recording by selecting a codec from the Video Codec drop-down list. The choice of codec will
impact the video quality, file size, and CPU load during recording. For most purposes, the
Microsoft Video 1 codec is recommended.
4. Click the Settings... button to set the temporal quality ratio of the video compression. The higher
the quality ratio, the better the video quality will be, but the more CPU resources will be
consumed.
5. Click Edit... to enable (or disable) codecs from the list. Select the codec from the disabled list and
click the left direction arrow to add the codec to the Video Codec drop-down list. Do the
opposite to remove a codec.
6. Click the Preview box to preview the video streamed from the device.
7. Select the Record user sound check box to enable user sound recording and choose the
microphone used to record the user form the Audio Source drop-down list.
© 2010 Tobii Technology - All rights reserved. Tobii Technology and the Tobii logo are either registered trademarks or trademarks of Tobii Technology in the United States
and/or other countries.
159
User Manual - Tobii Studio 2.X
To enable live viewing:
1. Select the Enable live viewing check box to enable the local live viewer. If this option is unchecked
you will not be able to open the local live viewer window.
2. Select the Enable remote viewing check box to use Studio Logger Live Viewer. If this option is
unchecked, you will not be able to view the live viewer window in the Remote Desktop pane of
Studio Logger.
When remote viewing is enabled, you can choose to allow Tobii Studio to connect to several
Studio Logger clients (several computers running the Studio logger). Select the Use multicast
check box to create a multicast IP address and enable multicasting. The IP address is displayed in
the Multicast IP address field.
Select the Sound and Camera image check boxes to enable broadcasting of the user camera
image and sound to Studio Logger.
11.2.2 Eye Tracker browser and hardware settings
The Eye Tracker tab allows you to select and connect to the eye tracker connected to the Tobii Studio
computer (as well as configure the connection to old eye tracker models), update the eye tracker firmware
and configure the X Series Eye Tracker setup.
The first element in the Eye Tracker tab is a list of eye trackers that are connected either to the Tobii
Studio computer or to the network the computer is connected to. The list displays information on whether
the connection to the eye tracker was made automatically or manually (Type), the address used to connect
with the eye tracker (Host), the name (Name) and serial number (Serial) of the eye tracker, and the type of
eye tracker (Model).
160
To select an eye tracker, click the row in the list that corresponds to the eye tracker and then click the Test
selected eye tracker button. A message showing the status of the connection is displayed.
If you are unable to see your eye tracker in the list, click Can’t find your eye tracker? to restart the protocol
used to communicate with the eye trackers (Bonjour). If you are still unable to connect to the eye tracker,
see the troubleshooting section of the eye tracker user manual or contact Tobii Support.
The Delete selected eye tracker button is used to remove eye trackers that have been manually added to
the list.
If you are using a Tobii X Series Eye Tracker, click the X-Series Config Tool… button to open the X Series
Configuration Tool dialog box and set up the X Series Eye Tracker (the button is only available if you select
a Tobii X Series Eye Tracker).
Earlier eye tracker models (e.g. 1750 and X50) are not detected automatically by Tobii Studio. If you are
using a Tobii -50 Series Eye Tracker, you need to set up the connection manually. Type the IP address of
the computer running the TET Server in the Host field, or type 127.0.01 as the address if the TET Server
is running on the same computer as Tobii Studio. Type a name for the eye tracker in the Name field
(optional) that can be used to identify the eye tracker in eye trackers list. Click Add eye tracker to connect
to the eye tracker and display it in the list.
11.2.3 Calibration Settings
See section 4.3.1 in this manual, pages 48-52, to learn how to change the calibration settings in Tobii
Studio.
© 2010 Tobii Technology - All rights reserved. Tobii Technology and the Tobii logo are either registered trademarks or trademarks of Tobii Technology in the United States
and/or other countries.
161
User Manual - Tobii Studio 2.X
11.2.4 Fixation filter settings
The Fixation Filters tab allows you to configure the gaze data and fixation filter calculations. These settings
affect how the fixation data is visualized and the eye tracking metrics calculated in Tobii Studio, but do not
affect the raw gaze data. To recalculate the fixation data, simply change the settings on the Fixation tab.
The gaze data received from the eye tracker consists of gaze point coordinates, distance to the eye
tracker, pupil size, etc., for the left and right eyes. The accuracy of the human eye is not identical in both
eyes. One of the eyes is usually more dominant and more accurate than the other. In some cases, the
difference between the two eyes is so great that it will affect the accuracy of the analysis. If so, it is best to
use the data from the dominant eye and discard the data from the other.
On the Fixation Filters tab, you can choose to discard the data from one of the eyes or average the data
from both eyes by clicking the Eye Selection drop-down list (Eye Selection Filter) and selecting Left, Right,
or Average.
After selecting the gaze data (Left or Right eye) or recalculating the gaze points (Average), you can
choose either to not process the data further by selecting the Raw Data Filter check box or to process the
gaze data further into fixations using the Tobii Fixation Filter or the ClearView Fixation Filter.
For more information on what fixation filters are and how they work, see the chapter Fixation Filters
(chapter 6), pages 76-79.
162
11.2.5 Recording settings
Under the Recordings tab you can configure the recording shortcut keys. The ESC key on your keyboard
is the default key for ending and exiting the recording, while F10 is the default key for moving the
presentation to the next media element.
To change the recording shortcut keys:
1. Click the End the recording drop-down list and select a keyboard key from the list.
2. Click the Move to next test element drop-down list and select a keyboard key from the list.
3. Click the Restore default button to restore the shortcut keys to ESC and F10.
Tobii Studio initiates the stimulus presentation by sending a command to the computer’s graphics card to
write the stimulus data to its memory. The speed at which the stimulus is written on the graphics card is
affected by different factors, such as: the type and size of the stimulus; the computer’s processor usage
and speed; the RAM allocated to this command; and the graphics card speed and available memory.
Once this process is completed, the stimulus is sent to the monitor via a VGA or DVI connector. The
Recording Settings for time gap between Images feature allows you to select whether you want to preload
a certain number of images before initiating the image presentation. Preparing the images in advance
shortens the gap between the presentation of the different images and keeps that gap constant. However,
preloading the images might introduce a short delay at the start of the stimulus presentation, as it requires
more memory to process several images. One or three images should be sufficient to ensure a smooth
presentation.
To set the number of images you want to preload:
1. Select the Prepare images in advance check box.
© 2010 Tobii Technology - All rights reserved. Tobii Technology and the Tobii logo are either registered trademarks or trademarks of Tobii Technology in the United States
and/or other countries.
163
User Manual - Tobii Studio 2.X
2. Type the number of images you wish to preload in the field.
Disabling this feature (clearing the check box) makes the time gap between the different images heavily
dependent on computer performance and resources allocated to Tobii Studio during image presentation.
11.2.6 Miscellaneous settings
Some dialog boxes in Tobii Studio provide the option “Don’t show this again.“ When selected, the specific
dialog box will not appear in future similar operations. Clicking the Show all warning and instruction dialog
boxes button removes the check marks from all dialog boxes in which the “Don’t show this again” option
was selected.
By default, the live viewer and track status window will be displayed at the last location (secondary or
primary screen) where they were active. If their previous location was on a secondary screen which is no
longer connected, they will not be shown on the primary screen. By clicking Forget live viewer window
position, they will be shown on the primary screen again.
164
12 Tobii Studio media limitations
Below is a list of the maximum number of media files, the amount of recordings, and the duration of media
presentation that can be used in a test (Tobii Studio 2.1.13).
1280 x 1024 pixels screen/image resolution
•
•
•
•
•
200 images, each image presented for 5 seconds > maximum 120 recordings
4 images, each image presented for 5 seconds > maximum 1200 recordings
PDF, 200 MB, 20 minutes recording >100 recordings
40 movies that are 20 seconds long > maximum 40 recordings
4 movies, 20 seconds long > maximum 250 recordings
1920 x 1200 pixels screen/image resolution:
•
•
•
200 images, each image presented for 5 seconds > maximum 120 recordings
4 images, each image presented for 5 seconds > maximum 1200 recordings
PDF, 200 MB, 20 minutes recording >100 recordings
Note: The limitations are only valid for tests run on a computer fulfilling the minimum requirements of the
Tobii Studio system recommendations (download the system recommendations document from
www.tobii.com).
© 2010 Tobii Technology - All rights reserved. Tobii Technology and the Tobii logo are either registered trademarks or trademarks of Tobii Technology in the United States
and/or other countries.
165
User Manual - Tobii Studio 2.X
13 Tobii Studio critical timing information
Tobii Studio computing operations are subject to the operating system allocation of memory and
processor resources. As a consequence, time offsets may occur when recording an eye tracking session.
These offsets may vary according to the eye tracker display hardware (Table 4), the type of computer used
in the test (laptop vs. desktop, processor speed, RAM, graphics card), the video capture devices (capture
cards and cameras), third-party software installed and running on the computer, and the type of stimuli
and stimuli format used in the test (image, video, codecs).
Table 4. Tobii Eye Trackers hardware display timing information (TFT screen & controller)
Eye Tracker
Native resolution (pixels) Controller refresh rate
*TFT Response time
(Hz)
(ms)
1750
1280×1024
60-75
5-25
T120 & T60
1280×1024
60-75
5-16
T60XL
1920×1200
60
16
*These values represent typical values for a full transition of a pixel from black-white-black.
Tests show that when using Tobii Studio with Tobii recommended hardware configurations and devices,
that these offsets can be maintained at a low value. Tables 5a and 5b summarize the different
configurations of computer hardware and stimulus that have been used to test the stimulus display timing
offset. These tests measure the offset between the Tobii Studio recording timestamps and the stimulus
display on a screen. All setups show that the offset between Tobii Studio timestamps and image or video
display is below 50 ms.
Table 5a. Test results for the offset of the start time of the stimulus display (tests were performed
with the stimulus size set to the eye tracker native screen resolution and using a Dell Precision
T5400 desktop computer) – type of stimulus (number, format, codec ) & Windows version
Stimulus
Format
Codec
Eye tracker
Windows OS
Offset (ms),
mean±s.d.
Single image
JPEG
T120
XP
20±6
BMP
T120
XP
17±5
JPEG
T60
Vista Classic***
43±6**
JPEG
T60 XL
XP
33±7*
4 images
JPEG + BMP
T120
XP
18±5
sequence
Single video
AVI
Techsmith
T120
XP
28±6
AVI
dviX
T120
XP
32±5
AVI
MV1
T120
XP
32±4
AVI
XviD
T120
XP
31±5
AVI
Techsmith
T120
Vista Classic***
21±7
AVI
MV1
T120
Vista Classic***
18±5
AVI
XviD
T60
XP
20±4*
AVI
XviD
T60XL
Vista Classic***
36±7**
3 videos sequence
AVI
Techsmith,
T120
XP
31±5
MV1, divX
*This test was performed using Dell Precision M6300 laptop computer.
** This test was performed using Dell Precision M6400 laptop computer.
*** Windows Vista appearance settings optimized for better performance
166
Table 5b. Test results for the offset of the start time of the stimulus display – display connector,
graphics card, and type of computer (Dell Precision T5400 desktop, M6300 and M6400 laptop)
Stimulus
Display
Card* Computer
Eye tracker
Windows
Offset (ms),
connector
OS
mean±s.d.
Single image
DVI
Nvidia
T5400
T120
XP
19±5
DVI
ATI
T5400
T120
XP
15±5
VGA
Nvidia
M6300
T60
XP
43±7
DVI
Nvidia
M6300
T60
XP
39±4
DVI
Nvidia
M6400
T60
Vista
43±6
Classic**
Single video
DVI
Nvidia
T5400
T120
XP
25±5
DVI
ATI
T5400
T120
XP
30±5
VGA
Nvidia
M6300
T60
XP
33±7
DVI
Nvidia
M6300
T60
XP
35±9
*Graphics card: Nvidia – NVidia Quadro FX570 256MB (T5400), NVIDIA Quadro FX 1600M 256MB
(M6300), NVIDIA Quadro FX 2700M Graphics with 512MB (M6400). ATI – ATI FireGL V3300 128MB
** Windows Vista appearance settings optimized for better performance
In addition to the stimuli display offsets, you can also encounter video and sound capture offsets that are
caused by the latency between image recording or capture (e.g. at image sensor exposure when using a
camera) and the Tobii Studio timestamps.
13.1 Recommendations
When designing an experiment, it is always good practice to test both experimental procedure as well as
the equipment you will be using to perform the tests. If you are conducting eye tracking experiments that
require high timing precision, we strongly recommend testing your eye tracking setup with the stimuli you
will be presenting, as well as conducting a pilot test to assess the quality of the data.
Tobii Studio timing offsets can be reduced by following these recommendations:
•
•
•
•
•
•
•
•
Optimize your computer hardware by using Tobii recommend components. For an overview of the
configurations tested by Tobii Technology, see Table 6 on the next page. For a more detailed list
of Tobii Eye Tracking Recommended components see the system recommendations for Tobii
Studio and TX-series Eye Trackers.
The computer running Tobii Studio should have the least number of processes running in the
background. This means that you should disable or uninstall any unnecessary programs that might
be running in the background (anti-virus software, firewall software, anti-spyware software, Skype
or other chat/communication programs). Ideally, use the computer only to run Tobii Studio tests
and analysis.
It may help to disable or disconnect Bluetooth, WLAN/Wifi, and network connectors and to
remove CDs or DVDs from disk drives.
Use a direct connection between your computer and Tobii Eye Trackers. For more information on
how to connect the computer and Tobii Eye Trackers, see the section entitled “Connecting Tobii
Eye Tracker” in your eye tracker user manual.
Use images and movies as stimuli using the recommended formats and codecs (see Table 7
below).
Disable Live Viewer, User Sound, and User Image (from the user camera).
Don't run your study at excessive screen resolutions. Choose something reasonable for your
purpose. Higher resolutions take up precious video RAM and increase the time for clearing the
frame buffer, drawing your stimulus, and for post-processing operations.
Optimize Windows 7, Vista or XP for better performance. For more information visit:
http://windows.microsoft.com/en-us/windows-vista/Optimize-Windows-Vista-for-better-
© 2010 Tobii Technology - All rights reserved. Tobii Technology and the Tobii logo are either registered trademarks or trademarks of Tobii Technology in the United States
and/or other countries.
167
User Manual - Tobii Studio 2.X
•
•
•
performance#section_6 or
http://www.microsoft.com/windowsxp/using/setup/maintain/improveperf.mspx.
Make sure that the energy saving options of your computer do not slow down the processor and
other subsystems to save power or battery life. This is especially important for laptops running on
battery power.
Running two displays simultaneously requires more video RAM and processor resources from
your graphics card, plus some additional management overhead in the graphics driver. This can
cause lower graphics performance and therefore lead to missed stimulus onsets when running
complex stimuli on high resolution, high refresh rate displays, especially when using older mobile
graphics chips with a low amount of local video RAM.
Test the timing of your setup by following the test procedures described in Tobii Studio
Timing Testing Guidelines. Contact Tobii Support or your sales representative if you wish to
receive a copy of the document.
Table 6. Hardware recommended configurations (includes operating system and Studio
versions)
Computers
CPU
RAM
Video
Graphic
Operating
Tobii Studio
RAM
card
System
versions
Laptop
Dell Precision
M6300
Core 2Duo,
2.4GHz
2 GB
256 MB
Dell Precision
M6400
Core 2Duo,
2.67GHz
4 GB
512 MB
Desktop
Dell Precision
T5400
Core 2Duo,
2.5GHz
4 GB
256 MB
Dell Precision
T5400
Core 2Duo,
2.5GHz
4 GB
128 MB
Table 7. Recommended stimulus
Stimulus
Format
Codec
JPEG, BMP
Image
Video
AVI
Techsmith1, dviX, MV1,
XviD
NVIDIA
Quadro FX
1600M
NVIDIA
Quadro FX
2700M
Windows XP
Professional
SP3
Windows
Vista
Business
SP2,
Classic view
1.6 and later
NVIDIA
Quadro
FX570
ATI FireGL
V3300
Windows XP
Professional
SP3
Windows XP
Professional
SP3
1.6 and later
1.6 and later
1.6 and later
Size
Frame rate
1280x1024; 1920x1200
(T60 XL)
1280x1024; 1920x1200
(T60 XL)
maximum 25
fps
Detailed documentation on Tobii Studio timing of stimulus display as well as Tobii Eye Trackers sample
timing information is available upon request. Contact Tobii Support or your sales representative in your
area to obtain a copy of Timing Guide for Tobii Eye Trackers and the eye tracking software whitepaper.
168
1
Function
1
Quit the recording
Exit the full screen replay
Exit test preview
Help
1
Advance to the next media (stimuli)
Preview media (stimuli)
Frame advance (when paused)
Fast forward (during the recording playback)
Move to the next Tobii Studio tab
Frame rewind (when paused)
Rewind (during the recording playback)
Move to the previous Tobii Studio tab
Increase the user camera opacity (full screen replay)
Decrease the user camera opacity (full screen replay)
Display the user camera (full screen replay)
Display the timeline (full screen replay)
Pause the replay
Open the local live viewer
Open the track status
Minimize Tobii Studio to system tray
Copy media (stimuli) from the test timeline
Paste media (stimuli) on the test timeline
Delete media from the test timeline
Unlock test
Export project archive
Import project archive
Create a new project
Open a project (Tobii Studio Project Library)
Event keys
z
z
z
z
z
z
z
z
z
z
z
z
z
z
z
z
z
z
z
z
z
z
z
z
z
Record
z
z
z
z
z
z
z
z
z
z
z
z
z
z
z
z
z
Replay
z
z
z
z
z
z
z
Visualization
Can be used during the following operations…
z
z
Design
These keyboard shortcuts can be customized in the Recording settings tab of the Global Settings dialog (Read section 11.2.5 of this manual, pp. 163)
UP ARROW
DOWN ARROW
E
T
SPACE
Ctrl+L
Ctrl+T
Ctrl+M
Ctrl+C
Ctrl+V
DELETE
Ctrl+U
Ctrl+E
Ctrl+I
Ctrl+N
Ctr+O
User defined
LEFT ARROW
F1
F10
F11
RIGHT ARROW
Keyboard Shortcut
ESC
Tobii Studio Keyboard Shortcut Keys
z
z
z
z
z
z
z
Statistics
www.tobii.com
Tobii Support contact:
SWEDEN/GLOBAL
+46 8 522 950 10 Phone
[email protected]
www.tobii.com
Support hours: 9 am - 5 pm
(Central European Time,
GMT+1)
GERMANY
+49 69 2475 034-27
Phone
[email protected]
www.tobii.com
North America
+1 703 738 1320 Phone
[email protected]
www.tobii.com
central Europe
Tobii Technology GmbH
Niedenau 45
D-60325 Frankfurt am Main
Germany
+49 69 24 75 03 40 Phone
+49 69 24 75 03 429 Fax
[email protected]
North America
Tobii Technology, Inc.
510 N. Washington Street
Suite 200 - Falls Church,
VA 22046 - USA
+1-703-738-1300 Phone
+1-888-898-6244 Phone
+1-703-738-1313 Fax
[email protected]
Support hours: 9 am - 5 pm
(Central European Time,
GMT+1)
Support hours: 8 am - 5 pm
(US Eastern Standard Time,
GMT-6)
JAPAN
+81-3-5793-3316 Phone
[email protected]
www.tobii.co.jp
Support hours: 9 am - 5.30 pm
(GMT+9)
Tobii Sales contact:
HEADQUARTERS
Tobii Technology AB
Karlsrovägen 2D
Box 743
S-182 17 Danderyd
Sweden
+46 8 663 69 90 Phone
+46 8 30 14 00 Fax
[email protected]
JAPAN
Tobii Technology, Ltd.
3-4-13 Takanawa, Minato-ku
Tokyo 108-0074
Japan
+81-3-5793-3316 Phone
+81-3-5793-3317 Fax
[email protected]
CHINA
Tobii Electronics Technology Suzhou Co., Ltd
No. 678, Fengting Avenue
Land Industrial Park
Weiting, Suzhou
China
Post code: 215122
+86 13585980539 Phone
[email protected]
Tobii Studio 2.X User Manual . Content subject to change without notice. Please check Tobii web site www.tobii.com for updated versions of this manual.
Manual Version 1.0 - © 2010 Tobii ® Technology. Illustrations and specifications do not necessarily apply to products and services offered in each local market.
Technical specifications are subject to change without prior notice. All other trademarks are the property of their respective owners.