1
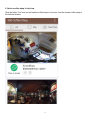
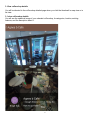
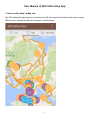
User Manual of 360 Coffee Shop App
1. Select a coffee shop via Map view
The 360 coffee shop app detects your location, and will then search the closest coffee shops on map.
Different icons indicate the different categories of coffee shops.
1 1.1. Select a coffee shop pin on map
By clicking any coffee shop pins on map, you will see detailed locations, category of coffee shops,
and the features (such as availability of Wi-Fi, electricity plug, outdoor space, and selling of specialty
coffee) of a coffee shop.
2 2. Select a coffee shop in List view
Click the button "List" and you will see the coffee shops in list view, from the closest coffee shop to
the furthest location.
3 3. View coffee shop details
You will be directed to the coffee shop detailed page when you click the thumbnail in map view or in
list view.
3.1 view coffee shop details
You will see the spherical image of your selected coffee shop, its categories, location, existing
features, and the description about it.
4 Click on the arrow in the textbox to enlarge the description box.
5 3.2 view photo album of a coffee shop
You can click on the "more photo" to view all the spherical images of a coffee shop.
6 3.3 Category rating
Click on the rating "Rate this coffee shop" to vote for which categories you think the coffee shop
belongs to. There are 5 different categories to categorize a coffee shop: (i) Day dream: a coffee shop
which is good to day dream; (ii) hangout: a coffee shop which is suitable to meet with friends for
gatherings; (iii) Take a break: a coffee shop which is suitable to take a coffee break at work; (iv) Small
talk: a coffee shop to talk something secret with your beloved one; (v) Workplace: a coffee shop good
to work or study.
You will be allowed to vote only if you login Facebook. If you have not done so, you will be prompted
with the login page.
7 Once you have voted, you will be notified your vote is successful. Each one can only vote once for
each coffee shop and you will be notified if you voted too many times.
8 4. Shot and Upload spherical images
4.1 Connect Theta camera to mobile phone via Wi-Fi
If you have not connected the theta to the mobile phone, you will see the below screen. Check your
Wi-Fi setting and connect the theta camera to the mobile phone.
9 After connect the theta with the mobile phone, you will see the Wi-Fi name updated with the camera
name. Then, press, "connect theta camera" to connect the app with the camera.
10 4.2 Shot photo using Ricoh Theta camera
Once the app connected with theta, you will see the status changes to "connected". You can press
the camera button to shot.
11 After shooting, the image will be transferred to the mobile phone. It may take 30 seconds to complete
the transfer and you can check the transfer status.
12 You can preview the image as below.
Click "Retake" to shoot again, "Cancel" to go back to camera page.
13 4.3 Upload photos
After shooting, user can click "upload" to upload the spherical image and upload to an existing album
of a coffee shop. Note that before upload, you need to make sure you are reconnected to the
network.
Only Facebook logged-in user can be allowed to upload spherical images.
The photo will be uploaded to a designated coffee shop album. If you cannot see the coffee
shop, please click "others" for our team to assist you.
14 15 16 Successfully uploaded photos can be viewed in the album of the selected coffee shop.
17