1
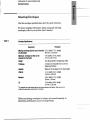
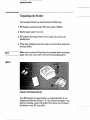
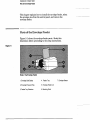
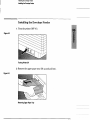
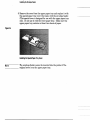
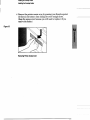
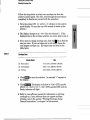
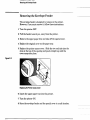
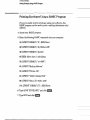
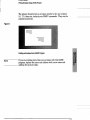
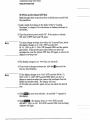
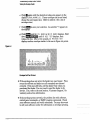
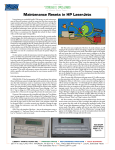
User’s Guide
H P LaserJet Envelope Feeder
HP LaserJet 4Si Printer
HP LaserJet IIISi Printer
Qolo4a-
Related User Documentation
Consult these manuals for additional information about printing
envelopes.
HP LaserJet 4Si Printer User’s Reference Manual or
HP LaserJet IIISi Printer User’s Reference Manual
Refer to appendix E in the appropriate manual for envelope
specifications. This section describes the size, material, weight, and
construction requirements for purchasing envelopes for your feeder.
PCL 5 Printer Language Technical Reference Manual
This manual contains PCL (printer control language) commands,
including commands to select the envelope feeder as the paper
source and choose envelope size. (This manual, HP part number
5961-0509, is designed for knowledgeable HP LaserJet printer users.)
HP LaserJet 4Si SofZware Application Notes or HP LaserJet IIISi
Software Application Notes
Refer to this manual for instructions on how to print envelopes using
your software application. Copies of individual software application
notes can be obtained by calling Hewlett-Packard’s Customer
Support Center at (208) 323-2551.
To order additional copies of the manuals from Hewlett-Packard’s
Support Materials Organization toll free at (800) 227-8164. (In
Canada, call (416) 671-8383. In the United Kingdom, call (0734)
441212. In Germany, call (0130) 3322.)
To order a free catalog of HP LaserJet accessories, call (800)
227-8164, toll free (U.S. only).
...
111
Conventions
This guide uses the following conventions:
Italic type is used for emphasis or for titles of related documents.
indicates text visible on the printer display or
commands as seen on a computer display.
CUNPUTEF.:type
indicates one of the keys (such as
control panel or your computer keyboard.
m)on the printer
Note
Notes contain important information set off from the text.
Caution
Caution messages appear before procedures which, if not observed,
could result in loss of data or in damage to equipment.
Warding
Warning messages alert you to a specific procedure or practice
which, if not followed correctly, could cause personal injury.
iv
In This Book
This brief overview describes the information you will find in each
chapter of your manual. Read this page, then read the manual to
familiarize yourself with the feeder and set up instructions.
Chapter 1: Introducing the H P LaserJet Envelope Feeder
Chapter 1 describes features of the HP LaserJet envelope feeder and
contains unpacking information.
Chapter 2 Installing the Envelope Feeder
Chapter 2 explains procedures for installing the feeder and selecting
envelope size from the control panel. It also describes removing the
feeder from the printer.
Chapter 3 Printing Envelopes
Chapter 3 provides information about printing envelopes using
software or a BASIC program.
Chapter 4 Troubleshooting Envelope Feeder Problems
Chapter 4 addresses envelope printing problems and suggests the
recommended action to solve them. A section about support,
warranty, and service of the envelope feeder concludes this chapter.
Index
The index provides quick access to specific information in the
manual.
Table of Contents
1 Introducing the H P LaserJet Envelope Feeder 1-1
Features 1-2
Selecting Envelopes 1-3
Unpacking the Feeder 1-4
2 Installing the Envelope Feeder 2-1
Parts of the Envelope Feeder 2-2
Installing the Envelope Feeder 2-3
Loading Envelopes 2-7
Selecting Envelope Size 2-12
Removing the Envelope Feeder 2-14
3 Printing Envelopes 3-1
Printing Envelopes Using Software 3-2
printing Envelopes Using Generic Instructions 3-3
For the HP LaserJet 4%: 3-3
For the HP LaserJet IIISi: 3-6
Printing Envelopes Using a BASIC Program 3-8
4 Troubleshooting Envelope Feeder Problems 4-1
Envelope Printing Problems 4-2
Control Panel Messages 4-3
Common Problems 4-5
Prints on Paper Instead of Envelopes 4-5
Envelope Wrinkling 4-5
Envelopes Jam or Feed Incorrectly 4-6
Paper Feeds with an Envelope 4-7
Multiple Envelopes Feed at Once 4-7
Image Problems 4-8
Return Address Image Problems 4-9
Marginal Print Quality 4-9
Blank Envelopes 4-9
Clearing Envelope Jams 4-10
Testing the Envelope Feeder 4-11
To Print an Envelope Self-Test 4-12
Customer Support 4-15
Refer to the Manuals 4-15
Call Your Dealer 4-15
Call Hewlett-Packard's Customer Support Center 4-15
Call Worldwide Sales and Support Offices 4-16
Limited Warranty 4-16
Warranty Exclusions 4-16
Warranty Limitations 4-17
Return Service 4-17
Other Support Services 4-18
1
htruduhg the HI? LaserJet Envelope
Feeder
Introducingthe HP LaserJet Envelope Feeder
Features
Features
The HP LaserJet envelope feeder is specifically designed for
envelope printing with your HP LaserJet printer. It provides
these features:
0
Holds up to 100 envelopes.
0
Prints up to 12 envelopes per minute.
Prints up to 3,000 envelopes per month.
0
Prints envelopes and letters in the same print job.
0
Adds a third paper source to the HP LaserJet printer.
0
Provides easy envelope size selection using software or the
printer’s control panel.
Attaches easily to the printer.
0
Remains attached to the printer, always ready to print
envelopes, or can be removed easily.
Introducing the HP LaserJet Envelope Feeder
Selecting Envelopes
I
Selecting Envelopes
Use this envelope specifications chart for quick reference.
For more complete information about using and selecting
envelopes, refer to your printer user’s manual.
Table 1-1
EnvelopeSpecifications
Description
Parameter
Minimum envelope size that can be inserted
into the feeder
Maximum envelope size that can be
inserted into the feeder
3.9 in. (width) x 7.5 in. (length)
(98.4 mm x 190.5 mm)
4.3 in (width) x 9.5 in. (length)
(110mmx241.3mm)
16 to 28 pound (60 to 105 gramslsq. meter)
3.3 mils to 5.5 mils (0.084 mm to 0.14 mm)
single layer thickness
Maximum 100 envelopes (75 mm stack height)
4.1 in. (width) x 9.4 in. (length)
(104 mm x 240 mm)
3.9 in. (width) x 7.5 in. (length)
(98 mm x 190 mm)
4.3 in (width) x 8.6 in. (length)
(110 mm x 220 mm)
Weight
Thickness
Quantlty
COM-10
Monarch
DL
DL envelopes have a self adhesive label that may cause envelopes to stick together. Make sure you fan or
shuffle the envelopes before inserting them into the feeder.
Before purchasing envelopes in volume, test a small quantity to
determine performance in your envelope feeder.
y
!g
introaucingtne nr LaserJer tnvelope beeaer
Unpacking the Feeder
Unpacking the Feeder
Your envelope feeder box should contain the following:
1 H P LaserJet envelope feeder (HP part number C2060A).
2 Special upper paper tray cover.
3 HP LaserJet Envelope Feeder User’s Guide (the one you are
reading now).
4 Three foam packing pieces that must be removed from inside the
envelope feeder.
Note
Make sure to remove all tape from the envelope feeder and upper
paper tray cover, and remove the three foam packing pieces.
Figure 1-1
Contents of the Envelope Feeder Box
Your H P LaserJet envelope feeder was inspected before it was
shipped from Hewlett-Packard. If it has become damaged or any
parts are missing, contact the dealer from whom you purchased
the feeder or your HP sales office.
2
Ins-
the Envelope Feeder
installing tne tnveiope keeaer
Parts of the Envelope Feeder
This chapter explains how to install the envelope feeder, select
the envelope size from the control panel, and remove the
envelope feeder.
Parts of the Envelope Feeder
Figure 2-1 shows the envelope feeder parts. Study this
illustration before proceeding to the setup instructions.
Figure 2-1
Parts of the Envelope Feeder
1. Envelope Side Guides
4. Feeder Tray
2. Envelope Pressure Plate
5. Envelope Feeder Lid
3. Feeder Tray Extension
6. Mounting Posts
7. Envelope Sensor
installing tne tnveiope beeaer
Installing the Envelope Feeder
Installing the Envelope Feeder
1 Turn the printer OFF (0).
Figure 2-2
Turning Printer Off
2 Remove the upper paper tray (lift up and pull out).
Figure 2-3
Removing Upper Paper Tray
insraiiing me envelope reeuer
Installing the Envelope Feeder
3 Remove the cover from the upper paper tray and replace it with
the special paper tray cover that came with the envelope feeder.
(This special cover is designed for use with the upper paper tray
only. Do not use it with the lower paper tray.) Make sure the
upper paper tray contains at least two sheets of paper.
Figure 2-4
Installing the Special Paper Tray Cover
Note
The envelope feeder cannot be inserted into the printer if the
original cover is on the upper paper tray.
insrailing-metnveiope reeaer
Installing the Envelope Feeder
4 Remove the printer access cover by pressing your thumbs against
the lines in the center, then sliding the cover straight down.
(Keep the access cover because you will need to replace it if you
remove the feeder.)
Figure 2-5
Removing Printer Access Cover
Installing the Envelope Feeder
Installing the Envelope Feeder
5 Replace the upper paper tray in the printer.
6 Insert the envelope mounting posts into the holes in the front of
the printer that were behind the access cover. Push the feeder
firmly into the printer.
Figure 2-6
Inserting Envelope Feeder Into Printer
insraiiing me tnveiope reeaer
Loading Envelopes
Loading Envelopes
Follow these instructions to load envelopes into your feeder:
1 Select 100 envelopes and inspect their quality. The edges should
be flat, not curled or wrinkled. Make sure envelope flaps are not
overlapping.
Note
The envelope feeder holds 100 envelopes. If more than 100
envelopes are loaded, the feeder may not feed envelopes correctly.
Do not compress the envelope stack before loading.
2 Lift the envelope feeder lid all the way up and open the feeder
tray. If you are loading Monarch envelopes, leave the small tray
extension folded up, as shown in figure 2-7A. If you are loading
COM-10and DL envelopes, unfold the tray extension, as shown
in figure 2-7B.
Figure 2-7
Preparing Envelope Feeder to Load Envelopes
Installingthe Envelope Feeder
Loading Envelopes
3 Use your hand to lift the envelope pressure plate all the way up
and latch it at the top, as shown in figure 2-8A.
4 Insert envelopes into the feeder, as shown in figure 2-8B,and
slide them all the way in until they stop against the back wall of
the feeder. (This illustration shows loading Monarch envelopes
because the feeder tray extension is not unfolded.)
Figure 2-8
Inserting Envelopesinto the Envelope Feeder
Note
Position envelopes with preprinted addresses and logos (or the
location for return addresses) in the near left corner of the
envelope feeder as you face the printer (as shown above). Most
software application packages will direct you to insert envelopes
this way.
Installingthe Envelope Feeder
Loading Envelopes
5 Push the envelope side guides toward the envelopes (push from
the bottom of the guides, not the top). The guides should barely
touch the envelopes.
Figure 2-9
Setting Side Guides Against Envelopes
installingm e tnveiope Feeder
Loading Envelopes
6 Adjust the envelope stack with the outside edges even with one
another, and the inside edges resting against the back wall of the
feeder, as shown in figure 2-1OA. Do not load the envelope stack
as shown in figure 2-10B, with the outside edges uneven with
each other.
Figure 2-10
Adjusting Envelopes in the Feeder
Note
The envelope stack must be square, as shown in figure 2-10A
above, or the envelopes will not feed correctly.
iiisiaiiiiiy iiie ~iiveiupereeuei
Loading Envelopes
7 Close the lid to release the pressure plate and place it on top of
the envelope stack. Do not be afraid to push the lid down; extra
effort may be needed to release the pressure plate.
Figure 2-11
Releasing the Pressure Plate
8 Proceed to “Selecting Envelope Size” on the next page to enter
the envelope size into the control panel.
i i i s w i i y irie criveiupe reeuer
Selecting Envelope Size
Selecting Envelope Size
Your H P LaserJet printer has no automatic means of
determining the size of the envelopes in the feeder. Therefore,
you must use the control panel to select the size of the loaded
envelopes. The three envelope sizes you may select are: COM-10,
Monarch, and DL.
Envelope size can only be changed when envelope size is
displayed on the control panel (EE TRFIY=[size]). The last selected
envelope size is displayed for 10 seconds on the control panel
when:
1 The printer is powered up,
2 The envelopes are removed and then replaced, or
3 The feeder is empty and then loaded with envelopes.
Note
You must change envelope size within the 10 second limit, before
the display changes to @@ E:EiF:i[?r' (HP LaserJet 4Si)/ 88 F'c::L- f;:E(7[>'~'
or 88 PS REFID'? (HP LaserJet IIISi) and the printer goes online.
If the printer goes online before you select the envelope size,
perform 1,2, or 3 above to return the display to envelope size.
installingtne tnveiope peeaer
Selecting Envelope Size
Follow the steps below to select your envelope size from the
printer’s control panel. But first, read through the instructions
completely to familiarize yourself with the procedure.
1 Turn the printer ON. 8:: I~l(-IF?MIt..II; i.F’ will show in the control
panel display. (It may take up to 90 seconds to warm up the
printer.)
2 The display changes to EE -rF?tY;:= [last size selected]
3 . If the
displayed size is the envelope selection you want, skip to step 4.
3 If you want to change envelope size, click the
key to find the
size you want. If your envelope size is not listed, choose the
next largest envelope size. Envelope sizes are listed in the
table below.
Table 2-1
Envelope Sizes
_
_
~
~
Display Reads
Size
4.1 in. x 9.4 in. (104 m m x 240 mm)
3.9 in. x 7.5 in. (98 mm x 190 mm)
4.3 in x 8.6 in. (110 mm x 220 mm)
EE TRRY=COPllO
EE TRRY=MONUEC
EE TRRY=DL
to save the selection. An asterisk
4 Click
“*’’ appears in
the display.
m.
The display will show 88 REWT’(HP LaserJet
4Si)hS PCL REUL’f or 88 FS F<EKI[::~’(HP LaserJet IIISi) and the
Ready indicator will light.
6 Click
6 Refer to your software manual for information on printing
envelopes or, if your software does not support envelope
printing, turn to the section, “Printing Envelopes Using
Generic Instructions,’’ in chapter 3 of this manual.
insraiiing me tnveiope beeaer
Removing the Envelope Feeder
Removing the Envelope Feeder
The envelope feeder is designed to remain on the printer.
However, if you must remove it, follow these instructions:
1 Turn the printer OFF.
2 Pull the feeder toward you, away from the printer.
3 Remove the upper paper tray and take off the special cover.
4 Replace the original cover on the paper tray
5 Replace the printer access cover. Slide the two end tabs into the
slots at the top of the opening and push straight up until the
cover snaps into place.
Figure 2-12
Replacing the Printer Access Cover
6 Insert the upper paper tray into the printer
7 Turn the printer ON.
8 Store the envelope feeder and the special cover in a safe location.
3
Printing Envelopes
Printing Envelopes Using Software
I
Printing Envelopes Using Software
The easiest way to print envelopes is using software. When you
purchased your HP LaserJet printer, you received a book of
software instructions, HP LaserJet Software Application Notes.
Refer to this manual to find out how to configure your software to
print envelopes with the HP LaserJet envelope feeder and your
software application package. If application notes are
unavailable for your software, look in your software manual for
instructions on printing envelopes with an envelope feeder or
refer to “Printing Envelopes Using Generic Instructions” on the
next page of this manual.
Note
If you did not receive the HP LaserJet Software Application
Notes for your printer, you can order it through
Hewlett-Packard‘s Customer Support Center at (208) 323-2551.
If you have this manual but your software application is not
addressed, the Hewlett-Packard Customer Support Center may
have information on printing envelopes with your specific
application.
rrinring tnveiopes
Printing Envelopes Using Generic Instructions
I
Printing Envelopes Using Generic Instructions
The following generic instructions are intended for software
applications that do not have specific procedures for printing with
an envelope feeder. Read through these instructions completely
to familiarize yourself with the procedure.
Note
Software commands always override control-panel commands. If
your envelopes are not printing correctly, your software
commands may be replacing control-panel commands.
The envelope feeder must be installed and envelopes loaded
before proceeding with these instructions. If the envelope feeder
is not installed, follow the instructions in"Instal1ing the Envelope
Feeder" in chapter 2. Also, the envelope size must be entered into
the printer's control panel (see "Selecting the Envelope Size" in
chapter 2) before you follow these instructions.
Note
If your printer is an HP LaserJet IIISi, skip to the next page and
follow the instructions for the HP LaserJet IIISi printer.
For the H p LaserJet 4Si:
1 Enter the default envelope size (COM-10, Monarch, DL) into your
software program. If your software does not allow you to select a
default envelope size, enter the size into the printer's control
panel by following these steps:
a Click
b Click
to take the printer offline.
once.
FW:K t..II":1.t..li:!i PIEt4.I
appears in the display.
rrinring envelopes
Printing Envelopes Using Generic Instructions
e Click
until the desired envelope size appears in the display
(comis, flOtdRFr:C, DL). If your envelope size is not listed, choose
the next largest size (refer table 2-1 for envelope sizes).
f Click
to save your selection. An asterisk “*” appears in
the display. Leave the printer offline.
2 Enter landscape orientation into your software application. If
your software does not allow you to select orientation, select
landscape orientation from the control panel by following these
steps:
a Click
once. CIR I EHTFITI0t.I-YF
appears.
b Click Eto select L for landscape. The display reads
OR I ENTFIT I ON=L.
c Click
to save your selection. An asterisk “Y” appears in
the display.
m.
d Click
The display should read 88 f?EiJE+” You have
completed entering commands into the control panel.
rrinring tnveiopes
Printing'Envelopes Using Generic Instructions
3 Set the margins for your address in your software application:
a For a mailing (destination) address only, set the top and left
margins. For example, for COM-10 envelopes, select a top
margin of approximately 12 lines (2 id50mm) and a left
margin of approximately 3.5 id99mm. Type the address on
your screen.
b Fo-r an envelope with a return address and a mailing address:
1 Set the top and left margins for the return address. (For
optimum print quality, position these margins no closer than
about .6 id15 mm from the edges of the envelope.)
2 Type the return address on your screen.
3 Move the cursor down one inch from the bottom line of the
return address and tab over about 3 id75mm from the left
margin.
4 Type the mailing address. When completed, your screen
should look like that of an addressed envelope.
c Type one mailing address per page (this means a return
address and mailing address or just a mailing address).
Separate each address with a page break.
d Print the envelope.
Note
When you finish printing envelopes and want to return to
printing on paper, restore the printer to its factory defaults. Take
the printer ofnine, then click and hold
and
until
09 MEtW=RESET appears in the display. Click
. The display
returns to 08 REUDY and the printer goes online.
rrinrtng tnveiopes
Printing Envelopes Using Generic Instructions
For the H P LaserJet IIISi:
1 Enter the default envelope size (COM-10, Monarch, DL) into your
software program. If your software does not allow you to select a
default envelope size, enter the size into the printer’s control
panel by following these steps:
a Click
mto take the printer offline.
once. FC:L (or P);: PF:It.4-r PiEtN, then
b Click
COFIES=l + appears in the display.
c Click
repeatedly (after i:iPI ES=1 *) until
PFIPER= [size] + (LETTER, LEGkl-, k4, EZ::EC) appears.
d Click Eluntil Et.IUELOPE= [size] (COPl19, PKit.IFiRC:, DL) appears.
e Click L3 until the desired envelope size appears in the display
(COtIlQ, MONFIRi:, DL). If your envelope size is not listed, choose
the next largest size (refer to table 2-1 for envelope sizes).
m
f Click
to save your selection. An asterisk
the display. Leave the printer offline.
“*” appears in
2 Enter landscape orientation into your software application. If
your software does not allow you to select orientation, select
landscape orientation from the control panel by following these
steps:
once. t~iF;IEt.~TRTIOt.~=P+ appears.
a Click
b Click p31 to select 1- for landscape. The display reads
ORIEt4TFITIOt+L.
c Click
mto save your selection. An asterisk “:e”
appears in
the display.
m.
d Click
The display should read Kid PC’L f?fZFi[:.V (or
69 FS REFIDC). You have completed entering commands into the
control panel.
~~~
3 Set the margins for your address in your software application:
~
~
rrinring tnveiopes
Printing Envelopes Using Generic Instructions
a For a mailing (destination) address only, set the top and left
margins. For example, for COM-10 envelopes, select a top
margin of approximately 12 lines (2 id50mm) and a left
margin of approximately 3.5 id99mm. Type the address on
your screen.
b For an envelope with a return address and a mailing address:
1 Set the top and left margins for the return address. (For
optimum print quality, position these margins no closer than
about .6 id15 mm from the edges of the envelope.)
2 Type the return address on your screen.
3 Move the cursor down one inch from the bottom line of the
return address and tab over about 3 in from the left margin.
4 Type the mailing address. When completed, your screen
should look like that of an addressed envelope.
c
Type one mailing address per page (this means a return
address and mailing address or just a mailing address).
Separate each address with a page break.
d Print the envelope.
Note
When you finish printing envelopes and want to return to
printing on paper, restore the printer to its factory defaults. Take
until
the printer offline, and click and hold
89 PlENI-I RESET appears in the display. The display automatically
returns to 88 F'CL RERW (or 88 PS REI") and the printer goes
online.
rrinring tnveiopes
Printing Envelopes Using a BASIC Program
Printing Envelopes Using a BASIC Program
If you are unable to print envelopes using your software, this
BASIC program can be used to print a mailing (destination only)
address.
4 Access your BASIC program.
5 Enter the following BASIC commands into your computer:
10 LPRINT CHR$(27);"E"; :REM Reset
2 0 LPRINT CHR$(27);"&;k'6h81alo3E";
3 0 LPRINT CHR$(27);"&a40L";
4 0 REM: Move down 1incW22mm
5 0 LPRINT CHR$(27);"*~+450Y";
60; LPRINT "Mailing Address"
7 0 LPRINT "PO Box 123"
80; LPRINT "12345 Chinden Blvd"
9 0 LPRINT "Boise, ID 84321-1234''
100; LPRINT CHR$(27);"E"; :REM Reset
6 Type SAVE "ENVELOPE" and click
7 Type RUN and click
riiiiiiiig ciivaiul~as
Printing Envelopes Using a BASIC Program
The printer should print an envelope similar to the one in figure
3-1. If it does not, recheck your BASIC commands. They may be
entered incorrectly.
Figure 3-1
Printing an Envelope from a BASIC Program
Note
If you are printing more than one envelope with this BASIC
program, replace the name and address with a new name and
address for each envelope.
4
t
Trouubleshmting Envelope Feeder
Problems
i roumesnooring tnveiope
reeaer rroDiems
Envelope Printing Problems
Envelope Printing Problems
Three factors that often cause envelope printing problems are:
Envelopes are not constructed well.
Envelopes do not meet specifications.
0
Envelopes are stored improperly.
This chapter contains information to help you recognize and solve
these and other problems you may encounter while using the
envelope feeder.
I ruuu~es~~uuui~y
c~~veiupe
reeuei
riuuieiii~
Control Panel Messages
Control Panel Messages
Messages may appear on the control panel display asking you to
perform a task before printing continues. The following table lists
messages associated with the HP LaserJet printer and envelope
feeder, along with recommended action.
Table 4-1
Control Panel Messages
Message
Description
Recommended Action
18 RESET TO SRUE
Changes to the Printing Menu have
been made while data, temporary
fonts or macros are still present in
printer memory.
Reset the printer to confirm the
acceptance of your selections
(temporary macros, temporary fonts,
and buffered data will be deleted). If
you press
or
instead, your changes are still
recorded in the menu (marked with an
but will not become
asterisk
active until the next time the printer is
reset via software or the control panel.
Open the printer’s top cover and look
for the jammed envelope or paper.
Remove the jammed envelope or
paper from the printer location as
shown in figure 4-3 (refer to your
printer’s user‘s manual for more
information). If necessary, remove
envelopes from the feeder and upper
paper tray. Printer’s top cover must
be opened and then cI
to
error message. Press
resume operation.
‘I*”),
13. x
13.1
13.2
13.4
PFIPER JAM
INTERNL JRM
INFUT JRM
UClTPClT .JRM
Envelope or paper is jammed in the
paper path. The decimal values (-1,
.2.,.4) indicate the general area
where the jam is located. See figure
4-3 to locate these areas.
1
I
r
n
I roumesnootingtnvelope feeder
Problems
Control Panel Messages
Table 4-1
Printer Attendance Messages cont’d
Message
EE LORD [Size]
EE TF:RY=[size]
Description
RecommendedAction
Printer requests an envelope size not
currently loaded; [size] may be:
c:i:itm, mtwm:, or DL..
Printer recognizes the feeder and
requests an envelope size.
Install the requested envelope size or
to override the
press
request.
Make sure the envelope size
displayed on the control panel
matches the envelope size loaded in
the feeder; if not, press Eluntil the
correct envelope size displays. Press
then
Load envelopes. The display reads
The envelope feeder is empty.
the last envelope size selected for any
tray.
Printer requests a paper tray size that Load the correct upper paper tray and
is not currently loaded (or tray is
the printer will continue, or press
empty); [size] may be w,EXEC,
to use the installed tray.
(Clipping may occur if the paper is the
LETTER, or LEGRL..
wrong size.)
The envelope feeder is not installed. Install the envelope feeder and load
the correct envelopes or, press
to override. Overriding
the message will not change the size
of the printable area.
The envelope feeder is not installed. Install the envelope feeder and load
the correct envelopes or, press
to override. Overriding
the message will not change the size
of the printable area.
m,
EE TERY EPlPTY
I-IC: LORD [size]
m
LIE LORD
[size]
m
ME FEED [Size]
m
For instructions about other printer errors, service, or attendance
messages, refer to your HP LaserJet printer user’s manual.
TrOUbleStIOOtlng tnvelope t-eeder problems
Common Problems
Common Problems
The following problems may occur during operation of your
envelope feeder.
Note
Refer to your printer user’s reference manual for information
about envelope specifications and for troubleshooting help.
Prints on Paper Instead of Envelopes
Problem: The address prints on a piece of paper instead of the
envelope.
Solution: The most likely cause is that software commands are
overriding control panel settings. Refer to the HP LaserJet
Software Application Notes for your printer for information about
printing envelopes with your software, or consult your software
documentation. If you are using a BASIC program, you may have
mistyped the command. Check t o see that all commands are
typed properly.
Envelope Wrinkling
Problem: Envelopes are wrinkled after printing.
Solutions: Before inserting envelopes into the feeder, run a pen
or pencil over the envelope edges to flatten them. A long-term
solution is to use envelopes with tight construction and sharply
creased folds. (Baggy construction may cause an envelope to
buckle as it passes through the printer.) When storing
envelopes, make sure they lie flat so the edges will not be
damaged.
I routxesnoottngtnveiope Feeder Problems
Common Problems
Envelopes Jam or Feed Incorrectly
Problem: Jams may occur when envelopes are:
1 Poorly manufactured (edges not straight or square, or edges with
more than two thicknesses of paper).
Solution: Refer to the envelope specifications or contact your
supplier to purchase envelopes manufactured to more exacting
tolerances.
2 Not creased sufficiently to have sharp edges.
Solution: Crease the leading edge of the envelope.
3 Affected by curl or wrinkles, or have bent or damaged edges.
Solution: Use envelopes with thin and sharply creased edges.
4 Too stiff or heavy (will not feed or pass through the printer).
Solutions: Use lighter-weight envelopes (do not exceed 28 lb/105
g/m2). Make sure envelope side guides are not tight against
envelopes.
5 Too shiny (smooth) or highly textured (rough).
Solution: Change to a different type of envelope.
6 Overloaded in the feeder.
Solution: Reduce the stack height. Maximum stack height is
100 envelopes or 75 mm.
7 Inserted incorrectly into the envelope feeder.
Solution: Make sure the envelope stack is square and uniform
(see figure 4-1).The leading edges of the envelopes should rest
against the back wall of the envelope feeder.
I I U U U l G 3 l l U U l l l l ~CIIVGIUc)G TGGUGI rIUUIGIII3
Common Problems
8 Shuffled or fanned.
Solution: Minimize handling envelopes after removing them
from their package. (You may need to fan DL envelopes because
the self adhesive label tends to make envelopes stick together.)
Paper Feeds with an Envelope
Problem: Paper pulls from the upper tray along with the
envelope.
Solution: Remove jammed paper and envelope. Pull out the top
paper tray and remove all but two to five sheets of paper.
Continue your job.
Multiple Envelopes Feed at Once
Problem: Two or more envelopes feed at the same time.
Solutions: Discard the damaged envelopes. Reload envelopes
into the feeder with the edges of the envelopes uniform (see
figure 4-1A). Do not load the envelopes with uneven outside
edges (see figure 4-1B).Make sure envelope flaps are not
overlapping. If this problem continues, try a new box of
envelopes or change to a different type of envelope.
Figure 4-1
Loading EnvelopesCorrectly
I rouoiesnooring
envelope reeaer rrooiems
Common Problems
Image Problems
Problem: Shading appears in background areas on the envelope.
Solution: Increase the print density setting inside your printer
(make it darker) as shown in figure 4-2.(After printing
envelopes, readjust the density dial for your next print job.)
Figure 4-2
Adjusting Print Density
I I U I J U I G ~ I I U U ~ ILI II ~
I V G I U ~ G I-UGUGI
r IUUIGIIIJ
Common Problems
Return Address Image Problems
Problem: Characters in the return address appear bold or
smudged.
Solutions: Move the return address further from the corner of
the envelope. It should be no closer than .6 id15 mm from the
edge. Also, the area of the return address is thicker than the rest
of the envelope; try to flatten the corner with a pen or pencil. If
the problem continues, configure your software or BASIC
program to print in reverse landscape. This requires inserting
the opposite end of the envelope into the feeder first (that is,
instead of inserting envelopes so that the top of the envelope
faces the left side of the feeder, insert envelopes so the top faces
the right side). The BASIC command for selecting reverse
landscape is:
20 LPRINT CHR$(27);”&l6h8la303E“;
Replace line 20 of the BASIC program listed in the section
“Printing Envelopes Using a Basic Program” (chapter 3) with this
line.
Marginal Print Quality
Problem: Print quality is poor.
Solution: Position addresses so print is not over envelope seams
or closer than .6 i d 1 5 mm from the envelope edge. If you suspect
a print quality problem with your printer, run an envelope
self-test by following the instructions in “To Print an Envelope
Self-Test,”in this chapter, to verify operation of your feeder.
Blank Envelopes
Problem: Envelopes feed correctly but nothing prints.
Solution: Check margin settings and envelope size selection.
Make sure commands are entered correctly if you are using a
BASIC program. Be careful to distinguish between the lower
case letter 1 (e) and the number one (1)and the number zero (0)
and an uppercase letter 0.
I rouDiesnooting tnvelope Feeder Problems
Clearing Envelope Jams
Clearing Envelope Jams
When an envelope (or piece of paper) jams along the paper path,
the control panel display shows one of the 13.x PAPER J A M
messages as explained in the section “Control Panel Messages” in
this chapter. Follow these instructions to remove jammed
envelopes or paper.
1 Open the printer top cover and examine the areas shown in
figure 4-3.
Figure 4-3
Envelope Paper Path
1. Envelope feeder pick-up area
(error message 13.2)
4. Fuser assembly area
(error message 13.1)
2. Paper pick-up area
(error message 13.2)
5. Paper output area
(error message 13.4)
3. Image transfer area
(error message 13.1)
CAUTION
Make sure to follow correct procedures in your printer user’s
reference manual for removing jammed envelopes and paper.
Printer damage may occur if envelopes or paper are not removed
properly.
I rouuasiiuouriy crivaiupa
raauai riuuieiiis
Testing the Envelope Feeder
2 Refer to your printer user’s reference manual for information on
correctly removing jammed envelopes and paper. You may need
to remove the envelope feeder and upper paper tray.
3 Re-attach the upper paper tray and envelope feeder if you
removed them.
4 Close the printer’s top cover.
Note
The printer’s top cover must be opened and then closed to clear
the 13.x PWER JkPl message.
6 Click
when 88 REnD’r’ (HP LaserJet 4Si)/80 F?::l-. F:ft1’7[>~~‘
or
REUDY(HP LaserJet IIISi) displays on the control panel.
The printer automatically continues with your job.
08 PS
%sting the Envelope Feeder
If you are unable to correct the problem you are experiencing
while printing envelopes, it may be that the envelope feeder is
not working correctly. Running an envelope self-test determines
if the printer can pull an envelope from the feeder and print it.
This eliminates the feeder and printer as the problem area, and
indicates that the problem may be incorrectly entered software or
BASIC commands, or other software problems.
Before running this test, make sure the feeder is installed
correctly. Read through the instructions in the section,
“Installing the Envelope Feeder” in chapter 2 to check feeder set
up. Then, run the self-test to verify operation of the feeder.
I roubiesnooting tnvelope Feeder problems
Testing the Envelope Feeder
To Print an Envelope Self-Test
Read through these instructions first to familiarize yourself with
the procedures.
1 Load a stack of envelopes in the feeder (refer to "Loading
Envelopes" in chapter 2 for instructions on loading envelopes in
the feeder).
2 Turn the printer's power switch ON. If the printer is already
ON, turn it OFF, then back ON again.
Note
You must change envelope size within the 10 second limit, before
the display changes to 88 ERC:+.I' (HP LaserJet 4Si)/
88 PCL RERLlY or 88 PS RERLW (HP LaserJet IIISi) and the printer
goes online. If the printer goes online before you select the
envelope size, turn the printer OFF, then ON again, to return the
display to envelope size.
3 The display changes to f:f_
TF:F:h'=[last
size selected]
4 If you want to change envelope size, click the
:e.
113 key until the
size you want displays.
Note
If the display changes to 88 RE!X:IY (HP LaserJet 4Si)/W PC:L..
RERDY or 88 PS RERD'f (HP LaserJet IIISi) before you have a
chance to switch envelope size, remove the envelopes from the
feeder and reinsert them. The display will read
EETRRY=[ZUS~
size selected]* again and you can select the desired
size.
to save your selection. An asterisk "$'appears in
6 Click
the display.
6 Click
m.
The display shows $38 f;!t:(K~Y (HP LaserJet
LaserJet IIISi) and the Ready
4Si)/88FCL REiWf or 88f:'S FEM::V(HP
indicator will light.
I rouuiesrioowig criveiupe
reeuei rruuieiiis
Testing the Envelope Feeder
7 Select the envelope size in the Print Menu:
For the HP LaserJet 4Si:
a Click
b Click
magain to take the printer offline.
once. PF.1t m tKi MEt4-l will appear in the display.
c Click
repeatedly until fww?=[sizel(LETTER, LEM.,
EXEC) appears.
d Click
I%$,
(iXiM161, tKit..liiRC, bL).
until you reach Et.~i...IELrJrE:=[size_7
e Click E3 again until the desired envelope size appears in the
display ( C O t l i 8 , IlOblRRr-:, Lt). If your envelope size is not listed,
choose the next largest size. (Refer to table 2-1 for a list of
envelope sizes.).
to save your selection. An asterisk "+" appears in
f Click
the display.
m
until
until TEST IIlEt4-l displays. Click
SELF TEST displays, then click
86, PRIHTIt43 TE:!?T
g Click
m.
displays and an envelope similar to the one in figure 4-4prints.
For the HP LaserJet IIISi:
a Click
magain to take the printer ofnine.
b Click
once. PCL (or PS) P R : M ' PlEt4...I,then
COPIES=i + appears in the display.
c Click
m
repeatedly (after I::::I:IPIF?+~ displays) until
PRPER=[size] (LETTER, LEGML, (74, E::.::E:C) appears.
I rouDiesnooring tnvelope
Peeder Problems
Testing the Envelope Feeder
113 again until the desired envelope size appears in the
display (i:i:i1418, tWt#%X:, Ed.). If your envelope size is not listed,
choose the next largest size. (Refer to table 2-1 for a list of
envelope sizes.)
e Click
to save your selection. An asterisk "3" appears in
f Click
the display.
until 80 FDc:L- i?E:RE++ (or 88 FI'S REt3Eh') displays. Hold
down
. until 05 SELF:
displays, then
release the key. After a few seconds, 8G F%I t.II" T tEi -I'E:?-r
displays and i n envelope similar to the one in figure 4-4prints.
g Click
Figure 4-4
Envelope Self-Test Printout
8 If the envelope does not print, the feeder may need repair. First,
rerun the self-test and make sure all commands are entered
correctly. If the test still fails, call the dealer from whom you
purchased the feeder. You may need to send the feeder in for
service. If so, refer to the next section, "Customer Support," for
warranty and service information.
9 If the envelope prints correctly, the problem lies with software,
control panel commands, or BASIC program commands. Check
your software manual and verify commands. You may also want
to call your software vendor for information on envelope printing.
~~
~
-
I rouaiesnooring envelope reeaer rroDiems
Customer Support
Customer Support
Hewlett-Packard offers the support services listed below. To
troubleshoot your envelope feeder, first, refer to your manuab);
next, call your dealer; then call Hewlett-Packard's Customer
Support Center.
Refer t o the Manuals
This manual, your printer user's reference manual, and the HP
LaserJet Software Application Notes for your printer provide the
information you need to set up, use, and troubleshoot the
envelope feeder on your own. Research these manuals first to
find answers to your questions before calling your dealer or the
Hewlett-Packard Customer Support Center.
Call Your Dealer
If you are unable to find what you need in the manuals listed
above, call the dealer from whom you purchased the feeder. Your
dealer understands your software and equipment and can help
you solve most problems.
Call Hewlett-Packard's Customer Support Center
If your dealer cannot help you, call Hewlett-Packard's Customer
Support Center. This option connects you to a group of support
personnel in Boise, Idaho, who can answer questions about your
HP LaserJet printer and envelope feeder. Call 1-208-323-2551,
Monday through Friday from 7 AM to 6 PM, Mountain Time
(Wednesday 7 AM to 4 PM).
Before you call, however, make sure you referenced your manuals
for answers to your questions or asked your dealer for help. If
you call the support center, please have the model number of
your equipment handy. Also, if possible, call from a phone close
to your equipment, as you may need to operate your equipment
while talking with support center personnel.
I rouDleshootingEnvelope Feeder Problems
Limited Warranty
Call Worldwide Sales and Support Offices
Hewlett-Packard products are sold and supported worldwide
through HP Sales and Support Offices. To locate the one nearest
you, use your telephone directory or contact one of the major HP
offices listed in the back of you HP LaserJet printer user’s
manual.
Limited Warranty
Hewlett-Packard warrants this product against defects in
materials and workmanship for one year from the date of
purchase. If HP receives notice of such defects during the
warranty period, HP will replace the product which proves to be
defective. Should HP be unable to replace the envelope feeder
within a reasonable amount of time, you will receive a refund of
the purchase price.
This warranty does not apply if the feeder has been damaged by
accident or misuse or as a result of service or modification by
other than an authorized Hewlett-Packard service facility. No
other express warranty is given by Hewlett-Packard.
Hewlett-Packard is not liable for consequential damages. This
warranty is valid only in the country in which the product was
originally purchased.
Warranty Exclusions
The above warranty shall not apply to defects resulting from
improper or inadequate maintenance by the customer,
customer-supplied software or interfacing, unauthorized
modification or misuse, operation outside of the environmental
specifications for the product, or improper site preparation and
maintenance. Finding an envelope which will work reliably with
the feeder is the responsibility of the user.
I rouoiesnooting tnveiope keeaer rroDiems
Return Service
Warranty Limitat ions
Hewlett-Packard makes no other warranty, whether written or
oral, expressed or implied, with respect to this product.
Hewlett-Packard specifically disclaims the implied warranties of
merchantability and fitness for a particular purpose.
Some states or provinces do not allow limitations on how long an
implied warranty lasts, so the above limitations or exclusions
may not apply to you. However, any implied warranty of
merchantability or fitness is limited to the one-year duration of
this written warranty.
If this product (HP part number 2060A) fails within the
warranty period, return it to the place you bought it. Be sure to
include a copy of your purchase receipt with the returned
product. If you are unable to return the product where you
bought it, you can get a replacement by providing any authorized
HP dealer or HP Sales Office with the defective unit and its
purchase receipt.
Return Service
If you need to return your HP LaserJet envelope feeder (HP part
number C2060A), make sure that you:
0
0
0
Package it in the original carton. If the packing material is unavailable, wrap the feeder securely with other packing material.
Include a copy of the purchase receipt and attach it to the returned unit.
Write a brief explanation of the problem and place it inside the
package with the envelope feeder.
I rouDiesnooting tnvelope Feeder Problems
Return Service
Other Support Services
Several types of Hewlett-Packard maintenance agreements are
available to meet customer support needs. For more information
on these services, refer to your HP LaserJet user’s manual.
Index
1
10 RESET TO SAVE, 4-3
13.1 INTERNL JAM, 4-3
13.2 INPUT JAM, 4-3
13.4 OUTPUTJAM, 4-3
13.x PAPER JAM, 4-3
A
accesscover
removal, 2-5
replacement, 2-14
accessories, ordering from the catalog, iii
address margins, 3-5
address prints on paper, not envelope, 4-5
application notes, software, iii
B
background shading, problems with,
4-8
BASIC
command for reverse landscape, 49
print envelopes using, 3-8
blank envelope, remedy, 4-9
C
catalog
HP LaserJet accessories, iii
telephone number to order, iii
causes of print problems, 4-2
change from envelope to paper printing, 3-5
changing to paper printing, 3-5
chapter summary, v
clearing envelope jams, 4-1
common problems, 4-5 - 4-9
computer type, definition iv
control panel
10 RESET TO SAVE, 4-3
13.x PAPER JAM, 4-3
control panel messages, 4-3
EE LOAD [size], 4-4
EE TRAY EMPTY, 4-4
EE TRAY=[sizel, 2-12,4-4
enter envelope size, 3-3
enter landscape orientation, 3-4
error messages, 4-3
selecting envelope size, 2-12 - 2-13
service messages, 4-3
UC LOAD [size] 4-4
UE LOAD [size], 4-4
control panel messages, 4-3
conventions used in this guide i-4
Customer Support Center
telephone number, 3-2
customer support, 4-15
D
dealer
calling, 4-15
customer support, 4-15
density setting, 4-8
description of envelope feeder, 1-2
destination address, setting margins, 3-5
Direct Marketing Division (DMK),
phone number, iii
E
EE LOAD [size], 4-4
EE TRAY EMPTY, 4-4
EE TRAY=[sizel, 4-4
EETRAY=[size], 2-12
envelope feeder
closing lid, 2-11
description, 1-2
envelope pressure plate, releasing,
2-11
features, 1-2
feeder lid, illustration, 2-2
feeder pick-up area, location, 4-10
feeder tray extension, 2-2
fuser assembly area, location, 4-10
image transfer area, location, 4-10
installation, 2-3 - 2-6
loading envelopes into, 2-7 - 2-11
mounting posts, illustration, 2-2
operational problems, 4-11
paper output area, location, 4-10
paper pick-up area, location, 4-10
part number, C2060A, 1-4,4-17
parts illustration, 2-2
pressure plate, illustration, 2-2
removing access cover, 2-5
removing, 2-14 - 2-15
return service, 4-17
sensor, illustration, 2-2
side guides, adjusting, 2-9
side guides, illustration, 2-2
test to determine feeder problem,
4-11
tray extension, illustration, 2-2
unpacking, 1-4
warranty, 4-16
envelope self-test, illustration, 4-14
envelope self-test, printing, 4-12
envelope stack, adjust in feeder, 2-10
envelopes
address prints only on paper, 4-5
adjusting in feeder, 2-10
amount in feeder, 2-7
blank envelopes, nothing prints, 49
clearing jams, 4-10
COM-10, size, 1-3,2-13
DL, size, 1-3,2-13
generic printing instructions, 3-3
image problems, 4-8
inserted incorrectly, 4-6
inspect before loading, 2-7
jams, causes/solutions, 4-6
making print darker, 4-8
maximum quantity in feeder, 2-7
maximum size in feeder, 1-3
minimum size in feeder, 1-3
Monarch, size, 1-3,2-13
multiple envelopes feed at once, 4-7
nothing prints, 4-9
paper feeds along with, 4-7
print return address in reverse
landscape, 4-9
print using BASIC program, 3-8
printing problems, 4-2
printing return address, 3-5
printing using software, 3-2
return address image problems, 4-9
selecting using control panel, 2-12
selecting, 1-3
sending margins for mailing address, 3-7
size table, 2-13
specifications chart, 1-3
thickness specifications, 1-3
using preprinted addresses, 2-8
weight specifications, 1-3
wrinkling, 4-5
error messages
10 RESET TO SAVE, 4-3
13.1INTERNL JAM, 4-3
13.2 INPUT JAM, 4-3
13.4OUTPUTJA.M, 4-3
13.x PAPER JAM. 4-3
EE LOAD [size], 4-4
EE TRAY EMPTY. 4-4
EE TRAY=[sizel, 4-4
Tnrl pu-1
Index
ME FEED [size], 4-4
UC LOAD [size], 4-4
UE LOAD [size], 4-4
exclusions, warranty, 4-16
F
factory defaults, return to paper
printing, 3-7
features of envelope feeder, 1-2
feeder
closing lid, 2-11
description, 1-2
features, 1-2
feeder lid, illustration, 2-2
feeder pick-up area, location, 4-10
fuser assembly area, location, 4-10
image transfer area, location, 4-10
installation 2-3 - 2-6
loading envelopes into, 2-7 - 2-11
mounting posts, illustration, 2-2
operational problems, 4-11
paper output area, location, 4-10
paper pick-up area, location, 4-10
part number, C2060A, 1-4,4-17
parts illustration, 2-2
pressure plate, illustration, 2-2
removing access cover, 2-5
removing, 2-14
return service, 4-17
sensor, illustration, 2-2
side guides, adjusting, 2-9
side guides, illustration, 2-2
test to determine problem, 4-11
tray extension, illustration, 2-2
tray, illustration, 2-2
unpacking, 1-4
Warranty, 4-16
feeder pick-up area, location, 4-10
fuser assembly area, location, 4:lO
G
generic printing instructions, 3-3 3-7
H
help, phone number, 3-2
HP
Customer Support Center, 4-15
Sales Offices, 4-17
Customer Support Center telephone number, 3-2
I
image problems
background shading, 4-8
return address, 4-9
image transfer area, location, 4-10
installation
envelope feeder, 2-3 - 2-6
special paper tray cover, 2-4
italic type, definition, iv
J
jams
clearing, 4-10
envelope, causesholutions, 4-6
L
LaserJet accessories, catalog i-3
LaserJet IIISi User’s Reference Manual, i-3
LaserJet Software Application Notes
how to order, i-3, 3-2
lid
envelope feeder, closing, 2-11
envelope feeder, opening, 2-7
limitations, warranty, 4-17
loading envelopes into feeder, 2-7 - 211
M
mailing address, setting margins, 35
maintenance agreements, 4-18
manual
LaserJet 4Si Software Application
Notes, iii
LaserJet 4si Software ADDlication
Notes, 3-2
LaserJet 4Si User’s Reference Manual, iii
LaserJet IIISi Software Application
Notes, iii
LaserJet IIISi Software Application
Notes, 3-2
LaserJet IIISi User’s Reference
Manual, iii
ordering additional copies, iii
PCL 5 Printer Language Technical
Reference, iii
marginal print quality, remedies, 4-9
margins, settings for mailing address, 3-5
ME FEED [size], 4-4
messages
10 RESET TO SAVE, 4-3
13.1 INTERNL JAM, 4-3
13.2 INPUT JAM, 4-3
--
13.4 OUTPUT JAM, 4-3
13.x PAPER JAM, 4-3
control Danel. 4-3
EE LO^ [size], 4-4
EE TRAY EMPTY. 4-4
EE TRAY=[sizel, 4-4
UC LOAD [size], 4-4
UE LOAD [size], 4-4
mounting posts, illustration, 2-2
multiple feed, several envelopes feed
atonce 4-7
N
nothing prints on envelopes, 4-9
0
ofices, sales and support, 4-16
ordering accessories, iii
ordering manuals, iii, 3-2
other support services, 4-18
overview
of each chapter, v
of the manual, v
P
package contents, envelope feeder, 14
packing material, 1-4,4-17
paper
feeds along with envelope, 4-7
output area, location, 4-10
path jams, remedy, 4-10
pick-up area, location, 4-10
part number, C2060A, 1-4,4-17
parts of the envelope feeder, 2-2
PCL 5 Printer Language Technical
Reference Manual, iii
poor print quality, 4-9
preprinted addresses, position in
feeder, 2-8
print density setting, 4-8
print quality problems, 4-9
printer
control panel messages, 4-3
reset from envelope to paper printing, 3-5
printer access cover
removal, 2-5
replacement, 2-14
printing envelopes
using BASIC program, 3-8
using generic instructions, 3-3 - 3-7
using software, 3-2
printing on paper, not envelope, 4-5
Index
printing return address, 3-5
printing using reverse landscape, 4-9
printout, self-test, 4-14
problems
10 RESET TO SAVE, 4-3
13.1 INTERNL JAM, 4-3
13.2 INPUT JAM, 4-3
13.4 OUTPUTJAM, 4-3
13.x PAPER JAM, 4-3
background shading, 4-8
blank envelopes, nothing prints, 49
clearing envelope jams, 4-10
clearing paper path jams, 4-10
control panel messages, 4-3
customer support, 4-15
EE LOAD [size], 4-4
EE TRAY EMPTY, 4-4
EE TRAY=[size], 4-4
envelope feeder operation, 4-11
envelope jams, causes/solutions, 46
envelope wrinkles, 4-5
envelopes inserted incorrectly, 4-6
H P Customer Support Center telephone number, 4-15
image problems, 4-8
ME FEED [size], 4-4
multiple envelopes feed at once, 4-7
nothing prints on envelopes, 4-9
paper feeds along with envelope, 47
print quality, 4-9
prints on paper, not envelope, 4-5
return address print quality, 4-9
return service, 4-17
test to determine feeder problem,
4-11
UC LOAD [size], 4-4
UE LOAD [size], 4-4
R
related manuals
LaserJet 4Si Printer User’s Reference Manual, iii
LaserJet 4Si Software Application
Notes, iii, 3-2
LaserJet IIISi Printer User’s Reference Manu, iii
LaserJet IIISi Software Application
Notes, i-3,3-2
ordering additional manuals, iii
PCL 5 Printer Language Technical
Reference Manual, iii
replacement of paper tray, 2-15
return address
print quality, 4-9
setting margins, 3-5
return service
procedure, 4-17
reverse landscape, printing return address, 4-9
13.2 INPUT JAM, 4-3
13.40UTPUTJAM, 4-3
13.x PAPER JAM, 4-3
background image problems, 4-8
blank envelopes, 4-9
clearing envelope jams, 4-10
clearing paper path jams, 4-10
control panel messages, 4-3
Customer Support Center telephone number, 4-15
customer support, 4-15
EE LOAD [size], 4-4
EE TRAY EMPTY, 4-4
EE TRAY=[sizel, 4-4
envelope feeder operation, 4-11
envelope jams, 4-6
envelope wrinkles, 4-5
envelopes inserted incorrectly, 4-6
feeder problems, 4-2
ME FEED [size], 4-4
multiple envelopes feed at once, 4-7
nothing prints on envelopes, 4-9
paper feeds along with envelope, 47
print quality, 4-9
printing on paper, not envelope, 4-5
printing problems, 4-3
return address print quality, 4-9
return service, 4-17
test to determine feeder problem,
4-11
UC LOAD [size], 4-4
UE LOAD [size], 4-4
S
Sales Offices, 4-17
selecting envelopes
foruse, 1-3
using control panel, 2-12
self-test
printing, 4-12
printout illustration, 4-14
setting mailing address margins, 3-5
shading on envelopes, 4-8
side guides, adjust against envelopes, 2-9
size selection, envelopes, 1-3,2-13
software
LaserJet 4Si Software Application
Notes, iii, 3-2
LaserJet IIISi Software Application
Notes, iii, 3-2
printing envelopes using, 3-2
special cover, upper paper tray, 2-4
specifications chart for envelopes, 13,2-13
stack height, envelopes in feeder, 2-7
summary of each chapter, v
support
Customer Support Center telephone number, 4-15
customer, 4-15
services, 4-15
T
Technical Reference Manual, iii
telephone number
Customer Support Center, 3-2,415
to order catalog, iii
to order manuals, iii
test feeder operation, 4-11
tray, illustration, 2-2
troubleshooting
10 RESET TO SAVE, 4-3
13.1 INTERNL J A M , 4-3
U
UC LOAD [size], 4-4
UE LOAD [size], 4-4
unpacking the feeder, 1-4
upper paper tray
removal, 2-3
replacement with special cover, 2-4
W
warranty, 4-16
exclusions, 4-16
limitations, 4-17
Worldwide Sales and Support Offices, 4-15
wrinkling, envelopes, 4-5
Index-3
,
Index-4
0893SZ3
PRINTED IN JAPAN
08/93
HEWLETT
PACKARD
Copyright 0 1993
Hewlett-Packard Company
Printed in Japan 3/93
Manual Part No.
C2060-90904
Printed on
Recycled Paper
C2060-90904