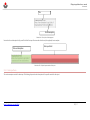
1
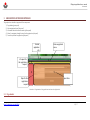
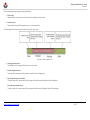
Filling out application form – manual User manual Document version : 1.0.0 Date of creation : 20.12.2010 CENTRAL REGISTRY OF REPUBLIC OF MACEDONIA Blvd. Kuzman Josifoski Pitu Nr.1 1000 Skopje Tel.: + 389 2 3290-241, + 389 2 3290-248 Fax: + 389 2 3123-169 www.crm.com.mk Filling out application form – manual http://e-submit.crm.com.mk/efiling 2|2 7 Filling out application form – manual User manual DOCUMENT HISTORY Version Author Date Changes 1.0.0 CRRM 20.12.2010 Initial version of the Manual. http://e-submit.crm.com.mk/efiling 3|2 7 Filling out application form – manual User manual USED TERMS Name Description CRRM Central Registry of RM OSS2 One Stop Shop System, Phase 2 (ONE STOP SHOP SYSTEM FOR REGISTRATION OF TRADE COMPANIES) http://e-submit.crm.com.mk/efiling 4|2 7 Filling out application form – manual User manual CONTENTS 1 2 INTRODUCTION ................................................................................................................................................................................................................................................................ 7 1.1 ABOUT THE DOCUMENT............................................................................................................................................................................................................................................................... 7 1.2 WHO IS THIS DOCUMENT INTENDED FOR? ....................................................................................................................................................................................................................................... 7 ORGANIZATION OF THE USER INTERFACE ......................................................................................................................................................................................................................... 8 2.1 PAGE HEADER............................................................................................................................................................................................................................................................................ 8 2.2 MAIN NAVIGATIONAL MENU......................................................................................................................................................................................................................................................... 9 2.3 INFORMATION ABOUT THE ACTIVE DOCUMENT ............................................................................................................................................................................................................................... 12 2.4 NAVIGATION MENU FOR THE REGISTRATION STEPS .......................................................................................................................................................................................................................... 14 2.5 INPUT FORM FOR DATA REGISTRATION.......................................................................................................................................................................................................................................... 14 2.5.1 Name and short description of data ........................................................................................................................................................................................................................... 16 2.5.2 Data input form ........................................................................................................................................................................................................................................................... 17 2.5.3 Navigation buttons and buttons for saving or cancelling data ................................................................................................................................................................................... 21 2.5.4 Application for Status Changes ................................................................................................................................................................................................................................... 22 2.6 RESETTING AND DELETION OF APPLICATION FORMS ......................................................................................................................................................................................................................... 23 2.7 ATTACHMENTS ........................................................................................................................................................................................................................................................................ 25 2.8 DOWNLOADING A RECEIPT ......................................................................................................................................................................................................................................................... 26 http://e-submit.crm.com.mk/efiling 5|2 7 Filling out application form – manual User manual ILLUSTRATIONS ILLUSTRATION 1 – ORGANIZATION OF THE GRAPHICAL USER INTERFACE AT THE HIGHEST LEVEL. ................................................................................................................................................................................. 8 ILLUSTRATION 2 –NAVIGATION IN THE HEADER OF THE GRAPHICAL USER INTERFACE ................................................................................................................................................................................................ 9 ILLUSTRATION 3 – MAIN NAVIGATIONAL MENU ............................................................................................................................................................................................................................................. 10 ILLUSTRATION 4 – MENU FOR TYPES OF REGISTRATION.................................................................................................................................................................................................................................... 11 ILLUSTRATION 5 - SECTION WITH GENERAL INFORMATION ABOUT THE OPENED DOCUMENT.................................................................................................................................................................................... 12 ILLUSTRATION 5 – MENU FOR DATA CATEGORIES FOR TYPE OF REGISTRATION ...................................................................................................................................................................................................... 14 ILLUSTRATION 7 – FORM FOR DATA CATEGORY FOR THE LEGAL ENTITY ................................................................................................................................................................................................................ 15 ILLUSTRATION 8 – INPUT FORM FOR DATA CATEGORY FOR REGISTRATION TYPE. .................................................................................................................................................................................................... 16 ILLUSTRATION 9 – DESCRIPTION OF DATA SEGMENT ........................................................................................................................................................................................................................................ 17 ILLUSTRATION 10 – GRAPHICAL REPRESENTATION OF THE PARTS ....................................................................................................................................................................................................................... 17 ILLUSTRATION 11 – DATA INPUT FIELD ......................................................................................................................................................................................................................................................... 18 ILLUSTRATION 12 – CONTROL FOR SELECTION OF A SUB-LIST WITH PRE- DEFINED VALUES ....................................................................................................................................................................................... 19 ILLUSTRATION 13 – GRAPHICAL REPRESENTATION OF DATA LIST ........................................................................................................................................................................................................................ 20 ILLUSTRATION 14 – CONTROL FIELDS FOR NAVIGATION THROUGH DATA GROUPS / FORMS FOR INSERTING DATA ......................................................................................................................................................... 21 ILLUSTRATION 15 – NAVIGATION BUTTONS FOR TYPE OF REGISTRATION.............................................................................................................................................................................................................. 22 ILLUSTRATION 16 – HOME PAGE FOR STATUS CHANGES ................................................................................................................................................................................................................................... 23 ILLUSTRATION 17 – RESETTING APPLICATION FORM ........................................................................................................................................................................................................................................ 23 ILLUSTRATION 18 – DELETING AN APPLICATION FORM ..................................................................................................................................................................................................................................... 24 http://e-submit.crm.com.mk/efiling 6|2 7 Filling out application form – manual User manual 1 INTRODUCTION This document is a manual for use of web based solutions for a part of the services offered by the Trade Registry and the Registry of other legal entities, the Registry of Pledge and Leasing. 1.1 About the document The document offers description about the graphical user interface and the specific controls of the system that the applicants can use. 1.2 Who is this document intended for? The document is prepared for the users of the system, i.e. the applicants in the Trade registry and the Registry of other legal entities, the Registry of Pledge and Leasing. http://e-submit.crm.com.mk/efiling 7|2 7 Filling out application form – manual User manual 2 ORGANIZATION OF THE USER INTERFACE The graphical user interface is organized in five components: 1) 2) 3) 4) 5) Page header (green panel) Main navigational menu (blue panel) Information about the active document (yellow panel) Menu for navigation through the steps for the registration (red panel) Form for input data for registration (pink panel) Header, application info Info panel for the registration request Main navigational menu 1 3 4 2 5 Input form Steps for the registration request Illustration 1 – Organization of the graphical user interface at the highest level. 2.1 Page header http://e-submit.crm.com.mk/efiling 8|2 7 Filling out application form – manual User manual This part of the graphical user interface contains data about the logged user and links for logging out or for viewing his profile details. The following illustration offers a preview of the right side of the page header. Name and surname of the sender 1 Links to the sender’s profile page 2 The user is logged out, redirects to the log in page 3 Illustration 2 –Navigation in the header of the graphical user interface 1) Name of user Name of active user in the system is displayed. 2) My profile A link to a page containing all details about the user account. The user can edit account information using the form on the page. 3) Log out This link will log the user out of the system. Once you click this link, the system will delete the token with the details for your user name and will redirect you to the log on page. After logging out, the user will not be able to use functionalities of the protected part of the system. In order to access the protected part again, the user is required to authenticate again. RECOMMENDATION: It is recommended that the user logs out of the system after completing all activities, especially if the system is used by publicly available printers. 2.2 Main navigational menu This part of the navigational menu is located under the header and contains the links that lead to the functionalities available for the user. http://e-submit.crm.com.mk/efiling 9|2 7 Filling out application form – manual User manual The main navigational menu is organized in two logical entities: Public section Options visible for the anonymous users of the unprotected, public part of the system. Protected section Options visible and accessible for registered users, i.e. authenticated users. The following illustration shows the basic principles from the drop- down menu: Illustration 3 – Main navigational menu Home page (public section) This link leads to the home page of the public section of the system. Preview of application forms This option links to a page that lists all applications created by the active (logged) user. Type of registration (protected section) This option opens a drop- down menu with links to pages which enable creation of application form for registration. Status changes (protected section) This option opens a drop- down menu with links to pages that enable creation of application forms for Status changes. http://e-submit.crm.com.mk/efiling 10 | 2 7 Filling out application form – manual User manual Illustration 4 – Menu for types of registration Information This option triggers a drop-down menu containing links to content that offers help to the new, existing and potential users of the system, on topics such as requirements for use of the system, options, etc. http://e-submit.crm.com.mk/efiling 11 | 2 7 Filling out application form – manual User manual You can learn about the following content: o o o What services does the system offer? What do I need to use the system? Frequently asked questions Guidelines This option triggers a drop down menu with links that lead to content that can help the user make the most of the system. The information includes: o o o o o o How can I create a user account in order to become an applicant? How can I fill out the application? How can I digitally sign the application form? How can I digitally sign documents? How can I register employees and health policy holders? How can I pay for the registration? 2.3 Information about the active document Part of the graphical user interface that contain information about the currently opened document. The next illustration shows data that is usually displayed in this section. Illustration 5 - Section with general information about the opened document This section offers just a preview of the following data: Registration type The field offers description about the selected type of registration. This information shows type of description about the opened document. This information can be seen when the document for registration is selected. Journal ID number This is the unique ID about the created document for registration. http://e-submit.crm.com.mk/efiling 12 | 2 7 Filling out application form – manual User manual This number is generated once the application form is sent to a representative of CRRM. Upon dispatch, this information will appear in the general information section of the application form (the document). Status Information about the status of the application from the moment it is created to its final processing (Decision about the application) LEID Legal Entity Identification Number Created Date and time of creation of the application form (the document). Submitted Date and time of application. Date and time of sending the document to a representative of CRRM. http://e-submit.crm.com.mk/efiling 13 | 2 7 Filling out application form – manual User manual 2.4 Navigation menu for the registration steps The application form is organized in several smaller categories, accessible through the links in the menu for type of registration. (See illustration 5). The following list includes basic principles for work with the navigational menu for one type of registration. Filling out data in the application form for registration of a company is consecutive. The data is filled out from the first group of data onwards. You cannot fill out data in random order. All completed/ filled out groups of data from the menu can be selected for editing and updating of data. The navigation through the groups of data can be done via the buttons (see Illustration 15) for navigation, located in the lower part of the pink zone (See Illustration 1) The visual representation of the already completed/ filled out data group, the active group and the groups which remain to be filled out is displayed in the graphical illustration as follows: Active data category Data category already completed, which can be reselected in order to update data Data category not filled out yet. This group cannot be selected before the previous ones are completed. N.B.: This visualization is visible only in the browser Internet Explorer. Illustration 6 – Menu for data categories for type of registration 2.5 Input form for data registration Each data category that can be reached via the menu for navigation (see 2.4) contains various data. http://e-submit.crm.com.mk/efiling 14 | 2 7 Filling out application form – manual User manual Illustration 7 – Form for data category for the legal entity The forms which represent the graphical user interface for input and preview of the data for the various types of registrations are standardized and constitute of the following categories/ parts: 1) Name and short description of data (green zone) http://e-submit.crm.com.mk/efiling 15 | 2 7 Filling out application form – manual User manual 2) Panel for input of data (red panel) 3) Navigational buttons and buttons for saving and cancelling (blue zone) Input form fields Title and description of the form fields 1 2 3 Buttons for saving, canceling and going to the next step of the regsitration request Illustration 8 – Input form for data category for registration type. 2.5.1 Name and short description of data This part of the graphical user interface contains the names and short descriptions of each data that has to be input in the form. http://e-submit.crm.com.mk/efiling 16 | 2 7 Filling out application form – manual User manual Title Short description Illustration 9 – Description of data segment Next to the title and description field, you will find a field for input of business data that the user (the applicant) has to complete Title and description Data input field Illustration 10 – Graphical representation of the parts 2.5.2 Data input form This section comprises controls for data input. The following list provides short description of the specific controls for data input. http://e-submit.crm.com.mk/efiling 17 | 2 7 Filling out application form – manual User manual 1) Data input This control enables data input. If you click open the calendar icon, you can select a concrete date. Required data format is DD.MM.YYYY (Day.Month.Year)) Illustration 11 – Data input field 2) Select a sub-list of predefined values This control enables selection of values of a predefined list that can be filtered. This control includes several elements: o Filter for the value list (Element 1) When you enter at least two symbols in the text field, the values containing the two symbols appear in the filter. In this way, the long, pre- defined list can be filtered; o List of offered, possible values (Element 2) This element displays filtered predefined values; o List of approved values (Element 3) This element contains list of selected values; o Buttons for selection of values from the pre-defined list (Element 4) You can add or remove values in the two lists. (Both the one with pre-defined versions and the one with selected versions) o Preview of the full value title (Element 5) If you do a mouse over the concrete value on any of the lists, the full description of the value shall be displayed. http://e-submit.crm.com.mk/efiling 18 | 2 7 Filling out application form – manual User manual Buttons for adding and removing activity codes Data filter List of chosen activities 1 4 2 3 5 List of found activities View of full title of the activity Illustration 12 – Control for selection of a sub-list with pre- defined values http://e-submit.crm.com.mk/efiling 19 | 2 7 Filling out application form – manual User manual 3) Data list Part of the data that is inserted, represents more than one record. For example, they can be owners of the legal entity. In the parts of the form for filing out type of registration a control field is used as an illustration that follows, in order to display a list of more records/data. Link for selecting the row of data 3 5 Type of data 1 Actual data view 2 4 Buttons for adding, editing and deletion of data Paging control Illustration 13 – Graphical representation of data list o Name of data elements (Element 1) The element of the entire horizontal panel shows the names of data fields displayed for every record. The names are links that enable sorting of the records according types of data; o Part of data description (Element 2) This element contains part of the data for the concrete record that is to enable a preview of the records that are inserted and to the ones that already exist. http://e-submit.crm.com.mk/efiling 20 | 2 7 Filling out application form – manual User manual o Link for marking a concrete record (Element 3) If you mouse over the arrow of this element, the concrete record will be marked, which means that concrete activity can be undertaken for it, i.e. we can opt to update it or delete it. o Controls for browsing the pages from the list of records (Element 4) This element contains controls that enable browsing the pages of the list of records. The page displays five records per page. To see more records, you need to use the controls of this element; o Links for updating and deleting a marked record (Element 5) This element contains links for updating and deleting elements. You can use the links if you have marked a record previously. (see Element 3); 2.5.3 Navigation buttons and buttons for saving or cancelling data The navigation buttons forward and back, i.e. for going back to the previous data form and moving to the next, are located over the space with controls for input of data. Illustration 14 – Control fields for navigation through data groups / forms for inserting data http://e-submit.crm.com.mk/efiling 21 | 2 7 Filling out application form – manual User manual When you click the button previous or next, the system automatically saves the inserted data in the active part of the form. If the button is directly clicked from the menu that leads to data groups that have already been inserted, the system doesn’t automatically save the data. With this action the data which was inserted in part of the active form will be lost, unless you click the button Save. (see illustration 15) Illustration 15 – Navigation buttons for type of registration 2.5.4 Application for Status Changes If you would like to fill out an application form for status changes, select the registration via the main menu. The application forms for status changes differ from the others in the system. The system creates the application forms automatically, once you enter the following data: Type of status change Certificate Format Contact office Number of legal entities which are part of the status changes Valid LEIDs of legal entities http://e-submit.crm.com.mk/efiling 22 | 2 7 Filling out application form – manual User manual Illustration 16 – Home page for status changes Once you fill out all fields, click Save. The system will inform you that X number of application forms related to group Nr. XX. Submitting application form The applications related to one group will be sent to the authorized person in CRRM in the moment when the last application from the group is submitted by the applicant. The remaining applications have status “Completed input” until the last application is filled out and submitted. 2.6 Resetting and deletion of application forms Resetting If the Authorized person in CRRM asks you to change significant portion of the data you have submitted, you can reset the application form and start inputting data again. Also, if the registration is any type of Change, and the Authorized person suggested removal of any of the types of changes you have selected, simply with the reset function. Open the application form (the status has to be “Back for correction” or “Processing- Web”) and the tab e- Journal, click the button Reset. Illustration 17 – resetting application form Once you click the button, a security question pops up. Click Yes. http://e-submit.crm.com.mk/efiling 23 | 2 7 Filling out application form – manual User manual N.B.: When you reset the application form, all data is deleted, except the data in the tabs: E- Journal, Attachment and Payment (if the application form is already paid for, you will not pay again). Deleting If the application that you have created is not submitted (doesn’t have a Journal ID), and you would like to delete it, you can do that by clicking the button Delete on the preview page. First, select the application form that you would like to delete and click Delete. Answer the security question with Yes. Illustration 18 – deleting an application form N.B.: If you haven’t file an application for a longer period of time, the system will delete it automatically. http://e-submit.crm.com.mk/efiling 24 | 2 7 Filling out application form – manual User manual 2.7 Attachments In the menu in the second tab, Attachments, select type of attachment, and then click the button Upload Attachment. ILLUSTRATION 19 – Attachments N.B: The attachment has to be either .docx or .pdf, not larger than 4 MB and digitally signed. http://e-submit.crm.com.mk/efiling 25 | 2 7 Filling out application form – manual User manual 2.8 Downloading a receipt On the page for preview of registrations, select a confirmed registration. Then select Confirmation of receipt and click the button Generate. ILLUSTRATION 20 – Generating confirmation of receipt http://e-submit.crm.com.mk/efiling 26 | 2 7 Filling out application form – manual User manual After the generation a button Refresh appears. Click the button and after a few seconds the button Download appears. ILLUSTRATION 21 – Refresh button Then click the button download. ILLUSTRATION 22 – Download button The confirmation is downloaded in .PDF format, that you need Adobe Reader to be able to view it. http://e-submit.crm.com.mk/efiling 27 | 2 7