1
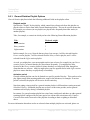
CentovaCast
User's Guide
Copyright 2007-2008, Centova Technologies Inc.
Published November, 2008
For CentovaCast v2.2
Table of Contents
1. Accessing Your Account.......................................................................................................................4
1.1. Logging In......................................................................................................................................4
1.2. Retrieving Your Password..............................................................................................................4
2. Dashboard..............................................................................................................................................4
3. Server Configuration..............................................................................................................................7
3.1.1. Stream.....................................................................................................................................7
3.1.2. AutoDJ....................................................................................................................................8
3.1.3. Start Page................................................................................................................................9
3.1.4. Files......................................................................................................................................10
3.1.5. Master Relaying....................................................................................................................11
3.1.6. Mountpoint Relaying............................................................................................................11
3.1.7. Advanced..............................................................................................................................12
3.1.8. Advanced: IceCast................................................................................................................13
4. Current Listeners..................................................................................................................................14
5. Statistics...............................................................................................................................................14
5.1. Recent Activity.............................................................................................................................15
5.2. Listeners.......................................................................................................................................15
5.3. User Agents..................................................................................................................................16
5.4. Countries......................................................................................................................................16
5.5. Tracks...........................................................................................................................................16
5.6. Historical Statistics.......................................................................................................................17
6. Server Logs..........................................................................................................................................18
7. Quick Links..........................................................................................................................................18
8. Code Snippets......................................................................................................................................19
8.1. Stream Status Summary...............................................................................................................19
8.2. Stream Details..............................................................................................................................19
8.3. On-demand Content.....................................................................................................................19
8.4. Recent Tracks...............................................................................................................................20
8.5. Song Requests..............................................................................................................................20
8.6. Tune In.........................................................................................................................................20
8.7. Alternate Character Encodings.....................................................................................................20
9. Playlist Manager..................................................................................................................................21
9.1. Creating a Playlist........................................................................................................................21
9.2. Editing a Playlist..........................................................................................................................21
9.3. Deleting a Playlist........................................................................................................................21
9.4. Enabling or Disabling a Playlist...................................................................................................21
9.5. Updating your Media Library.......................................................................................................21
9.6. Playlist Editor...............................................................................................................................21
9.6.1. General Rotation Playlist Options........................................................................................23
9.6.2. Scheduled Playlist Options...................................................................................................24
9.6.3. Interval Playlist Options.......................................................................................................26
9.6.4. Track Selection.....................................................................................................................26
10. Media Library....................................................................................................................................27
10.1. Browsing Media.........................................................................................................................27
10.2. Searching your Media................................................................................................................29
10.3. Album Covers.............................................................................................................................29
10.4. Managing Playlist Tracks...........................................................................................................30
10.4.1. Re-organizing Tracks..........................................................................................................31
10.4.2. Removing Tracks................................................................................................................31
10.4.3. Saving Changes..................................................................................................................31
10.4.4. Discarding Changes............................................................................................................31
11. Support...............................................................................................................................................32
12. Credits................................................................................................................................................32
CentovaCast
User's Guide
Section 1
Accessing Your Account
1. Accessing Your Account
1.1. Logging In
Your hosting provider should have provided a username and password to access your account, as well
as an URL at which you may login. To access your account, simply launch the login URL and enter
your username and password to login.
1.2. Retrieving Your Password
If you have forgotten your password, you may reset it using the Forgot password? link at the
bottom of the login page. Simply enter the E-mail address on file for your account, and instructions for
resetting your password will be sent to you via E-mail.
If you no longer have access to the E-mail account on file, you will need to contact your hosting
provider to have your password changed manually.
2. Dashboard
Immediately after logging in, you will be presented with the dashboard view for your account. The
dashboard provides the following information:
●
●
●
●
●
●
●
Current listeners: Indicates the number of listeners currently tuned in to your stream, as well as
the maximum number of listeners your stream will accomodate.
Host and Port: Indicate the hostname and port number of your stream, respectively.
Data transfer: Indicates the total data transfer used by your stream to for this month, as well as
your monthly data transfer limit.
Disk quota: Indicates the amount of disk space used by your uploaded media (if any), as well as
your disk space limit.
Maximum bit rate: Indicates the bit rate limit configured for your stream.
Projected data transfer: Indicates the amount of data transfer that your stream will use this
month if usage remains consistent for the remainder of the month.
Recent tracks: Provides a list of up to 10 of the most recently played songs or tracks on your
stream, as well as the times at which those tracks were played.
The dashboard, like all other pages in the client area, also provides a number of options for managing
your server. These options, shown grouped into sections at the left-hand side of the page, include:
●
The Realtime Stats section provides information about the status of the your stream, including
the following:
■ Listeners: indicates the number of listeners currently tuned-in to your stream.
Page 4 / 32
Copyright 2008, Centova Technologies Inc.
CentovaCast
User's Guide
■
■
■
●
●
Section 2
Dashboard
Server Status: indicates the status of your streaming server (online or offline).
Source Status: indicates the status of your streaming source (online, offline, or remote).
Source Connected: indicates whether or not a stream source is connected to your server.
The Management section provides options for managing the your account. These options are
described in detail below. They include:
■ Overview: Launches the dashboard, described above.
■ Configure Server: Provides access to the settings for your streaming server, described in
the Server Configuration section below.
■ View Current Listeners: Provides information about the listeners who are currently
listening to your stream at this moment in time.
■ View Statistics: Provides access to the statistics for your account, described in the
Statistics section below.
■ View Logs: Provides access to the logs for this account, described in the Server Logs
section below.
■ Server Administration: Provides access to the internal server administration interface
provided by your streaming server software (SHOUTcast or IceCast). For more
information, please consult the documentation for your streaming server software.
■ Quick Links: Provides a number of useful links and login information for managing and
working with your stream.
■ Code Snippets: Provides a number of JavaScript code snippets that you can use on your
own web site to display information about your stream.
■ Manage Playlists: Launches the playlist manager for your streaming source (if enabled),
described in the Playlist Manager section below.
■ Media Library: Launches your media library (if enabled), described under the Media
Library section below.
The Server Control section provides controls for stopping and starting your streaming server.
These options include:
■ Start Server: Starts your streaming server (and streaming source, if enabled).
■ Stop Server: Shuts down your streaming server (and streaming source, if enabled). This
will disconnect any listeners that may be tuned into your stream, and will take your
stream offline.
■ Restart Server: Shuts down your streaming server, then immediately starts it again. This
will disconnect any listeners that may be tuned into your stream. Restarting your server
may be necessary to apply certain configuration changes, and is equivalent to manually
stopping, then starting your server.
■ Reload Server: Attempts to re-load your server configuration and playlist without
disconnecting any listeners or interrupting your stream. This will apply many
configuration changes, but a full restart may be necessary in some cases.
■ Skip Song: Skips to the next song in your playlist. This option is only available if using
the server-side streaming source.
■ Deactivate Source: De-activates the server-side stream source (if enabled for your
account). If you want to switch from pre-programmed content to a live stream, you can
Page 5 / 32
Copyright 2008, Centova Technologies Inc.
CentovaCast
User's Guide
●
Section 2
Dashboard
use this feature to stop your server-side stream source before connecting your live
stream source. When you finish your live broadcast, simply disconnect your live stream
source and click the Activate Source button to re-activate your server-side stream source
and return to pre-programmed content.
A stream information bar is also displayed at the bottom of each page, and is updated
approximately every 30 seconds to reflect your stream's status. This includes the current track
and bitrate of your stream, your stream's name, and links to tune into the stream using various
media players.
Page 6 / 32
Copyright 2008, Centova Technologies Inc.
CentovaCast
User's Guide
Section 2
Dashboard
3. Server Configuration
Centova Cast provides access to a wide range of settings for your account which are broken down into
several tabbed sheets. Some settings may differ based on the type of streaming server or streaming
source being used by your hosting provider, and these differences are noted below.
The following tabs are available:
3.1.1. Stream
The stream tab includes general settings that will be required for virtually all accounts. These include:
Stream title
Specifies the title for the stream. This will be displayed by listeners' media players when they
tune into the stream.
E-mail address
Specifies your E-mail address. Centova Cast will automatically send notifications to this
address when necessary.
Company/organization
Specifies your company/organization name.
Website URL
Specifies the URL to the web site associated with this stream (if any).
Source password
Specifies the password required by streaming sources to connect to this stream and begin
broadcasting.
Administrator password
Specifies the password required to login to your Centova Cast account or the streaming server's
internal administrative interface.
Time zone
Specifies your time zone. This will affect the display of times in areas such as the Scheduled
Playlist editor.
Character encoding
Specifies your preferred character encoding. MP3 audio files do not contain any information
about the language or “character set” in which they were encoded, so if you are using a nonLatin character set (Russian, etc.), you will need to set your character encoding appropriately to
ensure that all of the letters in the alphabet of your language are interpreted correctly from your
Page 7 / 32
Copyright 2008, Centova Technologies Inc.
CentovaCast
User's Guide
Section 3
Server Configuration
media.
3.1.2. AutoDJ
The AutoDJ tab includes options for configuring your stream's autoDJ, if enabled by your stream
hosting provider. These settings are only required if you are permitted to upload media (MP3 files,
etc.) to the server. If you will be providing your own, offsite source (such as a live broadcast, using
something like WinAmp with the Oddcast plugin, or SAM Broadcaster) then the autoDJ may be
disabled.
Options include:
AutoDJ status
Specifies whether the server-side streaming source should be enabled. Options include:
● Disabled: If selected, server-side streaming support is turned off. This setting is
necessary if you plan to provide your own streaming source.
● Enabled: If selected, server-side streaming support will be turned on. This setting is
necessary if you plan to upload your media library to the server and will not be
providing your own streaming source.
Note that if the autoDJ is enabled, but no media (eg: MP3 files) have been uploaded, or media
has not been added to an enabled playlist, the server will fail to start. As such, be sure to upload
at least one track, and add one or more tracks to an enabled General Rotation playlist, before
starting the server with autoDJ support enabled.
Royalty reporting capability
If enabled, the autoDJ will include a small tracking code at the end of the song titles shown in
your listeners' media players. For example, instead of:
Artist Name – Song Title
You might see the following instead:
Artist Name – Song Title [C51B]
This allows detailed reports to be generated (on the Tracks tab of the View Statistics page)
containing most of the information needed to make reports to the appropriate entities for royalty
determination purposes.
If this option is disabled, the generated reports will be much less detailed and may not contain
sufficient information for accurate royalty reporting purposes.
Rebuild playlist on startup
Page 8 / 32
Copyright 2008, Centova Technologies Inc.
CentovaCast
User's Guide
Section 3
Server Configuration
Specifies whether the playlist should be rebuilt automatically every time the server is started or
restarted. If enabled, Centova Cast will re-index your media library and build a new playlist
every time the server is started or restarted. If disabled, the same playlist will always be used
unless you manually update it.
Note that if no playlist exists, Centova Cast will always build one regardless of this setting.
Also note that when Centova Cast is operating with realtime track scheduling support (i.e.,
when using ices-cc), this setting is ignored or hidden.
Randomize playlist
Specifies whether the playlist should be randomized automatically by the streaming source.
Enabling this setting is not recommended as it will interfere with Centova Cast's “Interval”
playlist type. Instead, set your “General Rotation” playlists to play in random order.
Note that when Centova Cast is operating with realtime track scheduling support (i.e., when
using ices-cc), this setting is ignored or hidden.
Genre
Specifies the genre of your stream.
Mount point
Note: this option may or may not be available depending on the server software being used by
your hosting provider. More specifically, this option is for IceCast servers only.
Specifies the mount point to which the streaming source should connect. If unsure, simply set
this to /stream as a default value.
Description
Note: this option may or may not be available depending on the server software being used by
your hosting provider.
Specifies a description for your stream, which is used when submitting metadata to various
directories.
3.1.3. Start Page
The Start Page tab includes options for configuring the stream “start page” provided by Centova Cast.
Activate start page
Specifies whether or not the start page will be available for your stream.
Enable song request widget
Specifies whether or not the Song Request widget will be enabled (both on the start page, and as
Page 9 / 32
Copyright 2008, Centova Technologies Inc.
CentovaCast
User's Guide
Section 3
Server Configuration
a code snippet). If enabled, users may use the song request widget to request songs, and the
requests will be sent to your E-mail address.
Enable on-demand content widget
Specifies whether or not the On-Demand Content widget will be enabled (both on the start
page, and as a code snippet). If enabled, Centova Cast will provide a media browser with which
the visitor can browse, download, or stream any media that you've published in your
“ondemand” folder.
Enable recent tracks widget
Specifies whether or not the Recent Tracks widget will be enabled (both on the start page, and
as a code snippet). If enabled, Centova Cast will provide a list of tracks and authors which have
played recently. If you have an Amazon.com access key ID, this feature can also display album
covers for each track.
Number of recent tracks
Specifies the number of tracks which will be shown in the Recent Tracks widget.
Enable Google Maps widget
Specifies whether or not the start page will use Google Maps to plot the geographic locations of
your listeners on a world map in realtime. This option may not be available depending on how
Centova Cast has been configured by the administrator.
Amazon access key ID
Specifies your Amazon.com access key ID. If specified, Centova Cast will automatically fetch
album cover images from Amazon.com to be displayed in the “recent tracks” list. This will also
activate a “Buy album” link next to each album, and any sales generated through these links
will be credited toward your Amazon.com affiliate account. This option may not be available
depending on how Centova Cast has been configured by the administrator.
3.1.4. Files
The Files tab includes options for uploading various sound files for use by the streaming server. These
include:
Introduction file
Specifies the introduction media file for the stream. The introduction file is an MP3 file that is
played immediately after each listener connects, before tuning in to the live stream. This may
be useful for for station identification or advertisement purposes.
Fallback file
Specifies the fallback media file for the stream. The fallback file is an MP3 file that is played in
a loop if the source stream disconnects. Without a fallback file, listeners will either hear
Page 10 / 32
Copyright 2008, Centova Technologies Inc.
CentovaCast
User's Guide
Section 3
Server Configuration
silence, or be disconnected entirely if the source stream disconnects.
3.1.5. Master Relaying
Note: this option may or may not be available depending on the server software being used by your
hosting provider. More specifically, this option is for IceCast servers only.
The Master Relaying tab includes options for setting up a master relay for another IceCast server.
Using Master Relay, the remote IceCast server essentially becomes the source for your own server, and
all of the mount points from the remote server are made available on your server.
Options include:
Master server
Specifies the hostname or IP address of the master server whose stream(s) you wish to relay.
Master port
Specifies the port number of the master server whose stream(s) you wish to relay.
Master update interval
Specifies the interval at which the remote stream's configuration is replicated to the local server.
Master username
Specifies the username required by the remote server for relaying.
Master password
Specifies the password required by the remote server for relaying.
Relay on demand
If enabled, your IceCast server will only connect to the remote IceCast server when one or more
listeners are connected, and it will disconnect from the remote server when there are no more
listeners. If disabled, your IceCast server will remain connected to the remote server and
continue receiving the stream even if no listeners are connected.
Enabling this setting may reduce unnecessary bandwidth usage, but may slightly increase the
time required to begin streaming when your first listener connects.
3.1.6. Mountpoint Relaying
Note: this option may or may not be available depending on the server software being used by your
hosting provider. More specifically, this option is for IceCast servers only.
The Mountpoint Relaying tab includes options for setting up a relay for a single stream on a remote
Page 11 / 32
Copyright 2008, Centova Technologies Inc.
CentovaCast
User's Guide
Section 3
Server Configuration
server. Using Mountpoint Relay, the remote stream essentially becomes the source for your own
server, and listeners tuning into your server will hear the remote server's stream.
Options include:
Stream server
Specifies the hostname or IP address of the remote server whose stream you wish to relay.
Stream port
Specifies the port number of the remote server whose stream you wish to relay.
Stream mount point
Specifies the mount point for the desired stream on the remote server. If the remote server is a
SHOUTcast server, you should specify /stream here.
Local mount point
Specifies the mount point for the relayed stream on the local server. If in doubt, you can
specify /stream here as a default value.
Stream username
Specifies the username required by the remote server for relaying.
Stream password
Specifies the password required by the remote server for relaying.
Relay on demand
If enabled, your IceCast server will only connect to the remote IceCast server when one or more
listeners are connected, and it will disconnect from the remote server when there are no more
listeners. If disabled, your IceCast server will remain connected to the remote server and
continue receiving the stream even if no listeners are connected.
Enabling this setting may reduce unnecessary bandwidth usage, but may slightly increase the
time required to begin streaming when your first listener connects.
Relay metadata
If enabled, the metadata provided by the remote streaming server will be passed through to your
own listeners. If disabled, the locally-configured metadata will be used instead.
3.1.7. Advanced
Note: the settings available on this tab will vary depending on the server software being used by your
hosting provider. As such ,they are broken down into two sections below.
The Advanced tab includes options for configuring various advanced settings, and normally does not
Page 12 / 32
Copyright 2008, Centova Technologies Inc.
CentovaCast
User's Guide
Section 3
Server Configuration
need to be adjusted.
3.1.8. Advanced: IceCast
When using IceCast as your streaming server, options include the following. Please consult the IceCast
documentation for more information about these options.
Directory listings URL
Specifies the URL to your directory listings or “yellow pages” service.
Directory listings port
Specifies the port number of your directory listings or “yellow pages” service.
Suppress metadata
Prevents IceCast from sending song artist/title information to your listeners.
Relay password
Specifies the password required to relay your stream, if any.
Page 13 / 32
Copyright 2008, Centova Technologies Inc.
CentovaCast
User's Guide
Section 3
Server Configuration
4. Current Listeners
Centova Cast provides a comprehensive overview of the listeners who are currently tuned into your
stream. The current listener report includes the following information:
●
●
Current Listener List
○
Country:
Indicates the country in which the listener is located, if this information available.
○
IP Address:
Indicates the IP address of the listener.
○
User Agent:
Indicates the name and version of the software with which the user has connected to your
stream.
○
Agent Type:
Indicates the type of software being used by the user; either a player (a standard media
player used to listen to music) or a ripper (a program which can “steal” music from your
stream and save it on the listener's PC).
○
Listen Time:
Indicates the total length of this listener's session.
Top Countries
Provides a breakdown of the top countries from which listeners are currently tuned in to you
stream. The country list is ranked by number of listeners from each country.
●
Top User Agents
Provides a breakdown of the top software with which your listeners are connected to your
stream.
●
Geographic Listener Locations
Provides a realtime world overview of your current listeners' geographic locations, plotted on a
world map. This service is provided by Google Maps and may or may not be available
depending on how your administrator has configured Centova Cast.
5. Statistics
Centova Cast provides the most comprehensive streaming radio statistics system commercially
available today. It provides information about listener trends and demographics, data transfer, track
performances and popularity, user agents, and much, much more.
To access your statistics, click the View Statistics link in your client area. The statistics
available are described in the following sections.
Page 14 / 32
Copyright 2008, Centova Technologies Inc.
CentovaCast
User's Guide
Section 5
Statistics
5.1. Recent Activity
The recent activity report provides a high-level overview of your stream statistics, including details of
listener trends, average session times, total listening hours, data transfer, track playback, and more.
●
Listener Minutes
This section contains information about listener trends over the past 7, 14, and 30 days, which
help you determine how your stream's audience is developing over time.
The total listening hours (TLH) is also provided for the selected period, which may be useful if
you need to report to a royalty/licensing authority.
●
Listeners
This section provides information about your listeners. Total listener sessions describes the
number of times a listener has tuned in. Unique listeners and unique countries indicate the
number of distinct listeners and countries (respectively) which have tuned in during the
reporting period.
●
Data Transfer
This section provides details of your stream's data transfer during the reporting period.
●
Tracks
This section provides details of the tracks played during the reporting period.
●
Peak Period
This section provides information about the time at which the most users were connected during
the reporting period. The number of listeners, track name, and date of that occasion are
provided.
●
Listeners for Today
Provides a graph of the total number listeners connections established during each hour
throughout the current day.
●
Listeners for Yesterday
Provides a graph of the total number listeners connections established during each hour
throughout the previous day.
5.2. Listeners
The listener overview provides information about listeners' usage of your station.
●
Average Listener Session Length
The average length of a listener session is broken down into common intervals and charted and
graphed.
●
Top Listeners by Listener Sessions
Top listeners are ranked according to the total number of times they have connected to your
stream during the reporting period.
Page 15 / 32
Copyright 2008, Centova Technologies Inc.
CentovaCast
User's Guide
●
Section 5
Statistics
Top Listeners by Listener Minutes
Top listeners are ranked according to the total number of minutes they have spent connected to
your stream during the reporting period.
Both of the Top Listeners reports automatically determine the countries from which your listeners were
connected, and the software used by the listener to tune into the stream is noted and identified as a
media player or stream ripper to assist in abuse detection.
5.3. User Agents
The user agents report provides an overview of the software programs your listeners are using to tune
in to your stream.
●
Top Agents by Listener Sesssions
The top software used to connect to your stream is charted and graphed according to the number
of times each software application has connected to your stream during the reporting period.
●
Top Agents by Listener Minutes
The top software used to connect to your stream is charted and graphed according to the total
amount of time each software application has spent connected to your stream during the
reporting period.
In both reports, each user agent is also classified as a legitimate media player (such as WinAmp,
iTunes, etc.), or a stream ripper (a program used to steal music from your stream) to assist in abuse
detection.
5.4. Countries
The country overview provides information about the countries from which the majority of your
listeners are tuning in.
●
Top Countries by Listener Sesssions
The top countries connecting to your stream are charted and graphed according to the number
of times a listener from each country has connected to your stream during the reporting period.
●
Top Countries by Listener Minutes
The top countries connecting to your stream are charted and graphed according to the total
amount of time listeners from each country have spent connected to your stream during the
reporting period.
In both reports, each country is identified (where possible) and the appropriate flag is displayed to aid
in identification at a glance.
5.5. Tracks
The tracks report provides information about the frequency and popularity of the tracks played on your
stream.
Page 16 / 32
Copyright 2008, Centova Technologies Inc.
CentovaCast
User's Guide
Section 5
Statistics
●
Least Popular Tracks
Provides an overview of the least popular tracks played during the reporting period, by
disconnections per minute. The popularity of a track is calculated by determining the number
of times a listener disconnected or “tuned-out” while the track was playing, averaged over the
total number of minutes the song was played throughout the reporting period.
●
Most Popular Tracks
Provides an overview of the most popular tracks played during the reporting period, by
connections per minute. This is calculated in the same manner as the Least Popular Tracks
report.
●
Top Tracks by Playbacks
Provides a list of the songs most frequently played during the reporting period, according to the
total number of times the song was played.
●
Top Tracks by Airtime
Provides a list of the songs which received the most “air time”, or total minutes, during the
reporting period.
●
Track Broadcast Reports
Provides access to your monthly broadcast reports for the past several months. These
downloadable (CSV spreadsheet) reports provide information about each and every song that
was played on your stream during the reporting period, along with information about how many
listeners heard each song.
Note that reports are generated on a monthly basis, and this section will not appear until at least
one report has been generated.
Each report contains two spreadsheets, either of which may be useful if you are required to
make reports to a royalty/music licensing authority:
○
A playback report, which individually records the date, time, artist, album, title, duration,
and listener information for each and every track played during the reporting period.
○
A performance report, which records the aggregate playback and listener information for
each unique song played on your stream during the reporting period.
5.6. Historical Statistics
Historical statistics provide detailed daily and monthly data transfer and listener statistics, complete
with graphs, allowing you to track listener trends and resource usage.
Unlike the other statistics provided by Centova Cast (which are limited to 60 days) historical statistics
provide information about your stream since it was first created in Centova Cast.
Graphs provided include:
Page 17 / 32
Copyright 2008, Centova Technologies Inc.
CentovaCast
User's Guide
Section 5
Statistics
●
Data Transfer
Indicates the total, combined data transfer for your stream over a period of time. Graphs are
displayed for one-month and one-year intervals.
●
Minutes
Indicates the total, combined number of listener minutes for your stream over a period of time.
Graphs are displayed for one-month and one-year intervals.
●
Listeners
Indicates the number of simultaneous listeners at each hour throughout the day for a one-day
period.
6. Server Logs
Centova Cast provides direct access to the log files created by your streaming server. To access your
logs, click the View Logs link in your client area. By default, the access log for your server is
displayed. To view the error log, click the View Error Log link at the bottom of the page.
The precise format of the logs displayed will vary depending on the streaming server software being
used by your hosting provider. If you require assistance, please contact your hosting provider.
7. Quick Links
Centova Cast provides a variety of useful links and connection information for your stream on the
“Quick Links” page. Information provided includes:
●
A link to your stream start page.
●
A link to your streaming server software's index page.
●
Tune-in links for a number of common media players, which you can paste into your own web
site.
●
Connection information for live sources. This can be used to connect to your stream with a live
source software application (such as SAM Broadcaster) and being a live broadcast using your
microphone.
●
Connection information for FTP access. This can be used to upload media to your stream if
your administrator has provided autoDJ capabilities to your stream.
●
A link to this user guide.
Page 18 / 32
Copyright 2008, Centova Technologies Inc.
CentovaCast
User's Guide
Section 7
Quick Links
8. Code Snippets
Centova Cast provides a number of JavaScript code snippets which you can include in your own web
pages to display information about your stream. No programming knowledge is required – anyone who
understands HTML (and, ideally, CSS) can make use of these snippets to easily add custom stream
information to a web page.
The code for each of these snippets can be obtained using the “Code Snippets” link in your Centova
Cast control panel. “Live” examples of all of these snippets are available on your stream start page.
The following code snippets are available.
8.1. Stream Status Summary
This snippet displays a brief line of information about your current stream status. Typically, this will
look something like the following:
Artist Name – Track Title (Online)
In this example, Artist Name – Track Title refers to the artist and track that are currently being played
on your stream, and Online refers to the status of your stream (which will be Offline if your stream is
offline).
The above text is hyperlinked such that, when clicked, it will tune in to your stream.
The status summary is also automatically updated using AJAX technology at 30-60 second intervals
such that it always displays the correct song artist and title.
8.2. Stream Details
This snippet is a more flexible version of the Stream Status Summary, for more advanced users who
wish to customize placement of the individual elements of stream information. Using this snippet, you
can place the <span> elements for the current song, stream title, bit rate, server status, and source
status individually, anywhere on your web page, and Centova Cast will automatically fill them in.
8.3. On-demand Content
This snippet allows you to embed an on-demand content browser in your web page, which allows the
visitor to browse, stream, or download the media you've published in your “ondemand” folder. The ondemand content browser operates using AJAX technology such that the page never re-loads, and thus
Page 19 / 32
Copyright 2008, Centova Technologies Inc.
CentovaCast
User's Guide
Section 8
Code Snippets
can be safely embedded into any web page.
8.4. Recent Tracks
This snippet displays a list of the 5 tracks which were most recently played on your stream, along with
the name of the artist associated with each.
If Amazon.com integration is enabled, and you've entered your Amazon.com access key ID on the
“Start Page” tab of the “Configure Server” page, Centova Cast will also display the album cover (when
available) along with a “Buy this album” link next to each track. Any sales generated through the “Buy
this album” link will be credited toward your Amazon.com affiliate account, making this an effective
revenue-generation strategy for your stream.
8.5. Song Requests
This snippet displays a form allowing your visitors to submit song requests. When a request is
received, it is automatically sent via E-mail to the E-mail address configured for your account. Note
that you (as the stream administrator) are responsible for handling the request yourself, and queuing the
requested tracks if desired.
The Song Request form, like most of the code snippets displayed on the start page, can be disabled on
the “Start Page” tab of the “Configure Server” page if it is not wanted or needed.
8.6. Tune In
This snippet displays a list of tune-in links for various media players. Users can click on the
appropriate link for their media player to tune in to your stream.
8.7. Alternate Character Encodings
If you find that the code snippets show certain accented characters incorrectly when used on your web
site, it is possible that you are not using UTF-8 encoding on your web page. To correct this, you
should set the “Character encoding” setting to the correct character encoding for your web page. This
will re-load the “Code Snippets” page and update each snippet to use the correct character encoding.
(Note that after changing the character encoding, you must copy and paste the updated snippets into
your web site, replacing the originals.)
Page 20 / 32
Copyright 2008, Centova Technologies Inc.
CentovaCast
User's Guide
Section 9
Playlist Manager
9. Playlist Manager
The playlist manager allows you to create and configure playlists to control how and when your media
is played. You can create as many playlists as you like, each with its own distinct settings, and
Centova Cast will automatically determine when to play each one based on your settings.
9.1. Creating a Playlist
To create a new playlist, click the Create Playlist link in the upper, right-hand corner of the page. This
will launch the playlist editor, described under Playlist Editor below.
9.2. Editing a Playlist
To edit an existing playlist, click the Edit Playlist icon next to the playlist you wish to edit. This will
launch the playlist editor, described under Playlist Editor below.
9.3. Deleting a Playlist
To delete an existing playlist, click the Delete Playlist icon next to the playlist you wish to delete. This
will permanently remove the playlist, its settings, and its list of tracks.
9.4. Enabling or Disabling a Playlist
To enable or disable an existing playlist, click the Enable Playlist icon next to the playlist you wish to
delete. A disabled playlist will be ignored by Centova Cast.
9.5. Updating your Media Library
Centova Cast maintains an internal list of information about all of your media – artists, albums, and
tracks – which is used to allow you to browse and search your media in the media library.
Whenever you add or remove media from your collection, you will need to click the Update Media
Library link, at the bottom of the Playlist Manager page, to allow Centova Cast to update its internal
list. Note that any new media you add to your collection will not appear in the media library until
you've clicked the Update Media Library link.
9.6. Playlist Editor
This will launch the playlist editor and allow you to configure the new playlist. The following fields
are available:
Page 21 / 32
Copyright 2008, Centova Technologies Inc.
CentovaCast
User's Guide
Section 9
Playlist Manager
Title
Specifies the title for the playlist. This is used only to help you identify the playlist, and is
completely ignored by Centova Cast. Use a descriptive name like “Heavy rotation” or “Friday
night's top 10 countdown” to ensure that you'll remember what this playlist is for.
Status
Specifies the status of the playlist. If the playlist is Enabled, it will be included in your
stream; if it is Disabled, it will be ignored by Centova Cast and its tracks will never be
played.
Type
Specifies the type of playlist. There are presently 4 playlist types available:
●
General Rotation: General rotation playlists are used to play media from your library
when no scheduled, interval, or immediate playlists are due to be played. This is the
“default” playlist type, and most stations spend the majority of their air time playing
random tracks from general rotation playlists.
●
Scheduled: Scheduled playlists allow you to schedule a list of tracks to be played at a
specific date and time. These playlists can also be setup to repeat on a schedule, making
them ideal for daily/weekly countdowns or pre-recorded shows.
●
Interval: Interval playlists allow you to play tracks at regular intervals of several
minutes or several songs. These playlists are useful for playing frequently-recurring
content, such as station identification or commercial advertisements.
●
Immediate: Immediate playlists allow you to queue tracks to be played immediately
after the end of the current track. These playlists are useful for playing tracks on
demand, such as song requests.
For more information about how tracks are selected when multiple playlists of different types
are activated, please see the section entitled Track Selection below.
Playback order
Specifies the track playback order for General Rotation, Scheduled, and Immediate playlists. If
set to Random (shuffled), tracks will be selected at random from the playlist. If set to
Sequential (in order), tracks will be selected in order from the playlist, starting with
the first track, and restarting when the end of the playlist is reached.
The playlist editor also includes a number of additional fields depending on the playlist type. Those are
discussed in the sections following immediately below.
Page 22 / 32
Copyright 2008, Centova Technologies Inc.
CentovaCast
User's Guide
Section 9
Playlist Manager
9.6.1. General Rotation Playlist Options
General Rotation playlists include the following additional fields in the playlist editor:
Playback weight
Specifies the “weight” for the playlist, which controls how often tracks from this playlist are
played relative to tracks from other General Rotation playlists. This can be used to ensure that,
for example, new releases (in one playlist) are played more frequently than older tracks (in
another playlist).
Take, for example, a scenario in which you have the following General Rotation playlists:
Title
Playback weight
Power rotation
6
Heavy rotation
3
Light rotation
1
In this example, for every 10 tracks that are played, on average, 6 will be selected from the
Power rotation playlist, 3 will be selected from the Heavy rotation playlist, and 1 will be
selected from the Light rotation playlist.
As such, you might place your most popular tracks (new releases, for example) in your Power
rotation playlist, to ensure that they are played most frequently. You might place older
favorites in the Heavy rotation playlist to ensure that they are still played often, though less
often than the new releases. And you might place your less popular tracks in the Light rotation
playlist to ensure that they are played only occasionally.
Activation period
General rotation playlists can also be limited to a specific period of the day. This can be used to
play lighter songs in the morning and heavier songs in the afternoon, for example. If no time
period is selected, the playlist will be active for the entire day.
Note that setting a time period for a general rotation playlist is different than creating an actual
Scheduled Playlist. Scheduled playlists are exclusive to their time periods, and no general
rotation tracks will play during a scheduled playlist.
In contrast, if a general rotation playlist has a time frame configured, and there are other general
rotation playlists configured for the same period (or with no time restriction at all), Centova
Cast will select tracks from each of the playlists according to their weighting as described
above.
For more information about how tracks are selected when multiple playlists are activated, please see
Page 23 / 32
Copyright 2008, Centova Technologies Inc.
CentovaCast
User's Guide
Section 9
Playlist Manager
the section entitled Track Selection below.
9.6.2. Scheduled Playlist Options
Scheduled playlists include the following additional fields in the playlist editor:
Scheduled date
Specifies the date on which this playlist should be activated. The playlist will remain inactive
until this date. You may optionally click the “...” button to choose the date visually on a
calendar.
Scheduled time
Specifies the time at which this playlist should be activated, on the date specified in the
Scheduled date field. The playlist will remain inactive until the scheduled date at the scheduled
time.
Important scheduling note: All dates and times will be in the server's time zone unless you have
explicitly configured your time zone on the “Basic Configuration” tab of the “Configure
Server” page.
Repeat schedule
Specifies when (if ever) this playlist should repeat. If enabled, this allows you to have the
tracks in the playlist automatically re-played several times per week, month, or year.
Possible values for this field include:
●
Never (one time only): If selected, the playlist will play only at the scheduled date/time.
After it has played, it will effectively be disabled.
●
Daily: If selected, the playlist will play every day at the scheduled time, starting on the
scheduled date.
●
Weekly: If selected, the playlist will play every week on the selected weekdays, at the
scheduled time, starting on the scheduled date (or rather, on the first selected weekday
after the scheduled date). The weekdays on which the playlist should be activated can
be selected using the Repeat on field, which appears only when the Weekly repeat
schedule is selected.
●
Monthly: If selected, the playlist will play every month, on the scheduled day of the
month, at the scheduled time. You can alternately use the Repeat on field, which only
appears when the Monthly repeat schedule is selected, to have the playlist played on the
first or last day of the month instead of on the scheduled day of the month.
Page 24 / 32
Copyright 2008, Centova Technologies Inc.
CentovaCast
User's Guide
●
Section 9
Playlist Manager
Yearly: If selected, the playlist will play every year, on the scheduled day and month, at
the scheduled time.
Playback style
Specifies how tracks are selected from the playlist.
● Play all tracks sequentially (in order)
When selected, Centova Cast will play the all tracks from the playlist, in order, at the
scheduled time.
● Play all tracks randomly (shuffled)
When selected, Centova Cast will play all tracks from the playlist, in random order, at
the scheduled time.
● Play only one randomly selected track from this playlist
When selected, Centova Cast will randomly play a single track from the playlist at the
scheduled time.
Interruptible
Specifies whether or not this playlist may be interrupted by other scheduled playlists. Possible
values for this field include:
●
No, always play to completion: If selected, the playlist will always play through to
completion before any other scheduled playlists are permitted to play. If any other
scheduled playlists have been scheduled to start while this playlist is still playing, they
will be delayed until this playlist finishes.
●
Yes, terminate if another scheduled playlist is due to begin: If selected, this playlist will
be aborted if another scheduled playlist is due to start while this playlist is still playing.
Note that for technical (and aesthetic) reasons, Centova Cast cannot interrupt individual
tracks while they are still playing, so the new playlist will be started at the next available
opportunity (i.e., when the current track finishes).
Stop after
Specifies the maximum number of minutes for which this playlist should remain active once
started.
Note that this setting is subject to the standard playlist rules enforced by Centova Cast;
specifically, Centova Cast will never interrupt a playing track. For example, if your limit is set
to 5 minutes, and an 8 minute track is started, the track will play through to completion even
though it will exceed your limit by 3 minutes.
Also note that this limit is relative to the time at which the playlist actually started, not the time
at which it was scheduled. Take the following scenario for example: say you scheduled your
playlist for 3:00 and configured it to stop after 20 minutes, but it started 5 minutes late because
of a late-playing track in an earlier playlist. In this case, the timer will be started at 3:05
(instead of 3:00), and thus the playlist won't be stopped until 3:25 instead of 3:20.
Page 25 / 32
Copyright 2008, Centova Technologies Inc.
CentovaCast
User's Guide
Section 9
Playlist Manager
For more information about how tracks are selected when multiple playlists are activated, please see
the section entitled Track Selection below.
9.6.3. Interval Playlist Options
Interval playlists include the following additional fields in the playlist editor:
Repeat every
Specifies how often the playlist should repeat. You may specify that the playlist should repeat
either after every few songs, or after every few minutes. You may also specify an interval (in
songs or minutes) at which the playlist should repeat.
Playback style
Specifies how tracks are selected from the playlist. If Play only one randomly selected track
from this playlist is selected, Centova Cast will choose a single track from the playlist, then
consider it “inactive” until the next interval. If Play all tracks from this playlist in order is
selected, then Centova Cast will play the all tracks from the playlist, in order, at each interval.
For more information about how tracks are selected when multiple playlists are activated, please see
the section entitled Track Selection below.
9.6.4. Track Selection
When creating playlists, it is important to understand how Centova Cast will select tracks when
multiple playlists are activated. At the end of each song, Centova Cast performs a number of checks, in
a specific order, to determine which playlist to select a track from next.
Note that Centova Cast will never interrupt a track to change playlists. That is, if a playlist is
scheduled to start at 10:30, and a 10 minute track starts at 10:25, the scheduled playlist will be deferred
until 10:35 to allow the track to finish. This is a common cause for concern for stations which play
“mix tracks” which may be an hour or more in length.
The following checks are performed in the order shown to determine which playlist to select a track
from:
1. Immediate Playlists. If an Immediate playlist is enabled, it will always take precedence over all
other playlist types, and it will be played through to completion before any other playlists will
be consulted, even if this requires interrupting another playlist. Upon completion, the status of
the Immediate playlist will be set to disabled to ensure that it is not repeated.
2. Scheduled Playlists. If it is time to play a Scheduled playlist, it will always take precedence
Page 26 / 32
Copyright 2008, Centova Technologies Inc.
CentovaCast
User's Guide
Section 9
Playlist Manager
over all other playlist types (except Immediate playlists). Once a Scheduled playlist starts, it
will be played through to completion, or to its scheduled stop time, before any other playlists
are consulted.
If two Scheduled playlists conflict (i.e., if one is scheduled to start while another is still
playing), Centova Cast will consult the active playlist's “Interruptible” flag. If it is configured
to be interruptible, Centova Cast will immediately abort the active playlist (leaving the
remaining tracks unplayed) and begin the second playlist. If it is not configured to be
interruptible, the second playlist will be deferred until the active playlist finishes.
3. Interval Playlists. If it is time to play an Interval playlist, it will always take precedence over
General Rotation playlists.
4. General Rotation playlists. If no other playlists are due for playback, a track will be selected
from one of the General Rotation playlists. Selection of tracks from General Rotation playlists
is “weighted” as described under General Rotation Playlist Options above, to ensure that tracks
from “heavier” playlists are chosen more often than those from “lighter” playlists.
If a General Rotation playlist has been configured for only a specific time period, it will only be
included in the rotation during that time period. During that period, it will be treated just like
any other General Rotation playlist, and included in the rotation based on its weight. Outside of
the configured time period, the playlist will be treated as if it is disabled.
10. Media Library
The media library provides a powerful, convenient way to browse and search your media and organize
it into the playlists you created in section 6 above. The media library uses AJAX technology, so you
may find that it operates more like a desktop computer application rather than a web page.
10.1. Browsing Media
To browse the media in your library, click the “Media Library” folder in the upper left-hand corner of
the page. This will launch the media library browser, which is organized into the following panes:
Playlist List
Displayed along the entire height of the left edge of the window, this pane lists all of the
playlists you have created (as described in section 6 above), as well as a folder for your media
itself.
●
●
Page 27 / 32
To manage the tracks in a playlist (described under Managing Playlist Tracks below),
click on one of the playlists in the list.
To enable or disable a playlist, right-click on it and select Enable/Disable Playlist.
Copyright 2008, Centova Technologies Inc.
CentovaCast
User's Guide
●
Section 10
Media Library
To return to your media library, click on the Media Library folder at the top of the list.
Artist List
Displayed to the upper left, this pane contains the list of all of the artists in your media library
(or, if performing a search, only the artist matching your search criteria are displayed).
●
●
●
To select an artist, click on its entry in the list, or hold Ctrl or Shift while clicking to
select multiple artists.
To add all of an artist's tracks to a playlist, select one or more artist(s), then drag them
with your mouse and drop them on the desired playlist.
To rename an artist, right-click on its entry in the list and select Rename artist.
Album List
Displayed to the upper right, this pane contains the list of all of the albums by the artists
selected in the Artist List (described above). If no artists are selected, no albums will be
displayed.
●
●
●
To select an album, click on its entry in the list, or hold Ctrl or Shift while clicking to
select multiple albums.
To add all of an album's tracks to a playlist, select one or more album(s), then drag them
with your mouse and drop them on the desired playlist.
To rename an album, right-click on its entry in the list and select Rename album.
Track List
Displayed across the lower portion of the page, this pane contains the list of all of the tracks in
the albums selected in the Album List (described above). If no albums are selected, no tracks
will be displayed.
●
●
●
●
To select an track, click on its entry in the list, or hold Ctrl or Shift while clicking to
select multiple tracks.
To add the selected track(s) to a playlist, drag them with your mouse and drop them on
the desired playlist.
To hear an short (several second) sample of the selected track(s), click the Preview
track(s) button (in the lower right-hand corner of the page) after selecting one or more
tracks, or right-click on a track and click Listen to Preview.
To rename a track, right-click on its entry in the list and select Rename track.
Note that when you drag and drop an artist, album, or track onto a playlist, it is immediately and
instantly added to that playlist. No further saving is necessary.
If the playlist's status is “enabled” and your administrator has setup Centova Cast to use realtime track
scheduling, the new track(s) will immediately become eligible for playback after the current song
completes. If realtime track scheduling is not in use, you will need to re-start your server for the
Page 28 / 32
Copyright 2008, Centova Technologies Inc.
CentovaCast
User's Guide
Section 10
Media Library
changes to take effect.
10.2. Searching your Media
Centova Cast includes a powerful search feature allowing you to quickly and easily locate specific
artists, albums, and tracks in media libraries of all sizes. The search feature is located at the top of the
page, above the artist list, and is composed of the following fields:
Keyword field
Enter the word or phrase for which you want to search in the keyword field.
Criteria field
The criteria field is located to the immediate right of the keyword field, and contains the
following options:
● Artists: Specifies that the search should match only the names of artists in your library.
● Albums: Specifies that the search should match only the names of albums in your
library.
● Tracks: Specifies that the search should match only the titles of tracks in your library.
● All: Specifies that the search should match artist names, album names, or track titles.
Genre field
The genre field is located to the immediate right of the criteria field, and contains a list of the
music genres included in your media library. By default, “All genres” is selected, which
specifies that you do not want to filter your results by any particular genre. Selecting a genre
will limit the search results to tracks of that genre.
Note that Centova Cast has no control over the genres associated with each track in your library.
The genre for each track is specified by the person who created the MP3 file at the time at
which the MP3 was created, and Centova Cast simply uses that information verbatim to classify
the track by genre.
10.3. Album Covers
Centova Cast is able to import album cover images when importing media for the autoDJ, to be shown
both in the media library and on the stream start pages. Centova Cast looks for cover images in the
following places (in order of preference) when working with the media you have uploaded:
1. In a JPEG file with the same name as the MP3 file.
Example:
Uploaded MP3 filename: My Music\demo_track.mp3
Cover filename: My Music\demo_track.jpg
Page 29 / 32
Copyright 2008, Centova Technologies Inc.
CentovaCast
User's Guide
Section 10
Media Library
2. In a JPEG file named "albumartsmall.jpg" in the same folder as the MP3 file. (This is a
standard filename also used by Windows explorer.)
Example:
Uploaded MP3 filename: My Music\demo_track.mp3
Cover filename: My Music\albumartsmall.jpg
3. In a JPEG file named "folder.jpg" in the same folder as the MP3 file. (Much like
albumartsmall.jpg, this is a standard filename also used by Windows explorer.)
Example:
Uploaded MP3 filename: My Music\demo_track.mp3
Cover filename: My Music\folder.jpg
4. In any JPEG file in the same folder as the MP3 file. If more than one JPEG exists, preference
will be given to those with filenames containing the words "front" or "cover". If no filenames
contain "front" or "cover", the first image Centova Cast finds will be used.
Example:
Uploaded MP3 filename: My Music\demo_track.mp3
Cover filename: My Music\any_filename_will_work.jpg
5. In the ID3 tags contained within the MP3. Many MP3s come with cover art embedded within
the MP3 file itself, so you don't need to upload any additional images to make this work.
If Centova Cast detects any of the above images during a media library update, it will automatically
import them and use them as the cover images for the albums associated with the track.
Note that if you upgraded to Centova Cast v2.2 from an earlier version, you will need to update your
media library, then click the "Perform full library update" button to pull in any cover images from your
existing library.
Also note that if Amazon.com integration is enabled, Amazon album covers will always override any
custom album covers you have uploaded.
10.4. Managing Playlist Tracks
After creating your playlists (as described in section 9 above) and adding media to them (as described
in section 10.1 above), you will likely need to re-organize or remove tracks from a playlist at some
point in time.
To display the list of tracks in a playlist, click on the name of the playlist in the playlist list at the lefthand side of the media library page. This will display the list of tracks currently assigned to the
playlist.
Page 30 / 32
Copyright 2008, Centova Technologies Inc.
CentovaCast
User's Guide
Section 10
Media Library
10.4.1. Re-organizing Tracks
To change the sort order of the tracks in a playlist, select the track(s) to be moved (by clicking on the
track title, optionally while holding Ctrl or Shift to select multiple tracks), then use one of the
directional buttons at the bottom of the page to move the track(s). The directional buttons include:
Top
Moves the selected track(s) to the top of the playlist.
Up
Moves the selected track(s) up one position in the playlist.
Down
Moves the selected track(s) down one position in the playlist.
Bottom
Moves the selected track(s) to the bottom of the playlist.
10.4.2. Removing Tracks
To remove tracks from a playlist, select the track(s) (by clicking on the track title, optionally while
holding Ctrl or Shift to select multiple tracks), then use the Remove button at the bottom of the page to
remove the selected track(s) from the playlist.
Note that removing a track from a playlist in this manner only removes it from the playlist – the track
will still appear in your media library and you can still add it to other playlists if desired.
10.4.3. Saving Changes
After re-organizing or removing tracks from a playlist, the playlist must be saved or the changes will be
lost. To save your changes, click the Save button at the bottom of the page.
If your administrator has setup Centova Cast to use realtime track selection (aka “ices-cc”), the your
changes will immediately take effect after the current song completes. If realtime track selection is not
in use, you will need to re-start your server for the changes to take effect.
10.4.4. Discarding Changes
If, after re-organizing or removing tracks from a playlist, you decide that you wish to discard your
changes instead of saving them, click the Revert button at the bottom of the page. This will destroy any
changes made since the last time you saved this playlist, and revert the playlist to its previous track list.
Page 31 / 32
Copyright 2008, Centova Technologies Inc.
CentovaCast
User's Guide
Section 10
Media Library
11. Support
If you require technical support or assistance with Centova Cast, please contact your stream hosting
provider.
12. Credits
Centova Cast
Copyright 2007-2008, Centova Technologies Inc.
http://www.centova.com
Page 32 / 32
Copyright 2008, Centova Technologies Inc.