1
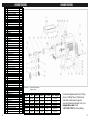
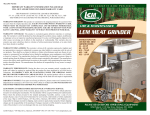
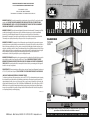
IMPORTANT WARRANTY INFORMATION PLEASE READ
FILL OUT AND RETURN ENCLOSED WARRANTY CARD
THE LEADER IN GAME PROCESSING
THIS WARRANTY COVERS:
LEM 700A SERIES BIG BITE GRINDERS
THE WARRANTY IS EXTENDED TO THE ORIGINAL PURCHASER ONLY.
WARRANTY DURATION: This product is warranted to the original purchaser for a period of five (5) years from the original
purchase date. EACH UNIT COMES WITH A WARRANTY CARD, WHICH MUST BE FILLED OUT COMPLETELY AND
RETURNED IMMEDIATELY, WITH A COPY OF THE PURCHASING RECEIPT. FAILURE TO RETURN YOUR WARRANTY
CARD WILL LIMIT WARRANTY TO 90 DAYS WITH PROOF OF PURCHASE.
WARRANTY COVERAGE: This product is warranted against defective materials or workmanship. The warranty is void if the
product has been damaged by accident, misuse, neglect, modification or improper service or repairs by unauthorized
personnel. It is also void if damaged in shipment or by other causes not arising out of defects in the materials or
workmanship. This warranty does not extend to any units which have been in violation of written instructions furnished.
This warranty covers only the product and its specific parts, not food or other products processed in it.
Electric Me at Grinder
WARRANTY DISCLAIMERS: This warranty is in lieu of all warranties expressed or implied, and no representative or person
is authorized to assume any other liability in connection with the sale of our products. There shall be no claims for defects or
failure of performance under any theory of sort, contract or commercial law including, but not limited to negligence, gross
negligence, strict liability or breach of contract. The manufacturer declines all responsibility for damage to persons, things or
animals arising from the failure to comply with the norms contained in this manual. The manufacturer reserves the right to
make modifications at anytime to the models while maintaining the main characteristics described herein. The
manufacturer also declines all responsibility for any errors in compiling this manual.
777A, 779A, 780A
781A, 782A
USE & MAINTENANCE
WARRANTY PERFORMANCE: During the above five year warranty period, a product with a defect will either be repaired or
replaced after the product has been inspected by an LEM Service Technician. LEM RESERVES THE RIGHT TO REFUSE
WARRANTY PERFORMANCE OR PRODUCT EVALUATION UNLESS THE ORIGINAL SALES RECEIPT OR THE WARRANTY
CARD IS ON FILE. The repaired product will be in warranty for the balance of the five year warranty period. No charge will
be made for such repair or replacement.
IMPORTANT NOTICE: If any parts are missing or defective, please contact our Customer Service Department for assistance at
877-536-7763. (M-F 8:30am to 4:30pm EST) DO NOT RETURN TO THE STORE WHERE THE PRODUCT WAS PURCHASED.
LEM PRODUCTS MERCHANDISE RETURN POLICY WARRANTY SERVICE:
To obtain service under terms of this warranty, please contact us at 877-536-7763 to obtain authorization prior to returning
the merchandise. No merchandise will be accepted without prior authorization. Please return the product pre-paid in the
original packaging if possible, enclose a copy of your receipt, (Keep a copy of your proof-of purchase for your records.) and
include a written explanation of the issue. Ship to LEM Products, 4440 Muhlhauser Rd., Suite 300, West Chester, OH 45011.
LEM Products is not responsible for damage incurred in shipping, make certain to pack product properly. Return shipping
charges are the responsibility of the purchaser. Packages returned to LEM should be insured for the value of the product to
cover any damages that may occur during shipping.
Revised April 1, 2015
5YEAR
WARRANTY
CAUTION
Cuts, injuries and/or fire may result from non-compliance with all operating
procedures described within this instruction manual.
L E M P r o du cts • We st Ches t er, OH 4 50 11 • PH: 1- 87 7 - 536-7763 • le m p r o d uc t s . c o m
LEM P rod u cts • W e s t C h e ste r , OH 45 01 1 • 1 -8 7 7 -5 3 6 -7 7 6 3 • le m p r o d u cts. co m
GENERAL WARNINGS AND SAFETY INFORMATION
IT IS IMPORTANT TO READ AND UNDERSTAND ALL OF THE INSTRUCTIONS AND SAFEGUARDS PRIOR TO USE
1. Always ensure that the appliance is properly assembled and safely set up before use.
2. DO NOT leave the appliance unattended if it can be switched on and operated.
3. CAUTION: This appliance is not recommended for use near or by children or persons with certain disabilities. Set up and
store the appliance out of reach of children. When not in use, store device in a secure and dry place out of reach of children.
4. Store appliance in upright position to extend life of motor.
5. WARNING: Heavy object, to avoid muscle strain or back injury, use lifting aids and proper lifting techniques when
moving appliance.
6. The appliance must be connected to an 120V AC electric supply only.
7. For your safety, this unit is equiped with a 3-pronged, grounding plug and must be plugged into a properly grounded
outlet. If your outlet is not of the proper type, it is your responsibility to have the outlet and wiring changed to the correct
type. Do not cut off the third (grounding) prong. Do not use an adapter.
8. Using this appliance with an extension cord may cause a decrease in electrical current, causing the motor to be over
worked and possibly catch fire.
9. Do not operate with a damaged cord or plug, after the unit malfunctions, has been damaged in any way or if appliance
has been immersed in water or other liquid. Return unit to LEM Products for assessment and repair.
10. Always unplug unit when not in use, when changing parts or cleaning.
11. Never unplug by pulling on the power cord, always pull directly on the plug itself.
12. Do not let cord hang over edge of table or counter, contact sharp edges or touch hot surfaces.
13. Indoor use only. To protect against the risk of electrical shock, never immerse the device in water and do not expose the
device to rain or moisture. WARNING: In the event the device should fall into water, remove the plug from the wall
socket before attempting to remove the unit from the water. If submergence occurs, have the appliance examined by an
authorized technician before use.
14. To protect against the risk of electrical shock, DO NOT use the appliance if your hands are wet or if you are standing on a
wet floor. DO NOT use the appliance if it is wet or moist. DO NOT operate this device with wet hands or bare feet.
DO NOT operate near running water.
15. The appliance is designed for domestic use and not for commercial purposes.
16. DO NOT use the appliance to grind bones, deep frozen food, hard items or non-food items.
17. Use the appliance with the supplied accessories only. WARNING: The use of attachments not recommended or sold by
the manufacturer may cause injury, damage to personal property, and may void your warranty.
18. WARNING: Do not use while under the influence of alcohol or drugs (prescription or non-prescription) as these may
impair user’s ability to properly assemble or safely operate the appliance.
19. The manufacturer declines any responsibility in the case of improper use of this product. Improper use of this product
voids the warranty.
20. Avoid contacting moving parts. Wait until all parts have come to a complete stop and disconnect from the power source
before removing any parts of the grinder.
21. Do not operate the grinder without the tray and the tray guard (when applicable) in place.
22. Never feed food into grinder by hand as serious injury may occur, always use provided meat stomper.
23. Do not use fingers to scrape food away from the grinding plate while the grinder is running, doing so may cause serious injury.
24. Thoroughly hand-wash all grinder parts in warm soapy water prior to use. Do not soak. NOT DISHWASHER SAFE
(discoloration may occur).
25. Tie back loose hair and clothing. Remove neckties, rings, watches, bracelets or other jewelry before operating the grinder.
26. Do not run grinder without meat in the Head, severe damage to the Head and Auger could result.
27. Use grinder on a level, stable surface to prevent tipping. Never move the grinder while unit is in use.
28. WARNING: Knife and plates are SHARP! To avoid injury, use extreme caution when handling.
29. When grinder is turned off, cooling fan will no longer operate. Do not touch housing during cool down period. Housing
will take a few minutes to cool down after unit is turned off.
30.
2
SAVE THESE INSTRUCTIONS
L E M P r o du cts • We s t Ches t er, OH 4 50 11 • PH: 1- 87 7 - 5 36-7763 • le m p r o d uc t s . c o m
STUFFING METHODS
METHOD #1 STUFFING SAUSAGE:
1. Grind the meat with the 10mm Plate (#5) for a course grind. For a finer grind, do a second grind with the 4.5mm Plate
(#6). (Unplug the grinder, remove 10mm plate, install the 4.5mm plate.)
2. Mix seasoning, water and cure into the meat.
3. Unplug the grinder, remove the grinder knife and plate. Install the stuffing plate on the auger stud (#11) in place of
knife and plate, put stuffing tube in front of stuffing plate and secure with the retaining ring.
4. Feed ground meat through the grinder into casings. Do not force meat in feed faster than the auger will take it.
METHOD #2 STUFFING SAUSAGE:
1. Cut meat into 1” chunks.
2. Mix seasoning into the meat or marinate the meat.
3. Unplug the grinder, install the knife, 4.5 mm Plate (#6) and stuffing tube.
4. Feed meat into the grinder.
5. Grind directly into casings.
METHOD #3 STUFFING SAUSAGE:
1. Grind the meat with the 10mm Plate (#5) for a course grind.
2. Mix seasonings into the meat or marinate the meat.
3. Unplug the grinder, remove the 10mm plate. Install the knife, 10mm Plate (#5) and stuffing tube.
4. Second grind the meat through this plate directly into the casings.
TROUBLESHOOTING
If your unit fails to operate, contact LEM Products technical assistance Toll Free at 877-536-7763. If meat is
mashing instead of extruding in strings from the grinding plate, chill the meat to 40°, and check to see that the plate and
blade are properly installed, check that the washer is installed on the back of the auger. A dull knife or plate will also cause
mashing of the meat.
For an overheated plug or grinder housing discontinue use and contact technical assistance Toll Free at 877-536-7763.
This product is equipped with a polarized AC (Alternating Current) plug (a plug having one blade wider than the other).
This plug will fit into the power outlet only one way. (If the plug does not fit fully into the outlet, contact a qualified
individual to install the proper outlet.)
DO NOT DEFEAT THE SAFETY PURPOSE OF THIS POLARIZED PLUG IN ANY WAY.
CIRCUIT BREAKER INFORMATION:
Your LEM grinder is equipped with a circuit breaker to protect the unit. In the event of a power disruption, abnormal
operation or over heating, the motor will temporarily shut down to prevent damage. If this should happen, follow the
seven steps listed below:
Step 1: Turn On/Off switch to off.
Step 2: Unplug unit.
Step 3: Check inside of grinding unit and remove any obstruction.
Step 4: Wait 1 or 2 minutes, then plug unit into wall outlet again.
Step 5: Push Restart Button and release. (Located on back panel of grinder #29).
Step 6: Turn switch on.
Step 7: Resume operation.
L EM Pr o d uc t s • W e s t C h e ste r , O H 45 0 1 1 • P H : 1 - 8 7 7 - 5 3 6 - 7 7 6 3 • l e mp r o d u cts. co m
7
GRINDER FEATURES
Ref.
1
2
3
4
5
6
7
8
9
10
11
12
13
14
15
16
17
18
19
20
21
22
23
24
25
26
27
28
29
30
31
32
33
34
35
36
37
38
39
40
41
42
43
44
4
Description
Qty
Retaining Ring
1
Stuffing Tube 10MM
1
Stuffing Tube 20MM
1
Stuffing Tube 30MM
1
10MM Plate
1
4.5MM Plate
1
Stuffing Plate
1
Knife
1
Auger
1
Washer
1
Auger Stud
1
Grinder Head
1
Stomper
1
Meat Pan
1
Star Bolt
1
Allen Screws for Front Panel
4
Front Panel
1
Grease Seal
1
Roller Bearing
1
Main Washer
1
Main Gear
1
Bearing 608
3
Rubber Pad/Gasket
1
Screw
10
S/S Upper Housing
1
Handle Screw
2
Handle
1
Back Panel
1
Circuit Breaker
1
Fastener for the Power Cord
1
Power Cord
1
Brace
1
Hex Nut for Brace
2 #32-4
S/S Lower Housing
1
Switch With Cover
1
Plastic Feet
4
Hex Nut for Feet
6
Phillips Screw M4 for Feet
5
Step Gear
1
Clip Spring
1
Pinion Gear
1
Front Panel of Motor
1
Electric Box
1
Motor
1
*Not Shown
Head
#5
#8
#12
#22
#32
GRINDER FEATURES
*46 Run/Start Capacitor
*48 Electric Box
HP Watts Volts Lbs./Min. Unit Weight
.25HP
180
120
29 lbs.
4
.35HP
250
120
35 lbs.
7
.75HP 550
120
40 lbs.
11
1.0HP
750
120
60 lbs.
13
1.5HP 1100 120
68 lbs.
17
For Grinder Replacement Parts, Plates,
Knives, Stuffing Tubes, Attachments
and other meat processing and
sausage making equipment visit us at:
lemproducts.com or call
1-877-536-7763 for a free catalog.
5
CAUTION
Before using the device for the first time please make sure to read carefully and
thoroughly through these operating instructions and the safety advice.
Familiarize yourself completely with the functions of the appliance.
OPERATING INSTRUCTIONS
GRINDING:
When making burger from wild game we suggest adding a minimum of 10% pork fat to the meat. This will give the
burger moisture, but still not make it fatty.
Cut meat into strips that will easily fit into the throat of the grinder head. Meat should be 40° or colder and free of gristle
and sinew. Feed meat slowly into the throat of the head. Use the meat stomper to push meat into the throat of the
head. Allow grinder to do the work. Do not force meat.
NEVER USE FINGERS TO PUSH MEAT INTO THE HEAD !
Place meat into freezer for 15-20 min. Grind meat through the coarse plate first. Return meat to freezer. Turn motor off
and unplug the grinder. Remove the coarse plate and clean the head of sinew, fat or gristle that has accumulated during
the first grind. Assemble the unit with the fine plate, plug grinder in and regrind the meat.
SECOND GRIND:
Turn on the grinder (make sure to have a clean and meat free head/throat). Feed the ground meat into the head/throat
slowly. Do not pack the throat full of meat. Keep the throat clear of meat. Resist the urge to stomp or push the meat
faster than the auger can move it.
CLEANING:
Unplug grinder and disassemble the grinder head. Wash all parts in hot, soapy water and thoroughly rinse in hot water.
Dry completely. Spray parts with food-grade silicone (Available at LEM Products) to prevent rust and keep your grinder
in like new condition.
STUFFING SAUSAGE CASINGS:
There are several methods for stuffing sausage with your grinder. Before you begin, review the helpful tips listed below:
- When making sausage, use at least 20% fat with your meat and grind it like burger. Without adequate fat, your
sausage will be dry when cooked, and will tend to crumble when cut or sliced.
- Make sure the meat is well-chilled (28-32° F).
- Use only the finest natural casings — hog for large sausages and sheep for small, breakfast-style links. Rinse well
before use. Eddible collagen casings are a nice alternative without the prep.
- Slide casings onto stuffing tube making sure to leave the end of the tube open. Turn grinder on and feed meat into the
head until meat is at the end of the stuffing tube. Stop grinder and pull casing out past the opening of stuffing tube
about 1”. Twist, knot or clip casing closed. Restart grinder. This procedure will keep the casing from filling up with air
when you first start stuffing. Continue to feed meat into head until the casing is filled.
- Stuff the casing firm, but not to the bursting point. To divide the sausage into links, give the casing two or three quick
twists before adding more meat. Twist links in alternating directions (clockwise for the first, counter-clockwise for the
second) to ensure that they keep their forms.
- If air bubbles form in your sausage, you can pop them with a sharp, sterilized needle.
6
L E M P r o du cts • We s t Ches t er, OH 4 50 11 • PH: 1- 87 7 - 536-7763 • le m p r o d uc t s . c o m
CAUTION
Before cleaning, assembling or disassembling meat grinder, make sure the
grinder motor is OFF and the plug is removed from the outlet/power source.
GRINDER ASSEMBLY
BEFORE USING: WASH ALL PARTS OF THE HEAD IN HOT SOAPY WATER. THIS WILL
REMOVE ANY GREASE RESIDUE AND DIRT LEFT FROM THE MANUFACTURING PROCESS
DO NOT PUT PARTS IN DISHWASHER
SEE DIAGRAM ON PAGES 4-5
1. Remove Retaining Ring (#1), Grinding Plate (#5), Knife (#8), and Auger (#9) from the grinder head (#12). Be sure that
the Star Bolt (#15) on the side of the motor coupler is backed all the way out. Insert the grinder head into the motor
coupler so that the auger fits properly into the Main Gear (#21). The head should be positioned upright so that the
locking screw can be firmly tightened to hold it in place during operation.
2. Place Washer (#10) on back of Auger Drive.
3. Insert Auger (#9) into grinder head and turn until the auger slips into the shaft of the motor.
4. Place the knife (#8) on the square Auger Stud (#11) of the Auger (#9) with blades facing out.
5. Place Grinding Plate (#5) on auger stud in front of knife. Make sure notch in plate is on locating pin in head. Cutting
edge of knife should be facing and flush against the grinding plate.
6. When assembled, plate will stick out past the end of the head by 1/8” - 3/16”.
7. Screw Retaining Ring (#1) onto head until tight. Hand-tighten, do not over-tighten. Over-tightening will cause undo
wear on the knife and plate of the grinder.
8. Insert Meat Pan (#14) into grinder head securely and snap pan holder on to handle.
ACCESSORIES (SOLD SEPERATELY)
GRINDER
#5 777A
#8 779A
#12 780A
#22 781A
#32 782A
50lb Mixer
(734A)
50lb Tilt Mixer
(868)
Patty Maker
(687)
Ground Beef Packing
System (200 Series)
25lb Mixer
(733A)
25lb Tilt Mixer
(869)
Jerky Slicer/
Tenderizer (433TJ)
Jerky/ Snack Stick
Patty Maker (517 Series)
Foot Switch
(724)
LEM also carries additional size grinding plates for a coarser or finer grind, stainless steel stuffing tubes, cleaning kits,
silicone spray and covers to keep your grinder looking new.
L EM Pr o d uc t s • W e s t C h e ste r , O H 45 0 1 1 • P H : 1 - 8 7 7 - 5 3 6 - 7 7 6 3 • l e mp r o d u cts. co m
3