1
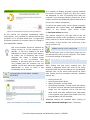
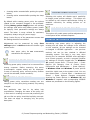
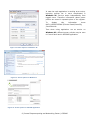
user’s manual TABLE OF CONTENTS Introduction....................................................... 2 About user’s manual ........................................ 2 About GICOMP ................................................ 2 How does it work? ........................................... 2 How to run GICOMP? .......................................... 3 Requirements ................................................. 3 Access to the application .................................. 3 First run ......................................................... 3 Logging .......................................................... 3 Errors ............................................................ 3 List of computers ............................................... 4 Grouping ........................................................ 4 Computers states ............................................ 4 Available actions ................................................ 5 Detail computer information ............................. 5 Title GICOMP – user’s manual Document version Software version Date 1.0 GICOMP 1.0 30.12.2011 Statistics ........................................................ 6 Changing computer state ................................. 6 Displaying available power policies .................... 7 Power policy activation..................................... 7 Creating new power policy ................................ 7 Removing power policy .................................... 8 Editing power policy ........................................ 8 Blocking power policies .................................... 8 Unblocking power policies ................................. 8 Changes introduced on computer ......................... 8 1 | Poznań Supercomputing and Networking Center | GICOMP INTRODUCTION HOW DOES IT WORK? ABOUT USER’S MANUAL During normal office work employees often leave computers turned on while making short breaks or during meetings. What is more, according to recent surveys, about 30% of machines are not turned off after leaving work and about 10% during weekends. If the company has a large number of employees, lost energy is a source of many expenses on electricity. This manual is intended to describe the main functionality of GICOMP software. You can find here information that will let you immediately start using the application. GICOMP functions and all the steps that are necessary to activate them were described here. You need to remember that GICOMP software is currently under extensive development and will be enriched with new functions. You need to always use the up-to-date manual. Information about the version of the document can be found on the right side of the table of contents. ABOUT GICOMP GICOMP is an infrastructure for monitoring and controlling energy usage. Because of rising energy prices and growing ecological concerns initiatives aimed at decreasing power consumption are becoming more and more popular. The most visible results are possible to achieve in environments with large number of computers. Main application features are: remote waking, suspending and shutting down computers, constant monitoring of power usage, based on the system workload and using e-sockets, monitoring computers and devices work time, generating statistics with detailed information about work time, creating and applying power management policies, communication through XMPP protocol – safe, easy to configure, complying with newest standards, extensibility – thanks to Python language and modular architecture the administrator can adjust the system to local preferences, easy to use management panel, ensured high level of security. GICOMP is a software that allows you to efficiently control the states of computers and manage them to minimize the power usage. Configuration is very intuitive, even when managing many machines. The application lets you define many power policy parameters, such as turning off display, turning off hard disk, suspending or hibernating the computer. Current power usage is constantly monitored and statistics are created, even for a period up to one year. Although it is necessary to install a small application on every computer (node program), it is unnoticeable to the user and does not interfere with normal work. It does not show any messages and does not ask to make any actions. Its work is restricted only to shutting down the computer or some of its components in case of inactivity. Hibernation and sleep mode cause no data to be lost. When the employee resumes his work, it is easy to return to the previous state of the computer. GICOMP software will not let third parties take over the machine. The application is safe: only privileged people have access to the administration panel and additional security measures were taken to prevent from unexpected situations. For example, it is not possible to execute certain actions during working hours. It is possible to access the administration panel from any place in the world using just a web browser. The test version of the system can be found here: http://app-trac.man.poznan.pl/tomcat/smoa-devmanager/bin-release/SmoaDevManagerWebGUI.html 2 | Poznań Supercomputing and Networking Center | GICOMP You can find a few computers there with Windows and Linux systems installed that can be freely managed. The username and password is admin. HOW TO RUN GICOMP? REQUIREMENTS To use the application you need a web browser with Adobe Flash Player plugin installed and an internet connection. ACCESS TO THE APPLICATION The address of the administration panel will be provided by PSNC. Login and password provided by PSNC will be required. Contact your administrator if you do not possess this data. FIRST RUN When you start the application for the first time, it may be necessary to use the configuration panel. Specified settings are automatically saved, so it is not necessary to input them again in the future. To access the configuration panel you need to click the button Change application settings, which is available in the login window (Figure 1). Figure 1: Login window It is necessary to enter the proper application URL. This is the address of the program with which whole communication takes place while working with GICOMP. If you are not certain what you should insert there, please contact your administrator. Refreshing frequency is the number of seconds after which the information about the state of managed computers should be updated. Higher value will make the information outdated. However, you should remember that a higher refreshing frequency can slow down the internet connection. The optimum value is about 5 seconds. After adjusting all the necessary fields click Save configuration button. The data will be automatically saved and the login window will show up again. LOGGING After saving configuration settings you need to provide login data and click Login button. If credentials are correct you will be automatically logged in. In case of wrong login or password an appropriate message will be shown. In case of success you will be automatically connected to the server and the list of available computers will be downloaded. ERRORS If during work some errors will appear (usually connection problems), they will be reported at the bottom of the application (Figure 2). Figure 2: Application error Double clicking on this message will open a new window with the exact description of the error. 3 | Poznań Supercomputing and Networking Center | GICOMP LIST OF COMPUTERS GROUPING Computers list is available on the left side of the application main window. Each computer is named in group.subgroup1.subgroup2@server convention, the number of subgroups is not limited. Grouping is performed from the most general to specific ones. The part before the @ sign designates computer assignment to the certain set. Parts separated by dots can state for company departments and offices. Example infrastructure division (in this case two rooms: 306 and 307, situated in the same office) is presented on Figure 3. Grouping is reflected in the application. GICOMP creates the proper hierarchies to simplify the management. Clicking on the name of a group causes all its elements to be chosen. Selected action will be then performed on all of the chosen machines. Figure 4: Example computer states Green tick icon denotes that computer responses to commands (reacts to XMPP pings). This means that executing requests (for example displaying available power policies list) is possible, they will be received and executed by the computer. "Forbidden" icon (red crossed ring) means that the computer does not respond to commands (does not react to XMPPP pings). Icon with two green circles connected states for possibility of establishing network connection with a computer (it reacts to ARP pings). This does not guarantee a valid communication. The computer might be not equipped with the GICOMP node program or the program might not work properly. If the circles color is grey and the line connecting them is crossed the network connection with the computer cannot be established (computer does not react to ARP pings). If this icon is present also the "forbidden" icon will be used. Figure 3: Example computer infrastructure grouping COMPUTERS STATES A relevant color and additional icons are assigned to each computer. The picture below presents few computers, each in different state (in this case no groups were created, so computers are placed in one, general tab marked with asterisk). Green background means that the application works correctly and the computer will receive and process the commands send. Grey background designates the computer in transitional state. It is connected to the network and in a moment it will become available or turn off. Computer with yellow background entry might be put in sleep mode or hibernated. In this case the background should, after some time (dependent on XMPP server settings, usually up to 10 minutes), 4 | Poznań Supercomputing and Networking Center | GICOMP turn red. The yellow color might also suggest Internet connection problems. Red color means that the computer is turned off and will not react to any commands except for turning it on again (provided the settings are correct and the computer is located in the correct subnetwork). Despite the computer being unavailable, its energy usage statistics can still be checked. For times when it was turned off, the zero power usage will be shown. AVAILABLE ACTIONS Figure 6: Extended action set After moving the cursor over the icon, the text describing its use is displayed. There are two possible outcomes of performing an action – the immediate result being displayed (for example when showing statistics) or information about for which computers the command succeeded and for which failed. Figure 7 shows the latter situation: All available actions are represented by the symbolic icons situated in the upper part of application. Before using them the computers to execute actions on should be chosen on the list. Manipulating the computer states, displaying energy usage statistics and creating power policies is possible. Power policy (power scheme, power plan) holds the information of actions that should be taken in case of certain period of inactivity. Many plans can be created and switching between them is possible. Only one plan is active at the given moment. Executing actions causes new tabs or dialog windows to appear, allowing to continue the action or providing information about previous activities result. Tabs can be switched at choice. All operations will be described below, in order of corresponding icons displayed in main application window (Figure 5). Please note that after displaying the available power policies for selected computer, the list of possible actions (number of icons) extends – the additional operations for power policies are available (Figure 6). Figure 7: Partially executed request On the right the computers chosen for the action are displayed. Green background means that the demanded operation succeeded, the red one indicates fail. DETAIL COMPUTER INFORMATION It is possible to browse detailed information about each computer: computer name in the GICOMP application, computer local network name (hostname), operating system installed, computer architecture (32-bit or 64-bit), processors number and type, available RAM size, IP address, network card MAC address. Figure 5: Actions available by default 5 | Poznań Supercomputing and Networking Center | GICOMP (though it will last longer comparing to sleep mode), STATISTICS Electric energy use can be monitored on-the-fly for each of the computers. This information will be saved in a database, with possibility of further browsing. Statistics module allows to create graph presenting power consumed by selected computers. In case of selecting more than one computer a separate curve will be drawn for each of them. After clicking on statistics button it is possible to adjust settings. To enable this option, click on small arrowhead icon. This will cause the panel from Figure 8 to be shown. After selecting Begin date and End date you will be able to change the time interval for which the statistics will be shown. To apply altered settings click on Refresh statistics button. Clicking again on the arrowhead button will cause the settings panel to hide. turn off – the behavior is the same as for clicking on the power button situated on the computer case; before this action is executed, the user is informed that the machine will be turned off in a moment and all necessary data should be saved. After selecting any of the actions described above program will ask for the confirmation (Figure 9). There are to possible methods of measuring energy use. The more accurate of two facilitates dedicated meters connected to each of the computers. However, the cost of equipping with a large number of such devices would be significant. Therefore GICOMP system is also able to estimate the energy consumed basing on machine load. In current software version this option is possible only for Windows machines. CHANGING COMPUTER STATE For each computer the following actions can be executed: turn on – the computer will be turned on again, sleep – save the operating system state in RAM; a little amount of energy is consumed to sustain data in memory, Figure 8: Statistics display settings hibernate – similar to sleep command, except for the state being saved on hard drive and computer being turned off; after turning on again, all the data will be restored 6 | Poznań Supercomputing and Networking Center | GICOMP It is possible to display all power policies available for chosen computers (Figure 10). Only the names are displayed. In case of choosing more than one computer, only the plans that are common for all the chosen machines are displayed (policies that exist on every of the chosen computers). Figure 9: Confirmation request for sleep command All the actions are executed immediately (after confirmation), but it should be noticed that turning computer on or off takes some time. It might take few dozen seconds for computer colors to change in main application window. One more condition should be satisfied for remote turning on of the computer to be possible – it has to be located in the same subnetwork in which computer that wakes it up resides (list of computers that certain computer can awake is decided during installation of the on–computer node program). If this action fails to execute it is very probable that the condition was not satisfied. In this case contact the application administrator in order to check if this functionality can be provided. DISPLAYING AVAILABLE POWER POLICIES To refresh the power policy list for chosen computer (redownload the newest data) click Refresh list button in the bottom right screen corner (in Perform actions window). The number located on the right side of the list indicates the number of the computers, on which the policy is active (in above example only one computer was chosen, so the number next to the one of the power policies is 1). POWER POLICY ACTIVATION After choosing an item on the power policy list you can activate this policy on the computer. This results in all policy settings to be applied. CREATING NEW POWER POLICY After clicking the new policy creation icon, the window is displayed where the name of the policy should be filled and all the settings can be adjusted. Settings refer to the action that should be taken after certain period of computer inactivity. Available options are: Figure 10: Example list of available power policies turning screen off, spinning hard drives down, setting computer in sleep mode, hibernating computer; if sleep mode was chosen for shorter period of inactivity and hibernation for longer one, the computer will be first put into sleep mode and after defined time hibernated; in the opposite case (later sleep mode time) only the hibernation will be executed. Additional options are available after clicking on Enable advanced settings button. These are: 7 | Poznań Supercomputing and Networking Center | GICOMP choosing action executed after pushing the power button, choosing action executed after pushing the sleep button. By default while creating power policy the options related to the computer plugged in are activated. Clicking Battery power supply button will activate the settings valid while using battery power (useful for laptops). Both parameters settings are always saved. The latter is never utilized for stationary computers, always using AC power supply. Using 0 value for any of the parameters means that the setting should be not utilized. Adjustments can be preserved by using Save settings option in Actions window the bottom right screen corner. New power policy is not activated for the computer. automatically REMOVING POWER POLICY Removing power policy causes it to be removed from chosen computer. Before executing this action a confirmation request dialog will be displayed. In case of removing policy currently active, another one will be activated, chosen randomly. EDITING POWER POLICY Editing power policy resembles creating new one except for no new policy being created, only setting changed. BLOCKING POWER POLICIES Selecting this option will disable user’s possibility to change power policies settings. This option can be utilized by the network administrator willing to establish exclusivity for editing policies on all machines. UNBLOCKING POWER POLICIES This option will enable power policies adjustments in control panel of the selected computer. CHANGES INTRODUCED ON COMPUTER Introducing new power policy or adjusting the existing one will cause the changes to be reflected on the machine. All the settings can be browsed or changed in GICOMP application – see previous sections, but can be also checked in affected operating system. This task is very easy when running the on–computer GICOMP node application as a console program, as such a program modifies the settings of currently logged user. In Windows XP system choose Start → Control Panel → Power Options (for Category View of Control Panel: Performance and Maintenance → Power Options). In Windows Vista and Windows 7 power policies should be visible next to the system clock. You can also choose Start → Control Panel → Hardware and Sound → Power Options. Example screenshots showing the Power Options in Windows XP and Windows 7 together with corresponding GICOMP window are presented on the following figures. One particular case has to be taken into consideration. Changing the name of the policy will in fact result in creating new one and preserving the old one. Old one policy should be implicitly removed. This does not apply to changing only the policy description. 8 | Poznań Supercomputing and Networking Center | GICOMP In case the node application is working as a service, browsing policies list is more complicated in Windows XP. Service works independently from logged users. Therefore information about power policies are saved in separate place of the register. To display this information chose HKEY_USERS/.DEFAULT/Control Panel/PowerCfg /PowerPolicies. Thus when using application run as service on Windows XP, different power policies may be seen in Control Panel and in GICOMP application. Figure 11: Power Options in Windows XP Figure 12: Power Options in Windows 7 Figure 13: Power Options in GICOMP application 9 | Poznań Supercomputing and Networking Center | GICOMP If you have any questions, please do not hesitate to contact us. 10 | Poznań Supercomputing and Networking Center | GICOMP E-mail address: [email protected]