1
THT105
Digital
Freeview
Receiver
User manual
Look, Listen & Live
www.thomsonstb.net
Please read this User Manual carefully to ensure proper use of this product and keep this
manual for future reference.
Important Safety Instructions
1. Read these instructions.
2. Keep these instructions.
3. Heed all warnings.
4. Follow all instructions.
5. Do not use this apparatus near water.
6. Clean only with dry cloth.
7. Do not block any ventilation openings, install in accordance with the instructions.
8. Do not install near any heat sources such as radiations, heat registers, stoves, or other
apparatus (including amplifiers) that produce heat.
9. Do not defeat the safety purpose of the polarized plug. If the provided plug does not fit into
your outlet, consult an electrician for replacement of the obsolete outlet.
10. Protected the power cord from being walked on or pinched particularly at plugs,
convenience receptacles, and the point where they exit from the apparatus.
11. Only use attachments/accessories specified by the manufacturer.
12. Unplug this apparatus during lighting storms or when unused for long periods of time.
13. Refer all servicing to qualified service personnel. Servicing is required when the apparatus
has been damaged in any way, such as power-supply cord or plug is damaged, liquid has
been spilled or objects have fallen into the apparatus, the apparatus has been exposed to
rain or moisture, does not operate normally, or has been dropped.
14. Mains plug is used as the disconnect device, the disconnect device shall remain readily operable.
15. The ventilation should not be impeded by covering the ventilation openings with items,
such as newspapers, table-cloth, curtains, etc.
16. No naked flame sources, such as lighted candles, should be placed on the apparatus.
17. Attention should be drawn to the environmental aspects of battery disposal.
18. The use of apparatus in moderate climate.
19. The apparatus shall not be exposed to dripping or splashing and that no objects filled with
liquids, such as vases, shall be placed on the apparatus.
WARNING:
To reduce the risk of fire or electric shock, do not expose this apparatus to rain or moisture.
WARNING:
The batteries shall not be exposed to excessive heat such as sunshine, fire or the like.
The symbol indicates that dangerous voltages constituting a risk of electric shock are
present within this unit.
The symbol indicates that there are important operating and maintenance instructions
in the literature accompanying this unit.
The symbol indicates that this product incorporates double insulation between
hazardous mains voltage and user accessible parts.
When servicing use only identical replacement parts.
The USB memory stick should be plugged in the unit directly. USB extension cable should not
be used to avoid failing of data transferring and interference caused.
When the apparatus was in electrostatic circumstance, it may be malfunction and need to reset by user.
21 Jun 2011 15:17
Table of Contents
1.0 Instruction
1.1 Safety Instructions
1.2 Electrical information
1.3 Storage
1.4 Equipment Set-up
1.5 Accessories
2
2
2
3
3
3
2.0 Your Receiver
2.1 PIN-CODE DEFAULT: 0000
2.2 Front panel
2.3 Rear panel
2.4 Remote Control
2.5 Installing the Batteries
2.6 Using the Remote Control
3
3
4
4
4
5
6
3.0 Connections
6
4.0 User Interface
4.1 Welcome Screen
4.2 Volume Control
4.3 Mute Symbol
4.4 Screen Freeze
4.5 Direct Digit Entry
4.6 TV/Radio select
4.7 Digital Information
7
7
7
7
7
7
7
7
5.0 Main Menu
5.1 Channel Organiser
5.2 Favourites
11
11
11
6.0 Setup Menu
6.1 Languages
6.2 TV Setup
6.3 Parental control
6.4 Service Setup
6.5 Check For Download
6.6 System Information
6.7 Inactivity Settings
13
13
14
14
15
18
20
20
7.0 Multimedia
7.1 My Images
7.2 My Music
20
21
21
8.0 Troubleshooting
22
9.0 Technical specifications
23
This product complies with the basic requirements and other relevant regulations of directives
CE 2004/108/EEC and 73/23EEC; RoHS 2002/95EEC
THOMSON is a trademark of TECHNICOLOR S.A. used under license to STRONG Europe.
Subject to alterations. In consequence of continuous research and development technical specifications,
design and appearance of products may change. Freeview is a trade mark owned by or licensed to
DTV Services Limited ("DTVS"), all other product names are trademarks or registered trademarks of their
respective owners. © THOMSON 2011. All rights reserved. 05/2011
P1
1.0 Instruction
1.1 Safety Instructions
DO NOT INSTALL YOUR RECEIVER:
yy
In a closed or poorly ventilated cabinet; directly on top of or under any other equipment; on a
surface which might obstruct the ventilation slots.
DO NOT EXPOSE THE RECEIVER OR ITS ACCESSORIES:
yy
To direct sunlight or any other equipment that generates heat; to rain or intense moisture; to
intense vibration and to any shock which may cause permanent damage to your receiver or to
any magnetic objects, such as loudspeakers, transformers, etc.
yy
Do not use a damaged power cord. It may cause a fire or an electrical shock. Do not touch a
power cord with wet hands. It may cause an electric shock.
yy
When the receiver is not used for a long period of time, you should unplug the power cord from
the wall socket.
yy
Do not use alcohol or ammonia based liquids to clean the receiver. If you wish, you may clean
your receiver with a soft lint-free cloth slightly made damp with a mild soap solution, only after
disconnecting from the mains voltage supply. Make sure no foreign objects fall through the
ventilation slots because this could cause fire or an electric shock.
yy
Do not place any objects on top of the receiver because this might prevent proper cooling of
the components inside.
Safety Precautions
yy
Never open the receiver cover. Doing so will void the warranty. It is dangerous to touch the
inside of the receiver due to high voltage currents and possible electrical hazards. Refer all
maintenance or servicing to qualified service personnel.
yy
When you are connecting cables, be sure that the receiver is disconnected from the mains
supply. Wait a few seconds after switching off the receiver before you move the receiver or
disconnect any equipment.
yy
Use only approved extension cords with compatible wiring that is suitable for the electrical
power consumption of the installed equipment. Please ensure that the electrical power supply
corresponds with the voltage on the electrical identification plate at the back of the receiver.
If the receiver does not operate normally even after strictly following the instructions in this user
manual, it is recommended to consult your dealer.
1.2 Electrical information
Important
This box generates, uses and can radiate radio frequency energy and, if not installed and used
in accordance with these instructions, may cause harmful interference to radio communication.
However, this is no guarantee that interference will not occur in a particular installation. If the TV
does cause harmful interference to electrical devices, which can be determined by turning the
box off and on, the user is encouraged to try to correct the interference by one of the following
measures:
yy
Re-orient or relocate the receiving aerial.
yy
Increase the separation between the external device and the box.
yy
Connect the external device into an outlet on a circuit different from that to which the box is
connected.
yy
Consult the dealer or an experienced Radio/TV technician for help.
P2
INSTRUCTION
Mains supply
The mains operating voltage is detailed on the rear of the box.
The mains lead on this box may be supplied with a moulded plug incorporating a fuse. Should
the fuse need to be replaced, an ASTA or BSI approved BS1362 fuse must be used of the
same rating. If the fuse cover is detachable never use the plug with the cover removed. If a
replacement fuse cover is required, ensure it is of the same colour as that visible on the pin
face of the plug. If there is no alternative to cutting off the mains plug, dispose of it immediately,
having first removed the fuse, to avoid a possible shock hazard by inadvertent connection to
the mains supply.
1.3 Storage
Your receiver and its accessories are stored and delivered in a packaging designed to protect
against electric shocks and moisture. When unpacking it, make sure that all the parts are
included and keep the packaging away from children. For transporting the receiver from one
place to another or if you are returning it under warranty conditions, make sure to repack the
receiver in its original packaging with its accessories. Failing to comply with such packaging
procedures could void your warranty.
1.4 Equipment Set-up
We recommend you consult a professional installer to set up your equipment. Otherwise,
please follow the instructions below:
yy
Refer to the user manual of your TV and antenna.
yy
Use well shielded SCART cable(s).
This manual provides complete instructions for installing and using this receiver. The following
symbols will serve as follow.
WARNING
Indicates warning information.
NOTE
Indicates any other additional important or helpful information.
MENU
Represents a button on the remote control or the receiver.
(Bold Character)
Move to
Represents a menu item within a window.
(Italic Character)
1.5 Accessories
yy
User Manual and Quick start guide
yy
1 Infrared Extender
yy
1 Remote control unit
yy
2x Batteries (AAA type)
2.0 Your Receiver
2.1 PIN-CODE DEFAULT: 0000
P3
YOUR RECEIVER
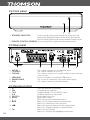
2.2 Front panel
1
2
1. STANDBY INDICATORUsed to visually show power state of the set top box, the
green LED will be light if turned on the set top box and the
red LED will be light if the set top box entered standby mode.
2. REMOTE CONTROL SENSORUsed to receive the signal from the remote control.
2.3 Rear panel
1
2
3
4
6
5
1. ANT IN
This socket connects to your external aerial.
2. TV SCART
This socket connects to your TV.
3. COAXIALThis socket connects to a coaxial socket on your surround
sound system.
4. USB JACKUsed to connect to an external USB device.
5. MAINS CABLE
This is used to connect to your main power supply.
6. IR IN
This socket connects to the IR extender.
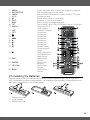
2.4 Remote Control
P4
1. q
Turns the receiver On/Standby
2. FAV
Favourite group selection
3. TV/R
Toggles between TV and RADIO mode
4. 0~9
Channel selection or value input
5. PG-/PG+
Scroll page wise in lists
6. BACK
Step back in menu.
Shows the actual channel information
7. 8. p/qMenu Off: Change channel to previous/next.
Menu On: Moves the cursor up/down.
9. t/uMenu Off: Increases/decreases the volume level.
Menu On: Change settings for specific Menus
10. OKMenu Off: No Function
Menu On: Activates the highlighted menu item.
YOUR RECEIVER
11. MENUOpens the main menu/ in menu you will get one step back
12. EXIT/SORTIE
Exits from the menu or sub-menu
13. GUIDE
Shows the EPG (Electronic Program Guide) in TV mode
14. V+/V-
Volume up/down
15. !
Mutes audio output of the receiver
16. P+/P-
Program +/- (up/down in menu)
17. SUBShows the list of subtitle languages
18. TXTShows MHEG-5 on OSD (On Screen Display) (if available)
19. AUDIOShows the list of
audio settings
20. LIST
Channel Organiser
21. OPT
No function
No function
22. 23. :
No function
24. 5/6
No function
25. "
No function
26. 4
No function
27. u
No function
28. 2Screen Freeze,
Pause in Media
Player
29. 3Stops playback of
the selected file in
Media Player
30. REDMedia Player
function
31. GREENMedia Player
function
32. YELLOWMedia Player
function
33. BLUEMedia Player
function
2.5 Installing the Batteries
Remove the rear side from the remote control by using the groove at the side and install 2 x
AAA size batteries inside the compartment. The diagram inside the battery compartment shows
the correct way (polarity) to install the batteries.
1. Remove rear side.
2. Install batteries.
3. Replace rear side.
P5
YOUR RECEIVER
2.6 Using the Remote Control
To use the remote control, point it towards the front of
the digital set top box. The remote control has a range of
up to 7 metres from the set top box at an angle of up to
60 degrees.
The remote control will not operate if its path is blocked.
If operation of the remote becomes erratic then the
batteries probably need replacing. Be sure to replace
them with the same type. Do not mix old and new
batteries, always replace both.
Tip: Sunlight or very bright light will decrease the sensitivity of the remote control.
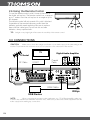
3.0 Connections
Caution:
Make sure to check the voltage specification of your mains supply is the same rating as the
receiver. To prevent the risk of electric shock, do not open the cover or the back of the receiver.
TV
TV Aerial
RF Cable
SCART
Digital Audio Amplifier
Coaxial
Cable
USB Cable
IR Eye
USB Device
Note:
When connecting the receiver to other equipment, e.g., TV, VCR and amplifier, make sure
to refer to the relevant user manual for instruction. Also, make sure you disconnect all the equipment from the
mains supply before making any connections.
P6
CONNECTIONS
4.0 User Interface
The EXIT key will close on screen menus.
All menus will automatically be removed after 30 seconds unless otherwise stated.
4.1 Welcome Screen
When the STB is powered up for the first time or is brought out of standby a welcome screen
will be displayed. This will tell you to press the OK key to start a full frequency service scan.
4.2 Volume Control
A bar will be displayed when volume is changed by pressing V+ or V-. The bar will disappear
after a predefined time following the last V+ or V- key press. Automatically removed after
2 seconds.
4.3 Mute Symbol
Pressing the ! key mutes the sound and a symbol is displayed. Press the ! key again to exit
mute.
4.4 Screen Freeze
Pressing the 2 key will freeze the screen and a pause symbol will be displayed. Press the 2
key again to exit freezing.
4.5 Direct Digit Entry
When you initiate a channel change using the number keys, you can press the OK key to
force the channel change before all 3 digits have been entered. If all 3 digits are entered then
the channel change will occur. 5 seconds after the last key press, the channel change will be
initiated if all digits have not been entered.
4.6 TV/Radio select
Press TV/R button on the remote to toggle between TV channels and Radio stations, then you
can move around among the TV channels or Radio stations by pressing P+/P- buttons. This
mode can be removed later if you select a channel by Direct Digit Entry or Service Organiser.
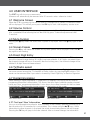
4.7 Digital Information
When viewing a digital programme, a single press of the key will bring up the first level of
programme information shown below. This shows the time, logical channel number, channel
name and ‘Now’ programme information. It also shows the current favourite list that has been
used/selected. The information banner appears at the bottom of the screen.
Now Information
Next Information
4.7.1 First level ‘Now’ Information
You can scroll through information for other channels in the currently selected favourites list or
the full service list if a favourites list is not enabled. This is done using the p/q keys. Whilst
information for other channels is displayed the actual channel being viewed will not change.
Pressing the OK key will jump to the new channel. After a channel change, the information
P7
USER INTERFACE
banner will be removed after 4 seconds. In addition you can toggle between ‘Now’ and ‘Next’
information using the t/u keys. To display ‘Next’ information from the ‘Now’ banner, the user
press the u key.
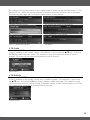
4.7.2 First level ‘Next’ Information
You can return from ‘Next’ to ‘Now’ Information using the t key.
A second press of the key will bring up the extended program information, and example is
shown below.
4.7.3 Extended ‘Now’ Information
Extended Information
Again, you will be able to scroll through information for other channels whilst still watching the
current program by using the P+/P- keys. In addition, the t/u cursor keys will toggle extended
info for ‘Now’ and “Next”. A third press of the key clears all on screen information.
Icons are used to notify you of some information about the displayed event:
SUB DVB subtitles are available for this programme.
TXT An MHEG application is available for this programme.
SUB DVB subtitles are NOT available for this programme.
TXT An MHEG application is NOT available for this programme.
If none of the above are being displayed then if the service is audio or data only, the following
will be displayed.
TXT Service is data/txt only.
Service is audio only.
The programme can be classified by the broadcaster and will show an icon to tell you the age
restrictions.
18
15
12
6
0
?
The event has an adult content age rating. Broadcast age rating 18+.
The event is not suitable for children under the age of 15. Broadcast age rating 15-17.
The event is not suitable for children under the age of 12. Broadcast age rating 12-14.
The event is not suitable for children under the age of 6. Broadcast age rating 6-11.
The event is suitable for ages 0 – 5. Broadcast age rating 0-5.
The event has NOT been given an age rating and may contain unsuitable content.
4.7.4 Channel Change OSD Banner
This is the graphic seen after using P+/P- or when a direct digit entry channel change is
completed. It times out after 4 seconds If P+/P- is used then the new service will be the next/
previous service in the currently selected favourites list. If no favourites list is selected/ enabled
then the full service list will be used. Direct digit entry will tune to a service using its LCN. This
may not be in a favourite list. This OSD will automatically timeout after 3 seconds.
P8
USER INTERFACE
This banner will stay permanently on the screen when no video can be watched on the TV. This
banner will also display the current favourite list enabled and if the service is new or removed.
The following messages will be displayed under various circumstances:
Channel Change Banner
No service are stored in the receiver
This service is encrypted
This data/MHEG only service
This is a audio only service
No Signal
4.7.5 Audio
Pressing the AUDIO key will display the following menu. This menu displays all the audio
streams available on the current service. The selection is done using the p/q keys. Pressing
the OK key selects the new audio. This selection is only valid until power-down or service
change. This menu will be automatically removed after 5 seconds.
Audio Menu
4.7.6 Subtitle
Pressing the SUBTITLE key will display the following menu. This menu displays all the subtitle
streams available on the current service and a subtitle off option. The selection is done using
the p/q keys. Pressing the OK key selects the new subtitle language. This selection is only
valid until power-down or service change. Enhanced subtitle streams are indicated by an ICON.
This menu will be automatically removed after 5 seconds.
Subtitle menu
P9
USER INTERFACE
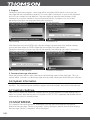
4.7.7 Data Service Loading
If the TXT key is pressed on a service that contains an MHEG data application and data
services have been enabled in the languages menu, then before the application has been fully
loaded, this display will be presented.
The graphics are displayed in the centre of the screen.
This will be automatically removed when the MHEG application acquires the display or will
timeout after 60 seconds if the MHEG application fails to launch.
4.7.8 TV Guide
Pressing the EPG key displays the following guide menu.
EPG menu
The guide contains all the channels in the service list rather than just the favourites list. This
allows you to view the now and next event information for every service as well as the extended
information for a selected event.
Also a video/audio preview is given which shows the programme that is currently being
watched if the user selects the button the preview will change to show the user what is
currently being shown on the selected/highlighted service.
The user can scroll through the service list, select between now or next information and
also use the GREEN key to set a reminder. If the video cannot be displayed then one of the
following messages will be displayed in the preview area:
An icon will be displayed if the service has been added or removed by the broadcaster.
This menu is full screen.
P10
USER INTERFACE
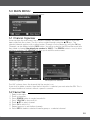
5.0 Main Menu
The Main Menu contains the following options.
5.1 Channel Organiser
Accessed from the main menu, the service list contains the details of the services that have
been added into the system. The list can be scrolled through using the p/q keys. The
selected channel appears with a yellow border. Channels can be viewed by using the OK key.
Channels can be deleted with the RED button. You will be asked for the PIN number each time
they delete a channel (the default pin number is ‘0000’). The GREEN button is used to allow
service re-ordering. The YELLOW will allow you to edit the service name.
Channel Organiser
PIN request for deletion
The UHF column shows the channel that the service is on.
If you wish to delete a service, then the first time this is selected you must enter the PIN. This is
to prevent deletion of services without a parent’s consent.
5.2 Favourites
1. Select main menu.
2. Scroll to favourites.
3. Press GREEN button to create favourite list.
4. Press YELLOW to show edit list.
5. Scroll p/q to select channel.
6. Press OK to add to list.
7. Repeat process to add further channels.
8. Press RED to delete a selected favourite group or a selected channel.
P11
MAIN MENU
5.2.1 Favourites Edit
Accessed from the favourites menu. The order of the Favourite list determines the order the
programmes appear when the user surfing up and down the channels with the P+/P- keys.
The full service list and the favourite list can be scrolled through using p/q. The two lists are
selected by using the t/u keys. The selected channel appears with a yellow border. When the
favourite list is selected the list can be re-ordered using the GREEN key. The favourite list name
can be changed by pressing the YELLOW key which will bring up the edit menu.
Favourite Menu
Favourite Edit
Depending on which list you have selected the help will Change: Left List (Service List)
Right List (Favourite List)
Left List Help Info
Right List Help Info
To re-order a favourite service you must select the required service using the p/q key and
then use the GREEN key to enter re-order mode. When the green re-order is selected you will
be presented with another help:
Re-order Menu
P12
MAIN MENU
5.2.2 Name Editor
This name editor menu is used to allow you to rename a favourite group. The character
selection is done by moving the highlight around a character matrix and using OK to choose
the character. The new name is displayed at the top of the menu. CAPS is used to toggle
the letters between upper-case and lower-case and Delete is used to backspace/delete the
last character. When complete the GREEN key saves the new name and exits the character
matrix menu. The YELLOW key will cancel the current edit and return to previous menu with no
name change.
Favourite Name Edit Menu
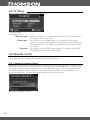
6.0 Setup Menu
This menu options allows you to set up the system.
Setup Menu
Languages Menu
6.1 Languages
This menu allows you to set-up default language for audio. This value will be used on power up.
The options are:
Audio: Selects the default audio language to be used on power-up and
service change. The options are English, Welsh, Gaelic and Irish.
OSD: Selects the default text language to be used in the menus and offair service information. Only English is currently available.
P13
SETUP MENU
6.2 TV Setup
The TV setup menu will have the following options:
TV Setup Menu
The options are:
Television type: Selects the type of TV screen that the set-top-box is connected to.
The options are 4:3 and 16:9.
Widescreen: This option is only available when 4:3 is selected in the shape
option. It is used to select what the user requires to be displayed for
16:9 transmissions. The options are Letterbox, Center Cut out and
Full Frame.
Standard: This option sets the SCART output mode. The options are CVBS,
RGB, RGB provides best picture quality.
6.3 Parental control
The default Parental control PIN is “0000”.
In this menu you can Change the PIN and Lock/Unlock Services.
6.3.1 Viewing a Locked Cannel
Selecting a channel that is locked results in the following OSD being displayed: Entering a valid
PIN will give access to the required service. Locking is on a per-channel basis, so if you switch
to another locked channel you will have to re-enter the PIN to view it. The channel will remain
unlocked until power-down. If the PIN is not entered then this OSD will be displayed at all
normal viewing times. i.e. After leaving the menus this display will return.
Enter PIN for locked channel
P14
SETUP MENU
6.3.2 Parental Locking via Menu Selection
The PIN must be entered to access the Parental Control menu:
Enter PIN to access Menu
Parental Control Menu
The system is supplied with a default PIN. The default Parental control PIN is “0000”.
6.3.3 Parental Control Menu
Entering a valid PIN gives access to a sub menu that provides options to change the PIN or
Lock and Unlock services
6.3.4 Parental Locking Change PIN
Selecting the option to change the PIN takes you to a further sub menu that handles the
confirmation and storing of the new PIN. The menu prompts for a new PIN. The select option
allows you to edit the numbers being entered. As each number is entered, the “-” in the display
is replaced by a “*”. Pressing the OK key causes the confirmation input line to be highlighted
and the process to be repeated. If the entered numbers are not identical, “Numbers not
identical” is displayed in the grey area.
6.3.5 Parental Control Lock/Unlock Services
Selecting the Lock/Unlock Services option gives access to the service locking menu ad shown
below. The program list is displayed and you can scroll through it, using the up and down keys.
The Select key is used to lock and unlock access.
The Icon indicates that the channel is locked.
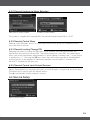
6.4 Service Setup
Service Setup Menu
P15
SETUP MENU
6.4.1 Full Scan Add New Services
When the Full Scan Add New Services option is selected, the end of the service list is
displayed. When new services are found, they are displayed at the end of the existing list in a
highlighted yellow colour. During the scan a progress bar is displayed and a message giving the
estimated time remaining to complete the scan.
When the scan is complete the progress bar will show 100% and a message stating how many
new services have been found is displayed.
Full Scan Add New Services
Shows how many services have been added
6.4.2 Full Scan Replace Existing Services
When Full Scan Replace Existing Services option is selected, the same as the Full Scan Add
New Services menu is displayed except that the existing services in the system are deleted
before the scan starts.
Full Scan Replace Existing Services
6.4.3 Manual Scan
Manual Scan Menu
This menu allows you to manually tune in services. Depending on the transmission this menu
will have different parameters.
Editable options are:
Channel: Sets the required UHF channel. This will automatically fill in the
frequency entry.
Frequency: Overrides and sets the frequency in kHz.
Tx Mode: Selects the required transmission mode. The options are 2K and 8K.
P16
SETUP MENU
Guard Interval: Selects the required guard interval. The options are 1/4, 1/8, 1/16,
and 1/32.
Scan: Starts or stops a service scan.
Information:
Modulation: The modulation type of the locked stream. The values can be
QPSK, QAM16 or QAM64.
FEC: The FEC rate of the locked stream. The values can be 1/2, 2/3,
3/4, 5/6 or 7/8.
Network ID: The network id of the locked stream.
Transport ID: The transport id of the locked stream.
Services Found: Number of services found on the locked stream after a scan.
Services Added: Number of services added to the system after a scan. If some of the
services found are already stored then they will not be re-added.
Signal Level: A bar indicator shows the current signal level.
Quality: Bar indicator to show the current bit-error-ratio and text displaying
the quality.
Before a scan is started or when a scan is started and waiting for SI information the information
parameters will be filled with “----” (dashes).
6.4.4 Info For Manual Scan Menu
When changing the connection settings, the FE connection settings will changed and the bars
updated to show the current FE information. To start a service scan the SCAN option must be
selected and toggled to “Started”. You must then wait for the service information to be found
and displayed.
While waiting for the service information and the services to be added the following will be
displayed in the preview windows:
After the scan has completed the scan option will automatically toggle back to “Stopped”.
The quarter screen preview will show the first service from the new services that have been
added, along with the service name and provider name of the previewing service.
You can then skip through the found services by using the PG+ and PG- keys.
If no new services are added then the preview window will stay blanked and no service or
provider name will be displayed. The following will be displayed in the preview window:
If the video can’t be displayed then one of the following messages will be displayed in the
preview area:
P17
SETUP MENU
Full Scan Setup Menu
6.4.5 First Time Setup
This menu is used to delete all channels and settings to the first time installation, including
Language, TV set, Service, Parental Control set, and then show the First time welcome screen.
First Time Setup
Press OK key to delete all channels and settings, the following menu will be displayed:
After initialize, the welcome screen will show
After Pressing OK, a full scan replacing existing services screen will be presented.
Once the scanning process is finished, the first program in the list will be showed.
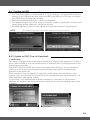
6.5 Check For Download
The option allows you to update the software.
Check for Download
P18
SETUP MENU
6.5.1 Update by USB
This menu for the SW upgrading by USB jack.
1. First Copy the provided *.ssu (for example THT105_version_3.ssu) upgrade file to the root
directory of the USB disk and then insert the USB to the USB port of the box, you should
see USB indicator flashing while reading.
2. Select the upgrading file and press ok to start upgrading.
3. The upgrade progress will last for about 20 seconds as below, please don’t shut down the
power during update, otherwise it will destroy the box.
4. The USB upgrade will clear the user setting and erase the channel list database also.
Note:
The update file must have *.ssu postfix, otherwise it can’t be recognised.
Software Upgrading
6.5.2 Update by OAD (Over Air Download)
1. Notification
This menu is displayed when a new over air download is detected after power-up. This allows
you to select whether to start the download now or download later by adding the event to the
timer programming table.
If the event cannot be added, then an error message will be displayed. You can refuse the
download at this time by pressing exit (however, the download may be re-detected and
indicated at next power-up).
Some downloads may be signalled as high priority which means the manufacturer of the
receiver wants you to perform the download. In this case the download will automatically start
when detected or after leaving standby.
If a download is not available when manually checking for a download or the download
becomes not available while the above menu is being shown, then the following menu will be
displayed.
Download Available
Not Available
P19
SETUP MENU
2. Progress
During the download progress a message will be displayed which details to the user any
message that the manufacturer requires. This message is broadcast as part of the download
and isn’t hard-coded into the interface. The message may describe new features of the
download or a contact number in case of download failure. A progress bar and a time
remaining countdown are displayed during the download.
If the download fails the following error message will be displayed.
Downloading
Download Fail
If the television uses one FLASH chip, the new images are download into another memory
space and then written to FLASH when the new images has been verified.
During the download you must not turn off the receiver, the following message is displayed.
While this message is displayed the television will not respond to any key presses.
Don’t Switch Off the Receiver
Download Completed
3. Download message after restart
When the receiver restarts after a download, the following menu will be displayed. This can
contain either a success or failure message and any other information about the new software.
6.6 System Information
The System Information screen displays the hardware version number and software version
numbers. The software version numbers depend on what modules are built into the software.
6.7 Inactivity Settings
Here you can adjust the automatic standby function of your receiver. Possible settings are: 3
Hours or 4 Hours after the last press of a button or OFF. If OFF is selected, the receiver will not
automatically switch to standby mode.
7.0 Multimedia
This menu for the media playback, Multimedia must be used with external USB device,
otherwise the message “Device is not ready!” will be displayed, remove device when playing,
the message “Device is removed!” will be displayed.
P20
MULTIMEDIA
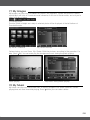
7.1 My Images
My Images can play most JPG/BMP/GIF photos and operate it, if there are photos in device
root folder, it will start at Thumbnail mode, otherwise it will start at Folder mode, and ask you to
select a folder as below.
Thumbnail/Folder
The info (Width x Height and date) of selected photo will be displayed at the left bottom at
Thumbnail mode.
My Album-Thumbnail
My Album-Browser
During playing, you can Zoom, Flip, Rotate, Slide the pictures according to the operation. For
help, press key. You can even play the background music during the photo playing.
Photo playing
Play music during Photo playing
7.2 My Music
My Music can play most MP3/WMA files. It displays progress bar, audio spectrum, current
playing time and total time while playing, Press button you can select device.
P21
MULTIMEDIA
Music Playing
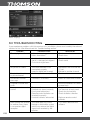
8.0 Troubleshooting
If you experience problems with this receiver or its installation, please read carefully the relevant
sections of this User Manual and this Troubleshooting section.
Problem
Possible cause
What to do
Standby light not lit
Mains lead unplugged
Mains fuse blown
Check mains lead
Check fuse
No signal found
Aerial is disconnected
Aerial is damages/misaligned
Out of data signal area
Check aerial lead
Check aerial
No picture or sound
The Scart interface is not
connected properly
tuned to digital text channel
Reconnect the STB and the
TV set
Retune to another channel
Mosaic block in picture
or picture freezes
Aerial may not be compatible
Check aerial
Scrambled channel
message
Channel is scrambled
Select an alternative channel
Forgotten channel lock
code
No response to remote
control
After moving the receiver
to another room, there
is no receiver digital
reception
P22
TROUBLESHOOTING
Re-install channels to cancel
channel lock
Receiver off
Handset not aimed correctly
Front panel obstructed
Remote control batteries are
inserted incorrectly
Handset batteries exhausted
Plug in and turn on receiver
Aim handset at front panel
Check for obstructions
Check batteries direction
The aerial feed may come
through a distribution system
which may reduce the digital
signal now received by the
receiver
Try a direct feed from the
antenna
Replace remote control
batteries
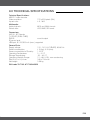
9.0 Technical specifications
Technical Specifications:
MPEG-2 video decoder
Video resolution:
Aspect ratio:
720 x 576 pixels (PAL)
4:3, 16:9
Multimedia:
Audio playback:
Picture view:
MP3 and WMA formats
JPG, BMP, GIF format
Connectors:
ANT IN - IEC Female
TV SCART (RGB, CVBS)
S/PDIF:
coaxial output
IR sensor input
USB port, 5 V DC/500 mA (max.) supported
General Data:
Supply voltage:
Power consumption:
Power consumption in Standby:
Operating Temperature:
Storage Temperature:
Operating Humidity Range:
Size (W x D x H) in mm:
Net-weight:
100 - 240 V AC (SMPS), 50/60 Hz
4 W (typ), 5 W (max)
1.00 W
0 ~ 40 °C
-30 ~ 80 °C
10 ~ 85 %, RH, non-condensing
183 x 128 x 46
0.35 kg
EAN code THT105: 8717185445923
P23
TECHNICAL SPECIFICATIONS
P24