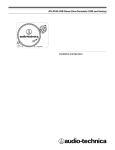
1
POC Bushings – Installation & Handling
1. Scope
This instruction contains general procedures to be followed during
receiving, installation, storage and maintenance of all PCORE POC
bushings. This instruction does not cover all contingencies that may
arise during installation, operation, or maintenance of such
equipment.
If you require additional information regarding a
particular installation and the operation or maintenance of your
bushing, contact PCORE or obtain the full online instruction manual
at www.hubbellpowersystems.com. PCORE does not assume any
liability or responsibility for any damage or failure that would result
from improper transportation, application, installation, storage, or
maintenance.
2. Safety
These tasks may cause safety hazards if they are not performed
properly. Those who are responsible for or involved in the
installation, maintenance, storage and operation of the bushings
must read this instruction and understand the details before they
perform the tasks. Required procedures and instructions must be
followed when installing bushings on apparatus or building
(hereafter, any equipment or buildings on which bushings are to be
installed will be called apparatus).
All applicable safety procedures such as OSHA requirements,
regional and local safety requirements, safe working practices and
good judgment must also be used by personnel when installing,
operating and maintaining such equipment.
Specific hazards are defined and identified in more detail in the
online instruction manual for PCORE bushings found online at
www.PCOREelectric.com.
3. Cable Connections
3.1 Bottom Connections
PCORE POC bushings have one of the following bottom terminals:
Flat spade or threaded stud. The bushings with a flat spade can be
directly connected to the apparatus. The bushings with a threaded
stud MAY need adapters to connect to the apparatus.
3.2 Draw Lead Connections
Some bushings are designed with a hollow conductor through which
a flexible cable or a rod can be pulled. The cable is a part of the
apparatus on which the bushing is mounted and is not supplied with
the bushing. Most draw-lead terminals have a flat spade for brazing,
crimp type, or tubular brazing terminals are available.
3.3 Transformer & Oil Circuit Breaker Interchangeability
The 800 Ampere draw-lead bushings in the 115 kV through 230 kV
class can be bottom connected for 1200 ampere transformer rating
and can also be 1600 ampere bottom connected for oil circuit
breaker application.
Some crates contain separate boxes containing special terminal
adapters, bottom shields, oil reservoir tanks for horizontally mounted
bushings, draw-lead extensions or other special parts. These
special parts should also be checked for damage from shipment.
Examine the porcelain for cracks or chips. Check all seals for oil
leakage. Although surface oil is removed from the bushing after
electrical testing, occasionally a gasket seal may weep an oil film
when received. To check for gasket seal leakage, wipe the
suspected joints clean and observe for a period of 48 hours. If oil
leakage is detected, contact the factory at Le Roy. Any special parts
should be checked for damage.
If shipping damage is evident, you must file a claim with the
transportation carrier and notify PCORE of the claim immediately.
5. Storage
The preferred way of storing bushing is to keep them vertical in a
proper stand, which cannot be tipped over. The preferred location is
indoors, however bushings may be stored outdoors. The crates are
not made for extended outdoor storage; inspect the crates
periodically for weather damage. It is important that the paper core
be completely submerged in oil.
Small bushings, shipped in wire-bound crates may be stored
vertically in the crates, as long as they are kept indoors.
Bushings shipped in crates at an angle can be stored on a flat
surface in the shipping crate.
The top end of larger bushings (greater than 230kV) and low-voltage,
high current bushings (25 kV through 69 kV) should be raised about
7 degrees. The bottoms of crates for EHV bushings must be
supported in several places to prevent crate damage.
For long term outside storage, moisture or water may gather inside
the protective plastic bag that covers the upper and lower porcelain.
Suitable protection, such as water-repellent grease should be
provided for top and bottom terminals, and mounting hardware to
protect the contact area from corrosion. Under these conditions, the
voltage tap housing should be filled with clean, dry transformer oil.
This will prevent condensation and corrosion of the threads.
6. Handling and Installation
6.1 Removing Bushings from Crates
25 kV ~ 69 kV Bushings
PCORE POC bushings in the 25 kV through 69 kV class can be
removed from the crate using a nylon choker around the upper
porcelain. Position the bushing vertically, and check the oil level of
the bushing before installation.
PCORE POC bushings can provide maximum interchangeability
between transformer and oil circuit breaker applications with the
same basic bushing by just changing some hardware. The current
rating for transformer application is based on the maximum oil
temperature of 95o C while that for the oil circuit breaker application
is on the maximum oil temperature of 800C.
4. Receiving and Inspection
You should perform a visual inspection on the crate and the bushing
before unloading. When unloading crates, you must take extreme
care not to damage the crates or the bushings. Do not drop the
bushings. The bushings should be unpacked in a flat, dry area
To open the wire bound crate, the twisted wires should be
straightened with pliers. The clips (on crates with reusable clips) can
be removed using a claw hammer. Remove any nailed covers
carefully to avoid damage.
Generator Step Up (GSU) Bushings
PCORE GSU bushings must be removed from the crate while in the
horizontal position. The center of gravity is not at the flange so a
double sling must be placed between the porcelain at the air end of
B-53744-A
Page 1 of 4
Rev. Date 10-28-15
* For more detailed information on all aspects of PCORE bushings, refer to the online instruction manual found at www.hubbellpowersystems.com
the bushing and the porcelain on the oil end of the bushing. Once
the bushing is removed from the crate and placed horizontally on a
pad, eyebolt may be attached to the top terminal to lift the bushing
from horizontal to vertical and into the apparatus.
!
Eyebolts must be placed in the vertical
terminals only, lifting from the horizontal
terminal may cause damaged to the terminal
alignment.
CAUTION
!
Do not attempt to lift bushing from the
shipping crate by the top terminal alone.
The angle of the flange in the shipping crate
may cause binding and extreme cantilever
loading on the terminal, which may cause
damaged to the bushing.
345 kV ~ 765 kV class
From one crane hook, use two slings or a double sling passed
through a spreader bar and attach the lower end of the slings to the
mounting flange lifting eyes. The spreader bar is not provided but
such a bar must be used. The slings should be long enough so when
the bushing is vertical the bushing will pass through and under the
spreader bar.
DANGER
Do not use a single sling around the top
porcelain shed as a means of lifting. This
unbalance may cause severe pressure
against the porcelain shed.
115 kV ~ 800 kV class bushings
These PCORE POC bushings are provided with lifting eyes in the
flange. Because of the size and weight of the bushings, they may
require special handling. Before lifting a bushing, remove any
mounting flange bolts holding the bushing in the crate and any other
method of support which may be used to secure the bushing.
The main lifting tackle should always be attached to the flange lifting
eyes. A second crane hook must be attached to a double sling with a
choker rope tied around the bottom of the top porcelain.
115 kV ~ 230 kV class
Tie two choker ropes around the top porcelain under the top
petticoat. Attach two slings to one crane hook. Pass the other end
of the sling through the eyes of each choker rope. Attach a shackle
to each of these ends. Connect the shackles to the lifting eyes of
the mounting flange 180 degrees apart.
Pass a sling through eyes of mounting flange and attach both ends
to the second crane hook. If it is not easy to pass the sling through
the eyes of the flange, you may tie a choker rope with a sufficient
strength under a petticoat close to the bottom petticoat. Attach a
sling to the second crane hook. Attach the end of choke rope to the
hook.
From the second crane hook attach a sling to the choker around the
bottom of the top porcelain 90 ° degrees from the flange lifting eyes.
This crane will be used to pivot the bushing only while the flange
crane by way of the spreader bar will support the main weight of the
bushing.
Lift the bushing by raising both crane hooks simultaneously
maintaining the air end of the bushing slightly above the oil end until
ready to lower the oil end of the bushing.
Under certain conditions it may be advantageous to remove the
bushing from the crate first to accommodate placement of the
choker sling or placement of shackles on the flange. Under these
conditions a sling or choker around the porcelain is acceptable and a
sling through the flange lifting eyes would be adequate to raise the
bushing and maintain a slight angle. The bushing can be removed
and placed on adequate support, which will keep the air end raised
while adjusting the slings and cables.
When ready to lift the bushing for mounting, raise both crane hooks
simultaneously while maintaining the air end at a slightly higher
angle by lowering the crane hook attached solely to the flange. The
entire weight of the bushing will be held by the two slings through the
choker and attached to the flange lifting eyes. The angle of
orientation can be adjusted by the raising and lowing of each crane.
B-53744-A
Page 2 of 4
Rev. Date 10-28-15
* For more detailed information on all aspects of PCORE bushings, refer to the online instruction manual found at www.hubbellpowersystems.com
These measurements should agree with the nameplate values within
equipment tolerances and should be kept as reference readings.
When power factor and capacitance readings are in disagreement
with nameplate data beyond reasonable tolerances, you should
contact the factory at Le Roy.
Never test the bushing while in the shipping
crate.
!
CAUTION
DANGER
Do not place a choker sling or rope above the
top shed between the porcelain and the metal
cover. The metal dome on PCORE bushings
consists of a spinning and may be damaged
from sling pressure.
!
Do not attempt to lift the bushing by a sling
on the porcelain alone.
!
WARNING
After the bushing is upright, check to ensure the internal bushing oil
is at the correct height in the sight glass or that the magnetic oil level
indicator is showing the proper oil level.
6.2 Cleaning
Bushings should be kept vertically in a secure stand and you must
remove all dust, grease, oil or particles of packaging from the
bushing with clean dry cloth. Especially the lower porcelain and
flange should be wiped clean of dust or dirt to prevent contamination
of transformer oil. Before mounting bushings to the apparatus cover,
inspect and clean the mounting surfaces of both the bushing and
apparatus.
When possible, place the bushing in a grounded
test stand. It is important to isolate the flange
from the grounded stand using a good insulating
material. Wood can contain significant moisture
and should never be used.
The readings may be taken with the bushing
installed in the equipment provided the top
terminal connections are not made or the
terminal is isolated from the main bus via a
After the testing has been completed, reassemble the tap cover after
coating the “0-ring” lightly with silicone grease and tighten the cap.
6.4 Mounting Bushings
If the bushings are stored horizontally, it is important to remove all
entrapped air from the core. Place the bushing in the vertical
position and shake the oil end to force any air bubbles out of the
core area before Installation. Do not apply voltage for at least 24
hours after installation for the bushings rated below 230 kV and
at least 48 hours for the bushings in the 230 kV class and above
6.4.1 Mounting Angle
PCORE bushings with oil level sight glasses are designed for safe
operation in vertical position or at angles up to 70 degrees from
vertical. Bushings with metal domes using magnetic oil level gauges
should not be used at angles exceeding 30 degrees from the vertical
and should be mounted with the magnetic oil level gage facing
downwards. Bushings with metal domes using sight glasses should
be mounted with the sight glass facing sideways (see figure below).
PCORE bushings should not be mounted horizontally unless the
bushing is furnished with a supplementary oil reservoir.
Check the inside wall of draw-lead tube especially when the bushing
has been stored outdoors a long time. If it is dirty, remove all the dirt,
dust and other foreign materials from the wall.
6.3 Electrical Tests
PCORE recommends that power factor and capacitance
measurements be performed on all bushings before installation. The
measured values should be compared with those on the nameplate.
The nameplate values are of special importance in asking PCORE
questions about bushings. The bushing must be kept vertically in a
secure stand for the electrical tests.
The methods of measuring power factor and capacitance are in the
user manual of your power factor measuring device or consult IEEE
Standard C57.152 IEEE Guide for Diagnostic Field Testing of FluidFilled Power Transformers, Regulators, and Reactors. Only C1
power factor and capacitance have meanings for the 25 kV through
69 kV class bushings. PCORE recommends against measuring C2
power factor and capacitance of this voltage class bushings for any
purpose.
6.4.2 Vertical Mounting
Lift the bushings in the same way as removing bushings from the
crates. If a flange adapter is required, install it before moving the
bushing to the mounting hole. Put the gaskets and/or o-rings on the
apparatus mounting surface per the apparatus instruction. Move the
bushing to the mounting hole of apparatus. Tighten the bolts to the
torque specified from the apparatus manufacturer.
Do not operate a bushing with the bushing oil level
Do not operate the bushing without the test tap
not visible in the sight glass under normal ambient
!
or voltage tap cover in place.
conditions. This could result in serious damage to
the bushing and/or apparatus on which the
CAUTION
bushing is being mounted.
!
PCORE recommends measuring C1 and C2 power factors and
It is normal for the oil level to drop below the sight
capacitances of the bushings rated 92 kV and above prior to the
glass in some bushings in extremely cold
WARNING
installation. PCORE POC Bushings rated 92 kV and above use a
conditions. Contact PCORE Electric Company if
voltage tap located just above the flange which is normally grounded
you have any questions.
in operation by means of a ground clip in the tap cover. Unless a
potential device is used, this cover must always be installed during
6.4.3 Draw-Lead Connection
operation of the bushing.
Bushings designed for draw-lead applications have the draw lead
B-53744-A
Page 3 of 4
Rev. Date 10-28-15
* For more detailed information on all aspects of PCORE bushings, refer to the online instruction manual found at www.hubbellpowersystems.com
terminal, nut and pin in place. Before installation, you must remove
the top terminal, the draw lead nut, the retaining pin and the draw
lead terminal. Braze the apparatus cable to the draw lead terminal.
Pass a wire or pull cord through the bushing center conductor from
the top and attach it to the hole in the top end of the draw lead
terminal on the flexible cable. While lowering the bushing into the
opening in the cover, simultaneously pull the cable up through the
center conductor. Secure the draw lead terminal into the top of the
bushing by replacing the retaining pin through the conductor and
then replace the draw lead nut. A light coating of silicone should be
applied to the 0-ring of the top terminal before replacing. Refer to the
section Bolting and Terminal Torque Settings for terminal tightness.
6.4.4 Torque Specifications for Bolts
Before mounting bushings to the apparatus cover, inspect and clean
the mounting surfaces of both the bushing and apparatus. Install the
gasket or 0-ring supplied by the apparatus manufacturer. Secure
the bushing on the apparatus cover by tightening all the bolts
uniformly in several steps. Do not attempt to pull the bolts down to
the final setting on the first tightening. It is good practice to allow
time between the several tightening steps for the gasket to set. Care
in tightening avoids possible damage or distortion of the mounting
flange. Normally, the torque values as listed will provide adequate
compression for sealing.
Use the torque recommendations and mounting specification of
the apparatus manufacturer. Reduce torque if gasketed per
manufacturing recommendations for material being used. Adjust
torque for other metals for bolts in flange. Values below are for SAE
Grade 1 or 2.
BUSHING FLANGE
Bolt Diameter
Torque
(inch)
(ft-lb)
¾
105
1
200
250
11/8
Current
(ampere)
400
800
DRAW LEADS
Thread Size
(inch)
¾
1¼
Torque
(ft-lb)
20
40
REMOVALBE TOP TERMINAL
Torque
(ft-lb)
80
6.4.5 Bottom Terminal and Shields
If a bottom terminal and or shield is to be installed, use 40 ft-lb for
the ½-13 SST. bolts and 20ft-lb torque for the 3/8-16 SST. bolts.
Pass the cable through the hole in the shield and mount the bottom
terminal. Then push the shield to the bushing and mount the shield
on the bushing.
6.4.6 Top Terminals
After power factor and capacitance tests are completed for the
apparatus, connect the top terminal for energization.
7. Partial Discharge Tests
PCORE does NOT add a pressurized gas blanket over the top of the
oil in the bushings. It is possible to encounter some partial
discharges in the sight glass during overvoltage tests. The partial
discharges are a result of a partial vacuum formed in the gas space
above the oil. The condition occurs most often after transformer
heat-run tests. It can be eliminated by venting the gas space to
atmospheric pressure.
!
CAUTION
When the bushing is hot, do NOT
remove oil fill plug.
8. Energization
During initial energization, you should monitor oil level changes. If oil
level changes excessively, contact the factory in LeRoy.
9. Maintenance
Little maintenance is required other than periodically checking the oil
level as indicated in the sight glass or the magnetic oil level gage.
Unless a bushing is damaged, the oil level should remain within the
sight glass or indicate normal with the oil level gage, fluctuating
slightly with thermal and ambient conditions.
Although we discourage the breaking of the seal of the oil-fill plug in
the bushing reservoir; if the oil level over an observed period of time
remains low and ambient conditions are normal, oil may be added.
However, contact the factory in LeRoy first.
Removal of oil filler plug should be done only in a dry atmosphere.
Provide oil that meets the IEEE C57. 106 standard for new
transformer oil. If there is mechanical damage to the bushing which
results in loss of oil, or the oil level in the bushing is still indicating
low after the addition of oil the bushing should be taken out of
service.
Never operate or test a bushing with a low
internal oil level. Under these conditions,
operation may result in severe personal
injury, death or property damage
!
WARNING
Bushings exposed to salt spray, cements dust, and other abnormal
contamination deposits are subject to a special hazard and must be
cleaned regularly to prevent flashover and corrosion of metal parts.
The sight glass should also be cleaned regularly. We endorse and
recommend the measurement of power factor and capacitance at
the time of installation and repeating the measurement regularly.
These values should be used as a base to compare the TRENDS of
future measurements. Field measurements of power factor and
capacitance may differ from measurements made under the
controlled conditions in the factory. Contact the factory if you
encounter any of the following:
A. Measurement of power factor increases to 1.5 times the original
installation value.
B. Measurement of capacitance increases by 10 percent over the
original installation value.
10.
Re-shipping or Returning Bushings
To ship the bushing to another site, you may re-use the original
crate. Inspect the crate for damage and repair before using.
Bushings with damaged porcelain or sight glasses pose a
significant danger. The entire assembly is under compressive
load, releasing that load suddenly may cause the bushing to
explode. Wrap broken porcelain or glasses with duct tape and
blankets (Burlap works well).
It is recommended that bushings be returned to the factory for all
significant repairs. Inquiries concerning repairs should be addressed
to the factory at Le Roy. You MUST obtain a Return Authorization
(RA) number before shipping bushings or bushing attachments to
PCORE. The handling of all requests will be expedited if the factory
is furnished the catalog number and the serial number which are on
the nameplate. The catalog number identifies the bushing rating.
The first two digits of the serial number are the last two digits of the
manufacturing year.
Do not attempt field repairs.
!
WARNING
A bushing experiencing a core problem may have
a high pressure and/or hot oil inside. Do not
remove oil fill plug.
Bushings are assembled using heavy clamping
pressures. A bushing with a shattered oil sight
glass must be wrapped with burlap and duct tape
before the bushing is removed from installation.
B-53744-A
Page 4 of 4
Rev. Date 10-28-15
* For more detailed information on all aspects of PCORE bushings, refer to the online instruction manual found at www.hubbellpowersystems.com