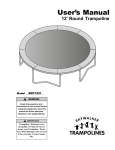
1
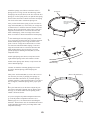
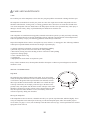
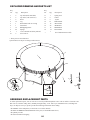
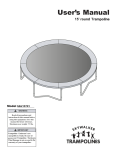
User ’s Manual
16’ Oval Trampoline
Model SWTC1600
__________
!
WARNING
Read all precautions and
instructions in this manual before
using this equipment. Save this
manual for future reference.
Maximum user weight 200 lbs.
!
IMPORTANT
Trampoline / Enclosure’s are
susceptible to winds. Be sure to secure your Trampoline / Enclosure.
Wind Damage is not covered in the
warranty of your trampo line.
SWTC1600
Model _________________
A serial decal is found on one of the trampoline legs. Model number decal tag is located on the jumping mat
CONTENTS
Important Precautions ...........................................3
Warning Label Placement. ....................................4
Before You Begin..................................................4
Trampoline Safety Information.............................5
Methods of Accident Prevention...........................6
Use and Instructional Material..............................7
Instructional Program and Model Lessons ...........8
Basic Trampoline skills.....................................9-10
Assembly..........................................................11-14
Care and Maintenance...........................................15
Exploded Drawing and Part List...........................16
Ordering Replacement Parts .................................16
Limited Warranty ...............................................Back
QUESTIONS?
If you have questions after reading this manual, please call our toll-free Customer Care Hot Line. The trained
technicians on our Customer Care Hot Line will provide immediate assistance.
Customer Care Hot Line: 1-866-603-Jump (5867)
Monday—Friday, 8 a.m.—5 p.m. Mountain Time
REPLACEMENT
PARTS
www.skywalkertrampolines.com
!
WARNING
Read the assembly, installation, care, maintenance, and use instructions in this manual prior to assembling and
using this trampoline. Save this manual for future reference.
2
.
USE INSTRUCTIONS
WARNING:
12. Trampoline over 20 in. ( 51 cm )tall are not recommended for use for
To reduce the risk of serious injury, read
for use by children under 6 years of age.
and follow all of the warnings, precautions, and instructions
in this manual before you use the trampoline.
Warnings and instructions for care, maintenance, and use of
13. Do not let more than one person inside the trampoline enclosure at the same time. Use by more than one person at the same
time can result in serious injury.
this trampoline are included to promote safe,
enjoyable use of this equipment.
14. Properly secure the trampoline when not in use. Protect it against
1. It is the responsibility of the owner and supervisors of the
trampoline and enclosure to make sure all users obey the safety instructions given in this manual. Secure the trampoline
unauthorized use. If a trampoline ladder is used, the supervisor
should remove it from the trampoline when leaving the area to
prevent unsupervised access by children under 6 years of age.
and trampoline enclosure against unauthorized and
unsupervised use.
15. Do not jump on the trampoline while you have or are holding
2. The trampoline enclosure is to be only be used as an enclosure
any objects, especially something sharp or breakable.
that for a trampoline of a size that for which the enclosure is
designed.
16. Do not use the trampoline while under the in�luence of
alcohol or drugs.
3. Be sure the trampoline and enclosure are on a level surface
before you use it.
17. Use trampoline enclosure only with mature, knowledgeable
supervision.
4. Adequate overhead clearance is essential. . A minimum of 24 feet
18. Misuse and abuse of the trampoline enclosure is dangerous
(7.3 meters) from ground level is recommended . Provide
and can cause you to be badly hurt.
clearance for wires, tree limbs, and any other possible hazards.
5. Lateral (sidewise) clearance is essential.. Place the tram-
19. Always climb onto and off of the trampoline. It is a dangerous
6. Use the trampoline and enclosure in an area with lots of light.
If the trampoline and enclosure are indoors or in shady areas
you may need to use arti�icial (electrical) lighting in the area.
20. For information concerning skill training, contact a certified trampoline
Practice to jump from the trampoline to the �loor or ground when
poline and enclosure away from walls, structures, ,
fences, sidewalks, and other play areas. maintain a clear
space on all sides of the trampoline and enclosure.
dismounting, or to jump onto the trampoline when mounting.
Do not use the trampoline as a springboard to other objects.
instructor.
21. For additional information concerning the trampoline equipment
contact the manufacturer.
7. DO NOT attempt or allow summersaults (�lips) on trampoline.
.
landing on the head or neck can cause serious injury,
paralysis, or death, even when landing in the middle of
22. Avoid bouncing too high. Stay low until bounce control and
repeated landings in the center of the trampoline can be accomplished
Control in more important than height.
the jumping bed.
23. While keeping head erect, focus eyes on the trampoline toward
8. Always inspect the trampoline enclosure before each use..
Make sure that the frame padding is correctly and securely
positioned. Replace any worn, defective, or missing parts.
(Jumpers may be hurt if the trampoline and enclosure are
used when they are in poor condition.)
The perimeter. This will help control bounce.
24. Avoid bouncing when tired. Keep turns short.
25. Stop bouncing by �lexing knees as feet come in contact with the
trampoline bed. Learn this skill before attempting others.
9. Remove any obstructions from under the trampoline and
trampoline enclosure.
26. Learn Fundamental bounces and body positions thoroughly before
before trying more advanced skills. A variety of trampoline activities
can be carried out performing the basic fundamentals in various series
and combinations, performing one fundamental after another, with or
feet bounces between them.
10. Keep objects away which could interfere with the performer.
Maintain a clear area around the trampoline.
11. Bounce only when the surface of the mat (bed) is dry. There
should be very little or no wind or air movement. The trampoline and enclosure must not be used in gusty or severe
winds.
3
WARNING LABEL PLACEMENT
!
WARNING/ADVERTENCIA
!
WARNING
Do not land on head or neck.
Do not attempt or allow somersaults. Landing on your head or neck can cause
serious injury, paralysis, or death, even when landing in the middle of the mat.
Use trampoline only with mature, knowledgeable supervision.
No se caiga de cabeza o cuello.
No intente dar ni permitir saltos mortales. Cayendo de cabeza o cuello puede
causar dano serio, paralisis o muerte, aun si se cae en la mitad de la
trampolina. Use la trampolina solamente con vigilancia madura y entendida.
Only one person at a time on the trampoline.
Do not allow more than one person on the trampoline. Use by more than one
person at the same time increases the chances of injury.
Use trampoline only with mature, knowledgeable supervision. This trampoline
is not recommended for children under 6 years of age.
Do not attempt or
allow somersaults.
(Flips)
Solamente una persona a la vez en la trampolina. No se permita mas que una
sola persona en la trampolina al mismo tiempo. Uso por mas que una sola
persona al mismo tiempo aumenta el riesgo de dano.
Use la trampolina solamente con vigilancia madura y sabia. Esta trampolina
no se recomiende por ninos que tienen menos de seis anos.
twl1
Do not land on head or neck.
Landing on your head or neck can
cause serious injury, paralysis, or
death, even when landing in the
middle of the mat.
Use trampoline only with mature,
knowledgeable supervision.
Do not allow more than one
person on the trampoline.
Multiple jumpers increase the chance
of loss of control, collision and falling
off. This can result in broken head,
neck, back or legs.
Use trampoline only with mature,
knowledgeable supervision.
Skywalker Trampolines.
This trampoline is not recommended
for children under 6 years of age.
Read all of the instructions before
using this trampoline.
Inspect before using and replace any
worn, defective or missing parts.
twl2
The labels shown on this page have been attached to the trampoline in the indicated locations. The placard will be
attached by the owner (see step 10 on page 14). If one of the labels or the placard is missing or illegible, call our
Customer Care Hot Line toll-free at 1-866-603-Jump (5867), Monday through Friday, 8 a.m. until 5 p.m. Mountain
Time, to order a free replacement label or placard. Attach the label or placard in the location shown.
Note: The labels and placard are not shown actual size.
Specific use Limitations
HIGH WIND
It is possible for the trampoline and enclosure to be blown about by high winds. If you expect high winds, move the
trampoline and enclosure to a sheltered location. Disassemble (take down) the enclosure netting. Tie the trampoline
frame down to the ground using ropes and stakes (not included).
BEFORE YOU BEGIN
Thank you for choosing your Skywalker Trampolines brand Trampoline. The Skywalker Trampoline oval
Trampolines are designed and crafted to provide many years of fun and fitness. This trampolines comes equipped
with warnings and instructions for the assembly, care, maintenance, and use of the trampoline. This information must be
read by all trampoline supervisors and users before any person is allowed to jump on the trampoline.
If you have questions after reading this manual, please call our toll-free Customer Care Hot Line at 1-866-603Jump (5867), Monday through Friday, 8 a.m. until 5 p.m. Mountain Time (excluding holidays). To help us assist
you, please mention the model and name of the trampoline when calling. (See the inside cover of this manual.)
4
TRAMPOLINE SAFETY INFORMATION
In trampoline use, as in all active recreational sports, participants can be injured. However, there are steps that can
be taken to reduce the risk of injury. In this section, primary accident patterns are identified and the responsibilities
of supervisors and jumpers in accident prevention are described.
ACCIDENT CLASSIFICATION
Somersaults (flips): Landing on your head or neck, even in the middle of the trampoline mat, increases the risk of a
broken back or neck, which can result in paralysis or death. Such events can occur when a jumper makes an error
trying to perform a forward or backward somersault (flip). Do not perform somersaults (flips) on this backyard
trampoline.
Multiple Jumpers: More than one jumper at a time on the trampoline increases the chance of a jumper becoming
injured by losing control of his or her jump. Jumpers may collide with one another, fall off of the trampoline, fall
onto or through the springs, or land incorrectly on the mat. The jumper weighing the least is the jumper most likely
to be injured.
Mounting and Dismounting (Getting On and Off): The trampoline mat is several feet above ground level. Jumping
from the trampoline to the ground or any other surface may result in injury. Jumping onto the trampoline from a
roof, deck, or other objects also presents a risk of injury. Smaller children may need assistance getting onto or down
from the trampoline. Climb carefully onto and off of the trampoline. Do not step onto the springs or the frame pad.
Do not grasp the frame pad to pull yourself onto the trampoline.
Striking the Frame or the Springs: Injury may result from hitting the frame or falling through the springs while
jumping or getting onto or off of the trampoline. Stay in the center of the mat when jumping. Be sure to
keep the frame pad in place to cover the frame. The frame pad is not made or intended to support the weight of the
trampoline user. Do not step or jump directly onto the frame pad.
Loss of Control: Jumpers who lose control of their jumps may land on the mat incorrectly, land on the frame or
springs, or fall off of the trampoline. A controlled jump is one where the landing is in the same spot as the takeoff.
Before learning a more difficult stunt, you should be able to do one before over and over with control
.
Attempting a stunt beyond present skill levels increases the chance of loss of control. To regain control and stop
your jump, bend your knees sharply when you land.
Alcohol or Drug Use: The chance of injury increases when a jumper has consumed alcohol or taken drugs. These
substances impair a person’s reaction time, judgment, and physical coordination.
Encountering Objects: Jumping on a trampoline while other people, pets, or objects are underneath it will increase
the chance of getting hurt. Jumping while holding or having an object on the trampoline, particularly one that is
sharp or breakable, will increase the chance of injury. Placing a trampoline too close to overhead electrical wires,
tree limbs, or other objects can increase the chance of injury.
Poor Maintenance of the Trampoline: Jumpers may be injured if a trampoline is used when it is in poor condition. A
torn mat, bent frame, broken spring, or missing frame pad, for example, should be replaced before anyone is
allowed to jump. Inspect the trampoline before each use.
Weather Conditions: A wet trampoline mat is too slippery for safe jumping. Gusty or high winds can cause jumpers
to lose control. To reduce the chance of injury, use the trampoline only when the weather is good.
Access: To prevent access to the trampoline by unsupervised smaller children, the optional access ladder should
always be taken away and stored in a safe place when the trampoline is not in use.
5
Avoid jumping too high or for too long. Always control your jump. A controlled jump is one where the landing is in
the same spot as the takeoff.
Bounce in the center of the trampoline. Focus eyes on trampoline toward the perimeter. In you don’t do this you
may lose your balance and control.
Take turns jumping, one at a time, and always have someone watch you.
GETTING ON AND OFF
Climb onto and off of the trampoline. Do not jump onto or off of it. Do not use the trampoline as a springboard to
jump to other objects or places.
For additional information regarding equipment, contact Skywalker Holding, LLC. For additional information
regarding skill training, contact a trainer certification organization.
USE AND INSTRUCTIONAL MATERIAL
OVERVIEW OF TRAMPOLINE USE
The first periods of trampoline use should focus on learning fundamental body positions and practicing the eight
basic bounces that are described on pages 9 and 10.
During this learning period, jumpers should practice these basic techniques and perfect them. Braking, or checking
the bounce, should be taught first and stressed as a safety measure. Jumpers should brake their jump whenever they
start to lose their balance or control. This is done by simply flexing the knees sharply upon landing and absorbing
the upward thrust of the mat. This allows the jumper to stop suddenly and avoid losing control.
With trampoline use, the takeoff point and landing point of a good, controlled jump are in the same spot. An exercise is considered learned only when a jumper is able to perform it correctly time after time. Jumpers should never
go on to any advanced stunt until they can perform all previous stunts correctly each time.
Allow each jumper a brief turn on the trampoline. Extended bouncing exposes an overtired user to an increased risk
of injury. Longer turns tend to lessen the interest of others waiting to jump. Clothing should consist of a T-shirt and
shorts. Jumpers should wear regulation gymnastic shoes or heavy socks, or they may jump barefoot. Street shoes or
tennis shoes should not be worn on the trampoline. Beginning jumpers may wish to wear loose-fitting protective
clothes, such as a long-sleeve shirt and pants, until correct landings are mastered. This will reduce the chance of mat
(bed) burns from improper landings on elbows and knees. No hard-sole shoes should be worn, as they cause extra
wear on the trampoline mat.
Mounting and dismounting (getting on and off) properly should be a strict rule from the beginning. Users should
climb onto the trampoline by placing their hands on the frame and stepping or rolling up onto the frame, across the
springs, and onto the mat. They should not step directly on the frame pad or hold on to the frame pad when getting
onto or off of the trampoline. Users should always place their hands on the frame while getting on or off. To get off,
jumpers should walk to the side of the mat, bend over and place one hand on the frame, and then step from the mat
to the ground. If you have installed the optional ladder, its rungs can be used to get on or off. Always face the ladder and place your hands on the frame. Make sure your foot has secure contact with the ladder rung when using it.
Reckless bouncing should not be permitted. All skills should be learned at moderate heights. Control, rather than
height, should be emphasized. Jumpers should be forbidden to practice alone and unsupervised.
7
INSTRUCTIONAL PROGRAM AND MODEL LESSONS
The following lessons are examples of an instructional program. They should follow a complete discussion and
demonstration of body mechanics between the supervisor and the student(s). See pages 9 and 10 for descriptions
of basic trampoline skills.
Lesson 1
1. Mounting and dismounting (getting on and off)—Demonstration and practice of proper techniques.
2. Fundamental bounce—Demonstration and practice.
3. Braking (stopping the bounce)—Demonstration and practice. Braking on command.
4. Hand and knee drop—Demonstration and practice, stressing four-point landing and alignment.
Lesson 2
1. Review and practice of skills already learned.
2. Knee drop—Half twist to the right, to the left, to the feet, and then to the knees.
3. Seat drop—Half twist to the feet. Seat drop, knee drop, hand and knee drop, repeat.
Lesson 3
1. Review and practice of skills already learned.
2. Front drop—To save time and avoid mat (bed) burns, all students should be requested to assume the front drop
position on the floor while the instructor checks for faults. Suggested progression: from hand and knee bounce,
the body is extended for the landing in the front drop position, and the rebound is made to the feet.
3. Practice routine—Hand and knee drop, front drop, feet, seat drop, half twist to feet.
Lesson 4
1. Review and practice of skills already learned.
2. Back drop—Demonstration, emphasizing the forward thrust of the hips by arching the body as one leg is brought
forward from the standing (not bouncing) position, and the drop to the back with the chin held forward to the
chest and the eyes forward on the frame pad. Spotting this skill is most important. Demonstration of back drop
with low bounce and practice of both techniques.
Lesson 5
1. Review and practice of skills already learned, encouraging original routines based on them.
2. Half turntable—Start from the front drop position and push to the left or right with the hands. Turn the head and
shoulders in the same direction. Keep the back parallel to the mat and the head up. After completing a half turn,
land in the front drop position.
Lesson 6
1. Swivel hips—Suggested progression: seat drop, feet, half twist, repeat; seat drop, half twist to feet, repeat; seat
drop, half twist to seat drop.
2. Half turntable.
Lesson 7
The student should now be encouraged to design and organize routines, with emphasis on good form. The
instructor may judge or grade students and arrange groupings for further instruction accordingly. To stimulate
interest in competition, the game of “Trampoline Horse” can be introduced. Before the game begins, students
must count off. To start the game, student number 1 performs a stunt. Student number 2 then mounts the trampoline, performs the same stunt and adds a second stunt. Student number 3 mounts and performs stunts 1 and 2 and
adds a third stunt. Thus the series of stunts is continuously lengthened. The first person to miss a stunt in the
series assumes the letter “H” and starts a new series with a stunt. If a person misses again, he assumes the letter
“O.” When a person accumulates “H-O-R-S-E,” he or she is eliminated from the game. The last remaining contestant is the winner. Lesson planning from this point on should be facilitated by contacting a certified trampoline
instructor.
8
BASIC TRAMPOLINE SKILLS
Fundamental Bounce
Knee Drop
1. Start from a standing position with your head erect and
your eyes on the frame pad.
2. Swing your arms forward and up in a circular motion.
3. Bring your feet together and point your toes downward
while in the air.
4. Keep your feet about 15 inches apart when landing on
the mat.
1. Start bouncing from a standing position, keeping your
eyes on the frame pad.
2. Land on your knees, keeping your back straight and
your body erect.
3. Come back up to an erect position.
Hand and Knee Drop
Back Drop
1. Start bouncing from a standing position, keeping your
eyes on the frame pad.
2. Land on the mat on your hands and knees.
3. Push with your hands and come back up to an erect
position.
1. Start from a low bounce and land on your back.
2. Keep your chin forward on your chest as you land.
3. Kick forward and up with your legs to return to an
erect position.
9
Seat Drop
Front Drop
1. Land in a sitting position with your legs parallel to the
mat.
2. Place your hands on the mat beside your hips.
3. Push with your hands to return to an erect position.
1. Start from a low bounce and land on the mat in a prone
position.
2. Keep your head up and your arms extended forward on
the mat.
3. Push with your arms to return to an erect position.
Half Turntable
Swivel Hips
1. Start from the front drop position and push to the left
or right with your arms to begin turning your body in
the opposite direction.
2. Turn your head and shoulders toward the direction that
your body is turning.
3. Keep your back parallel to the mat and your head up.
4. After completing a half turn, land in the front drop
position.
1. Start with a seat drop.
2. Turn your head to the left or right and swing your arms
up in the same direction.
3. Turn your hips in the same direction as your head and
arms, completing a twist.
4. Land in the seat drop position.
10
ASSEMBLY
IMPORTANT ASSEMBLY INFORMATION
• Need phillips screw driver and 2 adjustable wrenches (putting the trampoline together). A rubber mallet may make assembly
easier, however.
• Assembly requires two persons.
• Wear gloves to protect your hands from pinch points during assembly.
TRAMPOLINE PLACEMENT
1. Place the trampoline on a level surface before using it.
2. Adequate overhead clearance is essential. A minimum of 24 feet from ground level is best. Provide clearance for wires, tree
limbs, and other possible hazards. Lateral (sideways) clearance is also essential. Place the trampoline away from walls, structures, fences, and other play areas. Always have a clear space on all sides of the trampoline.
3. Use the trampoline in a well-lighted area. Electric lights may be required for shady areas.
4. Secure the trampoline against unauthorized and unsupervised use.
5. Remove any objects from beneath the trampoline.
6. The owner and supervisors of the trampoline are responsible to make all users aware of practices specified in this manual.
1.
1. Lay two Top Tubes(1) on the ground in the position as shown
1
small hole
Make sure the Top Tube is turned so the small holes (spring holes)
are facing the ground
Insert one Top Tube (1) into the Socket(12) as shown(a), insert the other Top Tube
(1) into the T-joint(13) as shown(b), secure them with M8X60mm Bolt(17)
and M8 Locknut(18).
Then insert one end of Top Tube with T-joint into the Socket of other Top Tube
Key No1
18
12
1
small hole
a
17
Key No1
18
17
13
b
1
Repeat above assembly step until two assembly units(A)
will be completed
1
2.
Make sure the Top Tube is turned so the small holes (spring holes)
are facing the ground
Insert one Top Tube (2) into the Socket(12) as shown(a), insert the other Top Tube
(1) into the T-joint(13) as shown(b), secure them with M8X60mm Bolt(17)
and M8 Locknut(18).
Then insert one end of Top Tube(1) with T-joint into the Socket of the other
1
2
2. Lay two Top Tubes(1 and 2) on the ground in the position as shown
small hole
18
12
small hole
Key No2
18
13
a
17
Top Tube (2).
Repeat above assembly step until two assembly units(B)
will be completed
Key No1
b
17
2
1
3.
3. Lay two Top Tubes(2) on the ground in the position as shown
Make sure the Top Tube is turned so the small holes (spring holes)
are facing the ground
Insert one Top Tube (2) into the Socket(12) as shown(a), insert the other Top Tube
(2) into the T-joint(13) as shown(b), secure them with M8X60mm Bolt(17)
and M8 Locknut(18).
Then insert one end of Top Tube with T-joint into the Socket of other Top Tube
Repeat above assembly step until two assembly units(C)
will be completed
2
small hole
Key No2
18
12
17
a
Key No2
18
13
Notice:do not tighten the locknuts
2
11
2
small hole
b
17
2
3
4.Slide two Legs (4) into a Brace (3) as shown. The peak of
4.
Push Here
the Brace (3) should point toward the ground. Screw the two
Screws (7) into the two Legs (4) and Brace (3).
Insert one of the Legs (4) halfway into one of the T-joint
assembled in step 1. Insert the other Leg halfway into the
Socket Press down on both Legs at the same time and fully
insert them into the Sockets and T-joint
Note: You may need to pull outward on the Legs as you insert
them into the Sockets and T-joint
Then connect the leg and Top Tube by inserting
two M4X50mm Bolts(14), four M4 washer(16) and two M4
Locknuts(15)
3
4
Pull
Here
4
7
Peak
7
15
15
Pull
Here
16
1
14
16
(D)
14
Notice:do not tighten the locknuts
Repeat above steps until the six assembled leg sections (E)
have been completed as shown in next step.
5.Note: This step requires two persons. During this
step, you will connect the six assembled leg sections
together.
Push Here
1
1
Leg Section
5.
Small End
Large End
Leg Section
Stand three leg sections(E) and hold them in the positions
shown. Slide the large end of the leg section(E) into the
small end of the indicated Top Tube on one of the leg sections.
Small End
Leg Section
2
Repeat this step until all six leg sections are connected.
When this step is completed, tighten all the Bolts and Locknuts.
The frame will be fully assembled and freestanding
1
2
2
Large End
6.Lay the Bed (Mat) (5) on the ground inside the assem-
(E)
bled frame. Make sure that the two warning decals (not
shown) are on top of the Bed (Mat). (Not Shown.)
Note: If you purchased the Skywalker Trampoline
Combo, the enclosure was pre-installed on the Bed (Mat)
(5) at the factory. Inspect the attachments of the enclosure
Netting to the trampoline mat (bed). Make certain each of
the V-rings on the trampoline mat (bed) is threaded
through the corresponding “buttonhole” in the Netting.
Be sure to place the opening in the Netting so it is centered under the arch where the jumpers will climb off of
and onto the trampoline. If you did not purchase a
Trampoline enclosure, disregard this paragraph.
2
2
1
1
2
1
1
1
Note: There are 96 V-rings around the edge of the Bed
(Mat) (5) and 96 holes around the top of the frame. In
Steps 6 and 7 you will attach the Bed (Mat) (5) to the
frame, using 96 Springs (8).
Caution: It is wise to wear leather gloves while attaching the Springs. Be careful where you place your
hands as the Springs and frame joints can pinch.
V-rings
12
1
2
2
2
Attach the Springs (8) as follows: Hook one end of a
Spring (8) into a V-ring. (See the inset drawing.) Hook
the Spring Tool(11)(not shown) to the free end of the first
Spring (8). Use the Spring Tool(11) to pull the first Spring
until it reaches the frame. Push the end of the first Spring
into a hole in the frame. Unhook the Spring Tool
6.
14’direction
V-rings
8
8
Make sure the opening of
the enclosure and T-joint
are aligned
After you have hooked one Spring (8) into one of the Vrings on the Bed (Mat) (5), count exactly 24 V-rings and
24 frame holes in a clockwise direction. Attach a second
Spring to the V-ring and frame at this point. Count 24 Vrings and 24 frame holes in a clockwise direction and
attach a third Spring. Count 24 V-rings and 24 frame
holes in a clockwise direction and attach a fourth Spring.
7.After attaching the first four Springs (8), count exact-
ly 12 V-rings and 12 frame holes in a clockwise direction.
Attach another Spring to the V-ring and frame at this
point. Count 24 V-rings and 24 frame holes in a clockwise direction and attach another Spring. Count 24 Vrings and 24 frame holes in a clockwise direction and
attach another Spring. You will now have 8 evenly
spaced Springs (8) attaching the Bed (Mat) (5) to the
trampoline frame.
7.
V-ring
6
Attach eight Springs (not shown) evenly between the
eight attached Springs in the same manner as before.
Attach sixteen Springs (not shown) evenly between the
sixteen attached Springs.
16’direction
8
Frame
Inset drawing
Continue to attach the remaining Springs between the
previously attached Springs, until all Springs are
attached.
( Door of the Enclosure)
alk
er
6
yw
8.
Sk
Safety Note: For the Bed (Mat) (5) to have the even tension necessary for safety in jumping, the Springs (8)
must be attached as described. As you attach Springs,
carefully count the V-rings and frame holes. If a V-ring or
hole is skipped, reattach the Springs in the proper position.
8.Lay the frame Pad (6) on the frame. Adjust the posi-
(If you are using the Skywalker Trampoline Enclosure,
go to the Skywalker Trampoline Enclosure User’s
Manual, pages 8-11, for instructions in assembling the
Enclosure. The Enclosure must be assembled and secured
to the trampoline frame before proceeding further with
trampoline assembly.)
13
Sky
wa
lk
er
tion of the Frame Pad so that the slits are directly above
the Legs (4), as shown. Make sure the printing of the “
LOGO is located as shown.
4
Slit
Printing
Do not use the trampoline without the Frame Pad (6).
The Frame Pad is designed to reduce the possibility of
injuries due to jumpers coming in contact with the trampoline frame. If you do not have a Frame Pad, contact
your dealer to obtain one. Properly install the Frame Pad
before using the trampoline.
Refer to the inset drawing. Thread one of the inner frame
straps through a V-ring and tie down. Repeat this with all
the inner straps along the inside of the frame pad.
Attach the outer straps to the frame of the trampoline by
tying them down
Repeat this step with the remaining straps (not shown).
Frame
10. Using the included plastic tie, attach the Safety
(9) to the frame near the point where jumpers will climb
onto and off the trampoline.
The trampoline is now fully assembled. Make sure that
all parts are securely attached. Familiarize yourself and
all users of the trampoline with the safety precautions,
use and instructional materials, and care and maintenance
instructions in this manual before using the trampoline.
Placard
9
DISASSEMBLY (TAKING APART)
To disassemble (take apart) the trampoline, follow assembly steps 1 through 10 in reverse order. Do not attempt to
disassemble any frame parts before the springs and the mat have been removed. Use gloves to protect your hands
from pinch points while taking the trampoline apart.
14
CARE AND MAINTENANCE
CARE
Do not allow pets on the trampoline, as their claws may snag and pull the mat material or damage the frame pad.
The trampoline is intended to be used by one person at a time who weighs not more than 200 pounds. The user
should be either barefoot, wearing socks, or wearing gymnastic shoes. Street shoes or tennis shoes should not be
worn on the trampoline. The user should remove all sharp objects from his or her person that may cause injury or
damage to the mat. Heavy, sharp, or pointed hard objects should never touch the mat.
MAINTENANCE
Your trampoline was manufactured using quality materials and crafted to provide you and your family with many
years of enjoyment and exercise. Proper maintenance and care will help to prolong the life of the trampoline and
reduce the possibility of injury. The following guidelines should always be followed.
Inspect the trampoline before each use, and replace any worn, defective, or missing parts. The following conditions
could represent possible hazards and increase the danger of personal injury:
• a missing, improperly positioned, or insecurely attached frame padding
• punctures, frays, tears, or holes worn in the mat or frame padding
• deterioration (wearing out) in the stitching or fabric of the mat or frame padding
• ruptured or missing springs
• a bent or broken frame or leg
• a sagging bed
• sharp protrusions on the frame or suspension system
If any of these conditions exist, the trampoline should be taken apart or otherwise protected against use until the
condition is fixed.
SPECIAL CONSIDERATIONS
High Wind
The trampoline can be blown around by high winds. If you expect high
winds, the trampoline should be moved to a sheltered location, taken apart,
or tied down to the ground with ropes and stakes (not included). At least
three ropes and three stakes should be used. Make sure to attach the ropes
to the top of the frame; do not simply secure the legs or the bases to the
ground, as they can separate from the frame sockets. The tops of the stakes
should be at ground level so they will not create a tripping hazard. In addition, the tops of the stakes should be covered, if necessary, so that users
will not be injured by falling onto the stakes.
Stake
Moving the Trampoline
If the trampoline needs to be moved, it should be moved by two persons, kept horizontal, and lifted slightly. If necessary, the trampoline can be taken apart for moving. To take the trampoline apart, follow the assembly steps in
reverse order (see pages 11 to 14). Do not attempt to take the frame sections, legs, or bases apart before the mat and
springs have been removed.
15
EXPLODED DRAWING AND PARTS LIST
Key
No.
Qty.
1
2
3
4
5
6
7
8
9
10
6
6
6
12
1
1
12
Description
Top Tube(with small hole)
Top Tube (with small arc)
Brace
Leg
Stitched Bed with 96 V-rings
Frame Pad
Self-tapping Screw
Springs
User’s Manual and Safety Placard
Screw Driver
96
1
2
Key
No.
Qty.
Description
11
12
13
14
15
16
17
18
1
6
6
12
12
24
12
12
Spring Tool
Socket
T-joint
M4X50 Bolt
M4 Locknut
M4 Washer
M8X60 Bolt
M8 Locknut
*
1
Set of ASTM Frame Labels
* These parts are not illustrated.
Specifications are subject to change without notice.
6
5
4
8
4
1
9
13
7
10
10
17
3
2
12
18
15
11
16
14
ORDERING REPLACEMENT PARTS
To order replacement parts, visit our web site at www.skywalkertrampolines.com or call our toll-free Customer Care
Hot Line at 1-866-603-Jump (5867), Monday through Friday, 8 a.m. until 5 p.m. Mountain Time (excluding holidays). To help us assist you, please provide the following information when calling:
• the MODEL of the trampoline (see the front cover of this manual)
• the KEY NUMBER and DESCRIPTION of the part (see the PART LIST above)
• the quantity needed
• the desired method of shipping
16
LIMITED WARRANTY
Skywalker Holdings, LLC warranties its trampoline products to be free from defects in material and workmanship
under normal use and service conditions. The steel frame is warranted for one (1) year after the date of purchase. All
other parts are warranted for ninety (90) days after the date of purchase.
All warranty coverage extends only to the original retail purchaser from the date of purchase.
Skywalker Holdings, LLC obigation under this Warranty is limited to replacing or repairing, at Skywalker Holdings,
LLC option,the product at one of this authorized service centers. All products for which a warranty is made
must be received Skywalker Holdings, LLC at authorized location , LLC. Preauthorization may be obtained
by calling Skywalker Holding, LLC Customer Care Hot Line at 1-866-603-Jump(5867). This Warranty does not
extend to any product or damage to a product caused by or attributable to freight damage, abuse, miuse, improper or
abnormal usage, or repair not provided by a Skywalker Holdings, LLC authorized service center, or to products
used for commercial or rental purpose. No other Warranty beyond that specifically set forth above is authorized by
Skywalker Holdings, LLC.
SKYWALKER HOLDINGS, LLC IS NOT RESPONSIBLE OR LIABLE FOR INDIRECT, SPECIAL OR CONSEQUENTIAL DAMAGES ARISING OUT OF OR IN CONNECTION WITH THE USE OR PERFORMANCE OF THE
PRODUCT OR OTHER DAMAGES WITH RESPECT TO ANY ECONOMIC LOSS, LOSS OF PROPERTY, LOSS OF
REVENUE OR PROFITS, LOSS OF ENJOYMENT OR USE, COST OF REMOVAL, INSTALLATION OR OTHER
CONSEQUENTIAL DAMAGES. SOME STATES DO NOT ALLOW THE EXCLUSION OR LIMITATION OF
INCIDENTAL OR CONSEQUENTIAL DAMAGES. ACCORDINGLY, THE ABOVE LIMITATION MAY NOT
APPLY TO YOU.
THE WARRANTY EXTENDED HEREUNDER IS IN LIEU OF ALL OTHER WARRANTIES AND ANY
IMPLIED WARRANTY OF MERCHANTABILITY OR FITNESS FOR A PARTICULAR PURPOSE IS LIMITED
IN ITS SCOPE AND DURATION TO THE TERMS SET FORTH HEREIN. SOME STATES DO NOT ALLOW
LIMITATIONS ON HOW LONG AN IMPLIED WARRANTY LASTS. ACCORDINGLY, THE ABOVE LIMITATION MAY NOT APPLY TO YOU. This warranty gives you specific legal rights. You may also have other rights
which vary from state to state. THIS WARRANTY IS VALID ONLY IN THE UNITED STATES.
Skywalker Holdings, LLC, PO Box 574, Brigham City, UT 84302 USA.
Printed in China © 2009 Skywalker Holdings, LLC,