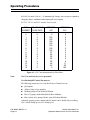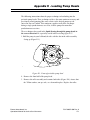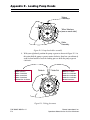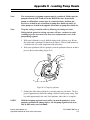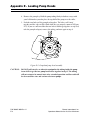
1
ACUSYST- MAXIMIZER
Operations Manual
®
8500 Evergreen Boulevard
Minneapolis, MN 55433-6000 USA
www.biovest.com
Telephone: (763) 786-0302
Toll-free in the U.S.: (800) 325-1112
After Hours: (763) 786-0302 (voice prompt)
Fax: (763) 786-0915
Email: [email protected]
Copyright Notice
© 2013 Biovest International, Inc. All rights reserved.
This document may not be reproduced in any form without the prior written consent of Biovest
International, Inc.
Biovest International. makes no warranties with respect to this documentation and disclaims any
implied warranties of merchantability and fitness for a particular purpose. Information in this
document is subject to change without notice. Biovest International assumes no responsibility for
any errors that may appear in this document.
Trademark Acknowledgements
ACUSYST-MAXIMIZER, RESCU, ACULINK-DATA LOG and ACUDATA are trademarks of Biovest
International, Inc.
Luer and Luer-Lok are trademarks of Becton-Dickinson and Co.
Acrodisc is a trademark of Gelman Sciences.
Masterflex is a trademark of Cole Parmer, Inc.
Tygon is a registered trademark of Norton Performance Plastics.
PharMed is a registered trademark of Saint-Gobain Performance Plastics Corp.
Revision History
Document #: 700037-000
This manual describes the Biovest International ACUSYST-MAXIMIZER (p/n 500011-XXX rev. M)
instruments.
The revision history of this manual is shown below.
Rev. A
Rev. B
Rev. C
Rev. D
Rev E
Rev. F
Rev. G
Rev. H
3/91
3/93
6/95
7/96
5/03
3/10
7/13
3/14
P/N 700037-000 Rev. H
ii
Initial Release
Changed pp. 1-2, 4-9, 4-15, 5-17, 5-55, Appendix E
CELLEX BIOSCIENCES, Inc. Name Change; all pages updated
Revised pages ii - vi, A1 - A3 & C2
Updated for name change to Biovest International, Inc.
Udated for new pH probe options
Updated for new GEX and conversion to PDF
Updated inoculation procedure’s clamping instructions
Biovest International, Inc.
Operations Manual for the ACUSYST-MAXIMIZER
Table of Contents
Introduction
ABOUT THIS MANUAL . . . . . . . . . . . . . . . . . . . . . . . . . . . . . . . . . . . . . . . . . . . . . . . . . . . . .1-1
SERVICE AND SUPPORT . . . . . . . . . . . . . . . . . . . . . . . . . . . . . . . . . . . . . . . . . . . . . . . . . . . .1-2
Technical Service. . . . . . . . . . . . . . . . . . . . . . . . . . . . . . . . . . . . . . . . . . . . . . . . . . . 1-2
Customer Service . . . . . . . . . . . . . . . . . . . . . . . . . . . . . . . . . . . . . . . . . . . . . . . . . . 1-2
Field Service. . . . . . . . . . . . . . . . . . . . . . . . . . . . . . . . . . . . . . . . . . . . . . . . . . . . . . . 1-2
Sales Support. . . . . . . . . . . . . . . . . . . . . . . . . . . . . . . . . . . . . . . . . . . . . . . . . . . . . . 1-2
System Theory
Hollow Fiber Technology . . . . . . . . . . . . . . . . . . . . . . . . . . . . . . . . . . . . . . . . . . . . . . . . . .2-2
ACUSYST Technology Difference . . . . . . . . . . . . . . . . . . . . . . . . . . . . . . . . . . . . . . . . . . . .2-3
The Integration Circuit . . . . . . . . . . . . . . . . . . . . . . . . . . . . . . . . . . . . . . . . . . . . . . 2-4
The Expansion Circuit . . . . . . . . . . . . . . . . . . . . . . . . . . . . . . . . . . . . . . . . . . . . . . . 2-5
EC Cycling. . . . . . . . . . . . . . . . . . . . . . . . . . . . . . . . . . . . . . . . . . . . . . . . . . . . . . . . . 2-5
System Description
Hardware Components . . . . . . . . . . . . . . . . . . . . . . . . . . . . . . . . . . . . . . . . . . . . . . . . . . . .3-1
Instrument Cabinet. . . . . . . . . . . . . . . . . . . . . . . . . . . . . . . . . . . . . . . . . . . . . . . . . 3-2
Incubator . . . . . . . . . . . . . . . . . . . . . . . . . . . . . . . . . . . . . . . . . . . . . . . . . . . . . . . . . 3-2
Pump Modules . . . . . . . . . . . . . . . . . . . . . . . . . . . . . . . . . . . . . . . . . . . . . . . . . . . . 3-3
Keypad and LCD . . . . . . . . . . . . . . . . . . . . . . . . . . . . . . . . . . . . . . . . . . . . . . . . . . . 3-3
Electrical and Gassing Features . . . . . . . . . . . . . . . . . . . . . . . . . . . . . . . . . . . . . . . 3-4
Cultureware Components . . . . . . . . . . . . . . . . . . . . . . . . . . . . . . . . . . . . . . . . . . . . . . . . . .3-5
Flowpath Modules . . . . . . . . . . . . . . . . . . . . . . . . . . . . . . . . . . . . . . . . . . . . . . . . . 3-5
Oxygen Probe and Case (Optional) . . . . . . . . . . . . . . . . . . . . . . . . . . . . . . . . . . . . 3-7
pH Probe and Case . . . . . . . . . . . . . . . . . . . . . . . . . . . . . . . . . . . . . . . . . . . . . . . . . 3-7
Bottles and Cap Assemblies (Optional) . . . . . . . . . . . . . . . . . . . . . . . . . . . . . . . . . . . . . . .3-8
Bottles . . . . . . . . . . . . . . . . . . . . . . . . . . . . . . . . . . . . . . . . . . . . . . . . . . . . . . . . . . . 3-8
Cap Assemblies . . . . . . . . . . . . . . . . . . . . . . . . . . . . . . . . . . . . . . . . . . . . . . . . . . . . 3-8
Printer Package (Optional) . . . . . . . . . . . . . . . . . . . . . . . . . . . . . . . . . . . . . . . . . . . . . . . . .3-9
Serial Interface Port . . . . . . . . . . . . . . . . . . . . . . . . . . . . . . . . . . . . . . . . . . . . . . . . . . . . . .3-9
Biovest International, Inc.
Operations Manual for the ACUSYST-MAXIMIZER
P/N 700037-000 Rev. H
iii
Table of Contents
Instrument Setup
Facility Requirements . . . . . . . . . . . . . . . . . . . . . . . . . . . . . . . . . . . . . . . . . . . . . . . . . . . . .4-1
Bench space. . . . . . . . . . . . . . . . . . . . . . . . . . . . . . . . . . . . . . . . . . . . . . . . . . . . . . . 4-1
Electrical and Gassing Requirements . . . . . . . . . . . . . . . . . . . . . . . . . . . . . . . . . . 4-1
Laboratory Supplies . . . . . . . . . . . . . . . . . . . . . . . . . . . . . . . . . . . . . . . . . . . . . . . . 4-3
Printer Setup (Optional) . . . . . . . . . . . . . . . . . . . . . . . . . . . . . . . . . . . . . . . . . . . . . . . . . . .4-4
Serial Interface Port . . . . . . . . . . . . . . . . . . . . . . . . . . . . . . . . . . . . . . . . . . . . . . . . . . . . . .4-4
ACULINK-DATA LOG™ Setup (Optional) . . . . . . . . . . . . . . . . . . . . . . . . . . . . . . . . . . . . . . .4-7
User Interface
Overview of LCD and Keypad . . . . . . . . . . . . . . . . . . . . . . . . . . . . . . . . . . . . . . . . . . . . . . .5-1
LCD . . . . . . . . . . . . . . . . . . . . . . . . . . . . . . . . . . . . . . . . . . . . . . . . . . . . . . . . . . . . . . 5-1
Keypad . . . . . . . . . . . . . . . . . . . . . . . . . . . . . . . . . . . . . . . . . . . . . . . . . . . . . . . . . . . 5-1
Menu Key Operations . . . . . . . . . . . . . . . . . . . . . . . . . . . . . . . . . . . . . . . . . . . . . . . . . . . . .5-3
MONITOR Key . . . . . . . . . . . . . . . . . . . . . . . . . . . . . . . . . . . . . . . . . . . . . . . . . . . . . 5-3
SETUP Key . . . . . . . . . . . . . . . . . . . . . . . . . . . . . . . . . . . . . . . . . . . . . . . . . . . . . . . . 5-6
START/SETUP Functions . . . . . . . . . . . . . . . . . . . . . . . . . . . . . . . . . . . . . . . . . . . . . 5-7
PROCESS CONTROL Key . . . . . . . . . . . . . . . . . . . . . . . . . . . . . . . . . . . . . . . . . . . . . 5-8
Override Controls . . . . . . . . . . . . . . . . . . . . . . . . . . . . . . . . . . . . . . . . . . . . . . . . . 5-19
CALIBRATE Key . . . . . . . . . . . . . . . . . . . . . . . . . . . . . . . . . . . . . . . . . . . . . . . . . . . 5-24
HOLD Key . . . . . . . . . . . . . . . . . . . . . . . . . . . . . . . . . . . . . . . . . . . . . . . . . . . . . . . . 5-25
ALARM Key . . . . . . . . . . . . . . . . . . . . . . . . . . . . . . . . . . . . . . . . . . . . . . . . . . . . . . 5-26
Diagnostics Key . . . . . . . . . . . . . . . . . . . . . . . . . . . . . . . . . . . . . . . . . . . . . . . . . . . 5-28
P/N 700037-000 Rev. H
iv
Biovest International, Inc.
Operations Manual for the ACUSYST-MAXIMIZER
Table of Contents
Operating Procedures
Process Control Strategy . . . . . . . . . . . . . . . . . . . . . . . . . . . . . . . . . . . . . . . . . . . . . . . . . . .6-1
pH Control . . . . . . . . . . . . . . . . . . . . . . . . . . . . . . . . . . . . . . . . . . . . . . . . . . . . . . . . 6-1
Oxygen Delivery . . . . . . . . . . . . . . . . . . . . . . . . . . . . . . . . . . . . . . . . . . . . . . . . . . . 6-6
Feed Strategy . . . . . . . . . . . . . . . . . . . . . . . . . . . . . . . . . . . . . . . . . . . . . . . . . . . . . 6-6
Harvesting Strategy. . . . . . . . . . . . . . . . . . . . . . . . . . . . . . . . . . . . . . . . . . . . . . . . . 6-7
Outline of a Culture Run . . . . . . . . . . . . . . . . . . . . . . . . . . . . . . . . . . . . . . . . . . . . . . . . . . .6-8
Biological Setup Procedures . . . . . . . . . . . . . . . . . . . . . . . . . . . . . . . . . . . . . . . . . . . . . . .6-10
Cell Line Characterization . . . . . . . . . . . . . . . . . . . . . . . . . . . . . . . . . . . . . . . . . . 6-10
Sterilizing Bottles and Cap Assemblies . . . . . . . . . . . . . . . . . . . . . . . . . . . . . . . . 6-11
Medium Preparation . . . . . . . . . . . . . . . . . . . . . . . . . . . . . . . . . . . . . . . . . . . . . . 6-13
Sterilizing Medium . . . . . . . . . . . . . . . . . . . . . . . . . . . . . . . . . . . . . . . . . . . . . . . . 6-13
Medium Quality Control . . . . . . . . . . . . . . . . . . . . . . . . . . . . . . . . . . . . . . . . . . . 6-14
Scale-up for Inoculation . . . . . . . . . . . . . . . . . . . . . . . . . . . . . . . . . . . . . . . . . . . . 6-14
Instrument Setup Procedures . . . . . . . . . . . . . . . . . . . . . . . . . . . . . . . . . . . . . . . . . . . . .6-15
Prepare Utilities . . . . . . . . . . . . . . . . . . . . . . . . . . . . . . . . . . . . . . . . . . . . . . . . . . 6-15
Prepare Data Logging Equipment . . . . . . . . . . . . . . . . . . . . . . . . . . . . . . . . . . . . 6-15
System Checkout . . . . . . . . . . . . . . . . . . . . . . . . . . . . . . . . . . . . . . . . . . . . . . . . . 6-16
Cultureware Setup Procedures . . . . . . . . . . . . . . . . . . . . . . . . . . . . . . . . . . . . . . . . . . . .6-26
pH Probe Selection . . . . . . . . . . . . . . . . . . . . . . . . . . . . . . . . . . . . . . . . . . . . . . . . 6-26
pH Probe Evaluation . . . . . . . . . . . . . . . . . . . . . . . . . . . . . . . . . . . . . . . . . . . . . . . 6-27
DO Probe Evaluation . . . . . . . . . . . . . . . . . . . . . . . . . . . . . . . . . . . . . . . . . . . . . . 6-28
Probe Case Assemblies. . . . . . . . . . . . . . . . . . . . . . . . . . . . . . . . . . . . . . . . . . . . . 6-30
Probe Case Assembly Pressure Tests . . . . . . . . . . . . . . . . . . . . . . . . . . . . . . . . . 6-32
Sterilization of Probes . . . . . . . . . . . . . . . . . . . . . . . . . . . . . . . . . . . . . . . . . . . . . 6-36
Cultureware Sterile Assembly . . . . . . . . . . . . . . . . . . . . . . . . . . . . . . . . . . . . . . . 6-37
Cultureware Installation. . . . . . . . . . . . . . . . . . . . . . . . . . . . . . . . . . . . . . . . . . . . 6-42
Cultureware Labels . . . . . . . . . . . . . . . . . . . . . . . . . . . . . . . . . . . . . . . . . . . . . . . . 6-43
Cultureware Pressurization Test . . . . . . . . . . . . . . . . . . . . . . . . . . . . . . . . . . . . . 6-44
Fill/Flush Procedure . . . . . . . . . . . . . . . . . . . . . . . . . . . . . . . . . . . . . . . . . . . . . . . 6-50
Biovest International, Inc.
Operations Manual for the ACUSYST-MAXIMIZER
P/N 700037-000 Rev. H
v
Table of Contents
Maintenance Procedures . . . . . . . . . . . . . . . . . . . . . . . . . . . . . . . . . . . . . . . . . . . . . . . . .6-62
Sampling . . . . . . . . . . . . . . . . . . . . . . . . . . . . . . . . . . . . . . . . . . . . . . . . . . . . . . . . 6-62
Probe Calibration . . . . . . . . . . . . . . . . . . . . . . . . . . . . . . . . . . . . . . . . . . . . . . . . . 6-65
Replacing Bottles . . . . . . . . . . . . . . . . . . . . . . . . . . . . . . . . . . . . . . . . . . . . . . . . . 6-68
Replacing LAVs and Septa . . . . . . . . . . . . . . . . . . . . . . . . . . . . . . . . . . . . . . . . . . 6-69
Removal of Cell Debris . . . . . . . . . . . . . . . . . . . . . . . . . . . . . . . . . . . . . . . . . . . . . 6-70
Pre-inoculation Procedures . . . . . . . . . . . . . . . . . . . . . . . . . . . . . . . . . . . . . . . . . . . . . . .6-73
pH Calibration . . . . . . . . . . . . . . . . . . . . . . . . . . . . . . . . . . . . . . . . . . . . . . . . . . . . 6-73
DO Calibration. . . . . . . . . . . . . . . . . . . . . . . . . . . . . . . . . . . . . . . . . . . . . . . . . . . . 6-73
EC Cycling. . . . . . . . . . . . . . . . . . . . . . . . . . . . . . . . . . . . . . . . . . . . . . . . . . . . . . . . 6-73
Osmolarity . . . . . . . . . . . . . . . . . . . . . . . . . . . . . . . . . . . . . . . . . . . . . . . . . . . . . . . 6-74
Offgassing (Optional) . . . . . . . . . . . . . . . . . . . . . . . . . . . . . . . . . . . . . . . . . . . . . . 6-74
Cytotoxicity Testing (Optional) . . . . . . . . . . . . . . . . . . . . . . . . . . . . . . . . . . . . . . 6-74
Sterility Testing (Optional) . . . . . . . . . . . . . . . . . . . . . . . . . . . . . . . . . . . . . . . . . . 6-76
Serum Pre-treatment of the ECS . . . . . . . . . . . . . . . . . . . . . . . . . . . . . . . . . . . . . 6-77
Process Control Summary during Pre-Inoculation Phase . . . . . . . . . . . . . . . . . 6-80
Inoculation Procedure . . . . . . . . . . . . . . . . . . . . . . . . . . . . . . . . . . . . . . . . . . . . . . . . . . . .6-82
Post-inoculation Procedures . . . . . . . . . . . . . . . . . . . . . . . . . . . . . . . . . . . . . . . . . . . . . .6-87
End of Culture Procedures . . . . . . . . . . . . . . . . . . . . . . . . . . . . . . . . . . . . . . . . . . 6-88
Recovery of Harvest . . . . . . . . . . . . . . . . . . . . . . . . . . . . . . . . . . . . . . . . . . . . . . . 6-89
Removal of Cultureware Components . . . . . . . . . . . . . . . . . . . . . . . . . . . . . . . . 6-91
Optimization Procedures . . . . . . . . . . . . . . . . . . . . . . . . . . . . . . . . . . . . . . . . . . . . . . . . .6-94
Inoculation. . . . . . . . . . . . . . . . . . . . . . . . . . . . . . . . . . . . . . . . . . . . . . . . . . . . . . . 6-94
Circulation Rate. . . . . . . . . . . . . . . . . . . . . . . . . . . . . . . . . . . . . . . . . . . . . . . . . . . 6-97
EC Cycling. . . . . . . . . . . . . . . . . . . . . . . . . . . . . . . . . . . . . . . . . . . . . . . . . . . . . . . . 6-97
Harvesting . . . . . . . . . . . . . . . . . . . . . . . . . . . . . . . . . . . . . . . . . . . . . . . . . . . . . . . 6-98
Serum Requirements . . . . . . . . . . . . . . . . . . . . . . . . . . . . . . . . . . . . . . . . . . . . . . 6-99
Serum-free Media. . . . . . . . . . . . . . . . . . . . . . . . . . . . . . . . . . . . . . . . . . . . . . . . 6-100
P/N 700037-000 Rev. H
vi
Biovest International, Inc.
Operations Manual for the ACUSYST-MAXIMIZER
Table of Contents
Troubleshooting
SOFTWARE . . . . . . . . . . . . . . . . . . . . . . . . . . . . . . . . . . . . . . . . . . . . . . . . . . . . . . . . . . . . . .7-1
Alarms . . . . . . . . . . . . . . . . . . . . . . . . . . . . . . . . . . . . . . . . . . . . . . . . . . . . . . . . . . . 7-1
Diagnostics Screens . . . . . . . . . . . . . . . . . . . . . . . . . . . . . . . . . . . . . . . . . . . . . . . . . . . . . .7-18
Problems with Biological Performance . . . . . . . . . . . . . . . . . . . . . . . . . . . . . . . . . . . . . .7-23
pH Control . . . . . . . . . . . . . . . . . . . . . . . . . . . . . . . . . . . . . . . . . . . . . . . . . . . . . . . 7-23
Product Secretion . . . . . . . . . . . . . . . . . . . . . . . . . . . . . . . . . . . . . . . . . . . . . . . . . 7-24
Contamination . . . . . . . . . . . . . . . . . . . . . . . . . . . . . . . . . . . . . . . . . . . . . . . . . . . 7-25
Hardware and Cultureware . . . . . . . . . . . . . . . . . . . . . . . . . . . . . . . . . . . . . . . . . . . . . . .7-26
Pumps . . . . . . . . . . . . . . . . . . . . . . . . . . . . . . . . . . . . . . . . . . . . . . . . . . . . . . . . . . 7-26
Cultureware. . . . . . . . . . . . . . . . . . . . . . . . . . . . . . . . . . . . . . . . . . . . . . . . . . . . . . 7-26
Appendix A - Specifications
ACUSYST-MAXIMIZER® Specifications . . . . . . . . . . . . . . . . . . . . . . . . . . . . . . . . . . . . . . . .A-1
Instrument Dimensions . . . . . . . . . . . . . . . . . . . . . . . . . . . . . . . . . . . . . . . . . . . . . A-1
Instrument Weight . . . . . . . . . . . . . . . . . . . . . . . . . . . . . . . . . . . . . . . . . . . . . . . . . A-1
Operating Temperature . . . . . . . . . . . . . . . . . . . . . . . . . . . . . . . . . . . . . . . . . . . . . A-1
Electrical Requirements . . . . . . . . . . . . . . . . . . . . . . . . . . . . . . . . . . . . . . . . . . . . . A-1
Backup Power Requirements (Instrument and Printer) . . . . . . . . . . . . . . . . . . . A-1
Main Fuse . . . . . . . . . . . . . . . . . . . . . . . . . . . . . . . . . . . . . . . . . . . . . . . . . . . . . . . . A-1
Heater Box Fuse . . . . . . . . . . . . . . . . . . . . . . . . . . . . . . . . . . . . . . . . . . . . . . . . . . . A-2
Power Supply Fuse . . . . . . . . . . . . . . . . . . . . . . . . . . . . . . . . . . . . . . . . . . . . . . . . . A-2
Pollution Degree . . . . . . . . . . . . . . . . . . . . . . . . . . . . . . . . . . . . . . . . . . . . . . . . . . . A-2
Installation Category . . . . . . . . . . . . . . . . . . . . . . . . . . . . . . . . . . . . . . . . . . . . . . . A-2
Battery Type . . . . . . . . . . . . . . . . . . . . . . . . . . . . . . . . . . . . . . . . . . . . . . . . . . . . . . A-2
Gas Requirements . . . . . . . . . . . . . . . . . . . . . . . . . . . . . . . . . . . . . . . . . . . . . . . . . A-2
Cultureware and Accessories . . . . . . . . . . . . . . . . . . . . . . . . . . . . . . . . . . . . . . . . A-3
Approximate Flowpath Volumes. . . . . . . . . . . . . . . . . . . . . . . . . . . . . . . . . . . . . . A-3
Peristaltic Pump Rate Ranges . . . . . . . . . . . . . . . . . . . . . . . . . . . . . . . . . . . . . . . . A-4
Schematic for 600058-xxx Cultureware Models . . . . . . . . . . . . . . . . . . . . . . . . . A-5
Schematic for 600068-xxx Cultureware Models . . . . . . . . . . . . . . . . . . . . . . . . . A-6
Biovest International, Inc.
Operations Manual for the ACUSYST-MAXIMIZER
P/N 700037-000 Rev. H
vii
Table of Contents
Appendix B - Ordering Information
Instrument and Accessories. . . . . . . . . . . . . . . . . . . . . . . . . . . . . . . . . . . . . . . . . . B-1
Cultureware Options . . . . . . . . . . . . . . . . . . . . . . . . . . . . . . . . . . . . . . . . . . . . . . . B-1
Sterile pH Probe Items . . . . . . . . . . . . . . . . . . . . . . . . . . . . . . . . . . . . . . . . . . . . . . B-1
Reusable pH Probe Items. . . . . . . . . . . . . . . . . . . . . . . . . . . . . . . . . . . . . . . . . . . . B-1
Dissolved Oxygen Probe Items . . . . . . . . . . . . . . . . . . . . . . . . . . . . . . . . . . . . . . . B-1
Miscellaneous Sterile Optional Items . . . . . . . . . . . . . . . . . . . . . . . . . . . . . . . . . . B-2
Reusable Glass Bottles and Polypropylene Cap Assemblies . . . . . . . . . . . . . . . . B-2
Cap Assembly for Plastic Bottles . . . . . . . . . . . . . . . . . . . . . . . . . . . . . . . . . . . . . . B-3
Miscellaneous Spare Parts . . . . . . . . . . . . . . . . . . . . . . . . . . . . . . . . . . . . . . . . . . . B-3
Services . . . . . . . . . . . . . . . . . . . . . . . . . . . . . . . . . . . . . . . . . . . . . . . . . . . . . . . . . . B-3
Appendix C - Relocation
Preparing the MAXIMIZER . . . . . . . . . . . . . . . . . . . . . . . . . . . . . . . . . . . . . . . . . . . C-1
Instrument Lifting Instructions . . . . . . . . . . . . . . . . . . . . . . . . . . . . . . . . . . . . . . . C-2
After the move ... . . . . . . . . . . . . . . . . . . . . . . . . . . . . . . . . . . . . . . . . . . . . . . . . . . C-2
Appendix D - Metabolic Calculations
Glucose Uptake . . . . . . . . . . . . . . . . . . . . . . . . . . . . . . . . . . . . . . . . . . . . . . . . . . . . . . . . . .D-2
Lactate Production . . . . . . . . . . . . . . . . . . . . . . . . . . . . . . . . . . . . . . . . . . . . . . . . . . . . . . .D-2
Glutamine Uptake . . . . . . . . . . . . . . . . . . . . . . . . . . . . . . . . . . . . . . . . . . . . . . . . . . . . . . . .D-3
Ammonia Production . . . . . . . . . . . . . . . . . . . . . . . . . . . . . . . . . . . . . . . . . . . . . . . . . . . . .D-3
Oxygen Uptake . . . . . . . . . . . . . . . . . . . . . . . . . . . . . . . . . . . . . . . . . . . . . . . . . . . . . . . . . .D-4
Product Formation . . . . . . . . . . . . . . . . . . . . . . . . . . . . . . . . . . . . . . . . . . . . . . . . . . . . . . .D-4
Appendix E - Loading Pump Heads
P/N 700037-000 Rev. H
viii
Biovest International, Inc.
Operations Manual for the ACUSYST-MAXIMIZER
Table of Contents
Appendix F - Maintenance
Probe Storage . . . . . . . . . . . . . . . . . . . . . . . . . . . . . . . . . . . . . . . . . . . . . . . . . . . . . . . . . . .F-1
pH Probe . . . . . . . . . . . . . . . . . . . . . . . . . . . . . . . . . . . . . . . . . . . . . . . . . . . . . . . . . F-1
DO Probe . . . . . . . . . . . . . . . . . . . . . . . . . . . . . . . . . . . . . . . . . . . . . . . . . . . . . . . . . F-1
PUMP HEADS . . . . . . . . . . . . . . . . . . . . . . . . . . . . . . . . . . . . . . . . . . . . . . . . . . . . . . . . . . . .F-2
Cleaning . . . . . . . . . . . . . . . . . . . . . . . . . . . . . . . . . . . . . . . . . . . . . . . . . . . . . . . . . . . . . . . .F-2
ACUSYST® INSTRUMENT SERVICE . . . . . . . . . . . . . . . . . . . . . . . . . . . . . . . . . . . . . . . . . . .F-3
Installation Qualification / Operational Qualification . . . . . . . . . . . . . . . . . . . . . F-3
Calibration . . . . . . . . . . . . . . . . . . . . . . . . . . . . . . . . . . . . . . . . . . . . . . . . . . . . . . . . F-3
Glossary
Preventive Maintenance . . . . . . . . . . . . . . . . . . . . . . . . . . . . . . . . . . . . . . . . . . . . F-3
Full Service Contract . . . . . . . . . . . . . . . . . . . . . . . . . . . . . . . . . . . . . . . . . . . . . . . . F-3
Biovest International, Inc.
Operations Manual for the ACUSYST-MAXIMIZER
P/N 700037-000 Rev. H
ix
Introduction
Welcome to ACUSYST (Automated CUlture SYSTem) technology from Biovest
International, the most advanced technology available in hollow fiber bioreactors.
The ACUSYST-MAXIMIZER (MAXIMIZER) belongs to a product line that is directed
toward the pilot plant scale of producing secreted biologicals from mammalian
cells. Average antibody harvests from this instrument can reach up to 1000
mg/day. The perfused hollow fiber cultures in this instrument are maintained by
microprocessor control.
ABOUT THIS MANUAL
This manual is designed to assist you in understanding and operating the
MAXIMIZER. It is a guide to the operations and features of the system and provides
guidelines for laboratory procedures sometimes necessary in the preparation or
operation of the instrument. Complete information on the following tasks is
included to aid your work from start to finish.
n how to assemble and inoculate the cultureware
n how to program the microprocessor for growth and harvest conditions
n how to maintain and support the culture
n how to dismantle the cultureware at the end of the run
The manual is organized into six sections, plus a Glossary, five appendices, and
this introduction. The sections are organized in the order in which procedures or
knowledge is necessary, although some cross-referencing may be required. Read
completely through each procedure before starting. To ensure efficiency and
reduce the risk of contaminating the system, make sure you have all necessary
supplies before beginning the procedure.
Familiarize yourself with the basics of Biovest’s hollow fiber design by reading
Section 2, System Theory. Then, use Sections 3 and 4 to learn the components of
the instrument and cultureware. The milestones table in Section 6 gives you an
idea of how to plan for laboratory preparations and needs of the instrument. Use
it to prevent unnecessary delays in setup and to adjust process controls before
inoculation.
Throughout the text, key terms will be in bold type when they are introduced and
defined — check the Glossary for definitions. Notes (designated as NOTES:) are
used to call attention to unique or important applications to which you should pay
particular attention.
Biovest International, Inc.
Operations Manual for the ACUSYST-MAXIMIZER
P/N 700037-000 Rev. H
Page 1-1
Introduction
SERVICE AND SUPPORT
Contact Biovest International’s Account Services department for:
n
n
Technical Service
Customer Service
n
n
Field Service
Sales Information
We are always willing to discuss your questions, suggestions, or problems with
the ACUSYST-MAXIMIZER cell culture system.
Account Services is available weekdays from 8:00 – 5:00 Central Time (GMT-6).
Our contact information is on the manual’s cover page. After-hours telephone
callers hear recorded instructions for emergency technical assistance. Keep a
copy of our telephone number posted near the MAXIMIZER for quick reference!
Technical Service
Contact us with any question you have when operating the MAXIMIZER instrument
or cultureware. Please be ready to provide as much detailed information as
possible, including: instrument serial number, cultureware manufacturing lot
number, printed or electronic run log, process alarms, chronology leading to the
situation, relevant previous run experiences, etc.
Customer Service
Field Service
Appendix B has ordering information for common items.
Appendix F has important information about Calibration and Preventive
Maintenance services that keep your MAXIMIZER operating optimally and
consistently to ensure its highest production, lowest operating cost, and minimal
unplanned downtime. We offer a Full Service Contract to simplify maintenance
of the instrument over its many years of usage. If it is malfunctioning, we provide
full repair services. MAXIMIZER is not user-servicable.
Sales Support
We’re happy to help you purchase any of Biovest’s products or services!
P/N 700037-000 Rev. H
Page 1-2
Biovest International, Inc.
Operations Manual for the ACUSYST-MAXIMIZER
System Theory
The ACUSYST-MAXIMIZER is a hollow fiber cell culture system. Both suspension
and anchorage-dependent cells are grown in hollow fiber bioreactors which are
maintained in the MAXIMIZER. The MAXIMIZER is designed to maintain cells in an
optimal environment, one that mimics the mammalian body. In fact, the analogy
of a body is used to describe how the system functions.
Cells are grown in the space outside of the fibers of a bioreactor. Media, the
"blood" of the system, carry fresh nutrients and oxygen to the cells while carrying
away cell wastes such as ammonia and CO2. Media are circulated via the
circulation pump acting as the "heart" of the MAXIMIZER. The "lungs" of the
system, an oxygenator diffuses an air and CO2 gas mixture into the media,
oxygenating the media while maintaining the prescribed pH setpoint.
The microprocessor-based control system is the "brain" of the MAXIMIZER. It not
only monitors but also provides feedback control to the various parts of the
system, ensuring that environ-mental conditions are maintained in their
operational ranges.
Cell-secreted product remains in a circuit separate from the waste products and
may be harvested by activating a separate pump as required.
With these general concepts in mind, the following detailed description will give
you an understanding of how and why the MAXIMIZER work.
Biovest International, Inc.
Operations Manual for the ACUSYST-MAXIMIZER
P/N 700037-000 Rev. H
Page 2-1
System Theory
HOLLOw FIBER TECHNOLOgY
The core of the MAXIMIZER mammalian cell culture systems is the hollow fiber
bioreactor (BRX). The BRX is a plastic cylinder containing several thousand
hollow fibers attached at each end of the tube. Cells are grown in the space
outside of the fibers known as the extracapillary space, or ECS. Growth media
are circulated through the inside of the fibers, known as the intracapillary space,
or ICS (Figure 2-1).
The fibers provide a substrate upon which the cells can grow. These fibers also
permit the exchange of nutrients and wastes. The fibers of the BRX are semipermeable and allow small molecular weight molecules, such as glucose and
ammonia, to move freely across the fiber. The cells, growth factors, and the large
molecular weight products produced by the cells remain in the ECS.
Media
In
Extracapillary Space (ECS)
Intracapillary Space (ICS)
Media
Out
Figure 2-1. Hollow fiber in a bioreactor
As the circulation pumps moves medium into the hollow fiber, a high relative
pressure is created within the ICS. This high pressure forces medium through the
pores of the fiber and into the ECS (Figure 2-1). As medium flows into the ECS,
the pressure in the ICS drops along the length of the fiber. Near the distal end of
the BRX, high relative pressure in the ECS forces medium to flow back into the
ICS, carrying with it the metabolic waste from the ECS. This process is known as
the Starling Effect and can be detrimental to the culture as it ends up pushing
growth factors and cells to the distal end of the bioreactor.
Due to the ECS flow along the length of the BRX, cells at the entrance of the
BRX are exposed to greater levels of oxygen and nutrients than those at the outlet
end.
P/N 700037-000 Rev. H
Page 2-2
Biovest International, Inc.
Operations Manual for the ACUSYST-MAXIMIZER
System Theory
ACUSYST TECHNOLOgY DIFFERENCE
The MAXIMIZER compensates for Starling Effect and keeps the ECS flow channels
open by a mixing process called EC Cycling. This mixing creates a more
homogeneous cellular environment, allowing better cell growth and production.
Think of the MAXIMIZER as having two separate fluid circuits which intersect only
at the fiber membrane of the BRX. These two fluid circuits, including their fluid
reservoirs, constitute the flowpath of the system (Figure 2-2).
⑥
①
⑦
⑤
⑧
⑨
②
③
Figure 2-2. Major Components of the
Integration Circuit (red)
and Expansion Circuit (yellow):
④
① Integration Chamber ⑥ Temperature Probe
② Circulation Pump
⑦ Dissolved Oxygen Probe
③ Gas Exchanger
⑧ Expansion Chamber
④ pH Probe
⑨ Volume Sensor
⑤ Bioreactors (volume inside hollow fibers is IC, volume surrounding hollow fibers is EC)
Biovest International, Inc.
Operations Manual for the ACUSYST-MAXIMIZER
P/N 700037-000 Rev. H
Page 2-3
System Theory
The Integration Circuit
The Integration Circuit (IC) is the part of the flowpath which coincides with the
inside of the fibers in the BRX. It includes:
n the circulation pump
n the Integration Chamber where media and factors are added to the system and
waste is removed
n the GEX (oxygenator)
n the IC flowpath tubing
n the ICS of the BRX(s)
Note:
n the probes used for monitoring pH, DO and temperature of the system
Figure 2-2 has been simplified and does not show the DO probe because it is
part of a secondary IC Circuit. See Figure 3-4 for a more detailed diagram.
When the circulation pump is on, pressure is created in the IC which forces media
to flow through the circuit and into the ECS from the ICS. This half of the
flowpath is basically the same as in a conventional hollow fiber system. If left to
circulate this way, the Starling Effect would create nutrient and waste gradients
which would not permit efficient large scale production.
P/N 700037-000 Rev. H
Page 2-4
Biovest International, Inc.
Operations Manual for the ACUSYST-MAXIMIZER
System Theory
The Expansion Circuit
In the MAXIMIZER there is a second fluid circuit called the Expansion Circuit
(EC). This circuit is connected to the outside of the fibers where the cells are
growing and product is being produced. The EC consists of:
n the Expansion Chamber
n two check valves which keep the flow within the circuit moving in one
direction
n the ECS of the BRX
EC Cycling
n the EC flowpath tubing
In the first half of the cycle the IC is pressurized at the integration chamber.
Additional pressure is provided to the IC by the circulation pump. As a result,
medium flows from the ICS (inside of the fibers) to the ECS (outside of the
fibers) along the length of the BRX, thereby moving media from the IC to the
EC. Thus, cells are provided with fresh glucose, glutamine, dissolved oxygen and
other small molecular weight nutrients. As media move from the IC to the EC, the
media level in the integration chamber decreases and the media level in the
Expansion Chamber increases. This half of the cycle is therefore referred to as
"EC Rise".
When fluid in the Expansion Chamber reaches a defined upper limit, an
ultrasonic detector signals the microprocessor to lower the pressure in the
integration chamber. This reduces the pressure throughout the IC. In addition,
pressure is applied to the Expansion Chamber to make the EC pressure higher
than the IC pressure. As a result, medium flows from the EC to the IC, and
removes small molecular weight wastes such as lactate and ammonia. This
portion of the cycle is called "EC Fall". When the level of media in the Expansion
Chamber reaches its defined minimum level, the process starts over.
Biovest International, Inc.
Operations Manual for the ACUSYST-MAXIMIZER
P/N 700037-000 Rev. H
Page 2-5
System Theory
Figures 2-3 and 2-4 illustrate this process. Arrows are shown to indicate net flow
of media.
This alternating flow of media between IC and EC is called EC Cycling. This
patented process thoroughly mixes the media in the BRX ECS and greatly
reduces the microenvironments and gradients.
Note:
Figure 2-3:
Figure 2-4:
Process controls in the ACUSYST-MAXIMIZER allow you to select time periods
for the EC Rise and EC Fall phases of cycling as well as a desired transfer
volume between IC and EC. To maintain these conditions, the instrument
uses an ultrasonic level sensor to measure fluid level in the Expansion
Chamber, and automatically regulates the pressures applied to the
Integration and Expansion Chambers.
P/N 700037-000 Rev. H
Page 2-6
Biovest International, Inc.
Operations Manual for the ACUSYST-MAXIMIZER
System Description
This section will introduce you to the basic components of the
ACUSYST-MAXIMIZER. Hardware includes the instrument and its obvious features,
while cultureware includes the disposable flowpath and the reusable probes and
holders. Also included in this section are descriptions of the bottles, cap
assemblies, and optional printer package.
HARDwARE COMPONENTS
Refer to Figure 3-1 for front external view of MAXIMIZER.
Incubator Door
Bulkhead Connections
Keypad and LCD
Circulation Pump
Mounting Bracket
Door Latch Pin
Tubing Raceway
Peristaltic Pumps
Figure 3-1. Front view of ACUSYST-MAXIMIZER (door open)
Biovest International, Inc.
Operations Manual for the ACUSYST-MAXIMIZER
P/N 700037-000 Rev. H
Page 3-1
System Description
Instrument Cabinet
Incubator
The cabinet of the MAXIMIZER is made of molded plastic. It may be cleaned with a
mild detergent or alcohol cleaner. (For necessary counter space, see Section 4,
Instrument Setup, for facility requirements.)
The incubator module is a forced-draft convection system designed to maintain
the culture at a controlled temperature. The exhaust fan for the incubator is
located on the upper rear of the incubator. Access to the interior of the incubator
is gained by lifting the door from its lower right hand corner. When the door is
fully open, the incubator fan and heater are shut off. A viewing window on the
door can be exposed to examine the incubator without disturbing its contents.
Inside the incubator are two rows of bulkhead connections on the upper right
wall (Figure 3-2). These are used in conjunction with cultureware to monitor and
control various parameters of the culture.
pH
pO2 TEMP.
IN
Note:
EC
OUT
IC
EC
Figure 3-2. Bulkhead connections in the incubator.
Upper row connections are for electrical cables.
Lower row connections are for gassing lines.
To prevent over-heating, the temperature probe supplied with the MAXIMIZER
should be connected to its bulkhead connection whenever the instrument is
on and the incubator door is closed.
In the center of the incubator floor is the mounting bracket for the circulation
pump. Tubing can be routed in and out of the incubator by placing it in the
tubing raceway panel below the door.
P/N 700037-000 Rev. H
Page 3-2
Biovest International, Inc.
Operations Manual for the ACUSYST-MAXIMIZER
System Description
The MAXIMIZER is shipped with 4 pieces of Tygon tubing with color-coded LuerLok collars. They are designed to connect various parts of the flowpath module to
bulkhead ports inside the incubator. These are reusable and should not be
discarded.
Pump Modules
Six mounting brackets are located below the tubing raceway panel. These are
labeled for their respective peristaltic pump heads: Outflow, Medium, Factor 1,
Factor 2, Factor 3, Harvest. Two size 7016 and four size 7014 pump needs are
included with the MAXIMIZER. Each pump head is packaged with a set of four
mounting screws and a pump key. The Circulation pump is a plastic bellows
assembly that is part of the flowpath module. It is mounted inside the incubator
with two metal screws and a threaded plastic knob.
Keypad and LCD
To the right of the incubator is the control panel for the microprocessor. It
consists of a touch sensitive keypad and a liquid crystal display (LCD). Separate
buttons are used to activate the MONITOR screen, CALIBRATE function,
ALARM listing, SETUP functions, PROCESS CONTROL parameters, and the
INOCULATE procedure. In addition, a row of buttons is available to control
certain OVERRIDE functions. The four arrow buttons are used to move the
blinking cursor when it is accessible, and the numeric section of the keypad is
used to ENTER or CLEAR values when accessible fields are shown in the LCD.
The START and HOLD buttons at the lower left are used for special situations.
Details on keypad operation are given in Section 5, User Interface.
Biovest International, Inc.
Operations Manual for the ACUSYST-MAXIMIZER
P/N 700037-000 Rev. H
Page 3-3
System Description
Electrical and gassing Features
The rear of the instrument contains several features necessary for the operation of
the instrument (Figure 3-3). The power cord is attached to the lower left near the
on/off rocker switch. Immediately to the right of the power switch is an access
panel for the fuse. An alarm with volume adjustment ring is located in the lower
center of the instrument. A 36-pin parallel port is available for attachment of the
printer cable (optional). An air inlet and an exhaust fan, which cool the system
electronics, are located in the lower right and upper left, respectively.
Mounting holes for the coalescent gassing filters are identified with a diagram on
the lower right. One of these filters will be attached to the internal air compressor,
while the other filter will be attached to an external supply of 100% carbon
dioxide (CO2). Two fittings are provided for a backup air supply and an
outgassing connection (both optional).
Figure 3-3. Rear view of ACUSYST-MAXIMIZER showing the main features:
1 = exhaust fan, 2 = alarm, 3 = serial interface port , 4 = on/off switch,
5 = power cord outlet, 6 = fuse, 7 = parallel printer port, 8 = alarm relay,
9 = offgassing port, 10 = air filter, 11 = backup air port, 12 = carbon dioxide
filter, 13 = inlet fan, 14 = label for gas filter assembly.
P/N 700037-000 Rev. H
Page 3-4
Biovest International, Inc.
Operations Manual for the ACUSYST-MAXIMIZER
System Description
CULTUREwARE COMPONENTS
The disposable part of the cultureware is the flowpath module, which consists of
a plastic tray that holds the BRX, gas exchange cartridge, bellows-type
circulation pump, two vessels called Integration Chamber and Expansion
Chamber, plus associated tubing, clamps and vent filters. The module is selfcontained and pre-sterilized.
The reusable parts of the cultureware are the oxygen and pH probe assemblies.
They are to be steam sterilized then attached to the flowpath under a laminar flow
hood.
Each flowpath module is supplied with an accessories package. This contains 60
ml syringes (for serum pre-treatment and inoculation), sterile sampling port septa,
and tubing assemblies for the pH and DO probe cases.
Flowpath Modules
The flowpath consists of two major circuits that meet at the hollow fiber BRX
(see Figure 3-4). The IC contains the Integration Chamber, circulation pump, pH
probe assembly, oxygenator, medium tubing, outflow tubing, two factor lines,
and the lumen of the BRX fibers. Within this major circuit lies a secondary path
that contains the oxygen probe assembly and its associated tubing, plus one
sample port. The EC contains the Expansion Chamber, harvest tubing, factor
tubing, check valves, two access ports (for sampling or inoculation), and the BRX
volume outside the hollow fibers (known as the ECS).
Biovest International, Inc.
Operations Manual for the ACUSYST-MAXIMIZER
P/N 700037-000 Rev. H
Page 3-5
System Description
Note:
Figure 3-4. Schematic diagram of ACUSYST-MAXIMIZER flowpath
Intracapillary Circuit shown with red tubing
Extracapillary Circuit shown with yellow-ish tubing
Biovest offers four flowpath options: a single 1.5 m2 or 2.1 m2 bioreactor (not
shown in the figure above) or double 1.5 m2 or 2.1 m2 bioreactors (shown in
the figure above). See Appendix A for further specifications.
The circulation pump moves media through the IC, while the cycling process
causes media to flow through the EC and between the IC and EC. Depending on
which IC sample clamp is open, IC medium flows through the DO probe from a
site located upstream or downstream (PRE- or POST-) from the BRX.
Peristaltic pump tubing is made of PharMed, which is a highly durable material
that will last throughout each run. The section of tubing that contains the DO
probe and IC sampling port is made of medical grade Tygon to minimize errors in
measuring DO.
P/N 700037-000 Rev. H
Page 3-6
Biovest International, Inc.
Operations Manual for the ACUSYST-MAXIMIZER
System Description
An ultrasonic level sensor is attached under the Expansion Chamber to assist in
the regulation of the cycling process by monitoring changes in fluid volume in
the chamber. The drop tube in the Integration Chamber is connected to the
Outflow pump, which runs continuously to remove excess media.
The silicone membrane oxygenator that serves as the primary pH control device.
Regardless of the gas mixture used for pH control, the oxygenator provides nearsaturation levels of dissolved oxygen to the IC. The oxygenator also contains a
connector for the temperature probe.
Oxygen Probe and Case (Optional)
The MAXIMIZER can support a polarographic oxygen electrode. When it is inserted
into its plastic and stainless steel DO probe case, it is considered a DO probe case
assembly that is to be prepared for attachment to the flowpath. The case exposes
the tip of the electrode to a small volume of constantly flowing medium for
optimal response time. An electrical cable is provided to connect the probe to the
appropriate bulkhead port in the incubator. When the electrode is not in use, it
should be stored in a vertical position with the membrane tip at the bottom. The
protective cap should cover the membrane tip, and the electrical cover should be
in place.
Contact Account Services for more information.
pH Probe and Case
A polarimetric pH electrode is furnished with a container of buffer. When the
electrode is inserted into its plastic and stainless steel pH probe case, it is
considered a pH probe case assembly very much like the oxygen probe case
assembly. The case is designed to expose the tip of the pH electrode to a small
volume of constantly moving medium for rapid response time. When the
electrode is not in use, it should be stored with the electrode tip in a buffer
solution (pH = 4) and with the electrical cap in place.
Biovest International, Inc.
Operations Manual for the ACUSYST-MAXIMIZER
P/N 700037-000 Rev. H
Page 3-7
System Description
BOTTLES AND CAP ASSEMBLIES (OPTIONAL)
Bottles
Biovest International offers glass bottles to be used with the MAXIMIZER. These
bottles are provided with screw caps and plastic pouring rings that will survive
repeated autoclave cycles (Figure 3-5).
Cap Assemblies
In addition to the bottles offered by Biovest International, two types of patented
vented RESCU-CAP assemblies are available (Figure 3-5). Each type can be
fitted with a 0.2 micron Acrodisc vent filter and two Luer plugs to ensure
protection of sterility after steam sterilization. One type of assembly, the
receiving cap, has a short segment of tubing attached to the inlet port. Bottles
used for collection of outflow or harvest should have this type of cap assembly.
The other type of assembly has a longer segment of tubing plus a glass tube on
the outlet port. Bottles used to deliver (feed) medium to the flowpath should have
this type of cap assembly with the correct length of tubing.
Figure 3-5. Bottle components and patented cap assemblies.
P/N 700037-000 Rev. H
Page 3-8
Biovest International, Inc.
Operations Manual for the ACUSYST-MAXIMIZER
System Description
PRINTER PACKAgE (OPTIONAL)
A printer and communications cable may be purchased from Biovest International
(see Appendix B). This device may be used with the MAXIMIZER to record process
control events and alarms with a user-defined logging schedule. It is useful when
hardcopies are needed for compliance with regulatory agencies, or for historical
purposes (run-to-run comparison, troubleshooting, daily flowpath variance in
process control, etc.). Included in this package is a box of printer paper
compatible with the tractor feed mechanism.
SERIAL INTERFACE PORT
Optionally connect to this port either of the following two devices:
• ACULINK-DATA LOg™ Base Unit to electronically collect the run log and graph
logged run data (see Appendix B for ordering information)
or
• A serial-communications, tractor-fed printer (Biovest does not supply this type
of printer)
Biovest International, Inc.
Operations Manual for the ACUSYST-MAXIMIZER
P/N 700037-000 Rev. H
Page 3-9
Instrument Setup
This section will explain what is needed to install the ACUSYST-MAXIMIZER in the
laboratory. It will describe the specific electrical and gassing requirements, as
well as the procedures to test the instrument for damage that may have occurred
during shipping. Please remember to save the packing list that was enclosed with
the box of accessories.
FACILITY REqUIREMENTS
Bench space
The MAXIMIZER should be placed on a level surface in a room with ambient
temperature of 18-26°C (64-79°F). If possible, the location of the MAXIMIZER
should provide easy access to an autoclave and a laminar flow hood. The tabletop
dimensions of the instrument are 69.8 cm [27.5 inches] (width) and
66 cm [26 inches] (depth). The height is 52 cm (20.5 inches) with the door
closed, and 73.6 cm (29.0 inches) with the door open. To permit clearance of
cables, gas lines, and the exhaust fan, the rear of the instrument must have
clearance of 10 cm (4 inches). More space will be needed if the printer package is
used. See Figure 4-1 for benchtop area covered by the MAXIMIZER and printer.
Electrical and gassing Requirements
One electrical outlet is required for the MAXIMIZER. The MAXIMIZER may be
configured at the factory for the three types of power specifications shown in
Figure 4-2 (refer to Appendix A and B). The in-house electrical circuit must
supply at least 500 watts of uninterrupted power. If the printer is used, an
additional outlet will be needed. It is recommended that an uninterruptible power
supply (on-line 500 vA with sine wave form) should be used with the MAXIMIZER.
Biovest International, Inc.
Operations Manual for the ACUSYST-MAXIMIZER
P/N 700037-000 Rev. H
Page 4-1
Instrument Setup
ACUSYST-MAXIMIZER
Printer
Figure 4-1. Foot print dimensions for ACUSYST-MAXIMIZER and printer
VOLTAgE
CURRENT
FREqUENCY
SPECIFICATIONS
120 VAC
100 VAC
230 VAC
60 Hz
50/60 Hz
50/60 Hz
4 amp
4 amp
2 amp
Figure 4-2. Power requirements for the ACUSYST-MAXIMIZER
Attach the two gas filters to the rear of the instrument, as shown by the label
(Figure 4-3, item 14). Remove the gas line plugs, and connect the gas line to the
proper inlet and outlet. Cable ties should be used to secure all gas line
connections. Attach the supply of 100% carbon dioxide (medical grade) to the
correct filter, and set the incoming supply pressure to 15 psi (1.0 kg/sq.cm). A
port is available for attaching a barbed fitting to be used for backup air supply
(set to same pressure). If there is a need to filter or incinerate exhaust gas, an
outgas port is available for a fitting and vacuum line.
Gas supply: Medical grade carbon dioxide (100%) is recommended for the
MAXIMIZER.
P/N 700037-000 Rev. H
Page 4-2
Biovest International, Inc.
Operations Manual for the ACUSYST-MAXIMIZER
Instrument Setup
Laboratory Supplies
See Electrical and Gassing Requirements for making the proper pressure
adjustments and connections to the instrument.
Cell culture equipment: Various supplies will be needed to maintain the
MAXIMIZER during a run. Laboratory coats, sterile gloves, masks, and other
apparel are recommended to minimize the risk of contamination. The importance
of these types of precautions depend upon the cleanliness and sterility of the
room where the MAXIMIZER is located, as well as the presence or lack of
antibiotics in the culture medium. Inoculation will require sterile syringes (60 ml)
and sterile needles (15 gauge). Two sizes of sterile syringes (10 ml and 3 ml) are
recommended for sampling; if septa are used during sampling, sterile needles (20
gauge) will also be needed. A disinfectant solution of alcohol, beta-iodine,
peracetic acid, etc. is necessary for making sterile connections. Sterile gauze or
cotton pads may be used with the disinfectant to protect the culture during these
procedures.
A laminar flow hood, autoclave, and some kind of pH meter (benchtop monitor,
or blood gas analyzer) are absolutely required for certain procedures. Assay
equipment and reagents for the measurement of secreted product, glucose and
lactate are used to adjust process control parameters. Calibration of the optional
oxygen electrode can be performed offline with an instrument such as a blood gas
analyzer.
Biovest International, Inc.
Operations Manual for the ACUSYST-MAXIMIZER
P/N 700037-000 Rev. H
Page 4-3
Instrument Setup
PRINTER SETUP (OPTIONAL)
Biovest International optionally offers a printer to document the run log. It is used
with the MAXIMIZER to make hardcopy records of process control conditions and
alarms during the run. Assemble the printer and tractor feed according to the
printer's pre-packaged instructions, and connect the printer to the MAXIMIZER by
attaching the parallel interface cable (see Figure 4-3 for location of parallel port).
Load the printer with paper, and plug it into an appropriate electrical outlet (or
uninterruptible power supply, as described on page 4-1).
SERIAL INTERFACE PORT
The serial interface port is a 25-pin serial cable connector on the rear panel of the
instrument. The serial port provides for the transfer of information from the
MAXIMIZER to an IBM-compatible computer or a serial printer. The MAXIMIZER
sends the same information to the parallel and serial ports.
An advantage of using a serial printer, rather than a parallel printer, is that a serial
printer may be placed an extended distance from the instrument for remote
printing - outside the cleanroom environment, for instance. One advantage of
using a computer over a printer is that, unlike printouts, a computer can capture
the printout as data. This allows the run data to be collected without using
particulate-generating paper.
Other advantages of using a computer are selective reviewal, graphical analysis,
and archiving of run data, and remote monitoring of instrument operation.
Biovest International offers ACULINK-DATA LOgTM, a custom hardware and
software solution that runs on a PC computer to log run data and provide the
benefits listed above. For computer information about the ACULINK-DATA LOg
system, contact Biovest International’s Account Services Department.
There are four modes available for parallel and serial port operation. These
different modes allow the MAXIMIZER to adapt to the requirements and equipment
of the production facility. The differences between the four modes are described
below. Refer to Figure 4-3 and 4-4 for details of configuring the desired mode in
the MAXIMIZER instrument. The factory default configuration of the MAXIMIZER is
parallel printer mode at a data transmission speed of 9600 baud.
P/N 700037-000 Rev. H
Page 4-4
Biovest International, Inc.
Operations Manual for the ACUSYST-MAXIMIZER
Instrument Setup
Caution:
Contact Biovest International’s Account Services Department if another
mode of operation is necessary. You risk instrument damage and/or personal
injury by changing the rocker switch settings!
Rocker Switch Settings
Desired Mode
Parallel printer only
Switch 3
Switch 4
Closed
Open
Open
Serial printer only
Serial computer
Open
Restricted mode
Closed
Open
Closed
Closed
Figure 4-3. Serial interface board settings for printer and computer
Switch 1
Rocker Switch Settings
Switch 2
Open
Open
Closed
Open
Open
Closed
Closed
Closed
Baud Rate
9600
4800
2400
1200
Figure 4-4. Serial interface board settings for baud rate.
Biovest International, Inc.
Operations Manual for the ACUSYST-MAXIMIZER
P/N 700037-000 Rev. H
Page 4-5
Instrument Setup
To use a serial printer configure its communications for 8 data bits, no parity, and
1 stop bit and to use XON/XOFF flow control. The serial port uses only transmit,
receive, and ground signals (Figure 4-5). The printer must be compatible with the
printer’s control characters.
Figure 4-5. Location of main pin functions on serial interface port
Parallel Port and Serial Port Modes of Operation
Parallel printer mode is primarily meant for only parallel printing, but the serial
port is active for use by the optional ACULINK-DATA LOg system (see serial
computer mode).
Serial printer mode allows simultaneous printing from both parallel and serial
printers. A parallel printer must be used in serial printer mode. The serial printer
may be placed at a remote location - outside the production room, for instance,
for convenience or other purposes.
Serial computer mode is primarily meant for only using the optional ACULINKDATA LOg system. The serial computer mode does, however, allow the use of a
parallel printer. The serial port will override any parallel printer failures after a
short timeout.
Restricted mode allows simultaneous printing from both parallel and serial
printers. A parallel printer may be used in serial printer mode. The serial port will
override any parallel printer failures after a short timeout.
P/N 700037-000 Rev. H
Page 4-6
Biovest International, Inc.
Operations Manual for the ACUSYST-MAXIMIZER
Instrument Setup
ACULINK-DATA LOg™ SETUP (OPTIONAL)
Biovest International optionally offers ACULINK-DATA LOg, a custom hardware
and software solution that runs on a PC computer to electronically collect and
store run data, rather than printing this information, as described above.
Advantages of using ACULINK-DATA LOg include:
n
saving space in the clean room
n
faster, simpler review of log data
n
n
n
n
eliminating particulate-generating paper in the clean room
archiving run log data
faster, simpler monitoring or instrument operation
improving reliable documentation of log data
Contact Biovest International’s Account Services Department for further
information about ACULINK-DATA LOg.
Biovest International, Inc.
Operations Manual for the ACUSYST-MAXIMIZER
P/N 700037-000 Rev. H
Page 4-7
User Interface
Note:
This section describes the control features and screens that are accessed using the
keypad of the ACUSYST-MAXIMIZER. Some of the keys and features are not
explained in detail in this chapter, but a brief description of their general use is
provided. More extensive coverage is provided in the chapter 6, Operating
Procedures. This is necessary for some features because it is easier to learn them
as you proceed through the steps of a culture run. Guidance for using some of
these features is provided in chapter 6, Optimization Procedure.
Refer to Section 7, Troubleshooting for a complete list and description of
alarms.
OVERVIEw OF LCD AND KEYPAD
LCD
Keypad
Refer to Figure 5-1 for the location of the LCD and keypad items.
This is the screen at the top of the keypad. Information is displayed as discrete
screens that may or may not contain a flashing, movable cursor. Because the LCD
has space for a limited amount of text, some information must be presented as a
series of separate screens. Scroll through them by repetitively pressing ENTER
(for most series) or ⬅ and ➡ (for others).
Numeric Panel: This is a collection of keys numbered 0 through 9, with a key
for decimal (.), CLEAR, and ENTER. A selection from a menu is chosen by pressing
the desired number. To input values, such as pH or temperature set points or
various pump speeds, first press the desired number keys, then press ENTER. If an
error is made before ENTER is pressed, press CLEAR to erase the unwanted entry.
Menu Keys: The following keys are called menu keys because pressing them
displays a list (menu) of items to be selected for further action:
n
SET-UP
n
CALIBRATE
n
n
n
PROCESS CONTROL
HOLD
Four Override Control keys
Biovest International, Inc.
Operations Manual for the ACUSYST-MAXIMIZER
P/N 700037-000 Rev. H
Page 5-1
User Interface
LEDs are present in the upper, lefthand corner of some keys. They are red
when turned on. Their purposes are
explained with their relevant keys in
the sections throughout this chapter.
Arrow keys move the cursor to fields
that need input, or to the override
indicator (*) if it is present. The cursor
uses the "wrap-around" function as a
shortcut function to quickly move from
one end of the screen to another end, if
desired (for example, pressing ⬆ from
a topmost field brings the cursor to a
bottommost field).
The ⬅ and ➡ keys are also used with
ALARM screens to scroll through the
stored alarm messages.
RUNNING
pH 7.30
DO 145
Tp 37.0
37-01:23
Cycle
RISE
IC
98
EC
0 112 ml
MONITOR
CALIBRATE
ACTIVE
⬆
PUMPS
GAS
E.C. CYCLE
ACTIVE
PROCESS
CONTROL
OVERRIDE
CONTROL
⬅
➡
⬇
TEMPERATURE
HOLD
6 F1
0
500 F2 35
350 F3* 0
420
ALARM
ACTIVE
SET-UP
START
HP
CP
MP
OP
INOCULATE
1
2
3
4
5
6
7
8
9
.
0
CLEAR
ENTER
DIAGNOSTICS
KEY
Figure 5-1. ACUSYST-MAXIMIZER
START has several functions. START
keypad and LCD
must be pressed immediately before
pressing SET-UP, PROCESS CONTROL,
or INOCULATE to activate these functions and cause the respective LED to turn on
to confirm which of the three functions is active. Only one of these functions may
be active at any one time (see caution note below).
To display the series of diagnostics screens, press START then the Diagnostics key
(an unlabeled key). Diagnostics screens may be displayed at any time during the
run, so the caution note below does not apply to the diagnostics screens.
Lastly, START also is used during the calibration procedure according to the
onscreen instructions.
CAUTION: Be careful about pressing START! See caution note on page 5-7. If START is
accidentally pressed, press MONITOR or CLEAR before pressing another key.
P/N 700037-000 Rev. H
Page 5-2
Biovest International, Inc.
Operations Manual for the ACUSYST-MAXIMIZER
User Interface
MENU KEY OPERATIONS
MONITOR Key
Pressing MONITOR displays the main screen that shows most of the parameters
that are automatically monitored and/or controlled (see Figure 5-2).
RUNNING
pH 7.30
DO 145
Tp 37.0
07-01:23
Cycle
RISE
IC
98
EC
0 112 ml
HP
CP
MP
OP
6
500
350
420
F1
F2
F3*
0
35
0
Figure 5-2. MONITOR screen
The Monitor screen shows which of the four modes of operation (IDLE, SETUP,
and RUNNING) is currently active and for how long the mode of operation
has been active, as shown by the elapsed time. Elapse time is represented as dayshours:minutes with maximum values of 999 days, 23 hours and 59 minutes.
Elapsed time resets to 0-00:00 whenever a new mode of operation is actived.
Elapsed time represents relative elapsed culture time, not the time of day or date.
INOC,
The remaining information on the Monitor screen is shown for all four modes of
operation and represents currently monitored/controlled conditions:
=
=
Tp
=
CYCLE =
IC
=
EC
=
PH
DO*
HP
CP
MP
OP
Note:
=
=
=
=
pH of pre-BRX medium
dissolved oxygen (mmHg)
temperature (°C) of circulating medium
phase of EC Cycling currently active (RISE, FALL, LOW, or HOLD)
pressure (mmHg) in Integration Chamber
pressure (mmHg) and volume (ml) in Expansion Chamber
Harvest pump rate (ml/hr)
Circulation pump rate (ml/min)
Media pump rate (ml/hr)
Outflow pump rate (ml/hr)
F1
F2
F3
= Factor 1 pump rate (ml/hr)
= Factor 2 pump rate (ml/hr)
= Factor 3 pump rate (ml/hr)
* The DO value displayed on the Monitor (and Calibrate) screen may change
depending on whether the pre-BRX or post-BRX clamp is open (see Figure
3-4). The DO value on the LCD does not reflect which of these clamps is
open, nor is this indicated in the run log.
Biovest International, Inc.
Operations Manual for the ACUSYST-MAXIMIZER
P/N 700037-000 Rev. H
Page 5-3
User Interface
Following is a synopsis of the four modes of operation and the sequence of when
they normally occur during a culture run.
appears on the Monitor screen immediately after the Abort function is used
(when the previous run was terminated) and until one of the active function
begins: either ACTIVE SET-UP, ACTIVE PROCESS CONTROL, or ACTIVE
INOCULATION.
IDLE
appears on the LCD after pressing START then SET-UP, which also turns
on the Active Set-Up LED and resets elapsed time to 0-00:00. Start Set-Up
activities normally occur after Idle. Further information about Start Set-Up is
described three pages below.
SETUP
appears automatically after completing the Start Set-Up activities, and
the Active Process Control LED also turns on automatically. Elapsed time resets
to 0-00:00. This stage of the run is called Pre-Inoculation phase, a time when
the MAXIMIZER is adjusting the cell culture medium to make it ready for
inoculating the cultureware with the scale-up culture by controlling pH,
temperature, EC Cycling, etc. Alarms, printing, and other functions become
enabled when the MAXIMIZER is in RUNNING mode.
RUNNING
appears after pressing START then INOCULATE, which also turns on the
Active Inoculate LED. Elapsed time resets to 0-00:00. Inoculation phase is a
short-duration phase used to inoculate the cultureware with the scale-up culture.
INOC
re-appears automatically after completing the Start Inoculate activities.
The Active Process Control LED turns on automatically again. The MAXIMIZER
resumes controlling process control parameters programmed in the series of
Process Control screens.
RUNNING
MAXIMIZER remains in RUNNING mode until it is time to terminate the run. Press
HOLD then 2 to abort the run. IDLE now appears on the screen, and the cycle of
progressing through these modes of operation repeats for the next culture run.
P/N 700037-000 Rev. H
Page 5-4
Biovest International, Inc.
Operations Manual for the ACUSYST-MAXIMIZER
User Interface
Note:
IDLE, SETUP
and INOCULATE must be manually activated. RUNNING
normally appears (and becomes the active mode) automatically after
Fill/Flush and Inoculation procedures are completed. However, if you need
to directly activate RUNNING mode, press START then PROCESS CONTROL. The
Active Process Control LED turns on; elapsed time resets to 0-00:00; and
pH, temperature, EC Cycling and other process control functions become
active.
Override Controls are available during any of the four modes of operation
described above. If an override applies to a parameter displayed on the Monitor
screen, its status of being manually overriden is indicated by an asterisk (*) to the
left of the monitored parameter. An example of this is shown in figure 5-2. The
F3 pump is overriden to a speed of 0 ml/hr.
Biovest International, Inc.
Operations Manual for the ACUSYST-MAXIMIZER
P/N 700037-000 Rev. H
Page 5-5
User Interface
SETUP Key
Press SET-UP to access two screens: System Tests and Logging Interval
(figures 5-3 and 5-4). Whichever screen was last viewed is the first one to be
displayed. Press ENTER to cycle between the two screens. Press MONITOR to exit
from either screen. These screens may be accessed at any time during an active
culture run.
System Tests: Six instrument self-tests should be performed on the MAXIMIZER
before each culture run is started. These tests ensure the functioning of the LCD,
audible alarm, LEDs, keypad response, and printer connection. The sixth test
allows you to examine the revision level of the microprocessor PROMs.
System Tests:
1) LCD
2) Alarm
4) Keypad
5) Printer
3) LEDS
6) PROMS
Figure 5-3. System Tests Menu Screen
Instrument Setup Procedures: (beginning on page 6-15) explain the details of
the six System Tests, which are activated by pressing the respective menu
numbers.
Printer Log Interval: The second Set-Up screen is shown in the figure below.
Printer: Disabled
Logging Interval: _ 0 mins (0-255)
Figure 5-4. Logging Interval Screen
Note:
Logging Interval is the user-defined frequency for sending current instrument
status information to the printer or ACULINK-DATA LOg. When set
to 0, logging is disabled. The interval may be changed at any time during an
active culture run. Logging is active only in RUNNING mode. This feature applies
to a printer or ACULINK-DATA LOg connected to the serial or parallel port.
The function of Logging Interval is different from the Printer test in the
System Tests screen.
P/N 700037-000 Rev. H
Page 5-6
Biovest International, Inc.
Operations Manual for the ACUSYST-MAXIMIZER
User Interface
START/SETUP Functions
Press START then SET-UP to display the screen shown in figure 5-5. This also
causes the Active Set-Up LED to turn on, and it changes the miniMAX’s status
from IDLE to SETUP. Press MONITOR to exit from this screen.
Perform:
1) Pressurization Test
2) Fill/Flush
Figure 5-5. START/SETUP Selection Screen
Pressing 1 or 2 results in several screens of instructions that are specific to the
chosen procedure. The PRESSURIZATION TEST must be performed before
FILL/FLUSH! After the Pressurization Test is complete, the display returns to
this screen in order to then perform Fill/Flush. See chapter 6 for operational
details.
Pressurization Test: This program applies air pressure at the EC and IC
bulkhead ports (and anything connected to them, such as pH or DO probe
assemblies or the entire cultureware), then measures any detectable reduction as a
sign of leakage. The test is performed several times per culture run to confirm the
MAXIMIZER instrument, probe assemblies, and cultureware are leak-free.
Fill/Flush Test: This program is used to fill the cultureware and rinse the wetting
agent from the hollow fibers in the bioreactor cartridge in preparation for the preinoculation phase.
CAUTION: During an active culture run the Monitor screen shows RUNNING as the run
mode and the LED for Active Process Control is turned on. During an active
run, do NOT press START then SET-UP because this will stop the active run
and display the screen shown in figure 5.5! However, if this is accidentally
done, press START then PROCESS CONTROL to restart the active run. Process
Control settings will be retained (if the backup battery is still good), but
elapsed time will reset to 0-00:00, which would affect process control
parameters that include a delay time feature. Press PROCESS CONTROL and
review all screens to ensure their settings return the instrument’s operation
to what it was prior to accidentally deactivating the run.
Biovest International, Inc.
Operations Manual for the ACUSYST-MAXIMIZER
P/N 700037-000 Rev. H
Page 5-7
User Interface
PROCESS CONTROL Key
Press PROCESS CONTROL to access several screens to enter or review the settings
that define how the MAXIMIZER operates when in RUNNING mode. The various
screens include information on pH control, pump rates and pump schedules,
alarm limits, temperature setpoint, and EC Cycling parameters. These parameters
have specific default values, but they may be changed at any time during a
culture run.
Pressing PROCESS CONTROL displays whichever of the series of the Process
Control screens was last viewed. This also causes the Process Control LED (in
the gray area of the key) to turn on. Repetitively press ENTER to scroll through
the series of Process Control screens. To exit from any of these screens, press
MONITOR.
Chapter 6 provides a detailed explanation of pH control, oxygenation, and basic
strategy implemented in a culture run.
P/N 700037-000 Rev. H
Page 5-8
Biovest International, Inc.
Operations Manual for the ACUSYST-MAXIMIZER
User Interface
pH Setpoint and Gas Numbers: The screen below shows the current pH
Setpoint that process control will attempt to maintain. This setpoint ideally is
specific to the mid-log phase of growth that is specific to the cell line being
actively cultured. This value may be changed anytime during the active culture
run. Acceptable values are in the range of 6.00 – 8.00 pH units, in increments of
0.01 units.
pH Setpoint:
7.10
LOW
1
GAS #:
HIGH
14
Figure 5-6. pH and Gas Number Screen
Note:
This screen also allows you to limit the LOW and HIGH gas numbers. We strongly
suggest using the default values: LOW 1, HIGH 14. A typical run needs the full
range of gas numbers. When changed, the LOW value must be ≤ the
HIGH value. (When LOW value = the HIGH value High, the result is the same as
overriding Gas # to a single gas number.)
Changing the default LOW and HIGH values reduces the range of pH control.
Alarms:
Use this screen to set the desired LOW and HIGH alarm limits for pH, DO, and
Temperature and setpoint for Temperature. These alarms are active only in
RUNNING mode. To enter a temperature setpoint outside of the default alarm
range, first change the LOW or HIGH temperature limit to a value outside of the
setpoint.
Acceptable ranges and increments:
n
n
n
n
pH alarm:
6.00 – 8.00 pH units
DO alarm:
0 – 200 mmHg
Temperature alarm:
24.1 – 45.8°C
Temperature setpoint:
24.1 – 45.8°C
pH
DO
Tp
Set
37.0
0.01 units
1 mmHg
0.1°C
0.1°C
LOW*ALARM*HIGH
7.10
7.50
80
20
36.5
37.5
Figure 5-7. Alarm and Temperature Setpoint Screen
Biovest International, Inc.
Operations Manual for the ACUSYST-MAXIMIZER
P/N 700037-000 Rev. H
Page 5-9
User Interface
Circulation Rate:
The Circulation Rate screen allows you to set the speed of the Circulation
Pump in ml/min. As described in chapter 6, Oxygen Delivery, this value should
be raised during the active culture run to maintain a minimum desired post-BRX
DO level (suggest 100 mmHg). Acceptable Circulation Rate values are between 0
– 1000 ml/min, in increments of 1 ml/min.
Circulation Rate
Note:
250 ml/min
Figure 5-8. Circulation Rate Screen
Cultureware that contains one BRX should not exceed circulation rates of
600 ml/min.
Media Pump Rates:
The Media Rates screen defines two pump rates related to pumping IC
medium by the Media Pump: Basal for nutrient feed, Dilution for optional,
supplemental control of pH (see pH Control beginning on page 6-1). Acceptable
rates (for both) are between 0 – 800 ml/hr, in increments of 1 ml/hr.
The Basal rate should be changed according to metabolic information — periodic
off-line assays of media samples to measure, for example, glucose concentration.
As the culture expands and requires faster nutrient delivery, increase the Basal
rate, as necessary.
When the Dilution rate ≤ Basal rate, the Media Pump remains at the Basal
rate to maintain the chosen nutrient delivery rate. The result is the disabling of the
Medium Dilution method of maintaining the pH setpoint. Excess medium will not
be used to dilute lactate even if pH drops below its setpoint.
When the Dilution rate > Basal rate, the result is the enabling of the Medium
Dilution method of maintaining the pH setpoint. Excess medium may be used to
dilute lactate if pH drops below its setpoint.
Media Rates
Basal
Dilution
( ml/hr )
25
0
Figure 5-9. Medium Pump Rates Screen
P/N 700037-000 Rev. H
Page 5-10
Biovest International, Inc.
Operations Manual for the ACUSYST-MAXIMIZER
User Interface
Factor 1 (F1, Base Addition) Pump Rate:
This screen allows you to enable (press 1) or disable (press 2) the base addition
strategy for pH control, and to designate a volume that must be pumped into the
cultureware before the next strategy (Medium Dilution) is activated.
Base solution is automatically pumped at 1⁄20 of the Medium Pump rate, or 5 ml/hr,
whichever is greater — when Gas #1 (typically) by itself is unable to maintain (or
raise pH to) the pH setpoint. If Base Addition is enabled (option 1), you may
enter 0 – 9999 ml (in increments of 1 ml) as the desired Base Volume before
start of Dilution. This volume of base is pumped before the instrument
activates Medium Dilution, if it is enabled and its use is necessary — pH
continues to be lower than the setpoint despite base addition being used.
Base addition continues once Medium Dilution begins. If Base Addition is
enabled and the Base Volume before start of Dilution is set to 0 ml
(as shown in Figure 5-10), then Base Addition and Medium Dilution (if enabled)
begin simultaneously — when Gas #1 (typically) by itself is unable to maintain
(or raise pH to) the pH setpoint.
After pH returns to the desired setpoint, Base Addition stops (F1 pumps stops
turning) and the Base Volume before start of Dilution is reset to the
user-defined volume, for example, 50 ml. If pH goes out of range again and Base
Addition is activated, another 50 ml of base may be pumped (if pH remains
below the setpoint during this time) before Medium Dilution can be activated.
Base (F1): DISABLED
1 = Enabled,
2 = Disabled
Base Volume before
start of Dilution
_2
0 ml
Figure 5-10. Factor 1 (Base Addition) Screen
If you do not need to pump base to assist with pH control (which is true for most
applications) and instead want to use the F1 Pump to deliver some other solution
into the IC, leave Base Addition disabled and control this pump’s speed using a
manual override. Press PUMPS, use the arrow keys to navigate to the F1 pump
field, enter the desired pump rate using the number keys, and press ENTER.
Biovest International, Inc.
Operations Manual for the ACUSYST-MAXIMIZER
P/N 700037-000 Rev. H
Page 5-11
User Interface
EC Cycling:
This screen allows you to set the conditions used by the MAXIMIZER in regulating
the fluid cycling process between IC and EC. Default values are:
(7 days)
n Transfer Vol 70 (ml)
n UP 15 (15-minute Rise time)
n DN 15 (15-minute Fall time)
n
Delay
07-00:00
During active process control (RUNNING mode), the MAXIMIZER controls the
volume in the Expansion Chamber at a low level setpoint (108 ml) during the EC
Cycling Delay period. This is displayed as LOW on the Monitor screen. When the
elapsed time exceeds the delay period, EC Cycling begins (in a Rise phase) using
the transfer volume and Rise/Fall times specified in this process control screen.
When the ultrasonic level detector senses that the desired transfer volume has
been added to the Expansion Chamber, the Rise phase is stopped, and the Fall
phase begins. At the low level setpoint, the Fall phase stops, and the sequence
repeats.
Use ⬅⬆➡⬇ to move the cursor between the four programming options.
Allowed EC Cycling parameters (see chapter 6, Optimization Procedures):
Delay:
0-00:00 – 999-23:59, in increments of 1 minute
n Rise Time: 5 – 999 minutes, in increments of 1 minute
n Fall Time: 10 – 999 minutes, in increments of 1 minute
n Transfer Volume: 1 – 140 ml, in increments of 1 ml
n
EC Cyling
Delay
Transfer Vol
07-00:00
70
UP
DN
15
15
Figure 5-11. EC Cycling Parameters Screen
P/N 700037-000 Rev. H
Page 5-12
Biovest International, Inc.
Operations Manual for the ACUSYST-MAXIMIZER
User Interface
Factor 3 (F3, Serum) Pump Control: This pump delivers factor 3 solution
(growth-supplemented medium) to the EC in a continuous or discontinuous
(pulsatile) manner.
After the user-defined Delay period elapses, the pump runs at the desired flow
The On and Cycle fields are used to define a continuous or pulsatile
pumping process.
Rate.
To run the F3 Pump continuously, the On and Cycle times must be set to the
same, non-zero time. This is the most common mode of operation for this pump.
To run the F3 pump in pulses at your desired intervals, set the On field to the
length of time the pump should turn, and set the Cycle field to the combined On
and Off time. Pulses are the only means of achieving fractional rates, and they
allow frequent or infrequent and large or small doses of factor to be pumped.
Example: Rate = 3, Delay = 2-12:30, Cycle = 00-02:00,
On = 00-00:30. With these settings the F3 Pump will begin turning two days,
twelve hours and thirty minutes after RUNNING mode began and at a rate of
3 ml/hr. The F3 Pump will turn for 30 minutes, stop for 1 hour 30 minutes (to
complete the two-hour CYCLE time), turn again for another 30 minutes, stop
again for another 1 hour 30 minutes, etc. The long-term, effective pumping rate
of these pulses will be 0.75 ml/hr (3 ml/hr at 25% on-time).
Allowed F3 Pump parameters:
Delay:
n Rate:
n On:
n
n
Cycle:
0-00:00 – 999-23:59, in increments of 1 minute
0 – 200 ml/hr, in increments of 1 ml/hr (see page A-4)
0-00:00 – 999-23:59, in increments of 1 minute
On time must be ≤ Cycle time
0-00:00 – 999-23:59, in increments of 1 minute
SERUM Control (F3)
On
Rate
0
Cycle
Delay
00-00:00
Note:
0-00:00
0-00:00
Figure 5-12. Factor 3 (Serum) Control Screen
The use of Cycle time in this screen should not be confused with — and is
unrelated to — EC Cycling parameters described on page 5-12.
Biovest International, Inc.
Operations Manual for the ACUSYST-MAXIMIZER
P/N 700037-000 Rev. H
Page 5-13
User Interface
Factor 2 Pump Control (F2): This pump delivers factor 2 solution (usually a
glucose or glutamine concentrate) to the IC in a continuous or discontinuous
(pulsatile) manner.
The usage for these settings is the same as for the F3 Pump Control, described on
the previous page.
Allowed F2 Pump parameters:
Delay:
n Rate:
n On:
n
n
Cycle:
0-00:00 – 999-23:59, in increments of 1 minute
0 – 200 ml/hr, in increments of 1 ml (see page A-4)
0-00:00 – 999-23:59, in increments of 1 minute
On time must be ≤ Cycle time
0-00:00 – 999-23:59, in increments of 1 minute
FACTOR 2 Control (F2)
On
Rate
0
Cycle
Delay
00-00:00
Note:
0-00:00
0-00:00
Figure 5-13. Factor 2 Control Screen
The use of Cycle time in this screen should not be confused with — and is
unrelated to — EC Cycling parameters described on page 5-12.
P/N 700037-000 Rev. H
Page 5-14
Biovest International, Inc.
Operations Manual for the ACUSYST-MAXIMIZER
User Interface
Harvest Schedule: This screen allows you to select the type of harvesting
strategy to be employed by Process Control. One of the choices (option 4) is no
harvesting. The other choices are referenced as Continuous, Continuous Batch,
and Timed Batch and are described in detail on the following pages.
When any of the 4 selections are made, the top of this screen displays the name of
the selection after Harvest Schedule:
When option 4 is chosen, the Harvest Pump does not turn and the next Process
Control screen (displayed by pressing ENTER) is pH Setpoint.
When options 1 – 3 are chosen, the next Process Control screen (displayed by
pressing ENTER) varies based on the harvest schedule option chosen, and it
provides the appropriate settings needed for the chosen harvesting method.
Harvest Schedule: Continuous
1) Continuous
2) Continuous Batch
Note:
3) Timed Batch
4) None
Figure 5-14. Harvest Schedule Selection Screen
Because the Continuous Batch and Timed Batch strategies rely partly on EC
Cycling to start the harvest pump, certain conditions related to EC Cycling
may influence timing aspects of these two harvesting methods.
n
n
When the Delay time of EC Cycling is greater than the Delay time of the
Continuous Batch or Timed Batch harvest strategy, these two harvesting
methods will not begin until after EC Cycling has started.
Using the Override Controls (described below) to set a Low or Hold
condition on EC Cycling may prevent these harvest strategies from being
used. This potential pause to harvesting depends on the phase of EC Cycling
that is in progress when either of these two EC Cycling overrides is set.
Biovest International, Inc.
Operations Manual for the ACUSYST-MAXIMIZER
P/N 700037-000 Rev. H
Page 5-15
User Interface
Continuous Harvesting: When this selection is made, the screen in figure 5-15
will be displayed by pressing ENTER.
As with the F3 Pump and F2 Pump screens, you may select a Delay time and
harvest pump Rate, as well as a continuous or pulsatile harvest pump operation.
Yes, even though this harvest method is called Continuous, it nevertheless is
possible to program a pulsatile harvest pumping method (in addition to the fully
continuous method). The basic difference between Pulsatile Continuous
Harvesting and Continuous Batch or Timed Batch is Pulsatile Continuous
Harvesting occurs irrespective of the EC Cycling process. In other words, the
Harvest Pump operates regardless of the fluctuating volume in the Expansion
Chamber. Continuous Batch and Timed Batch operate the Harvest Pump relative
to the Expansion Chamber volume. See the following page for further details
about Continuous Batch and Timed Batch.
Fully continuous harvesting is the most common method of operating the Harvest
Pump. To achieve this, the On and Cycle times must be set to the same, non-zero
time. If the On and Cycle times remain at the default of 0-00:00, the Harvest
Pump will not turn on, even when the Delay time is elapsed and the Rate is
> 0 ml/hr !
Allowed parameters:
Delay:
n Rate:
n On:
n
n
Cycle:
0-00:00 – 999-23:59, in increments of 1 minute
0 – 200 ml/hr, in increments of 1 ml (see page A-4)
0-00:00 – 999-23:59, in increments of 1 minute
On time must be ≤ Cycle time
0-00:00 – 999-23:59, in increments of 1 minute
Harvest : Continuous
Delay
14-00:00
Rate
On
0-00:00
Cycle
0-00:00
Note:
3 ml/hr
Figure 5-15. Continuous Harvest Control Screen
The use of Cycle time in this screen should not be confused with — and is
unrelated to — EC Cycling parameters described on page 5-12.
P/N 700037-000 Rev. H
Page 5-16
Biovest International, Inc.
Operations Manual for the ACUSYST-MAXIMIZER
User Interface
Continuous Batch Harvesting: When this selection is made, the screen in figure
5-16 will be displayed by pressing ENTER.
Once the user-defined Delay time has elapsed (and the separate EC Cycling
Delay has elapsed), this harvesting method becomes active. The Harvest Pump
then will run at a pre-programmed, high flow rate to remove the user-defined
Volume each time the Expansion Chamber volume is near its lowest level
during the EC Cycling’s Rise and Fall process. Product concentration is highest
when the Expansion Chamber volume is at its lowest level, as compared to when
this volume is at its highest level.
Continuous Batch harvesting generally occurs more frequently than the Timed
Batch method (see next page), although both harvesting methods remove fluid
when the Expansion Chamber volume is near its low level.
Allowed parameters:
Delay: 0-00:00 – 999-23:59, in increments of 1 minute
n Volume: 0 – 35 ml, in increments of 1 ml
n
Harvest : Continuous Batch
Delay
14-00:00
Volume
35
ml
Figure 5-16. Continuous Batch Harvest Control Screen
Biovest International, Inc.
Operations Manual for the ACUSYST-MAXIMIZER
P/N 700037-000 Rev. H
Page 5-17
User Interface
Timed Batch Harvesting: When this selection is made, the screen in figure
5-17 will be displayed by pressing ENTER.
Once the user-defined Delay time has elapsed (and the separate EC Cycling
Delay has elapsed), this harvesting method becomes active. The Harvest Pump
then will automatically run to remove the user-defined Volume each time the
Harvest Pump turns on, which generally does NOT occur each time the
Expansion Chamber volume is near its lowest level during the EC Cycling’s
Rise and Fall process.
Unlike with Continuous Batch harvesting, Timed Batch harvesting includes a
Cycle time. This Cycle time repeats, counting down to 0-00:00 repeatedly.
Once Cycle time reaches 0-00:00, the Harvest Pump waits until the next time
the Expansion Chamber volume is near its low level. Then the Harvest Pump
turns on at the pre-programmed, high flow rate to remove the user-defined
Volume.
Several EC Cycling Low Levels may occur without the Harvest Pump turning on
while the Harvest Pump is waiting for the Timed Batch Cycle time to count down
to 0-00:00. In this way, Timed Batch harvesting generally occurs less
frequently than Continuous Batch harvesting, although both batch methods
remove fluid when the Expansion Chamber volume is near its low level.
Allowed parameters:
Delay: 0-00:00 – 999-23:59, in increments of 1 minute
n Volume: 0 – 35 ml, in increments of 1 ml
n Cycle: 0-00:00 – 999-23:59, in increments of 1 minute
n
Harvest : Timed Batch
Delay
_14-00:00
Volume
35
ml
Cycle
00-00:00
Note:
Figure 5-17. Timed Batch Harvest Control Screen
EC Cycling’s timing and Timed Batch Cycle time are distinct from one
another, and they operate independently from one another.
P/N 700037-000 Rev. H
Page 5-18
Biovest International, Inc.
Operations Manual for the ACUSYST-MAXIMIZER
User Interface
Override Controls
In the lower left portion of the keypad, four keys are grouped vertically under the
title Override Controls: PUMPS, GAS, E.C. CYCLE, and TEMPERATURE. They may
be used anytime in Idle, Setup, Inoculate, or Running mode. Overrides must be
manually activated and cannot be set to automatically turn on or off in advance.
Once active, overrides remain in effect — despite whatever activity the Setup,
Inoculate, or Running modes require — until the override is manually cleared
(cancelled). For this reason, use overrides carefully until you are very familar
with the operation of the MAXIMIZER and be sure to clear them as soon as
possible!
Pumps: Press PUMPS.to display the following screen:
MP
HP
OP
CP
0
0
0
0
ml/hr
ml/hr
ml/hr
ml/min
F1
F2
*F3
0 ml/hr
0 ml/hr
0 ml/hr
Figure 5-18. Pumps Override Control Screen
The abbreviations used here are the same as the ones used on the Monitor screen
(page 5-3). To activate a Pump rate override, use ⬅⬆➡⬇ to move the cursor
until it is in the field with the desired pump rate value, press the desired number
keys (the desired pump speed), and press ENTER.
Overrides are noted by the display of an asterisk (*):
n
n
To the left of the pump label, as shown for F3 pump in figure 5-18.
To the right of the pump label, as shown for F3 pump in figure 5-1.
The Pumps LED does not turn on when PUMPS is pressed (when no pump
override is already active). The LED turns on only when a Pump override speed
is selected and ENTER is pressed. The Pumps LED remains lit until all pump
overrides have been cleared.
To clear a Pump override, press PUMPS, use ⬅⬆➡⬇ to move the cursor until it
is on the desired asterisk (not the pump rate value), then press CLEAR. The pump
may stop or turn, depending on whether Inoculate or Running is active and what
their process control settings are at this time.
Biovest International, Inc.
Operations Manual for the ACUSYST-MAXIMIZER
P/N 700037-000 Rev. H
Page 5-19
User Interface
Gas: Press GAS to display the following screen:
*Gas #:
11
Figure 5-19. Gas Override Control Screen
The Gas # shown in this screen is a relative value and the current one in use to
control pH. It represents a variable mixture of air and CO2 being delivered to the
GEX (see chapter 6, pH Control). When Running or Inoculate is active and the
Gas # is not overriden (no asterisk is displayed), the Gas # automatically changes
with the demands of the pH control strategy and set point.
Manually overriding the Gas # results in disabling automatic pH control. The gas
mixture remains constant because the Gas # remains constant. To override the
Gas # press GAS, use the number keys to enter a number from 1 – 14, and press
ENTER. An asterisk (*) appears as shown above, and the Gas LED turns on to
indicate a gas override is active. Now, even if automatic pH control wants to vary
the Gas # to maintain pH at the desired setpoint, the Gas # will not change.
Why control pH manually via a gas override? If the pH probe in the cultureware
has malfunctioned mid-run, automatic pH control will not work. Rather than
aseptically replacing the probe, enter a gas override #, wait ~20 minutes, aseptically sample IC medium, assay pH off-line, and adjust the Gas # up or down, if
necessary, to achieve the desired pH. Repeat these steps every few days!
Notes:
If a gas override is a number that is outside of the range set in Process Control, an
alarm occurs, but this gas override is allowed. After the override is cleared, the
gas # returns to the range set in Process Control.
1. Using gas overrides inhibits pH control and generally should not be used
long-term if the pH probe is properly functioning.
2. The Monitor screen does not indicate a gas override is active. You must
rely on the Gas LED’s status — if it is lit, a gas override is active!
3. Gas numbers 0 and 15 may be set at any time, even during an active
culture run. These numbers correspond to no gas flow and 100% carbon
dioxide, respectively (see Figure 6-1) and should be used only at the
direction of Biovest technical service personnel.
P/N 700037-000 Rev. H
Page 5-20
Biovest International, Inc.
Operations Manual for the ACUSYST-MAXIMIZER
User Interface
E.C. Cycle: Press E.C. CYCLE to display the following screen:
E.C. Cycle:
1) Hold
2) Low
3) Drain
Off
4) Cycle
5) Clear
Figure 5-20. E.C. Cycle Override Control Screen
These override functions are related to the fluid movement (cycling) between the
IC and EC. Press numbers 1 – 5 activates the relevant menu items immediately
without the need to press ENTER.
Items 1 – 4 are the options to override EC Cycling. Activating one of these four
options turns on the E.C. Cycle LED. Item 5 is used to clear the EC Cycle
override (instead of needing to press CLEAR), which also turns off the E.C. Cycle
LED.
When items 1 – 4 are selected, the Monitor screen shows an asterisk (*) and
message in the Cycle field to indicate which EC Cycle override is active. In the
override screen, the word "Off" will be replaced to show the same override
selection. After an EC Cycle override has been cleared, this word indicates
whether process control is in Cycle or Low mode.
The Hold override (item 1) should not be confused with the red HOLD key. They
perform different functions! Pressing HOLD stops all process control and override
activities. The EC Cycle Hold override interrupts only the current Rise or Fall
phase of the EC Cycling process. When the Hold override is chosen, the level of
medium in the Expansion Chamber is maintained at the level when the Hold
override became active. The level will not change until the Hold override is
cleared.
The Low override (item 2) works similarly to the Hold override, except that the
Low override first forces the level in the Expansion Chamber down to its low
volume (108 ml), then the level is maintained at this level until the Low override
is cleared.
Biovest International, Inc.
Operations Manual for the ACUSYST-MAXIMIZER
P/N 700037-000 Rev. H
Page 5-21
User Interface
Note:
The Drain override (item 3) is only shown when the Idle mode is active. This
override is provided for use afte the culture run is terminated. When the Drain
override is chosen, pressure is applied to the Expansion Chamber to force all of
the media out of the EC Chamber and down the Cell Removal line to collect the
product into syringes. If collecting the product is unnecessary, leave the Cell
Removal clamp closed, and the media is then pushed into the IC circuit. This
override merely drains the flowpath before cleanup operations at the end of a run.
Refer to Section 6, End of Culture Procedures, before using this feature.
If cell buildup is excessive, completely draining the EC Chamber using the
EC Cycle override may not work. Any medium remaining in the EC
Chamber may be removed by using the Cell Removal line, even though
product collection is unnecessary.
The Cycle override (item 4) activates the EC Cycling (Rise/Fall) process using
the parameters currently set. This allows EC Cycling to function even during the
Idle, Inoculate, or Setup mode, when EC Cycling is normally disabled. In these
modes EC Cycling occurs using the default parameters (70 ml, 15 minute Rise,
15 minute Fall). If Running mode is active, the Cycle override uses these same
default parameters when the Elapsed Time is less than the EC Cycling Delay
time. Otherwise, the Process Control parameters are used when the Elapsed Time
is greater than the EC Cycling Delay time.
P/N 700037-000 Rev. H
Page 5-22
Biovest International, Inc.
Operations Manual for the ACUSYST-MAXIMIZER
User Interface
Temperature: Press TEMPERATURE to display the following screen:
MEDIA
TEMPERATURE (C)
Current
Set Point
37.0
37.0
Figure 5-21. Temperature Override Control Screen
The temperature below "Current" is the current temperature that is measured from
the temperature probe that is installed in a fitting in the cultureware in the
incubator.
The temperature below "Set Point" is the current control value in effect. This
means that in the Running mode, the temperature setpoint used by the instrument
will be the one set in Process Control, unless a Temperature override is active. In
all other modes (Idle, Setup and Inoculate), the setpoint is 37°C unless a
Temperature override is active.
When a temperature override is used, an asterisk (*) is displayed to the left of the
word "Set Point", and the Temperature LED will be turned on. An asterisk also
appears on the Monitor screen next to Tp.
NOTE:
NOTE:
To activate a Temperature override, use ⬅⬆➡⬇ to move the cursor to the value
under Set Point, press the desired number keys (the desired temperature), and
press ENTER. The acceptable range of values is 24.1 – 45.8°C in increments of
0.1°C. To remove the Temperature override, use ⬅⬆➡⬇ to move the cursor to
the asterisk and press CLEAR. After the override has been cleared, the value below
"Set Point" returns to the current setpoint value.
If the Temperature override is set to a value outside of the alarm limits in
Process Control, an alarm will occur when the temperature exceeds these
limits.
A temperature override may not be able to attain the desired value. This
limitation is bound by the temperature of ambient air and the temperature
and flow rate of incoming media. Contact Technical Services for further
details.
Biovest International, Inc.
Operations Manual for the ACUSYST-MAXIMIZER
P/N 700037-000 Rev. H
Page 5-23
User Interface
CALIBRATE Key
Press CALIBRATE to display the program and onscreen instructions to calibrate the
pH and DO probes. Calibration can be done at any time during an active culture
run.
Calibrating either probe requires offline analysis of an IC sample of medium that
is aseptically removed from the cultureware. See chapter 6, Probe Calibration,
for further details.
P/N 700037-000 Rev. H
Page 5-24
Biovest International, Inc.
Operations Manual for the ACUSYST-MAXIMIZER
User Interface
HOLD Key
Pressing HOLD results in the following screen:
Select
1) Continue current activity
2) Abort
Figure 5-22. Hold Key Selection Screen
Use the Hold feature to respond to an imminent or on-going crisis or to terminate
the instrument’s current state (during SETUP, for example) or the active culture
run. An example of a crisis is a media leak from a tubing line.
Pressing HOLD stops these functions whether they’re operating from process
control or override settings, where applicable:
n
n
n
All pumps stop
pH control stops
Oxygenation stops
n
n
n
EC Cycling control stops
Alarm monitoring stops
Logging stops
If HOLD was pressed to respond to a crisis after the cultureware has been
inoculated, it is important to resove the problem and resume normal operation as
quickly as possibe to minimize the negative effects of no pumping, no pH
control, etc. to the cell culture.
After resolving the problem and to resume normal operation, press 1.
To terminate the instrument’s current state or the active culture run, press 2. The
following changes occur:
n
n
n
n
n
NOTE:
state is activated
Elapsed time resets to 0-00:00
Process control settings are reset to the default values
Active overrides stop and these settings are reset to the default values
All six items listed above stop
IDLE
After pressing 2, alarm messages remain in queue and must be reset manually.
Incubator temp. control continues to function before and after pressing 1 or 2.
Special use of HOLD during the Fill/Flush procedure and Pressurization test
is described in chapter 6.
Biovest International, Inc.
Operations Manual for the ACUSYST-MAXIMIZER
P/N 700037-000 Rev. H
Page 5-25
User Interface
ALARM Key
When the Alarm LED is off, no alarm is stored in the alarm queue. In this
situation, pressing ALARM displays the following screen:
No errors reported
Press ENTER to continue.
Figure 5-23. Alarm Screen — No Alarm
When the Alarm LED is on (and the alarm screen is not displayed), an alarm(s) is
stored in the alarm queue. In this situation, pressing ALARM displays a screen
specific to one type of alarm. An example alarm screen:
pH out of range
13 0 0
TIME:
0-00:00
← PREVIOUS ALARM
NEXT ALARM →
PRESS ENTER TO RESTORE THIS ALARM_
Figure 5-24. Alarm Screen — Example Alarmt in Queue
Press ⬅ or ➡ to review however many alarm messages are stored in the queue.
Alarms occur when: a) probes in the cultureware or instrument measure a value
that is out of range or b) instrument hardware circuitry malfunctions.
MAXIMIZER recognizes 33 distinct alarms, most of which are active only during
INOC and RUNNING modes. When an alarm occurs, the Alarm LED turns on,
the alarm message is sent to the printer or ACULINK-DATA LOg, and the audible
alarm and external alarm relay are activated.
Press ALARM to silence the audible alarm and deactivate the external alarm relay.
The display changes to show the most recent alarm message (if more than one
alarm is activated).
P/N 700037-000 Rev. H
Page 5-26
Biovest International, Inc.
Operations Manual for the ACUSYST-MAXIMIZER
User Interface
Each time a new alarm occurs you have two choices to respond:
n
n
Press ENTER to restore (re-enable) a particular alarm:
For example, a pH out of range alarm occurs. Press ⬅ or ➡ to display this
particular alarm, if necessary. When this alarm is displayed, pressing ENTER
restores this alarm only. If other alarm(s) are stored in the alarm queue, they
must be restored individually. Press ENTER only when the monitored
parameter, pH in this example, is no longer out of range. Otherwise, another
pH out of range alarm will recur in a matter of several seconds.
Leave the alarm message stored in alarm queue (prevent its recurrence):
Do this when the monitored parameter, pH in this example, remains out of
range. In this case, press MONITOR while the problem is examined. Once pH
is no longer out of range (is within the alarm limits set in PROCESS
CONTROL), restore the pH alarm by following the instructions above. If this is
not done and pH goes out of range again in the future, the pH alarm will not
be recognized, which prevents what happens when an alarm occurs (described
on the previous page).
The Alarm LED remains lit when at least one alarm message is stored in the
alarm queue. Storing the alarm message continues to silence the alarm and allows
you to perform normal activities while also evaluating what may have caused the
alarm.
When an alarm is stored in the alarm queue and the Alarm LED is on and the
audible alarm is silenced: when a new alarm occurs that is not stored in the alarm
queue, the audible alarm and external alarm relay will activate. Press alarm to
silence the audible alarm and deactivate the external alarm relay. Respond to this
new alarm according to the same two choices described above.
There are a few critical alarms that monitor the instrument’s internal circuitry. If
one of these alarms occurs and is then stored in the alarm queue, subsequent
occurrences of the same alarm will nevertheless cause the audible alarm and
external alarm relay to be re-activated. Inform Biovest’s Account Services of this
situation!
Note:
When the last message in the queue has been restored, the screen in figure 5-23
appears. Press ENTER. The Alarm LED turns off and the Monitor screen appears.
Chapter 7, Troubleshooting, lists and describes all available alarms.
Biovest International, Inc.
Operations Manual for the ACUSYST-MAXIMIZER
P/N 700037-000 Rev. H
Page 5-27
User Interface
Diagnostics Key
A special key exists to permit access to a series of four screens that display
information that is automatically monitored by the instrument. Most of this
information is used by and meaningful to trained service personnel.
One of the diagnostic screens (shown below) is routinely used to test the pH and
DO probes prior to autoclaving them for use in a culture run. The pH probe is
tested by assessing its A/D value (126 as shown below). The DO probe is tested
by assessing its A/D value (150 as shown below). A/D values represent the
electrical signal from the probes and are reliable means of evaluating the probes’
functionality. Operational details of this testing are provided in chapter 6, pH
Probe Validation and DO Probe Validation.
Incu 39.4 155
Media 37.0 143
Heat
2
Press ENTER for next
pH 7.31
126
DO 145
150
P1 1111 1111
screen
Figure 5-25. Diagnostics Screen 0 for pH and
DO Probe Validation
Press START then HIDDEN KEY (see figure 5-1) to display whichever of the four
diagnostic screens was last viewed. Press ENTER to scroll through the four
diagnostics screens and find the one you want.
Press MONITOR at any time to exit from any of the Diagnostics screens.
Chapter 7, Troubleshooting, provides details of the diagnostic screens.
P/N 700037-000 Rev. H
Page 5-28
Biovest International, Inc.
Operations Manual for the ACUSYST-MAXIMIZER
Operating Procedures
PROCESS CONTROL STRATEgY
pH Control
You may wish to review Section 1, System Theory, before proceeding through
this section. Here, the overall operating procedures of the ACUSYST-MAXIMIZER
are explained with emphasis on pH control, dissolved oxygen delivery, media
feed strategy, and harvesting technique. Then an outline is presented to show the
basic sequence of activities of a typical culture run. This is followed by detailed
instructions on each item in that outline, so you will be able to set up, inoculate,
and operate a culture run in the MAXIMIZER.
MAXIMIZER actively controls pH to maintain the user-defined setpoint when in
RUNNING mode. pH is monitored on-line (using the pH probe in the cultureware)
and controlled in real time, with a 10-second sampling and correction interval.
MAXIMIZER uses three techniques to control pH, described below. The primary
method, Gassing, remains in use throughout the active culture run (except for
briefly stopping during the inoculation phase) even when either or both of two
optional, supplemental methods of controlling pH are enabled and in use.
n
n
n
Gassing: pH is primarily controlled by delivering variable gas mixtures and
flow rates through the gas exchanger (referred to as “gassing”). %CO2
increases when pH is above its setpoint. %CO2 decreases (or air flow rate
increases) when pH is below its setpoint.
Base Addition (Optional): Factor 1 Pump pumps an alkaline buffer solution
to counter the effects of lactic acid. The recommended base solution is
0.1 – 0.5 N NaOH or 8.5% NaHCO3 in distilled water.
Medium Dilution (Optional): Media Pump pumps additional medium to
dilute lactic acid.
See chapter 5, Factor 1 (F1, Base Addition) Pump and Medium Pump Rates
Rate for further information about Base Addition and Medium Dilution.
Gassing’s variable gas mixtures are assigned relative Gas Numbers that range
from 0 – 15. Only 1 – 14 are used to control pH during an active culture run.
See Figure 6-1. Gas # 1 is the most potent for raising pH. Gas # 14 is the most
potent for lowering pH. (Gas #15 is used by service personnel only.)
Biovest International, Inc.
Operations Manual for the ACUSYST-MAXIMIZER
P/N 700037-000 Rev. H
Page 6-1
Operating Procedures
In RUNNING mode, Gas #s 1 – 14 automatically change as necessary to respond to
changing culture conditions and maintain pH at its setpoint.
In IDLE, SETUP, and INOC modes, Gas 0 is used.
gAS
RELATIVE AIR
NUMBER FLOw RATE
0
1
2
3
4
5
6
7
8
9
10
11
12
13
14
15
Note:
0
7
6
5
4
3
2
1
7
6
5
4
3
2
1
0
PERCENT
AIR
0
100
100
100
100
100
100
100
97
96
95
94
92
89
80
0
PERCENT
CO2
0
0
0
0
0
0
0
0
3
4
5
6
8
11
20
100
Figure 6-1. CO2 Concentration and Air Flow Rates
Gas 15 is used only by service personnel.
User-Defined pH Control Parameters:
The following parameters are set in their Process Control screens:
n
pH setpoint
n
Medium pump rate for Medium Dilution
n
n
n
Allowed range of gas numbers
Base (F1) pump enabled/disabled for Base Addition
Base volume to be pumped before start of Medium Dilution
Automatic gassing system control and pH control can be disabled by overriding
Gas #, Media Pump speed, or F1 Pump speed.
P/N 700037-000 Rev. H
Page 6-2
Biovest International, Inc.
Operations Manual for the ACUSYST-MAXIMIZER
Operating Procedures
Overview of pH Control Algorithm:
The following pH control algorithm functions when no overrides are active for
Gas # or the MP and F1 pumps. These overrides take precedence over
calculations made by the pH control algorithm and partially or completely disable
pH control.
Figure 6-2. Flowchart of pH control algorithm
Gassing:
The pH control algorithm uses a PID controller to automatically determine and
adjust the required gas mixture (variable %CO2 + air) and air flow rate. pH
control preferentially uses this gas mixture and flow (referred to as Gassing),
but supplements it with base addition and medium dilution, which may be
individually enabled. Gassing is always in effect, even when these supplementary
methods of pH control are used.
In Process Control the user sets the allowed range of gas numbers (GAS #: LOW
and HIGH). Default LOW is 1. Default HIGH is 14. As pH drops, Gas #
automatically drops to compensate. Gas # continues to drop as pH continues to
drop. Once Gas # reaches the LOW value, it cannot drop further. If pH now drops
below its setpoint, the algorithm advances to Base Addition. If Base Addition is
disabled, the algorithm advances to Medium Dilution. If Medium Dilution is also
disabled (Dilution rate < Basal rate), the algorithm continues to use only
Gassing to adjust pH. pH may slowly drop, which often is not detrimental to the
culture, unless it drops to a very low level, which occasionally happens.
Biovest International, Inc.
Operations Manual for the ACUSYST-MAXIMIZER
P/N 700037-000 Rev. H
Page 6-3
Operating Procedures
Base Addition:
Base Addition is optional and disabled by default. Base Addition may be enabled
or disabled, as desired, throughout the active culture run via its Process Control
screen.
Enable or disable Base Addition in its Process Control screen. If enabled, also
enter the desired Base Volume before start of Dilution. that is to be
pumped into the system before Medium Dilution is activated.
When gassing alone cannot keep pH at its setpoint (current Gas # = the LOW
value) and Base Addition is enabled, the F1 Pump automatically starts pumping
base at 1⁄20 of the Media Pump’s rate or 5 ml/hr, whichever is greater. F1 Pump
continues to pump base until the desired Base Volume before start of
Dilution has been pumped, as long as pH remains below its setpoint. At this
point, if pH is still below its setpoint, Base Addition continues (F1 keeps
pumping base) and Medium Dilution is also activated, if it is enabled.
If pH returns to its setpoint (and the current Gas # ≥ the LOW value) before the
desired Base Volume before start of Dilution has been pumped:
n
n
n
F1 Pump stops
Base Volume before start of Dilution
Gassing alone controls pH
is reset to the entered value
If pH again falls below its setpoint and Base Addition is activated, the previous
amount of base that was pumped is forgotten and the user-defined volume now
can be pumped again before Medium Dilution is re-activated, if it’s enabled.
Base addition is usually unnecessary for most applications and may be left
disabled. However, if pH is dropping more than seems safe, you may wish to
enable Base Addition to be prepared and prevent pH from dropping too far and
jeopardizing culture viability. Prepare a sterile bottle of base solution, aseptically
connect it to F1 tubing line, and open the F1 clamp. Then, if Base Addition is
needed, it is ready to be automatically pumped.
P/N 700037-000 Rev. H
Page 6-4
Biovest International, Inc.
Operations Manual for the ACUSYST-MAXIMIZER
Operating Procedures
Medium Dilution:
Medium Dilution is optional and disabled by default. Medium Dilution may be
enabled or disabled, as desired, throughout the active culture run via its Process
Control screen.
Medium Dilution is:
Enabled when Dilution rate > Basal rate
n Disabled when Dilution rate < Basal rate
n
When Medium Dilution is enabled, it is activated for either situation:
n
n
has been pumped, current
Gas # is the LOW value, and pH remains below its setpoint.
Base Volume before start of Dilution
Base Addition is disabled, current Gas # is the LOW value, and pH drops
below its setpoint.
When Medium Dilution is activated, the result is the Media Pump speed
automatically increases from the Basal rate up to the Dilution rate to dilute
Lactate (an acid) in the cultureware in an attempt to reduce pH to its setpoint.
Medium Dilution continues until pH reaches its setpoint and the current Gas # ≥
the LOW value. Medium Dilution then stops, and the MP speed automatically
decreases from the Dilution rate to the Basal rate. Only Gassing continues to
be used to control pH. If pH drops below its setpoint again, the whole cascade of
using Base Addition and Medium Dilution repeats as described above.
When Medium Dilution is disabled, the MP speed remains at the Basal rate, so
no extra medium is used to dilute lactate.
Biovest International, Inc.
Operations Manual for the ACUSYST-MAXIMIZER
P/N 700037-000 Rev. H
Page 6-5
Operating Procedures
Oxygen Delivery
Regardless of the gas mixture number used for pH control (see above), the GEX
provides near-saturation levels of dissolved oxygen (DO) in the medium before it
reaches the BRX(s). As a culture matures, cells will consume oxygen from the
surrounding medium, and produce a lower DO value downstream from the
BRX(s). The cultureware design allows you to monitor the DO of medium either
before or after it is pumped to the BRX(s). The difference between these values is
used to calculate an oxygen uptake rate (OUR) for the culture (see Appendix E).
Equally important is the post-BRX DO value itself because it represents the
lowest level of oxygen to which the cells may be exposed. This may be used as a
guideline for DO delivery to maintain a healthy culture.
DO delivery is regulated by the speed of the circulation pump. Therefore, as the
post-BRX DO value falls due to cellular activity, the circulation pump rate can be
increased to maintain a desired post-culture minimum level of DO. You may wish
to consider maintaining different post-BRX DO values for the growth and
production phases of a MAXIMIZER culture.
Feed Strategy
The most commonly used feeding strategy in perfusion is based on providing
nutrients (mainly glucose) or diluting wastes (mainly lactate). In the case of
nutrients, a minimum concentration (setpoint) of glucose is established in
advance of setting up the culture, and the feed rate is manually adjusted to ensure
that this level is attained by the next sampling period. A similar maximum
setpoint may be established for lactate, so that an upper tolerable concentration is
known. Regardless of which metabolite is considered more important, the
MAXIMIZER medium rate must be changed manually to maintain the desired level
of nutrients and/or wastes. A regular schedule of sample removal and analysis for
metabolite concentrations provides important data for this determination.
P/N 700037-000 Rev. H
Page 6-6
Biovest International, Inc.
Operations Manual for the ACUSYST-MAXIMIZER
Operating Procedures
Note:
Note:
Biovest International offers a software package (ACUDATA) for IBMcompatible computers. It is based on a non-linear regression growth rate
formula. Use ACUDATA during a culture run to calculate media pump rates
that will maintain metabolite concentrations in the future based on recent
nutrient consumption rates, which ACUDATA also calculates. See Appendix B
of this manual for information and contact Account Services for more
details.
Special consideration must be placed on any labile components of the medium.
Because glutamine is known to degrade spontaneously to ammonia, especially
with increasing temperatures, it makes for a prime example. You may choose to
formulate your basal medium without glutamine, and make a concentrated
glutamine factor solution. If so, Process Control or Override Controls may be
used to pump this factor into the flowpath at a rate which effectively delivers
glutamine as if it were incorporated in the basal medium. (EXAMPLE: If your
basal medium normally has 4mM glutamine, you can prepare a 160mM
glutamine factor, and set Process Control or Override Controls to add it at 1⁄40 of
the basal medium rate.) The advantage of this technique is to allow you to store
such an unstable component in a small volume which can be chilled in an ice bath
to prevent its breakdown.
Although Biovest International offers bottles up to 10 liters in size, you may
feel that larger containers are necessary for weekends and/or total feed rates
greater than 400 ml/hr (9.6 l/day). Consult Account Services for alternative
sources of vessels and their appropriate sterilization conditions.
Harvesting Strategy
The ACUSYST-MAXIMIZER may be programmed for several types of harvesting
protocols. You must decide which method is best suited for harvesting the
secreted product from your cell line. Continuous harvest is the most common
technique. The two other options available through Process Control include
harvesting at every low Expansion Chamber volume or, each low Expansion
Chamber volume that occurs after a user-defined number of EC Cycles that are
skipped. Of course, the PUMPS Override Controls allows you the flexibility to
perform batch harvesting by overriding the HP manually to collect the desired
volume regardless of the phase of EC Cycling (see Section 5, User Interface).
Biovest International, Inc.
Operations Manual for the ACUSYST-MAXIMIZER
P/N 700037-000 Rev. H
Page 6-7
Operating Procedures
Be aware that removing fluid from the ECS is not a selective process. All
material in the ECS will be pumped out, including serum, secreted protein, and
loosely adherent cells. For this reason, the early stages of harvesting should be
complemented with an equivalent replacement rate of serum factor.
As the culture matures, the harvest rate (or frequency) may be increased
gradually until the daily yield or concentration of product has reached a peak.
Then, because dense cultures frequently need less serum, the serum factor pump
concentration may be lowered gradually to further optimize production. The key
to both of these strategies is to effect changes slowly to avoid sudden shifts in
environmental conditions which might cause an adverse reaction by the culture.
OUTLINE OF A CULTURE RUN
The following list shows the major events that occur in a typical culture run.
They are presented chronologically, but due to the variability of each MAXIMIZER
owner, the chart cannot show the length of time required for each step to be
completed. Each step is described in detail.
P/N 700037-000 Rev. H
Page 6-8
Biovest International, Inc.
Operations Manual for the ACUSYST-MAXIMIZER
Operating Procedures
Milestones For A Culture Run
Biological Setup Procedures
Cell line characterization
Sterilization of bottles and cap assemblies
Preparation of media
Scale-up for inoculation
n
n
n
n
Instrument Setup Procedures
n Instrument checkout
Cultureware Setup Procedures
n Probe validation
n Sterilization of probe assemblies
n Completion of flowpath module
n Flowpath installation in MAXIMIZER
n Flowpath pressurization test
n Fill/Flush procedure
Maintenance Procedures
n Sampling
n Calibration
n Replacing bottles
n Replacing luer-activated valve or septa
n Removal of cell debris
Pre-inoculation Procedures
n pH calibration
n DO calibration
n Cycling
n Osmolarity
n Offgassing
n Cytotoxicity testing
n Sterility testing
n Serum pre-treatment of the ECS
Inoculation Procedure
Post-inoculation Procedures
End of Culture Procedures
Biovest International, Inc.
Operations Manual for the ACUSYST-MAXIMIZER
P/N 700037-000 Rev. H
Page 6-9
Operating Procedures
BIOLOgICAL SETUP PROCEDURES
Cell Line Characterization
Successful mammalian cell culture production requires the capability of precise
process control. The MAXIMIZER is equipped with a process control system which
provides you with complete control of the cell environment. A good process
control strategy will allow cells to grow to a high density quickly and then shift
control parameters to keep the cells in a stable environment with production at its
peak. It also allows you to vary conditions, if required, to maximize that
production.
Thus, a successful process control strategy depends on a thorough knowledge of
the characteristics of your cell line. There are many possible methods for
characterizing cells, but they all should establish specific values for:
n
optimum pH
n
serum dependence
n
n
n
n
choice of medium
glucose and lactate levels
product yield
cell viability
These established values and other information are used to obtain target values
for the process control strategy. Before beginning production, a full
characterization of your cell line should be completed.
All cell lines differ in their requirements, and a thorough knowledge of your cells
is important. For further information on establishing process parameters, contact
Account Services.
P/N 700037-000 Rev. H
Page 6-10
Biovest International, Inc.
Operations Manual for the ACUSYST-MAXIMIZER
Operating Procedures
Sterilizing Bottles and Cap Assemblies
All bottles and cap assemblies used in the MAXIMIZER system must be sterilized to
minimize the potential for system contamination. The time required for complete
sterilization should be determined by autoclave validation.
Note:
Note:
All bottles, except those being used for outflow and harvest, should be sterilized
with their original caps on to facilitate the sterile addition of media and/or factor
to the bottle. The special delivery cap assemblies should be sterilized separately,
wrapped in aluminum foil or placed in an autoclave bag.
Because instruments and conditions may vary, ensure sterility by validating
your autoclave before carrying out this procedure.
Filters on the cap assemblies may be autoclaved up to five times.
1.
2.
Note:
Note:
Validate your autoclave.
Clean and wash bottles, caps, and cap assemblies using a tissue culture grade
soap and water. Use good laboratory procedures for cleaning tissue culture
glassware.
Prior to washing cap assemblies, remove the filter and two Luer plugs.
A syringe may be used to clean the IN and OUT ports on the cap assemblies.
Do not wash the filters.
The plastic pouring rings should be removed from the bottles and washed
separately.
3.
4.
Replace the pouring rings on all bottles. Put the caps on all bottles, leaving
them loose enough to allow steam to enter. Cover these caps with foil or
other autoclavable covering.
Put the two male Luer plugs in their respective holes (IN and OUT ports) on
the cap assemblies. Install a 0.2 micron Acrodisc filter onto each cap
assembly. (These are supplied as part of the Bottle and Cap Startup package.
See Appendix B.). Wrap the cap assemblies with foil or other autoclavable
covering.
Biovest International, Inc.
Operations Manual for the ACUSYST-MAXIMIZER
P/N 700037-000 Rev. H
Page 6-11
Operating Procedures
5.
6.
7.
8.
Note:
Place all prepared bottles and cap assemblies in the autoclave.
Autoclave at 121°C at 15 psi maximum for approximately 30 minutes, or at
the conditions determined during your autoclave validation.
Remove the bottles and cap assemblies from the autoclave and allow them to
cool. Tighten caps when completely cool. Do not remove the covering.
Store bottles in a dust-free cabinet until you are ready to use them. Bottles
may be stored sterilized for six weeks before they need to be re-sterilized. It
is a good idea to sterilize extra bottles so that they will be available as
needed. This can save time during your production run.
Each bottle is equipped with a removable plastic pouring ring. Although it
may be autoclaved at the conditions described above, it will not withstand
the dry heat conditions used in depyrogenating glassware. If you employ this
process, you must remove the pouring ring before placing the bottle in the
depyrogenating oven.
P/N 700037-000 Rev. H
Page 6-12
Biovest International, Inc.
Operations Manual for the ACUSYST-MAXIMIZER
Operating Procedures
Medium Preparation
Be aware that it can take up to 6 – 8 weeks for sufficient medium for the run to be
ready, so plan the date to inoculate the MAXIMIZER accordingly.
Note:
Note:
The medium should meet any special requirements suggested by your cell line
characterization, and can be pre-packaged or made in the laboratory. The medium
must contain all of the necessary nutrients, adequate sodium bicarbonate buffer,
and any required pH indicators or antibiotics. The choice of a medium is usually
determined by cell requirements, the user's experience, and financial
considerations.
A high glucose medium (3.0 – 4.5 g/l) is recommended for use in the
MAXIMIZER to minimize the amount of medium required while supplying
adequate glucose to the cell culture. A glucose level lower than 3.0 g/l may
result in excessive medium usage.
pH control in the MAXIMIZER is based on a bicarbonate buffering system. We
suggest 3.5 g/l of Sodium bicarbonate when using approximately 4 g/L
glucose. At least 2.2 g/l of Sodium bicarbonate should be present in the
medium. Other pH buffers such as HEPES or Tris should NOT be used. If
glucose concentrations are higher than suggested, it may be necessary to
increase the concentration of NaHCO3 to prevent problems with pH control.
Procedures for medium preparation will vary depending upon the medium being
prepared. Use the procedure most appropriate for your circumstances.
Sterilizing Medium
As one of the key components of the system, the growth medium used must be
sterilized before it is pumped into the system. Once sterilized, medium can be
transferred into sterile bags or bottles.
Biovest International, Inc.
Operations Manual for the ACUSYST-MAXIMIZER
P/N 700037-000 Rev. H
Page 6-13
Operating Procedures
Medium quality Control
The medium used in your system is one of the key ingredients to a successful
experiment or production run. If it is in any way contaminated, the entire run may
be at risk of contamination. Thus, you should always check your medium for
contamination before pumping it into the system.
Because medium quality control requires one week to complete, it is important to
complete medium checks not only before beginning, but also throughout your
production run. Several quality control methods can be used to check the quality
of your medium.
If medium has been prepared and stored for over six weeks before being used, it
should be tested to be sure that it is still usable. Certain nutrients in the medium
may degrade during a long storage period. If there are any questions regarding
medium quality, please refer to the manufacturer's recommendations or contact
Biovest International’s Account Services.
Scale-up for Inoculation
Before you proceed to Instrument Setup Procedures, you should begin the
scale-up preparations for inoculating the MAXIMIZER. As there is no single method
suitable for all cell lines, this manual will not recommend specific procedures.
Typical protocols for growing cells in T-flasks, spinner flasks, or roller bottles are
probably already in place at your facility. Use them to prepare the inoculum so
that the inoculation can proceed smoothly. Account Services and the opening
paragraphs of the Inoculation part of this section will be able to provide you with
the necessary background information.
P/N 700037-000 Rev. H
Page 6-14
Biovest International, Inc.
Operations Manual for the ACUSYST-MAXIMIZER
Operating Procedures
INSTRUMENT SETUP PROCEDURES
Prepare Utilities
1.
Regulate the two gas supplies to 15 ± 1 psi
3.
Open the Backup Air (optional) supply to the MAXIMIZER
2.
Open the CO2 (required) supply to the MAXIMIZER
Prepare Data Logging Equipment
If ACULINK-DATA LOg is in use:
1.
2.
3.
4.
5.
6.
Connect the serial cable to the computer’s serial port and the PC INTERFACE
port of the ACULINK Instrument Interface Module.
Connect the parallel cable to MAXIMIZER and any one of the four ACUSYST
ports of the ACULINK Instrument Interface Module.
Plug the power supply into the ACULINK Instrument Interface Module.
Turn on the computer and start the ACUSOFT-Link program.
To enable exporting the run log to ASCII format for use in various other
computer programs, from within the ACUSOFT-Link program press
SHIFT F2 and set the parallel port to 0.
Further setup and operation details are provided in the operations manual for
ACULINK-DATA LOg.
If a printer is in use rather than ACULINK-DATA LOg:
1. Load paper
2. Plug in the parallel (or serial) cable to the printer and the MAXIMIZER
3. Turn on the printer’s power
4. Configure the printer to be on-line or selected, depending on printer model.
Consult the printer’s user manual for further information.
Biovest International, Inc.
Operations Manual for the ACUSYST-MAXIMIZER
P/N 700037-000 Rev. H
Page 6-15
Operating Procedures
System Checkout
Before starting any culture run, the following checkout list should be consulted,
and the appropriate procedures should be performed to ensure that everything is
in working order. If you have a certified service technician who can inspect the
internal electronics and gassing system, you may consult him/her before
performing the following checkout.
Note:
Note:
Pre-Culture Checkout List
1. System Tests
2. Instrument Pressurization Test
3. Validation of pH Probe and DO Probe
4. Pressure Testing of pH and DO Probe Case Assemblies
The pH and DO probes should be tested for satisfactory performance before
installing them in the flowpath. This testing is done prior to installing the
probes in their cases, which occurs before pressure testing and autoclaving
the probe case assemblies. Contact Account Services if you have questions
about a probe or cable.
Skip steps 3 and 4 for the sterile, disposable pH probe, see page 6-24, pH
Probe Selection and Appendix B, Ordering Information.
P/N 700037-000 Rev. H
Page 6-16
Biovest International, Inc.
Operations Manual for the ACUSYST-MAXIMIZER
Operating Procedures
System Tests:
These tests and the one titled Pressurization Test should always be performed
before probes are tested and a new cultureware is opened and put into use.
Plug in the MAXIMIZER and turn on its power switch at the rear of instrument.
The LCD should show IDLE in the upper left corner. If not, press HOLD then 2.
Press SET-UP to display the System Tests menu.
System Tests:
1) LCD
2) Alarm
4) Keypad
5) Printer
3) LEDS
6) PROMS
Figure 6-3. System Tests Menu Screen
When SET-UP was pressed above, the Logging Interval screen may have
been displayed instead. Its use is described later in this chapter.
Printer: Disabled
Logging Interval: _ 0 mins (0-255)
Figure 6-4. Logging Interval Screen
Note:
Press ENTER to display the System Tests menu, if necessary.
Repetitively pressing ENTER cycles between the System Tests and Logging
Interval screens.
Biovest International, Inc.
Operations Manual for the ACUSYST-MAXIMIZER
P/N 700037-000 Rev. H
Page 6-17
Operating Procedures
Perform each of the System Tests consecutively by pressing 1 – 6. After each test
passes, press ENTER. If a test fails, contact Biovest’s Account Services before
proceeding with the run.
Test:
Press 1
LCD displays a 4x40 pattern of rectangles
All pixels of each rectangle should be black and easy to see
Cursor flashes in the lower-right corner
If all pixels are black, the test passed
Press ENTER
1) LCD
a)
b)
b)
c)
d)
e)
nnnnnnnnnnnnnnnnnnnnnnnnnnnnnnnnn
nnnnnnnnnnnnnnnnnnnnnnnnnnnnnnnnn
nnnnnnnnnnnnnnnnnnnnnnnnnnnnnnnnn
nnnnnnnnnnnnnnnnnnnnnnnnnnnnnnnnn
Figure 6-5. LCD Test Screen
Test:
a) Press 2
b) LCD displays AlarM Test:
b) Audible alarm turns on for several seconds
c) Audible alarm turns off
d) If the audible alarm makes noise, the test passed. (This is the sound that
occurs whenever an alarm happens during a run.)
e) Press ENTER
2) Alarm
Alarm Test:
Note:
_
Figure 6-6. Alarm Test Screen
The volume of the audible alarm can be adjusted somewhat by turning its
plastic cover to open or close the openings built into the cover. Repeat the
Alarm Test (by pressing 2) as often as necessary to allow you to adjust this
volume. (The audible alarm is mounted at the rear of the instrument. Refer
to Figure 3-3 for further details.)
P/N 700037-000 Rev. H
Page 6-18
Biovest International, Inc.
Operations Manual for the ACUSYST-MAXIMIZER
Operating Procedures
Test:
Press 3
LCD displays LED Test:
If all 13 red LEDs turn on, the test passed
Press ENTER
3) LEDS
a)
b)
c)
d)
LED Test:
_
Figure 6-7. LED Test Screen
Test:
Press 4
LCD displays Keypad Test:
Cursor flashes to the right of this prompt
Sequentially press 1 – 0 and the decimal key
LCD updates to show each number and decimal at the top of the screen
and in the lower, right-hand corner
Sequentially press ⬆⬅➡⬇ and START
LCD updates to show the name of each key
Press CLEAR and note the value in the lower, right-hand corner disappears
If the keys and LCD respond as described, the tests passed
Press ENTER
4) Keypad
a)
b)
c)
d)
e)
f)
g)
h)
i)
j)
Keypad Test:
_
Figure 6-8. Keypad Test Screen
Biovest International, Inc.
Operations Manual for the ACUSYST-MAXIMIZER
P/N 700037-000 Rev. H
Page 6-19
Operating Procedures
5) Printer
a)
b)
c)
d)
e)
f)
Test:
Press 5
LCD displays Printer Test:
Printer advances paper by one page
Four lines of various letters, numbers and characters are printed
If steps c and d occur, the test passed
Press ENTER
Printer Test:
Notes:
_
Figure 6-9. Printer Test Screen
1. This test merely checks the communications between the MAXIMIZER and
the printer. It does not set the printer log interval.
2. This test applies to a printer that is connected either to the serial or the
parallel port.
3. If the four printed lines are printed on a single line or there is an empty
line between each printed line, the printer is not configured properly,
which must be corrected.
4. This test does not apply to ACULINK-DATA LOG. The MAXIMIZER does not
have a built-in method of testing ACULINK-DATA LOG. To test that it is
working, perform the following:
ACULINK-DATA LOg Test:
a) Follow instructions on page 6-16 to display Logging Interval screen
b) Press 1 then ENTER
c) Press START and PROCESS CONTROL
d) Press ALARM to silence the audible alarm
e) In ACULINK-DATA LOg, navigate to the correct Instrument Monitor screen
that represents this MAXIMIZER
f) After ~ 1 minute ACULINK-DATA LOg should update and show the
MAXIMIZER is running
g) If step f happens, the test passed
h) Press HOLD then 2
i) Press ALARM. Press ENTER until all alarms are restored and the Monitor
screen appears
j) Change Logging Interval to 0 mins
P/N 700037-000 Rev. H
Page 6-20
Biovest International, Inc.
Operations Manual for the ACUSYST-MAXIMIZER
Operating Procedures
Test:
Press 6
LCD displays top screen of Figure 6-10
Press ENTER
LCD displays middle screen of Figure 6-10
Press ENTER
LCD displays bottom screen of Figure 6-10
Press ENTER
If each of the three screens shows the correct software names, part
numbers, and revision levels, the test passed
Press ENTER
6) PROMS
a)
b)
c)
d)
e)
f)
g)
h)
i)
Notes:
MP
OP
HP
CP
3232-000
Rev
3232-000
Rev
3232-000
Rev
400146-000 Rev
A
A
A
C
F1
F2
F3
MONITOR
3232-000
Rev
3232-000
Rev
3232-000
Rev
400133-000
Rev
A
A
A
A
UIF
Control1
Control2
400129-000
Rev B
400127-000 Rev A1
400128-000 Rev A1
Figure 6-10. PROMS Test Screens
(Showing Current Information)
The PROMS test allows you to check the revision levels of the various
Programmable Read-Only Memory (PROM) chips. This information will
not change unless the instrument is serviced by Biovest personnel.
Biovest International, Inc.
Operations Manual for the ACUSYST-MAXIMIZER
P/N 700037-000 Rev. H
Page 6-21
Operating Procedures
Instrument Pressurization Test:
Note:
This procedure checks the integrity of the internal gassing system and should be
performed before proceeding with the run to ensure the instrument is in good
working order.
The air filter must be attached to the rear of the MAXIMIZER (see Figure 3-3)
at this time.
pH pO2 TEMP.
IN
OUT
EC
IC
EC
Figure 6-11. Bulkhead preparation for internal system pressure test
1.
2.
Use the reusable black-collared Tygon gassing line to interconnect the IC and
EC bulkhead ports inside the incubator (Figure 6-11). This seals the internal
gassing system from leaks through the IC and EC ports.
Press START then SET-UP. The LCD displays the following screen.
Perform:
1) Pressurization Test
2) Fill/Flush
3.
4.
5.
Figure 6-12. Active Setup Menu Screen
Press 1 to start the Pressurization Test.
Press ENTER to begin the test.
Instructions for testing a cultureware are displayed in a series of five
screens. These screens’ instuctions are not relevant for pressure-testing the
instrument itself. Ignore the instructions to open or close various clamps in
these screens.
P/N 700037-000 Rev. H
Page 6-22
Biovest International, Inc.
Operations Manual for the ACUSYST-MAXIMIZER
Operating Procedures
6.
7.
Repetitively press ENTER to advance past these five screens until the top
screen of Figure 6-13 appears.
The LCD updates to show the three automated stages of the Pressurization
Test: - PRESSURIZING... , STABILIZE, and TESTING.
- PRESSURIZING...
STABILIZE
TESTING
8.
Figure 6-13. Pressurization Test Duty Screens
The Pressurization Test automatically finishes within 90 seconds.
n
n
If there was no leak, the test passes (see top screen of Figure 6-14).
Go to step 14.
If there was a leak, the test fails (see bottom screen of Figure 6-14).
Go to step 9.
Pressure level is satisfactory.
Press ENTER to continue.
WARNING: A pressure drop has been
detected.
Please correct and retest.
Figure 6-14. Pressurization Test Passed Screen and
Pressure Test Failed Screen
Biovest International, Inc.
Operations Manual for the ACUSYST-MAXIMIZER
P/N 700037-000 Rev. H
Page 6-23
Operating Procedures
9.
If the instrument Pressurization Test fails, press ALARM to silence the
audible alarm (and deactivate the external alarm relay).
10. A screen similar to Figure 6-15 appears.
Pressure drop detected
21 0 0
TIME:
0-00:00
← PREVIOUS ALARM
NEXT ALARM →
PRESS ENTER TO RESTORE THIS ALARM_
Figure 6-15. Pressuirzation Test Failure Alarm Screen
11. The leak must be located and fixed before proceeding with the run. Potential
sources of a leak are:
a) Tightness of gassing line in the IC and EC bulkhead ports
b) Connection of the gassing line’s tubing on its male Luer fittings
c) Damage to the gassing line’s male Luer fittings or tubing
d) Damage to the instrument’s bulkhead port female Luer fittings
e) The instrument has an internal leak
12. For 11 d and e, contact Biovest’s Account Services department. For 11 a – c,
repair or replace the parts and repeat the Pressurization Test.
13. After each attempt to fix the leak, repeat the Pressurization Test to confirm
the leak has been fixed:
a) If necessary, press ALARM
b) Use ⬅ or ➡ to locate the Pressure drop detected alarm
c) Press ENTER to restore the alarm
d) Press START then SET-UP
e) Press ENTER if necessary to return to the Active Setup Menu screen
(Figure 6-12)
f) Repeat the instrument Pressurization Test using steps 3 – 8.
P/N 700037-000 Rev. H
Page 6-24
Biovest International, Inc.
Operations Manual for the ACUSYST-MAXIMIZER
Operating Procedures
14. When the instrument Pressurization Test passes, press ENTER to display the
following screen.
Open the GEX OUT clamp.
Press ENTER to continue.
Figure 6-16. Final Pressuirzation Test Screen
15. Ignore the clamp instruction because it is irrelevant when pressure-testing
the instrument.
16. Press ENTER to return to the Active Setup Menu screen (Figure 6-12).
17. Disconnect the Tygon gassing line from the IC and EC bulkhead ports. Set it
aside for possible use later in the run.
Biovest International, Inc.
Operations Manual for the ACUSYST-MAXIMIZER
P/N 700037-000 Rev. H
Page 6-25
Operating Procedures
CULTUREwARE SETUP PROCEDURES
pH Probe Selection
The ACUSYST-MAXIMIZER automatically controls pH of the circulating cell
culture medium when an in-line pH probe is in use. Biovest offers two types of
pH probes for this purpose. One type is reusable. The other type is disposable.
The two types of pH probes are not distinguished by their functionality in
controlling pH. Rather, they are distinguished by the expertise, time, testing,
documentation, and troubleshooting that are required during their use.
The reusable pH probe requires validation, assembly, autoclave-sterilization,
and other procedures to prepare it during run startup. Expertise is needed to
ensure these steps are properly performed, so the probe functions well and is not
damaged. A reusable pH probe has a finite lifespan, however, and will eventually
fail. Such failures may not be detected until after the pH probe has been
aseptically installed into a cultureware and it contains circulating cell culture
medium. Replacement in this circumstance is possible but is time consuming,
can lead to contamination, or may negatively impact the cell culture.
The advantage of reusable pH probes is their purchase price is low compared to
disposable pH probes.
To proceed with a reusable pH probe, go to the next section, pH Probe
Evaluation.
The disposable pH probe comes as an assembly including the probe, probe
case, and electronics cable. Disposable pH probes are provided with a certificate
of compliance and are sterile and ready-for-use. Cultureware also are provided in
the same manner. Disposable pH probes make run startup and turn-around very
fast. The technician obtains one cultureware and one disposable pH probe,
aseptically connects them, and starts the run. At the end of the run, the entire
disposable pH probe assembly is discarded with the cultureware.
The disposable pH probe has many advantages during run startup and
termination. It also eliminates maintenance and storage issues, as well as the risk
that a reusable probe will not function during the next production run.
To proceed with a disposable pH probe, skip ahead to Cultureware Sterile
Assembly.
P/N 700037-000 Rev. H
Page 6-26
Biovest International, Inc.
Operations Manual for the ACUSYST-MAXIMIZER
Operating Procedures
pH Probe Evaluation
The probe evaluation instructions do not apply to the disposable pH probe.
1.
2.
3.
The instrument must be plugged in and turned on.
Press START then HIDDEN KEY to display the diagnostics screens.
Press ENTER until the following screen appears.
1st column to the right of pH: Standard reading from probe (pH units)
n
n
2nd column to the right of pH: A/D reading from probe
Incu
44.0
155
pH 7.30
Media 37.0
148
DO 145
Heat
2
P1 1111
Press ENTER for next screen
125
150
1111
Figure 6-17. Diagnostics Screen 0
4.
Remove and save the storage solution bottle and electrical cap.
6.
Place the tip of the probe in a container with pH 7.0 buffer solution.
8.
A functional pH probe’s A/D reading in pH buffer 7.0 is 95 – 160 at room
temperature. Do not use the probe if the value is outside this range!
5.
7.
9.
Connect the pH cable to the probe and the bulkhead pH jack.
Place the container and probe so they remain upright without being touched
or held. Wait about 2 minutes, then proceed (for the 7.0 buffer test).
Remove the pH probe from buffer 7.0, rinse it, and place it in pH buffer 4.0.
10. Repeat step 5.
11. A functional pH probe’s A/D reading in pH buffer 4.0 is < 3 at room
temperature. Do not use the probe if the value is outside this range.
Notes:
12. Rinse the probe and put on the storage solution bottle and electrical cap.
1. Ignore the readings in pH units during the evaluation. Acceptance is
based only on A/D values (not whether pH agrees with buffer’s pH).
2. Ensure the buffer solutions have not expired.
3. If either A/D value is nearly out of range, the subsequent autoclavesterilization may render the probe unacceptable for continued use.
Biovest International, Inc.
Operations Manual for the ACUSYST-MAXIMIZER
P/N 700037-000 Rev. H
Page 6-27
Operating Procedures
DO Probe Evaluation
1.
2.
3.
4.
5.
6.
7.
8.
9.
The instrument must be plugged in and turned on.
Remove the electrical cap and the protective cap covering the probe’s tip.
Unscrew the probe’s sleeve, remove the probe’s membrane cartridge, discard
the electrolyte, rinse the probe and membrane cartridge, pour electrolyte into
the membrane cartridge without forming bubbles until it is ~ 3⁄4-full, carefully
slide the membrane cartridge on to the DO probe, wipe off electrolyte from
the outside of the membrane cartridge, and screw on the sleeve. Ensure no air
bubbles are inside the membrane cartridge.
Connect the DO cable to the probe and the bulkhead pO2 jack.
Do not allow the DO probe to contact any metal parts inside the incubator.
This would not damage the probe, but it would electrically ground the probe
to earth ground and prevent it from being polarized.
Connect the temperature probe to the bulkhead TEMP. jack.
Close the incubator door. Allow at least 2 hours for the probe to reach 37°C.
In addition to warming to 37°C, the probe receives an electrical charge from
the instrument. The electrical charge polarizes the probe. The required period
of time to fully polarize the probe can vary. Two hours is the minimum
suggested time. The best strategy is to allow the probe to polarize overnight
before proceeding.
Press START then HIDDEN KEY to display the diagnostic screens, if necessary.
10. Press ENTER until the following screen appears.
n 1st column to the right of DO: Standard reading from probe (mmHg)
n
2nd column to the right of DO: A/D reading from probe
Incu
44.0
155
pH 7.30
Media 37.0
148
DO 145
Heat
2
P1 1111
Press ENTER for next screen
125
150
1111
Figure 6-18. Diagnostics Screen 0
11. A functional DO probe’s A/D reading when its tip is exposed to air is
65 – 130 at 37°C. Do not use the probe if the value is outside this range!
12. If the A/D reading is unacceptable, disassemble the probe. Use a new
membrane cartridge and/or a new bottle of electrolyte.
P/N 700037-000 Rev. H
Page 6-28
Biovest International, Inc.
Operations Manual for the ACUSYST-MAXIMIZER
Operating Procedures
Notes:
1. Do NOT touch the membrane cartridge that is at the tip of the DO
probe!
2. Polarization time is an important step in this procedure. If the A/D count
is slowly changing, wait additional time until it has reasonably stabilized
before determining if the probe is working within specification.
3. Ensure the electrolyte solution has not expired.
4. See Appendix B, Ordering Information, for replacement kits of
membrane cartridges and electrolyte.
Biovest International, Inc.
Operations Manual for the ACUSYST-MAXIMIZER
P/N 700037-000 Rev. H
Page 6-29
Operating Procedures
Probe Case Assemblies
The pH and DO probe assemblies include the two probes and their respective
probe cases. The probes are reused as long as they pass the evaluation tests. The
probe cases are very durable and last many runs. Only the o-rings should be
replaced for each run. New o-rings are included with each new cultureware, so
there is no reason to reuse them. Each new cultureware also includes two sets of
non-sterile probe case tubing lines used to pressure test and autoclave-sterilize
the probe assemblies.
The probe assembly instructions do not apply to the disposable pH probe.
The instructions for assembling the DO probe and reusable pH probe are:
1. Get the o-rings and both sets of probe case tubing lines from the cultureware
box. Do NOT lift the cultureware by its sterile bag if it’s necessary to
move the cultureware to find these items! Instead, lift the cultureware by
grasping it by its white plastic tray.
2. Remove the o-rings from their bags. They do NOT need to remain sterile
now. Inspect the o-rings for damage.
3. Disassemble the probe cases (and ensure they were cleaned at the end of the
previous run) and discard the old o-rings, if present. Install the new o-rings
and loosely thread the lower section into the upper section, see figures 6-19
and 6-20.
4. Connect the threaded pH probe electrical cap finger-tight and connect the DO
probe twist-lock electrical cap.
5. Remove the plastic orange cap and sponge from the DO probe tip. Be careful
to avoid touching the membrane at the tip of the probe!
6. Insert the DO probe down fully into the case as far as its design allows. This
includes gently but firmly forcing the probe tip through the probe case’s
o-ring. Install the locking ring, but just hand-tight!
7. Insert the pH probe into its probe case. These items have threads. Only make
them finger-tight. Do not use tools to tighten them together!
8. Finish tightening the lower sections of both probe cases, but just hand-tight!
9. Slide the DO probe case tubing lines onto the port fittings as far as possible.
Either tubing line can go on either port fitting. See CAUTION note below.
P/N 700037-000 Rev. H
Page 6-30
Biovest International, Inc.
Operations Manual for the ACUSYST-MAXIMIZER
Operating Procedures
10. Connect the pH tubing lines to the pH probe case ports in the following
orientation: connect the pH IN/LO tubing line to the lower port fitting of the
probe case and connect the pH OUT/HI tubing line to the higher port fitting
of the probe case. Follow the next step’s instructions to actually connect the
pH tubing lines to the probe case port fittings.
11. Rotate the white locking rings to the unlocked position for both pH probe
case tubing lines. Press and hold the latch, push the connector fully on to the
port fitting, release the latch, and rotate the locking ring to the locked
position. Repeat these steps for the other tubing line. Ensure the latches of
both probe case tubing lines face upwards.
CAUTION: The pH and DO probe case tubing lines and their connection methods to the
probe cases will be leak-free without using cable ties. We recommend to
NOT add cable ties to this tubing. Adding cable ties can actually cause leaks
to occur!
electrical cap
electrical cap
probe case
locking ring
reusable
pH probe
threaded connection
DO probe
probe case
upper section
probe case
upper section
probe case
lower section
large o-ring
o-ring
Figure 6-19. Components of DO probe case
assembly
Biovest International, Inc.
Operations Manual for the ACUSYST-MAXIMIZER
probe case
lower section
quick-coupler
latch
higher port
small o-rings (2)
lower port
Figure 6-20. Components of pH probe case
assembly
P/N 700037-000 Rev. H
Page 6-31
Operating Procedures
Probe Case Assembly Pressure Tests
It is important to pressure-test the pH and DO probe case assemblies to ensure
they do not leak. They are tested one at a time, and either probe assembly may be
tested first. Successful pressure tests for these probe assemblies ensure that cell
culture medium will not leak out at a later time.
The pressure test instructions do not apply to the disposable pH probe.
The instructions for pressure testing the DO probe and reusable pH probe are:
1.
2.
3.
Before proceeding, ensure the Instrument Pressurization Test was successful,
see page 6-21. If that test fails, the Probe Case Pressurization Tests will fail.
Remove the sterility protector (small tubing with white plug) to expose the
female Luer fitting from both probe case tubing lines of the DO and pH
probe assemblies.
Connect the reusable IC and EC gassing lines supplied with the instrument
to the IC and EC bulkhead ports inside the incubator (Figure 6-21).
pH pO2 TEMP.
IN
EC
OUT
IC
EC
probe case
4.
5.
6.
7.
8.
9.
Figure 6-21. Bulkhead Attachments for Probe Case Pressurization
Connect the male Luer fittings of the two gassing lines to the female Luer
fittings of the probe case tubing lines from step 2.
Press START then SET-UP.
Press 1 to start the Pressurization Test.
Press ENTER to begin the test.
Instructions for testing a cultureware are displayed in a series of five
screens. These screens’ instuctions are not relevant for pressure-testing the
probe case assemblies. Ignore the instructions to open or close various
clamps in these screens.
Repetitively press ENTER to advance past these five screens.
P/N 700037-000 Rev. H
Page 6-32
Biovest International, Inc.
Operations Manual for the ACUSYST-MAXIMIZER
Operating Procedures
10. The LCD updates to show the three automated stages of the Pressurization
Test: - PRESSURIZING... , STABILIZE, and TESTING.
- PRESSURIZING...
STABILIZE
TESTING
Figure 6-22. Pressurization Test Duty Screens
11. The Pressurization Test automatically finishes within 90 seconds.
n
n
If there was no leak, the test passes (see top screen of Figure 6-23).
Go to step 16.
If there was a leak, the test fails (see bottom screen of Figure 6-23).
Go to step 12.
Pressure level is satisfactory.
Press ENTER to continue.
WARNING: A pressure drop has been
detected.
Please correct and retest.
Figure 6-23. Pressurization Test Passed Screen and
Pressure Test Failed Screen
Biovest International, Inc.
Operations Manual for the ACUSYST-MAXIMIZER
P/N 700037-000 Rev. H
Page 6-33
Operating Procedures
12. If the probe case assembly Pressurization Test fails, press ALARM to silence
the audible alarm (and deactivate the external alarm relay).
13. A screen similar to Figure 6-24 appears.
Pressure drop detected
21 0 0
TIME:
0-00:00
← PREVIOUS ALARM
NEXT ALARM →
PRESS ENTER TO RESTORE THIS ALARM_
Figure 6-24. Pressuirzation Test Failure Alarm Screen
14. The leak must be located and fixed before proceeding with the run.
Otherwise, later on the cultureware will likely leak cell culture medium and
become contaminated, which could jeopardize the cultureware’s warranty.
Potential sources of a leak are:
a) Tightness of the lower and upper sections of the probe case (don’t over
tighten them!)
b) Proper installation of the o-rings
c) Damage to the o-rings
d) Tightness of the Luer connections
e) The instrument itself, if it did not successfully pass the instrument
Pressurization Test described earlier in this chapter. Perform this test, if
necessary!
15. After each attempt to fix the leak, repeat the Pressurization Test to confirm
the leak has been fixed:
a) If necessary, press ALARM
b) Use ⬅ or ➡ to locate the Pressure drop detected alarm
c) Press ENTER to restore the alarm
d) Press START then SET-UP
e) Press ENTER if necessary to return to the Active Setup Menu screen
(Figure 6-26)
f) Repeat the probe case assembly Pressurization Test using steps 6 – 11.
16. When the probe case assembly Pressurization Test passes, press ENTER to
display the following screen.
Open the GEX OUT clamp.
Press ENTER to continue.
Figure 6-25. Final Pressuirzation Test Screen
P/N 700037-000 Rev. H
Page 6-34
Biovest International, Inc.
Operations Manual for the ACUSYST-MAXIMIZER
Operating Procedures
17. Ignore the clamp instruction because it is irrelevant when pressure-testing
the probe case assembly.
18. Press ENTER to return to the Active Setup Menu screen (Figure 6-26).
Perform:
1) Pressurization Test
2) Fill/Flush
Figure 6-26. Active Setup Menu Screen
19. Disconnect the probe case assembly from the IC and EC gassing lines and
connect the other probe case assembly.
20. Repeat steps 6 – 11 to pressure-test the other probe case assembly.
21. When the other probe case assembly Pressurization Test passes, disconnect
it from the IC and EC gassing lines.
22. Repeat steps 16 – 19.
23. Reconnect the sterility protectors that were disconnected in step 2.
Biovest International, Inc.
Operations Manual for the ACUSYST-MAXIMIZER
P/N 700037-000 Rev. H
Page 6-35
Operating Procedures
Sterilization of Probes
The sterilization instructions do not apply to the disposable pH probe.
After the probe case assemblies have passed pressure testing, they can be
sterilized. Fill the probe cases with phosphate buffered saline or bicarbonate
buffered saline solution until the liquid and electrode are in contact. Be certain
the sterility protectors (tubing with white plugs) cover the ends of the probe case
tubing. Loosen the probe cases 1/4 turn to allow for thermal expansion in the
autoclave. Be certain the electrical connection at the top of each probe is covered
with its screw cap. Put the probe case assemblies in the autoclave so the tubing is
facing upward at an angle and is not pinched shut.
Use validated sterility indicators. Run autoclave at 121°C, 55 minutes, slow
(liquid cycle) exhaust.
Note:
Carefully transfer the sterile probe case assemblies to a laminar flow hood. If
liquid has accumulated inside the probe case tubing, allow it to drain into the
probe case before attaching the assembly to the flowpath module. Allow the
probe case assemblies to cool to room temperature in a laminar flow hood. Retighten the probe case bodies by hand after they have cooled.
The sterility protectors contain porous white plugs that cannot survive more
than one autoclave cycle. If more than one sterilization cycle must be
performed, the sterility protectors must be replaced, or the ends of the
tubing must be covered. Contact Account Services for details.
P/N 700037-000 Rev. H
Page 6-36
Biovest International, Inc.
Operations Manual for the ACUSYST-MAXIMIZER
Operating Procedures
Cultureware Sterile Assembly
After the probe case assemblies have been sterilized, attach them to the
cultureware inside a laminar flow hood. Additionally, in-line media filters, tubing
extension lines, and/or sampling septa should be attached at this time, if desired.
The following instructions describe the procedures to make these additions to the
cultureware. You need to supply sterile gloves, disinfectant in addition to optional
sterile in-line filters, tubing extension lines, and any other sterile modifications
necessary for a custom configuration. See Appendix B for ordering information
on in-line filter assemblies and tubing extension lines.
CAUTION: Do NOT lift the cultureware by its sterile bag! Lift and carry the
cultureware by holding it from the underside.
1. To minimize system contamination:
a) Use aseptic technique.
b) Inspect the cultureware’s sterile bag for holes or tears. Do the same for
the optional sampling septa and other sterile accessories that will be used.
c) Disinfect the outside of the cultureware’s bag and the packaging
materials of the sterile accessories (if in use) and place them in the sterile
hood.
CAUTION: Fully open the bag and remove the cultureware from it while inside the
sterile hood. During this step, cultureware tubing can be caught and pulled
by the plastic bag! Be very careful to not pull tubing off of their connectors!
d) Confirm the green tape on the cultureware has brown stripes to indicate
sterility conditions by Ethylene oxide.
e) Remove and discard the foam protectors that are taped to the corners of
the cultureware tray. Remove and discard the green striped tape that
stretches across most of the tubing.
f) Carefully place the tubing from the tray onto the surface of the flow
hood. Inspect all clamps and sterility covers. Check and finger-tighten all
fittings and connections. Do not over-tighten clear, plastic components
because using too much force can break them!
g) Confirm the GEX clamp labeled CLOSE CLAMP BEFORE USE is open!
Now close this clamp. It remains closed for the entire run.
h) Check that all sterility caps and plugs are in place.
Biovest International, Inc.
Operations Manual for the ACUSYST-MAXIMIZER
P/N 700037-000 Rev. H
Page 6-37
Operating Procedures
i) Confirm there is no kinked tubing and all clamps are open!
j) Close all clamps on tubing with open ends (sample lines, bottle
connections, etc.).
k) Remember to check the tightness of the 3 filters (IC, EC, GEX IN), five
Luer plugs on the GEX, and the Luer connection for the in-line filter in
the combined Media and F2 line.
If there is any question regarding cultureware sterility, please contact Biovest
International Account Services before proceeding.
2. Working in a sterile hood, attach either the autoclave-sterilized, reusable pH
probe or the pre-sterilized, disposable pH probe to the cultureware:
a) Remove the black plastic holder that is taped to the tray and between the
two clear chambers. Save this for use with the DO probe case assembly.
b) When using the reusable pH probe, remove the autoclaved packaging
materials and insert the probe case into the right-hand black clip on the
front of the cultureware. The tubing lines connected to the probe case
should point to the left and right. Go to step 3.
c) When using the disposable pH probe,
disinfect the:
• outside of its sterile bag and place it in
the laminar flow hood
•
reusable pH probe holder and place it
in the laminar flow hood.
d) Insert the reusable pH probe holder into the
right-hand black clip on the front of the
cultureware (illustrated at right). Ensure the
small black clip on the reusable pH probe
holder is facing forward and positioned
below the round section held by the
cultureware’s clip.
e) Remove and discard the packaging for the
disposable pH probe assembly.
f) Press the disposable pH probe case into the
reusable pH probe holder’s black clip and
position it as shown at right.
P/N 700037-000 Rev. H
Page 6-38
Reusable pH
Probe Holder
grooves for
DO probe’s
black clips
Disposable
pH Probe
Assembly
groove for
cultureware’s
black clip
Latch
Locking Ring
Biovest International, Inc.
Operations Manual for the ACUSYST-MAXIMIZER
Operating Procedures
3. Connect the cultureware tubing to the pH probe assembly. These steps apply
to both the disposable and reusable pH probe assemblies:
a) The pH probe assembly replaces the cultureware’s tubing adapter
between the tubing ends labeled PH IN/LO and PH OUT/HI. The pH probe
case ports are offset from one another—one is higher than the other.
Orientation is important!
b) Rotate the locking rings of the four quick-coupler fittings to the unlocked
position. There are two in the pH probe assembly and two in the tubing
adapter between the PH IN/LO and PH OUT/HI labels.
c) Press and hold the latch of the pH probe’s PH IN/LO quick-coupler
fitting. Remove the fitting from the probe case and discard it.
d) Press and hold the latch of the cultureware’s PH IN/LO quick-coupler
fitting. Disconnect this fitting from the cultureware’s tubing adapter and
connect it to the pH probe’s exposed port from the previous step. Ensure
the latch faces upward.
e) Release the latch and rotate the locking ring to the locked position.
f) Repeat the previous two steps for the PH OUT/HI connection.
g) When using the reusable pH probe, save the removed tubing adapter for
use at the end of the run.
Biovest International, Inc.
Operations Manual for the ACUSYST-MAXIMIZER
P/N 700037-000 Rev. H
Page 6-39
Operating Procedures
4. Attach the autoclave-sterilized DO probe case assembly to the cultureware:
a) Attach the two black plastic clips that were set aside as the first task of
step 2 above to the correct locations depending on which type of pH
probe is in use:
• when using the reusable pH probe, press the two black clips on to the
pH probe case. Locate both black clips below the clip of the
cultureware that is holding the pH probe case itself.
• when using the disposable pH probe holder, press the two black clips
on the two grooves of the reusable pH probe holder.
b) Similar to the pH probe case, the DO probe case ports are offset from one
another—one is higher than the other. The difference is more subtle than
for the pH probe case.Orientation is important! The liquid inlet port is
lower than the liquid outlet port.
c) Locate in the cultureware the two red Luer-Lok fittings connected
together by a polypropylene double female Luer fitting. They are near the
bottom of the GEX. Two clear Tygon tubing lines connect to these red
Luers: DO IN tubing line and the unlabeled DO OUT tubing.
d) The DO probe case inlet tubing line connects to the culturewares DO IN
tubing line.
e) The DO probe case outlet tubing line connects to the culturewares DO IN
tubing line.
f) Disinfect the white Luer-Lok fittings of both DO probe case tubing lines.
g) Rotate the DO probe case in the black ckips so the DO probe case inlet
tubing line reaches the DO IN tubing line.
h) Loosen white Luer-Lok (on DO inlet tubing line). Loosen polypropylene
fitting connected to red Luer-Lok (on the DO IN tubing line).
i) Remove and discard the white Luer-Lok, short tubing, and white plug.
j) Disconnect DO IN red Luer-Lok (from polypropylene fitting) and connect
it to exposed female Luer of DO probe case inlet tubing line.
k) Rotate DO probe case in the black ckips so DO probe case outlet tubing
line reaches the unlabeled DO OUT tubing line.
l) Repeat steps h – j to connect DO Out tubing line’s female Luer to
remaining red Luer-Lok (of unlabeled DO OUT tubing line).
m) Save the removed double female Luer fitting for use at the end of the run.
P/N 700037-000 Rev. H
Page 6-40
Biovest International, Inc.
Operations Manual for the ACUSYST-MAXIMIZER
Operating Procedures
LAV
5. Optional, sterile items should be added to the cultureware while the
cultureware is still in the sterile laminar cabinet. Examples of these options
are explained below. Appendix B has ordering information for these items.
Use LAVs or tubing extension lines together or separately, depending on
your application and facility.
Cover
male port
syringe port
a) Luer Activated Valves (LAV) allow you to connect and disconnect
syringes aseptically outside of a sterile laminar cabinet. Usage
instructions are provided with the package of LAVs.
Use LAVs on cultureware’s four syringe ports:
IC SAMPLE, FACTOR PRIME, INOCULATE/EC SAMPLE, CELL REMOVAL
b) Tubing extension lines provide longer tubing lengths to allow you to
aseptically connect bags, bottles, and syringes in a nearby sterile laminar
cabinet. Use them to extend cultureware’s ten tubing lines:
• MEDIA, OUTFLOW, CELL REMOVAL (use 600101-072)
• F1, F2, F3, HARVEST, IC SAMPLE, FACTOR PRIME, INOC/EC SAMPLE
(use 600100-072).
A
Remove “A”
Connect this end to cultureware
6 feet, 1.8 m
Tubing Extension Line
B
Remove “B”
Connect LAV or syringe to this end
c) In-line media filters minimize the risk of a contaminant entering the
flowpath and typically are used for MEDIA and F2 because these deliver
nutrient fluids into the flowpath. Use the in-line filter listed in Appendix
B (not shown) at the blue circled location, or add your own filter
assembly at the end of an individual tubing line.
6.
Remove male luer sterile port covers.
Add LAVs and/or tubing extension lines to these
tubing lines, as listed in a) and b) above.
The flowpath is now completely assembled and ready to be installed in the
MAXIMIZER incubator.
Biovest International, Inc.
Operations Manual for the ACUSYST-MAXIMIZER
P/N 700037-000 Rev. H
Page 6-41
Operating Procedures
Cultureware Installation
To install the cultureware, you will need: 3 Tygon gassing lines (red, green, and
blue Luers) , pH probe cable, DO probe cable, and temperature probe that were
supplied with the MAXIMIZER. The black-collared Tygon gassing line for offgassing may be needed (see Pre-inoculation Procedures).
1.
2.
3.
4.
5.
6.
7.
8.
9.
Connect pH and DO cables to their respective probes. Save the electrical
caps for future autoclave cycles and for probe storage.
Connect the temperature probe to the non-invasive, in-line fitting in the
large-diameter tubing near the middle of the BRX(s).
a) Note the fitting has two small plastic knobs.
b) Note the temperature probe’s connector has two curved channels.
c) Align the channels’ openings with the small plastic knobs.
d) While pushing the tip of the probe into the fitting, rotate the temperature
probe connector 1⁄4-turn to lock the probe in the fitting.
e) Push the temperature probe’s insulation over the fitting.
Set aside the two metal screws and the white plastic threaded cap for the
circulation pump. Do not skip this step. It can prevent cultureware damage!
Carefully place the cultureware into the incubator. The upper tray sits
behind the metal ciculation pump bracket. Do not pinch any tubing between
the tray and incubator. Allow the long tubing lines to hang in front of the
instrument. Do NOT load any pump heads at this time!
Connect pH, DO, temperature, and EC ultrasonics cables to their respective
bulkhead connections. Connect Tygon gassing lines to their color-coded
bulkhead fittings, then attach them to the IC, EC, and (GEX) IN filters.
Simultaneously slide the upper and lower portions of the cultureware’s
bellows pump onto the metal bracket and crank pin. If necessary, grasp the
black, hexagonal part of the bellows pump while rotating the black, flat arm
of this pump to align it with the crank pin. Do not loosen the bellows pump
assembly!
Fully thread the two metal screws until their heads touch the bracket.
Thread the white plastic threaded cap
Press the tubing lines into channels at the edge of the incubator’s opening.
10. The cultureware is now ready for the Pressurization Test.
P/N 700037-000 Rev. H
Page 6-42
Biovest International, Inc.
Operations Manual for the ACUSYST-MAXIMIZER
Operating Procedures
Cultureware Labels
Certain cultureware tubing lines and connections are labeled with unique names
to differentiate them and make their usage clear. These labels are referred to
throughout the following procedures and in the LCD’s onscreen instructions.
Because the LCD’s space is limited, some of its label names are shortened from
what is printed on the labels that are on the cultureware. The following table
relates the actual names to the names shown on the LCD. Use this information if
there is any uncertainty about which label is being referred to by the onscreen
instructions. Not all cultureware labels are used in the onscreen instructions.
Label names in this manual primarily use the full cultureware label names.
Cultureware Label Name
CELL REMOVAL
EC CHECK VALVE BYPASS
EC FLUSH IN
EC RETURN
FACTOR #1
FACTOR #2
FACTOR #3
FACTOR PRIME
GEX OUT
HARVEST
IC
IC RETURN
IC SAMPLE
INOCULATE/EC SAMPLE
MEDIA
OUTFLOW
POST BRX DO
PRE BRX DO
EC
DO IN LO
GEX IN
PH IN/LO
PH OUT/HI
CLOSE CLAMP BEFORE USE
Biovest International, Inc.
Operations Manual for the ACUSYST-MAXIMIZER
LCD Label Name
CELL REMOVAL
EC Check Valve Bypass
EC FLUSH IN
EC RETURN
F1
F2
F3
FACTOR PRIME
GEX OUT
and EC
FACTOR PRIME
HARVEST
IC Vent
IC RETURN
IC SAMPLE
INOC/SAMPLE
MEDIA
OUTFLOW
POST BRX DO
PRE BRX DO
not displayed onscreen
not displayed onscreen
not displayed onscreen
not displayed onscreen
not displayed onscreen
not displayed onscreen
P/N 700037-000 Rev. H
Page 6-43
Operating Procedures
Cultureware Pressurization Test
After the cultureware has been installed in the MAXIMIZER incubator, it must be
tested for leaks. This procedure can be performed with the incubator door open or
closed.
1.
Press START then SET-UP.
Perform:
1) Pressurization Test
2) Fill/Flush
2.
Figure 6-27. Active Setup Menu Screen
Press 1 to select Pressurization Test.
Press ENTER to begin the test.
3.
Figure 6-28. Begin Pressurization Test Screen
Press ENTER to begin the test.
P/N 700037-000 Rev. H
Page 6-44
Biovest International, Inc.
Operations Manual for the ACUSYST-MAXIMIZER
Operating Procedures
4.
Open or close the clamps as instructed on the next five screens (shown
below) to prepare the cultureware for the Pressurization Test. Make certain
that closed clamps are centered over the tubing and completely pinch it.
Press ENTER when instructed.
Close
Close
Close
Press
OUTFLOW line clamp.
MEDIA line clamp.
F1, F2 and F3 line clamps.
ENTER to continue.
Close HARVEST and INOC/SAMPLE
line clamps.
Press ENTER to continue.
Close IC SAMPLE clamp.
Open PRE and POST BRX DO clamps.
Press ENTER to continue.
Open IC Vent and IC RETURN clamps.
Close EC FLUSH IN clamp.
Close FACTOR PRIME clamp.
Press ENTER to continue.
Close CELL REMOVAL line clamp.
Open EC RETURN clamp.
Close GEX OUT clamp.
Press ENTER to continue.
Figure 6-29. Instructions Screens 1-5 for Pressurization Test
Biovest International, Inc.
Operations Manual for the ACUSYST-MAXIMIZER
P/N 700037-000 Rev. H
Page 6-45
Operating Procedures
5.
The LCD updates to show the three automated stages of the Pressurization
Test: - PRESSURIZING... , STABILIZE, and TESTING.
- PRESSURIZING...
STABILIZE
TESTING
Figure 6-30. Pressurization Duty Screens
P/N 700037-000 Rev. H
Page 6-46
Biovest International, Inc.
Operations Manual for the ACUSYST-MAXIMIZER
Operating Procedures
6.
The Pressurization Test automatically finishes within 90 seconds.
n
n
If there was no leak, the test passes (see top screen of Figure 6-31).
Go to step 12.
If there was a leak, the test fails (see bottom screen of Figure 6-31).
Go to step 7.
Pressure level is satisfactory.
Press ENTER to continue.
WARNING: A pressure drop has been
detected.
Please correct and retest.
7.
8.
Figure 6-31: Pressurization Test Passed Screen and
Pressure Test Failed Screen
If the cultureware Pressurization Test fails, press ALARM to silence the
audible alarm (and deactivate the external alarm relay).
A screen similar to Figure 6-16 or 6-17 appears.
If EC leaked, the second number is > 0. For example: 2 in Fig. 6-32.
n
n
If IC leaked, the third number is > 0. For example: 2 in Fig. 6-33.
Pressure drop detected
21 2 0
TIME:
0-00:00
← PREVIOUS ALARM
NEXT ALARM →
PRESS ENTER TO RESTORE THIS ALARM_
Figure 6-32. Example Pressuirzation Test Alarm Screen: EC Leak
Pressure drop detected
21 0 2
TIME:
0-00:00
← PREVIOUS ALARM
NEXT ALARM →
PRESS ENTER TO RESTORE THIS ALARM_
Figure 6-33. Example Pressuirzation Test Alarm Screen: IC Leak
Biovest International, Inc.
Operations Manual for the ACUSYST-MAXIMIZER
P/N 700037-000 Rev. H
Page 6-47
Operating Procedures
9.
The leak must be located and fixed before proceeding with the run.
Otherwise, later on the cultureware will likely leak cell culture medium and
become contaminated, which could jeopardize the cultureware’s warranty.
Focus your efforts on finding and fixing the leak in either the IC circuit or
EC, as indicated in the Pressure drop detected alarm screen.
10. Potential sources of a leak are:
a) Clamp was opened that should have been closed
b) Tubing is not centered in a closed clamp, particularly F1, F2, F3,
Harvest, Factor Prime, Inoc/EC Sample
c) Lower and upper sections of the probe cases weren’t tightened (don’t
over tighten them!)
d) Tab of pH IN/LO connector or pH OUT/HI connector was not fully
pressed in while connecting it on to the pH probe case port fitting, which
damaged the o-ring or pushed it out-of-place
e) Loose male/female Luer connection
f) Loose male Luer plug
g) Cable ties were installed on tubing that connect to DO or pH probe case
port fittings
h) The instrument itself, if it did not successfully pass the instrument
Pressurization Test described earlier in this chapter. Perform this test, if
necessary!
11. After each attempt to fix the leak, repeat the Pressurization Test:
a) If necessary, press ALARM
b) Use ⬅ or ➡ to locate the Pressure drop detected alarm
Note:
c) Press ENTER to restore the alarm
d) Press START then SET-UP
e) Press ENTER if necessary to return to the Active Setup Menu screen
(Figure 6-27)
f) Repeat the instrument Pressurization Test using steps 2 – 6.
If you cannot find the leak after a few attempts using reasonable efforts,
contact Biovest’s Account Services group before proceeding! Keep the
cultureware intact and sterile to not jeopardize the product warranty or
incur re-sterilization expense and delay!
P/N 700037-000 Rev. H
Page 6-48
Biovest International, Inc.
Operations Manual for the ACUSYST-MAXIMIZER
Operating Procedures
12. When the cultureware Pressurization Test passes, press ENTER to display the
following screen.
Open the GEX OUT clamp.
Press ENTER to continue.
Figure 6-34. Final Pressuirzation Test Screen
13. Open the GEX OUT clamp!
14. Press ENTER to return to the Active Setup Menu screen (Figure 6-27).
15. After the cultureware passes the pressurization test, proceed with the
Fill / Flush procedure.
CAUTION: Do not proceed to Fill / Flush unless the culureware passes the Pressurization
Test!
Biovest International, Inc.
Operations Manual for the ACUSYST-MAXIMIZER
P/N 700037-000 Rev. H
Page 6-49
Operating Procedures
Fill/Flush Procedure
Notes:
After the flowpath has been installed and tested for leaks, the cultureware can be
primed with sterile medium.
1. This procedure requires sterile medium and a waste (collection) bottle
large enough to contain this medium. A single BRX cultureware (600058xxx) should be flushed by collecting at least 6 L. A double BRX
cultureware (600068-xxx) should be flushed by collecting at least 8 L.
When this procedure is completed, you will also need sterile medium and
factor solutions as well as one sterile waste bottle to begin the Preinoculation phase of cultureware setup.
2. This procedure operates only with the medium pump head loaded. Do
NOT load any other pump heads until the procedure is completed and
the onscreen instructions tell you to do so.
1.
Press START then SET-UP, if necessary, to display the following screen.
Perform:
1) Pressurization Test
2) Fill/Flush
2.
Figure 6-35. Screen to Begin Fill/Flush Procedure
Press 2 to begin the Fill & Flush procedure.
P/N 700037-000 Rev. H
Page 6-50
Biovest International, Inc.
Operations Manual for the ACUSYST-MAXIMIZER
Operating Procedures
3.
Open or close the clamps as instructed on the next four screens (shown
below) to prepare the cultureware for Fill/Flush. Make certain that closed
clamps are centered over the tubing and completely pinch it. Even if you
have recently finished the cultureware pressurization test, make certain these
clamps are adjusted properly. Press ENTER when instructed.
Close F1, F2 and F3 line clamps.
Close INOC/SAMPLE line clamp.
Press ENTER to continue.
Close IC SAMPLE clamp.
Close PRE and POST BRX DO clamps.
Press ENTER to continue.
Close CELL REMOVAL clamp.
Close EC RETURN clamp.
Press ENTER to continue.
Close EC FACTOR PRIME clamp.
Close IC Vent and IC RETURN clamps.
Open EC FLUSH IN clamp.
Press ENTER to continue.
Figure 6-36. Instructions Screens 1-4 for Fill/Flush
Biovest International, Inc.
Operations Manual for the ACUSYST-MAXIMIZER
P/N 700037-000 Rev. H
Page 6-51
Operating Procedures
4.
The fifth screen tells you to load the medium pump head. Follow the
instructions in Appendix E to do this step. Attach the loaded pump head to
the mounting position labeled "MEDIA". When this is done, aseptically
attach the medium pump tubing to the bottle (or bag) of medium that will be
used to flush the flowpath. Then, close the Outflow clamp.
Load tubing for Media pump only.
Connect fill bottle to the Media line.
Close OUTFLOW clamp.
Press ENTER to continue.
Note:
Figure 6-37. Instructions Screen 5 for Fill/Flush
The Media and Outflow pump tubing segments must be loaded into size
7016 peristaltic pump heads. Factor and Harvest pump tubing segments
must be loaded into size 7014 peristaltic pump heads.
5.
The sixth screen tells you to attach the Harvest line aseptically to the
collection bottle. This bottle should be large enough to contain the medium
intended for flushing. When this is done, disconnect the IC tubing line from
its bulkhead connection. This step acts as a safety measure against medium
leaking through the vent filter and flowing inside the instrument.
Connect the Harvest line to the
collection bottle.
Remove the IC Gas Vent Line.
Press ENTER to continue.
Figure 6-38. Instructions Screen 6 for Fill/Flush
P/N 700037-000 Rev. H
Page 6-52
Biovest International, Inc.
Operations Manual for the ACUSYST-MAXIMIZER
Operating Procedures
6.
The next screen tells you to close the two EC Check Valve Bypass clamps.
After that, open the Medium and Harvest line clamps for the inlet and outlet
lines during the Fill/Flush procedure.
Close both EC Check Valve Bypass clamps.
Open the MEDIA and HARVEST line clamps.
Press ENTER to continue.
7.
Figure 6-39. Instructions Screen 7 for Fill/Flush
The next screen tells you to inspect the flowpath before the Medium pump
is started. Carefully follow the tubing route from the Medium bottle to the
Harvest bottle. When the route meets another piece of tubing, be certain that
the appropriate clamps are shut to force medium to flow in only one
direction. Verify that closed clamps are centered over their tubing and
completely occlude the tubing. Be certain that tubing is not pinched
between the cultureware tray and the incubator walls.
Inspect flowpath; correct any pinched
tubing.
Press ENTER to initiate the
Fill and Flush of the tubing set.
Figure 6-40. Instructions Screen 8 for Fill/Flush
Biovest International, Inc.
Operations Manual for the ACUSYST-MAXIMIZER
P/N 700037-000 Rev. H
Page 6-53
Operating Procedures
8.
The correct route of Fill/Flush is described below and shown in Fig. 6-41:
n
Medium bottle to Medium pump (MP)
n
Bottom of IC chamber to Circulation Pump (CP)
n
n
n
n
n
n
n
Note:
n
MP to top of IC chamber
CP to GEX to pH probe
pH probe to bottom (IC inlet) of BRX(s)
Top (IC outlet) of BRX to POST-BRX sample line
Sample line to EC FLUSH IN line
EC FLUSH IN to bottom (ECS inlet) of BRX(s)
Top (EC outlet) of BRX(s) to Harvest line
Harvest line to Waste (collection) bottle
Flush medium may flow from the BRX IC to the BRX EC directly through
the fiber wall, rather than via the EC Flush In line, which is acceptable.
Figure 6-41. Route of media flow during initial Flush
P/N 700037-000 Rev. H
Page 6-54
Biovest International, Inc.
Operations Manual for the ACUSYST-MAXIMIZER
Operating Procedures
9.
When you are sure the Fill/Flush route is free from obstructions in the
previous step, press ENTER.
10. The screen shown in Figure 6-42 appears. Also, the Medium pump
automatically turns on and runs at 4320 ml/hr to flush the wetting agent out
of the hollow fibers in the BRX(s).
Press ENTER to terminate initial Flush.
Press HOLD to halt.
Figure 6-42. Duty Screen 1 for Fill/Flush
11. Press ENTER to terminate initial Flush. means: press ENTER
to stop the MP after the trouble-free collection of at least 8 L (2 BRXs) or
6L (1 BRX) of flush medium into the container connected to the Harvest
tubing line. This step requires about 1.5 – 2 hours (using default MP speed).
Notes:
12. Press HOLD to halt. means:
a) Press HOLD when one of the following occurs:
n Flow route of medium is not according to the schematic (Fig. 6-41)
n Cell culure media leaks from the cultureware
n One of the following three Notes (below) is a problem
b) Correct the problem, then press 1 to Continue current activity
(screen not shown):
1. If the route of medium flow is different from what is illustrated or
medium leaks from the cultureware, press HOLD to stop the procedure
temporarily. After the problem has been resolved, resume Fill/Flush
procedure by selecting pressing 1 to Continue current activity.
2. During this phase of the Fill/Flush procedure, it is CRITICAL that the
level of medium in the IC chamber does NOT continue to rise and fill
the IC chamber. If the medium continues to rise beyond ~5 cm (2″) of
medium, ensure that the IC vent clamp is completely closed. If the
problem continues, there may be a blockage downstream of the IC
Chamber. If you cannot resolve this, press the HOLD key and contact
Biovest!
3. During this phase of the Fill/Flush procedure, the EC chamber receives
NO Fill/Flush medium and should remain DRY. If Fill/Flush medium is
Biovest International, Inc.
Operations Manual for the ACUSYST-MAXIMIZER
P/N 700037-000 Rev. H
Page 6-55
Operating Procedures
entering the EC chamber, completely close the EC Return clamp and the
lower Check Valve Bypass clamp. If the problem persists, contact Biovest!
13. The first phase of Fill/Flush is complete.
14. The results of the instructions in the screen (Figure 6-43):
a) Opening the EC RETURN clamp and closing the HARVEST clamp diverts
the flow of cell culture medium from exiting the Harvest line to entering
the Expansion Chamber. (This is the first time the Expansion Chamber
should become wet.)
b) Pressing ENTER causes the Medium pump to automatically turn on and
run at 4320 ml/hr.
Open the EC RETURN clamp.
Close the HARVEST clamp.
Press ENTER to initiate filling the EC.
Figure 6-43. Instructions Screen 9 for Fill/Flush
15. The meaning of the instructions in the following screen (Figure 6-44) is:
Press ENTER when you see that the Expansion Chamber is approximately
half-full. This stops the Media Pump (and changes the screen). This step
only takes about 1.5 – 2 minutes.
CAUTION: You must decide when to stop the pump! It will NOT automatically stop! Do
NOT become distracted during this brief step! Otherwise the Expansion
Chamber could flood and leak cell culture medium—possibly ruining the
cultureware and damaging the instrument!
Press ENTER to terminate filling the EC.
WARNING: Failure to stop the EC filling
will result in the Chamber flooding
and possible instrument damage.
Figure 6-44. Duty Screen 2 for Fill/Flush
P/N 700037-000 Rev. H
Page 6-56
Biovest International, Inc.
Operations Manual for the ACUSYST-MAXIMIZER
Operating Procedures
16. Open the POST-BRX DO clamp (to prime the DO circuit during the preinoculation period). Be certain the EC FLUSH IN clamp is centered over its
tubing, close the clamp, and ensure the tubing is completely pinched shut.
Wrap the EC FLUSH IN clamp with tape to keep it securely closed. This clamp
remains shut for the remainder of the run.
Open the POST BRX DO clamp.
Close and tape the EC FLUSH IN clamp.
Press ENTER to continue.
Figure 6-45. Instructions Screen 10 for Fill/Flush
17. Re-attach the reusable Tygon IC tubing to the IC bulkhead connector. Open
the IC Vent (see note below) and IC RETURN clamps. Be certain the IC
RETURN clamp does not pinch the circulation tubing after it has been opened.
Attach the IC GAS Vent Line.
Open IC RETURN and IC Vent clamps.
Press ENTER to continue.
Note:
Figure 6-46. Instructions Screen 11 for Fill/Flush
The IC Vent clamp’s label reads IC, not IC VENT.
Biovest International, Inc.
Operations Manual for the ACUSYST-MAXIMIZER
P/N 700037-000 Rev. H
Page 6-57
Operating Procedures
18. The next screen tells you to load the remaining five pump heads with their
respective tubing segments. Remember that the Outflow and Harvest
pumps are loaded differently from the other pumps because they
remove media from the flowpath!
a) Aseptically attach a waste bottle to the Outflow pump.
b) Asepically attach a fresh medium bottle (or bag) to the Media pump, if
necessary.
c) Aseptically attach Factor bottles to their respective tubing lines.
d) Aseptically replace the Flush Collection container on the Harvest line
with an empty, sterile bottle.
e) Open the OUTFLOW clamp.
f) Discard the collected flush medium.
Load Outflow, Harvest and Factor tubing
into the pumps. Attach bottles for Preinoculation phase.
Open OUTFLOW CLAMP.
Press ENTER to continue.
Note:
Figure 6-47. Instructions Screen 12 for Fill/Flush
Using Outflow and Media pumps is necessary at this point. You must decide
when/if Factor and Harvest pumps are needed. If so, and they are attached
to their respective bottles, open their clamps now to allow their pumping
later on.
19. The next screen informs you that Fill/Flush is finished. Pressing enter causes
the next screen to appear (Figure 6-49).
Fill/Flush Procedure Complete.
Press ENTER to continue.
Figure 6-48. Instructions Screen 13 for Fill/Flush
P/N 700037-000 Rev. H
Page 6-58
Biovest International, Inc.
Operations Manual for the ACUSYST-MAXIMIZER
Operating Procedures
20. The instructions in the next screen (Figure 6-49) mean that you need to
temporarily leave this Fill/Flush screen to go into the Process Control screens
to:
n Change the default pH setpoint to what is best for your particular cell line.
This ensures the Pre-inoculation phase to follow adjusts the cell culture
medium to what is necessary for the pending inoculum.
n Start EC Cycling by changing the default Delay from 7-00:00 to
0-00:00. Starting EC Cycling speeds pH adjustment throughout the
cultureware. The remaining EC Cycling defaults are OK: 70, 15, 15.
a) Press PROCESS CONTROL
b) Press ENTER until pH Setpoint appears
c) Enter the pH that corresponds to mid-log phase growth for the pending
inoculum, if known. Otherwise, 7.1 – 7.3 often works for many cell lines.
d) Press ENTER until EC Cycling appears
e) Change DELAY time to 0-00:00
n Suggest a Circulation Rate of 250 ml/min for 1 BRX or 2 BRX
cultureware during first few hours of pending Pre-Inoculation Phase.
CAUTION: Do NOT exceed 500 ml/min Circulation Rate when using cultureware with
1 BRX at any time!
Set PROCESS CONTROL parameters for the
Pre-inoculation phase.
Remember: Begin cycling and set pH.
Press ENTER to continue.
Notes:
Figure 6-49: Instructions Screen 1 for Pre-inoculation Phase
In addition to entering the desired pH setpoint, calibrate pH approximately
30 minutes after starting the Pre-inoculation phase (step 24 below) when the
on-line pH will have reasonably equilibrated. This ensures accurate pH
control. Calibration is described below in Maintenance Procedures.
21. If ACULINK-DATA LOg or a printer is connected, enable them and enter the
desired Logging Interval by pressing:
a) SET-UP
b) ENTER, if necessary, to display Logging Interval
c) Number keys for the desired logging frequency
d) ENTER
Biovest International, Inc.
Operations Manual for the ACUSYST-MAXIMIZER
P/N 700037-000 Rev. H
Page 6-59
Operating Procedures
21. When the changes to Process Control and Logging Interval are complete,
press START then SET-UP to return to the screen shown in Figure 6-49.
22. Press ENTER to advance to the next screen, which is provided as a safety
feature. If you have performed the Fill/Flush procedure with the incubator
door open, close the door to activate the incubator heater.
Press ENTER to start Pre-inoculation
phase.
Figure 6-50. Instructions Screen 2 for Pre-inoculation Phase
23. Press ENTER to proceed to the last screen in the Fill/Flush procedure (Figure
6-51).
24. Press ENTER to display the Monitor screen. The following actions have
automatically occurred:
n Elapsed time has reset to 0-00:00
n SETUP has ended and RUNNING is the active mode of operation
n Active Process Control is active (Active Process Control LED is on), so
logging, alarms, setpoint control and other activities are now active
n See Note on next page
Process Control Started
Press ENTER to continue
Figure 6-51. Instructions Screen 3 for Pre-inoculation Phase
25. Press ALARM to silence the audible alarm and deactivate the external alarm
relay. Alarms normally occur (such as temperature, pH and DO)
immediately when mode RUNNING mode begins. Review the alarms stored
in the queue to ensure unusual alarms are not present.
26. Press MONITOR and watch temperature, pH and DO readings. After
approximately 20 minutes they will be equilibrated and likely within the
user-defined LOW and HIGH alarm limits as defined in Process Control.
27. Press ALARM. Individually restore each stored alarm by using arrow keys to
locate each parameter that is in its alarm range and pressing ENTER to
restore its alarm. Press MONITOR.
P/N 700037-000 Rev. H
Page 6-60
Biovest International, Inc.
Operations Manual for the ACUSYST-MAXIMIZER
Operating Procedures
Note:
28. If pH does not reach the entered setpoint and equilibrate within its alarm
range in order for the pH alarm to be restored, it is likely that pH must be
calibrated, which should be done regardless to ensure pH is properly
controlled. After RUNNING mode’s elapsed time has reached approximately
thirty minutes (0-00:30), on-line pH likely will have reasonably
equilibrated, so calibrate the pH probe.
The volume of media within the flowpath — and particularly the Integration
Chamber — may be very low when Active Process Control starts. This is
normal! This may result in air bubbles circulating through the IC circuit,
which is undesirable but does not cause damage. If this occurs, use the
Pumps Override Control to set the Circulation Pump rate to 0 ml/min and
the Media Pump rate to 800 ml/hr. When the Outflow pump begins drawing
medium out of the top of the Integration Chamber, clear the Circulation
Pump and Media Pump overrides.
Biovest International, Inc.
Operations Manual for the ACUSYST-MAXIMIZER
P/N 700037-000 Rev. H
Page 6-61
Operating Procedures
MAINTENANCE PROCEDURES
Sampling
This part of Operating Procedures describes various procedures that are used
during the pre-inoculation and post-inoculation phases of a culture. The intent is
to present them only once, as a group, so as to be easier to locate in the future.
The procedure on the following page is used to remove samples of medium from
the flowpath. These samples can be from either fluid circuit:
n
n
IC for metabolite, pH, or DO analysis or probe calibration
EC for various product analyses
Details specific to calibrating the pH and DO probes are provided in the next
section, Probe Calibration.
Post-BRX IC samples may be used to calculate metabolic uptake rates and
production rates. (See Appendix D for the formulae in these calculations.)
Pre-BRX IC samples may be used to calibrate the pH probe. Post-BRX IC
samples may be used to calibrate the DO probe.
Samples from the EC port are used for offline analysis of secreted product.
EC sample analysis is affected by EC chamber volume. Remove EC samples at
consistent EC chamber volumes to simplify data analysis.
Recommended schedules of sampling for metabolite and product analysis, as well
as for probe calibration, are provided in Post-inoculation Procedures.
Sampling involves the removal of stagnant medium in the sample port, followed
by removal of fresh flowpath medium for offline analysis. The stagnant medium
is called a pre-sample and is to be discarded. The pre-sample volume from the IC
and EC sample ports should be 3 ml. Pre-samples must be removed and
discarded before the analysis sample is withdrawn. This is true even if a postBRX sample immediately follows a pre-BRX sample (or vice versa).
P/N 700037-000 Rev. H
Page 6-62
Biovest International, Inc.
Operations Manual for the ACUSYST-MAXIMIZER
Operating Procedures
Use aseptic technique to perform all sampling operations according to the
following protocol:
1.
2.
3.
4.
5.
6.
7.
8.
9.
Prepare sterile syringes, disinfectant, sterile gauze, and sampling tubes. (If
septa are attached to the sampling ports, use 21 gauge needles on the
syringes as described below.)
Disinfect the sampling port. If you use caps, wipe the junction of the cap
and sample port fitting. If you use luer-activated valves, remove the dust
cover and wipe the surface of the LAV with an approved disinfectant (see
usage instructions that came with the LAVs). If you use septa, wipe only the
surface that will be punctured by the needle.
Attach the pre-sample syringe to the sample port. If you use caps, remove
the cap and protect it by covering it with sterile gauze. If you use LAVs,
simply connect the syringe to the LAV, which opens inside of the LAV. If
you use septa, remove the needle guard, then puncture the septum until the
tip of the needle can be seen inside the sample port.
Adjust the PRE-BRX and POST-BRX clamps to permit the desired IC sample.
Open the clamp to the sample port. Remove the pre-sample volume (3 ml
for IC or EC samples).
Close the sample clamp. Replace the pre-sample syringe with the sample
syringe (for offline analysis). If you use LAVs, wipe the LAV with an
approved disinfectant after disconnecting the pre-sample syringe and again
before connecting the sample syringe It’s unnecessary to reconnect the dust
cover between the pre-sample and sample syringes. If you use septa, you
can detach the syringe from the needle and leave the needle in the septum
while only the syringe is replaced.
Open the sample clamp again. Remove the analysis sample.
Close the sample clamp. Remove the sample syringe. Replace the sample
syringe with a sterile syringe. This syringe may be used for the pre-sample
during your next sampling. If you use caps on sample ports, replace it now,
and disinfect the junction of the cap and sample port. If you use LAVs, do
not leave a syringe connected to the LAV. Wipe it as previously mentioned
and reconnect the dust cover. If you used a septum, remove the syringe plus
needle, and wipe any drops of medium from the septum's surface.
Seal the analysis syringe with its cap or the needle guard.
While performing the above tasks, perform the software steps needed for
calibration (see Probe Calibration procedure below).
Biovest International, Inc.
Operations Manual for the ACUSYST-MAXIMIZER
P/N 700037-000 Rev. H
Page 6-63
Operating Procedures
Note:
10. If this sample is used for pH or DO calibration, proceed immediately to the
offline pH meter or blood-gas analyzer (or equivalent), and obtain the
desired value. Then, return to the MAXIMIZER and complete the software
steps in the calibration sequence. If this sample is used for other metabolites,
store it appropriately before analysis.
To avoid inaccurate readings due to changes in pH or DO inside the syringe,
you should prepare the offline meter or analyzer in advance of removing the
sample, and measure pH or DO immediately after the sample has been
withdrawn. Samples that are used for other metabolites or for product
analysis should be stored appropriately to avoid degradation before the
desired analyte can be measured.
P/N 700037-000 Rev. H
Page 6-64
Biovest International, Inc.
Operations Manual for the ACUSYST-MAXIMIZER
Operating Procedures
Probe Calibration
For pH probe calibrations, use samples from the pre-BRX sample line; for DO
probe calibrations, use samples from the post-BRX sample line. Calibrate probes
according to the following schedule: pH probe, 2 – 3 times per week; DO probe,
1 – 2 times per week.
The instructions below are specific to calibrating either the pH or DO probe.
These instructions do not cover details of aseptic connection, removing samples
from the flowpath, opening and closing clamps, etc. that were covered in the
preceding section, Sampling.
CAUTION: Calibrate in advance the offline pH meter or blood gas analyzer (or
equivalent) as recommended by the manufacturer! If this is not done, the use
of this equipment to calibrate the MAXIMIZER pH or DO probe can result in
faulty pH control or DO readings.
1.
2.
Check PRE-BRX and POST-BRX clamps to verify that the desired clamp is
open (pre for pH, post for DO). Only one of these clamps should be open at
one time. If the desired IC sample can be taken with the clamp that happens
to be open, the pre-sample can be taken immediately. Any time the open
clamp changes, wait approximately 2 minutes before proceeding to step 2 to
allow the medium in the common tubing line to change. This can be
monitored by changes to the DO reading on the Monitor screen.
Press CALIBRATE to display the following screen. This screen appears only
for the first calibration for each run. After the first calibration is completed,
pressing CALIBRATE displays the screen in Figure 6-56.
Calibrate:
3.
4.
1) Take Sample
Figure 6-52. Main Menu Probe Calibration Screen before Sampling
Remove and discard the pre-sample volume from the cultureware.
Replace the pre-sample syringe with the analysis sample syringe.
Biovest International, Inc.
Operations Manual for the ACUSYST-MAXIMIZER
P/N 700037-000 Rev. H
Page 6-65
Operating Procedures
5.
Press 1 (Take Sample) to display the following screen.
Take sample for pH and DO measurements.
Press START to continue.
Press ENTER to abort taking a sample.
6.
Figure 6-53. Probe Calibration Screen 2
To abort the calibration either before or after removing the sample:
a) Press ENTER
b) The screen in Figure 6-52 re-appears (to re-start calibration, if desired)
7.
c) Press MONITOR to leave the calibration screen (and discontinue
calibration)
To continue with the calibration:
a) Remove the analysis sample
b) Immediately press START (to store the current probe readings and
advance the screen, Figure 6-45)
c) The elapsed time for sample taken at is when START was pressed.
This also is logged by the printer or ACULINK-DATA LOg, if in use.
c) Go to step 8 only if you pressed START
Calibrate:
1) Take Sample
2) Enter New Values
sample taken at
8.
9.
0-00:02
Figure 6-54. Main Menu Calibration Screen after Sampling
Immediately analyze the sample offline for pH or DO.
Press 2 (Enter New Values) to display the following screen.
pH
DO
Probe
7.31
145 mmHg
Measured
7.29
147 mmHg
Figure 6-55. Probe Calibration Screen for Data Entry
P/N 700037-000 Rev. H
Page 6-66
Biovest International, Inc.
Operations Manual for the ACUSYST-MAXIMIZER
Operating Procedures
9) Press ⬆ or ⬇ to move between the pH and DO fields. Press number keys to
enter the offline pH or DO value in its corresponding field. Press ENTER to
input the offline value.
10) After entering the value, press the following key depending on what you
want to do next:
n press MONITOR to leave the Calibrate mode
n Press ENTER to perform another calibration
11) If you pressed ENTER in the previous step a screen similar to the following
screen appears. It shows which probe was most recently calibrated (offline
value was entered).
n either pH value written (if pH was calibrated most recently)
n or DO value written (if DO was calibrated most recently)
n The elapsed time for sample taken at is when START was pressed for
the last sampling prior to entering the offline value. This also is logged by
the printer or ACULINK-DATA LOg, if in use.
a) Press 1 to begin a new calibration of the pH or DO probe. Go to step 6.
b) Press 2 to re-enter an offline value for a previous calibration. Only do
this if an error occurred during the first entry of the offline value! In this
case, the log will show Sample Taken once followed by two Calibration
entries.
Calibrate:
1) Take Sample
2) Enter New Values
pH value written
DO value written
sample taken at
0-00:03
Notes:
Figure 6-56. Main Menu Calibration Screen after Data Entry
1. Blood gas analyzers are compatible with Luer-Lok syringes. If you have
only a pH meter, you will need to modify the sampling method to
accommodate the use of syringes during the offline measurement of the
sample. Contact Account Services for details.
2. If a DO probe is in the cultureware but there is no offline equipment to
measure DO, with the PRE-BRX/DO clamp open, calibrate DO to 140 mmHg
weekly. After the calibration is complete, close the PRE-BRX/DO clamp and
open the POST-BRX/DO clamp. It is more important to monitor post-BRX
DO. When it drops below 100 mmHg, increase the speed of the CP by 100
ml/min, or more, unless it is at the maximum of 500 ml/min (single BRX) or
1000 ml/min (double BRX).
Biovest International, Inc.
Operations Manual for the ACUSYST-MAXIMIZER
P/N 700037-000 Rev. H
Page 6-67
Operating Procedures
Replacing Bottles
The attachment of medium, outflow, factor and harvest bottles is a necessary preinoculation and maintenance procedure. Use this procedure any time you have to
connect bottles to the system.
Use sterile gloves and aseptic technique during bottle replacement. Work
smoothly and quickly.
Procedure
1.
2.
3.
4.
5.
6.
7.
8.
Prepare the appropriate bottle (with RESCU cap assembly) to exchange with
the bottle presently attached to the system.
Cover the connection between the media line and the cap assembly (or
sterile protection) of the presently used bottle with sterile gauze saturated
with disinfectant.
Sterilize the connection by soaking it for several minutes.
Meanwhile, cover the appropriate connecting port (see below) of the new
bottle with sterile gauze saturated with disinfectant.
Outflow line
Harvest line
Media line
Factor line
In port on bottle cap assembly
In port on bottle cap assembly
Out port on bottle cap assembly
Out port on bottle cap assembly
Turn off the appropriate pump by setting the rate to zero using Override
Controls.
On the appropriate line, close the clamp near the bottle or sterile protector.
After the connections are sterile, disconnect the tubing line from the cap
assembly or protection. Keep the tubing from the flowpath covered with the
sterile gauze at all times.
Remove the Luer plug from the new bottle and attach the line. Place the Luer
plug in the old bottle's opening.
P/N 700037-000 Rev. H
Page 6-68
Biovest International, Inc.
Operations Manual for the ACUSYST-MAXIMIZER
Operating Procedures
9.
Note:
Open the clamp.
10. Clear the override (or return the pump rate to its previous override value).
Air may be removed from the Factor 3 tubing before it reaches the BRX and
collects in the ECS. To do this, you will need to put a temporary clamp on
the Factor 3 tubing downstream from the FACTOR PRIME port and attach a
syringe to the FACTOR PRIME port. After the fresh Factor 3 bottle has been
attached (steps 1–9 above), open the FACTOR PRIME clamp and set the
Override Controls to run the Factor 3 pump at high speed until the air is in
the syringe. Then, override the Factor 3 pump rate to zero, close the FACTOR
PRIME clamp, remove the temporary clamp, and clear the override as
described in step 10.
11. Treat removed bottles appropriately. Outflow bottles should be
decontaminated. All bottles should be washed as soon as possible.
Replacing LAVs and Septa
LAVs should be replaced after ~100 uses (or 96 hours of continuous use, i.e.,
when something has been connected to it long-term, which we do not
recommend). Septa should be replaced after 7 – 10 samples.
1.
2.
3.
4.
5.
6.
7.
8.
9.
Wear a mask, hair restraint, lintless lab coat, and sterile gloves. Aseptic
technique is important in this procedure.
Check the sample line clamp to make sure it is closed.
Carefully wrap the old LAV or septum with gauze soaked in disinfectant.
Wipe the entire area (tubing, LAV/septum and female Luer-Lok connector).
Holding the female Luer-Lok connector in one hand, carefully twist the old
LAV/septum counterclockwise until it is loose. Do not remove at this time.
Open the sterile package of the new LAV or septum and hold the removable
protector between your fingers.
Carefully remove and discard the old LAV or septum and replace it with the
new item. Twist it clockwise until secure.
Sample site is once again ready for use.
Disinfect the surface of the new LAV and the inside of its cover. Install the
cover on the LAV.
Suggest covering the septum with a disinfected cover, such as a piece of
aluminum foil.
Biovest International, Inc.
Operations Manual for the ACUSYST-MAXIMIZER
P/N 700037-000 Rev. H
Page 6-69
Operating Procedures
Removal of Cell Debris
Note:
Cells that slough off the BRX(s) are removed to some extent by the harvest
pump, but most accumulate in the Expansion Chamber. Here, they can interfere
with EC Cycling or disturb the environmental conditions within the ECS. For
these reasons, the Cell Removal line is attached to the bottom of the Expansion
Chamber. If followed regularly, the procedure described below will help you to
minimize cellular buildup. An alternate method is provided after the standard
method.
This procedure instructs you to remove the entire contents of the Expansion
Chamber — cells plus ECS liquid — then return fresh serum-supplemented
medium to the flowpath to avoid depleting the ECS of serum. Contact
Account Services if you have any questions about modifying this protocol for
serum-free cultures or for replenishing the ECS with conditioned medium.
Standard Cell Removal Procedure
1.
Note:
Needed supplies: at least two empty 60 ml syringes and possibly two 60 ml
syringes filled with serum-supplemented medium and the usual supplies for
aseptic sampling.
During this procedure you will be working with the incubator door open
long enough to activate the temperature alarm. Also, your handling of the
cultureware in step 7 may activate other alarms related to EC Cycling. In all
of these cases, press ALARM, then MONITOR to silence the alarm until you
have completed the entire procedure. Reset the alarms after this procedure is
done.
2.
3.
4.
5.
6.
7.
8.
9.
Press E.C. CYCLE then 2 to override EC Cycling to the Low Expansion
Chamber volume.
Press MONITOR and wait until EC is approximately 108 ml.
Press PUMPS and override F3 and HP to 0
Close the EC RETURN clamp.
ml/hr.
Put a temporary clamp on the EC tubing that connects to the lower side port
(in port) of the BRX(s), and close this clamp.
Disconnect the tubing line from the EC bulkhead port.
Aseptically attach an empty 60 ml syringe to the Cell Removal line.
Carefully shake the Expansion Chamber to loosen the cells and form a slurry.
P/N 700037-000 Rev. H
Page 6-70
Biovest International, Inc.
Operations Manual for the ACUSYST-MAXIMIZER
Operating Procedures
10. Open the CELL REMOVAL clamp and remove as much of this suspension as
possible.
11. Close the CELL REMOVAL clamp.
12. Aseptically replace the first syringe with an empty 60 ml syringe.
13. Repeat steps 10 and 11. Tilt the Expansion Chamber to the left to remove as
much of the slurry as possible, if necessary.
14. Aseptically replace the second syringe with a 60 ml syringe filled with
serum-supplemented medium.
15. Open the CELL REMOVAL clamp.
16. Inject the 60 ml of medium up the Cell Removal line and into the Expansion
Chamber.
17. Close the CELL REMOVAL clamp.
18. Replace this syringe with the second syringe filled with serum-supplemented
medium. Repeat steps 15 and 16.
19. Leave this syringe attached to the Cell Removal line.
20. Press E.C. CYCLE then 5 to clear the EC Cycle override.
21. Press MONITOR.
22. Remove the temporary clamp applied in step 6.
23. Reconnect the tubing line to the EC bulkhead port.
24. Open the EC RETURN clamp.
25. The cell removal procedure is finished.
26. Reset the alarms that may have been activated once they are between their
respective Low and High Alarm Limits.
27. Optional: Process the collected cell slurry because it contains product from
the ECS. Discard the cell pellet as a biohazard.
CAUTION: If the application has the potential to release a biohazardous agent, contact
Biovest’s Account Services department.
Biovest International, Inc.
Operations Manual for the ACUSYST-MAXIMIZER
P/N 700037-000 Rev. H
Page 6-71
Operating Procedures
Alternate Cell Removal Procedure
1.
2.
3.
4.
5.
6.
7.
8.
9.
Needed supplies: a sterile container (a bottle and cap assembly or a
disposable bag) that holds ≥ 250 ml and can connect to the Cell Removal
line’s female Luer fitting.
Aseptically connect the sterile container from step 1 to the Cell Removal
line.
Place the sterile container on the floor.
Close the EC RETURN clamp.
Carefully shake the Expansion Chamber to loosen the cells and form a
slurry.
Open the CELL REMOVAL clamp.
Gravity alone may cause the liquid and cell slurry in the Expansion
Chamber to flow into the sterile container. If not, press E.C. CYCLE then 2 to
cause EC pressure to momentarily increase.
When the Expansion Chamber is reasonably empty, close the CELL
REMOVAL clamp.
Press 5 to clear the EC Cycle override.
10. Press MONITOR.
10. Either leave the sterile container on the Cell Removal line, or replace it with
a sterile male Luer plug or syringe.
11. Open the EC RETURN clamp.
12. Allow EC Cycling to resume. It will replenish the volume in the Expansion
Chamber. If the MP rate is quite slow compared to the EC Cycling flow
rate, using syringes to replenish the Expansion Chamber volume may
provide better results.
13. The cell removal procedure is finished.
14. Reset the alarms that may have been activated once they are between their
respective Low and High Alarm Limits.
15. Optional: Process the collected cell slurry because it contains product from
the ECS. Discard the cell pellet as a biohazard.
P/N 700037-000 Rev. H
Page 6-72
Biovest International, Inc.
Operations Manual for the ACUSYST-MAXIMIZER
Operating Procedures
PRE-INOCULATION PROCEDURES
After the flowpath has been flushed and filled with medium, it may be run
without cells for a period of time before it is inoculated. This pre-inoculation
phase of the culture is begun automatically after the Fill & Flush procedure, and
it uses Process Control parameters for pump rates, cycling conditions, and pH
control. You may use the default parameters for pH setpoint and pump rates, or
you may change them to suit your needs. It is recommended that you change the
default parameters for cycling (see below).
pH Calibration
During the pre-inoculation phase, the pH probe should be calibrated at least once
to enable the system to establish the desired pH setpoint. If calibration is not
performed, the software does not have an accurate basis for reading pH from the
probe, and media components could be adversely affected by extreme pH created
by an incorrectly monitored probe. Calibration at this time may also be helpful in
detecting a probe that did not survive the autoclave conditions. A replacement can
therefore be installed before the culture begins. Details on the calibration
procedure are given in Maintenance Procedures.
DO Calibration
EC Cycling
Although the system does not control dissolved oxygen levels in the media,
calibrating the DO probe during the pre-inoculation phase permits the software to
monitor DO readings accurately from the probe. This may prove helpful in
detecting a probe that did not survive the autoclave conditions. A replacement can
therefore be installed before the culture begins. Details on the calibration
procedure are given in Maintenance Procedures.
The conditions necessary to create EC cycling should be tested in the preinoculation phase. To do this, you will have to change the default delay time in
Process Control to zero. To measure the actual Rise and Fall times, set the printer
log time to a convenient interval (using SETUP, not Process Control).
Biovest International, Inc.
Operations Manual for the ACUSYST-MAXIMIZER
P/N 700037-000 Rev. H
Page 6-73
Operating Procedures
Osmolarity
The effect of medium pump rate on osmolarity should be considered, especially
during long pre-inoculation periods. Slow medium rates (<25ml/hr) have the
potential of allowing the GEX to dehydrate the flowpath and consequently raise
the osmolarity of the medium. This problem can be resolved by raising the
medium pump rate temporarily. Contact Account Services if you have questions
about this relationship.
Offgassing (Optional)
If the gas exiting the oxygenator has the potential of carrying biohazardous
material from the cells or media, the off-gassing tubing should be installed. This
is the black-collared Tygon tubing supplied with the instrument. It should be
attached to the GEX OUT line and to the bulkhead fitting labeled "OUT". The
barbed fitting on the rear of the instrument should be connected to slightly
negative pressure and to a disposal system to ensure that gases are collected and
properly treated.
Cytotoxicity Testing (Optional)
A few days before inoculation, samples of media should be removed from the
ICS and ECS, then tested for cytotoxic residue. The cytotoxicity test is run to
determine whether medium in the system has any toxic effect on cells.
All tests should be compared to medium which has previously been shown to be
non-toxic. A certain percentage of cells will die even if the medium is not toxic. A
known control will ensure that cell death is due to toxicity and not some other
factor.
Flasks should be gassed aseptically with 5–10% CO2 to prevent bicarbonate
buffer in the medium from losing CO2 until the flask is equilibrated with the
incubator environment. While some cells survive this shock (loss of CO2) which
results in high pH, it usually induces a lag period of cell growth and some cells
will die.
A high percentage of serum may bind toxins and mask a potentially bad lot of
medium.
A suggested protocol follows. Other cytotoxicity tests may be used.
P/N 700037-000 Rev. H
Page 6-74
Biovest International, Inc.
Operations Manual for the ACUSYST-MAXIMIZER
Operating Procedures
Cytotoxicity Testing Procedure
Run cytotoxicity assays of medium taken from the system against a control flask
of the same type medium. All flasks should have the necessary nutrients at the
same concentrations.
1.
2.
3.
4.
5.
6.
7.
8.
9.
Label six T-25 flasks: two control flasks, two for ICS samples, and two for
ECS samples.
Add 10 ml of control medium to each of the control flasks.
Remove two 20 ml samples, one from the IC circuit and one from the EC
circuit, using the technique described in the sampling procedure.
Put half of the IC sample (10 ml) in one IC sample flask, and the other half
in the second IC sample flask. Put half of the EC sample in one EC sample
flask, and the other half in the second EC sample flask.
Add serum to all flasks so that the serum concentration is the same as that in
static culture.
All of the flasks should have identical medium make-ups before proceeding
to the next step.
Flush the flasks with 5 – 10% CO2 in air.
Inoculate each flask with 5 x 10⁵ cells with a viability of at least 85%.
Incubate in a 37°C, CO2 incubator for two days.
10. Observe the flasks daily for cell number and viability. Include a count from
the day that the flasks were seeded.
11. Test results may be determined in two ways:
First, a quantitative result may be obtained by counting cell number and cell
viability in all of the flasks and recording the results. If there are no significant
differences (based on customer pre-determined values), the system is ready to be
inoculated.
Biovest International, Inc.
Operations Manual for the ACUSYST-MAXIMIZER
P/N 700037-000 Rev. H
Page 6-75
Operating Procedures
Second, flasks may be observed carefully under a phase microscope and their
appearance assessed in comparison to the controls. If the cell appearance in the
sample flasks are as good as those of the controls, or better, the system passes the
test and is ready for inoculation.
If the test results confirm cytotoxicity, do not inoculate the flowpath module.
n
n
n
Continue to add medium to the system with EC Cycling in effect.
Re-examine the flowpath for stagnant BRX or pinched lines.
Contact Biovest International’s Account Services. Be prepared with the lot
number and manufacturing number of your cultureware, the conditions
applied from Fill/Flush to the removal of cytotoxicity samples, and the
specific cytotoxicity results.
Sterility Testing (Optional)
At the same time that you test for cytotoxicity, the system should be tested for
sterility to be sure that you have not introduced bacteria or fungi into the system
before inoculating it with your cell line. Draw samples from each of the ports
used for cytotoxicity testing, and use the medium quality control procedures used
previously (see Medium Quality Control).
Because sterility tests generally required several days to be completed, this test is
used to double check the sterility of the system. If aseptic technique has been
used throughout, the system should still be sterile. This test is simply a
confirmation of that fact.
P/N 700037-000 Rev. H
Page 6-76
Biovest International, Inc.
Operations Manual for the ACUSYST-MAXIMIZER
Operating Procedures
Serum Pre-treatment of the ECS
For cultures using serum-supplemented media, serum is added to the ECS at the
end of the pre-inoculation phase to prepare the ECS with the same serum
concentration as in static culture. This creates an environment similar to that in
static culture, and minimizes the stress incurred from inoculating into a serumfree environment. Pre-treatment of the fibers can be done any time before
inoculation, however, it is most effective if done between four hours and twentyfour hours before the inoculation
Because Biovest International’s standard cultureware uses BRXs with a MWCO
of ~60,000 daltons, media components with molecular weights lower than this
may or may or may not freely exchange between the ECS and ICS.
An important consideration in the pre-treatment procedure is whether the
components in the growth-supplemented EC media are smaller than ~60,000
daltons. If they are, it is possible they may pass to the IC. This dialysis can cause
no or slow growth of the inoculum, in which case, the IC medium also can be
supplemented.
Notes:
The volume of serum required for pre-treatment depends on the concentration of
serum used routinely in static culture, and it depends on the cultureware volume,
which varies by bioreactor size and the number of bioreactor in the cultureware.
Refer to Appendix A for system and ECS volumes in MAXIMIZER cultureware.
1. For other types of ECS pre-treatment, contact Account Services.
2. The serum pre-treatment protocol outlined here is optional and may be
replaced with other pre-treatment procedures, depending on the type of
medium and/or cells you are using. Consult Account Services if you have
any questions.
Biovest International, Inc.
Operations Manual for the ACUSYST-MAXIMIZER
P/N 700037-000 Rev. H
Page 6-77
Operating Procedures
To perform the pre-treatment procedure, follow the steps outlined below. Refer to
the procedures described in Sampling.
1.
Aseptically fill a syringe with the desired volume of serum.
3.
Disinfect the FACTOR PRIME port.
2.
4.
5.
Aseptically fill a 3ml syringe with unsupplemented medium.
Attach the serum syringe to the FACTOR PRIME port.
When using the single BRX flowpath (600058-xxx):
a) Open the FACTOR PRIME clamp
b) Inject the serum
6.
c) Close the FACTOR PRIME clamp
When using the double BRX flowpath (600068-xxx):
a) Put a temporary clamp on the tubing connected to the top EC port of one
BRX.
a) Open the FACTOR PRIME clamp
b) Inject half of the serum
c) Close the FACTOR PRIME clamp
d) Move the temporary clamp to the tubing connected to the top EC port of
the other BRX.
e) Open the FACTOR PRIME clamp
f) Inject the remaining serum
g) Close the FACTOR PRIME clamp
7.
8.
9.
h) Remove the temporary clamp
Aseptically replace the empty serum syringe with the syringe containing
unsupplemented medium.
Open the FACTOR PRIME clamp.
Inject the unsupplemented medium to flush residual serum in the tubing into
the bioreactor(s).
10. Close the FACTOR PRIME clamp.
P/N 700037-000 Rev. H
Page 6-78
Biovest International, Inc.
Operations Manual for the ACUSYST-MAXIMIZER
Operating Procedures
11. Leave the flush syringe on this port unless you are using sampling septa.
This syringe can later be used to purge air out of the line when F3 bottles
are replaced.
12. Be certain that the system is cycling properly. This will ensure that the
serum is distributed throughout the BRX(s) and the Expansion Chamber. If
you are using the double BRX flowpath, be sure that both BRXs are cycling
properly but confirming there is no stationary air bubble in either of the two
tubing lines that connect to the lower EC (side) ports.
Biovest International, Inc.
Operations Manual for the ACUSYST-MAXIMIZER
P/N 700037-000 Rev. H
Page 6-79
Operating Procedures
Process Control Summary during Pre-Inoculation Phase
Single Bioreactor Flowpath: (600058-xxx, for either bioreactor size)
pH setpoint
Temp setpoint
Alarms:
pH
DO
Temp
Circulation pump
Media pump
Base (F1)
EC Cycling
Serum Control (F3)
F2 Control (F2)
Harvest
P/N 700037-000 Rev. H
Page 6-80
7.2 (7.1 – 7.3 or the value determined
from the cell line characterization)
37.0 °C
Low 7.10
Low *100
Low 36.5
High 7.50
High 200
High 37.5
Basal
Dilution
25 – 75
0
ml/hr
ml/hr
Delay
Up
Dn
Transfer Vol
0-00:00
15
15
70
DDD-HH:MM
minutes
minutes
ml
250–500
Disabled
Rate
Delay
ON
Cycle
Rate
Delay
ON
Cycle
0
0-00:00
0-00:00
0-00:00
0
0-00:00
0-00:00
0-00:00
None (option 4)
mmHg
°C
ml/min
ml/hr
DDD-HH:MM
DDD-HH:MM
DDD-HH:MM
ml/hr
DDD-HH:MM
DDD-HH:MM
DDD-HH:MM
Biovest International, Inc.
Operations Manual for the ACUSYST-MAXIMIZER
Operating Procedures
Double Bioreactor Flowpath: (600068-xxx, for either bioreactor size)
pH setpoint
Temp setpoint
Alarms:
pH
DO
Temp
Circulation pump
Media pump
Base (F1)
EC Cycling
Serum Control (F3)
F2 Control (F2)
Harvest
7.2 (7.1–7.3 or the value determined
from the cell line characterization)
37.0 °C
Low 7.10
Low *100
Low 36.5
High 7.50
High 200
High 37.5
Basal
Dilution
25–75
0
ml/hr
ml/hr
Delay
Up
Dn
Transfer Vol
0-00:00
15
15
70
DDD-HH:MM
minutes
minutes
ml
500–1000
Disabled
Rate
Delay
ON
Cycle
Rate
Delay
ON
Cycle
0
0-00:00
0-00:00
0-00:00
0
0-00:00
0-00:00
0-00:00
None (option 4)
Biovest International, Inc.
Operations Manual for the ACUSYST-MAXIMIZER
mmHg
°C
ml/min
ml/hr
DDD-HH:MM
DDD-HH:MM
DDD-HH:MM
ml/hr
DDD-HH:MM
DDD-HH:MM
DDD-HH:MM
P/N 700037-000 Rev. H
Page 6-81
Operating Procedures
INOCULATION PROCEDURE
Note:
The preceding part of this manual describes certain procedures that prepare and
test the flowpath before cells are added to the BRX. Read them carefully, and be
certain the necessary steps have been performed before continuing with this
procedure. The last part in this section, Optimization Procedures, provides you
with advice related to the inoculation of flowpath modules.
The following instructions are written for cells that have been grown in static
culture using serum-supplemented media. Consult the Optimization
Procedures part of this manual, or contact Account Services, if you have
questions about using serum-free (or similar) media.
Cells should be prepared so they will be in mid-log phase of growth on the day of
flowpath inoculation. This can be determined by constructing a growth curve for
suspension cells, or by selecting anchorage-dependent cells at the appropriate
(typically 50 – 70%) confluency in static culture. To shorten the lag time of
growth in the BRX, a minimum of 2 x 10⁸ viable cells should be prepared for
each bioreactor in the cultureware. The steps used to collect cells for inoculation
should ensure the highest possible percent viability.
Note:
Resuspend the cells to 50 ml per BRX using a large bore (15 gauge) needle and
the 60 ml syringes provided in the accessories package. Conditioned medium will
probably provide the least stressful environment. Fill a small (10 ml) syringe with
cell-free medium to flush the tubing after cells are injected into the BRX.
Proceed immediately to the MAXIMIZER.
Even though the Outflow pump is running during the inoculation procedure,
if you use inoculum volumes greater than 50 ml per BRX, you will run the
risk of flooding the Integration Chamber. Watch this chamber’s volume and
do NOT allow it to fill faster than the Outflow Pump can remove volume!
CAUTION: If the application has the potential to release a biohazardous agent, contact
Biovest’s Account Services department.
P/N 700037-000 Rev. H
Page 6-82
Biovest International, Inc.
Operations Manual for the ACUSYST-MAXIMIZER
Operating Procedures
1.
Press START then INOCULATE. All of the pumps and logging stop, and the
software reminds you to make any necessary changes to Process Control.
The most important change in Process Control is to set the EC Cycling
Delay to a future time to ensure it does not activate immediately after
completing the inoculation procedure, which could cause the inoculum to
flow into the Expansion Chamber.
Verify that the PROCESS CONTROL
Parameters are properly set.
Press ENTER to continue.
Figure 6-57: Instructions Screen 1 for Inoculation
CAUTION: EC Cycling typically should not activate until approximately two to three
days after inoculation for most applications. When using low- or protein-free
medium in the ECS, longer delays may provide better results by giving the
culture more time to become established before the start of EC Cycling.
Note:
Perform the inoculation with minimum delays to prevent pH changing in the
flowpath as a result of the stopped pumps.
2.
Press PROCESS CONTROL.
4.
Change Delay to 14-00:00
3.
5.
6.
7.
Press ENTER until EC Cycling appears.
Confirm the remaining Process Control settings are appropriate for a newly
inoculated culture. Refer to the settings on page 6-80/81.
Press START then INOCULATE to return to the previous screen (Fig. 6-57).
Press ENTER to display the following screen.
Waiting for EC level to become low...
Excess volume remaining is:
8.
47 ml.
Figure 6-58: Instructions Screen 2 for Inoculation
EC pressure rises to lower Expansion Chamber volume to its low setting,
108 ml. The screen shows this excess volume being removed.
Biovest International, Inc.
Operations Manual for the ACUSYST-MAXIMIZER
P/N 700037-000 Rev. H
Page 6-83
Operating Procedures
9.
When the excess volume has been removed, the Outflow pump stops and the
screen changes. Perform the onscreen instructions. For the instruction,
Remove IC Vent Gas Line, disconnect the reusable Tygon tubing from
the IC bulkhead port.
Close EC Return clamp.
Remove IC Vent Gas Line.
Attach syringe to INOC/SAMPLE line.
Press ENTER to continue.
Figure 6-59: Instructions Screen 3 for Inoculation
10. The Outflow pump starts again, and the screen changes. For the instruction,
Open INOC/SAMPLE clamp, open the clamp labeled INOC/EC SAMPLE.
Open INOC/SAMPLE clamp and inject the
cells. Follow with 10ml of media.
Press ENTER when injection is complete.
Figure 6-60: Instructions Screen 4 for Inoculation
11. If the cultureware has more than one BRX, apply a temporary clamp on the
tubing that connects to the upper EC (side) port of the left-hand BRX to
direct the inoculum into only the top of the right-hand BRX.
CAUTION: Do NOT clamp the top IC (end) port of the BRX!
12. Inject the cells. Excess fluid passes into the lumen and is removed at the
Integration Chamber by the Outflow pump. As you inject cells, maintain
constant pressure on the syringe, and rock the syringe gently to keep the cells
suspended. Avoid adding any bubbles to the BRX. This step should require
1–2 minutes.
13. If the cultureware has two BRXs:
a) Close the INOC/EC SAMPLE clamp
b) Aseptically replace the empty syringe with one containing cells
c) Move the temporary clamp to the tubing that connects to the upper EC
(side) port of the right-hand BRX to direct the inoculum into only the top
of the left-hand BRX. See CAUTION note above!
d) Open the INOC/EC SAMPLE clamp and repeat step 13
e) Close the INOC/EC SAMPLE clamp
f) Remove the temporary clamp
P/N 700037-000 Rev. H
Page 6-84
Biovest International, Inc.
Operations Manual for the ACUSYST-MAXIMIZER
Operating Procedures
14. When the BRX(s) have been inoculated, replace the last empty syringe that
had cells with the 10 ml syringe containing cell-free medium.
15. Open the INOC/EC SAMPLE clamp.
16. Inject the medium to flush any residual cells in the tubing up and into the
BRX(s).
17. Close the INOC/EC SAMPLE clamp.
18. Press ENTER to advance to the following screen.
Close the INOC/SAMPLE clamp.
Remove syringe and attach sterile GREEN
plug.
Press ENTER to continue.
Figure 6-61: Instruction Screen 5 for Inoculation
19. For the instruction, Close the INOC/SAMPLE clamp, close the clamp
labeled INOC/EC SAMPLE.
20. Replace the flush syringe with a new, sterile syringe, not the green plug,
which is no longer provided as an accessory with the cultureware.
21. Press ENTER to display the following screen. This also causes the Outflow
pump to stop.
Note: Do not open the EC RETURN clamp at this time. EC Cycling is inactive
at this time, so this clamp does not need to be open, and it is safe to leave this
clamp closed. The EC RETURN clamp will be opened when EC Cycling is
activated, see EC Cycling information on page 6-95.
Attach IC Vent Gas Line by connecting the reusable Tygon tubing to
the IC bulkhead port.
Open EC RETURN clamp.
Attach IC Vent Gas Line.
Press ENTER to continue.
Figure 6-62: Instructions Screen 6 for Inoculation
22. Pressing ENTER displays the following screen, which briefly appears to
indicate the inoculation procedure is finished.
Biovest International, Inc.
Operations Manual for the ACUSYST-MAXIMIZER
P/N 700037-000 Rev. H
Page 6-85
Operating Procedures
Inoculate Procedure Complete.
Figure 6-63: Completion Screen for Inoculation
23. The following screen appears and Process Control automatically activates
before ENTER is pressed.
Process Control Started
Press ENTER to continue
Figure 6-64: Final Screen for Inoculation
24. Press ENTER to leave this last Inoculation screen.
25. The Monitor screen appears. The following actions have automatically
occurred:
n Elapsed time has reset to 0-00:00
n INOC
n
has ended and RUNNING is the active mode of operation
Active Process Control is active (Active Process Control LED is on), so
logging, alarms, setpoint control and other activities are now active
26. Press ALARM to silence the audible alarm and deactivate the external alarm
relay. Alarms normally occur (such as temperature, pH and DO) immediately
when mode RUNNING mode begins. Review the alarms stored in the queue to
ensure unusual alarms are not present.
27. Press MONITOR and watch temperature, pH and DO readings. After
approximately 20 minutes they will be equilibrated and likely within the
user-defined LOW and HIGH alarm limits as defined in Process Control.
28. Press ALARM. Individually restore each stored alarm by using arrow keys to
locate each parameter that is in its alarm range and pressing ENTER to restore
its alarm. Press MONITOR.
P/N 700037-000 Rev. H
Page 6-86
Biovest International, Inc.
Operations Manual for the ACUSYST-MAXIMIZER
Operating Procedures
Note:
29. You may wish to:
n record the time of day that corresponds to the new elapsed time of
0-00:00 to know when the inoculation was completed.
n take time-zero IC sample of medium to establish baseline levels of
metabolites. Wait at least about 30 minutes after inoculation before
removing this sample to allow their concentrations to stabilize.
Process Control sets the Gas # at 7 after Inoculation. Gas # gradually
increases during the first 15 – 20 minutes to establish pH control. pH may go
out of range while pH control is determing the correct Gas # to use, causing
a pH out of range alarm. Follow steps 25 – 27 to respond to the alarm.
Biovest International, Inc.
Operations Manual for the ACUSYST-MAXIMIZER
P/N 700037-000 Rev. H
Page 6-87
Operating Procedures
POST-INOCULATION PROCEDURES
After inoculation, the culture will require periodic changes to the feed rate, factor
rate, harvest rate, cycling conditions, and circulation rate. Although some of these
parameters are automatically set into Process Control, you must perform manual
changes to others. Information useful to these procedures was provided earlier in
the descriptions on Oxygen Delivery, Feed Strategy, and Harvesting Strategy.
In addition, the last part of this section, Optimization Procedures, contains more
ideas on "customizing" various parameters to your cultures.
Note:
After a culture has been inoculated, various system functions need to be
examined to ensure that a healthy culture is maintained. The following schedule
is suggested for daily and periodic checkouts of the culture.
You may wish to prepare a printed form to remind you of these items, as well
as to maintain a record of activities during each run. Contact Account
Services for ideas and examples of this type of documentation.
Daily
EC Cycling is inactive after inoculation. Remember to activate it when
necessary, see page 6-95
n Sample for metabolite and product assays and determine which pump speeds
to change based on that information
n Check the circulation pump to ensure that it is operating smoothly and does
not have leaks
n Check the fluid in the Integration and Expansion Chambers to verify that the
level is satisfactory and for signs of contamination
n Check the IC and EC chamber vent filters to ensure proper gas line
connections (especially after inoculation and removal of cell debris)
n Inspect the outflow and feed bottles for proper fluid levels
n Check CO2 tank and optional backup air supply
n Check ALARM screen and correct problems as needed
n
Periodically
n Calibrate pH and DO probes
n Replace the feed, factor(s), outflow, and harvest bottles
n Replace sampling port septa
n Remove unwanted cell debris from Expansion Chamber
P/N 700037-000 Rev. H
Page 6-88
Biovest International, Inc.
Operations Manual for the ACUSYST-MAXIMIZER
Operating Procedures
End of Culture Procedures
The following is a description of the procedures that are to be performed after a
culture run is finished. Instructions will be given for removing the cultureware,
discarding the disposable components, and saving the reusable components. A
separate part of Section 6, Contamination, will discuss the details of handling
cultureware affected by contamination.
Shutdown Procedures
Perrform the following steps to terminate the active culture run.
1.
2.
If ACULINK-DATA LOg, is in use, export the log and save it. Shut down the
computer and turn off its power.
Press HOLD then 2.
Select:
1) Continue current activity
2) Abort
3.
4.
Figure 6-65: Selection Screen for HOLD key
The instrument sends Process Aborted to the printer, if Logging is enabled.
(ACULINK-DATA LOg, does not receive the Process Aborted log entry.)
If a printer is in use, retain the printout. Turn off power to the printer.
5.
Close the CO2 supply to the instrument.
7.
Turn off power to the instrument to minimize wear and tear to its
components.
6.
Backup Air is optional. If it is in use, close this supply to the instrument.
Biovest International, Inc.
Operations Manual for the ACUSYST-MAXIMIZER
P/N 700037-000 Rev. H
Page 6-89
Operating Procedures
Recovery of Harvest
After the run is terminated and the Circulation Pump speed is 0 ml/min, you may,
if desired, manually empty the Expansion Chamber and BRX(s) to collect their
remaining supernatant. These are just two methods to do this. Other methods also
are possible, such as using multiple syringes connected to various ports. The
effectiveness of any method depends on the accumulated cell mass. If product
titer was low when the run was terminated, this harvest recovery process is not
likely worthwhile.
Use the EC Cycling Override:
1.
Put clamps on the IC inlet and outlet tubing of the BRX(s) (to prevent
unwanted IC medium from also being collected).
2. Aseptically connect the F3 tubing to a Harvest collection container
3. Remove the F3 tubing from the pump head
4. Close these clamps:
a) INOCULATE/EC SAMPLE
b) HARVEST
c) FACTOR PRIME
d) CELL REMOVAL
e) Lower CHECK VALVE BYPASS
5. Open these clamps:
a) FACTOR 3
b) EC RETURN
c) Upper CHECK VALVE BYPASS
6. Override EC Cycling to Drain
7. Collect supernatant from BRX(s) and proceed when the ECS is empty
8. Close the upper CHECK VALVE BYPASS clamp
9. Open the lower CHECK VALVE BYPASS clamp
10. Collect supernatant from Expansion Chamber. Proceed when it’s empty
11. Press HOLD then 2
12. Close all clamps and process the supernatant
P/N 700037-000 Rev. H
Page 6-90
Biovest International, Inc.
Operations Manual for the ACUSYST-MAXIMIZER
Operating Procedures
Use the Factor 3 Pump:
1.
2.
3.
4.
5.
6.
7.
8.
9.
10.
11.
12.
13.
14.
Put clamps on the IC inlet and outlet tubing of the BRX(s) (to prevent
unwanted IC medium from also being collected).
Remove the F3 pump segment from the pump head
Reverse-load the F3 pump segment in the pump head (in the orientation the
Harvest pump segment is loaded).
Aseptically connect the F3 tubing to a Harvest collection container
Disconnect the reusable Tygon gassing line from the vent filter on the
Expansion Chamber.
Close these clamps:
a) INOCULATE/EC SAMPLE
b) HARVEST
c) FACTOR PRIME
d) CELL REMOVAL
e) Lower CHECK VALVE BYPASS
Open these clamps:
a) FACTOR 3
b) EC RETURN
c) Upper CHECK VALVE BYPASS
Override F3 Pump to 400 ml/hr
Collect supernatant from BRX(s) and proceed when the ECS is empty
Close the upper CHECK VALVE BYPASS clamp
Open the lower CHECK VALVE BYPASS clamp
Collect supernatant from Expansion Chamber. Proceed when it’s empty
Press HOLD then 2
Close all clamps and process the supernatant
Biovest International, Inc.
Operations Manual for the ACUSYST-MAXIMIZER
P/N 700037-000 Rev. H
Page 6-91
Operating Procedures
Removal of Cultureware Components
The cultureware has disposable and reusable components. Read the following
procedures, and be certain that you save the reusable components for use in future
cultures.
CAUTION: If the application has the potential to release a biohazardous agent, contact
Biovest’s Account Services department.
1.
2.
3.
4.
5.
6.
7.
8.
9.
Close all clamps, particularly Outflow, Media, F1, F2, F3 and Harvest.
Disconnect the In, Out (if used), IC, and EC gassing lines from their
bulkhead and cultureware connections. Save them for the next run!
Disconnect all electronic cables from their bulkhead jacks.
Remove the temperature cable and DO probe cable (if it’s in use). Save them
for the next run!
For the reusable pH probe: Remove the cable. Save it for the next run!
For the disposable pH probe:
a) the cable, case and the probe are discarded, so leave them in the
cultureware as they are.
b) remove the reusable plastic pH holder. Save it for the next run!
Remove the two metal screws and plastic knob from the circulation pump
bracket and crank pin. Save them for the next run!
Slide the cultureware’s circulation pump out of the metal bracket and off of
the crank pin. The cultureware’s circulation pump has a cylindrical bearing
that should slide off of the crank pin. If it stays on the crank pin, remove it
too because it is discarded with the cultureware.
Remove the six tubing lines from the pump heads.
10. Set the six pump heads and their screws aside.
11. Lift the cultureware up and over the metal circulation pump bracket and pull
it out of the incubator.
12. Open a biohazard bag and place it on a benchtop.
13. Place the cultureware on the opened biohazard bag. Do not close it yet!
P/N 700037-000 Rev. H
Page 6-92
Biovest International, Inc.
Operations Manual for the ACUSYST-MAXIMIZER
Operating Procedures
14. Remove the reusable pH probe case assembly and the DO probe case
assembly (if in use) from the cultureware:
a) put temporary clamps on the two tubing lines that connect to the pH probe
case
b) put temporary clamps on the two tubing lines that connect to the DO
probe case
c) disconnect the tubing from the probe cases and
d) reconnect the cultureware’s open pH and DO tubing lines by installing the
fittings saved from Cultureware Sterile Assembly (see on page 6-37).
e) remove the temporary clamps
f) drain the probe case assemblies
g) remove both probe case assemblies and set them aside
h) coil the long tubing lines and place them on top of the culutreware
i) seal the biohazard bag and dispose of it as a biohazard
15. Clean the pump heads! They likely will have small pieces of pump tubing
in their grooves and other places. They also may have media spills in them.
16. Each pump head requires two white, teflon washers. Replacements must be
installed before the next run. See Appendix B, Ordering Information.
17. Once the pump heads are clean and reassembled, store them or reattach them
with the mounting screws.
18. Reconnect to the bulkhead jacks: the reusable pH cable, the DO cable (if in
use), the temperature probe, and the four gassing lines.
19. Clean the reusable pH probe and the DO probe case assemblies:
a)
b)
c)
d)
e)
f)
g)
h)
remove the probes from their cases
do not touch the tip of the DO probe
briefly rinse the probes with water
put the pH probe in its storage bottle with fresh storage solution (see
Appendix B)
screw the electrical cap on the pH probe
put the protective cap on the tip of the DO probe and screw on its
electrical cap
disassemble the probe cases
discard the o-rings: 3 for pH, 1 for DO (cultureware includes new ones)
Biovest International, Inc.
Operations Manual for the ACUSYST-MAXIMIZER
P/N 700037-000 Rev. H
Page 6-93
Operating Procedures
Notes:
i) rinse the probe case pieces with water and clean with tissue culture-grade
detergent and rinse with deionized water
j) save both probe cases for the next run
k) store the pH probe so its tip remains wetted in storage solution
l) store the DO probe (preferably vertically, with the tip at the bottom)
1. After a culture has been terminated, do not autoclave-sterilize the pH
and oxygen electrodes until they are prepared immediately before the
next run. Excessive autoclave cycles will shorten their lifespans and/or
reduce their effectiveness. If the flowpath is contaminated or a
biohazardous agent may be present, contact Biovest’s Account Services
department.
2. Do not forget to remove the temperature probe from the cultureware.
Autoclaving it will damage it!
n
n
Properly dispose of the contents of all bottles that were attached to the
flowpath. Remove the cap assemblies (and any labels) from the bottles, and
clean as described in Sterilizing Bottles and Cap Assemblies.
Clean the incubator and cabinet of the MAXIMIZER with a disinfectant or mild
soap solution. Be careful to not allow disinfectant liquids to wick behind the
keypad or enter the instrument in other locations! Avoid spilling any solutions
on the circulation pump rotor, in the bulkhead connections and in the incubator
circulation vent.
P/N 700037-000 Rev. H
Page 6-94
Biovest International, Inc.
Operations Manual for the ACUSYST-MAXIMIZER
Operating Procedures
OPTIMIZATION PROCEDURES
The following suggestions are offered to users to improve the quality of cultures
grown in the MAXIMIZER. Because each cell line responds individually to culture
conditions, it is not possible to specify protocols that will work in all situations.
However, this information will give you some ideas to consider. Experience with
using these suggestions is usually the best method of instruction.
Inoculation
Biovest International’s Account Services personnel are always available to assist
you in optimization and will be happy to answer your questions as they arise.
Several factors related to the inoculum influence the growth of the culture in the
flowpath. These include the number of cells per BRX, their viability, and the
stage of growth when the inoculum is prepared.
n
n
n
A higher inoculum population will shorten the period between inoculation
and indication of significant metabolism. Although this may seem to be an
advantage, the user must be aware of the practical concerns in preparing a
higher density inoculum:
. How many static culture vessels are needed?
. What volume of cell suspension can be processed safely?
. How much time is required?
Anchorage dependent cells may require a higher inoculum density than
suspension cells. Re-suspending them in conditioned medium rather than
fresh medium may improve the initial growth period by providing the cellspecific growth factors secreted by the cells.
Best results are often obtained by preparing the inoculum from cells that are
in mid- to late-log phase of growth. A standard growth curve is often useful
in scheduling the progress of cells in static culture to coincide with the day of
inoculating the flowpath.
Biovest International, Inc.
Operations Manual for the ACUSYST-MAXIMIZER
P/N 700037-000 Rev. H
Page 6-95
Operating Procedures
n
n
n
An option when inoculating is to split the inoculum and inject half of the
cells into the upper EC port, which is the normal port, and the other half of
the cells into the lower EC port (via the Factor Prime port). This may lead to
better distribution when the culture’s expansion begins. This effectiveness
depends on several factors, including how sticky the cells are and how much
protein is in the EC medium, among others.
Although the cultureware permits several options for adding cells, this
manual has described the simplest method. Using a pressurized bottle to
deliver cells to the BRXs may be dangerous if the bottle is weak or damaged.
It is possible to distribute cells along the entire length of the BRX by
circulating a cell suspension with a vented bottle and peristaltic pump, but
this process requires more time than the standard technique, caution must be
observed when using the override functions to control pump rates, and the
longer inoculation time and pump action may cause cell damage.
Forcing excess media from the ECS to the IC is sometimes called a
transmembrane method of inoculation. Depending on the pore size and total
surface area of the BRX(s), this method may cause a temporary pressure
buildup (back-pressure) within the ECS. If the EC CHAMBER RETURN
clamp is opened immediately after this type of inoculation, the back-pressure
will cause a short burst of media to flow from the ECS of the BRX(s) to the
Expansion Chamber. To avoid displacing cells in this manner, keep the
Expansion Chamber clamps shut until process control has begun, manually
vent the Integration Chamber to zero (room) pressure, and then open the
Expansion Chamber clamps. Replace the vent line to the Integration
Chamber after a few seconds.
P/N 700037-000 Rev. H
Page 6-96
Biovest International, Inc.
Operations Manual for the ACUSYST-MAXIMIZER
Operating Procedures
n
Seeding a BRX more than once may be considered an option in the following
situations: low inoculum density and/or viability, poor initial growth, re-use
of the flowpath. Ideally the first situation should be avoided, but time
constraints or other factors may take precedence over preparing a suitable
inoculum. In the other two situations, it may be best to flush the cells out of
the BRXs before re-use, although cleaning a BRX that was densely
populated is usually difficult and may not be recommended because of
manufacturing regulations involving the desired product. Poor initial growth
in the MAXIMIZER culture may be attributed to many conditions that can be
avoided before inoculation.
.
.
.
Cytotoxicity should be assessed before cells are added to the BRXs.
The procedure for this type of evaluation is described in
Cytotoxicity Testing.
Characteristics of cells in static culture will give some indication of
how fast they will appear to grow in MAXIMIZER cultures. Cells that
exhibit relatively slow growth in static culture will respond
similarly in perfusion systems.
Problems associated with microbial contamination may be avoided
by using antibiotic-free media in static culture and by routinely
testing stock cultures for mycoplasma and unwanted viruses.
Biovest International, Inc.
Operations Manual for the ACUSYST-MAXIMIZER
P/N 700037-000 Rev. H
Page 6-97
Operating Procedures
Circulation Rate
EC Cycling
As a culture grows, cells consume more of the oxygen dissolved in the
surrounding medium and therefore need a greater delivery to maintain the same
level of available oxygen. By increasing the circulation pump rates, the flowpath
is capable of delivering more dissolved oxygen from the IC (saturated with
oxygen by the gas exchanger) to the cell mass. If cultures require dissolved
oxygen (for growth or production), it is best to increase the circulation pump rate
gradually and allow 1–2 hours before measuring any changes in dissolved
oxygen.
EC Cycling should be activated when the cell culture shows signs of steady
metabolic growth — a period of two to three days of glucose concentration
decreases or glucose uptake rate increases, lactate concentration or lactate
production rate increases, etc.
Typically, EC Cycling will begin some time during the first week after
inoculation of the bioreactor(s).
To activate EC Cycling:
1.
Open EC RETURN clamp.
3.
Press ENTER until the following screen appears.
2.
Press PROCESS CONTROL.
EC Cyling
Delay
Transfer Vol
4.
5.
6.
07-00:00
70
UP
DN
15
15
Figure 6-66. EC Cycling Parameters Screen
Use ⬅⬆➡⬇ to move the cursor between the four programming options.
Change Delay to 0-00:00 (by pressing 0 once and pressing ENTER).
Press MONITOR to see Cycle state change from RISE to FALL according
to the UP (EC Chamber volume increases duration) and DN (EC Chamber
volume decreases duration) times in minutes.
Routine EC media have enough protein supplementation that the default UP and
DN times of 15 minutes work well for the entire run. EC media with low or no
P/N 700037-000 Rev. H
Page 6-98
Biovest International, Inc.
Operations Manual for the ACUSYST-MAXIMIZER
Operating Procedures
protein supplementation may need to use 60 – 90 minute UP and DN times for the
first few days when EC Cycling is active. When this strategy is followed,
decrease these times by 15 – 30 minutes every few days. Continue this step-wise
reduction until the default UP and DN times of 15 minutes are in use unless
metabolic activity worsens. In such cases, decrease these times more slowly.
Once the bioreactor contains areas of high cell density, UP and DN times of 15
minutes are important to maintain maximum culture viability and productivity.
The default Transfer Vol(transfer volume) is 70 ml, which normally works
well when using various EC media, for the entire run, and when using
cultureware with one bioreactor.
The default Transfer Vol of 70 ml is sufficient for the first approximately
two weeks of active EC Cycling time when using cultureware with two
bioreactors. After this time it may be beneficial to increase the transfer volume in
steps of 15 – 35 ml every 2 – 3 days until the maximum transfer volume of 140 ml
is in use, unless metabolic activity worsens. In such cases, increase the transfer
volume more slowly.
Reducing the initial transfer volume may be necessary especially if the EC
medium is protein-free or low in protein because the cell culture may require a
longer period of time to become established among the bundle of hollow fibers.
When this strategy is followed, increase the transfer volume in step-wise amounts
of 15 – 35 ml every 2 – 3 days until the maximum suggested transfer volume of 70
ml is in use unless metabolic activity worsens. In such cases, increase the transfer
volume more slowly.
Biovest International, Inc.
Operations Manual for the ACUSYST-MAXIMIZER
P/N 700037-000 Rev. H
Page 6-99
Operating Procedures
Harvesting
n
n
n
n
For secreted products that show feedback inhibition, the user should
determine the threshold level to monitor before starting the harvest pump at a
time different from the default value. Samples analyzed from the flowpath
will provide the necessary information in this case.
After the harvest pump has been started, product will be collected and
measured for content. Depending on the type of product secreted by the cells,
this measurement may be in units of concentration or activity. The harvest
rate may be gradually increased until the product levels reach a satisfactory
concentration/activity, or until the daily yield reaches a maximum amount, or
until the harvest volume becomes difficult to process. The previous
discussion on feedback inhibition should also be considered when pump
rates are changed.
A comparison of secreted product from the harvest bottle and the sample port
will undoubtedly show different levels (concentration or activity) of
harvested material. This happens because the harvest bottle contains an
"average" of product material from the ECS throughout a specified period,
while the sample originates from a single point in time. In addition, product
levels in the sample may vary with the phase of cycling. Therefore, to
measure accurately from the flowpath, samples should always be removed at
the same time during the cycling process.
Cooling the harvest bottle is a good way to preserve product integrity by
preventing thermal degradation. It also has the advantage of stabilizing the
changes in pH due to harvested cells, as well as reducing the activity of
proteases released by cell lysis. If cell buildup in the harvest becomes a
concern, the bottles should be replaced as often as possible, and the contents
separated by centrifugation.
P/N 700037-000 Rev. H
Page 6-100
Biovest International, Inc.
Operations Manual for the ACUSYST-MAXIMIZER
Operating Procedures
Serum Requirements
The pre-treatment of BRX ECS with serum is an important step in conditioning
the flowpath before inoculation. Although the inoculum should contain the same
amount of serum as in static culture, lack of serum in the EC would dilute the
inoculum to an undesirable level. Therefore, serum should be added to the EC
prior to inoculation. This procedure is described in Serum Pre-treatment of the
ECS.
n
n
n
n
Some components of serum are consumed while others (notably enzymes)
are used as tools for biochemical reactions. The serum pump should be
started when either of these functions/components is exhausted. Monitoring
growth and productivity parameters will give an indication of the need to add
serum.
Cultures that show a drop in metabolic activity may require additional serum
to recover. A syringe can be used to inject a quantity of pure serum into the
EC.
However, as a culture matures, it becomes less dependent on the serum. To
reduce the serum content of the ECS, two procedures may be used. The
factor bottle may be replaced with one that has less serum, or the factor
pump rate may be lowered. These changes should be performed gradually to
avoid sudden changes in environmental conditions. Metabolism and
productivity should be monitored to determine the effect of lowering the
serum content.
If a culture does not begin expanding and consuming nutrients for many days
after inoculation, an option to encourage their growth is to add growth
supplement to the IC medium at the same concentration as what is in the EC
medium (or switch to serum-free media in the IC if it is the EC medium and
FBS is not in use). Continue this until the culture has expanded for one to
two weeks. Change directly to unsupplemented IC medium at that time, or if
necessary, periodically reduce the concentration (in steps) of growth
supplements in the IC medium. This scenario can eliminate a dialysis (loss)
of low molecular weight components from the ECS that was causing the
culture to remain in lag phase. Once the culture has been growing for many
days, it may continue to expand when IC medium is unsupplemented.
P/N 700037-000 Rev. H
Page 6-101
Biovest International, Inc.
Operations Manual for the ACUSYST-MAXIMIZER
Operating Procedures
Serum-free Media
Experience with serum-free media varies widely. A culture can be started with
serum-supplemented medium, then weaned onto serum-free medium, or it can be
started with serum-free medium. Another technique is to add serum-free medium
only to the EC. Regardless of the technique, the important point to consider is
that the large molecular weight components of serum-free medium must be added
directly to the EC.
Hybridomas grown in serum-free medium may not remain in the BRX if the
protein content of the serum-free medium is too low. In this case, cycling and
harvesting conditions should be modified to avoid excessive loss of cells.
P/N 700037-000 Rev. H
Page 6-102
Biovest International, Inc.
Operations Manual for the ACUSYST-MAXIMIZER
Troubleshooting
SOFTwARE
If you have a problem that appears to be related to the software, verify the
following items before notifying Account Services:
1.
2.
Alarms
Are Override Controls in use, and are they performing as expected to
supersede Process Control? Have you properly removed an override, or is it
still active?
Determine which revision level of firmware your instrument is currently
using. This may be done by checking the PROMs list; to do this, press
SETUP, then choose menu item 6.
The MAXIMIZER is capable of generating 33 alarms. At the time an alarm condition
occurs:
n
n
n
Audible alarm makes a 1-second tone every 4 seconds
External alarm relay closes
Alarm message and details (see next page) are recorded by ACULINK-DATA
LOg or the printer, if either is in use.
Therefore, when an alarm occurs, common practice should be to:
1.
Press ALARM to see what happened
2.
Press MONITOR to silence the alarm and deactivate the external alarm relay
4.
Press ALARM and use the arrow keys to display the desired stored alarm
3.
5.
Resolve the alarm condition
Press ENTER to restore the alarm so it can be activated in the future
See chapter 5, section ALARM Key for further information about the information
in alarm screens and responding to them.
Biovest International, Inc.
Operations Manual for the ACUSYST-MAXIMIZER
P/N 700037-000 Rev. H
Page 7-1
Troubleshooting
Each of the 33 alarm messages has the same format. Each alarm has a:
n
n
n
n
n
Alarm name
Alarm#: a unique number for each alarm name
data1: variable number for each alarm message and alarm condition *
data2: variable number for each alarm message and alarm condition *
elapsed time: when alarm condition occurred (Days-Hours:Minutes format)
Alarm Message
alarm# data1 data2
TIME:
DDD-HH:MM
← PREVIOUS ALARM
NEXT ALARM →
PRESS ENTER TO RESTORE THIS ALARM
Figure 7-1: General Format for Alarm Screen
* data1 and data2: the meaning of these values is not detailed in this manual.
They are used by Biovest personnel to provide technical assistance or during field
service. If you report an alarm condition to Account Services, please include all
of the displayed information.
Alarms 34, 35, and 36 monitor internal instrument functions. Even when they are
stored in the alarm queue, each new occurrence of these alarms causes another
activation of the audible alarm and external alarm relay, and it is recorded
recorded by ACULINK-DATA LOg or the printer. If these alarms occur more than
once in a short period of time, contact Biovest’s Account Services.
The remaining alarms do not re-activate the alarm responses, if they are stored in
the alarm queue.
P/N 700037-000 Rev. H
Page 7-2
Biovest International, Inc.
Operations Manual for the ACUSYST-MAXIMIZER
Troubleshooting
Some information about each of the 33 alarms is presented below. Some of alarm
descriptions will be useful to you, but they are intended for qualified service
personnel.
Processor Communication Failure
8 data1 data2
TIME:
0-00:00
← PREVIOUS ALARM
NEXT ALARM →
PRESS ENTER TO RESTORE THIS ALARM_
Figure 7-2: Format for Alarms 1 Through 8
Alarms numbered 1 – 8 indicate eight types of failures of the main control
program to communicate with secondary programs. If this alarm occurs once, it
may be of little concern, because it could be caused by electrical noise. However,
repeated occurrences need immediate attention. The primary causes are improper
DIP switch settings on the pump or monitor boards, loose or faulty wire
assemblies, or a malfunction in various circuit boards. This problem likely
requires repair service.
Clock Failure
9 0 0
TIME:
DDD-HH:MM
← PREVIOUS ALARM
NEXT ALARM →
PRESS ENTER TO RESTORE THIS ALARM
Figure 7-3: Alarm Screen 9
This alarm means a failure of the chip on the control board, and it must be
replaced by service personnel. When the clock fails, all operations related to
elapsed time will not function (e.g., process control, circulation).
Biovest International, Inc.
Operations Manual for the ACUSYST-MAXIMIZER
P/N 700037-000 Rev. H
Page 7-3
Troubleshooting
Media Temperature out of range
10 0 0
TIME:
DDD-HH:MM
← PREVIOUS ALARM
NEXT ALARM →
PRESS ENTER TO RESTORE THIS ALARM
Figure 7-4: Alarm Screen 10
This alarm means the media temperature is outside of the limits set in Process
Control. This may be due to recent activity inside the incubator, a fault in the
heating system, neither of which is user-serviceable.
Users can check the following items to try to correct this problem:
n
n
n
n
n
n
Incubator door fully latched on its pin? Is the gasket around the door
completely sealing the incubator against air leaks?
Sufficient clearance at the rear of the instrument for air to circulate through
the inlet and outlet fans?
Temperature cable fully connected in the cultureware and is the insulation
covering the sensor tip?
Temperature probe fully connected in its bulkhead jack?
Room temperature within the operating specifications (18 – 26°C)?
Does another temperature probe fix the problem?
EC pressure out of range
11 0 0
TIME:
DDD-HH:MM
← PREVIOUS ALARM
NEXT ALARM →
PRESS ENTER TO RESTORE THIS ALARM
Figure 7-5: Alarm Screen 11
This alarm means the pressure in the Expansion Chamber is >280 mmHg. Verify
that the chamber is not flooded and its gassing line is attached properly. This
problem likely requires repair service.
P/N 700037-000 Rev. H
Page 7-4
Biovest International, Inc.
Operations Manual for the ACUSYST-MAXIMIZER
Troubleshooting
IC pressure out of range
12 0 0
TIME:
DDD-HH:MM
← PREVIOUS ALARM
NEXT ALARM →
PRESS ENTER TO RESTORE THIS ALARM
Figure 7-6: Alarm Screen 12
This alarm means the pressure in the Integration Chamber is >280 mmHg. Verify
that the chamber is not flooded and its gassing line is attached properly. This
problem likely requires repair service.
pH out of range
13 0 0
TIME:
DDD-HH:MM
← PREVIOUS ALARM
NEXT ALARM →
PRESS ENTER TO RESTORE THIS ALARM
Figure 7-7: Alarm Screen 13
This alarm means the current pH value is outside of the alarm limits set in
Process Control. Verify the following items to try to correct this problem:
n
n
n
n
n
n
n
n
n
n
n
n
n
n
n
Bulkhead IN port connected to GEX IN vent filter port?
Wet GEX Vent filter?
GEX Out clamp open? Gas lines to and from GEX pinched or plugged?
Off-gas port at the instrument’s back panel not obstructed or plugged?
CO2 gas line to the instrument and its gas supply pinched, disconnected,
closed?
CO2 gas supply properly set to deliver 15 ± 1 psi?
pH cable properly connected to the probe and bulkhead jack?
pH probe A/D reading within acceptable range? (See Section 6, pH Probe
Evaluation.)
Calibration of the pH probe fixes problem?
Calibration procedure being properly performed?
Circulation pump turning smoothly?
Bubbles in pH probe case?
Bubbles in the bioreactor(s) or in the IC?
Medium Dilution set high enough to sufficiently dilute lactate?
Base Addition attempted?
Biovest International, Inc.
Operations Manual for the ACUSYST-MAXIMIZER
P/N 700037-000 Rev. H
Page 7-5
Troubleshooting
DO out of range
14 0 0
TIME:
DDD-HH:MM
← PREVIOUS ALARM
NEXT ALARM →
PRESS ENTER TO RESTORE THIS ALARM
Figure 7-8: Alarm Screen 14
This alarm means the current DO value is outside of the alarm limits set in
Process Control. Verify the following items to try to correct the problem:
Bulkhead IN port connected to GEX IN vent filter port?
n Wet GEX Vent filter?
n
n
n
n
n
n
n
n
n
n
n
GEX Out clamp open?
Gas lines to and from the GEX pinched or plugged?
Off-gas port at the instrument’s back panel not obstructed or plugged?
DO cable properly connected to the probe and bulkhead jack?
DO probe A/D reading within acceptable range? (See Section 6, DO Probe
Evaluation.)
Calibration of the DO probe fixes problem?
Calibration procedure being properly performed?
Circulation pump turning smoothly?
Bubbles in pH probe case?
Integration Chamber vent filter wet and thereby creating an over-pressurized
system?
P/N 700037-000 Rev. H
Page 7-6
Biovest International, Inc.
Operations Manual for the ACUSYST-MAXIMIZER
Troubleshooting
System volume exceeded
15 0 0
TIME:
DDD-HH:MM
← PREVIOUS ALARM
NEXT ALARM →
PRESS ENTER TO RESTORE THIS ALARM
Figure 7-9: Alarm Screen 15
This alarm means the Expansion Chamber is approaching its maximum volume.
Take immediate action!
1.
2.
3.
4.
5.
Inspect the IC and EC chambers.
Press HOLD if either chamber is about to, or has, flooded.
If either chamber’s filter is about to become wet:
a) Close IC (Vent) clamp if the IC vent filter is in jeopardy.
b) Put a temporary clamp on the tubing between the Expansion Chamber and
its vent filter if the EC vent filter is in jeopardy.
c) Close EC RETURN clamp if the EC vent filter is in jeopardy.
c) Prevent these filters from getting wet! If this happens, the filter likely
must be replaced with a new, sterile filter. Do this aseptically!
If the filter is wet, disconnect its corresponding gassing line from the
bulkhead port to prevent (additional) medium from flowing into the
instrument! If this happens, the instrument may require service. Inspect the
IC or EC port for the presence of cell culture medium.
Drain IC chamber:
a) If HOLD was pressed, press 1 first
b) Override Outflow pump to maximum, 4230 ml/hr
c) Override Media pump to 0 ml/hr
d) Clear overrides when Outflow pump pumps air from IC chamber.
6. Drain EC chamber:
a) Remove medium via the Cell Removal line using syringes — or—
b) If IC chamber volume is OK:
• override Outflow pump to 4230 ml/hr
• connect EC gassing line to EC chamber and instrument
• override EC Cycling to Low
• clear overrides when EC volume is ~ 108 ml
Contact Biovest’s Account Services for technical assistance
Biovest International, Inc.
Operations Manual for the ACUSYST-MAXIMIZER
P/N 700037-000 Rev. H
Page 7-7
Troubleshooting
Verify the following items to try to correct the cause of the System Volume
Exceeded problem:
n Any clamps incorrectly open or closed?
n Any tubing pinched or plugged?
n Vent lines fully connected to the IC and EC chambers and bulkhead ports?
n Vent lines attached to the correct bulkheads, i.e., IC to IC and EC to EC?
n Any unintended pump overrides still active, particularly Outflow Pump?
n EC Chamber ultrasonics cable fully connected in its bulkhead jack?
n Outflow and Harvest bottles full of media or are their vent filters wet, which
could prevent removal of liquid from the flowpath?
P/N 700037-000 Rev. H
Page 7-8
Biovest International, Inc.
Operations Manual for the ACUSYST-MAXIMIZER
Troubleshooting
System volume low
16 0 0
TIME:
DDD-HH:MM
← PREVIOUS ALARM
NEXT ALARM →
PRESS ENTER TO RESTORE THIS ALARM
Figure 7-10: Alarm Screen 16
This alarm means the Expansion Chamber is below its minimum volume.
Take immediate action!
1.
If the Expansion Chamber is empty and/or the bioreactor is filled with air:
a) Disconnect the EC gassing line from EC bulkhead port.
b) On Monitor screen, if Rise is shown, go to step d).
c) On Monitor screen, if Fall is shown, disconnect IC gassing from IC
bulkhead port and connect it to EC bulkhead port.
d) Watch Integration Chamber volume and increase Media pump speed if
necessary to maintain ~ 1.5 inches of medium.
e) When Expansion chamber has ~ 108 ml, clear the overrides and connect
IC and EC gassing lines in their normal places.
f) Check the suggestions below and if EC chamber volumes drains again,
contact Biovest’s Account Services.
Verify the following items to try to correct the problem:
n
n
n
n
n
n
n
Any clamps incorrectly open or closed, particularly GEX Out?
Does the flowpath have any leaks, cracks, or loose tubing connections?
Gassing lines fully connected to IC and EC chambers and bulkhead ports?
Gassing lines attached to the correct bulkheads: IC to IC and EC to EC?
Medium pump segment properly loaded in the pump head? Is its pump
tubing segment leaking? Is its pump tubing segment kinked inside the pump
head?
Any unintended pump overrides still active, particularly Media Pump?
Is the Media supply empty? Its clamp closed? Its vent filter plugged? Its
tubing male/femal Luer connection loose?
Biovest International, Inc.
Operations Manual for the ACUSYST-MAXIMIZER
P/N 700037-000 Rev. H
Page 7-9
Troubleshooting
Printer fault
17 0 0
TIME:
DDD-HH:MM
← PREVIOUS ALARM
NEXT ALARM →
PRESS ENTER TO RESTORE THIS ALARM
Figure 7-11: Alarm Screen 17
This alarm means the printer is unable to print for a variety of reasons. Verify the
following items to try to correct the problem:
Printer offline or deselected?
n Printer out of paper?
n
Printer paper jammed?
n Printing head jammed or cannot move on its track?
n
Printer not available
18 0 0
TIME:
DDD-HH:MM
← PREVIOUS ALARM
NEXT ALARM →
PRESS ENTER TO RESTORE THIS ALARM
Figure 7-12: Alarm Screen 18
Note:
This alarm means the printer is not turned on, or the printer cable is not fully
connected to the printer and/or instrument.
More than one printer alarm usually occurs at the same time. To minimize
unnecessary printer alarms, disable the printer (SETUP screen) before
adjusting the printer functions or paper supply.
Printer timeout
19 0 0
TIME:
DDD-HH:MM
← PREVIOUS ALARM
NEXT ALARM →
PRESS ENTER TO RESTORE THIS ALARM
Figure 7-13: Alarm Screen 19
This alarm means attempts to send log information to the printer have failed. The
printer may need service.
P/N 700037-000 Rev. H
Page 7-10
Biovest International, Inc.
Operations Manual for the ACUSYST-MAXIMIZER
Troubleshooting
A/D convertor timeout
20 0 0
TIME:
DDD-HH:MM
← PREVIOUS ALARM
NEXT ALARM →
PRESS ENTER TO RESTORE THIS ALARM
Figure 7-14: Alarm Screen 20
This alarm means the monitor board, or possibly the control board, is faulty. This
problem likely requires repair service.
Pressure drop detected
21 0 0
TIME:
DDD-HH:MM
← PREVIOUS ALARM
NEXT ALARM →
PRESS ENTER TO RESTORE THIS ALARM
Figure 7-15: Alarm Screen 21
This alarm only occurs when the Pressurization Test fails (and not during an
active culture run). It indicates there is a leak large enough to cause a rapid loss of
pressure. This may happen during the pressurization test of the instrument, probe
case assemblies, or cultureware.
n
n
n
n
n
n
n
n
If EC leaked, the second number is > 0
If IC leaked, the third number is > 0
Verify that all connections are properly sealed on probe case assemblies
Gassing lines are firmly connected to the IC and EC bulkhead ports and the
probe case assemblies or cultureware
If tubing extension lines or othe items were added to the cultureware, do not
include them in a repeat of the Pressurization Test. If the test then passes, the
integrity tubing extension lines or other items should be checked.
Remove cable ties added to the pH and DO probe case assemblies and repeat
the Pressurization Test.
Re-check the tightness of the male Luer plugs on the cultureware and repeat
the Pressurization Test.
If the instrument Pressurization Test fails, the instrument likely needs repair
service.
Biovest International, Inc.
Operations Manual for the ACUSYST-MAXIMIZER
P/N 700037-000 Rev. H
Page 7-11
Troubleshooting
Printer buffer full
22 0 0
TIME:
DDD-HH:MM
← PREVIOUS ALARM
NEXT ALARM →
PRESS ENTER TO RESTORE THIS ALARM
Figure 7-16: Alarm Screen 22
This alarm means the instrument’s user interface buffer is unable to send
characters to the printer. Verify the following possible causes:
Printer power on?
n Printer online or selected?
n
Printer paper empty?
n Another reason the printer is offline?
n Printer cable fully connected to the printer and MAXIMIZER?
n If the alarm persists, call Account Services.
n
Printer busy
23 0 0
TIME:
DDD-HH:MM
← PREVIOUS ALARM
NEXT ALARM →
PRESS ENTER TO RESTORE THIS ALARM
Figure 7-17: Alarm Screen 23
This alarm means the printer is unable to receive information while it is in the
process of printing. Verify the following possible causes:
n
n
n
n
n
n
n
Printer power on?
Printer online or selected?
Printer paper empty?
Another reason the printer is offline?
Printer cable fully connected to the printer and MAXIMIZER?
Printing head jammed or cannot move on its track?
If the alarm persists, call Account Services.
P/N 700037-000 Rev. H
Page 7-12
Biovest International, Inc.
Operations Manual for the ACUSYST-MAXIMIZER
Troubleshooting
Invalid O2 Cal-O2 Value Unusable
24 0 0
TIME:
DDD-HH:MM
← PREVIOUS ALARM
NEXT ALARM →
PRESS ENTER TO RESTORE THIS ALARM
Figure 7-18: Alarm Screen 24
This alarm means the calibration value entered (data2) was zero, or the sampled
A/D count (data1) equaled zero. Ensure DO calibration is properly performed.
Gas out of range
25 0 0
TIME:
DDD-HH:MM
← PREVIOUS ALARM
NEXT ALARM →
PRESS ENTER TO RESTORE THIS ALARM
Figure 7-19: Alarm Screen 25
This alarm means the gas mixture number (1–14) is outside of the gas limits set
in Process Control. Verify the following items to try to correct the problem:
n
n
n
n
n
pH probe measuring accurately? If so, you may have to change the gas limit
setting in Process Control.
CO2 gas supply properly set to deliver 15 ± 1 psi?
Gas override active and setting the gas number outside the range?
Calibration of the pH probe fixes problem?
Calibration procedure being properly performed?
Biovest International, Inc.
Operations Manual for the ACUSYST-MAXIMIZER
P/N 700037-000 Rev. H
Page 7-13
Troubleshooting
Printer deselected
26 0 0
TIME:
DDD-HH:MM
← PREVIOUS ALARM
NEXT ALARM →
PRESS ENTER TO RESTORE THIS ALARM
Figure 7-20: Alarm Screen 26
This alarm means the printer is offline. Ensure printer is selected or on-line.
Check for "paper out" light on printer and jammed printer head.
EC error rate exceeded
27 0 0
TIME:
DDD-HH:MM
← PREVIOUS ALARM
NEXT ALARM →
PRESS ENTER TO RESTORE THIS ALARM
Figure 7-21: Alarm Screen 27
This alarm means the software is unable to measure a high percentage of valid
readings from the ultrasonics cable.
If this alarm occurs infrequently, it may be of little concern because it could be
caused by sudden vibration against the instrument (moving the instrument,
slamming the door) or by shaking the cultureware tray during cell removal or
other tasks.
If this alarm occurs frequently, verify the items below to try to correct the
problem. It is possible the chamber could drain or flood! Watch the Expansion
Chamber for a few Rise and Fall cycles to ensure its volume is properly
controlled and remains between the Low (~ 108 ml) and the High volume (~ 108
ml + Transfer Volume).
n
n
n
n
n
Cultureware tray in a level position in the incubator?
Repositioning cultureware tray resolves problem?
Ensure nothing is under cultureware tray
Cell debris or foam in the Expansion Chamber? Performing Cell Removal
Procedure resolves problem?
Ultrasonics cable fully connected to its bulkhead jack?
P/N 700037-000 Rev. H
Page 7-14
Biovest International, Inc.
Operations Manual for the ACUSYST-MAXIMIZER
Troubleshooting
pH probe out of range
31 0 0
TIME:
DDD-HH:MM
← PREVIOUS ALARM
NEXT ALARM →
PRESS ENTER TO RESTORE THIS ALARM
Figure 7-22: Alarm Screen 31
This alarm means the calibration procedure measured too large a difference
between the ideal pH probe value and the offline value. Verify the following
items to try to correct the problem:
n
Calibration procedure being properly performed?
n pH cable fully connected to the probe and its bulkhead jack?
n pH cable faulty?
n pH probe A/D reading within acceptable range? (See Section 6, pH Probe
Evaluation.)
n
Note:
Calibration of the pH probe fixes problem?
Because pH control is critical to the viability of a culture, this alarm is
extremely important. If you are unable to resolve the problem, control pH
manually by using Gas # overrides, periodically checking pH offline, and
adjusting Gas # as necessary. Otherwise, replace the pH cable or pH probe
or contact Account Services.
DO probe out of range
32 0 0
TIME:
DDD-HH:MM
← PREVIOUS ALARM
NEXT ALARM →
PRESS ENTER TO RESTORE THIS ALARM
Figure 7-23: Alarm Screen 32
This alarm means the calibration procedure measured too large a difference
between the ideal DO probe value and the offline value. Verify the following
items to try to correct the problem:
Calibration of the DO probe fixes problem?
n Calibration procedure being properly performed?
n DO cable fully connected to the probe and its bulkhead jack?
n DO probe A/D reading within acceptable range (See Section 6, DO Probe
Evaluation.)? If not, you must decide whether or not to replace the probe.
Contact Account Services for further details.
n
Biovest International, Inc.
Operations Manual for the ACUSYST-MAXIMIZER
P/N 700037-000 Rev. H
Page 7-15
Troubleshooting
Incubator over temperature shut down
33 0 0
TIME:
DDD-HH:MM
← PREVIOUS ALARM
NEXT ALARM →
PRESS ENTER TO RESTORE THIS ALARM
Figure 7-24: Alarm Screen 33
Note:
This alarm means the air temperature at the internal heater box has reached 65°C.
This condition activates the over-temperature relay to shut off the heater, but its
fan continues running to try to cool the system. The Monitor screen will show ‘>’
to the right of the temperature value until the heater box (incubator) temperature
cools down. The heater re-starts only after the heater box temperature falls to
45°C. If the ambient temperature is within specified values (Appendix A) and the
problem occurs, the instrument likely requires repair service.
The incubator temperature mentioned above is measured internally with a
separate temperature sensor. It should not be confused with the media
(flowpath) temperature that is measured with the cable connected to the
incubator bulkhead jack.
Power Interruption
34 0 0
TIME:
DDD-HH:MM
← PREVIOUS ALARM
NEXT ALARM →
PRESS ENTER TO RESTORE THIS ALARM
Figure 7-25: Alarm Screen 34
This alarm means the instrument has experienced a power outage, whether
intentional or unintentional.
Data1 shows the number of hours, and data2 shows the number of minutes that
the instrument was without power.
P/N 700037-000 Rev. H
Page 7-16
Biovest International, Inc.
Operations Manual for the ACUSYST-MAXIMIZER
Troubleshooting
I/O Recovery SUCCESSFUL
35 0 0
TIME:
DDD-HH:MM
← PREVIOUS ALARM
NEXT ALARM →
PRESS ENTER TO RESTORE THIS ALARM
Figure 7-26: Alarm Screen 35
This alarm means the main program could not communicate with one of the
secondary programs that was then followed by an electronic reset that did restore
communications. Data1 indicates which processor caused the error.
If this alarm occurs very infrequently, it may not be symptomatic of a problem. If
it occurs more frequently than that, the instrument should be serviced.
I/O Recovery FAILED
36 0 0
TIME:
DDD-HH:MM
← PREVIOUS ALARM
NEXT ALARM →
PRESS ENTER TO RESTORE THIS ALARM
Figure 7-27: Alarm Screen 36
This alarm means the main program could not communicate with one of the
secondary programs that was then followed by an electronic reset that did not
restore communications. Data1 indicates which processor caused the error.
If this alarm occurs very infrequently, it may not be symptomatic of a problem. If
it occurs more frequently than that, the instrument should be serviced.
Biovest International, Inc.
Operations Manual for the ACUSYST-MAXIMIZER
P/N 700037-000 Rev. H
Page 7-17
Troubleshooting
DIAgNOSTICS SCREENS
Some of the uses of these four screens are explained in Section 5 and 6. Although
these screens were meant for service personnel to check on the internal system
status, you may be asked to refer to certain information during discussions with
Account Services.
REMINDER: To view this series of screens, press START, then the hidden key
(empty space between the HOLD key and the ⬇). Advance through the series by
pressing ENTER.
P/N 700037-000 Rev. H
Page 7-18
Biovest International, Inc.
Operations Manual for the ACUSYST-MAXIMIZER
Troubleshooting
Incu 41.9
144
pH 7.30
Media 37.0
128
DO
144
Heat
3
P1 1111
Press ENTER for next screen
120
135
1111
Figure 7-28: Diagnostics Screen 0
The screen shown in Figure 7-28 is called Screen 0, and you have been taught
how to use the pH and DO fields to validate probes (Section 6). The fields
represent the following information:
Incu
Media
Heat
pH
DO
P1
Indicates the temperature of the air as it leaves the heater box.
Normal operating temperature is 39 – 55°C. Range of A/D reading
(second column) is 176 – 250.
Indicates the temperature of the media measured by the cultureware
probe. At 37°C the A/D reading (second column) is 147.
This indicates the number of 50 msec increments that the incubator
heating element is ON during a heater cycle time of 250 msec.
Completely OFF is shown as 0, while completely ON is shown as 5.
The first column displays the pH, while the second column displays
the A/D reading from the pH probe.
The first column displays the DO, while the second column displays
the A/D reading from the DO probe.
This is a collection of bits indicating various status values on the
monitor board. These are used for internal system communication
only.
Biovest International, Inc.
Operations Manual for the ACUSYST-MAXIMIZER
P/N 700037-000 Rev. H
Page 7-19
Troubleshooting
A/D
000
EC
EC Err 000
EC
IC Err 000
EC
Press ENTER for
Read
0000 IC Read 0000
Valid 0000 IC Valid 0000
Set
0000 IC Set
0000
next screen
Figure 7-29: Diagnostics Screen 1
The screen shown in Figure 7-29 is called Screen 1. The fields represent the
following information:
A/D
This indicates the A/D time out count and should always be zero.
IC Read
Disregard
IC Err
Disregard
EC Read These are the counts from the ultrasonics. Normal volume in the
Expansion Chamber during cycling (with default settings) is
108 – 178 ml. The corresponding counts are 64 – 96.
EC Err
This value indicates the number of faulty ultrasonic readings in a 30
second period and should always be less than 120.
EC Valid This value indicates the weighted valid reading from the ultrasonics.
If the ultrasonics are functioning properly, the EC Read and EC Valid
values will be within 2 A/D readings of each other.
IC Valid
Disregard
IC Set
Disregard
EC Set
P/N 700037-000 Rev. H
Page 7-20
This value indicates the last pressure setting that was calculated for
the Expansion Chamber during cycling operation. At 100 mmHg the
A/D reading should be 33.
Biovest International, Inc.
Operations Manual for the ACUSYST-MAXIMIZER
Troubleshooting
Disable
111 1111
IOA
1111 1111
Media Set
IOC
1111 1111
pH Set
Press ENTER for next screen
37.0
7.00
150
128
Figure 7-30: Diagnostics Screen 2
This screen is called Screen 2. The fields represent the following information:
Disable
IOA
This is a collection of bits indicating whether gas, temperature, and
EC control are enabled. These are for internal system communication
only.
These are a collection of bits that control the gas solenoids. bit0 =
CO2, bit1 = high air, bit2 = medium air, bit3 = low air (where 0 =
closed, 1 = open).
Media Set These indicate the media temperature setpoint and its corresponding
A/D reading. A medium temperature of 37.0° should have an A/D
reading of 150.
IOC
pH Set
These are a collection of bits that control the chamber pressurization
and venting valves. bit0 = IC gas solenoid, bit1 = IC vent solenoid,
bit2 = EC gas solenoid, bit3 = EC vent solenoid (where 0 = closed, 1
= open).
This indicates the pH setpoint and its corresponding A/D reading. A
pH value of 7.00 at 37°C should have an A/D reading of 128.
Biovest International, Inc.
Operations Manual for the ACUSYST-MAXIMIZER
P/N 700037-000 Rev. H
Page 7-21
Troubleshooting
EC DN Time
EC UP Time
15
15
EC LOW Setpoint
EC HI Setpoint
68
96
Press ENTER for next screen
Figure 7-31: Diagnostics Screen 3
This screen is called Screen 3. The fields represent the following information:
EC DN Time
EC UP Time
This is the time in minutes that the cycling control routine will
attempt to move EC fluid from the high setpoint to the low
setpoint. Default value = 15.
This is the time in minutes that the cycling control routine will
attempt to move EC fluid from the low setpoint to the high
setpoint. Default value = 15.
EC LOW and EC HIGH Setpoint
These are the A/D readings where EC cycling toggles from a
Rise phase to a Fall phase. The default values are 68 for LOW
Setpoint and 96 for HIGH Setpoint. They correspond to
Expansion Chamber volumes of 108 ml and 178 ml,
respectively.
P/N 700037-000 Rev. H
Page 7-22
Biovest International, Inc.
Operations Manual for the ACUSYST-MAXIMIZER
Troubleshooting
PROBLEMS wITH BIOLOgICAL PERFORMANCE
pH Control
Because pH is controlled by several factors, you may have to consider many
aspects of the culture to resolve problems with pH control. The following is a list
of major areas to examine. Contact Account Services for more details on pH
control.
CO2 gas supply properly set to deliver 15 ± 1 psi?
n Gas override active and setting the gas number outside the range?
n GEX Out clamp closed?
n Correct amount of bicarbonate added to the medium?
n
n
n
n
n
n
Medium should not include HEPES.
pH probe functioning properly? (See Section 6, pH Probe Evaluation.)
Also, has the pH probe been calibrated regularly?
If a base solution is attached to Factor 1, does its addition to the culture
cause changes in pH that are too great or too small? If so, you may need to
replace this solution with one that has a lower or higher concentration.
pH cable attached to the probe and bulkhead securely?
pH probe may require preventative maintenance. Refer to the manufacturer's
instructions that are provided with the probe.
Biovest International, Inc.
Operations Manual for the ACUSYST-MAXIMIZER
P/N 700037-000 Rev. H
Page 7-23
Troubleshooting
Product Secretion
Failure of a culture to attain a desired level of productivity may be caused by a
variety of factors. The following is a list of suggestions to consider if you find
yourself in this situation. Due to the many unknowns in cell culture, it is not a
comprehensive list, but Account Services personnel are prepared to discuss any
problem you may have.
n
n
n
n
n
n
Could there be problems with the product assay?
Are there problems with storage of harvested medium? Temperature, length
of storage, and pH should be considered.
Drastic changes in productivity suggest a significant change has occurred in
some aspect of process control. Changing the harvest rate or serum
concentration too severely are common sources of this type of problem.
Replacing serum-supplemented medium with serum-free (or similar) medium
too suddenly is another.
Changes in medium or serum lots might affect productivity due to differences
in quality. You may need to examine the medium preparation process and/or
quality control procedures.
Changes in productivity may be seen immediately after cells are removed
from the Expansion Chamber. The protocol used in this procedure may have
to be altered.
Harvest strategy may have to be changed to accommodate the nature of the
cells’ production process. For example, batch harvesting may need to be
compared to continuous harvesting. In addition, some metabolic parameter
(pH, DO) may need to be changed to enhance production.
P/N 700037-000 Rev. H
Page 7-24
Biovest International, Inc.
Operations Manual for the ACUSYST-MAXIMIZER
Troubleshooting
Contamination
Sources of contamination: Termination of a culture run due to contamination is
always a humbling experience. It is important to recognize the most likely
source(s) of such a problem because it (they) must be avoided in future runs.
Sometimes diagnosing the cause of contamination is simplified by observing
whether the problem is restricted to the ICS or ECS loop. Refer to any records of
autoclave cycles, validation of hoods and autoclaves, sterility tests, medium and
serum lots, quality control procedures and any timetable that shows when
sampling or bottle replacement is performed. Be honest about the history of
aseptic techniques used throughout the run.
Cultureware and instrument cleanup: Remove the flowpath as described on
page 6-90. Save the probe cables and gassing lines, and thoroughly clean the pH
and oxygen probe case assemblies. Replace the oxygen electrode membrane, and
add fresh electrolyte. The components of the probe holders can be soaked in
sodium hydroxide solution (0.1N) for 30 minutes to remove endotoxin residue,
then rinsed thoroughly in distilled water before they are washed with tissue
culture detergent.
Properly dispose of the contents of all bottles that were attached to the flowpath.
Bottles and cap assemblies may be treated like the probe holders with sodium
hydroxide solution. Vent filters for cap assemblies should be discarded as a
biohazard.
Disinfect the incubator, the outer surfaces of the MAXIMIZER cabinet and the
interior of the door. Avoid spilling any solutions on the circulation pump rotor, in
the bulkhead connections and in the incubator exhaust vent.
Biovest International, Inc.
Operations Manual for the ACUSYST-MAXIMIZER
P/N 700037-000 Rev. H
Page 7-25
Troubleshooting
HARDwARE AND CULTUREwARE
Pumps
Note:
Cultureware
To ensure optimum performance, the peristaltic pumps should be cleaned after
each culture run. Media spills and small pieces of worn pump tubing may be
trapped inside the plastic housing and should be removed. Wipe the interior of
each plastic shell with a cloth or paper towel soaked in disinfectant or alcohol.
Wipe the surface of the metal rollers with a cloth or paper towel soaked in
alcohol. Allow any moisture to evaporate before you re-assemble the pump head.
Each pump head requires two white, teflon washers. Replacements must be
installed before the next run. See Appendix B, Ordering Information.
Do not soak the pump head or rollers in alcohol because it will strip away the
necessary lubricant.
Each cultureware assembly is assigned a lot number which may be used to trace
defects specific to a certain build. This number is located on the left corner of the
tray (near the Outflow tubing). In addition, the shipping box for the cultureware
has a manufacturing number which identifies the sterilization lot. These numbers
should be recorded and used when any cultureware problem is brought to the
attention of Account Services.
P/N 700037-000 Rev. H
Page 7-26
Biovest International, Inc.
Operations Manual for the ACUSYST-MAXIMIZER
Appendix A - Specifications
ACUSYST-MAXIMIZER ® SPECIFICATIONS
Note:
FOR INDOOR USE ONLY
Instrument Dimensions
Width:
Depth:
Height:
Instrument weight
69.8 cm (27.5 inches)
66.0 cm (26.0 inches)
52.0 cm (20.5 inches) [door closed]
73.6 cm (29.0 inches) [door open]
54.5 kg (120 lb)
Operating Temperature
External (Ambient): 18 – 26°C (64–79°F)
Internal (Incubator: 24.1 – 45.8°C (75–114°F)
Electrical Requirements
P/N: 600052-000:
P/N: 600052-001:
P/N: 600052-002:
120 VAC, 4 amp, 60 Hz, 500 watts
100 VAC, 4 amp, 50 or 60 Hz, 500 watts
230 VAC, 2 amp, 50 or 60 Hz, 500 watts
CAUTION: Supply voltage fluctuation not to exceed ± 10% of nominal voltage
(Refer to Appendix B)
Note:
Biovest International’s printers require 120 VAC and 0.7 amps.
Backup Power Requirements (Instrument and Printer)
Main Fuse
Uninterruptible Power Supply (UPS), 500 watts, sine wave form
120VAC:
100VAC:
230VAC:
4 Amp 3AG Time Delay (SLO-BLO), 1⁄4 x 11⁄4 inch
4 Amp 3AG Time Delay (SLO-BLO), 1⁄4 x 11⁄4 inch
2 Amp Type T (SLO-BLO, need 2), Metric 5 x 20 mm
Biovest International, Inc.
Operations Manual for the ACUSYST-MAXIMIZER
P/N 700037-000 Rev. H
Page A-1
Appendix A - Specifications
Heater Box Fuse
(Not intended for replacement by Operator)
1.5 Amp 3AG Time Delay (SLO-BLO), 1⁄4 x 11⁄4 inch
Power Supply Fuse
(Not intended for replacement by Operator)
1.5 Amp 3AG Time Delay (SLO-BLO), 1⁄4 x 11⁄4 inch (230VAC units only)
Pollution Degree
II
Installation Category
Battery Type
II
Sanyo Lithium CR-2N, 3 Volt (MnO2) (Serviced by authorized personnel only)
gas Requirements
Necessary:
Backup (optional):
As Needed:
P/N 700037-000 Rev. H
Page A-2
100% Carbon Dioxide (medical grade), 15 psi (1 kg/cm2)
100% Air (medical grade), 15 psi (1 kg/cm2)
Outgas (biohazardous applications only), slight vacuum
Biovest International, Inc.
Operations Manual for the ACUSYST-MAXIMIZER
Appendix A - Specifications
Cultureware and Accessories
Disposable, pre-sterilized:
Reusable, non-sterile:
Approximate Flowpath Volumes
600058-215:
600058-221:
600068-215:
600068-221:
Flowpath with Pharmed pump tubing, bioreactor
gas exchanger, silicone tubing, Tygon tubing,
ultrasonics
Electrode (pH, DO, temperature), probe cases,
bottles, cap assemblies, vent filters, Tygon gassing
lines
IC + EC Circuit Volume = 570 ml
EC Circuit Volume = 230 ml (at low vol.)
EC Circuit Volume = 300 ml (at high vol. *)
IC + EC Circuit Volume = 615 ml
EC Circuit Volume = 275 ml (EC low vol.)
EC Circuit Volume = 345 ml (EC high vol. *)
IC + EC Circuit Volume = 680 ml
EC Circuit Volume = 340 ml (at low vol.)
EC Circuit Volume = 480 ml (at high vol. **)
IC + EC Circuit Volume = 770 ml
EC Circuit Volume = 430 ml (EC low vol.)
EC Circuit Volume = 570 ml (EC high vol. **)
* 70 ml transfer volume
**140 ml transfer volume
Biovest International, Inc.
Operations Manual for the ACUSYST-MAXIMIZER
P/N 700037-000 Rev. H
Page A-3
Appendix A - Specifications
Peristaltic Pump Rate Ranges
Process Control Pump Rates:
7016 Pump Heads
Outflow Pump
Media Pump
7014 Pump Heads
Factor 1 Pump
Factor 2 Pump
Factor 3 Pump
Harvest Pump
Range
Increment
0– 4320 ml/hr*
0 – 800 ml/hr
1 ml/hr
1 ml/hr
* Automated—no direct user input
Manual Override Pump Rates:
7016 Pump Heads
Outflow Pump
Media Pump
7014 Pump Heads
Factor 1 Pump
Factor 2 Pump
Factor 3 Pump
Harvest Pump
Fill/Flush Media Pump Rate:
Inoculation Outflow Pump Rate:
0 – 200
0 – 200
0 – 200
0 – 200
ml/hr*
ml/hr
ml/hr
ml/hr
0 – 4320 ml/hr
0 – 800 ml/hr
0 – 400
0 – 400
0 – 400
0 – 400
ml/hr
ml/hr
ml/hr
ml/hr
1 ml/hr
1 ml/hr
1 ml/hr
1 ml/hr
1 ml/hr
1 ml/hr
1 ml/hr
1 ml/hr
1 ml/hr
1 ml/hr
4320 ml/hr, automated
1000 ml/hr, automated
Circulation Pump Rate Range
0 – 1000 ml/min
1 ml/min
Note: Same range and increment for process control and manual override.
CAUTION: Maximum user-entered CP speed when using a single bioreactor cultureware
must be ≤ 500 ml/min to prevent excessive pressure, tubing disconnection,
severe media leak, and contamination. Using CP speeds
> 500 ml/min will void the cultureware’s warranty!
Note:
All pumps rotate counterclockwise only.
P/N 700037-000 Rev. H
Page A-4
Biovest International, Inc.
Operations Manual for the ACUSYST-MAXIMIZER
Appendix A - Specifications
EC RETURN
Schematic for 600058-xxx Cultureware Models
EC CHECK
VALVE BYPASS
CELL REMOVAL
EC CHECK
VALVE BYPASS
HARVEST
FACTOR PRIME
PRE BRX DO
IC
IC RETURN
gEX OUT
Intracapillary
Circuit
gEX IN
PH IN / LO
Extracapillary
Circuit
FACTOR 3
PH OUT / HI
DO IN
POST BRX DO
EC FLUSH IN
INOCULATE /
EC SAMPLE
IC SAMPLE
OUTFLOw
MEDIA
Factor 2
Factor 1
Biovest International, Inc.
Operations Manual for the ACUSYST-MAXIMIZER
P/N 700037-000 Rev. H
Page A-5
Appendix A - Specifications
EC RETURN
Schematic for 600068-xxx Cultureware Models
HARVEST
INOCULATE /
EC SAMPLE
FACTOR PRIME
PRE BRX DO
PH OUT / HI
IC
Intracapillary
Circuit
PH IN / LO
gEX OUT
IC RETURN
Extracapillary
Circuit
FACTOR 3
gEX IN
DO IN
POST BRX DO
EC FLUSH IN
EC CHECK
VALVE BYPASS
EC CHECK
VALVE BYPASS
CELL REMOVAL
IC SAMPLE
OUTFLOw
MEDIA
Factor 2
Factor 1
P/N 700037-000 Rev. H
Page A-6
Biovest International, Inc.
Operations Manual for the ACUSYST-MAXIMIZER
Appendix B - Ordering Information
These orderirng part numbers represent common items needed to operate the
ACUSYST-MAXIMIZER. Other miscellaneous items also are available, so if you
need something not on the list, please contact Biovest’s Account Services group.
Part Number
Description Of Part
600052-XXX
4190-000
600072-000
600095-000
600096-000
600096-001
ACUSYST-MAXIMIZER® Cell Culture System
-000 (120 VAC)
-001 (100 VAC)
-002 (230 VAC)
Printer Package (100 / 120 VAC)
ACUDATA™ Software Package
ACULINK-DATA LOg™ Base Unit
ACULINK-DATA LOg™ Complete (100 / 120 VAC)
ACULINK-DATA LOg™ Complete (230 VAC)
600058-215
600058-221
600068-215
600068-221
Single 1.5 m2 Bioreactor Flowpath
Single 2.1 m2 Bioreactor Flowpath
Double 1.5 m2 Bioreactor Flowpath
Double 2.1 m2 Bioreactor Flowpath
600305-000
600306-000
pH Probe, Sterile, Ready-for-Use, Single-Use
pH Probe Holder, Reusable (use with 600305-000 only)
103037-000
103047-000
401090-000
600298-000
600300-000
600301-000
pH Electrode, Non-sterile, Reusable
pH Electrode Storage Solution, 250 mL
pH Electrode Cable
pH Electrode Holder
pH probe Tubing Lines (spare set of two)
pH Electrode Holder O-rings, (spare set of three)
4192-001
102323-000
3923-000
5330-000
Oxygen Electrode Re-membrane Kit (replaces 4192-000)
Oxygen Electrode Electrolyte, 25 mL
Oxygen Electrode Cable
Oxygen Electrode Holder O-ring (spare, qty. 1)
Instrument and Accessories
Cultureware Options
Sterile pH Probe Items
Reusable pH Probe Items
Dissolved Oxygen Probe Items
Biovest International, Inc.
Operations Manual for the ACUSYST-MAXIMIZER
P/N 700037-000 Rev. H
Page B-1
Appendix B - Ordering Information
400831-000
600057-000
600054-000
Oxygen Electrode & Electrolyte
Oxygen Electrode Holder
DO Probe Tubing Lines (spare set of two)
600063-000
600063-001
600100-072
600101-072
In-line Media filters, Small (4, Individually packaged)
In-line Media filters, Large (4, Individually packaged)
1
⁄16˝ Sterile Tubing Extension, six feet long
1
⁄8˝ Sterile Tubing Extension, six feet long
Both extension lines are silicone and include:
• Male luer to connect to the cultureware
• Male and female luers to connect to the container
• Pinch clamp at the container connection end
Luer-Activated Valve (LAV) Kit, 15 each of:
• Sterile and Individually Packaged LAVs
• Polypropylene Luer Dust Covers (Sterilizable)
Miscellaneous Sterile Optional Items
600318-000
Reusable glass Bottles and Polypropylene Cap Assemblies
Bottles are borosilicate with polypropylene pouring ring, GL45 thread and
volume markings. Caps are polypropylene with two liquid ports (accept male luer
slip connection), one vent port (1825-000 filter purchased separately), and they
include internal silicone tubing to deliver or collect fluid. Each part number is a
package of four items.
600013-000
Media Bottle, 0.5 liter
600014-000
Media Bottle, 1.0 liter
600015-000
Media Bottle, 2.0 liters
600016-000
Media Bottle, 5.0 liters
600017-000
Media Bottle, 10.0 liters
600018-000
Delivery Cap Assembly, 0.5 liter
600019-000
Delivery Cap Assembly, 1.0 liter
600020-000
Delivery Cap Assembly, 2.0 liters
600021-000
Delivery Cap Assembly, 5.0 liters
600022-000
Delivery Cap Assembly, 10.0 liters
600023-000
Receiving Cap Assembly, use on any volume bottle
600061-000
Bottle & Cap Startup Package, includes:
• Six 1-liter bottles
• Four 10-liter bottles
• Two 10-liter delivery cap assemblies
• Four 1-liter delivery cap assemblies
P/N 700037-000 Rev. H
Page B-2
Biovest International, Inc.
Operations Manual for the ACUSYST-MAXIMIZER
Appendix B - Ordering Information
Cap Assembly for Plastic Bottles
• Four receiving cap assemblies (fit any size bottle)
• One box of vent filters (see 1825-000)
Cap is polypropylene size 53B with two liquid ports (accept male or female luer
lock connections) and one vent port (filter included). It is fully assembled,
including all necessary external and internal tubing, clamps and color-coded
labels to deliver or collect fluid. It is ready-for-use. User only needs to autoclavesterilize it.
400836-000
Delivery and Receiving Cap Assembly, (use with 2L Nalge
bottle)
Miscellaneous Spare Parts
1825-000
3033-000
3429-027
3675-019
4197-000
4198-000
100201-000
102064-000
400136-000
400137-240
400148-000
600156-000
Services
CALIB
SERV
SERV CON
400828-000
Sterilizable, Reusable Vent Filters (50 per box)
White Sterility Protector Vent Plug (each, minimum 10)
4 Amp Fuse (100 / 120 VAC units)
2 Amp Fuse (230 VAC units)
Size 14 Pump Head
Size 16 Pump Head
Urethane Pump Head Coupler
Pump Head White Teflon Washers (pack of 12)
Operations Manual
Circulation Temperature Probe
Circulation Pump Hardware
• Metal Screws (two)
• Plastic Threaded Knob (one)
Incubator Gassing Lines, one set:
• GEX IN, GEX OUT, IC, EC
Calibration (recommend annually)
Installation Qualification, Calibration, Operation Qual.
Service Contract (renewable, one-year coverage)
Preventive Maintenance (recommend every five years)
Biovest International, Inc.
Operations Manual for the ACUSYST-MAXIMIZER
P/N 700037-000 Rev. H
Page B-3
Appendix C - Relocation
If you need to move the ACUSYST-MAXIMIZER to another room or building, you
should consider the following recommendations before starting any cultures in
the instrument.
Preparing the MAXIMIZER
n
n
n
n
n
Turn off the power to the MAXIMIZER before disconnecting the power cord
from the wall outlet.
Remove any plastic cable ties from the CO2 gas line on the rear of the
instrument before disconnecting the tubing. Then, remove the tubing carefully
to avoid breaking the plastic fitting on the filter. Allow ample work space to
do this efficiently.
Be certain you have the cables for temperature probe, pH probe, and DO
probe, as well as the four Tygon gassing lines.
The gas filters on the rear of the MAXIMIZER do not have to be removed when
the instrument is moved. However, use caution to avoid damaging the filters
or their mounting brackets when you place the instrument on a cart and when
you move through narrow doorways. This also applies to the peristaltic
pumps on the front of the instrument.
Be certain you have the plastic screw cap and the 2 metal screws for the
circulation pump bracket.
Biovest International, Inc.
Operations Manual for the ACUSYST-MAXIMIZER
P/N 700037-000 Rev. H
Page C-1
Appendix C - Relocation
Instrument Lifting Instructions
The Instrument is quite heavy. Two people working together should be used to
lift and carry the instrument. Failure to follow these instructions could result in
injury to the person(s) lifting or carrying the instrument or damage to the
instrument. Handle with care. Do not lift the instrument by grasping the door or
gas filters. Grip sides and back of instrument only.
After the move ...
n
n
Note:
Have the instrument’s internal system serviced by a qualified technician. This
will ensure that transporting the MAXIMIZER has not damaged electrical or
mechanical components.
Be certain the electrical circuit in the new room will not be overloaded by the
installation of the MAXIMIZER, and that it contains the desired backup power
facility.
Contact Biovest International’s Account Services Department for additional
instructions if relocation requires shipping the MAXIMIZER over extended
distances. Biovest International recommends shipping the MAXIMIZER in
specially designed packaging only.
P/N 700037-000 Rev. H
Page C-2
Biovest International, Inc.
Operations Manual for the ACUSYST-MAXIMIZER
Appendix D - Metabolic Calculations
This section details calculations to determine uptake rates for glucose, glutamine,
and oxygen, and the production rates of lactate, ammonia, and secreted product.
The following information applies to all metabolic calculations:
e´ = e-rt/v
where: e = 2.7183
r = total inflow rate (ml/h)
t = t2 - t1 (rounded to the nearest integer)
t1 = time of previous sample
t2 = time of current sample
v = system volume:
Single bioreactor 1.5 m2 Flowpath = 570 ml
Double bioreactor 1.5 m2 Flowpath = 615 ml
medium rate = (medium volumet2 - medium volumet1) ÷ t
factor rate = (factor volumet2 - factor volumet1) ÷ t
glucose rate = (glucose volumet2 - glucose volumet1) ÷ t
serum rate = (serum volumet2 - serum volumet1) ÷ t
base rate = (base volumet2 - base volumet1) ÷ t
harvest rate = (harvest volumet2 - harvest volumet1) ÷ t
r = medium rate + factor rate + glucose rate + serum rate + base rate
Biovest International, Inc.
Operations Manual for the ACUSYST-MAXIMIZER
P/N 700037-000 Rev. H
Page D-1
Appendix D - Metabolic Calculations
The remainder of this section describes individual calculations for rates of
cellular metabolism and productivity.
gLUCOSE UPTAKE
The calculation of glucose uptake is based on the following equation:
Glucosein – r Glucoset2 – e´(Glucosein – r Glucosetl)
GUR =
where:
GUR
Glucoset2
Glucoset1
Gm
Gg
Gs
Gf
glucosein
LACTATE PRODUCTION
1 – e´
=
=
=
=
=
=
=
=
Glucose Uptake Rate (mg/h)
current glucose reading (mg/ml)
previous glucose reading (mg/ml)
conc of glucose in medium (mg/ml)
conc of glucose in glucose supplement (mg/ml)
conc of glucose in serum (mg/ml)
conc of glucose in factor (mg/ml)
(medium rate * Gm) + (glucose rate * Gg) +
(factor rate * Gf) + (serum rate * Gs)
The calculation of lactate production is based on the following equation:
LPR =
where:
P/N 700037-000 Rev. H
Page D-2
r (Lactatet2 – e´ Lactatetl)
1 – e´
LPR
= Lactate Production Rate (mg/h)
Lactatet1 = previous lactate reading (mg/ml)
Lactatet2 = current lactate reading (mg/ml)
Biovest International, Inc.
Operations Manual for the ACUSYST-MAXIMIZER
Appendix D - Metabolic Calculations
gLUTAMINE UPTAKE
The calculation of glutamine uptake is based on the following equation:
GltUR =
where:
Glutin – r Glucoset2 – e´(Glutin – r Gluttl)
GltUR
Gltm
Gltf
Glutaminein
Glutaminet1
Glutaminet2
AMMONIA PRODUCTION
1 – e´
=
=
=
=
=
=
Glutamine Uptake Rate (mmol/h)
glutamine concentration in medium (mmol/ml)
glutamine concentration in factor (mmol/ml)
(medium rate * Gltm) + (factor rate * Gltf) (mmol/h)
previous glutamine reading (mmol/ml)
current glutamine reading (mmol/ml)
The calculation of ammonia production is based on the following equation:
APR =
where:
r (Ammt2 – e´Ammtl)
1 – e´
APR = Ammonia Production Rate (mmol/h)
Ammt1 = previous ammonia reading (mmol/ml)
Ammt2 = current ammonia reading (mmol/ml)
Biovest International, Inc.
Operations Manual for the ACUSYST-MAXIMIZER
P/N 700037-000 Rev. H
Page D-3
Appendix D - Metabolic Calculations
OXYgEN UPTAKE
Some investigators prefer to use the oxygen update, or consumption rate (OUR)
as a measure of a culture’s metabolic status. The calculation of OUR is based on
the following equation:
CP (pO2out – pO2in)
OUR =
where:
OUR =
pO2(out)
pO2(in)
CP
k
k
=
=
=
=
PRODUCT FORMATION
Oxygen Uptake Rate (mmol/hr)
post-BRX DO (mmHg)
pre-BRX DO (mmHg)
circulation pump rate (ml/min)
oxygen solubility constant = 13,333 ml•mmHg•hr⁄mmol•min
The calculation of product formation is based on the following equation:
where:
P/N 700037-000 Rev. H
Page D-4
PFR = 24 x f x Product
PFR
= Product Formation Rate (units/day)
f
= Harvest pump flow rate (ml/h)
Product = current product concentration (units/ml)
Biovest International, Inc.
Operations Manual for the ACUSYST-MAXIMIZER
Appendix E - Loading Pump Heads
The following instructions show the proper technique to load tubing into the
peristatic pump heads. These techniques achieve the most consistent accuracy and
precision in actual pumping flow rates relative to the desired pumps speeds
entered in Process Control. This consistency applies to all of the six pumps
during a single production run, as well as, to these pumps for numerous
production runs over time.
These techniques also result in the liquid flowing through the pump heads in
the correct direction! Be especially careful when reviewing figure E-3!
1. Hold the pump in your left hand, the side with the slot in the roller assembly
facing up (Figure E-1).
Slot
Figure E-1: Front of peristaltic pump head
2. Remove the front half of the pump head.
3. Remove the roller assembly and examine both sides (Figure E-2). Assure that
the Teflon washers, one per axle, are clean and in-place. Replace the roller.
Biovest International, Inc.
Operations Manual for the ACUSYST-MAXIMIZER
P/N 700037-000 Rev. H
E-1
Appendix E - Loading Pump Heads
Tubing
Raceways
Teflon washers
(one on each side!)
Roller
Assembly
Figure E-2: Pump head roller assembly
4. With your right hand, position the pump segment as shown in Figure E-3. At
this point shift the pump segment counterclockwise from how you ultimately
want it when loaded because the loading process shifts the pump segment
clockwise.
Outflow from incubator
Media container
Factor 1 container
Factor 2 container
Factor 3 container
Harvest from incubator
Fluids In
Fluids Out
Outflow container
Media to incubator
Factor 1 to incubator
Factor 2 to incubator
Factor 3 to incubator
Harvest container
Figure E-3: Tubing placement
P/N 700037-000 Rev. H
E-2
Biovest International, Inc.
Operations Manual for the ACUSYST-MAXIMIZER
Appendix E - Loading Pump Heads
Note:
Note:
The orientation of each pump segment must be considered. Fluids enter the
pump head on the LEFT and exit on the RIGHT because all peristaltic
pumps on all ACUSYST systems operate counterclockwise. Outflow and
harvest are loaded in one orientation (to pump these fluids out) while all
other pumps are loaded in the opposite orientation (to pump these fluids in).
Wrap the tubing around the roller by following its existing curvature.
Tubing loaded against its existing curvature will have a tendency to twist
resulting in greater inaccuracies in flow rates and premature wear of the
pump tubing segment.
5. With your left thumb, securely hold the tubing in the right raceway. Be sure
that your hand is positioned as shown in the figures. Correct hand position is
essential to the successful completion of the procedure.
6. With your right hand, slide the pump key into the position as shown, so that it
presses down on the tubing (Figure E-4).
Figure E-4. Pump key position
NOTE:
7. Pushing the roller down with the key, turn the pump key clockwise. The key
presses approximately half of the tubing’s diameter in the pump casing. Turn
key until approximately the ten o’clock position, where there is a stop tab.
Hold the left pump segment loosely while you turn the pump key. As the
pump key positions the tubing in place, the left pump segment needs to be
able to slide under your left thumb.
Biovest International, Inc.
Operations Manual for the ACUSYST-MAXIMIZER
P/N 700037-000 Rev. H
E-3
Appendix E - Loading Pump Heads
8. Remove the pump key. Hold the pump tubing firmly in both raceways with
your left thumb as you also place the top half of the pump over the roller.
9. Push the two halves of the pump head together. The halves will ‘snap’
together and the edges will be flush when they are properly connected (Figure
E-5). If you are concerned that the two halves did not go together as expected,
take the pump head apart, remove the tubing, and start again at step 4.
Figure E-5: Completed pump head assembly
CAUTION: DO NOT pull, stretch, or otherwise manipulate the tubing inside the pump
in an effort to get the two pump head halves together in step 9. The tubing
will not return to its normal state after extended operation and the result will
be decreased flow rate and variances between pumps.
P/N 700037-000 Rev. H
E-4
Biovest International, Inc.
Operations Manual for the ACUSYST-MAXIMIZER
Appendix F - Maintenance
PROBE STORAgE
pH Probe
DO Probe
The reusable pH probe should be stored with its electrical cap attached and it’s tip
in pH storage solution, see Ordering Information in Appendix B. A storage bottle
is provided with the probe to hold the storage soluttion.
Store new disposable pH probes in the same manner as for cultureware.
The DO probe should be stored with its electrical cap attached and the plastic cap
and sponge covering its membrane tip. Store the probe vertically with the tip
downward. Leave the electrolyte in the membrane cartridge if the probe will be
used in the next ~6 months. If storage time will be longer, store the probe without
electrolyte in the membrane cartridge.
The DO probe requires replacement parts to work properly over many years of
service. The replacement parts are provided in a Re-membrane Kit, see Ordering
Information in Appendix B. Usage information is in DO Probe Evaluation in
chapter 6, Operating Procedures.
Other considerations for pH and DO probes:
n Aggressive cleaning of the reusable pH probe and the DO probe is generally
not necessary. Rinsing these probes with water at the end of the production
run is usually sufficient.
n Store them at room temperature.
n Do not store them in a room with a high relative humidity.
Biovest International, Inc.
Operations Manual for the ACUSYST-MAXIMIZER
P/N 700037-000 Rev. H
Page F-1
Appendix F - Maintenance
PUMP HEADS
Pump heads routinely accumulate small pieces of tubing debris during production
runs. This debris must be cleaned at the end of each production run.
Pump heads require two white teflon washers. They wear out over time. Replace
them if they are worn or missing, see Ordering Information in Appendix B.
CLEANINg
Pump heads typically last for many years of service. However, if the metal roller
shows signs of wear or doesn’t revolve freely in the pump head, replace the pump
head, see Ordering Information in Appendix B.
Use a gentle detergent solution to clean the cabinet. Do NOT spray liquid on the
electrical connections and keypad (and cabinet openings!) to prevent liquid from
entering into the cabinet.
Clean any cell culture medium spill in the incubator. Use caution to ensure
medium — or any other liquid — does NOT enter the cabinet via the opening for
the circulation pump motor!
P/N 700337-000 Rev. H
Page F-2
Biovest International, Inc.
Operations Manual for the ACUSYST-MAXIMIZER
Appendix F - Maintenance
ACUSYST ® INSTRUMENT SERVICE
Biovest offers the following validation and defined maintenance services to
facilitate the use of your ACUSYST system in a Quality System Regulation
environment. These services also help to keep its operation as trouble-free as
possible and to minimize unplanned downtime and disruptions to manufacturing
operations.
Installation qualification / Operational qualification
Calibration
IQ/OQ validation service is optional with a new instrument purchase. Validation
can be performed before the instrument’s first use, at a later time, and whenever it
is relocated. IQ/OQ includes Calibration.
Biovest International specifies annual calibration of all ACUSYST systems.
Adherence to the schedule facilitates consistent, optimal manufacturing.
Calibration returns the instrument’s electrical and mechanical systems to
Biovest’s factory standards.
Preventive Maintenance
Biovest International specifies a five-year interval for preventive maintenance on
all ACUSYST systems. The purpose of preventive maintenance is to minimize the
risk that the system’s operation will fail and prematurely end a production run,
which could further delay future production scheduling. Preventive maintenance
replaces all wearable components of the system and includes calibration.
Full Service Contract
Biovest International offers a renewable, annual service contract to ensure the
instrument is maintained in normal working order by covering all parts, labor,
and an amount of travel expense for the contract year.
Biovest International, Inc.
Operations Manual for the ACUSYST-MAXIMIZER
P/N 700037-000 Rev. H
Page F-3
Glossary
ACUSYST
Bioreactor
BRX
Automated Culture System.
Polycarbonate case containing thousands of hollow fibers where
media is exchanged and a cell culture grows.
See Bioreactor.
Bulkhead
Connection panel located near the top inside of the incubator.
Circulation Pump
Bellows pump which circulates media throughout the IC
flowpath.
Cap Assembly
Clamp
Cultureware
Expansion Chamber
EC
EC Cycling
ECS
Expansion Circuit (EC)
Extracapillary Space
(ECS)
Factor
Biovest International’s patented vented screw-cap for glass
bottles. May be used for feed or receiving bottles.
Device which restricts flow through tubing.
The disposable and non-disposable components of the flowpath
and its associated sensors, cables, and tubing.
The fluid reservoir in the Expansion Circuit.
See Expansion Circuit.
Ultrafiltrative movement of media through the bioreactor fibers
from the IC to the EC. One cycle consists of an EC Rise and an
EC Fall.
See Extracapillary Space.
The portion of the flowpath that includes the outside of the fibers
in the bioreactors, the Expansion Chamber and the associated
tubing.
The space in the bioreactor outside of the hollow fibers where
cells are grown (part of the Expansion Circuit). Can also be used
to refer to the volume in the bioreactor where the cells are grown.
A supplement, or addition, to a growth medium. This may be
serum, insulin, transferrin, or other components typically added to
the ECS or ICS.
tBiovest International, Inc.
Operations Manual for the ACUSYST-MAXIMIZER
P/N 700037-000 Rev H
g-1
Glossary
Flowpath
All components of the EC and IC; see Cultureware.
GEX
See Gas Exchange Cartridge.
Gas Exchange
Cartridge
Harvest
Hollow Fibers
IC
ICS
Integration Chamber
Integration Circuit
Intracapillary Space
(ICS)
LCD
Medium Dilution
MWCO
Outflow
P/N 700037-000 Rev. H
g-2
The cartridge in the cultureware which is responsible for
the introduction of gases (CO2 and O2) into the media. Also
known as an oxygenator.
The process of collecting media containing cell product.
or
The media which contains the cell product.
The thousands of porous hydrophilic tubes within a bioreactor.
They permit exchange of nutrients and wastes and serve as
growth substrate for cultured cells.
See Integration Circuit.
See Intracapillary Space.
The media reservoir for the Integration Circuit.
The portion of the flowpath which includes the inside of the
fibers, the integration chamber and associated tubing. The
Integration Circuit is separated from the Expansion Circuit by the
walls of the hollow fibers.
The volume inside of the fibers of the bioreactor.
Liquid crystal display at the top of the control panel. Used to
show all of the user interface screens.
The process of removing high levels of waste or raising the pH by
increasing the medium flow rate.
Molecular weight cutoff, measured in daltons. Refers to the pore
size of the hollow fibers.
Effluent from the IC, media containing metabolic by-products
which are small enough to pass through the pores of the fibers.
Biovest International, Inc.
Operations Manual for the ACUSYST-MAXIMIZER
Glossary
Oxygenator
See Gas Exchange Cartridge.
Pre-sample
The portion of the media that is removed before the sample to be
analyzed. The pre-sample contains media which may not be
representative of that which is in the culture.
Peristaltic Pump
Pump Head
Sample
Sample Port
Setpoint
Tubing Raceway
Vent Filters
The metal and plastic pumps which move fluid into and out of the
flowpath for media, factor, harvest, and outflow.
The plastic portion of the peristaltic pump which encloses the
pump segment of the tubing.
The media removed from the flowpath for metabolic or chemical
analysis.
A controlled opening in the flowpath which permits removal of
media for analysis. A sample port may end in a female Luer-Lok
fitting or a septum.
The value of a given metabolic parameter (pH, temperature)
which is to be maintained by the software.
A grooved plastic panel used for routing tubing into the incubator
and refrigerator.
Either the filters used for introducing gas into the flowpath (to the
Integration and Expansion Chambers) or the hydrophobic 0.2
micron pore filter (Acrodisc) on the cap assemblies which prevent
pressure buildup.
tBiovest International, Inc.
Operations Manual for the ACUSYST-MAXIMIZER
P/N 700037-000 Rev H
g-3