1
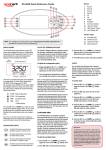
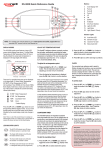
Contents
Overview ........................................................................................................... 3
Keypad Overview ............................................................................................. 3
SmartSTREAM Stereo Operation ........................................................................... 4
Power On/Off .................................................................................................. 4
Touchpad Key Assignments ............................................................................... 4
Key Press Operations ..................................................................................... 4
Single Key Functions ..................................................................................... 4
Hold & Tap Key Functions............................................................................... 5
Bluetooth ........................................................................................................ 6
Bluetooth Indicator LED ................................................................................. 6
Pairing ......................................................................................................... 6
Reconnect a paired device .............................................................................. 6
Unpair / Disconnect Bluetooth Connection ........................................................ 7
Volume Control................................................................................................ 7
Loudness ..................................................................................................... 8
Audio Input Sources ......................................................................................... 8
EEPROM (non volatile) Memory.......................................................................... 8
Reset to Factory Defaults ............................................................................... 8
SmartSTREAM WiFi Module .................................................................................. 9
SpaLINK App Overview........................................................................................ 9
Installing the SpaLINK App on your smart device ................................................. 9
Register a User Account .................................................................................... 9
Configure your Spa/WiFi module .......................................................................11
Spa List Screen ..............................................................................................17
Online/Offline Spas ......................................................................................17
Edit Spa List ................................................................................................18
Troubleshooting Spa/WiFi Module Configuration ..................................................18
SV WiFi network not showing in smart device WiFi List .....................................19
Legal Information ..............................................................................................20
V.1409A
Page | 2
Overview
The SV SmartSTREAM controller is an all in one, purpose built, high definition sound system for
your spa with Bluetooth® connectivity that also includes a WiFi module for remote access
control of your SV Series spa control. The controller has been designed from the ground up
specifically for spa pool applications and built to withstand the high ambient temperatures and
the humid/wet environment the unit may be exposed to.
The SmartSTREAM controller contains an advanced high efficiency MOSFET four channel 50W
amplifier module. This is used to drive four (4) x full range speakers or transducer speakers,
dependant on the spa manufacturer’s choice. In addition the unit also contains a mono 150W
channel amplifier used to drive a subwoofer (if fitted). The Bluetooth module receives audio
stream direct from your smart device (phone/tablet) and three (3) x auxiliary audio input
sources are provided to enable audio connection to a TV/DVD/iPod Dock/MP3 player (if fitted).
At the heart of the SmartSTREAM is a powerful audio processor responsible for audio source
switching and allowing complete control over volume, fader, balance, treble, midrange, bass,
subwoofer levels and sub frequency adjustments.
The SmartSTREAM controller can operate as a standalone stereo system for your spa or be
connected via a data cable to a SpaNET SV Series spa control. When connected to a SpaNET SV
Series spa control the SmartSTREAM’s WiFi module allows remote control of the SV Series spa
control via the Internet. Users can use an App on their smart device (phone, tablet) to remotely
connect to and control their spa pool. This is ideal for holiday homes or commercial use. The
WiFi module is connected to an external 5dB antenna mounted on the SmartSTREAM enclosure
using a SMA connector. Should the user wish to strengthen their WiFi reception a SMA
extension cable could be used to enable the antenna to be mounted external to the spa cabinet,
or a stronger powered antenna can easily be connected to the SMA connector directly.
Keypad Overview
Volume UP
(Adjustment UP)
Play / Pause
Mute
Audio Source Select
(Bluetooth Adjust)
Power On/Off
Bluetooth Indicator LED
On Steady: Bluetooth connected
Flashing: Waiting for connection
Off: Source other than
Bluetooth connected
Auxiliary Audio
Input Source
Indicator LEDs
Volume DOWN
(Adjustment DOWN)
V.1409A
Skip Track
PREVIOUS
Skip Track
NEXT
Page | 3
SmartSTREAM Stereo Operation
Power On/Off
Press and hold the Power On/Off button for 4 seconds to turn the power ON or OFF.
Touchpad Key Assignments
Key Press Operations
There are two key press operations as follows.
Single key press – the key is pressed and released. The function operates when the key is
released.
Hold and tap – the hold button is held down and the tap key is pressed. Each release of the
tap key operates the function.
Single Key Functions
FUNCTION
Power (on /off)
Volume (+)
Volume (-)
Play / Pause
Track (-)
Track (+)
Mute
Source (Mode)
V.1409A
KEY
1
2
3
4
5
7
6
8
NOTES
Press & hold for 4 seconds to turn on or off
Increases amplifier volume
Decreases amplifier volume
Works with Bluetooth source only
Works with Bluetooth source only
Works with Bluetooth source only
Mutes amplifier
Select input audio source 1 to 4
• 4 = Bluetooth
• Each press steps to the next source
• A chirp sound is produced to reflect the
source. i.e. 1 chirp = source 1, 4 chirps =
source 4.
Page | 4
Hold & Tap Key Functions
FUNCTION
HOLD KEY
TAP KEY
Bluetooth Connect
Bluetooth Disconnect
Bluetooth Volume (+)
Bluetooth Volume (–)
Loudness (on/off)
8
8
8
8
1
6
7
2
3
6
Attempts to reconnect to last connected device
Kill current Bluetooth connection
Increases Bluetooth module volume
Decreases Bluetooth module volume
Treble (+)
Treble (–)
Midrange (+)
Midrange (–)
Bass (+)
Bass (–)
Subwoofer (+)
Subwoofer (–)
Subwoofer frequency
4
4
5
5
6
6
7
7
1
2
3
2
3
2
3
2
3
7
Increases audio processor treble filter
Decreases audio processor treble filter
Increases audio processor midrange filter
Decreases audio processor midrange filter
Increases audio processor bass filter
Decreases audio processor bass filter
Increases audio processor subwoofer gain
Decreases audio processor subwoofer gain
Select subwoofer cut off frequency 1 to 4
• 1 = Flat (no cut off)
• 2 = 80Hz
• 3 = 120Hz
• 4 = 160Hz
• Each press steps to the next setting
A chirp sound is produced to reflect the setting
i.e. 1 chirp = flat, 4 chirps = 160Hz
Fader (+)
Fader (–)
Balance (+)
Balance (–)
1
1
1
1
2
3
4
5
Fades audio output to front speakers
Fades audio output to rear speakers
Balances audio output to left speakers
Balances audio output to right speakers
Factory reset
1
3&5
V.1409A
NOTES
Low beep = off, high beep = on
Reset all sound settings and levels to default
* Press all three buttons to perform reset
Page | 5
Bluetooth
The SmartSTREAM stereo system has been principally designed for streaming audio from any
Bluetooth compatible device. By default when the unit is powered ON it will be in Bluetooth
mode and will attempt to connect to the last used Bluetooth device. If the last used Bluetooth
device is available it will automatically connect to it and the indicator LED will turn solid green
indicating a successful Bluetooth connection. However if a Bluetooth device has not been paired
before, or the last used Bluetooth device is unavailable, the unit will remain waiting for a
Bluetooth connection and the indicator LED will be flashing green until a connection is made.
Bluetooth Indicator LED
The Bluetooth indicator LED easily identifies the status of the Bluetooth module:
LED
STATUS
On Steady
Flashing
Off
Bluetooth connected successfully and selected as audio source
Bluetooth waiting for connection and selected as audio source
Audio source other than Bluetooth selected or unit powered off
Pairing
The Bluetooth module will follow the naming format of “SpaNET SV-AMP-XXXX” where XXXX is
the last four digits of the Bluetooth module’s serial number. This name appears on the smart
device (phone/tablet/PC) list of Bluetooth devices to connect to.
1) Ensure the SmartSTREAM system has Bluetooth mode selected with the Bluetooth
indicator LED flashing
2) Search for Bluetooth devices from your smart device (phone/tablet/PC)
3) Select the SpaNET SV-AMP-XXXX device from the list to pair with it (Note: no pin is
required)
4) Your smart device should automatically pair with the SmartSTREAM module
Once paired the SmartSTREAM keypad can be used to control Bluetooth functions such as
volume adjustment, skip track, play/pause, connect, disconnect.
NOTE: The Bluetooth module produces its own beeps/tones when adjustments are made.
(These are most noticeable when the module makes or loses the Bluetooth connection.)
Reconnect a paired device
Once a particular device has been paired to the SmartSTREAM system the Bluetooth module will
always attempt to reconnect to that same device. If the Bluetooth signal has been lost/dropped
by taking the paired device out of range, or if the SmartSTREAM system has been powered on
before the last used device was available you can force the Bluetooth module to reconnect by
using the Hold & Tap function. Hold MODE (key 8) and Tap MUTE (key 6).
HOLD
V.1409A
+ TAP
Page | 6
Unpair / Disconnect Bluetooth Connection
If you wish to unpair/disconnect the current Bluetooth connection so that a different smart
device can be paired use the Hold & Tap function. Hold MODE (key 8) and Tap SKIP TRACK +
(key 7) to unpair the connection.
HOLD
+ TAP
Volume Control
Audio volume is a combination of the audio source volume (smart device/TV/DVD/MP3) times
the SmartSTREAM amplifier’s volume. Where Bluetooth is the audio source, in addition the
Bluetooth module inside the SmartSTREAM controller also contains its own volume control. All
three volume levels need to be considered when controlling overall volume of the SmartSTREAM
stereo system.
Smart Device
Volume
Bluetooth
Module
Volume
SmartSTREAM
Amplifier
Volume
For best audio quality both the audio source (smart device/TV/DVD/MP3) and Bluetooth module
volumes should be set to maximum and the SmartSTREAM amplifier’s volume adjusted to suit.
This allows the amplifier to amplify more signal than noise producing the best audio quality.
DEVICE
HOW TO ADJUST VOLUME
Smart Device
Volume adjusted on the smart device itself (recommend setting to maximum)
Bluetooth Module
Adjusted via SmartSTREAM keypad using Hold & Tap function. Hold (key 8) and Tap
(keys 2 or 3) to increase or decrease volume (recommend setting to maximum)
NOTE: A beep will sound when volume has reached its maximum level
SmartSTREAM
Amplifier
Adjusted via single press Volume(+) and Volume(–) keys on the SmartSTREAM
keypad. NOTE: A beep will sound when volume has reached its maximum level
Bluetooth Module Volume Adjustment (Increase/Decrease)
HOLD
+ TAP
HOLD
+ TAP
NOTE: When a Bluetooth connection is established and music is streamed for the first time the
SmartSTREAM system will automatically increase the Bluetooth module volume to maximum. However if
one device is unpaired and a different device is paired the Bluetooth module volume will reset to the
minimum volume level. Each time a new device is paired it is best practice to check the Bluetooth module
volume is set to the maximum level.
V.1409A
Page | 7
Loudness
The maximum volume can be boosted by activating the loudness feature via the keypad. When
loudness is turned on certain frequencies are boosted, particularly the treble. Whilst the overall
volume will be increased the general sound quality will become thinner and not as rich. For best
audio quality and richness of sound the Loudness feature should be left off. To toggle Loudness
on/off use the Hold & Tap function. Hold POWER (key 1) and Tap MUTE (key 6).
HOLD
+ TAP
Audio Input Sources
There are four (4) x audio input sources, one being the Bluetooth source, and three (3) x other
auxiliary audio input sources available for connection to a TV, DVD, iPod Dock or MP3 player (if
fitted). The auxiliary audio sources connect to the SmartSTREAM system using 3.5mm Stereo
audio jacks. To select a different audio source single key press MODE (key 8). Each key press
steps to the next input source. There are three (3) x indicator LEDs on the SmartSTREAM
keypad (labelled 1, 2, 3) which will illuminate with a steady green light to identify which audio
source is currently selected. There is a fourth indicator LED for the Bluetooth source (labelled by
the Bluetooth symbol). The Bluetooth indicator LED will either be flashing or on steady
depending on Bluetooth status (refer Bluetooth section of this user manual for further details).
NOTE: The last used audio source will be remembered when the SmartSTREAM is powered OFF
and used when the system is next powered ON
EEPROM (non volatile) Memory
All SmartSTREAM system settings (audio source, volumes, fader, balance, treble, midrange,
bass and subwoofer levels/frequency) are stored in non volatile memory (EEPROM) so that the
settings are remembered when the system is powered OFF. There is no need to adjust the
settings when powered is restored unless desired.
Reset to Factory Defaults
The SmartSTREAM system has been preset to provide optimal sound quality for most transducer
speakers and subwoofers. In some instances users may experiment with the sound levels and
find the sound quality has become undesirable. To reset all settings to factory defaults press the
following three key combination: POWER (key 1) + VOLUME(-) (key 3) + SKIP(-) (key 5)
A double chirp sound will be produced to acknowledge the factory reset was carried out.
Factory Reset Key Combination
+
V.1409A
+
Page | 8
SmartSTREAM WiFi Module
The WiFi module within the SmartSTREAM controller is independent to the stereo system. The
SmartSTREAM controller can be used for its WiFi feature exclusively, it can be used for its
Stereo system exclusively, or it can be used for both stereo system and WiFi functionality. Once
configured the WiFi module enables remote access to a SpaNET SV Series spa control via the
Internet using our SpaNET SpaLINK smart device app.
The SpaNET WiFi module requires an active Internet connection via a wireless router to operate.
To be able to access your spa from anywhere at any time the Internet connection/router must
remain powered on at all times. The stronger the WiFi signal to the spa area the faster the app
will respond. In some situations, dependant on the location and proximity of the spa pool and
wireless router, the WiFi signal may need to be boosted by relocating your wireless router or
installing a WiFi range extender.
SpaLINK App Overview
The SpaLINK app allows you to connect to, and take control of your SV Series equipped spa,
locally or remotely via a WiFi, 3G or 4G network, providing access to your spa from any location
at any time. Your Apple® or Android™ smart device becomes a wireless remote for your spa
enabling complete control over all spa accessories including pumps, air blowers, and LED spa
lights and lighting effects.
In addition the app provides total control over every possible spa configuration setting. There
are no shortened menus or minimal access to limited settings, the SpaLINK app allows complete
adjustment of all spa control settings as if you were standing in front of the spa.
Installing the SpaLINK App on your smart device
Download and install our app from the App Store℠ for iOS devices.
Download and install our app from the Google Play™ Store for Android devices.
Our app can be found by searching for “Spanet SpaLink”
Register a User Account
Once you have downloaded and installed the SpaLINK app, before your spa and WiFi module
can be configured you must first register a user account with SpaNET. Your user account is the
portal between the smart device app and your spa. It provides a secure gateway to login and
access your spa and allows multiple SV controllers to be configured to the one user account,
should you be fortunate enough to own a dual zone swim spa or more than one spa. Your smart
device must have a WiFi, 3G or 4G Internet connection to complete the registration.
V.1409A
Page | 9
Step 1: Open the app and click REGISTER
Step 2: Enter your details into the registration
form
Your name
Create username for login
Your email address
Create password for login
Confirm password for login
Step 3: Review your registration details then
click REGISTER to proceed
Complete: If your registration was successful
the app will automatically login with your
details and proceed to the spa list page ready
for you to add your spa to your account.
NOTE: Shortly after completing your
registration you will receive an email
confirming your login details
V.1409A
Page | 10
NOTES FOR REGISTERING A USER ACCOUNT:
1) If your chosen username has already been taken a “MEMBER EXISTS” error will appear once you
click REGISTER. Enter a different username and try again.
2) Only one user account can be registered to an email address. If you attempt to register multiple
accounts with the same email address a “MEMBER EXISTS” error will appear.
3) The chosen username and email address must not have been used before for successful
registration with the SpaNET server.
4) If you have made a mistake or are experiencing difficulties with your user account registration, or
wish to change your details please email [email protected]
Configure your Spa/WiFi module
Once you have registered a user account with SpaNET you are now ready to configure your spa.
The configuration process is a once off setup event that programs the SpaNET WiFi module with
your wireless router’s login details (SSID and password) to provide Internet access to your spa.
Unless your router login details change (i.e. you change ISP) you will never need to run the
setup procedure again. The login details will be stored in the SpaNET WiFi module and will be
remembered even if power to the spa or router is turned OFF. To complete the process require:
a) An active WiFi, 3G or 4G Internet connection on your smart device
b) Your login credentials for your wireless router (SSID name and password)
c) Router left in default WPA/WPA2 security encryption. DO NOT use WEP encryption.
Step 1: On your spa side keypad press and
hold the UP + DOWN buttons simultaneously
until the display shows [MODE]
Step 2: Press the DOWN button multiple times
until display shows [WIFI]
Step 3: Press the OK button and the display
will show [HOT]
Step 4: Press the OK button to activate the Hot
Spot mode. The display will briefly show [WAIT]
The above steps place the SpaNET WiFi module into Hot Spot Mode (HOT) enabling your smart
device to connect directly to the WiFi module for configuration.
V.1409A
Page | 11
Step 5: If you have just completed your user
account registration your app will already be
logged in at the spa list screen (refer below)
Step 6: Press on NEW DEVICE to add your spa
to your spa list
If you do not see the above screen, please
open the app and login with your username
and password entered during registration.
Step 7: Your display should change to the
following setup screen (refer below).
V.1409A
Step 7a: Press your smart device home button
to return to your icons, and navigate to your
WiFi settings screen.
Page | 12
Step 8: Select and connect to the SV WiFi
network denoted by your SV controller’s serial
number. No password is required to connect.
Step 9: Once connected to the SV WiFi
network go back and re-enter the SpaLINK
app. Press on X to close the setup instructions.
Wait for a moment to ensure the SV network is
connected properly. If no SV network is found
in the list repeat steps 1 to 4 on the spa side
keypad to reactivate HOT mode and try again.
Step 10: Press on SETUP to begin a WiFi scan
to locate your home wireless network. A
spinning wait icon will appear whilst the scan is
taking place. Wait for the scan to complete
before pressing anything else.
Step 11: Select your wireless network for the
spa to connect to for Internet access (ensure
signal strength is -80db or higher).
NOTE: The WiFi list may display neighboring
wireless networks in your area. Select the
SSID name that matches your home router.
V.1409A
Page | 13
The wireless network list displays a list of the wireless network SSIDs discovered in proximity to
the spa after the WiFi scan. The signal strength of each network is detailed on the right hand
side in decibels (db). A basic guide to WiFi signals strengths is as follows:
-120db is unacceptable
-100db is poor, often unstable but usable
-80db is acceptable
-70db is decent
-60db is good
-40db is excellent
WiFi signal strength is particularly important for reliable communication and operation of the
app. The signal strength of your wireless network should be no less than -80db for
reliable operation. If the signal strength is not acceptable you may need to relocate your
wireless router closer to the spa, install a WiFi range extender to boost the signal, or install a
higher powered antenna to the SpaNET SmartSTREAM module underneath your spa.
If your wireless network SSID is not discovered you will need to carry out steps to improve the
signal strength and perform another WiFi scan. Simply press the refresh button at the top of the
screen to re-scan for WiFi networks.
Refresh WiFi Scan
Wireless SSID
V.1409A
Signal Strength
Page | 14
Step 12: Enter the password for your
wireless network and press OK.
Notes on Wireless Network Password
Password is case sensitive. You must take
particular care when entering the password
for your wireless network to ensure it is
correct.
The app is unable to confirm your wireless
network password is correct. The password
you enter will be programmed directly into
the SpaNET WiFi module for connecting to
your wireless router.
If you type the password incorrectly the
SpaNET WiFi module will be unable to login
and connect to your wireless router and the
whole setup procedure will need to be run
again.
Step 13: Press OK to confirm the wireless
network settings (SSID & Password) have
been saved to the SpaNET WiFi module
V.1409A
Step 14: Your display will now show the
screen below advising you to exit the app,
return to your WiFi Settings and connect to
your WiFi network for Internet access, or turn
WiFi OFF to return to 3G/4G Internet access.
Page | 15
Step 14a: Press your smart device home
button, navigate to your WiFi settings and
select your WiFi network for Internet access.
Step 15: Once connected to your usual WiFi
network re-enter the SpaLINK app. Press on
the X to close the setup instructions.
NOTE: Your smart device may automatically
revert to your normal WiFi network by itself.
Step 16: Enter a name for your spa and
press REGISTER
V.1409A
Complete: Your WiFi module is configured
and will attempt to connect to the Internet.
The app will return to your spa list showing
your spa as offline (greyed out).
Page | 16
Spa List Screen
If you have just completed setup or have just logged into the SpaLINK app you will be
presented with your spa list page. The spa list page allows you to access your spa, rename your
spa, delete your spa, or add a new spa to the list. It also shows if your spa is currently online or
offline.
SPA OFFLINE
Back to
Login
Add new
spa
SPA ONLINE
Refresh List
Edit Spa
Click online
spa name for
remote access
to the spa
When you first complete the setup process of adding a spa it will take a few minutes for the
SpaNET WiFi module to login to your wireless router, obtain an IP address and register itself on
the Internet and show the spa as online. Please just wait and press the refresh button every
now and then until the spa shows as online. If the spa fails to show as online after 5 minutes
refer to the Troubleshooting Spa/WiFi Module Configuration on the following page.
Online/Offline Spas
Once your SpaNET WiFi module has been configured, so long as there is power to your spa and
your wireless router is available for Internet access your spa should show online in your spa list
ready for remote access at anytime. However to ensure your spa connection remains stable and
to ensure your spa automatically reconnects to the Internet if there is a power outage or your
wireless router resets, your WiFi module will periodically refresh its Internet connection.
Therefore occasionally you may find your spa appears offline in your spa list. Simply press the
refresh button in the top right hand corner to refresh your spa list. Your spa will soon return
online.
Furthermore if you happen to press on an online spa to launch the remote access part of the
app at the exact moment the WiFi module begins refreshing its Internet connection you may
receive a “Communication with the spa has timed out” error. Just return to the spa list, wait a
moment and press refresh until the spa returns online.
V.1409A
Page | 17
Edit Spa List
Press on the pencil to edit your spa. You can rename the spa or delete it. To rename your spa
just click on the spa name and edit it as required. Press on SAVE to save the new name, or
press CANCEL to exit the edit box without saving. Press on DELETE to delete your spa from the
list (you may do this if the configuration process was unsuccessful and you need to setup your
spa again).
Troubleshooting Spa/WiFi Module Configuration
If you have completed the configuration process of adding a spa but it has failed to show online
after 5 minutes you should follow these steps to help overcome the problem.
Method 1: Ensure WiFi module has entered Infrastructure Mode
Once you have entered your wireless network password during the setup process the SpaNET
WiFi module should automatically change from hot spot mode (HOT) to infrastructure mode
(INFR). Occasionally something may occur during the setup process which will prevent this. To
ensure your WiFi module is in infrastructure mode follow these steps:
1) On the spa side keypad press and hold the [UP] + [DOWN] buttons until display shows
“MODE”
2) Press the [DOWN] button until display shows “WIFI”
3) Press the [OK] button to enter WIFI menu (display will show “HOT”)
4) Press the [UP] button to change display to “INFR”
5) Press the [OK] button to confirm INFR (infrastructure) mode (display will briefly show
“WAIT” and then return to the default temperature display)
After these steps allow the WiFi module another 5 minutes to login to your wireless router and
obtain Internet access, then login to the SpaLINK app again and check your spa list. Refresh
your list several times until spa appears online.
Method 2: Delete the spa and run the setup process again
The WiFi module requires reasonable WiFi signal strength (-80db or above) from your wireless
router as well as a correct password to login to your router and obtain Internet access. During
the setup process it is easy to skip past the signal strength without checking it in detail, and it is
also easy to make a typing mistake with the network password. To correct these items the spa
should be deleted from your spa list and the configuration process carried out again.
1) Open the app and login to your spa list page. Press on the edit pencil, press DELETE and
confirm OK to delete your spa from your spa list.
V.1409A
Page | 18
2) Follow the instructions for “Configuring your Spa/WiFi Module” on pages 11-16 to
complete the setup process again.
IMPORTANT NOTES:
a) Ensure you start the configuration process again by carrying out steps 1-4 (page 11) on
the spa side keypad to put the WiFi module back into Hot Spot mode (HOT).
b) Take care to note the signal strength of your wireless network once the WiFi scan is
complete and network list is displayed. If your signal strength is not -80db or higher,
take steps to improve the signal strength and refresh the network list before continuing.
c) Take particular care to ensure your wireless network password is entered correctly.
Remember the password is case sensitive so you must pay attention to capital and lower
case letters. The password characters disappear as you enter them so watch as you are
typing to ensure the number or letter is correct and in the correct case.
SV WiFi network not showing in smart device WiFi List
In some rare situations you may find that you are unable to locate the SV WiFi network in your
smart device WiFi network list and therefore are unable to complete the configuration process.
If this scenario occurs please carry out the following steps:
1) Turn the mains power to the spa OFF and leave powered OFF for 2 minutes
2) Turn the mains power back ON and wait for the priming sequence to complete and
default temperature display to appear
3) On the spa side keypad press and hold the [UP] + [DOWN] buttons until display shows
“MODE”
4) Press the [DOWN] button until display shows “WIFI”
5) Press the [OK] button to enter WIFI menu (display will show “HOT”)
6) Press the [DOWN] button to change display to “RSET” (reset)
7) Press the [OK] button to confirm and reset the WiFi module to factory default values
(display will briefly show “WAIT” and then return to the default temperature display)
8) Once the keypad has returned to its default temperature display wait a further 2 minutes
before continuing to step 9 (this allows sufficient time for the WiFi module to properly
reboot after the factory reset)
9) On the spa side keypad press and hold the [UP] + [DOWN] buttons until display shows
“MODE”
10) Press the [DOWN] button until display shows “WIFI”
11) Press the [OK] button to enter WIFI menu (display will show “HOT”)
12) Press the [OK] button to confirm HOT (hot spot) mode (display will briefly show “WAIT”
and then return to the default temperature display)
13) Now the above steps have been completed go back to your smart device WiFi settings
and the SV WiFi network should be available in the list. If not, perform a rescan and it
should soon appear in the list.
V.1409A
Page | 19
Legal Information
The Bluetooth® word mark and logos are registered trademarks owned by Bluetooth SIG, Inc. and any use
of such marks by Spa Net Pty Ltd is under license. Other trademarks and trade names are those of their
respective owners.
Apple® and App Store
℠
are trademarks of Apple Inc., registered in the U.S. and other countries.
Android® and Google Play™ are trademarks of Google Inc.
Contains Transmitter Module FCC ID: T9J-RN52
Contains Transmitter Module FCC ID: T9J-RN131,171
This device complies with Part 15 of the FCC Rules. Operation is subject to the following two conditions:
(1) this device may not cause harmful interference, and (2) this device must accept any interference
received, including interference that may cause undesired operation.
This equipment has been tested and found to comply with the limits for a Class B digital device, pursuant
to part 15 of the FCC Rules. These limits are designed to provide reasonable protection against harmful
interference in a residential installation. This equipment generates, uses and can radiate radio frequency
energy, and if not installed and used in accordance with the instructions, may cause harmful interference
to radio communications. However, there is no guarantee that interference will not occur in a particular
installation. If this equipment does cause harmful interference to radio or television reception, which can
be determined by turning the equipment off and on, the user is encouraged to try to correct the
interference by one or more of the following measures:
•
•
•
•
Reorient or relocate the receiving antenna.
Increase the separation between the equipment and receiver.
Connect the equipment into an outlet on a circuit different from that to which the receiver is
connected.
Consult the dealer or an experienced radio/TV technician for help.
To satisfy FCC RF Exposure requirements for mobile and base station transmission devices, a separation
distance of 20 cm or more should be maintained between the antenna of this device and persons during
operation. To ensure compliance, operation at closer than this distance is not recommended. The
antenna(s) used for this transmitter must not be co-located or operating in conjunction with any other
antenna or transmitter.
Spa Net Pty Ltd
4/103 Railway Road North
MULGRAVE NSW 2756
AUSTRALIA
Phone:
Facsimile:
+61 2 4587 7766
+61 2 4587 8766
Email:
Website:
[email protected]
www.spanet.com.au
V.1409A
Page | 20