1
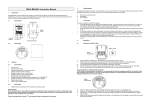
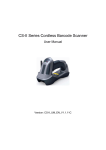
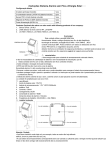
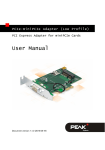
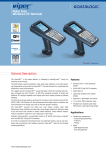
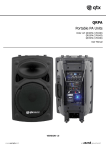
Introduction to LR-433-WPAN protocol
With PS2 cable
1. Plug one end of the PS2 cable to the cradle, one
end to PS2 port on PC, and one end to the
keyboard.
2. Plug the output of the AC/DC adaptor into the
power terminal of on the cradle. Plug the
AC/DC adaptor provided by the manufacturer
into an electrical outlet.
The scanner utilize 430.5~432.0MHz, 433.05~434.79MHz RF wireless communication with
LR-433-WPAN wireless communication protocol.
LR-433-WPAN protocol first time
introduces adaptive frequency hopping technique. With this new protocol, cordless scanner
is able to pick up a higher-performance RF channel from a group of channels in terms of
consolidated communication. LR-433-WPAN protocol supports up to 128 handheld units (16
handheld-units/cradle x 8 cradle = 128) within the same effective communication range. A
circle of response time for one cradle with 16 handheld units is 1 second, while the response
time for one cradle with one handheld unit is less than 0.1 second.
With USB cable
1. Plug one end of the USB cable to the cradle.
Plug the other end into the USB port of the
computer.
2. Plug the output of the AC/DC adaptor into the
power terminal of on the cradle. Plug the
AC/DC adaptor provided by the manufacturer
into an electrical outlet.
HR2280/2180 Cordless Barcode Scanner Quick Guide
) A standard kit contains: a handheld unit, a cradle (with PS2, or USB, or RS232 cable), a
5V AC/DC adaptor (for battery charge) and a CD-ROM (containing software and electrical
manuals).
)Use dry and soft cloth to clean the handheld unit and the cradle.
Parts of the handheld unit
①Exit window
②Trigger
With RS-232 cable
1. Connect the DB9 serial communication cable
with the cradle and the COM port of the
computer.
2. Plug the output of the AC/DC adaptor into the
power terminal of on the cradle. Plug the
AC/DC adaptor provided by the manufacturer
into an electrical outlet.
③Red LED (Charging indicator)
④Communication/Charge socket
⑤Power button
⑥Sound hole
⑦Red LED (Not successful transmission); Blue LED (Power); Green LED (Setting)
Parts of the cradle
Charge battery
①
B button (Reserved); S button (Upgrade / Reset); P
button (USB Enumeration)
② Red LED (Initiation failure); Blue LED (Power);
Green LED (Data In / Radio Frequency hopping
indicator)
③ Antenna
Installation of cradle
1.
2.
Please charge the battery before the first time of use.
The charge indicator (red LED) on the handheld unit is
turned on when the charging is in process. When the
charging process completes, the red LED is turned off.
Charging time: 8 hours for fully charged.
Power on handheld unit: Press the power button
Power off handheld unit: Press the power button
on handheld unit for two seconds.
on handheld unit for two seconds.
Effective data communication range
To achieve longer communication range, avoids concrete, wall and metallic storage racks
between the barcode scanner and the cradle. Obstacle between the barcode scanner and
the cradle would decrease the communication severely. Test result is up to 200 meters for
free space data communication range under the condition of clear weather, temperature at
27℃, visibility of 5 kilometers.
Note: 1. See “HR2280/2180 series User Manual” for more information.
2. For better readability, please print this document with laser printer.
3. Version: 1.1.11.
Visual and audio indication of handheld unit for RF transmission
Successful Transmission
Yes
No
Audio (Beeper)
None
Three beeps
01*
Red LED on handheld unit
Off
On
END
RF communication setting for cradle
SETUP
RF communication as clusters
Option barcode
¡
Cradle RF channel No.
Option
01-08
01-16
01-16
01*
01-16
01-16
¡
Bind the first handheld unit ID
Alpha. entry
01-08
06*
¡
Join a next handheld unit ID
END
Note: 1) The factory default settings are indicated with asterisks (*);
¡
2) The settings indicated with ( ) are valid only when the cradle is in upgrade ready
mode.
Cluster 2
Cluster 1
¡
Default setting of Cradle
Default setting of Handheld unit
Firmware version of Cradle
Firmware version of Handheld unit
Show channel information of Cradle¡
Show channel information of handheld
unit
Cradle entering upgrade ready mode
Keep pressing the S button on the cradle, until the blue LED is flashing. Then three LEDs
will all be turned ON, this indicates the cradle being upgrade ready mode.
Configuration alphanumeric entry barcode
5
0
8
3
6
1
9
4
7
2
RF communication setting for handheld unit
SETUP
Option barcode
Handheld unit RF channel No.
Handheld unit ID
Option
Alpha. entry
01-08
01-08
06*
01-16
01-16
Note: 1. See “HR2280/2180 series User Manual” for more information.
2. For better readability, please print this document with laser printer.
3. Version: 1.1.11.