1
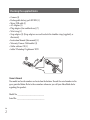
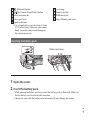
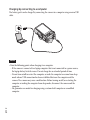
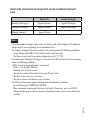
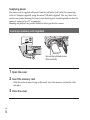
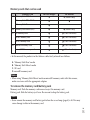
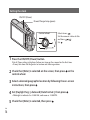
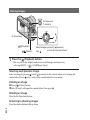
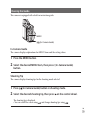
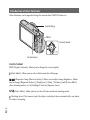
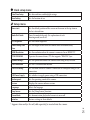
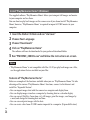
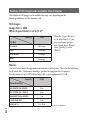
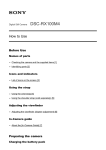
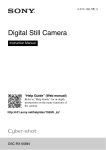
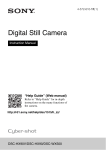
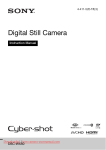
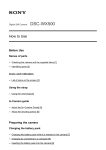
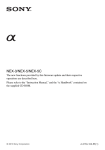
Instruction Manual Checking the supplied items • Camera (1) • Rechargeable battery pack NP-BX1 (1) • Micro USB cable (1) • AC Adaptor (1) • Plug adapters (for worldwide use) (7) • Wrist strap (1) • Strap adapter (2) (Strap adapters are used to attach the shoulder strap (supplied), as illustrated.) • Instruction Manual (this manual) (1) • Warranty/Owners Club booklet (1) • Stellar software CD (1) • Adobe® Photoshop® Lightroom® DVD Owner’s Record The model and serial numbers are located on the bottom. Record the serial number in the space provided below. Refer to these numbers whenever you call your Hasselblad dealer regarding this product. Model No. ____________________________ Serial No. _____________________________ ENG 2 WARNING To reduce fire or shock hazard, do not expose the unit to rain or moisture. IMPORTANT SAFETY INSTRUCTIONS -SAVE THESE INSTRUCTIONS DANGER TO REDUCE THE RISK OF FIRE OR ELECTRIC SHOCK, CAREFULLY FOLLOW THESE INSTRUCTIONS If the shape of the plug does not fit the power outlet, use an attachment plug adaptor of the proper configuration for the power outlet. CAUTION Battery pack If the battery pack is mishandled, the battery pack can burst, cause a fire or even chemical burns. Observe the following cautions. • Do not disassemble. • Do not crush and do not expose the battery pack to any shock or force such as hammering, dropping or stepping on it. • Do not short circuit and do not allow metal objects to come into contact with the battery terminals. • Do not expose to high temperature above 60°C (140°F) such as in direct sunlight or in a car parked in the sun. • Do not incinerate or dispose of in fire. • Do not handle damaged or leaking lithium ion batteries. ENG 3 • Be sure to charge the battery pack using a genuine Hasselblad battery charger or a device that can charge the battery pack. • Keep the battery pack out of the reach of small children. • Keep the battery pack dry. • Replace only with the same or equivalent type recommended by Sony. • Dispose of used battery packs promptly as described in the instructions. AC Adaptor Connect the AC Adaptor to the nearest wall outlet (wall socket). If some trouble occurs while using the AC Adaptor, immediately shut off the power by disconnecting the plug from the wall outlet (wall socket). The power cord (mains lead), if supplied, is designed specifically for use with this camera only, and should not be used with other electrical equipment. For Customers in the U.S.A. and Canada RECYCLING LITHIUM-ION BATTERIES Lithium-Ion batteries are recyclable. You can help preserve our environment by returning your used rechargeable batteries to the collection and recycling location nearest you. For more information regarding recycling of rechargeable batteries, call toll free 1-800-822-8837, or visit http:// www.rbrc.org/ Caution: Do not handle damaged or leaking Lithium-Ion batteries. Battery pack This device complies with Part 15 of the FCC Rules. Operation is subject to the following two conditions: (1) This device may not cause harmful interference, and (2) this device must accept any interference received, including interference that may cause undesired operation. This Class B digital apparatus complies with Canadian ICES-003. ENG 4 For Customers in the U.S.A. UL is an internationally recognized safety organization. The UL Mark on the product means it has been UL Listed. Regulatory Information Declaration of Conformity Trade Name: Hasselblad Model No.: Stellar Responsible Party: Victor Hasselblad AB Address: Utvecklingsgatan 2, 41756 Göteborg Sweden This device complies with Part15 of the FCC Rules. Operation is subject to the following two conditions: (1) This device may not cause harmful interference, and (2) this device must accept any interference received, including interference that may cause undesired operation. CAUTION You are cautioned that any changes or modifications not expressly approved in this manual could void your authority to operate this equipment. Note: This equipment has been tested and found to comply with the limits for a Class B digital device, pursuant to Part 15 of the FCC Rules. These limits are designed to provide reasonable protection against harmful interference in a residential installation. This equipment generates, uses, and can radiate radio frequency energy and, if not installed and used in accordance with the instructions, may cause harmful interference to radio communications. However, there is no guarantee that interference will not occur in a particular installation. If this equipment does cause harmful interference to radio or television reception, which can be determined by turning the equipment off and on, the user is encouraged to try to correct the interference by one or more of the following measures: – Reorient or relocate the receiving antenna. – Increase the separation between the equipment and receiver. – Connect the equipment into an outlet on a circuit different from that to which the receiver is connected. – Consult the dealer or an experienced radio/TV technician for help. The supplied interface cable must be used with the equipment in order to comply with the limits for a digital device pursuant to Subpart B of Part 15 of FCC Rules. ENG 5 For Customers in Europe Notice for the customers in the countries applying EU Directives The manufacturer of this product is Victor Hasselblad AB, Utvecklingsgatan 2, 41756 Göteborg, Sweden. For any service or guarantee matters please refer to the addresses given in separate service or guarantee documents. This product has been tested and found compliant with the limits set out in the EMC Directive for using connection cables shorter than 3 meters (9.8 feet). Attention The electromagnetic fields at the specific frequencies may influence the picture and sound of this unit. Notice If static electricity or electromagnetism causes data transfer to discontinue midway (fail), restart the application or disconnect and connect the communication cable (USB, etc.) again. Disposal of Old Electrical & Electronic Equipment (Applicable in the European Union and other European countries with separate collection systems. This symbol on the product or on its packaging indicates that this product shall not be treated as household waste. Instead it shall be handed over to equipment. By ensuring this product is disposed of correctly, you will help prevent potential negative consequences for the environment and human health, which could otherwise be caused by inappropriate waste handling of this product. The recycling of materials will help to conserve natural resources. For more detailed information about recycling of this product, please contact your local Civic Office, your household waste disposal service or the shop where you purchased the product. ENG 6 Disposal of waste batteries (applicable in the European Union and other European countries with separate collection systems) This symbol on the battery or on the packaging indicates that the battery provided with this product shall not be treated as household waste. On certain batteries this symbol might be used in combination with a chemical symbol. The chemical symbols for mercury (Hg) or lead (Pb) are added if the battery contains more than 0.0005% mercury or 0.004% lead. By ensuring these batteries are disposed of correctly, you will help prevent potentially negative consequences for the environment and human health which could otherwise be caused by inappropriate waste handling of the battery. The recycling of the materials will help to conserve natural resources. In case of products that for safety, performance or data integrity reasons require a permanent connection with an incorporated battery, this battery should be replaced by qualified service staff only. To ensure that the battery will be treated properly, hand over the product at end-of-life to the applicable collection point for the recycling of electrical and electronic equipment. For all other batteries, please view the section on how to remove the battery from the product safely. Hand the battery over to the applicable collection point for the recycling of waste batteries. For more detailed information about recycling of this product or battery, please contact your local Civic Office, your household waste disposal service or the shop where you purchased the product. Notice for customers in the United Kingdom A moulded plug complying with BS 1363 is fitted to this equipment for your safety and convenience. Should the fuse in the plug supplied need to be replaced, a fuse of the same rating as the supplied one and approved by ASTA or BSI to BS 1362, (i.e., marked with an or mark) must be used. If the plug supplied with this equipment has a detachable fuse cover, be sure to attach the fuse cover after you change the fuse. Never use the plug without the fuse cover. If you should lose the fuse cover, please contact your nearest Hasselblad service centre. ENG 7 Identifying parts ENG 8 Shutter button Mode dial (Intelligent Auto)/ (Superior Auto)/ (Program Auto)/ (Aperture Priority)/ (Shutter Priority)/ (Manual Exposure)/ (Memory recall)/ (Movie) / (Sweep Shooting) / (Scene Selection) For shooting: W/T (zoom) lever For viewing: Index/Playback zoom lever Self-timer lamp/Smile Shutter lamp/AF illuminator Power/Charge lamp ON/OFF (Power) button Flash • Do not cover the flash with your fingers. • When using the flash, the flash pops up automatically. If not using the flash, press it down manually. Microphone Hook for strap Control Ring Lens Speaker Light sensor LCD screen Fn (Function) button MOVIE (Movie) button Micro USB connector MENU button Control wheel (Playback) button (In-Camera Guide/Delete) button Battery insertion slot Battery eject lever Tripod socket hole • Use a tripod with a screw less than 5.5 mm (7/32 inches) long. Otherwise, you cannot firmly secure the camera, and damage to the camera may occur. Access lamp Memory card slot HDMI micro jack Battery/Memory card cover Inserting the battery pack Battery eject lever 1 Open the cover. 2 Insert the battery pack. • While pressing the battery eject lever, insert the battery pack as illustrated. Make sure that the battery eject lever locks after insertion. • Closing the cover with the battery inserted incorrectly may damage the camera. ENG 9 Charging the battery pack Power/Charge lamp Lit: Charging Off: Charging finished Flashing: Charging error or charging paused temporarily because the camera is not within the proper temperature range Use the correct plug for your region 1 Connect the camera to the AC Adaptor (supplied), using the micro USB cable (supplied). ENG 10 2 Connect the AC Adaptor to the wall outlet (wall socket). The Power/Charge lamp lights orange, and charging starts. • Turn off the camera while charging the battery. • You can charge the battery pack even when it is partially charged. • When the Power/Charge lamp flashes and charging is not finished, remove and reinsert the battery pack. Notes • If the Power/Charge lamp on the camera flashes when the AC Adaptor is connected to the wall outlet (wall socket), this indicates that charging is temporarily stopped because the temperature is outside the recommended range. When the temperature gets back within the appropriate range, the charging resumes. We recommend charging the battery pack in an ambient temperature of between 10°C to 30°C (50ºF to 86ºF). • The battery pack may not be effectively charged if the terminal section of the battery is dirty. In this case, wipe any dust off lightly using a soft cloth or a cotton swab to clean the terminal section of the battery. • Connect the AC Adaptor (supplied) to the nearest wall outlet (wall socket). If malfunctions occur while using the AC Adaptor, disconnect the plug from the wall outlet (wall socket) immediately to disconnect from the power source. • When charging is finished, disconnect the AC Adaptor from the wall outlet (wall socket). • Be sure to use only genuine Sony brand battery packs, micro USB cable (supplied) and AC Adaptor (supplied). Charging time (Full charge) The charging time is approximately 155 min. using the AC Adaptor (supplied). Notes • The above charging time applies when charging a fully depleted battery pack at a temperature of 25°C (77°F). Charging may take longer depending on conditions of use and circumstances. ENG 11 Charging by connecting to a computer The battery pack can be charged by connecting the camera to a computer using a micro USB cable. Notes • Note the following points when charging via a computer: – If the camera is connected to a laptop computer that is not connected to a power source, the laptop battery level decreases. Do not charge for an extended period of time. – Do not turn on/off or restart the computer, or wake the computer to resume from sleep mode when a USB connection has been established between the computer and the camera. The camera may cause a malfunction. Before turning on/off, or restarting the computer or waking the computer from sleep mode, disconnect the camera and the computer. – No guarantees are made for charging using a custom-built computer or a modified computer. ENG 12 Battery life and number of images that can be recorded and played back Battery life Number of images Shooting (still images) Approx 165 min. Approx 330 images Viewing (still images) Approx 250 min. Approx 5000 images Shooting (movies) Approx 80 min. – Notes • The above number of images applies when the battery pack is fully charged. The number of images may decrease depending on the conditions of use. • The number of images that can be recorded is for shooting under the following conditions: – Using “Memory Stick PRO Duo” (Mark2) media (sold separately) – The battery pack is used at an ambient temperature of 25°C (77°F). • The number for “Shooting (still images)” is based on the CIPA standard, and is for shooting under the following conditions: (CIPA: Camera & Imaging Products Association) – DISP is set to [Display All Info.]. – Shooting once every 30 seconds. – The zoom is switched alternately between the W and T ends. – The flash strobes once every two times. – The power turns on and off once every ten times. • The battery life for movies applies shooting under the following conditions: – Record Setting: 60i 17M(FH)/50i 17M(FH) –When continuous shooting ends because of set limits (29 minutes), press the MOVIE (Movie) button again to continue shooting. Shooting functions such as zoom will not be available. ENG 13 Supplying power The camera can be supplied with power from the wall outlet (wall socket) by connecting to the AC Adaptor (supplied), using the micro USB cable (supplied). This way, there is no need to worry about draining the battery when shooting over extended periods or when the camera is connected to a TV or computer. Shooting and playback are possible without a battery pack in the camera. Inserting a memory card (supplied) Ensure the notched corner faces correctly. 1 Open the cover. 2 Insert the memory card. • With the notched corner facing as illustrated, insert the memory card until it clicks into place. 3 Close the cover. ENG 14 Memory cards that can be used A Memory card Memory Stick PRO Duo For still images For movies (Mark 2 only) Memory Stick PRO-HG Duo Memory Stick Duo – B Memory Stick Micro (M2) C SD memory card (Class 4 or faster) SDHC memory card (Class 4 or faster) SDXC memory card (Class 4 or faster) microSD memory card (Class 4 or faster) microSDHC memory card (Class 4 or faster) D (Mark 2 only) • In this manual, the products in the table are collectively referred to as follows: A: “Memory Stick Duo” media B: “Memory Stick Micro” media C: SD card D: microSD memory card Notes • When using “Memory Stick Micro” media or microSD memory cards with this camera, make sure to use with the appropriate adaptor. To remove the memory card/battery pack Memory card: Push the memory card in once to eject the memory card. Battery pack: Slide the battery eject lever. Be sure not to drop the battery pack. Notes • Never remove the memory card/battery pack when the access lamp (page 8) is lit. This may cause damage to data in the memory card. ENG 15 Setting the clock ON/OFF (Power) Power/Charge lamp (green) Select items: Set the numeric value of date and time: Set: Control wheel the ON/OFF (Power) button. 1 Press Date & Time setting is displayed when you turn on the camera for the first time. • It may take time for the power to turn on and allow operation. 2 Check that [Enter] is selected on the screen, then press control wheel. on the 3 Select a desired geographic location by following the on-screen instructions, then press . [Daylight Svg.:], date and [Date Format:], then press 4 •Set Midnight is indicated as 12:00 AM, and noon as 12:00 PM. 5 Check that [Enter] is selected, then press ENG 16 . . Shooting still images/movie Do not cover the flash. Shutter button W/T (zoom) lever Mode dial : Intelligent Auto : Movie W: zoom out T: zoom in Shooting still images MOVIE 1 Press the shutter button halfway down to focus. When the image is in focus, a beep sounds and the or indicator lights. 2 Press the shutter button fully down to shoot an image. Shooting movies the MOVIE (Movie) button to start recording. 1 Press • Use the W/T (zoom) lever to change the zoom scale. • Press the shutter button to shoot still images while continuing to record the movie. 2 Press the MOVIE button again to stop recording. • Do not pull up the flash manually. This may cause a malfunction. • When using the zoom function while shooting a movie, the sound of the camera operating will be recorded. The sound of the MOVIE button operating may also be recorded when movie recording is finished. • Continuous shooting is possible for approximately 29 minutes at one time at the camera’s default settings and when the temperature is approximately 25°C (77°F). When movie recording is finished, you can restart recording by pressing the MOVIE button again. Recording may stop to protect the camera depending on the ambient temperature. ENG 17 Viewing images W: zoom out T: zoom in Fn (Function) (Playback) (Delete) 1 Press the Select images: (next)/ (previous) or turn the control wheel Set: (Playback) button. • You can switch the display mode between still images and movies by selecting MENU [Still/Movie Select]. Selecting next/previous image Select an image by pressing (next)/ (previous) on the control wheel or by turning the control wheel. Press in the center of the control wheel to view movies. Deleting an image Press (Delete) button. Select [Delete] with on the control wheel, then press . Rotating an image Press the Fn (Function) button. Returning to shooting images Press the shutter button halfway down. ENG 18 Viewing the Guide This camera is equipped with a built-in instruction guide. MENU (In-Camera Guide) In-Camera Guide The camera displays explanations for MENU items and the setting values. 1 Press the MENU button. 2 Select the desired MENU item, then press / (In-Camera Guide) button. Shooting Tip The camera displays shooting tips for the shooting mode selected. 1 Press (In-Camera Guide) button in shooting mode. 2 Select the desired shooting tip, then press on the control wheel. The shooting tip is displayed. • You can scroll the screen using and change shooting tips using . ENG 19 Introduction of other functions Other functions can be operated using the control wheel, MENU button, etc. Control Ring MENU Control wheel Fn (Function) Control wheel DISP (Display Contents): Allows you to change the screen display. (Flash Mode): Allows you to select a flash mode for still images. (Exposure Comp./Photo Creativity): Allows you to adjust image brightness. Allows you to change [Bkground Defocus], [Brightness], [Color], [Vividness] and [Picture Effect] when shooting mode is set to [Intelligent Auto] or [Superior Auto]. (Drive Mode): Allows you to use the self-timer and burst shooting mode. (Tracking focus): The camera tracks the subject and adjusts focus automatically even when the subject is moving. ENG 20 Fn (Function) button Allows you to register seven functions and recall those functions when shooting. Press the Fn (Function) button. Select the desired function using the Fn (Function) button or on the control wheel. Select the setting value by turning the control wheel or Control Ring. Control Ring Your favorite functions can be assigned to the Control Ring; when shooting, established settings can be changed just by turning the Control Ring. Menu Items Still shooting menu Image size Selects the size of still images. Aspect ratio Selects the aspect ratio for still images. Quality Sets the image quality for still images. Panorama:Size Selects the size of panoramic images. Panorama: Direction Sets the shooting direction for panoramic images. Drive Mode Sets the drive mode, such as for continuous shooting. Flash Mode Sets the flash settings. Focus mode Selects the focus method. Autofocus Area Selects the area of focus. Soft Skin Effect Sets the Soft Skin Effect and the effect level. Smile/Face Detect. Selects to detect faces and adjust various settings automatically. Sets to automatically release the shutter when a smile is detected. Auto Port. Framing Analyzes the scene when capturing a face and saves another image with a more impressive composition. ISO Adjusts the luminous sensitivity. Metering Mode Selects the metering mode that sets which part of the subject to measure to determine the exposure. ENG 21 ENG 22 Flash Comp. Adjusts the intensity of flash output. White Balance Adjusts color tones of an image. DRO/Auto HDR Compensates automatically for brightness and contrast. Creative Style Selects the desired image processing. Picture Effect Shoots still images with a texture unique to the selected effect. Clear Image Zoom Provides a higher-quality zoomed image than with Digital Zoom. Digital Zoom Provides zoomed images at higher magnification than with Clear Image Zoom. Long Exposure NR Sets noise reduction processing for shots with a shutter speed of 1/3 second or longer. High ISO NR Sets noise reduction processing for high-sensitivity shooting. AF Illuminator Sets the AF illuminator, which provides light for a dark scene to aid focusing. SteadyShot Sets SteadyShot. Color Space Changes the range of reproducible colors. Shooting Tip List Accesses all shooting tips. Write Date Sets whether to record a shooting date on the still image. Scene Selection Selects pre-set settings to match various scene conditions. Memory recall Selects settings you want to recall when the mode dial is set to [Memory recall]. Memory Registers the desired modes or camera settings. Movie shooting menu File Format Selects the movie file format. Record Setting Selects the size of the recorded movie frame. Image Size(Dual Rec) Sets the still image size shot when recording a movie. SteadyShot Sets SteadyShot. Audio Recording Sets whether to record audio when shooting a movie. Wind Noise Reduct. Reduces wind noise during movie recording. Movie Selects the exposure mode to suit your subject or effect. Custom menu Red Eye Reduction Reduces the red-eye phenomenon when using flash. Grid Line Sets a grid line display to enable alignment to a structural outline. Auto Review Displays the captured image after shooting. Sets auto review. DISP Button(Monitor) Sets the screen display modes that can be selected by pressing DISP on the control wheel. Peaking Level Enhances the outline of in-focus ranges with a specific color. Peaking Color Sets the color used for the peaking function. Control Ring Assigns the desired functions to the Control Ring. Control Ring Display Sets whether to display animation when operating the Control Ring. Function Button (Fn) Customizes functions displayed when the Fn button is pressed. Func. of Center Button Assigns the desired functions to the center button. Func. of Left Button Assigns the desired functions to the left button. Func. of Right Button Assigns the desired functions to the right button. MF Assist Displays an enlarged image when focusing manually. Focus Magnif. Time Sets the length of time the image will be shown in an enlarged form. Face Priority Tracking Sets whether to track faces as a priority when tracking. Face Registration Registers or changes the person to be given priority in the focus. ENG 23 Playback menu Still/Movie Select Selects the display format for images. Delete Deletes an image. Slide Show Shows a slide show. Image Index Displays multiple images at the same time. Protect Protects the images. Specify Printing Adds a print order mark to a still image. Picture Effect Adds various textures to images. Volume Settings Adjusts the volume. Playback Display Sets how to play back an image recorded in portrait. Memory Card Tool menu ENG 24 Format Formats the memory card. File Number Sets the method used to assign file numbers to still images and movies. Select REC Folder Changes the selected folder for storing images. New Folder Creates a new folder for storing still images and movies (MP4). Recover Image DB Recovers the image database file and enables recording and playback. Display Card Space Displays the remaining recording time of movies and the recordable number of still images on the memory card. Clock setup menu Date/Time Setup Sets date and time, and daylight savings. Area Setting Sets the location of use. Setup menu Menu start Sets the default position of the cursor on the menu to the top item or the last-selected item. Mode Dial Guide Turns the mode dial guide (the explanation of each shooting mode) on or off. LCD Brightness Sets the screen brightness. Power Saving Start Time Sets the length of time until the camera turns off automatically. HDMI Resolution Sets the resolution when the camera is connected to an HDMI TV. CTRL FOR HDMI Operates the camera from a TV that supports “BRAVIA” Sync. Upload Settings* Sets the upload function of the camera when using an Eye-Fi card. USB Connection Sets the USB connection method. USB LUN Setting Sets the mode when the camera is connected to a computer using a USB connection. USB Power Supply Sets whether to supply power using a USB connection. Audio signals Sets the operating sound of the camera. Version Displays the camera software version. Language Selects the language. Drop Sensor Sets the [Drop Sensor] function. Demo Mode Sets demonstration playback of a movie to on or off. Initialize Restores settings to their defaults * Appears when an Eye-Fi card (sold separately) is inserted into the camera. ENG 25 Install “PlayMemories Home” (Windows) The supplied software “PlayMemories Home” allows you to import still images and movies to your computer and use them. You can shoot or play back images on this camera even if you do not install “PlayMemories Home”, however, “PlayMemories Home” is required to import AVCHD movies to your computer. 1 Insert the Stellar CD-Rom and run “start.exe” 2 Choose Your Language 3 Choose “Downloads” on “PlayMemories Home” 4 Click The software will now be downloaded to your preferred download folder. 5 Run “PMHOME_2003DL.exe” and follow the instructions on screen. Notes • “PlayMemories Home” is not compatible with Mac OS. If you play back images on a Mac, use the applications that are installed on your Mac. Features of “PlayMemories Home” Below are examples of the functions available when you use “PlayMemories Home”. To take advantage of the various “PlayMemories Home” functions, connect to the Internet and install the “Expanded Feature”. • You can import images shot with the camera to a computer and display them. • You can display images stored on a computer by shooting date in a calendar display. • You can correct (Red Eye Correction, etc.) still images, print the images, send images by e-mail, and change the shooting date and time. • You can save and print images with the date. • You can create a disc from AVCHD movies imported to a computer. (Expanded Feature) ENG 26 Install “Image Data Converter” (Windows) “Image Data Converter” allows you to develop RAW images. 1 Insert the Stellar CD-Rom and run “start.exe” 2 Choose Your Language 3 Choose “Image Data Converter” 4 Click on “Install IDC” and follow the instructions on screen. Install “Image Data Converter” (Mac - English version) 1 Insert the Stellar CD-Rom 2 Choose Your Language 3 Open the “Image Data Converter” folder 4 Double click on the “IDC.dmg” file and follow the instructions on screen. Install “Image Data Converter” (Mac - All Non-English versions) 1 Insert the Stellar CD-Rom 2 Choose Your Language 3 Double click the “Image Data Converter” shortcut 4 Run the “IDC Install” package and follow the instructions on screen. ENG 27 Number of still images and recordable time of movies The number of still images and recordable time may vary depending on the shooting conditions and the memory card. Still images Image Size: L: 20M When [Aspect Ratio] is set to [3:2]* Capacity 2 GB Quality Standard 295 images Fine 170 images RAW & JPEG 58 images RAW 88 images * When the [Aspect Ratio] is set to other than [3:2], you can record more pictures than shown above. (Except when [Quality] is set to [RAW].) Movies The table below shows the approximate maximum recording times. These are the total times for all movie files. Continuous shooting is possible for approximately 29 minutes. The maximum size of an MP4-format movie file is up to approximately 2 GB. Capacity 2 GB Record Setting 60i 24M(FX)/50i 24M(FX) 10 m 60i 17M(FH)/50i 17M(FH) 10 m 60p 28M(PS)/50p 28M(PS) 9m 1440×1080 12M 15 m VGA 3M 1 h ENG 28 1 h 10 m (h (hour), m (minute)) • The recordable time of movies varies because the camera is equipped with VBR (Variable Bit Rate), which automatically adjusts image quality depending on the shooting scene. When you record a fast-moving subject, the image is clearer but the recordable time is shorter because more memory is required for recording. The recordable time also varies depending on the shooting conditions, the subject or the image quality/size settings. Notes on using the camera Functions built into this camera • This manual describes 1080 60i-compatible devices and 1080 50i compatible devices. To check whether your camera is a 1080 60i-compatible device or 1080 50i compatible device, check for the following marks on the bottom of the camera. 1080 60i-compatible device: 60i 1080 50i-compatible device: 50i • This camera is compatible with 1080 60p or 50p-format movies. Unlike standard recording modes up to now, which record in an interlacing method, this camera records using a progressive method. This increases the resolution, and provides a smoother, more realistic image. On use and care Avoid rough handling, disassembling, modifying, physical shock, or impact such as hammering, dropping, or stepping on the product. Be particularly careful of the lens. ENG 29 Notes on recording/playback • Before you start recording, make a trial recording to make sure that the camera is working correctly. • The camera is neither dust-proof, nor splash-proof, nor water-proof. • Avoid exposing the camera to water. If water enters inside the camera, a malfunction may occur. In some cases, the camera cannot be repaired. • Do not aim the camera at the sun or other bright light. It may cause the malfunction of the camera. • If moisture condensation occurs, remove it before using the camera. • Do not shake or strike the camera. It may cause a malfunction and you may not be able to record images. Furthermore, the recording media may become unusable or image data may be damaged. Do not use/store the camera in the following places • In an extremely hot, cold or humid place In places such as in a car parked in the sun, the camera body may become deformed and this may cause a malfunction. • Storing under direct sunlight or near a heater The camera body may become discolored or deformed, and this may cause a malfunction. • In a location subject to rocking vibration • Near a location that generates strong radio waves, emits radiation or is strongly magnetic place. Otherwise, the camera may not properly record or play back images. • In sandy or dusty places Be careful not to let sand or dust get into the camera. This may cause the camera to malfunction, and in some cases this malfunction cannot be repaired. On carrying Do not sit down in a chair or other place with the camera in the back pocket of your trousers or skirt, as this may cause malfunction or damage the camera. Carl Zeiss lens The camera is equipped with a Carl Zeiss lens which is capable of reproducing sharp images with exellent contrast. The lens for the camera has been produced under a quality assurance system certified by Carl Zeiss in accordance with the quality standards of Carl Zeiss in Germany. Notes on the screen The screen is manufactured using extremely high-precision technology so over 99.99% of the pixels are operational for effective use. However, some tiny black and/or bright dots (white, red, blue or green) may appear on the screen. These dots are a normal result of the manufacturing process, and do not affect the recording. ENG 30 Notes on the flash • Do not carry the camera by the flash unit, or use excessive strength on it. • If water, dust or sand get into the open flash unit, it may cause a malfunction. On camera’s temperature Your camera and battery may get hot due to continuous use, but it is not a malfunction. On the overheat protection Depending on the camera and battery temperature, you may be unable to record movies or the power may turn off automatically to protect the camera. A message will be displayed on the screen before the power turns off or you can no longer record movies. In this case, leave the power off and wait until the camera and battery temperature goes down. If you turn on the power without letting the camera and battery cool enough, the power may turn off again or you may be unable to record movies. On charging the battery If you charge a battery that has not been used for a long time, you may be unable to charge it to the proper capacity. This is due to the battery characteristics, and is not a malfunction. Charge the battery again. Warning on copyright Television programs, films, videotapes, and other materials may be copyrighted. Unauthorized recording of such materials may be contrary to the provisions of the copyright laws. No compensation for damaged content or recording failure Hasselblad cannot compensate for failure to record or loss or damage of recorded content due to a malfunction of the camera or recording media, etc. Cleaning the camera surface Clean the camera surface with a soft cloth slightly moistened with water, then wipe the surface with a dry cloth. To prevent damage to the finish or casing: –Do not expose the camera to chemical products such as thinner, benzine, alcohol, disposable cloths, insect repellent, sunscreen or insecticide. ENG 31 Specifications Camera [System] Image device: 13.2 mm × 8.8 mm (1.0 type) Exmor CMOS sensor Total number of pixels: Approx. 20.9 Megapixels Effective number of pixels: Approx. 20.2 Megapixels Lens: Carl Zeiss Vario-Sonnar T* 3.6× zoom lens f = 10.4 mm – 37.1 mm (28 mm –100 mm (35 mm film equivalent)) F1.8 (W) – F4.9 (T) While shooting movies (16:9): 29 mm – 105 mm*1 While shooting movies (4:3): 36 mm – 128 mm*1 *1When [SteadyShot] is set to [Standard] SteadyShot: Optical Exposure control: Automatic exposure, Aperture priority, Shutter priority, Manual exposure, Scene Selection (13 modes) White balance: Automatic, Daylight, Shade, Cloudy, Incandescent, Fluorescent (Warm White/ Cool White/Day White/Daylight), Flash, Color temperature/Color filter, Custom Signal format: For 1080 50i: PAL color, CCIR standards HDTV 1080/50i, 1080/50p specification For 1080 60i: NTSC color, EIA standards HDTV 1080/60i, 1080/60p specification File format: Still images: JPEG (DCF, Exif, MPF Baseline) compliant, DPOF compatible Movies (AVCHD format): AVCHD format Ver. 2.0 compatible Video: MPEG-4 AVC/H.264 Audio: Dolby Digital 2ch, equipped with Dolby Digital Stereo Creator • Manufactured under license from Dolby Laboratories. ENG 32 Movies (MP4 format): Video: MPEG-4 AVC/H.264 Audio: MPEG-4 AAC-LC 2ch Recording media: “Memory Stick Duo” media, “Memory Stick Micro” media, SD cards, microSD memory cards Flash: Flash range (ISO sensitivity (Recommended Exposure Index) set to Auto): Approx. 0.3 m to 17.1 m (11 3/4 inches to 56 ft. 1 3/4 inches) (W) Approx. 0.55 m to 6.3 m (1 ft. 9 1/2 inches to 20 ft. 8 inches) (T) [Input and Output connectors] HDMI connector: HDMI micro jack Micro USB connector: USB communication USB communication: Hi-Speed USB (USB 2.0) [Screen] LCD screen: 7.5 cm (3.0 type) TFT drive Total number of dots: 1 228 800 dots [Power, general] Power: Rechargeable battery pack NP-BX1, 3.6 V AC Adaptor, 5 V Power consumption (during shooting): 1.5 W Operating temperature: 0 °C to 40 °C (32 °F to 104 °F) Storage temperature: –20 °C to +60 °C (–4 °F to +140 °F) Dimensions (CIPA compliant): 109 mm × 59 mm × 36 (W/H/D) Mass (CIPA compliant) (including NPBX1 battery pack, “Memory Stick Duo” media): Approx. 252 g Microphone: Stereo Speaker: Monaural Exif Print: Compatible PRINT Image Matching III: Compatible AC Adaptor Power requirements: AC 100 V to 240 V, 50 Hz/60 Hz, 0.2 A Output voltage: DC 5 V, 1 500 mA Operating temperature: 0 °C to 40 °C Storage temperature: –40 °C to +85 °C Dimensions: Approx. 75 mm × 33 mm × 45 mm (W/H/D) Mass: Approx. 75 g Rechargeable battery pack NP-BX1 Used battery: Lithium-ion battery Maximum voltage: DC 4.2 V Nominal voltage: DC 3.6 V Maximum charge voltage: DC 4.2 V Maximum charge current: 1.89 A Capacity: 4.5 Wh (1 240 mAh) Design and specifications are subject to change without notice. ENG 33 Trademarks • The following marks are trademarks of Sony Corporation. , “Cyber-shot,” “Memory Stick PRO Duo,” “Memory Stick PRO-HG Duo,” “Memory Stick Duo,” “Memory Stick Micro” • “AVCHD Progressive” and “AVCHD Progressive” logotype are trademarks of Panasonic Corporation and Sony Corporation. • Windows is registered trademark of Microsoft Corporation in the United States and/or other countries. • Mac and Mac OS are registered trademarks of Apple Inc. • SDXC logo is a trademark of SD-3C, LLC. •“ ” and “PlayStation” are registered trademarks of Sony Computer Entertainment Inc. • In addition, system and product names used in this manual are, in general, trademarks or registered trademarks of their respective developers or manufacturers. However, the or marks are not used in all cases in this manual. ENG 34 • Add further enjoyment with your PlayStation 3 by downloading the application for PlayStation 3 from PlayStation Store (where available.) • The application for PlayStation 3 requires PlayStation Network account and application download. Accessible in areas where the PlayStation Store is available. Additional information on this product and answers to frequently asked questions can be found at our Customer Support Website. www.hasselblad.com v1.0 Victor Hasselblad AB www.hasselblad.com ENG 35