1
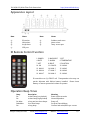
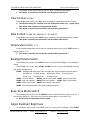
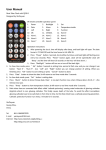
IN-14(IN-8-2) Nixie Tube Clock
v1.0.2
Instructions
Designer: Yan Zeyuan. China
Website:
http://www.nixieclock.org
E-mail:
[email protected]
Catalogue
Attention …………………………………….……………………………………………………………….....……… 2
Functional Features …………………………………………..……………………………………….…..………… 2
Technical Specifications …………………………………………………….……………………………...……… 2
Package Content …………………………………………………………………………….………………....…… 2
Clock Appearance Layout ………………………..………………………….………………………….....…….. 3
IR Remote Control Function ……………………………………………………………………………....…… 3
Operation Beep Tones …………………………………………………….……………………..………....……… 3
Display Mode Switch ....……………………………………………….………...………………………………… 4
Digital Effects Switch …....………………………………………………....……………………………………… 4
Time Format 12H/24H
…………………………………………………………….………………….......…… 5
Date Format YY-MM-DD/MM-DD-YY/DD-MM-YY …..……………..………………...…………… 5
Temperature Unit ℃/℉ ....…….………………………………………………...……………………………..… 5
Back Light Mode Switch ..………………………………………………………..……………………………..… 5
Beep Tone Mode Switch ………………………………..……………………..……………………………....… 5
Adjust Back Light Brightness ……………………………………………….………………………………...... 5
Set Time ……………………………………………………………………………….………………………………..… 6
Set Date ………………………………………………………………………….……………………………………..… 6
Set GMT ………………………………………………………………...………………………….………………..…… 6
Set Alarm .....…………………………………………………….…………….……………………………………....… 6
Set Switch On/Off Time …………………………………….…………….……………………………………..… 7
GPS Adjust Date & Time ……………………………………………………………………………………....… 7
Cathode Poisoning Prevention .……………………………………………………………………………..… 8
Notes .………………………………………………………………………….…………………………………………… 8
IN-14(IN-8-2) Nixie Tube Clock Instructions
http://www.nixieclock.org
Attention
◇
Attention:
To prevent accidental damage, do not place this clock on an uneven surface.
◇
Warning:
The clock has an internal high voltage circuit; do not touch the components
while the clock is operating.
◇
Warning:
Clock is for indoor use only.
◇
Warning:
Please do not let children touch the clock.
Functional Features
1.
Six IN-14 (IN-8-2) nixie tubes display (1976-1984 made in USSR).
2.
Display hour, minute and second (12 or 24 hour format optional)
3.
Display year, month and day and Chinese lunar date (YY-MM-DD or MM-DD-YY
format optional).
4.
GPS adjust, real-time synchronization. (GPS is offered as an option).
5.
GMT time zone functions, the clock will calculate the local time base on satellite.
6.
Temperature display (℃ or ℉) with optional temperature sensor.
7.
Two alarm clock.
8.
Switch On/Off automatically (On and Off-time can be set for longer tube lifetime).
9.
Background light effects include 10 colors, adjustable brightness, On and Off, and
background color change for each day of the week.
10. 4 digital switching effects.
11. IR remote controller operation.
12. High-accuracy, ±2 min/per year.
13. Built-in backup lithium battery will maintain clock time more than 3 years.
Technical Specifications
Input voltage:
DC12V
Working current:
300mA (Max 500mA)
Tubes type:
IN-14(IN-8-2) 1976-1984 made in USSR
Size :
175mm x 50mm, tube diameter 19mm x 54.5mm high
Working temp.:
0℃ - 60℃
Weight:
150g
Shell material:
Acrylic plate with laser cut.
Package Contents
Name
Quantity
Name
Quantity
Nixie tube clock
(1)
Power adapter
(1)
IR remote controller
(1)
Colon glass tube
(2)
User manual
(1)
Designer:
YanZeyuan. China.
Email: [email protected]
Website: www.nixieclock.org
2 / 8 IN-14(IN-8-2) Nixie Tube Clock Instructions
http://www.nixieclock.org
Appearance Layout
③
③
③
③
④
③
③
④
①
⑤
②
⑥ ⑦ Num
Name
Num
Name
①
IR receiver
②
Stainless steel screw
③
Nixie tubes
④
Neon colons
⑤
Acrylic base
⑥
Temp. sensor port
⑦
GPS port
IR Remote Control Function
1. POWER
2. BACKLIGHT
3. SET
4. DATE
5. ALARM
6. TEMPERATURE
7. LEFT
8. RIGHT
9. FUNCTION
10. OK
11. CANCEL
12. NUM 0
13. NUM 1
14. NUM 2
15. NUM 3
16. NUM 4
17. NUM 5
18. NUM 6
19. NUM 7
20. NUM 8
21. NUM 9
IR controller uses (1) CR2025 cell. Transportation rules may not
permit shipment with lithium battery installed.
Please insert
battery or remove protective insulator to operate.
Operation Beep Tones
Beep
Description
Meaning
Be
a short beep (low pitched)
Power on/In set mode
Be
a short beep (high pitched)
Normal Operation
Be..bebe
a long and two short beeps
Power off
Bebebebe
four short beeps
Set Error/Cancel/Alarm
Be…
a long beep
Confirm and saved/GPS sync success
Designer:
YanZeyuan. China.
Email: [email protected]
Website: www.nixieclock.org
3 / 8
IN-14(IN-8-2) Nixie Tube Clock Instructions
http://www.nixieclock.org
Display Mode Switch
1.
Display time mode
After powering on the clock or pressing the POWER button in shutdown state, clock
displays in time mode. Clock will display HOUR, MINUTE, SECOND in this mode.
2.
Display calendar date mode
Press DATE button to enter calendar date display mode. Clock will display YEAR, MONTH,
DAY. Clock will return to display time mode after three seconds.
3. Display lunar date mode
Press DATE button twice to enter display lunar calendar date mode. Clock will display YEAR,
MONTH, DAY of lunar date. Clock will return to display time mode after three seconds.
4.
Display GMT time zone mode
Press DATE button three times to enter display GMT time zone mode. Clock will return to
display time mode after three seconds.
5.
Display alarm mode
Press ALARM button to show alarm 1 mode. Press ALARM button again to show alarm 2
mode. Clock will return to display time mode after three seconds.
6.
Display cathode poisoning prevention setting mode
Press ALARM button three times to show cathode poisoning prevention setting mode; first
tube will display 3. Clock will return to display time mode after three seconds.
7. Display OFF/ON switch time mode
Press ALARM button four times to show OFF time mode; first tube will display 4. Press
ALARM button five times to show ON time mode; first tube will display 5. Clock will return
to display time mode after three seconds.
8. Display temperature mode
Press TEMPERATURE button to show temperature mode. Clock will return to display time
mode after three seconds.
■
If optional temperature sensor is not connected, clock can not display temperature.
Digital Effects Switch
■
In the display time mode, press the FUNC button repeatedly to toggle between
1.
Crossfade
three different digital effects and standard display.
Old digit will be concealed gradually as new digit is gradually displayed.
Digits show
fading overlap.
2.
Fade in & fade out
Old digital will fade gradually.
After old digit fades out, the new digit will gradually
fade in.
3.
Flip over
The correct digit will be displayed after a fast scrolling through the digits, one after
another, (slot machine effect) until the correct digit is displayed.
4.
Standard
Designer:
YanZeyuan. China.
Email: [email protected]
Website: www.nixieclock.org
4 / 8 IN-14(IN-8-2) Nixie Tube Clock Instructions
http://www.nixieclock.org
In standard mode, if digit changes, the new digit is displayed immediately.
■
This option is stored in the clock and is not lost when powered off.
Time Format 12H/24H
In the display time mode, press OK button repeatedly to toggle between time formats.
■
Time format setting for 12H/24H is for the display time mode only. During setup
time mode, time is always set using the 24H format.
■
This option is stored in the clock and is not lost when powered off.
Date Format YY-MM-DD / MM-DD-YY / DD-MM-YY
In the display date mode, press FUNC button repeatedly to toggle between date formats.
■
This option is stored in the clock and is not lost when powered off.
Temperature Units
℃/℉
In the display temperature mode (with the optional temp sensor), press FUNC button to
toggle between ℃/℉ .
■
This option is stored in the clock and is not lost when powered off.
Backlight Mode Switch
In the display time mode, press LIGHT button to turn ON/OFF backlight or set backlight to
breath.
In the display time mode, press NUM0 - NUM9 buttons to turn on the backlight directly,
and set the backlight color.
NUM0: Backlight will change the color according the day of the week as shown below:
Monday: red. Tuesday: orange. Wednesday: yellow. Thursday: green.
Friday: cyan.
Saturday: blue.
Sunday: purple.
NUM1: red color breath.
NUM2: yellow color breath. NUM3: green color breath.
NUM4: cyan color breath.
NUM5: blue color breath.
NUM7: white color breath.
NUM8: auto change color breath.
NUM6: purple color breath.
NUM9: auto change backlight color with backlight always lit.
Beep Tone Mode Switch
In the display time mode, press the CANCEL button to switch the beep sound on or off. If
the last tube display is 1, the beep is on; if the last tube display is 0, the beep is off.
■
Alarm sound is independent of this setting.
Adjust Backlight Brightness
In the display time mode, press LEFT button to reduce light brightness, press RIGHT
Designer:
YanZeyuan. China.
Email: [email protected]
Website: www.nixieclock.org
5 / 8 IN-14(IN-8-2) Nixie Tube Clock Instructions
http://www.nixieclock.org
button to increase light brightness.
■
There are five levels of lighting adjustment.
Set Time
In display time mode, press SET button to enter set time mode.
After entering the set
time mode, SECOND (SS) digits will be blinking, meaning SECONDS are now being set.
Press
LEFT or RIGHT button to change between MINUTES (MM) and HOURS (HH) setting.
Press button NUM0 - NUM9 to change the numbers.
Press OK to save setting.
Press CANCEL to abort setting and exit.
■
After setting success, clock will beep for a long time, and return to display time
mode.
■
If setting is illogical, clock will beep four short times and abort. Settings will not
be saved and the clock will return to display time mode.
■
When setting time, clock displays in 24H format.
Set Date
In display date mode, press SET button to enter set date mode.
After entering set date
mode, DAY (DD) will be blinking, meaning now setting DAY. Press LEFT or RIGHT button to
change setting position between DD - MM - YY.
Press button NUM0 - NUM9 to change the numbers.
Press OK to save settings.
Press CANCEL to abort setting and exit.
■
After setting success, clock will beep for a long time, and return to display time
mode.
■
If setting is illogical, clock will beep four short times and abort. Settings will not
be saved and the clock will return to display time mode.
■
The moon date doesn't need setting, the clock will calculate automatically
according to the Gregorian calendar.
■
Two digit of YEAR (YY) means 20YY year.
Set GMT Time Zone
In display GMT mode, press LEFT or RIGHT button to change the GMT time zone.
If the digits are displayed on the left side of the clock, it means GMT-.
If the digits are
displayed on the right side of the clock, it means GMT+. For example: BEIJING lies in GMT8+,
press the LEFT or RIGHT button to get digits displayed on the right two tubes to show 08.
Set Alarm
In display alarm 1/2 mode, press SET button enter set alarm mode.
In set alarm mode, HOUR (HH) will blink, meaning now setting HOUR of alarm.
Press
LEFT or RIGHT button to change between (HH) and (MM) setting position.
Left two tubes will display which alarm is being set, A1 means now setting alarm 1, A2
Designer:
YanZeyuan. China.
Email: [email protected]
Website: www.nixieclock.org
6 / 8 IN-14(IN-8-2) Nixie Tube Clock Instructions
http://www.nixieclock.org
means now setting alarm 2.
Press button NUM0 - NUM9 to change the number.
Press OK to save setting.
Press CANCEL to abort setting and exit.
■
After setting success, clock will beep for a long time, and return to display time
mode.
■
If setting is illogical, clock will beep four short times and abort. Settings will not
be saved and the clock will return to display time mode.
■
To disable the alarm function, press the FUNC button in alarm display mode, then
clock display OFF, means this alarm is disabled.
■
If the clock alarm is sounding, press any button to stop the alarm. The clock will
automatically stop the alarm after 60 seconds.
Set Switch On/Off Display Time
In display time mode, press ALARM button four times to enter set SWITCH OFF TIME
mode and the left tube will display 4.
Press ALARM button five times enter set SWITCH ON
TIME mode and the left tube will display 5.
After entering set SWITCH ON/OFF TIME mode, the middle two tubes will blink, meaning
now setting HOUR of SWITCH ON/OFF TIME. Press LEFT or RIGHT button to change setting
position between (HH) and (MM).
Press button NUM0 - NUM9 to change the number.
Press OK to save setting.
Press CANCEL to abort setting and exit.
■
After setting success, clock will beep for a long time, and return to display time
mode.
■
If setting is illogical, clock will beep four short times and abort. Settings will not
be saved and the clock will return to display time mode.
■
If the clock is in SWITCH OFF TIME mode, the tube, colon and LED backlight will
turn off automatically.
■
During the SWITCH OFF TIME mode, you can set the time or date, check date,
alarm setting, temperature, and GMT setting normally.
■
During the SWITCH OFF TIME mode, to display the current time, please press the
POWER button and the clock will display for 5 seconds and then switch off.
■
During the SWITCH OFF TIME mode, ALARM will work normally.
Clock will
display while sounding alarm and switch off automatically after the alarm reset.
■
During the SWITCH OFF TIME mode, if the clock is in GPS adjusting mode, the
clock will display time normally and switch off automatically after adjustment is
finished.
GPS Adjust Date & Time
When the optional GPS receiver is connected, the clock will update the time and date from
the GPS satellite after the GPS receiver gets real time from the satellite.
Designer:
YanZeyuan. China.
Email: [email protected]
After a successful sync,
Website: www.nixieclock.org
7 / 8 IN-14(IN-8-2) Nixie Tube Clock Instructions
http://www.nixieclock.org
the clock will beep for a long time.
■
After acquisition of the current time from the GPS satellite, the clock will calculate
the local time by GMT zone setting.
■
If GPS receiver is connected correctly, the clock will sound a continuous long beep
in Display GMT time zone mode.
Cathode Poisoning Prevention
Nixie tubes have an unwanted side effect called 'cathode poisoning' (CP) which causes
metal molecules from the glowing cathodes (digits) and attach to non-glowing cathodes. This
will cause deterioration and finally death of the tube. To avoid this effect non/seldom glowing
cathodes need to be periodically switched on.
Since cathode poisoning varies between
different types of tubes, there is an adjustable cathode poisoning prevention setting.
The cathode poisoning prevention function default settings are to run every 10 minutes for
5 seconds duration. The switch on of the non-glowing digits will be achieved by a fast
sequential scrolling through the digits (slot machine effect). This feature can be adjusted in
duration and frequency of scrolling.
In the display time mode, press ALARM three times, to enter setup for the cathode
poisoning prevention function. The left tubes will show‘3’;
time interval of CP function; and the unit for minutes.
running time in units of seconds.
function.
the middle two tubes show the
The right two tubes display CP function
Press set key to begin to adjust the time interval of CP
Use LEFT or RIGHT buttons to set the interval (the longest is 20 minutes, the
shortest is 1 minute).
Press SET button to begin to set CP function running time. Use LEFT or
RIGHT button to set running time (the longest is 10 seconds, the shortest is 1 second). Press
OK button save setting and exit.
Notes
1.
These nixie tubes were produced in 1976-1984 and there may be some differences
between every tube or imperfection on them.
2.
Please understand this is normal. The clock will become warm or little hot because there are two DC-DC converters in
the clock. Please understand that this is normal operation.
3.
In order to prevent accidental damage, do not place this clock on an uneven surface.
■
For any questions, please contact the designer.
Software design: YanZeyuan
Hardware design: YanZeyuan
Designer:
YanZeyuan. China.
E-mail:
[email protected]
Website:
www.nixieclock.org Email: [email protected]
Website: www.nixieclock.org
8 / 8