1
User’s Manual
ISIS
Information Systems
College of Agriculture & Life Sciences
Virginia Tech
Blacksburg, VA 24061-0365
December 21, 1998
ii
NutMan
The software described in this book is provided under a license agreement and should be
used in accordance with those terms.
© 1998. Virginia Tech. All rights reserved.
NutMan version 1.28 User Guide
Trademarks
Microsoft, MS, MS-DOS, Visual Basic and Visual C++ are registered trademarks and
Windows, Windows 95, and Windows NT are trademarks of Microsoft Corporation in the
United States of America and other countries.
IBM is a registered trademark of International Business Machines Corporation.
iii
License Agreement & Warranty Information
© 1998. Virginia Tech. All rights reserved.
NutMan version 1.28 User Guide
License:
This software is provided for use under the agreement that you may: (a) use the program on
a single computer, and (b) copy the program into any computer readable or printed form for
back-up purposes only. You may not use, copy, modify or transfer the program , or any copy
or merged portion, in whole or in part, except as expressly provided for in this agreement.
The information contained in this manual and program is for informational purposes only. It
is subject to change without notice, and should not be construed as a commitment by
Virginia Tech or the Virginia Department of Conservation and Recreation. Virginia Tech or
the Virginia Department of Conservation and Recreation assume no responsibility or liability
for any errors or inaccuracies that may appear in this manual and program. You may print
additional copies of this manual in its entirety as necessary, however, you may not modify
contents of this manual without the prior written consent of Virginia Tech.
The program is owned by Virginia Tech and is protected by United States copyright laws
and international treaty provisions. Therefore, you must treat the program and the manual
like any other copyrighted material (e.g., a book or a musical recording) except that you
may either: (a) make one copy of the program solely for back-up or archival purposes; or (b)
transfer the program to a single hard disk provided you keep the original solely for back-up
or archival purposes.
This program is not for sale. It is provided by Virginia Tech and the Department of
Conservation & Recreation. When you receive this program you will be asked to fill out a
registration card.
iv
Limited Warranty and Remedies:
Virginia Tech warrants the diskette(s) on which the program is furnished, to be free from
defects in materials and workmanship under normal use for a period of ninety (90) days from
the date of delivery to you as evidenced by a copy of your receipt. This warranty is not
transferable. During the 90-day warranty period, Virginia Tech will replace any NutMan
program diskette not meeting the foregoing warranty. Except as expressly set forth above, no
other warranties, either express or implied, or made with respect to this program and
manual. Virginia Tech does not warrant that the functions contained in the program will
meet your requirements or that the operation.
In no event will Virginia Tech or the Virginia Department of Conservation and Recreation
shall be liable to you or any other person for any damages, including any incidental or
consequential damages, expenses, lost profits, lost savings or other damages arising out of
the use of or inability to use such program.
Upon opening the software package, you acknowledge that you have read this agreement,
understand it, and agree to be bound by its terms and conditions.
v
Credits
Design Team
1. Russ Perkinson
2. Winston Phillips
3. Dean Gall
4. Jay Marshall
from the Virginia Department of Conservation and Recreation.
1. Nicholas D. Stone
from the Information Systems and Insect Studies Lab (ISIS), Department of
Entomology, Virginia Tech.
Programmers
1. Jim Venuto
2. Lei Peng
3. Bretton Wade
4. Yihong Qian
from the Information Systems and Insect Studies Lab (ISIS), Department of
Entomology, Virginia Tech.
Documentation
1. Prabhakar Bhogaraju
2. Nicholas D. Stone
from the Information Systems and Insect Studies Lab (ISIS), Department of
Entomology, Virginia Tech.
vi
Table of Contents
CHAPTER 1. GETTING STARTED
WHAT IS NUT MAN ?
H ARDWARE AND SOFTWARE REQUIREMENTS
PRINTER
WHAT IS IN THE PACKAGE ?
WHAT IS IN THIS MANUAL ?
CONVENTIONS USED IN THIS MANUAL :
CHAPTER 2. INSTALLING NUTMAN
BEFORE YOU INSTALL
INSTALLATION
TO I NSTALL IN WINDOWS 3. X
TO I NSTALL IN WINDOWS 95 OR WINDOWS NT
CHAPTER 3. USING NUTMAN
WHAT YOU SHOULD K NOW
G ETTING H ELP
LAUNCHING NUT MAN
FOR WINDOWS 3. X USERS
FOR WINDOWS 95 OR WINDOWS NT U SERS
A UTHORIZATION
PROGRAM TOOLS
TOOLBAR
MENUS
File Menu
Edit Menu
Farm Menu
Nutrients Menu
View Menu
Window Menu
Help Menu
NARRATIVES
Creating a Narrative
Using the Narrative Glossary
NOTES
Creating a Note
Reading, Editing, and Removing a Note
Associating a Note(s) to a Nutrient Application
Saving a Note to the ‘Global’ Note Book
SETTING NUTMAN PREFERENCES
Nutrient Plan Features (checkboxes)
1
1
1
2
2
2
2
3
3
3
3
4
5
5
5
5
5
6
6
8
8
9
9
9
9
9
10
10
10
10
11
11
12
13
13
13
13
14
15
vii
Soil Test (default)
Biosolid Application (default)
Tillage Options Dialog Box
MANAGING PLAN FILES
CREATING A NEW PLAN
SAVING A PLAN
OPENING AN EXISTING PLAN
Q UITTING NUT MAN
15
15
15
16
16
18
19
20
CHAPTER 4. DESCRIBING A FARM
21
EDITING FARM INFORMATION
NARRATIVES (FARM, TRACT, AND FIELD)
EDITING TRACT INFORMATION
EDITING FIELD INFORMATION
FIELD DESCRIPTION
General Description
Past Manure Applications
Field Features
Soils
Previous Crop
Crop Rotation Sequence
SOIL TESTS
LIME APPLICATIONS
PLANTING SEASON DIALOG BOX
Selecting a Crop
Planting and Harvesting Dates
Tillage
Crop Yield
Crop Nutrient Needs
Soil Test Results
Lime
Calculations
21
22
22
23
24
24
25
26
26
27
27
28
31
32
33
34
34
34
35
35
35
36
CHAPTER 5. MANURE PRODUCTION
37
A DDING AN ANIMAL GROUP
THE MANURE PRODUCTION DIALOG BOX
Manure Nutrient Analysis
Manure Production
Manure Storage
Season Production
EDITING AN ANIMAL GROUP
REMOVING AN ANIMAL GROUP
38
40
40
40
41
42
42
42
CHAPTER 6. BIOSOLIDS
43
A DDING A BIOSOLID G ROUP
EDITING A BIOSOLIDS G ROUP
REMOVING A BIOSOLIDS G ROUP
A PPLYING BIOSOLIDS TO YOUR FARM
BIOSOLIDS HISTORY
44
45
45
46
46
CHAPTER 7. NUTRIENT APPLICATIONS
49
viii
MANURE A LLOCATIONS BY FIELD
ALLOCATING MANURE/BIOSOLIDS
MANURE A LLOCATION BY SEASON
COMMERCIAL FERTILIZER A PPLICATIONS
APPLYING COMMERCIAL FERTILIZER
CHAPTER 8. PLAN OUTPUT
NUTRIENT MANAGEMENT J OB SHEET
FARM SUMMARY
FIELD SUMMARIES
MANURE SCHEDULE
MANURE SUMMARIES
PRODUCTIVITY REPORT
SOIL TEST
A PPLICATION SUMMARY
PRINTING YOUR NUTRIENT MANAGEMENT PLANS
49
50
52
54
55
56
56
56
56
57
57
57
57
57
58
ix
Chapter 1. Getting Started
Welcome to NutMan. This chapter tells you what is in your NutMan package, what
equipment you need, and what you need to know to use this program. This manual is
designed to teach the first-time user how to install and run NutMan. This manual assumes
that you are familiar with your operating system, Microsoft Windows 3.x or Windows 95/NT.
What is NutMan?
NutMan is a program that helps nutrient management planners develop plans. Nutrient
management involves the allocation of nutrients to crop fields and pastures so that plants
receive adequate nutrient at appropriate times, manure is allocated efficiently, and both
costs and environmental risks are minimized.
The fundamentals of such planning are described in “Virginia Nutrient Management
Standards and Criteria”, Department of Conservation and Recreation, Richmond, Virginia,
revised November, 1995.
You should be familiar with these standards and criteria before you use NutMan.
Hardware and Software Requirements
•
A personal computer running Microsoft Windows 3.1 or higher, Windows 95, or Windows
NT
•
A 3-1/2” floppy disk drive
•
A hard disk with a minimum of 4MB free space
•
At least 16 MB of RAM
1
Printer
NutMan will print to any correctly installed printer through the Windows 3.x or Windows
95/NT operating systems. To print NutMan reports you may have to change the properties in
your printer settings to 300dpi.
What is in the package?
1. One 3-1/2" floppy disk
2. License Agreement and Warranty Information
3. This manual
What is in this manual?
This manual is organized into eight chapters: Getting Started, Installing NutMan, Using
NutMan, Describing a Farm, Manure Production, Biosolids, Nutrient Applications, and Plan
Output.
Conventions used in this manual:
1. Instructions in this italicized font are commands that you enter. For example, 'At
the DOS prompt, enter NutMan', would require you to type in the word NutMan at the
prompt and hit the ENTER or RETURN key on your keyboard.
2. Items in quotation marks (" ") refer to file and directory names, program window titles,
menu titles, menu options, or button names. For example: 'Click on the program group
called “NutMan”' - refers to an item on your windows desktop called NutMan.
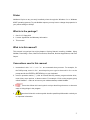
3.
Items that follow this hand symbol are tips describing shortcuts or alternate
ways of doing things in the program.
4.
Items that follow this caution symbol describe possible pitfalls and/or remind you
of important information.
2
Chapter 2. Installing NutMan
Before You Install
1. Read the file called “Readme.txt”, to look for any last minute changes or notes released
after this manual was published.
2. Make a backup copy of this software and keep the original at a safe place.
3. Make sure you meet all the hardware and memory requirements.
Installation
The following instructions assume that you have started your computer. The installer will
copy files to a directory you specify. C:\NutMan is the default. The installer will create a
new directory if you specify one.
To Install in Windows 3.x
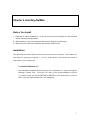
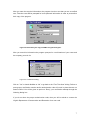
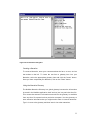
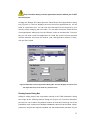
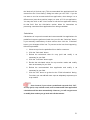
Insert NutMan installation disk into drive A or B. In Windows 3.x, open the Program
Manager. Choose “Run...” from the “File” menu. In the opened dialog box (Figure
2.1) type A:\setup.exe and hit RETURN or ENTER on your keyboard (if your drive
letter is “B” then type B:\setup.exe in the dialog box).
3
Figure 2.1 To install NutMan from Windows 3.1 choose “Run” from the File Menu in the
"Program Manager" window. Type in A:\setup.exe in the space provided and
click on "OK".
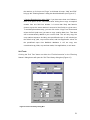
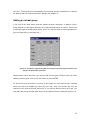
To Install in Windows 95 or Windows NT
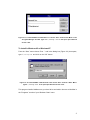
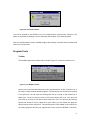
From the “Start” menu choose “Run...” and in the dialog box (Figure 2.2) that opens,
type A:\setup.exe and click on the “OK” button.
Figure 2.2 To install NutMan in Windows 95 or NT choose “Run” from the “Start” Menu.
Type A:\setup.exe in the space provided and click on "OK".
This program installs NutMan onto your hard drive and adds a shortcut to NutMan in
the “Programs” section of your Windows “Start” menu.
4
Chapter 3. Using NutMan
What You Should Know
NutMan does many calculations for you, but you, as the planner, are still responsible for the
accuracy and appropriateness of your plans. You will find that NutMan allows you to
override default values and even make mistakes. Make sure you review the information in
your plans thoroughly.
Getting Help
Select "Index" from the NutMan "Help" menu or click on the "Help" button (the one with a
question mark and arrow) in the toolbar.
Launching NutMan
For Windows 3.x Users
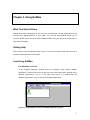
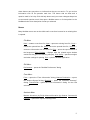
In the "Program Manager" window locate the program group called "NutMan
Application". Double-click that icon with the left mouse button and a window with a
"NutMan Application" icon in it will open (see Figure 3.1). Double-click the
"NutMan Application" icon to launch the NutMan Application.
Figure 3.1. Program Manager window and NutMan Application program .
5
For Windows 95 or Windows NT Users
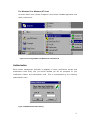
Go to the "Start" menu, choose "Programs", then choose “NutMan Application” and
finally “nutrient.exe”.
Figure 3.2 Launching NutMan from Windows 95 or Windows NT.
Authorization
Each nutrient management specialist is assigned a unique certification number and
authorization code. Every time you launch NutMan you will be prompted for your
certification number and authorization code. This is accomplished by the following
authorization screen.
Figure 3.3 NutMan Authorization Dialog.
6
After you enter the required information, the program checks to see that you are a certified
user. First-time users will be prompted for some personal information in order to personalize
their copy of the program .
Figure 3.4 Personalize your copy of NutMan using this dialog box.
After you enter this information the program prompts for a confirmation of your name and
the company you work for.
Figure 3.5 Confirmation Dialog.
Click on “Yes” to launch NutMan or “No” to go back to the “First Time User” dialog. Failure to
enter proper certification number and/or authorization code will result in plans that are not
State Certified. You will be given an option to “Retry” your certification attempt through the
following dialog box.
If you do not have the proper authorization code, then you will be asked to contact the
Virginia Department of Conservation and Recreation for a new code.
7
Figure 3.6 Failed Authorization.
You will be allowed to use NutMan even if the authorization process fails. However, the
plans so produced will display a note mentioning that the plan is not State Certified.
After the authorization process, NutMan begins and displays a window with a toolbar and
menu bar, but little else.
Program Tools
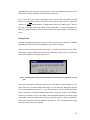
Toolbar
The NutMan application window has a toolbar (Figure 3.7) with nine buttons on it.
Figure 3.7 The NutMan Toolbar.
Most of the icons on these buttons are fairly representative of their functions, as in
the case of other windows based programs. The first button can be used for opening
a new plan file. You can open an existing plan file by clicking on the button with a
folder icon. To save a plan file click on the button with a disk icon. You can print
plan files by clicking on the button with the printer icon. The printing and saving
options will be active only if a plan file is open. When you first launch the program
these buttons will be grayed out. The three buttons in the middle of the toolbar are
for editing purposes and are not implemented in this version of NutMan. Therefore,
8
these buttons are grayed out to indicate that they are not active. To get version
information click on the question mark icon. The button with an arrow and a
question mark is for help. Click this help button and your cursor changes shape into
an arrow and question mark. Now open a NutMan menu or click anywhere in the
NutMan window for a description of what you selected.
Menus
Many NutMan menus are not be visible until a new farm is saved or an existing farm
is opened.
File Menu
New – creates a new farm file, Open – opens an existing farm file, Close –
closes the opened farm file, Save – saves the opened farm file, Save As –
saves the information to a new farm file, Print – prints the report window in
the foreground, Print Preview – displays what the printed report window
would look like (good for checking margins), Print Setup – specifies margins
and other settings for printing, Exit – quits the NutMan application
Edit Menu
Preferences – opens the "NutMan Preferences" dialog
Farm Menu
Farm – opens the "Farm Information" dialog, Manure Production – opens
the "Manure Groups" dialog, Biosolids – opens the "Biosolids Summary"
dialog, Tracts/Fields – opens the "Field Information" dialog for the field
selected
Nutrients Menu
Manure Allocation (by Field), Manure Allocation (by Season, Commercial
Fertilizer – opens their respective dialog boxes
9
Browse Menu
Note Book – opens the Note Book for this Farm; Soil Tests, Lime, and
Biosolids – opens the dialog box that displays the most recent application
for each of these respectively
View Menu
Farm Summary, Field Summary, Job Sheet, Manure Schedule, Manure
Summary, Productivity Report, Soil Test, and Application Summary – opens
their respective report windows; Toolbar and Status Bar – controls what is
displayed on the NutMan screen (both should have a check beside them)
Window Menu
New Window – opens a new window as a clone of an already opened
window (not useful), Cascade and Tile – arranges NutMan windows so all are
visible, Arrange Icons – not applicable, List of Open NutMan Windows –
displays the name of all open NutMan windows, click on a name to bring it
to the foreground
Help Menu
Index – opens an index of help topics for using NutMan, Using Help – opens
instructions for using Help, About NUTRIENT... – opens a brief description of
the NutMan application installed including version number
Narratives
NutMan includes a feature called "Narratives" to allow you to enter extra descriptive
information into your farm plan. These narratives will be available from within the
particular farm file they were entered in and will be included into some of the
printed reports for that farm. You can add comments (narratives) for a farm, tract,
field, or crop by clicking on the "Narrative" button in the respective dialog box. The
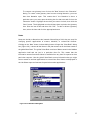
"Narrative" dialog box (Figure 3.8) for that farm, tract, etc. will open. The dialog will
have an area on the left side in which to type your comments. The right side of the
dialog displays the global NutMan Narrative Glossary (described below). Comments
from your narrative can be added to the Glossary and vice versa.
10
Figure 3.8 The Narrative Dialog Box.
Creating a Narrative
To create a Narrative, enter your comments about the farm, or tract, etc into
the textbox on the left. To insert the text from a glossary item into your
Narrative, select the appropriate glossary item and click the "Insert" button.
Once you have completed your Narrative, click on the "Done" button.
Using the Narrative Glossary
The NutMan Narrative Glossary is a global glossary because the information
is stored in the NutMan application itself and not just in a particular farm file.
This means that narrative information entered into the glossary is available
from any farm file opened on that particular computer. Use the glossary to
store narrative information that you might need to enter in several narratives.
Type it in once to the glossary and then insert it into other narratives.
11
To create a new glossary item click on the "New" button in the "Narrative"
dialog. To create a new glossary item from an existing Narrative, you must
have that Narrative open. This means that if the Narrative is about a
particular tract, you must open the dialog box for that tract and click on the
"Narrative" button. Highlight the text that you want to include, then click the
"New" button. The highlighted text should have been copied to the glossary
item. Give the item a title and then click "OK". To edit or delete a glossary
item, select the item and click the appropriate button.
Notes
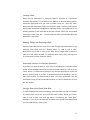
Notes are similar to Narratives but instead of describing a field, they are used for
clarifying specific applications of manure, biosolids, or commercial fertilizer.
Clicking on the “Note” button in these dialog boxes will open the "Note Book" dialog
box (Figure 3.9). It shows all the Notes in the plan as well as all the Notes saved to
the global Note Book. The ‘global’ Note Book consists of Notes stored in the NutMan
application itself and not just in a particular farm file. This means that the
information entered into those Notes is available from any farm file opened on that
particular computer. Use the ‘global’ Note Book to store information that you might
want to attach to nutrient applications in several farm files. Notes are displayed in
the Job Sheet report as footnotes for particular nutrient applications.
Figure 3.9 The Note Book Dialog Box.
12
Creating a Note
Notes can be associated to particular Manure, Biosolid or Commercial
Fertilizer applications. From either of the Manure or Nutrient dialog boxes,
select the application that you wish to create a note for. Click the “Note”
button and the Note Book (Figure 3.xxx) should open. Click the “Add” button
and a "Note" dialog box will appear for inputting a note. It provides spaces for
entering a name for the Note and for the Note content. When you are finished
creating the note click “OK”. To associate the newly created Note with the
application, see below.
Reading, Editing, and Removing a Note
Open the Note Book either from one of the dialogs described above or by
selecting “Note Book” from the “Browse” menu. To read or edit a Note,
double-click on its title or click on the “Edit” button. Make edits as desired,
then click ”OK” when finished. To remove a Note, select it by clicking once
on its title then click the “Remove” button.
Associating a Note(s) to a Nutrient Application
If you have not already done so, from either of the Manure or Nutrient dialog
boxes, select the application that you wish to create a Note for, then click the
“Note” button. To associate a Note(s) to the nutrient application, select the
Note by clicking once on its title. To associate more than one Note, click on
their titles as well. To disassociate a Note, click on it again and it will be
unselected. Once you have selected the Notes you wish to associate, click on
the “OK” button.
Saving a Note to the ‘Global’ Note Book
To save a Note to the ‘global’ Note Book, select the Note from the list of Notes
by clicking once on its title, then click the “Save” button. When you create,
read, or edit a Note, you have the option of selecting the “Auto Save”
checkbox. If you do so, the Note will be saved to the ‘global’ Note Book when
you close the Note by clicking “OK”.
13
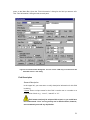
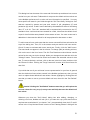
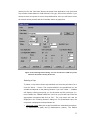
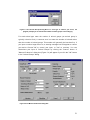
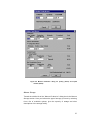
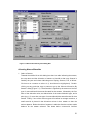
Setting NutMan Preferences
The first time you run NutMan you should enter some basic information into
“Preferences” dialog. This creates some "default" settings for NutMan. Preferences
are set by selecting the “Preferences” option under the “Edit” menu of the NutMan
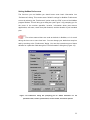
program window. This will bring up a dialog box (see Figure 3.10) prompting you for
the name of the nutrient specialist, location, information about past manure
applications, soil tests, certain farm plan features, and the duration of your intended
plan.
The values entered here are used as defaults in NutMan, so it is worth
taking the time now to save time later. You can change your defaults at anytime
and by returning to the “Preferences” dialog. You can also customize most of these
defaults for a particular field through its "Field Information" dialog box (Figure 4.3).
Figure 3.10 Preferences dialog box prompting you for default information on the
specialists name, location, plan duration, soil test results, and manure options.
14
Nutrient Plan Features (checkboxes)
There are six check boxes on this Preferences dialog box each relating to a
specific aspect of the nutrient management plan. These options affect the
information displayed by NutMan in different places and allow you to
customize the plan and the output to your requirements. Remember, any
and all of these options can be overridden for a particular planning session.
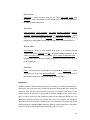
Plan Features
Confined Livestock
Description
Program will prompt for manure production information as part
of your plan (necessary if want to use manure for fertilizer).
Biosolids
Program will prompt for biosolids information.
Show Soils
Program will show soil information in the field summary report
Show Crops
Program will show crop rotation information by season in the
field summary report
Show Warnings
Program will list soil related warnings in the field summary
report
Show Narratives
Program will show narratives in summary reports.
Table 3.1 Nutrient Management Plan features available to select in "Preferences".
Soil Test (default)
Enter the results of a soil test that best represents your farm. This will be the
default soil test for all fields. It can be customized at any time for any field
and any season via the "Soil Test History" dialog box (Figure 4.5).
Biosolid Application (default)
Enter the "Virginia Nutrient Management Standards and Criteria" allowable
biosolid amount (dry tons/acre) for your farm.
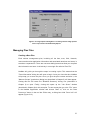
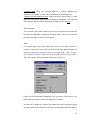
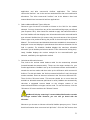
Tillage Options Dialog Box
The "Tillage Options" dialog box (Figure 3.11) is accessed from the NutMan
"Preferences" dialog box through the "Productivity" button. This dialog is
used to set the tillage options for the crops used in the Productivity Report.
15
Figure 3.11 Tillage Options Dialog Box. This dialog sets the tillage options
for the crops used in the Productivity Report.
Managing Plan Files
Creating a New Plan
Each nutrient management plan, including all the farm, tract, field, livestock,
manure and nutrient application information and associated narratives and notes, is
stored as a separate file. There are numerous dialog boxes that allow you complete
this information and store it collectively in one single file called a ‘Plan File’.
NutMan will guide you through the steps in creating a plan. This means that the
"Farm Information" dialog box will open to begin. Once you close that box, NutMan
will prompt you to save the plan. Once you give the plan a name and save it, the
"Manure Groups" (production) dialog box (described in Chapter 5) will then appear.
Closing this box will cause the "Biosolids Summary" dialog box (described in
Chapter 6) to open. Finally, closing this opens up the "Job Sheet" window
(described in Chapter 8) for this new plan. To start a new plan, go to the “File” menu
in the NutMan application window and choose "New" or, click on the "New
Document" button in the tool bar. Either way, a dialog box titled “Farm Info” will
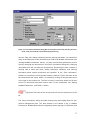
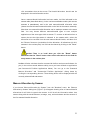
appear (Figure 3.12).
16
Figure 3.12. The Farm Information Dialog Box. A description of the farm including its tracts,
fields, crops and livestock is provided through this dialog.
Use the “Farm Info” dialog to describe the farm and set plan dates. You should see
many of the fields filled in with information you entered as NutMan Preferences (see
“Setting NutMan Preferences” above). You may override those preferences for this
farm by changing the information in this Farm Information dialog box (changing
information here will not affect the preferences). Describing the farm consists of
entering lists of tracts and fields, adding descriptive narratives, and entering
information about manure production and biosolids. In the “Farm Information”
window, be sure that the correct planner's name is entered. Type in the name of the
farm and choose the county where it is located by clicking on the pull-down arrow
to the right of the location box. The farm’s county is used as a default for all farm
tracts. For information about the function each of the checkboxes, see “Setting
NutMan Preferences” and Table 3.1 above.
Typing the first letter of the county name will scroll to that portion of the
list.
The “Farm Information” dialog includes the beginning and ending dates for your
nutrient management plan. The plan duration is the default is set in NutMan
Preferences. NutMan determines the beginning season (Spring or Fall/Winter) and
17
year based on your computer’s internal clock. You can change these values in the
“Farm Info” dialog if necessary (click on the pull-down list).
The “Tracts” box in the upper right hand corner of this “Farm Information” dialog
shows a list of tracts on the farm. All farms must have at least one tract. Tracts are
made up of fields, described later. To add tracts click on the “Add” button. This will
take you to another dialog box called “Tract Information”. Further information on
adding tracts and fields to a farm can be found in the next chapter, "Describing a
Farm".
Saving a Plan
Nutrient management plans are saved in files in order to be read later. NutMan
automatically saves your plan file whenever you close all dialogs.
Once you have entered the farm information, click the OK button on the “Farm
Information” dialog. NutMan then gives you a dialog box asking you to confirm the
start and end dates of your plan (Figure 3.13).
Figure 3.13 Dialog box asking for the confirmation of starting and ending dates for your
plan.
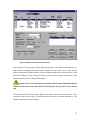
Click "OK" and then the program will ask you if you want to save changes to your
plan. Click the “Yes” button and it will bring up a “File Save As” dialog box (Figure
3.14). All saved plans are given a “.nmp” file extension. You do not need to enter
the file extension; it will be added automatically. Plans are saved in the NutMan
directory by default, but you can change the destination directory and drive using
this dialog. Type an appropriate name for your plan (eight or fewer characters),
choose the location to save the plan file, and click on “OK”. The plan will be saved
to the file and location you named.
18
Figure 3.14 File Save As dialog box prompting you to name the plan file and save it in a
directory of your choice.
Each file represents a farm and its plan. To create a new plan for a farm that
already has a plan file saved, open the file and go to “Save As...” under the “File”
menu in the NutMan program window. It will bring up the “File Save As” dialog box.
Change the file name by typing in an alternate name for the plan and click “OK”.
You can now add, delete or edit items from this plan according to your needs. The
old file still exists, so you will have a copy of the original plan file before editing the
information for the new plan. You should also periodically copy your plan files to a
floppy disk, tape drive or other media, as a backup.
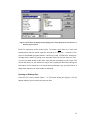
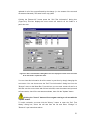
Opening an Existing Plan
From the "File" menu, choose "Open...". A "File Open" dialog box (Figure 3.15) will
appear allowing you to browse all your plan files.
19
Figure 3.15 File Open Dialog Box. Choose the appropriate drive and the directory to open
an existing plan file.
Change directories (or drives) based on where you saved your plan files. Choose the
file name you want to open (all saved plan files are named with a ".nmp"
extension), and press ENTER or click "OK". Your plan file will be opened and shown
on the screen (depending on the size of the file and the speed of your machine this
can take a minute or more). A nutrient balance sheet or “Job Sheet” will be
displayed when you open an existing plan (see Chapter 8).
Quitting NutMan
To quit the program, first choose “Close” from the "File" menu to close the current plan file
you are working with. Save changes if you want to. Once the plan is closed, the screen will
remain mostly blank and look like the opening screen when you first launch NutMan. Now
choose “Exit” from the "File" menu. This will quit NutMan and give you a “Thanks” box. Click
on “OK” to get back into your Windows environment.
20
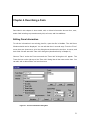
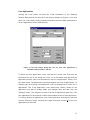
Chapter 4. Describing a Farm
Described in this chapter is how to add, edit, or delete information about a farm, tract,
and/or field including crop rotations and yield, soil tests, and lime additions.
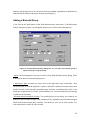
Editing Farm Information
To edit the information in an existing plan file, open that file in NutMan. The Job Sheet
Window should now be displayed. You can edit the farm in several ways. From the "Farm"
menu there are shortcuts to all of the dialog boxes that describe the farm, its tracts, and
their fields. We will start with "Farm Info" dialog box (described briefly in Chapter 3).
Choose "Farm" under the Farm menu and the "Farm Info" dialog box will appear. The
Tracts list box on the right top of the "Farm Info" dialog lists all the tracts on the farm. You
can add, edit or delete tracts in a farm from here.
Figure 4.1. The Farm Information Dialog Box.
21
You can create a new tract by clicking on the “Add” button. NutMan will then display a
“Tract Information” dialog box (Figure 4.2) which you use to add fields to the tract. To edit
an existing tract, highlight that tract name from the list by clicking on it, then click the
"Edit" button beneath the Tracts box. To remove a particular tract, highlight the name of
that and click on the "Remove" button. Removing a tract also deletes all the fields
associated with that tract.
Double-clicking on an item in a list will usually open that item for editing.
Complete the Farm Information (Farm and Planner name, County, and plan dates)
according to the instructions provided in the previous chapter on creating a new plan, but
do not close the window.
Be sure to check the confined livestock box if you intend to apply manure to the
farm.
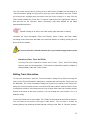
Narratives (Farm, Tract, and Field)
You may click on the “Narrative” button in the "Farm", "Tract", and "Field" dialog
boxes to enter text that describes it. This feature is described in detail in Chapter 3
(Using NutMan) under the “Tools” section.
Editing Tract Information
To edit tract information, open the "Tract Information" dialog box by either selecting the
tract from the "Farm Information" dialog box or choosing the tract from the "Farm" menu on
the Menu Bar. The "Tract Information" dialog box (Figure 4.2) is similar to the "Farm Info"
dialog box. Here you name the tract, record its CFSA tract number, state its location, enter
a descriptive narrative, and create the tract’s list of fields. Each tract has a location that by
default is the same as the farm’s location. You can change the tract location if it is in a
different county.
A tract may include one or more fields. The "Fields" list box shows all the fields in the tract.
You can create a new field by clicking the "Add" button. You can edit or remove an
existing field by first selecting the field and then clicking on the “Edit” or “Remove” buttons.
22
Clicking the "Add" or "Edit" buttons will display the "Field Information" dialog box (Figure
4.3) which will be explained in the next section.
Figure 4.2 Tract Information Dialog Box.
All tracts for a particular farm must have unique names or the system will not
recognize the second tract correctly. Tracts of different farms can have the same name.
A tract must have at least one field, and although there is no limit to the number you can
add, the system will only display the first 50 fields per tract in the "Farm" menu on the Menu
Bar.
After entering the tract description and fields, press ENTER or click on the "OK" button to
accept the input. Clicking on the "Cancel" button will cancel all changes made since the
last save. Clicking on the "Narrative" button will allow you to enter your comments for the
tract.
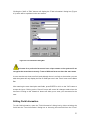
Editing Field Information
To edit field information, open the "Field Information" dialog box by either selecting the
field from the "Tract Information" dialog box or choosing the tract/field from the "Farm"
23
menu on the Menu Bar. Open the “Field Information” dialog for the field you want to edit.
This “Field Information” dialog box has several parts.
Figure 4.3 Field Information Dialog Box. You can use the “TAB” key or the mouse to edit
individual entries in this dialog.
Field Description
General Description
In the upper left, you must enter or verify descriptive information for this field
including:
• Name: Enter a unique name for the field. It can be text or a number or a
combination of both. e.g., “corn-2”; “sawmill” or “21”.
Field names need only be unique within a tract, so you could have
two fields named “Corn” as long as they are in different tracts; however,
we recommend you avoid any duplication.
24
• Location: The county shown here is the Tract’s county, but you may
change it if need be.
Changing a field’s location will eliminate its soil information and
invalidate all yield and nutrient recommendations, if they have already
been entered.
• CFSA Number: The number used by CFSA to refer to the field.
• Manure Rating: This field has three options. Either “OK”, “Possible”, or
“Never”. Choose one of these options using the pull-down list. This rating will
be used in future versions of NutMan to help suggest manure allocation
schemes. It indicates the farmer’s preference about whether you should
consider applying manure to that particular field.
• Acreage and Usable Acreage: Enter either or both values here. Usable
acres are used in calculations and must be less than or equal to “Acreage”,
i.e., the measured acreage. Reduce usable acreage to account for buffers,
field borders, rock outcrops, or other factors that limit the area over which
you apply fertilizers or manure.
Past Manure Applications
The “Past Manure” box (middle left) describes this field’s history of manure
applications before the beginning date of the plan. It is used to calculate
residual nitrogen levels during subsequent years. This box also has a
“Biosolids” button. When you click this button, NutMan will open the
"Biosolids History" dialog box explained in Chapter 6.
Past Manure Application descriptors include:
• Manure Type: You must choose one from the pull-down list. Choices are:
Poultry, Dairy/Beef, or Swine manure.
• Frequency: Select an application frequency of Rare, Frequent, or
Continuous, representing the number of years: 0 to 1, 2 to 3, or 4 to 5
respectively for the last five years that manure was applied to this field.
Note that setting the frequency to “Rare” or the Average Rate to
“Zero” results in no residual Nitrogen credit from past manure applications.
25
• Average Rate: Enter the average amount of manure applied per
application in the past, in either tons or thousands of gallons per acre.
• Manure Nutrient Analysis Values: Default nutrient values (TKN, P, K and
NH4-N) for the chosen manure type are shown in lbs/kgal/ton. You may edit
these values, and they will be saved with the plan for this field only.
Field Features
The “Features” box (lower middle left) lets you record some field features
that affect management considerations and/or yield on your field. Check all
the boxes that apply to your field conditions.
Soils
In the upper right of the “Field Information” dialog is the “Soils” section. A
field may contain one or more soil types. Each soil type added includes the
percent of the field it comprises. Here you use the "Add", "Edit", "Purge",
and "Remove" buttons to select the soil(s) for this field. Clicking “Add” or
“Edit” bring up the “Soil Information” dialog box (Figure 4.4).
Figure 4.4 Soil Information Dialog Box. You can select a soil type for your
field either by the name and/or the mapping unit symbol.
As each soil is added, the system will update the field’s hydrologic group
and slope class automatically, but you can override these values manually if
26
necessary. If you override the hydrologic group and slope class values,
NutMan puts a star next to the value to indicate that and it also inserts a
comment in the "Field Summary" report. As with other list dialogs, click
once on “Add” to add a soil type, click on a soil type (in the list area) and
click on “Edit” or “Remove” to change or delete the soil, or click once on
“Purge” to eliminate all soils.
You can choose a soil by map unit symbol (from the soil survey for the field’s
county) or by soil series name. If you use the name, be sure that the slope
class (letter code at the end of the map unit symbol) is correct. Enter a
percent of the field for the soil and click “OK”. The program enters the
remaining percentage for you as a default. The soil type has a direct
bearing on the productivity of the field. Changing the soil type would
change the crop yield and crop nutrient needs.
If you change field soil types after you have entered crops for that
field, you must edit each crop and click the "Calculate" button in the
"Planting Season" dialog box to force NutMan to recalculate the crop
yield and nutrient needs for that season. Do this for each crop/season.
Previous Crop
In the middle right of the “Field Information” dialog (below the "Soils" list) is
a box with previous crop information. The default is “Fallow”. It is a clickable
box where you can have a drop down list of various crops from which you
can choose the crop last grown on the field. Enter or verify the percentage
of legume if the previous crop included legumes.
Crop Rotation Sequence
Towards the bottom right of the “Field Information” dialog is a box with crop
rotation information in it. If you started a new plan, this box will be empty
until you specify the planned rotation for your field. A rotation is represented
as a series of crops. Each crop added includes the season and the year in
which it will be grown. You can use the "Add", "Edit", "Purge", and
"Remove" buttons to describe the planned rotation for this field. As with
other list dialogs, click once on “Add” to add a crop, click on a crop in the
list area and click on “Edit” or “Remove” to change or delete the crop from
27
the rotation, or click once on “Purge” to eliminate all crops. “Add” and “Edit”
bring up the "Planting Season” dialog box described below (see Figure 4.7).
• Copying Rotations from other fields: If you have more than one field/tract,
there is an option in the “Field Information” dialog box to copy a complete
rotation from one field into another. It is more than likely that farmer’s
choose to grow the same rotation in several of their fields in a given tract.
To avoid duplicate data entry, you can click on the “Copy From” button and
select the field (and tract) you want to copy rotation data from. That data
will be automatically added to your current field. This will only copy the
crop rotation sequence including non-predefined crops. It will include just
the default crop yield, crop nutrient need, and lime application values for
the predefined crops from NutMan's database. It will not copy over
customized crop yields, crop nutrient needs, lime applications, or soil tests.
Soil Tests
Clicking the "Soil Test" button on either the "Field Information" or the "Planting
Season" dialog boxes will open the "Soil Test History dialog box (Figure 4.5).
Figure 4.5 Soil Test History Dialog Box.
28
This dialog box has the name of the tract and field at the top and has a box to store
results from your soil tests. Fields and their crops use the default soil test values set
in the NutMan preferences if no other soil test information is specified. You may
enter specific soil tests for your fields through the "Soil Test History" dialog box. Soil
tests are entered by season and year and consist of pH, phosphorus (P) and
potassium (K) values. P and K can be defined by the standard of either of the testing
labs, VT or A & L. The A & L standard will be automatically converted to the VT
standard. Once a soil test has been entered for a field, it becomes the default for all
crops for that field that were planted in that season or later. If a more recent test is
added then it becomes the default for all crops planted in that season or later.
To add a new soil test, make sure that the correct tract and field are selected at the
top of the dialog box. Then, fill in the season and year and the soil test results.
Check if it was an estimate and not an actual test. Finally, click the "Add" button.
The test should now appear in the list of tests. To change (edit) an existing soil test,
click on the test in the list of tests. The Soil Test Results area should now contain
values for the test you wish to change. Make your changes there and then click the
"Change" button. The soil test list should now contain the amended values for that
test. To remove (delete) a soil test, click on the test in the list of tests, and then click
the "Remove" button. Clicking the "Purge" button will remove all of the soil tests for
that field.
If you think that one of your soil tests is more representative for your farm in general
than the default soil test values entered in the NutMan preferences, then you can
use it to replace those default soil test values. Choose (highlight by clicking) the soil
test that you want to use as your new default soil test, then click the "Set Default"
button.
Caution! Clicking the "Set Default" button means that you will replace the
soil test values for every crop (in every tract and field) that uses the default soil
test values.
Whenever you close the "Soil History" dialog box after adding, changing, or
deleting a soil test, NutMan will ask you if you want the crop yields and nutrient
requirements recalculated. If you choose “Yes” (recommended), then the N, P and K
values in the “Crop Nutrient Needs” section of the “Planting Season” dialog will be
29
updated for all of the crops affected by the change (i.e. the season of the test and
all seasons afterward). The same for the crop yields.
Clicking the "Browse All" button opens the "Soil Test Information" dialog box
(Figure 4.6). This box displays the most recent soil tests for all the fields in a
particular tract.
Figure 4.6 Soil Test Information Dialog Box. This box displays the most recent soil tests
for all the fields in a particular tract.
You can view this information for all the tracts in your farm by simply changing the
tract name. You can also access the "Soil Test Information" dialog box from the
"Browse" menu on the Menu Bar. From this box you can enter a new soil test for a
field. Be sure the correct tract and field are selected, enter the season and year and
soil test results, check if the test was an estimate, then click the "Update" button.
Clicking the "Cancel" button will not negate entering a soil test with the
"Update" button.
To 'undo' a mistake, you must click the "History" button to open the "Soil Test
History" dialog box, select the soil test from the list and either "Change" or
"Remove" it per instructions above.
30
Lime Applications
Clicking the "Lime" button on either the "Field Information" or the "Planting
Season" dialog boxes will open the "Lime History" dialog box (Figure 4.7) for that
field. The "Lime History" dialog contains information about the date and amount of
all lime applications for the field selected.
Figure 4.7 The Lime History Dialog Box. You can enter lime applications in
individual fields by season in this box.
To add a new lime application, make sure that the correct tract and field are
selected at the top of the dialog box. Then, fill in the season and year and the
application amount. Now click somewhere in the list of applications. Finally, click
the "Add" button. The application should now appear in the list of applications. To
change (edit) an existing lime application, click on the application in the list of
applications. The "Lime Application" area should now contain values for the
application you wish to change. Make your changes there and then click the
"Change" button. (You may have to click in the list of applications again first). The
lime application list should now contain the amended values for that application.
To remove (delete) an application, click on the application from the list, and then
click the "Remove" button. Clicking the "Purge" button will remove all of the lime
applications for that field.
31
Take note when adding new lime applications that the default year is NOT
the current year.
Clicking the "Browse All" button opens the "Most Recent Lime Applications" dialog
box (Figure 4.8). This box displays the most recent lime applications for all the
fields in a particular tract. You can view this information for all the tracts in your
farm by simply changing the tract name. You can also access the "Most Recent
Lime Applications" dialog box from the "Browse" menu on the Menu Bar. From this
box you can enter a new lime application for a field. Be sure the correct tract and
field are selected, then enter the season, year, and application amount. Finally,
click the "Set" button.
Figure 4.8 Most Recent Lime Applications Dialog Box. This box displays the most recent
lime applications for all the fields in a particular tract.
Planting Season Dialog Box
Adding or editing crops in the crop rotation section of the “Field Information” dialog
box brings up the “Planting Season” dialog box (Figure 4.9). From this dialog box
you select a crop to add to the planned rotation for that field. Selecting one of the
predefined crops, makes use of NutMan's database values for harvest date, tillage,
yield units, and percent legumes. NutMan can also automatically calculate for you
32
(when you click the "Calculate" button) the proper lime application, crop yield, and
crop nutrient needs based on field features, soil type, and soil test results. If you
choose to enter a crop that is not on the predefined list, then you will have to enter
all of these values yourself and the "Calculate" button is grayed-out.
Figure 4.9 The Planting Season Dialog. You can use either the “TAB” key or the
mouse to move from one entry to the next.
Selecting a Crop
To select a crop either choose a predefined crop from the pull-down list or
click the "Other..." button. The crops available in the predefined list are
variable and depend on the planting season. If you click "Other...", NutMan
will display a dialog prompting you for the name and the yield units (i.e.
tons, bushels, lbs.; NutMan enters the "/acre" for you) for that crop. Enter the
appropriate information and click on "OK". The crop name will now be
displayed in the "Planting Season" dialog box. For predefined crops, the
crop name is displayed via the pull-down list.
•
Multi-year crops: Multi-year crops like Alfalfa are listed with two options:
(1) Establishment (estb.) and (2) Maintenance (maint.). The default
33
duration for an establishment crop is five years and for a maintenance
crop is one year. You can change these values to reflect your rotation
conditions more accurately.
•
Double-Crop Soybean: If your rotation involves a soybeans doublecropped with Wheat (or Barley), simply select either Wheat/Soy.D.C (or
Barley/Soy.D.C) from the list. You need not enter these two crops as
separate entities. The system will automatically add these two crops to
your rotation.
Planting and Harvesting Dates
If the crop you have selected is the first crop in the planned rotation for the
field, the planting season of the crop defaults to the first season of the
current plan; if it is not the first crop, the planting season defaults to the
harvest season of the previous crop. The harvest season is automatically
calculated (for crops selected from the predefined list) according to the
number of seasons for that crop. You can change these data manually. If
you enter a crop that is not predefined, then you must select the proper
harvest season yourself.
Tillage
Select one of “Conventional”, “Minimum”, or “No-Till” to describe the tillage
practices for the selected crop. This is done automatically for predefined
crops.
Crop Yield
Crop yield is influenced by soil type, field features, and soil test results. Crop
yields (and units) for predefined crops are stored in NutMan's database.
NutMan will calculate the yield for predefined crops when you click the
"Calculate" button. You can manually change the calculated crop yield to
customize the plan for your specific field. If the crop yield is modified
manually, a little star will appear on the right side of the yield box indicating
that it has been modified. This change will also be indicated in the "Field
Summary" report. After you have changed the crop yield manually, you
should click the "Calculate" button and NutMan will recalculate the crop
nutrient need for the different yield. You may not see any change in nutrient
34
needs depending on the crop, the soil test results, and the degree of change
in the crop yield. However, clicking the "Calculate" button again removes
the little star from beside the yield box.
Crop Nutrient Needs
Crop nutrient needs (N, P, K) is the nutrient deficit determined by the
nutrient requirements for that crop and soil test results for that field. If the soil
test results show a nutrient level above the nutrient requirements of the
chosen crop, then there is no nutrient deficit and no nutrient need. Crop
nutrient requirements for predefined crops are stored in NutMan's database.
NutMan will calculate the nutrient needs for predefined crops when you
click the "Calculate" button. You can manually change the calculated crop
nutrient needs to customize the plan for your specific field. See the
Calculation section below for instructions on preventing customized crop
nutrient needs from being overridden.
Soil Test Results
Soil test results shown in the "Planting Season" dialog are based either on
the most recent soil test for that field, the defaults set in NutMan
Preferences, or the defaults set with the "Soil Test History" dialog box's "Set
Default" button. Soil test results that are based on one of the defaults are
signified by "*Default". You may enter a recent soil test by clicking the "Soil
Tests" button and adding a test in the "Soil Test History" dialog box. Once
you are done adding a soil test, click on “OK” to go back to the “Planting
Season” dialog. Whenever you change the soil test results, the program will
prompt you if you need the crop yield and
recommended
lime
application)
recalculated.
nutrient
If
you
needs
(and
choose
“Yes”
(recommended) then the crop yield, crop nutrient needs, and recommended
lime application will be updated.
Lime
The lime application section of the "Planting Season" dialog box displays
the most recent lime application date and amount. NutMan will recommend
a lime application amount based on the soil test results, if necessary, when
you click the "Calculate" button. (NutMan can not recommend lime
applications for seasons with non-predefined crops because it does not know
35
the ideal soil pH for that crop.) This recommended lime application will be
entered into the "Lime History" dialog box when you click "OK". If you do
not want to use the recommended lime application, then change it to a
different one (must be a positive integer) or enter a "0" for no application.
You may also click on the "Lime" button to edit the lime application history
for that field. See the Calculation section below for instructions on
preventing customized lime applications from being overridden.
Calculations
Calculations of crop nutrient needs and recommended lime applications for
predefined crops are performed each time you click the “Calculate” button.
If you manually modified any of those values then click the "Calculate"
button, your changes will be lost. To prevent such a loss from happening,
follow this procedure:
1. Chose a crop from the predefined list or define a new one.
2. Click the "Calculate" button.
3. Review the calculated value for crop yield and modify it as
necessary for your field.
4. Click the "Calculate" button again.
5. Review the calculated values for crop nutrient needs and modify
them as necessary for your field.
6. Review the recommended lime application and modify it as
necessary for your field.
7. Click the "OK" button to go back to the “Field Information” dialog.
From here you can add/edit more crops to adequately represent your
crop rotation.
As a shortcut, if you select a predefined crop and click “OK”,
all crop yield, crop nutrient needs, and recommended lime application
calculations will be done automatically. However, you will not get to see
or modify them unless you go back and edit that season.
36
Chapter 5. Manure Production
If you are creating a new plan and you are done describing your Farms (entering tracts and
fields, soil tests, etc.), NutMan will check to see if you indicated that you have confined
livestock. If so, NutMan will automatically open the "Manure Groups" dialog box (Figure
5.1) where you can begin to enter manure production information. If you are editing an
already saved plan, then you should choose "Manure Production" under the Farm menu to
get to the "Manure Groups" dialog box.
Figure 5.1 Manure Groups Dialog Box. You can add/edit/delete manure groups on your
farm using this dialog box.
The "Manure Groups" dialog box shows a list of animal groups on the farm. Each animal
group has a group name, count (number of animals), quantity or total annual manure
production in tons (solid manure) or kgals (liquid manure), and manure nutrient analysis.
The total amount of nutrients contained in the liquid and solid manure is also shown in this
dialog box. This total amount is broken down into nitrogen, phosphorus, potassium, and
ammonium amounts (lbs). In this dialog, you can add, edit or remove the animal groups on
37
your farm. These tasks will be explained in the following sections. Applications of manure
are planned with the "Manure Allocation" dialogs (see Chapter 7).
Adding an animal group
If you click on the "Add" button from the "Manure Groups" dialog box, a "Manure Types"
dialog (Figure 5.2) will appear allowing you to add particular types of manure. These refer
to the basic types of animal groups (dairy, swine, etc.) and the kinds of manure produced on
your farm (liquid slurry, semi-solid, etc.).
Figure 5.2 The Manure Types Dialog Box. You should indicate the types of manure you
expect to be produced on your farm.
Multiple boxes can be checked, if you need to add several types of manure. After you finish
selecting manure types, click on the "OK" button or press ENTER.
An "Animal Groups" dialog box (Figure 5.3) will appear for each manure type selected
(after you finish one, NutMan will open the next one). Only one animal type may be
selected in the "Animal Groups" dialog box. If you need to add more than one type, you
may add other groups with the "Add" button in the "Manure Groups" dialog box (Figure 5.1).
38
Figure 5.3 The Animal Groups Dialog Box. For each type of manure you select, the
program prompts you to indicate the number of animal groups in that category.
For each animal type enter the number of animal groups (an animal group is
typically a herd or flock). A common error is to enter the number of animals rather
than the number of animal groups. This number will generally be less than five. If
you input a number larger than five, a warning message box will appear to confirm
your action. Choose "No" to cancel your input, or "Yes" to continue. You can
discontinue your input of "Animal Groups" by clicking the "Cancel" button. A
"Manure Production" dialog box (Figure 5.4) will appear if you click the "OK" button
in the "Animal Groups" dialog.
Figure 5.4 The Manure Production Dialog Box.
39
The Manure Production Dialog Box
You can enter information regarding manure production and handling for a
particular animal group and manure type using the "Manure Production" dialog box
(Figure 5.4).The top right corner of the dialog box indicates the animal type and the
manure type as indicated in the “Animal Groups” dialog box (Figure 5.3). Give a
descriptive name to the animal group in the top left corner.
Manure Nutrient Analysis
The middle left portion has manure nutrient analysis information in it. The
manure analysis is default data based on the manure type. NutMan does not
contain default values for several types including: dairy cow liquid lagoon,
beef cow liquid lagoon and slurry, and swine semi-solid. You may change
the analysis as necessary.
Manure Production
The "Manure Production" box includes the number of animals in your
group, total annual production of manure in kgals, and the amount of
manure available for sale. NutMan enters a default number of animals for
you. Modify this number to reflect your animal group, then click in the Total
Annual Production box to have NutMan recalculate the total annual
manure production for you. You can see or modify the how NutMan
determines the manure production amount by clicking on the “Calculation”
button. A calculation dialog box will appear to allow you to change
individual parameters and to recalculate the total annual production. There
is a calculation dialog box for each manure type because each formula is
unique (Figure 5.5).
Also in the Manure Production box are places to enter how much of this
type of manure to sell and buy annually. The total available amount of
manure is the total annual manure production minus the amount sold, plus
the amount purchased. The seasonally available amount is the total
available amount times the percentage determined
by
the
season
production percentage.
40
Figure 5.5 Manure calculation dialog for poultry (above) and liquid
manure (below).
Manure Storage
Toward the middle left of the “Manure Production” dialog box is the Manure
Storage section. Here you indicate the type of storage you have by selecting
from a list of available options, give the capacity of storage and other
descriptions of the storage facility.
41
Season Production
The bottom right of this “Manure Production” dialog has a “Season
Production” section. This splits up the total annual manure production for an
animal group into seasonal percentages.
Editing an animal group
Editing an animal group is similar to adding a group. Go to the “Manure Production” option
under the “Farm” menu. It will bring you the “Manure Groups” dialog box. Double-click on
the animal group you want to edit and NutMan will open the “Manure Production” dialog
box. This box will show all the information and data already entered for the selected animal
group. You can modify these data and click “OK” after all the changes are made.
Removing an animal group
Removing an animal group is straight forward. Just select the group you want to remove,
and click the "Delete" button. This will remove the animal group from the “Manure Groups”
dialog box.
42
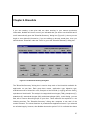
Chapter 6. Biosolids
If you are creating a new plan and are done entering in your manure production
information, NutMan will check to see if you indicated that you wish to use biosolids and if
so will automatically open the "Biosolids Summary" dialog box (Figure 6.1) where you can
begin to enter biosolid information. If you are editing an already saved plan, then you
should choose "Biosolids" under the "Farm" to get to the "Biosolids Summary" dialog box.
Figure 6.1 The Biosolids Summary Dialog Box.
The "Biosolids Summary" dialog box is used to keep track of the biosolids available for
application on your farm. Each group has a name, application type, digestion type,
available amount of biosolid in tons, analysis of the biosolid (in mg/Kg) and the CaCO 3
equivalent of the biosolid. The analysis is categorized into nitrogen (TKN), phosphorus (P),
potassium (K), ammonical nitrogen (NH4), and nitrate nitrogen (NO3). In this dialog, you can
add, edit or remove biosolid groups on your farm. These tasks will be explained in the
following sections. The "Biosolids Summary" dialog also computes a sum total of the
nutrient contents. The values listed are in pounds before application losses. If you selected
an unlimited supply, however, then NutMan inserts the symbol "UL" for unlimited into these
43
tables to signify that there is no limit to the nutrients available. Applications of biosolids are
planned with the "Manure Allocation" dialogs (see Chapter 7).
Adding a Biosolid Group
If you click on the "Add" button of the "Biosolids Summary" dialog box, a "New Biosolids
Group" dialog box (Figure 6.2) will appear allowing you to add a new biosolid group.
Figure 6.2 The New Biosolids Group Dialog Box. You can add a new biosolids group or
edit an existing one using this dialog.
• Name: This field appears in the top left corner of the “New Biosolids Group” dialog. Enter
a descriptive name to the biosolid group here.
• Application Type: Beneath the name box is the application type information. Here
choose the type of biosolid application: liquid or cake/solid. Indicate the extent of the solid
portion (%solid). If the cake/solid application type is chosen, %solid defaults to 30%. If the
liquid type of application is chosen, %solid defaults to 0. You can change the percentage
of solid here as necessary.
• Biosolid Nutrient Analysis (mg/Kg): The middle portion of the dialog box contains an
analysis of the biosolid's nitrogen (TKN), phosphorus (P), potassium (K), ammonical nitrogen
NH4-N, and nitrate nitrogen (NO 3) contents. The default is ‘zero’ for all these values. You
must customize the values for your biosolid.
44
• CaCO 3 Equivalent: The bottom portion of the dialog has two options for indicating the
CaCO3 equivalency of the biosolid. You can specify the pH of the biosolid and/or indicate
the %CCE of the biosolid in the boxes provided. These fields are enabled only if a "Lime
Stabilized" digestion type is selected.
• Digestion type: The top, right corner of the "New Biosolids Group" dialog has a list to
indicate the digestion type involved in the preparation of the biosolid. You can click on the
list and select one of four types of digestion (Lime Stabilized, Aerobic, Anaerobic and
Composed).
• Available Amount: Below the Digestion Type list are the options to indicate the available
amount of biosolids (in Tons) from the current biosolid group. If you choose a limited
amount of biosolids as being available then indicate the number of tons in the box
provided. You can also specify unlimited biosolid availability where you need not mention
the number of tons available.
The bottom right portion of this dialog box has three buttons. You can choose “Cancel” to
discard any changes you made in this dialog. You can add a narrative to this biosolid group
by clicking on the “Narrative” button. After you complete all the information in this dialog
click on “OK” to go back to the "Biosolids Summary" dialog. This dialog lists all the biosolid
groups and provides a summary of the nutrient contents. The values listed are in pounds
before application losses.
Editing a Biosolids Group
Editing a biosolids group is similar to adding a group. Go to the “Biosolids” option under the
“Farm” menu. It will bring you the “Biosolids Summary” dialog box. Double click on the
animal group you want to edit and it will pop up the “New Biosolids Group” dialog. This box
will show all the information and data already entered for the selected biosolid group. You
can modify these data and click “OK” after all the changes are made.
Removing a Biosolids Group
Removing a biosolids group is straight forward. Just select the group you want to remove,
and click the Delete button. This will remove the group from the “Biosolids Summary”
dialog box.
45
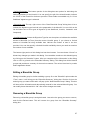
Applying Biosolids to Your Farm
Applications of biosolids are planned with the "Manure Allocation" dialogs (see Chapter 7).
This combination allows the planner to easily choose the best mix of manure and biosolid
types for effective and efficient nutrient applications. NutMan allows you to keep track of
past biosolid applications through the "Biosolids History" dialog (Figure 6.3).
Biosolids History
In the past manure section of the "Field Information" dialog box (Figure 4.3) there is
a button called “Biosolids”. Click on that button to edit the biosolids application
history for that field. This box contains information about the time and amount of
the biosolid applications by tract and by field.
Figure 6.3 The Biosolids History Dialog Box. You can enter biosolid applications
in individual fields by season in this box.
46
You can enter biosolid applications by season, year and quantity applied. However,
you can only enter 'historical data', i.e. biosolid applications before the beginning
date of the current plan. You can jump to the “Lime History” dialog or go to the “Soil
Test dialog” from this dialog box. There is an option in this "Biosolids History" dialog
to browse the biosolid applications across all the fields in a particular tract on your
farm. Simply click on the “Browse All” button and NutMan will open the "Most
Recent Biosolids Applications" dialog box (Figure 6.4) displaying information on all
the fields in a tract, date when biosolids were applied, and the quantity applied.
Figure 6.4 The Most Recent Biosolids Applications Dialog Box. View the most
recent biosolid applications for your fields.
You may also reach the "Most Recent Biosolids Applications" dialog box
by selecting
"Biosolids" from the "Browse Menu" on the menu bar. You can view this information for all
47
the tracts in your farm by simply changing the tract name. You may not enter a new
biosolid application from this dialog box. You can only edit biosolid applications prior to
this plan.
48
Chapter 7. Nutrient Applications
The application of nutrients includes manure (including biosolids) allocations and
commercial fertilizer applications. NutMan was designed to support the convention of
determining the nutrient needs of a field first, then allocation manure/biosolids toward that
need and lastly applying commercial fertilizer to fill the nutrient deficit. Therefore, we
suggest following this convention in creating your nutrient plan. For the user's convenience,
manure can be allocated by field or by season. You may select these different options in
addition to the commercial fertilizer option from the “Nutrients” menu on the NutMan menu
bar.
Be sure to read the "Notes" section in Chapter 3 for instructions on keeping notes of your
nutrient applications.
Manure Allocations by Field
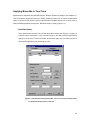
If you choose "Manure Allocation by Field" from the "Nutrients" menu, a "Manure
Allocation by Field" dialog box (Figure 7.1) will open. This dialog box shows the seasons
and associated crops for a particular field for each season in the nutrient management
plan. From this dialog you may view and manage your manure and biosolid allocations for
that particular field.
This dialog has the tract and field names at the top of the screen. It also indicates the
acreage of the field just below the tract name.
49
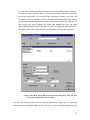
Figure 7.1 Manure Allocation by Field Dialog Box.
Allocating Manure/Biosolids
1. Select a Season:
Towards the middle left on this dialog box there is a table indicating the season,
the crop name and the allocation of manure or biosolid to that crop. Season is
listed by the year and a letter indicating one of Spring, Summer, Fall, or Winter.
Click once on a season to select it (it should now be highlighted). Doubleclicking on any particular crop or season to get to the “Manure Allocation By
Season” dialog (Figure 7.2). The allocation is signified by the amount of the first
type of manure/biosolid that was allocated for that season, followed by the first
letter of the allocation units, an abbreviation of the manure/biosolid type, and a
plus sign (+) if more than one type of manure/biosolid that was allocated for that
season. Finally, if one of the manure types will overflow its storage container, a
small asterisk is placed in the allocation column in that season to alert the
nutrient planner. Below the table of seasons is table that lists the nutrient needs
balance for the season selected. This shows before commercial fertilizer
50
application
and
after
commercial
fertilizer
application.
The
"before
commercial fertilizer" row is the nutrient needs balance after manure/biosolid
allocations. The "after commercial fertilizer" row is the balance after both
manure/biosolid and commercial fertilizer applications.
2. Select a Manure/Biosolid Type to Allocate:
Choose a type of manure or biosolid to allocate to the field for the season
selected. You may choose from any of the manure/biosolid groups you defined
(see Chapters 5 & 6). Also choose the method to apply the manure/biosolid to
the field. NutMan will then display some information about the manure/biosolid
type selected. NutMan lists (for manure only) the total amount of the selected
manure type to be produced during the period of the nutrient plan as "Excess
Manure". For both manure and biosolids the amount available for that season is
displayed in tons and displays in parentheses the maximum allocation for the
field in question. For biosolids, NutMan displays the maximum allowable
allocation (set in NutMan preferences and/or "Farm Information" dialog box).
Lastly, NutMan displays the nutrient analysis for the manure/biosolid type
selected, modified by the application method.
3. Calculate an Allocation Amount:
First, look at the nutrient needs balance table for the season/crop selected
(located beneath the seasons table). These are the target numbers for your
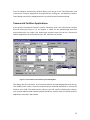
nutrient applications. NutMan is set up to first allocate manure and biosolids to
toward the nutrient needs and then make up the difference with commercial
fertilizer. For this calculation, the "before commercial fertilizer" row is the target
nutrient numbers. Enter an amount to allocate in the "Amount to Allocate" box.
Then click the "Allocate button. This amount should be no more than the
available or allowable amounts (whichever is valid). NutMan can automatically
calculate a suggested amount based on the nitrogen content of
the
manure/biosolid and the nitrogen nutrient need. To use this feature, click the
"Allocate to N" button and then the "Allocate" button.
NutMan will display a warning if a manure/biosolid allocation exceeds
the nitrogen nutrient need. However, you can still go ahead with the
allocation.
Whenever you choose to allocate a biosolid, NutMan prompts you to, "Check
that this allocation does not exceed soil pH limits." Click the "OK" button, then
51
click somewhere else on the screen. The biosolid allocation should now be
displayed in the total allocation section.
Once a manure/biosolid allocation has been made, it will be indicated in the
season table (described above), in the nutrient need balance table (with excess
amounts in parentheses), and in the total manure/biosolid allocation table
(shows the total allocated manure/biosolid on the field in the season selected).
More than one manure/biosolid allocation can be made per season to the same
field. You may choose different manure/biosolid types or even multiple
applications of the same type within a season. To remove an allocation from a
season, be sure the right season is selected in the season table, select the
allocation to be removed from the total manure/biosolid table, and then click
the "Remove" button or just double-click the allocation. All allocations (for ALL
seasons in the nutrient plan) in a field can be cleared by clicking on the “Reset”
button.
Caution! There is no 'undo' when you click the "Reset" button.
Remember that the "Reset" button clears all the allocations for the field for
every season in the nutrient plan.
NutMan will also calculate the after commercial fertilizer nutrient need balance for
you (in the nutrient needs balance table), once you have defined an application
(see Commercial Fertilizer Applications below). You can go to the "Seasonal
Manure Allocation" and "Commercial Fertilizer Application" dialog boxes by
clicking the corresponding buttons. These dialog boxes will be displayed with the
currently selected field and season.
Manure Allocation by Season
If you choose "Manure Allocation by Season" from the "Nutrients" menu, the "Manure
Allocation by Season" dialog box (Figure 7.2) will appear showing a list of manure/biosolid
allocations for all fields in a particular season. It will list all the information about that
season along with the tract/field name, acreage, crop, nutrient balance and the amount of
the first manure/biosolid allocation.
52
Figure 7.2 Manure Allocation by Season Dialog.
The top half of this dialog box has a table that groups all the manure allocations by a
single season. Changing the season in the “Season” list will allow you to view all the
manure allocations in another season. Other information and tasks are similar to the "Field
Allocation" dialog box. By clicking the “Reset” button, all the manure allocations in the
selected season (for ALL fields) will be cleared.
Caution! There is no 'undo' when you click the "Reset" button. Remember that the
"Reset" button clears all the allocations for the field for every season in the nutrient
plan.
The bottom half of this screen has a “Manure Allocation” section to the left and the “Total
Allocated” section to the right. These sections are the same as those described in the
“Manure Allocation by Field” dialog.
53
From the "Manure Allocation by Season" dialog, you can go to the "Field Allocation" and
"Commercial Fertilizer Application" dialog boxes by clicking the corresponding buttons.
These dialog boxes will be displayed with the currently selected season and field.
Commercial Fertilizer Applications
If you choose "Commercial Fertilizer" from the "Nutrients" menu, the "Commercial Fertilizer
by Field" dialog box (Figure 7.3) will appear. It shows all the seasons/crops with their
nutrient balances in a single field. Selecting a season/crop will list all the commercial
fertilizer applications for that season/crop in the "Fertilizer List" section.
Figure 7.3 The Commercial Fertilizer by Field Dialog Box.
This dialog has the Tract name, the Field name and the acreage displayed across the top.
The middle portion of the screen has a table that lists seasonal allocations of commercial
fertilizer in the field. This table has the season (year and a suffix indicating the season),
crop, nutrient balance after manure/biosolid allocations, and the total commercial fertilizer
applications received in that season.
54
Applying Commercial Fertilizer
1. Select the Season:
At the top of this dialog box there is a table indicating the season, crop name,
nutrient balance after manure/biosolid allocations, and the total commercial
fertilizer applications received in that season. Season is listed by the year and a
letter indicating one of Spring, Summer, Fall, or Winter. Click once on a season
to select it (it should now be highlighted).
2. Select an Application Method:
The bottom left of this dialog box has the fertilizer application section. Here you
must specify an application method (broadcast, banded, topdress, or sidedress).
Select one from the drop-down list.
3. Calculate an Application Amount:
From the fertilizer application section, note the new nutrient balance. It should
be the same as the balance after manure/biosolid allocations displayed in the
upper section of the dialog box. This is the target amount of N, P, and K to
apply. Chose an fertilizer application rate from blends that you have available
that will best meet the nutrient needs of the crop. Enter that blend of N, P, and
K into the appropriate area. You could also a select a recent application from
the recent application drop-down list. Next, click on the "Apply" button. The
application you just defined should show up in the fertilizer list on the bottom
right. The new balance should be recalculated on the bottom left and the
application should be added to the total application for the corresponding
season at the top of the dialog box.
To remove a fertilizer application, be sure that the correct tract, field, and
season are selected at the top of the dialog box. Then from the fertilizer list in
the lower right, select the application to remove, and click on the "Remove"
button.
55
Chapter 8. Plan Output
Nutrient Management Job Sheet
Once you have completed the Farm, Manure, Biosolid, and Nutrient information, the
program will show a “Job Sheet” in the background. The Job Sheet shows the current
nutrient management plan in a table. Each tract has a Job Sheet table. Each Job Sheet
table has a heading including the name of the farm, tract, and county. It includes the
following columns: field CFSA No., name, size (acreage), year of planting, crops in the
rotation, nutrient needs, manure rate & type (season), incorporation time (IT), applied
manure N-P-K, nutrient balances (NET), commercial N-P-K, and list of note numbers. All
numbered notes will be shown in their entirety at the bottom of a page.
In addition to the Job Sheet, the program generates several other summaries as part of its
output. These can be accessed under the “View” menu in the NutMan program menu bar. A
brief description of each of these options follows.
Farm Summary
The "Farm Information" option under the “View” menu shows a summary of the farm. It
displays the current plan duration, the name and location of the farm, the name of the
specialist and all the narratives associated with the “Farm Information” dialog. This sheet
also lists the tract names, location and their CFSA number. Field level information is not
summarized under this option.
Field Summaries
This option gives you a summary of all the information you would have entered for your
fields. It lists the total acreage, the location, soil test data, the hydrologic group and the
slope class of each field in your farm by the tract name and the field name. It also lists soil
warnings, the crop rotation in the field and the most recent lime application information in
the summary.
56
Manure Schedule
The "Manure Schedule" report gives you a manure spreading summary in a format. The
season in which the manure is spread, the field on which manure is applied, the
area/acreage of the field, rate of application/acre and the total manure application in that
field (for that season!). It also lists the crop in that season and gives you a running total of
manure applied by the manure type.
Manure Summaries
The "Manure Summaries" option gives you an overview of the manure produced on your
farm based on the livestock information provided. It summarizes the number of animal
groups and the number of animals in each group. It breaks up the total manure produced by
season, gives you an analysis of the manure (TKN, P 2O5, K 2O and NH 4) and tabulates the
plant available nutrients under “Immediate Incorporation”, “Surface Applied” and “Residual
N” categories.
Productivity Report
The "Productivity" report indicates productivity classes for major crops (based on soil series)
by field and also indicates the environmental risks associated with individual fields. This
report also indicated what the productivity classes mean (in terms of yield/acre) in a tabular
format.
Soil Test
The "Soil Test Summary" lists the soil test results (P2O5, K 2O and pH) and includes lime data
by date and tons per application. Results are listed by field names under each tract on the
farm.
Application Summary
The "Application Summary" tabulates the list of manure and commercial fertilizer
applications given by crop. It lists the farm name, the planner, the crop and the year in
which it is raised. Each crop gets a separate summary of its nutrient applications in this
report.
57
Printing Your Nutrient Management Plans
To print these reports, first choose the window (report) you want to print by opening it and
bringing it to the foreground. From the "File" menu, choose "Print Preview" to preview your
plan on the screen. You may adjust some settings such as the range of the printing pages,
page orientation, or printer dpi from the "Page Setup" option in the "File" menu. When you
are satisfied with the setup, choose "Print" from the "File" menu (or toolbar) to print the
plan.
If you are having problems with the margins of your printed reports, be sure that
you are printing at 300 dpi.
58