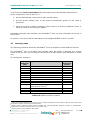
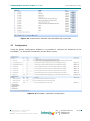
1
IntesisBox ® DK-RC-ENO-1i DK-RC-ENO-1iC EnOcean Interface for DAIKIN Air Conditioners Compatible with SKY and VRV lines User's Manual r1 eng Issue Date: 02/2012 IntesisBox® DK-RC-ENO-1i / 1iC © Intesis Software S.L. User’s Manual r1 eng All Rights Reserved. Information in this document is subject to change without notice. The software described in this document is furnished under a license agreement or nondisclosure agreement. The software may be used only in accordance with the terms of those agreements. No part of this publication may be reproduced, stored in a retrieval system or transmitted in any form or any means electronic or mechanical, including photocopying and recording for any purpose other than the purchaser’s personal use without the written permission of Intesis Software S.L. Intesis Software S.L. Milà I Fontanals, 1 bis, 1º 08700 Igualada Spain TRADEMARKS All trademarks and tradenames used in this document are acknowledged to be the copyright of their respective holders © Intesis Software S.L. - All rights reserved This information is subject to change without notice ® IntesisBox is a registered trademark of Intesis Software SL URL Email tel http://www.intesis.com [email protected] +34 938047134 2 / 46 IntesisBox® DK-RC-ENO-1i / 1iC User’s Manual r1 eng Interface for integration of Daikin air conditioners into EnOcean systems. 2 models are available for this interface, with the following Order Codes: DK-RC-ENO-1i EnOcean communication frequency: 868 MHz DK-RC-ENO-1iC EnOcean communication frequency: 315 MHz © Intesis Software S.L. - All rights reserved This information is subject to change without notice ® IntesisBox is a registered trademark of Intesis Software SL URL Email tel http://www.intesis.com [email protected] +34 938047134 3 / 46 IntesisBox® DK-RC-ENO-1i / 1iC User’s Manual r1 eng INDEX 1. Presentation .................................................................................................... 6 1.1 Typical Application......................................................................................... 7 2. Quick setup ..................................................................................................... 8 3. Connection and placement................................................................................. 9 3.1 Connection to AC unit .................................................................................... 9 3.2 Connection of binary inputs .......................................................................... 10 3.3 Placement .................................................................................................. 11 3.3.1 Screening zones .................................................................................... 11 3.3.2 Penetration Angle .................................................................................. 12 3.3.3 Distance between receiver and sources of interference .............................. 12 3.3.4 Use of repeaters ................................................................................... 12 3.4 Power up .................................................................................................... 13 4. Manual configuration ...................................................................................... 14 4.1 Configuration .............................................................................................. 14 4.2 Normal mode .............................................................................................. 15 4.2.1 Monitor mode ....................................................................................... 15 4.2.2 Teach-in .............................................................................................. 16 4.3 Learning mode ............................................................................................ 17 4.3.1 Learning sensors ................................................................................... 18 4.3.2 Learning gateways ................................................................................ 18 4.4 Erasing mode.............................................................................................. 19 4.4.1 Deleting one by one .............................................................................. 19 4.4.2 Deleting all the devices linked to one profile ............................................. 19 4.4.3 Return to factory settings ....................................................................... 20 4.5 Remote management disablement ................................................................. 20 5. Remote configuration ...................................................................................... 21 5.1 Reception profiles ........................................................................................ 21 5.2 Transmission profiles ................................................................................... 21 5.3 Configuration .............................................................................................. 22 5.3.1 Machine operation ................................................................................. 23 5.3.2 Window operation ................................................................................. 23 5.3.3 Keycard operation ................................................................................. 23 5.3.4 Occupancy operation ............................................................................. 24 5.3.5 Input operation ..................................................................................... 24 5.3.6 Radio operation..................................................................................... 25 5.4 Default values ............................................................................................. 25 6. Special Behaviours ......................................................................................... 26 6.1 Window contact .......................................................................................... 26 6.2 External temperature sensors. Virtual temperature .......................................... 26 6.3 Key card .................................................................................................... 27 6.4 Occupancy sensors ...................................................................................... 27 6.5 MultiTeach-in procedure ............................................................................... 28 6.6 Binary inputs .............................................................................................. 28 6.7 Setpoint ..................................................................................................... 28 6.8 Master of mode ........................................................................................... 29 7. Status monitoring........................................................................................... 30 7.1 L2 (yellow): AC monitoring ........................................................................... 30 7.2 L1 (green): EnOcean monitoring ................................................................... 30 7.3 L3 (green): Tx data activity LED .................................................................... 30 8. How to? ........................................................................................................ 31 8.1 Check if my AC unit can be controlled with the IntesisBox® .............................. 31 8.2 Disable AC remote controller ........................................................................ 31 8.3 Link sensors to the IntesisBox® ..................................................................... 31 © Intesis Software S.L. - All rights reserved This information is subject to change without notice ® IntesisBox is a registered trademark of Intesis Software SL URL Email tel http://www.intesis.com [email protected] +34 938047134 4 / 46 IntesisBox® DK-RC-ENO-1i / 1iC User’s Manual r1 eng 8.4 Control & monitor the IntesisBox® from an EnOcean gateway ........................... 8.5 Control & monitor the IntesisBox® from a software application .......................... 8.6 Configure parameters .................................................................................. 8.7 Check if the devices have been correctly learnt ............................................... 8.8 Protect the IntesisBox® from undesired remote access ..................................... 8.9 Improve radio coverage of IntesisBox® .......................................................... 9. Technical data and dimensions ......................................................................... 10. Dimensions.................................................................................................... 11. AC Unit Types compatibility ............................................................................. 12. AC profile data (Generic HVAC interface) ........................................................... 12.1 EEP: 07-20-10 ............................................................................................ 12.2 EEP: 07-20-11 ............................................................................................ 12.3 EEP: 07-10-03 ............................................................................................ 13. Error Codes ................................................................................................... 14. EnOcean Interoperability ................................................................................. 15. Regulations and standards............................................................................... © Intesis Software S.L. - All rights reserved This information is subject to change without notice ® IntesisBox is a registered trademark of Intesis Software SL URL Email tel http://www.intesis.com [email protected] +34 938047134 31 32 32 32 32 32 33 34 34 35 35 38 40 41 44 46 5 / 46 IntesisBox® DK-RC-ENO-1i / 1iC User’s Manual r1 eng 1. Presentation IntesisBox® DK-RC-ENO-1i and IntesisBox® DK-RC-ENO-1iC devices allow a complete and natural integration of Daikin air conditioners with EnOcean control systems both in their 868 MHz (DK-RC-ENO-1i) and 315 MHz (DK-RC-ENO-1iC) versions. Compatible with SKY and VRV lines (check section 11). Air Conditioner Indoor unit DK-RC-ENO-1i DK-RC-ENO-1iC 4 x potential-free binary inputs , USB … IntesisBox® DK-RC-ENO-1i / 1iC (IntesisBox® from now on) allows monitoring and control, fully bi-directionally, all the functioning parameters of Daikin air conditioners from EnOcean installations. Small dimensions. Quick installation and possibility of hidden installation. External power not required. Direct connection to the AC indoor unit (split unit). Fully EnOcean interoperable. Control and monitoring, from sensors or gateways, of the internal variables of the indoor unit and error codes and indication. Use the air conditioner ambient temperature or the one measured by an EnOcean temperature sensor or Thermostat. AC unit can be controlled simultaneously by the remote control of the AC unit and by EnOcean devices. Advanced control functions: use it as a room controller. 4 binary inputs. They work as standard EnOcean binary inputs as well as being used to control the AC directly. © Intesis Software S.L. - All rights reserved This information is subject to change without notice ® IntesisBox is a registered trademark of Intesis Software SL URL Email tel http://www.intesis.com [email protected] +34 938047134 6 / 46 IntesisBox® DK-RC-ENO-1i / 1iC User’s Manual r1 eng 1.1 Typical Application In Figure 1.1 it is shown a typical application of IntesisBox® in a hotel room. The different devices that control the AC unit, like switches, key cards, window contacts, are connected to it through the IntesisBox®. • EnOcean standard communication • Small Dimensions • Fast Installation • No external PS • Several Profiles • Direct connection to AC unit 1) Batteryless wireless switches controlling lighting and/or AC 5) Climatic sensors 2) Key card switch controls access to a room and turns on AC and lighting when entering a room 6) 7) Position sensors – window handle and window contact – cut out heating and air-conditioning when window are open 3) AC unit connected to IntesisBox® 8) Central control 4) Room temperature sensor 9) IntesisBox® Figure 1.1 Typical application of IntesisBox® in a hotel Typical transmitting EnOcean devices: Thermostat Switches Key card Window contact Occupancy sensor ... Typical receiving EnOcean devices: Actuators Gateway ... © Intesis Software S.L. - All rights reserved This information is subject to change without notice ® IntesisBox is a registered trademark of Intesis Software SL URL Email tel http://www.intesis.com [email protected] +34 938047134 7 / 46 IntesisBox® DK-RC-ENO-1i / 1iC User’s Manual r1 eng 2. Quick setup 1. Connect the IntesisBox® to the Air conditioner (section 3) 2. Wait for the initialization process to be finished (section 3.4) 3. Configure the IntesisBox®: a. Manually (section 4.1) b. Remotely using the Intesis Configuration Software (section 5.3) 4. Learn the EnOcean sensors/gateways that will control the IntesisBox®: a. Manually (section 4.3) b. Remotely using the Intesis Configuration Software (section 5.1) 5. Teach the signals of the IntesisBox® that will be sent to other EnOcean actuators/gateways: a. Manually (section 4.2.2) b. Remotely using the Intesis Configuration Software (section 5.3) 6. (Optional) Protect the IntesisBox® from an undesired remote access (section 8.8) 7. The device is ready to be used © Intesis Software S.L. - All rights reserved This information is subject to change without notice ® IntesisBox is a registered trademark of Intesis Software SL URL Email tel http://www.intesis.com [email protected] +34 938047134 8 / 46 IntesisBox® DK-RC-ENO-1i / 1iC User’s Manual r1 eng 3. Connection and placement 3.1 Connection to AC unit The IntesisBox® connects directly to the DAIKIN two wire P1/P2 bus. Depending on which controllers are available the recommended connection methods are the following (details in Figure 3.1): Wired remote control available. Connect the interface as Slave in parallel with the wired remote controllers (Wall controller acts as master). Infrared remote control available. Connect the interface as Master in parallel with the infrared remote controller (Infrared receiver) as Slave. No remote control available Connect the interface directly to the P1/P2 bus of the indoor unit as Master when there is no DAIKIN remote controller. Disconnect mains power from the AC unit and use a 2 wire cable with a diameter of 0.75mm2 to 1.25mm2 for the connection of the IntesisBox®, DAIKIN’s remote controller and its corresponding indoor unit. Screw the suitably peeled cable ends in the corresponding P1/P2 terminals of each device, as summarized in Figure 3.1. Maximum P1/P2 bus length is 500 meters, cable has no polarity. Insert the cable through the hole and follow the instructions below Remote Control DAIKIN AC Indoor Unit Internal electronic control board P1 P2 P2 P1 ® IntesisBox Max. 500 m Insert the cable through the hole and follow the instructions below AC Indoor Unit Internal electronic control board P1 P2 ® IntesisBox Max. 500 m Figure 3.1 IntesisBox® connection diagram © Intesis Software S.L. - All rights reserved This information is subject to change without notice ® IntesisBox is a registered trademark of Intesis Software SL URL Email tel http://www.intesis.com [email protected] +34 938047134 9 / 46 IntesisBox® DK-RC-ENO-1i / 1iC User’s Manual r1 eng To connect the IntesisBox® to the AC, use the lid hole above the connector K1 as indicated in Figure 3.2: Lid holes Antenna zone K1 zone Wall fixing holes Figure 3.2 Connection scheme Important: The cable should not be placed on top of the antenna zone (is marked in Figure 3.2) as the performance of the device might be affected. The antenna zone changes depending on the position of the antenna cable (see section 8.9). 3.2 Connection of binary inputs Follow the scheme below in order to connect the binary inputs of the K2 connector (check Figure 4.1). Figure 3.3 Connection of binary inputs © Intesis Software S.L. - All rights reserved This information is subject to change without notice ® IntesisBox is a registered trademark of Intesis Software SL URL Email tel http://www.intesis.com [email protected] +34 938047134 10 / 46 IntesisBox® DK-RC-ENO-1i / 1iC User’s Manual r1 eng 3.3 Placement The IntesisBox® interface antenna has a better sensibility when the device is placed vertically, and therefore this is the preferred position when placed (antenna zone should be located in the bottom side, floor side, once the device is fixed to the wall). The coverage distance (see Table 3.1) of the signal emitted by the IntesisBox®, or by any other EnOcean device, is determined by the room geometry and where they are placed. As an example, long narrow corridors with wide walls are an adverse situation. People or other obstacles can reduce the coverage distance too. Therefore, is advised to always think in the worst possible scenario to decide the placement of the device to ensure a good stability in the radio system. Coverage distance < 30 m < 20 m < 10 m <1m Conditions Under ideal conditions: broad room, no obstacles, good antenna design and good antenna positions. The room is filled with furniture and people and penetration through up to 5 dry walls or up to 2 brick walls or up to 2 aero concrete walls. Identical to the previous case but the receiver is placed to a room corner or range along a narrow floor. Metal-reinforced ceilings at upright penetration angle (in strong dependence of reinforcement density and antenna positions). Table 3.1 IntesisBox® coverage distance 3.3.1 Screening zones It is important not to place the device in a place where the airwaves must go through a metallic object as they create a screening zone where the receivers are not going to be able to receive the EnOcean telegrams. This situation is shown in Figure 3.4a. Figure 3.4 a) Screening zone b) Solution with a repeater The situation of one of the receivers does not allow it to receive the transceiver telegrams. To solve this situation the use of a repeater outside the screening zone (Figure 3.4b) is recommended. The telegrams will be retransmitted from there to the receiver © Intesis Software S.L. - All rights reserved This information is subject to change without notice ® IntesisBox is a registered trademark of Intesis Software SL URL Email tel http://www.intesis.com [email protected] +34 938047134 11 / 46 IntesisBox® DK-RC-ENO-1i / 1iC User’s Manual r1 eng 3.3.2 Penetration Angle This is the angle in which the airwaves reach a certain object they need to go through. The transmission to the other side of the object would be better as this angle gets closer to 90º, being this the best transmission situation. In Figure 3.5a it is shown a receiver in a situation where the penetration angle is too close to 0º. The solution to that problem can be seen in Figure 3.5b using a repeater in a different position. Figure 3.5 a) Penetration angle b) Solution with a repeater 3.3.3 Distance between receiver and sources of interference The distance between EnOcean receivers, as it is the IntesisBox® and other transmitters (e.g. GSM / DECT / wireless LAN) or high frequency sources of interference (computers, audio and video equipment) should be higher than 50 centimeters. However, EnOcean transmitters can be installed next to any other high-frequency transmitters without any problem. 3.3.4 Use of repeaters In case of a poor radio reception, it may be helpful to use a repeater. EnOcean repeaters do not require any configuration, only a line-power supply is needed. A poor radio signal is received, refreshed and transmitted again, so nearly a double radio range can be achieved. Special EnOcean repeaters which can be switched to 2-level function allow two repeaters to be cascaded. In order to configure the IntesisBox® as a repeater see section 5.3.6. © Intesis Software S.L. - All rights reserved This information is subject to change without notice ® IntesisBox is a registered trademark of Intesis Software SL URL Email tel http://www.intesis.com [email protected] +34 938047134 12 / 46 IntesisBox® DK-RC-ENO-1i / 1iC 3.4 User’s Manual r1 eng Power up Once the IntesisBox® is properly connected and placed, AC unit’s main power can be connected again. Then it will start an initialization process, L1 will be ON during 3 seconds and L2 will be ON during 5 seconds (see the location of the LEDs in Figure 4.1). The normal operation starts when both LEDs are turned OFF again. It is important to bear in mind that changes made during the initialization process will not have effect until it finishes. © Intesis Software S.L. - All rights reserved This information is subject to change without notice ® IntesisBox is a registered trademark of Intesis Software SL URL Email tel http://www.intesis.com [email protected] +34 938047134 13 / 46 IntesisBox® DK-RC-ENO-1i / 1iC User’s Manual r1 eng 4. Manual configuration 4.1 Configuration The IntesisBox® (Figure 4.1) has two sets of switches, a push button and a rotary profile selector in order to configure the behaviour of the device and perform EnOcean actions (explained in Table 4.1, Table 4.2 and following sections). S1: AC switches - 1 S1-1 - 2 S1-2 - 3 S1-3 - 4 S1-4 S2: Profile selector S3: Push button S4: EnOcean switches - 1 S4-1 - 2 S4-2 - 3 S4-3 - 4 S4-4 K1: AC connector K2: Inputs connector K9: Bootloader connector L1: EnOcean LED L2: AC LED L3: Tx data activity LED Figure 4.1 IntesisBox® diagram S1 – AC unit configuration: Master/Slave, Operating Mode, Fan Speeds and Vanes Binary value b0…b3 Decimal value Switches 1 2 3 4 Description 0xxx 0 x x x Slave (default value) – A Daikin BRC Controller must be present in P1/P2, configured as Master. 1xxx 1 x x x Master in P1 P2 bus – Daikin BRC Controller not needed in P1/P2. If existing, BRC must be configured as slave. x0xx 0 x x x Master of VRV Operation Mode (For VRV only). See section 6.8. x1xx 1 x x x VRV slave of Operating Mode (For VRV only) (default value) xx0x 0 xx1x 1 x x x x x x Indoor unit has 2 Fan Speeds (default value) Indoor unit has 3 fan speeds xxx0 0 x x x Indoor unit has no Vanes xxx1 1 x x x Indoor unit has Vanes (default value) Table 4.1 S1 switch configuration © Intesis Software S.L. - All rights reserved This information is subject to change without notice ® IntesisBox is a registered trademark of Intesis Software SL URL Email tel http://www.intesis.com [email protected] +34 938047134 14 / 46 IntesisBox® DK-RC-ENO-1i / 1iC User’s Manual r1 eng S4 – EnOcean switches: normal mode, learning mode, erasing mode and remote management enabling/disabling Binary value b3…b0 Decimal value Switches 1 2 3 4 00xx 0 x x Normal mode (default value). See section 4.2. 01xx 1 x x N/A (behaves as normal mode) 10xx 2 x x Learning mode. See section 4.3. 11xx 3 x x Erasing mode. See section 4.4. xx0x 0 x x x Remote management enabled (default value). See section 4.5. xx1x 1 x x x Remote management disabled. xxx0 0 x x x N/A xxx1 1 x x x N/A Description Table 4.2 S4 switch configuration The different actions that can be performed in each mode are described in this section. 4.2 Normal mode While the normal mode is selected it is possible to set the device to monitor mode and perform the teach-in procedure. These operations will not interfere in the normal behaviour of the device. 4.2.1 Monitor mode Due to the transmitting method (radio) of EnOcean telegrams, is possible that the IntesisBox® is outside the coverage range of one device. For that reason, the interface, as a receiver, has the ability to show when it receives EnOcean telegrams from a linked device when in monitoring mode. To activate the monitoring mode (check Figure 4.1): 1. Make sure that IntesisBox® is working in normal mode (switches S4-1 and S4-2 set to OFF) 2. Press S3 for 5 seconds. The L1 will briefly flash (100ms). From then on, L1 will flash for 100ms each time that a valid telegram from a learnt device is received. To disable the monitoring mode: 1. In order to disable the monitor mode it is necessary to set EnOcean switches (S4) to learning or erase mode. Once S4 is set to normal mode again the monitor mode will be disabled Mode L1 Normal mode (monitor mode enabled) Off Normal mode (monitor mode disabled) Flashing (100ms) per telegram received Table 4.3 L1 and monitor mode © Intesis Software S.L. - All rights reserved This information is subject to change without notice ® IntesisBox is a registered trademark of Intesis Software SL URL Email tel http://www.intesis.com [email protected] +34 938047134 15 / 46 IntesisBox® DK-RC-ENO-1i / 1iC User’s Manual r1 eng 4.2.2 Teach-in The IntesisBox®, as an EnOcean transmitter device, has the teach-in procedure implemented. The aim of this procedure is to link the IntesisBox® with other EnOcean devices in order to control them, not the other way around. So after the teach-in procedure it will be possible, for instance, to get the “IntesisBox® Tx profile 0 (On/Off)” linked to another EnOcean device. Then, each time we turn on or off the AC unit, a signal will be sent from the IntesisBox® and accepted by the other EnOcean device. All the signals will also be sent periodically according to the IntesisBox® configuration (section 5.3.1). Table 4.4 shows which signals and EEPs correspond to each Tx profile: Profile Index Tx (S2) 0 1 2 3 4 Transmission signals 6 7 8 9 A B C D E On/Off Alarm State Set point Temperature Ambient Temperature Ambient Temperature, Set point Temperature, Fan Speed, On/Off AC interface: Mode, fan speed, vane position, sensors and On/Off Set point Temperature, Ambient Temperature AC interface: AC Error code, Error state and disablements Input 1 Input 2 Input 3 Input 4 N/A N/A All. AC profiles F All. AC profiles 5 EEP (EnOcean Profile) [05-02-01] [05-02-01] [07-02-05] [07-02-05] [07-10-01] [07-20-10] [07-10-03] [07-20-11] [05-02-01] [05-02-01] [05-02-01] [05-02-01] [07-20-10]1 [07-10-03] [07-20-11] [07-20-10]1 [07-10-03] [07-20-11] Table 4.4 Transmission profiles - signals 1 Multiteach-in process: The three EEPs are sent one after the other pressing the teach-in button only once. Also a Teach-in of the same signals can be done one by one using profiles 5, 6 and 7. See section 6.5. © Intesis Software S.L. - All rights reserved This information is subject to change without notice ® IntesisBox is a registered trademark of Intesis Software SL URL Email tel http://www.intesis.com [email protected] +34 938047134 16 / 46 IntesisBox® DK-RC-ENO-1i / 1iC User’s Manual r1 eng To execute the Teach-in procedure the next steps need to be followed. References to device components refer to Figure 4.1: 1. Set the switches S4-1 and S4-2 to OFF (normal mode). 2. Set the profile selector (S2) to the desired transmission profile for the teach-in procedure. 3. Press S3 to send a teach-in telegram. There must be a receiving EnOcean device in learning mode for the linking to happen. Remember that after this procedure the IntesisBox® does not keep information from any of the devices. In section 14 can be found the description of the supported EEPs in each Tx profile. 4.3 Learning mode The learning procedure allows the IntesisBox® to be controlled by other EnOcean devices. The IntesisBox® has 14 reception (Rx) profiles. Each Rx profile is assigned to a control signal of the AC unit. Up to 5 devices can be linked to each profile (see exceptions in Table 4.5). The profiles are as follow: Profile Index Rx (S2) 0 1 2 3 4 5 6 7 8 9 B C&D E F Signal On/Off Mode Fan Speed Up/Down Vane position Set point Temperature1 Ambient Temperature (virtual) 2 3 Window contact KEY CARD Occupancy sensor Up/Down Vane position Ambient temperature (Profiles 5 & F have priority over it)3 N/A All. AC profiles All. AC profile2 Allowed devices in profile 5 5 5 5 5 1 5 5 5 5 1 N/A 5 5 Table 4.5 Default reception profiles 1 When the Virtual temperature is turned on, the set point temperature to be written to the AC unit is the Virtual temperature instead of the Set point temperature. 2 When a device is linked to either of these profiles, the virtual temperature function is turned on automatically. Temperature in profile F will have priority (see section 6.2). 3 Only one device can be linked to this profile. © Intesis Software S.L. - All rights reserved This information is subject to change without notice ® IntesisBox is a registered trademark of Intesis Software SL URL Email tel http://www.intesis.com [email protected] +34 938047134 17 / 46 IntesisBox® DK-RC-ENO-1i / 1iC User’s Manual r1 eng 4.3.1 Learning sensors When learning sensors it is important to bear in mind that just one signal of the EEP of the sensor is going to be linked each time that the Learning procedure is executed. See an example in section 8.3. To execute the Learning procedure the next steps need to be followed. References to device components refer to Figure 4.1: 1. Set switch S4-1 to ON position and switch S4-2 to OFF (Learning mode). L1 will be ON. 2. Set the profile selector (S2) in the desired position to link the EnOcean transmitters to the reception profile. 3. Push the Teach-in button of the devices that want to be linked, or if they do not have the Teach-in button (as the EnOcean switches) action them. 4. When a valid EnOcean telegram is received L1 turns OFF for 100 ms and then it turns ON again. The maximum number of linked devices in one profile is 5 (check Table 4.5 for special cases). Once this number is reached, no more devices are going to be linked to that profile. The L1 turns OFF when that happens. 5. Once the learning procedure is finished set both S4-1 and S4-2 to OFF for a normal operation of the device. Once that is done L1 turns OFF. In section 14 can be found the EEPs supported in each Rx profile. 4.3.2 Learning gateways In order to control the IntesisBox® using a gateway, the gateway needs to be learnt by the IntesisBox®. The Learning procedure is the following one: 1. Set switch S4-1 to ON position and switch S4-2 to OFF (Learning mode). L1 will be ON. 2. Set the profile selector of the IntesisBox ® (S2) to E or F. The difference between them is that using profile F the ambient temperature supplied by the gateway is going to be used instead of the AC one. If no temperature is supplied by the sensor, the IntesisBox® is going to have undesired behaviours. 3. Set the profile selector of the gateway that wants to be linked to F. 4. Push the Teach-in button of the gateway that wants to be linked. 5. When a valid EnOcean telegram is received L1 turns OFF for 100 ms and then it turns ON again. The maximum number of linked devices in one profile is 5. Once this number is reached, no more devices are going to be linked to that profile. The L1 turns OFF when that happens. As a gateway takes 3 devices to be linked, just one will be fully linked in one profile. 6. Once the learning procedure is finished set both S4-1 and S4-2 to OFF for a normal operation of the device. Once that is done L1 turns OFF. © Intesis Software S.L. - All rights reserved This information is subject to change without notice ® IntesisBox is a registered trademark of Intesis Software SL URL Email tel http://www.intesis.com [email protected] +34 938047134 18 / 46 IntesisBox® DK-RC-ENO-1i / 1iC User’s Manual r1 eng Important! In Profiles E and F up to 5 devices can be linked. It needs to be taken into account that if the devices are linked by MultiTeach-in procedure (more information in section 6.5) only one is going to be fully linked as it would take 3 of the 5 spaces available. 4.4 Erasing mode In order to delete the devices that have been learnt the erase mode needs to be selected. It is possible to delete the devices one by one, to delete all the devices linked in one Rx profile (Table 4.5) and perform a “return to factory settings”. 4.4.1 Deleting one by one To delete the linked devices one by one it will be necessary to have the linked device working properly. To do so follow next lines (the references to device components are specified in Figure 4.1): 1. Set the switches S4-1 and S4-2 to ON. L1 will turn into flashing (100 ms on and 100 ms off). 2. Set the profile selector (S2) to the desired Rx profile (Table 4.5) where the device to be deleted is saved. 3. Push the Teach-in button of the device that want to be deleted, or if they don’t have the Teach-in button (as the EnOcean switches) action them. Once the telegram is received L1 will be on for 1 second to show that the device has been deleted correctly from this profile. 4. Once finished, set the switches S4-1 and S4-2 to OFF for a normal operation of the device. 4.4.2 Deleting all the devices linked to one profile A device can break down or be lost, and therefore the above mentioned delete procedure would not be possible to be executed. For that reason all the devices in one profile can be deleted. To do so follow the instructions (the references to device components are specified in Figure 4.1): 1. Set the switches S4-1 and S4-2 to ON. L1 will turn into flashing (100 ms on and 100ms off). 2. Set the profile selector (S2) to the desired Rx profile (Table 4.5). 3. Press the button S3 for 5 seconds. Once that is done the L1 will be on for 1 second to show that all devices in this profile have been deleted. 4. Once finished, set the switches S4-1 and S4-2 to OFF for a normal operation of the device. © Intesis Software S.L. - All rights reserved This information is subject to change without notice ® IntesisBox is a registered trademark of Intesis Software SL URL Email tel http://www.intesis.com [email protected] +34 938047134 19 / 46 IntesisBox® DK-RC-ENO-1i / 1iC User’s Manual r1 eng 4.4.3 Return to factory settings When a return to factory settings is performed, all the devices linked to all the Rx profiles will be deleted. It will also set the configuration to its default values (section 5.4). Follow the steps below in order to perform the return to factory settings (the references to device components are specified in Figure 4.1): 1. Set the switches S4-1 and S4-2 to ON. L1 will turn into flashing (100 ms on and 100ms off). 2. Press the button S3 for 10 seconds. After the first 5 seconds L1 will turn on during 1 second indicating that all the devices in the current Rx profile have been deleted, and then it will continue with the flashing. After 10 seconds pressing S3, L1 and L2 will turn on during 1 second and the device will reset itself. 3. Once finished, set the switches S4-1 and S4-2 to OFF for a normal operation of the device. 4.5 Remote management disablement In order to prevent the IntesisBox® from being configured remotely, the remote management has to be disabled by setting the switch S4-3 to ON according to Table 4.2. Once the remote management is disabled, the Intesis Configuration Software will not be able to communicate with the IntesisBox®. It still will be possible to configure the IntesisBox® manually. © Intesis Software S.L. - All rights reserved This information is subject to change without notice ® IntesisBox is a registered trademark of Intesis Software SL URL Email tel http://www.intesis.com [email protected] +34 938047134 20 / 46 IntesisBox® DK-RC-ENO-1i / 1iC User’s Manual r1 eng 5. Remote configuration In this section is shown how the IntesisBox® can be configured using the Intesis Configuration Software. For a more detailed explanation see the documentation of Intesis Configuration Software. 5.1 Reception profiles Reception channels where up to 5 devices can be linked (see exceptions in Table 4.5). The links can be also achieved using the manual learning procedure (section 4.3). Figure 5.1 Reception profiles with their associated signals and devices 5.2 Transmission profiles Transmission channels to be used to teach the IntesisBox ® into other devices. As in the reception channels, the procedure can be done manually just following the steps of the teach-in procedure (section 4.2.2). © Intesis Software S.L. - All rights reserved This information is subject to change without notice ® IntesisBox is a registered trademark of Intesis Software SL URL Email tel http://www.intesis.com [email protected] +34 938047134 21 / 46 IntesisBox® DK-RC-ENO-1i / 1iC User’s Manual r1 eng Figure 5.2 Transmission channels with their EEPs and unique IDs 5.3 Configuration Using the Intesis Configuration Software it is possible to configure the behaviour of the IntesisBox®, its advanced functionality and the binary inputs. Figure 5.3 IntesisBox® parameter configuration © Intesis Software S.L. - All rights reserved This information is subject to change without notice ® IntesisBox is a registered trademark of Intesis Software SL URL Email tel http://www.intesis.com [email protected] +34 938047134 22 / 46 IntesisBox® DK-RC-ENO-1i / 1iC User’s Manual r1 eng Each one of the parameters is explained in the following sections: 5.3.1 Machine operation Machine mode: three different operation modes related to the setpoint temperature can be selected: - NORMAL: no action is performed; the setpoint limits are defined by the AC unit. - LIMITED SETPOINT: the setpoint range is adjusted depending on the current mode. - AUTOCHANGEOVER: mode is decided automatically depending on the ambient temperature; setpoint range is adjusted dynamically. Threshold ambient temperature cool: temperature above which the AC unit will be set to cool mode (when AUTOCHANGEOVER is configured). Threshold ambient temperature heat: temperature under which the AC unit will be set to cool mode (when AUTOCHANGEOVER is configured). Min. setpoint cool: minimum setpoint allowed when AC unit is in cool mode (when LIMITED SETPOINT is configured). Max. setpoint cool: maximum setpoint allowed when AC unit is in cool mode (when LIMITED SETPOINT is configured). Min. setpoint heat: minimum setpoint allowed when AC unit is in heat mode (when LIMITED SETPOINT is configured). Max. setpoint heat: maximum setpoint allowed when AC unit is in heat mode (when LIMITED SETPOINT is configured). 5.3.2 Window operation Window reload last value: if true, previous ON/OFF state is restored when all windows are closed. Window lock when open: if true, ON/OFF state is forced to OFF while a window is opened. Window timeout: timeout to turn OFF the AC unit when a window is opened. 5.3.3 Keycard operation Keycard reload last value: if true, previous ON/OFF state is restored when a key card is inserted. Keycard lock when not inserted: if true, ON/OFF state is forced to OFF while no key card is inserted. © Intesis Software S.L. - All rights reserved This information is subject to change without notice ® IntesisBox is a registered trademark of Intesis Software SL URL Email tel http://www.intesis.com [email protected] +34 938047134 23 / 46 IntesisBox® DK-RC-ENO-1i / 1iC User’s Manual r1 eng 5.3.4 Occupancy operation Occupancy duration: time while the last occupancy signal is considered valid. Occupancy 1st action timeout: if no valid occupancy signal is received during this time, action 1 will be executed. Occupancy 1st action: occupancy action type: - APPLY_DELTA: it will apply an increment of temperature depending on the mode. - SWITCH_OFF: the AC unit will be switched OFF. Occupancy 1st action delta heat: if action 1 is configured as APPLY_DELTA, increment to apply in heat mode. Occupancy 1st action delta cool: if action 1 is configured as APPLY_DELTA, increment to apply in cool mode. Occupancy 2nd action active: if true, the 2nd action will be performed as well. Occupancy 2nd action timeout: if no valid occupancy signal is received during this time, action 2 will be executed. Occupancy 2nd action: occupancy action type: - APPLY_DELTA: it will apply an increment of temperature depending on the mode. - SWITCH_OFF: the AC unit will be switched OFF. Occupancy 2nd action delta heat: if action 2 is configured as APPLY_DELTA, increment to apply in heat mode. Occupancy 2nd action delta cool: if action 2 is configured as APPLY_DELTA, increment to apply in cool mode. Occupancy reload last value: if true, previous ON/OFF state is restored when the room is occupied. Occupancy lock when unoccupied: if true, ON/OFF state is forced to OFF while the room is unoccupied. 5.3.5 Input operation There are three configurable parameters per each input, so X is valid from 1 to 4 in the following lines: Input X inverted: input X logic inversion, if true input X is inverted. Input - X function: input X can be configured in order to behave as: NONE: input X is only transmitted to EnOcean, with any other effect. ON_OFF: input X is able to change the ON/OFF state of the AC unit. WINDOW_CONTACT: input X is used as a window contact. KEY_CARD: input X behaves as a key card reader. OCCUPANCY: input X is used as an occupancy sensor. Input X key card: input X is transmitted to EnOcean as a key card, which means that just one telegram will be sent per each change on the state of input X. © Intesis Software S.L. - All rights reserved This information is subject to change without notice ® IntesisBox is a registered trademark of Intesis Software SL URL Email tel http://www.intesis.com [email protected] +34 938047134 24 / 46 IntesisBox® DK-RC-ENO-1i / 1iC User’s Manual r1 eng 5.3.6 Radio operation Repeater enable: EnOcean repeater function enablement. Repeater level: EnOcean repeater function mode, if repeater is disabled, this parameter is not significant. It can be configured as: - Disabled: no telegrams will be repeated. - 1-LEVEL: original telegrams will be repeated. - 2-LEVEL: original and repeated telegrams will be repeated. IR disablement: disablement of the AC remote control. If this value is true, AC remote control will be overridden by the gateway. 5.4 Default values Parameter Machine mode Threshold ambient temperature cool Threshold ambient temperature heat Min. setpoint cool Max. setpoint cool Min. setpoint heat Max. setpoint heat Wake up time Window reload last value Window lock when open Window timeout Key card reload last value Key card lock when not inserted Occupancy duration Occupancy 1st action timeout Occupancy 1st action Occupancy 1st action delta heat Occupancy 1st action delta cool Occupancy 2nd action active Occupancy 2nd action timeout Occupancy 2nd action Occupancy 2nd action delta heat Occupancy 2nd action delta cool Occupancy reload last value Occupancy lock when unoccupied Input 1..4 inverted Input 1..4 function Input 1..4 key card Repeater enable Repeater level IR disablement Default value NORMAL 26 21 24 28 19 23 120 False True 1 False True 40 10 APPLY _DELTA -2 2 True 30 SWITCH_OFF -3 3 False False False NONE False False Disabled False Units <enum> ºC ºC ºC ºC ºC ºC seconds <bool> <bool> minutes <bool> <bool> seconds minutes <enum> ºC ºC <bool> minutes <enum> ºC ºC <bool> <bool> <bool> <enum> <bool> <bool> <enum> <bool> Table 5.1 Default values © Intesis Software S.L. - All rights reserved This information is subject to change without notice ® IntesisBox is a registered trademark of Intesis Software SL URL Email tel http://www.intesis.com [email protected] +34 938047134 25 / 46 IntesisBox® DK-RC-ENO-1i / 1iC User’s Manual r1 eng 6. Special Behaviours In this section it is explained the special behaviour of the IntesisBox® when certain kinds of devices are used: window contacts, thermostats with external temperature sensor, occupancy sensors and key cards. The use of these sensors needs further explanation as the IntesisBox® carries out special operations or assumes previous states. All the explanations in these sections are related to the factory settings of the device. 6.1 Window contact The IntesisBox® has the functionality to automatically control the turning on and off of the AC indoor unit depending on the state of one or several (up to 5) EnOcean window contacts. EnOcean window contacts periodically send its state and they do so too after a change in the window state. When a window contact is associated to the IntesisBox® interface it is assumed that the window is closed until the correct state of the window contact is received. The AC indoor unit will be turned OFF and disabled if any of the window contacts linked to the window contact profile is sending a “window opened” message for a certain period of time (default value: 1 minute). If the AC indoor unit is set to ON (either by an EnOcean device or by the remote control) the IntesisBox® will set it back to OFF. When all the window contacts are sending a “window closed” message, the AC indoor unit will stay OFF but it will be possible to turn it ON. The functionality specified on the above lines would only be active when devices are linked in the window contact profile (Table 4.5). The information about the states of the linked window contacts would be lost if there is a power down in the system, but it will restore itself in a brief period of time as the window contacts send their state periodically. 6.2 External temperature sensors. Virtual temperature This behaviour is only activated when there is an external temperature device linked to either profile 5 or profile F. If both profiles have a temperature sensor linked, the one in profile F will have priority and the one in profile 5 will be ignored. If no temperature is supplied by the sensor, the IntesisBox® is going to have undesired behaviours. Four temperatures are involved: Set point temperature: It is the set point temperature sent to the AC unit Return path temperature: It is the ambient temperature sent by the AC unit Virtual set point temperature: It is the set point temperature requested by the thermostat Virtual ambient temperature: It is the ambient temperature measured by the thermostat © Intesis Software S.L. - All rights reserved This information is subject to change without notice ® IntesisBox is a registered trademark of Intesis Software SL URL Email tel http://www.intesis.com [email protected] +34 938047134 (S) (Tr) (Sv) (Tv) 26 / 46 IntesisBox® DK-RC-ENO-1i / 1iC User’s Manual r1 eng The set point temperature sent to the AC indoor unit is calculated with the following formula: S = Sv – ( Tv – Tr ) 6.3 Key card Due to the way the key card reader works there is a specific reception profile for it. In this profile (Table 4.5) it is possible to link up to five devices. If the linked device is not a key card the correct behaviour of the IntesisBox® cannot be granted. When inserting the key card in the reader, the AC unit is enabled (becomes available to be turned on) but it stays OFF. A manual actuation of another device would be needed to turn it ON. When the key card is removed, the AC unit is disabled and turned OFF, staying in this state until we insert the key card again. If the AC indoor unit is set to ON (either by an EnOcean device or by the remote control) the IntesisBox® will set it back to OFF. The functionality specified on the above lines would only be active when devices are linked in the key card profile (Table 4.5). The information about the state of the linked key card would be lost if there is a power down in the system. Therefore it would be needed to set the previous state by actuating the key card. 6.4 Occupancy sensors The IntesisBox® has the functionality to automatically control the behaviour of the AC unit depending on the state of one or several (up to 5) EnOcean occupancy sensors. When all the occupancy sensors linked to the device are not detecting any occupancy, the IntesisBox® will go to non-presence mode following these steps: 1. Wait a certain time period (default value: 10 minutes) where no action is performed. 2. When this time expires the set point temperature will change depending on the mode. In cool mode the set point would increase 2ºC and in heat mode would decrease 2ºC. If any other mode the set point temperature would not be changed. 3. After a second period of time (default value: 30 minutes) the AC unit will be turned OFF. If a presence is detected the system will work as follows: 1. After step 2: recovers previous set point temperature. 2. After step 3: recovers previous set point temperature but AC unit remains OFF. The explained functionality will only be valid if the occupancy sensors are linked in the occupancy profile (Table 4.5). The information about the state of the linked occupancy sensors would be lost if there is a power down in the system. It will recover as soon as a presence signal is received. © Intesis Software S.L. - All rights reserved This information is subject to change without notice ® IntesisBox is a registered trademark of Intesis Software SL URL Email tel http://www.intesis.com [email protected] +34 938047134 27 / 46 IntesisBox® DK-RC-ENO-1i / 1iC User’s Manual r1 eng 6.5 MultiTeach-in procedure AC units have a lot of parameters to control and supervise and with only one 4BS telegram all this information cannot be fitted in. For this reason the IntesisBox® implements, besides standard Teach-in, a MultiTeach-in procedure where more than one EEP is sent at the same time in order to be linked. In the next lines this procedure is going to be further explained. This procedure is performed only when the profile selector (S2) is set to profiles E or F (the ones that implement the HVAC generic EEPs). The way it is implemented is simple. A different Base ID is assigned to each EEP and it is actually performing 3 consecutive teachin procedures. This allows devices that support the 3 EEP’s to automatically link them. It might happen that the device in learning mode does not support the MultiTeach-in procedure. In that case profiles 5, 6 and 7 can be used in order to perform the Teach-in one by one due to the fact that these profiles have the same EEPs as profile E or F. It needs to be taken into account that used in this profile the IntesisBox® is working as if it was three different EnOcean devices at a time. If this procedure is performed in the opposite way (the IntesisBox® is in Learning mode in profile E or F) 3 devices positions would be taken, implying that only 1 device using MultiTeach-in would be able to be fully linked in each profile. If tried again with another device only 2 of the different EEPs are going to be stored. 6.6 Binary inputs The device IntesisBox® has four potential-free binary inputs. Each one of these inputs can be configured to behave according to the following functionalities: a) b) c) d) e) NONE: Input sate is sent but no other action is performed. ON_OFF: Input is able to change the ON/OFF state of the AC unit. WINDOW_CONTACT: Input is used as a window contact. KEY_CARD: Input behaves as a key card reader. OCCUPANCY: Input is used as an occupancy sensor. By default, the four inputs are configured as NONE. 6.7 Setpoint When a device is linked to Rx profile 4, E or F, it will be able to modify the setpoint temperature of the AC unit. Nevertheless the following differences between these profiles must be taken into account (check the supported EEPs for each profile in section 14): - Profile E & F: the setpoint temperature is sent through one byte of the EEP (0...255), and its scale will always be 0...40ºC. Profile 4: the setpoint can be sent either by a rocker switch (it will increment/decrement the setpoint) or through one byte of the EEP (0...255). In case of an EEP which sends one byte for the setpoint, its scale will be MIN.SETPOINT...MAX.SETPOINT. Depending on the mode of the AC unit and the configuration of machine mode (see section 5.3.1), the value of MIN. SETPOINT and MAX. SETPOINT could change. Therefore the scale of the setpoint in profile 4 might change depending on the AC unit’s mode and machine mode’s configuration. - © Intesis Software S.L. - All rights reserved This information is subject to change without notice ® IntesisBox is a registered trademark of Intesis Software SL URL Email tel http://www.intesis.com [email protected] +34 938047134 28 / 46 IntesisBox® DK-RC-ENO-1i / 1iC 6.8 User’s Manual r1 eng Master of mode The master of mode only applies under the following conditions: 1. The AC system is VRV 2. The VRV system uses a Heat pump outdoor unit 3. The IntesisBox® is configured as Master of the P1/P2 bus (Table 4.1) If they are not matched the parameter is going to be ignored. The Heat pump outdoor unit of a VRV system can only work in one mode (either Heat, Cool or fan). The Master of mode is the indoor unit that defines which is the working mode of the outdoor unit. If there is no Master of mode in the system the first AC unit to be turned ON is the one controlling the mode. In a VRV system there can only be one device acting as Master of Mode. If more than one is configured this way the system is not going to work properly. When the IntesisBox® is configured as Master of Mode it can control all the modes of the system. The Mode selection of all the other gateways and remote controllers is going to be affected by the one chosen by the Master of Mode (detailed in Table 6.1). Master of Mode Heat Dry Fan Cool Slave of Mode Heat, Fan Cool, Fan, Dry Fan Cool, Fan, Dry Table 6.1 Mode correspondence © Intesis Software S.L. - All rights reserved This information is subject to change without notice ® IntesisBox is a registered trademark of Intesis Software SL URL Email tel http://www.intesis.com [email protected] +34 938047134 29 / 46 IntesisBox® DK-RC-ENO-1i / 1iC User’s Manual r1 eng 7. Status monitoring The interface IntesisBox® has three LEDs that show information about the operation of the device. The LED L1 (see Figure 4.1) is associated to the EnOcean section and the LED L2 to the AC one (AC LED). 7.1 L2 (yellow): AC monitoring In Table 7.1 it is shown how the AC LED L2 behaves and its meaning Device status LED (L2) state Turning on Pulse ON / OFF Period ON during 5 seconds During normal operation During normal operation 100ms ON 1900ms OFF 500ms ON 500ms OFF Flashing Blinking Meaning Initialization process after start up or reset Normal Operation AC unit error / communication error Table 7.1 IntesisBox® state and AC LED 7.2 L1 (green): EnOcean monitoring EnOcean LED L1 will behave according to the following table: Device status LED (L1) state Turning on Pulse ON / OFF Period ON during 3 seconds Learning mode ON ON Erasing mode Blinking Comm. monitoring enabled Flashing 100ms ON 100ms OFF 100ms ON Meaning Initialization process after start up or reset Devices can be learnt in the selected profile Erase mode, see section 4.4 A telegram has been received in normal mode, see section 4.2 Table 7.2 EnOcean LED 7.3 L3 (green): Tx data activity LED It will behave according to the transmission data activity from the IntesisBox ® to AC unit / remote controller. © Intesis Software S.L. - All rights reserved This information is subject to change without notice ® IntesisBox is a registered trademark of Intesis Software SL URL Email tel http://www.intesis.com [email protected] +34 938047134 30 / 46 IntesisBox® DK-RC-ENO-1i / 1iC User’s Manual r1 eng 8. How to? Check if my AC unit can be controlled with the IntesisBox® 8.1 See section 11. 8.2 Disable AC remote controller There are a two ways to perform this functionality: a) Set the “IR disablement” parameter to true using the Intesis Configuration Software (see section 5.3.6). b) Sending a telegram using the EEP [07-20-11], in receive mode, setting the bit DB0.2 to 1 (see section 12). It is important to bear in mind that the transmitter device needs first to be learnt by the IntesisBox®. Link sensors to the IntesisBox® 8.3 It can be done either manually (section 4.3.1) or remotely (section 5.1). It is important to know that just one signal of the EEP of the sensor is going to be linked. See an example of how an Intesis thermostat (IS-TK04PST) will behave depending on the way it is linked: - If an IS-TK04PST is linked to the Rx profile 0 (On/Off), it will only be possible to turn on or off the AC unit connected to the IntesisBox® using the IS-TK04PST’s switch. It will not be possible to change the fan speed, setpoint or ambient temperature. If the IS-TK04PST is linked now to Rx profile 2 (fan speed), the fan speed will be changed by the IS-TK04PST’s fan speed switch. At this point the IS-TK04PST is linked to both signals, so it will change the fan speed and it will turn on or off the AC unit. The IS-TK04PST will be fully functional if it is linked to the corresponding profiles: o On/Off -> Rx profile 0 o Fan speed -> Rx profile 2 o Set point -> Rx profile 4 o Ambient temperature -> Rx profile 5 - - 8.4 Control & monitor the IntesisBox® from an EnOcean gateway In order to control the IntesisBox® from a gateway it will be necessary to learn this gateway first. To monitor the IntesisBox® from a gateway, the Teach-in procedure will have to be executed. a) Learn the gateway in profile E or F. See section 4.3.2. b) Teach profile F to the gateway. See section 4.2.2. © Intesis Software S.L. - All rights reserved This information is subject to change without notice ® IntesisBox is a registered trademark of Intesis Software SL URL Email tel http://www.intesis.com [email protected] +34 938047134 31 / 46 IntesisBox® DK-RC-ENO-1i / 1iC 8.5 User’s Manual r1 eng Control & monitor the IntesisBox® from a software application a) Control the IntesisBox® from a software application: Follow the steps in section 4.3.2 (learning gateways) and instead of steps 3 and 4 (selecting profile F and pressing the Teach-in button of the gateway), three Teach-in telegrams corresponding to EEPs 07-20-10, 07-20-11 and 07-10-03 must be sent by the software application. See the description of the Teach-in telegrams structure in section 12. b) Monitor the IntesisBox® from a software application: Teach profile F to the software application. See section 4.2.2. 8.6 Configure parameters The IntesisBox® parameters can be configured using the Intesis Configuration Software (section 5.3). 8.7 Check if the devices have been correctly learnt a) Using the Intesis Configuration Software, load the reception profiles and check that the device has been learnt in the correct profile. b) Enable monitor mode (section 4.2.1) and check if the device has been learnt or. It will not be possible to know if it is learnt in the desired profile. 8.8 Protect the IntesisBox® from undesired remote access It can be achieved either by remote configuration or using the switch S4-3. Even both protection methods can be performed: a) If using remote configuration: See Intesis Configuration Software documentation. b) If using manual configuration: Section 4.5. 8.9 Improve radio coverage of IntesisBox® It is important to set the antenna cable as much straight as possible, trying to avoid angles in this cable and with no loops. Changing the location of the antenna cable might improve the radio coverage of the IntesisBox®, which will depend on the position of the IntesisBox®. © Intesis Software S.L. - All rights reserved This information is subject to change without notice ® IntesisBox is a registered trademark of Intesis Software SL URL Email tel http://www.intesis.com [email protected] +34 938047134 32 / 46 IntesisBox® DK-RC-ENO-1i / 1iC User’s Manual r1 eng 9. Technical data and dimensions Enclosure ABS (UL 94 HB). 2,5 mm thickness Dimensions 70 x 100 x 28 mm Weight 90g Colour White Power supply Mounting LED indicators (internal) 12V, 80mA typical Doesn’t require external power supply (supplied by the AC Unit) Wall. 1 x AC unit state 1 x EnOcean state 1 x Tx data activity 4 x Potential-free binary inputs (dry contacts) Signal cable length: 5m unshielded, may be extended up to 20m with twisted. Binary inputs Compliant with the following standards: IEC61000-4-2 : level 4 - 15kV (air discharge) - 8kV (contact discharge) MIL STD 883E-Method 3015-7 : class3B Configuration Operating Temperature Manual procedures: Teach-in and Learning Remote wireless Configuration from PC From -25ºC to 85ºC Operating humidity <93% HR, no condensation Stock humidity <93% HR, no condensation RoHS conformity Compliant with RoHS directive (2002/95/CE). DK-RC-ENO-1i: Certifications CE conformity to EMC directive (2004/108/EC) and Lowvoltage directive (2006/95/EC) o EN 61000-6-2 o EN 61000-6-3 o EN 60950-1 o EN 50491-3 DK-RC-ENO-1iC: FCC (ID: SZV-STM300C) IC (ID: 5713A-STM300C) Table 9.1 Technical data © Intesis Software S.L. - All rights reserved This information is subject to change without notice ® IntesisBox is a registered trademark of Intesis Software SL URL Email tel http://www.intesis.com [email protected] +34 938047134 33 / 46 IntesisBox® DK-RC-ENO-1i / 1iC 10. User’s Manual r1 eng Dimensions Figure 10.1 IntesisBox® dimensions in mm 11. AC Unit Types compatibility A list of Daikin indoor unit model references compatible with DK-RC-ENO-1i / 1iC and their available features can be found in: http://www.intesis.com/pdf/IntesisBox_DK-RC-xxx-1_AC_Compatibility.pdf © Intesis Software S.L. - All rights reserved This information is subject to change without notice ® IntesisBox is a registered trademark of Intesis Software SL URL Email tel http://www.intesis.com [email protected] +34 938047134 34 / 46 IntesisBox® DK-RC-ENO-1i / 1iC 12. User’s Manual r1 eng AC profile data (Generic HVAC interface) In this section the Generic HVAC interface EEPs (07-20-10 and 07-20-11) applied to the IntesisBox® are explained. These two EEPs along with the Room Operating Panel EEP 0710-03 can transmit and receive all the AC information. Following description will only apply for profiles E and F. 12.1 EEP: 07-20-10 ORG = 07 (4 BS) FUNC = 20 (HVAC Components) TYPE = 10 (Generic HVAC interface – Functions: Mode, vane position, fan speed, sensors and on/off) EEP for Generic HVAC interface – Functions: Mode, vane position, fan speed, sensors and on/off: With this EEP plus the already existing EEP 07-10-03 and 07-20-11 all the information of AC indoor unit can be sent and received allowing a much easier and complete control of these units. Teach-In The teach-in telegram has the same structure as a normal 4BS telegram. See EnOcean Equipment Profiles (EEP) v2.1 and use the following structure. DB_3.7 ... DB_3.2: DB_3.2 ... DB_2.3: DB_2.2 ... DB_1.0: DB_0.7: DB_0.6: DB_0.5: DB_0.4: DB_0.3: DB_0.2 ... DB_0.0: Function: same as teach-in telegram heating valve = 20 Type: same as teach-in telegram actuator = 10 Manufacturer: Intesis Software ID = 0x019 LRN TYPE = 0b1 (type 1 with profile, manufacturer Id) EEP result; EEP supported = 0b1, EEP not supported = 0b0 LRN result; ID stored = 0b1, ID deleted (not stored) = 0b0 TA: teach-in answer = 0b1 LRN Learn button 0b0 Teach-in telegram 0b1 Data telegram Not used © Intesis Software S.L. - All rights reserved This information is subject to change without notice ® IntesisBox is a registered trademark of Intesis Software SL URL Email tel http://www.intesis.com [email protected] +34 938047134 35 / 46 IntesisBox® DK-RC-ENO-1i / 1iC User’s Manual r1 eng EEP: 07-20-10 (CONTINUATION) DATA BYTES Receive mode: Commands received by the HVAC interface DB_3 Mode DB_2.7 ... DB_2.4 1 0 1 3 9 14 15 ... 32 33 … 254 255 Auto Heat Cool Fan only Dehumidification (dry) Not supported Reserved 2 N/A Vane position 0 1 2 3 4 5 6 7 ... 10 11 12 ... 14 15 Not supported Position 1 Position 2 Position 3 Position 4 Position 5 Not supported Reserved Swing Not supported N/A DB_2.3 ... DB_2.0 Fan Speed 0 1 2 3 4...14 15 Not supported Fan speed 1 Fan speed 2 Fan speed 3 Sets the value to max. fan speed N/A DB_1 Not used DB_0.3 Learn Button 0b0 0b1 Teach-in telegram Data telegram DB_0.2 ... DB_0.1 Room occupancy 00: 01: 10: 11: Occupied StandBy (waiting to perform action) Unoccupied (action performed) Off (no occupancy and no action) DB_0.0 On/Off 0b0 0b1 Off On 1 2 Other modes don’t apply to this AC interface. If any other received it would behave as if it had received and N/A N/A stands for No Action. It keeps the current value of the parameter © Intesis Software S.L. - All rights reserved This information is subject to change without notice ® IntesisBox is a registered trademark of Intesis Software SL URL Email tel http://www.intesis.com [email protected] +34 938047134 36 / 46 IntesisBox® DK-RC-ENO-1i / 1iC User’s Manual r1 eng EEP: 07-20-10 (CONTINUATION) Transmit mode: Commands sent by the HVAC interface DB_3 Mode DB_2.7 ... DB_2.4 1 0 1 3 9 14 15 ... 32 33 … 254 255 Auto Heat Cool Fan only Dehumidification (dry) Not supported Reserved 2 N/A Vane position 0 1 2 3 4 5 6 7 ... 10 11 12 ... 14 15 Not supported Position 1 Position 2 Position 3 Position 4 Position 5 Not supported Reserved Swing Not supported N/A DB_2.3 ... DB_2.0 Fan Speed 0 1 2 3 4...14 15 Not supported Fan speed 1 Fan speed 2 Fan speed 3 Not supported N/A DB_1 Not used DB_0.3 Learn Button 0b0 0b1 Teach-in telegram Data telegram DB_0.2 ... DB_0.1 Room occupancy 00: 01: 10: 11: Occupied StandBy (waiting to perform action) Unoccupied (action performed) Off (no occupancy and no action) DB_0.0 On/Off 0b0 0b1 Off On 1 2 Other modes don’t apply to this AC interface. It will only send this ones N/A: it is send when the value of the parameter is not known © Intesis Software S.L. - All rights reserved This information is subject to change without notice ® IntesisBox is a registered trademark of Intesis Software SL URL Email tel http://www.intesis.com [email protected] +34 938047134 37 / 46 IntesisBox® DK-RC-ENO-1i / 1iC User’s Manual r1 eng 12.2 EEP: 07-20-11 ORG = 07 (4 BS) FUNC = 20 (HVAC Components) TYPE = 11 (Generic HVAC interface – Error control: AC Error code, Error states and disablements) EEP for Generic HVAC interface – Functions: : Error control: AC Error code, Error states and disablements: With this EEP plus the already existing EEP 07-10-03 and 07-20-10 all the information of AC indoor unit can be sent and received allowing a much easier and complete control of these units. Teach-In The teach-in telegram has the same structure as a normal 4BS telegram. See EnOcean Equipment Profiles (EEP) v2.1 and use the following structure. DB_3.7 ... DB_3.2: DB_3.2 ... DB_2.3: DB_2.2 ... DB_1.0: DB_0.7: DB_0.6: DB_0.5: DB_0.4: DB_0.3: DB_0.2 ... DB_0.0: Function: same as teach-in telegram heating valve = 20 Type: same as teach-in telegram actuator = 11 Manufacturer: Intesis Software ID = 0x019 LRN TYPE = 0b1 (type 1 with profile, manufacturer Id) EEP result; EEP supported = 0b1, EEP not supported = 0b0 LRN result; ID stored = 0b1, ID deleted (not stored) = 0b0 TA: teach-in answer = 0b1 LRN Learn button 0b0 Teach-in telegram 0b1 Data telegram Not used © Intesis Software S.L. - All rights reserved This information is subject to change without notice ® IntesisBox is a registered trademark of Intesis Software SL URL Email tel http://www.intesis.com [email protected] +34 938047134 38 / 46 IntesisBox® DK-RC-ENO-1i / 1iC User’s Manual r1 eng EEP: 07-20-11 (CONTINUATION) DATA BYTES Receive mode: Commands received by the HVAC interface DB_3 DB_2 DB_1.7 ... DB_1.1 DB_1.0 Not used Not used Not used External disablement DB_0.3 0b0 0b1 Not disabled Disabled Learn Button 0b0 0b1 Teach-in telegram Data telegram DB_0.2 Disable remote controller 0b0 0b1 Enable Remote controller Disable Remote controller DB_0.1 Window contact 0b0 0b1 Windows opened Windows closed DB_0.0 Not used Transmit mode: Commands sent by the HVAC interface DB_3 Error code HI DB_2 Error code LO DB_1.7 ... DB_1.4 Reserved DB_1.3 Other disablement Generated by A.C (Table 10.1) Generated by A.C (Table 10.1) 0x00 0b0 Not Used DB_1.2 Window contact disablement 0b0 0b1 Not disabled Disabled DB_1.1 Key card disablement 0b0 0b1 Not disabled Disabled DB_1.0 External disablement 0b0 0b1 Not disabled Disabled DB_0.3 Learn Button 0b0 0b1 Teach-in telegram Data telegram DB_0.2 Disable remote controller 0b0 0b1 Enable Remote controller Disable Remote controller DB_0.1 Window contact 0b0 0b1 Windows opened Windows closed DB_0.0 Alarm State 0b0 0b1 OK Error © Intesis Software S.L. - All rights reserved This information is subject to change without notice ® IntesisBox is a registered trademark of Intesis Software SL URL Email tel http://www.intesis.com [email protected] +34 938047134 39 / 46 IntesisBox® DK-RC-ENO-1i / 1iC User’s Manual r1 eng 12.3 EEP: 07-10-03 ORG = 07 (4 BS) FUNC = 10 (Room Operating Panel) TYPE = 03 (Temperature Sensor, Set Point Control) EEP for Room Operating Panel – Functions: Temperature Sensor, Set Point Control: With this EEP plus the already existing EEP 07-20-11 and 07-20-10 all the information of AC indoor unit can be sent and received allowing a much easier and complete control of these units. Teach-In The teach-in telegram has the same structure as a normal 4BS telegram. See EnOcean Equipment Profiles (EEP) v2.1 and use the following structure. DB_3.7 ... DB_3.2: DB_3.2 ... DB_2.3: DB_2.2 ... DB_1.0: DB_0.7: DB_0.6: DB_0.5: DB_0.4: DB_0.3: Function: same as teach-in telegram heating valve = 20 Type: same as teach-in telegram actuator = 11 Manufacturer: Intesis Software ID = 0x019 LRN TYPE = 0b1 (type 1 with profile, manufacturer Id) EEP result; EEP supported = 0b1, EEP not supported = 0b0 LRN result; ID stored = 0b1, ID deleted (not stored ) = 0b0 TA: teach-in answer = 0b1 LRN Learn button 0b0 Teach-in telegram 0b1 Data telegram Not used DB_0.2 ... DB_0.0: DATA BYTES DB_3 DB_2 DB_1 DB_0.7 ... DB_0.4 DB_0.3 Not used 1 Set Point 2 Temperature Not used Learn Button DB_0.2 ... DB_0.0 Not used 1 2 0 ... 255 Set Point (0 ... 40ºC) 255 ... 0 Temperature (0 ... 40ºC) 0b0 0b1 Teach-in telegram Data telegram Scaling with values 0 … 40 ºC only apply with profiles E and F. While no sensor is linked to the IntesisBox®, a value of 0xFF will be sent indicating “no valid temperature”. © Intesis Software S.L. - All rights reserved This information is subject to change without notice ® IntesisBox is a registered trademark of Intesis Software SL URL Email tel http://www.intesis.com [email protected] +34 938047134 40 / 46 IntesisBox® DK-RC-ENO-1i / 1iC 13. User’s Manual r1 eng Error Codes Error Code Modbus 0 17 18 19 20 21 22 23 24 25 26 27 28 30 31 32 33 36 37 38 39 40 41 42 43 44 45 46 47 48 49 50 52 53 54 55 56 57 58 59 60 61 62 63 64 65 66 67 68 69 70 71 72 73 74 75 76 77 79 80 81 82 83 84 87 91 92 93 95 96 Error in Remote Controller N/A A0 A1 A2 A3 A4 A5 A6 A7 A8 A9 AA AH AJ AE AF C0 C3 C4 C5 C6 C7 C8 C9 CA CH CC CJ CE CF E0 E1 E3 E4 E5 E6 E7 E8 E9 EA EH EC EJ EE EF H0 H1 H2 H3 H4 H5 H6 H7 H8 H9 HA HH HC HE HF F0 F1 F2 F3 F6 FA FH FC FE FF Error category Indoor Unit Outdoor Unit Error Description No active error External protection devices activated Indoor unit PCB assembly failure Interlock error for fan Drain level system error Temperature of heat exchanger (1) error Temperature of heat exchanger (2) error Fan motor locked, overload, over current Swing flap motor error Overcurrent of AC input Electronic expansion valve drive error Heater overheat Dust collector error / No-maintenance filter error Capacity setting error (indoor) Shortage of water supply Malfunctions of a humidifier system (water leaking) Malfunctions in a sensor system Sensor system of drain water error Heat exchanger (1) (Liquid pipe) thermistor system error Heat exchanger (1) (Gas pipe) thermistor system error Sensor system error of fan motor locked, overload Sensor system of swing flag motor error Sensor system of over-current of AC input Suction air thermistor error Discharge air thermistor system error Contamination sensor error Humidity sensor error Remote control thermistor error Radiation sensor error High pressure switch sensor Protection devices activated Outdoor uni9t PCB assembly failure High pressure switch (HPS) activated Low pressure switch (LPS) activated Overload of inverter compressor motor Over current of STD compressor motor Overload of fan motor / Over current of fan motor Over current of AC input Electronic expansion valve drive error Four-way valve error Pump motor over current Water temperature abnormal (Site installed) Protection device activated Malfunctions in a drain water Ice thermal storage unit error Malfunctions in a sensor system Air temperature thermistor error Sensor system of power supply error High Pressure switch is faulty Low pressure switch is faulty Compressor motor overload sensor is abnormal Compressor motor over current sensor is abnormal Overload or over current sensor of fan motor is abnormal Sensor system of over-current of AC input Outdoor air thermistor system error Discharge air thermistor system error Pump motor sensor system of over current is abnormal Water temperature sensor system error Sensor system of drain water is abnormal Ice thermal storage unit error (alarm) No.1 and No.2 common protection device operates. No.1 protection device operates. No.2 protection device operates Discharge pipe temperature is abnormal Temperature of heat exchanger(1) abnormal Discharge pressure abnormal Oil temperature is abnormally high Suction pressure abnormal Oil pressure abnormal Oil level abnormal © Intesis Software S.L. - All rights reserved This information is subject to change without notice ® IntesisBox is a registered trademark of Intesis Software SL URL Email tel http://www.intesis.com [email protected] +34 938047134 41 / 46 IntesisBox® DK-RC-ENO-1i / 1iC User’s Manual r1 eng 97 98 99 100 101 102 103 104 105 106 107 108 109 111 112 113 116 117 118 119 120 121 122 123 125 129 130 132 133 134 135 136 142 145 146 147 148 J0 J1 J2 J3 J4 J5 J6 J7 J8 J9 JA JH JC JE JF L0 L3 L4 L5 L6 L7 L8 L9 LA LC P0 P1 P3 P4 P5 P6 P7 PJ U0 U1 U2 U3 Sensor system error of refrigerant temperature Pressure sensor error Current sensor error Discharge pipe thermistor system error Low pressure equivalent saturated temperature sensor system error Suction pipe thermistor system error Heat exchanger(1) thermistor system error Heat exchanger(2) thermistor system error Oil equalizer pipe or liquid pipe thermistor system error Double tube heat exchanger outlet or gas pipe thermistor system error Discharge pipe pressure sensor error Oil temperature sensor error Suction pipe pressure sensor error Oil pressure sensor error Oil level sensor error Inverter system error Temperature rise in a switch box Radiation fin (power transistor) temperature is too high Compressor motor grounded or short circuit, inverter PCB fault Compressor motor grounded or short circuit, inverter PCB fault Over current of all inputs Compressor over current, compressor motor wire cut Stall prevention error (start-up error) Compressor locked, etc. Power transistor error Communication error between inverter and outdoor control unit Shortage of refrigerant (thermal storage unit) Power voltage imbalance, open phase Sensor error of temperature rise in a switch box Radiation fin temperature sensor error DC current sensor system error AC or DC output current sensor system error Total input current sensor error Capacity setting error (outdoor) Low pressure drop due to insufficient refrigerant or electronic expansion valve error, etc. Reverse phase, Open phase Power voltage failure / Instantaneous power failure Failure to carry out check operation, transmission error 149 U4 150 U5 151 U6 152 U7 153 U8 154 U9 155 UA 156 UH 157 158 159 UC UJ UE 160 UF 209 210 211 212 213 214 217 219 220 221 222 223 224 226 227 228 229 241 242 243 244 245 258 60 61 62 63 64 65 68 6A 6H 6C 6J 6E 6F 51 52 53 54 40 41 42 43 44 31 Communication error between indoor unit and outdoor unit, communication error between outdoor unit and BS unit Communication error between remote control and indoor unit / Remote control board failure or setting error for remote control Communication error between indoor units Communication error between outdoor units / Communication error between outdoor unit and ice thermal storage unit Communication error between main and sub remote controllers (sub remote control error) / Combination error of other indoor unit / remote control in the same system (model) Communication error between other indoor unit and outdoor unit in the same system / Communication error between other BS unit and indoor/outdoor unit Combination error of indoor/BS/outdoor unit (model, quantity, etc.), setting error of spare parts PCB when replaced Improper connection of transmission wiring between outdoor and outdoor unit outside control adaptor Centralized address duplicated Attached equipment transmission error Communication error between indoor unit and centralized control device Failure to carrey out check operation Indoor-outdoor, outdoor-outdoor communication error, etc. All system error PC board error Ozone density abnormal Contamination sensor error Indoor air thermistor system error Outdoor air thermistor system error HVU error (Ventiair dust-collecting unit) Dumper system error Door switch error Replace the humidity element Replace the high efficiency filter Replace the deodorization catalyst Simplified remote controller error Fan motor of supply air over current or overload Fan motor of return air over current / Fan motor of return air overload Inverter system error (supply air side) Inverter system error (return air side) Humidifying valve error Chilled water valve error Hot water valve error Heat exchanger of chilled water error Heat exchanger of hot water error The humidity sensor of return air sensor System Others © Intesis Software S.L. - All rights reserved This information is subject to change without notice ® IntesisBox is a registered trademark of Intesis Software SL URL Email tel http://www.intesis.com [email protected] +34 938047134 42 / 46 IntesisBox® DK-RC-ENO-1i / 1iC 259 260 261 262 263 267 268 269 339 345 347 349 65535 32 33 34 35 36 3A 3H 3C M2 M8 MA MC N/A DK-RC-MBS-1 User’s Manual r1 eng Outdoor air humidity sensor error Supply air temperature sensor error Return air temperature sensor error Outdoor air temperature sensor error Remote controller temperature sensor error Water leakage sensor 1 error Water leakage sensor 2 error Dew condensation error Centralized remote controller PCB error Communication error between centralized remote control devices Centralized remote control devices inappropriate combination Centralized remote controller address setting error Error in the communication of DK-RC-MBS-1 device with the AC unit Table 13.1 Error codes In case you detect an error code not listed, contact your nearest Daikin technical support service. © Intesis Software S.L. - All rights reserved This information is subject to change without notice ® IntesisBox is a registered trademark of Intesis Software SL URL Email tel http://www.intesis.com [email protected] +34 938047134 43 / 46 IntesisBox® DK-RC-ENO-1i / 1iC 14. User’s Manual r1 eng EnOcean Interoperability In this section there is a list of the allowed transmission and reception EEPs and its description: EEP Tx [05-02-01] [07-02-05] [07-10-01] [07-10-03] [07-20-10] [07-20-11] EEP 1 description Light and Blind Control – Application Style 1 Temperature Sensor. Range 0°C to +40°C Temperature Sensor; Set Point, Fan Speed and Occupancy Control Temperature Sensor; Set Point Control HVAC Components. Generic HVAC interface. Functions: Mode, vane position, fan speed, sensors and on/off HVAC Components. Generic HVAC interface. Functions: Error control: AC Error code, Error states and disablements Table 14.1 IntesisBox® supported transmission (Tx) EEPs Profile Index Rx (S2) 0 1 2 3 4 5 6 7 8 A B E F Supported EEP [05-02-xx] [05-03-xx] [06-00-01] [07-10-01] [07-10-02] [07-10-05] [05-02-xx] [05-03-xx] [05-02-xx] [05-03-xx] [07-10-01] [07-10-02] [07-10-04] [07-10-07] [07-10-08] [07-10-09] [05-02-xx] [05-03-xx] [05-02-xx] [05-03-xx] [07-10-01] [07-10-02] [07-10-03] [07-10-04] [07-10-05] [07-10-06] [07-10-0A] [07-10-10] [07-10-11] [07-10-12] [07-02-05] [07-02-06] [07-10-01] [07-10-02] [07-10-03] [07-10-04] [07-10-05] [07-10-06] [07-10-07] [07-10-08] [07-10-09] [07-10-0A] [07-10-0B] [07-10-0C] [07-10-0D] [07-10-10] [07-10-11] [07-10-12] [07-10-13] [07-10-14] [05-02-xx] [05-03-xx] [06-00-01] [07-30-02] [05-04-01] [07-07-01] [07-08-01] [07-08-02] [05-02-xx] [05-03-xx] [07-02-05] [07-02-06] [07-10-01] [07-10-02] [07-10-03] [07-10-04] [07-10-05] [07-10-06] [07-10-07] [07-10-08] [07-10-09] [07-10-0A] [07-10-0B] [07-10-0C] [07-10-0D] [07-10-10] [07-10-11] [07-10-12] [07-10-13] [07-10-14] [07-20-10] [07-10-03] [07-20-11]2 [07-20-10] [07-10-03] [07-20-11]2 Table 14.2 IntesisBox® supported reception (Rx) EEPs 1 2 EnOcean Equipment Profiles (EEP) V2.0 and v2.1 HVAC Components (FUNC = 20) Generic HVAC interface (TYPE = 10 and 11) explained in section 12 and in EnOcean Equipment Profiles (EEP) v2.1 © Intesis Software S.L. - All rights reserved This information is subject to change without notice ® IntesisBox is a registered trademark of Intesis Software SL URL Email tel http://www.intesis.com [email protected] +34 938047134 44 / 46 IntesisBox® DK-RC-ENO-1i / 1iC EEP Rx [05-02-xx] [05-03-xx] [05-04-01] [06-00-01] [07-02-05] [07-02-06] [07-07-01] [07-08-01] [07-08-02] [07-10-01] [07-10-02] [07-10-03] [07-10-04] [07-10-05] [07-10-06] [07-10-07] [07-10-08] [07-10-09] [07-10-0A] [07-10-0B] [07-10-0C] [07-10-0D] [07-10-10] [07-10-11] [07-10-12] [07-10-13] [07-10-14] [07-20-10] [07-20-11] [07-30-02] User’s Manual r1 eng EEP description Rocker Switch, 2 Rocker Rocker Switch, 4 Rocker Key Card Activated Switch Single Input Contact Temperature Sensor. Range 0°C to +40°C Temperature Sensor. Range +10°C to +50°C Occupancy Sensor Light, Temperature & Occupancy Sensor Light, Temperature & Occupancy Sensor Temperature Sensor; Set Point, Fan Speed and Occupancy Control Temperature Sensor; Set Point, Fan Speed and Day/Night Control Temperature Sensor; Set Point Control Temperature Sensor; Set Point and Fan Speed Control Temperature Sensor; Set Point and Occupancy Control Temperature Sensor; Set Point and Day/Night Control Temperature Sensor; Fan Speed Control Temperature Sensor; Fan Speed and Occupancy Control Temperature Sensor; Fan Speed and Day/Night Control Temperature Sensor, Set Point Adjust and Single Input Contact Temperature Sensor and Single Input Contact Temperature Sensor and Occupancy Control Temperature Sensor and Day/Night Control Temperature and Humidity Sensor; Set Point and Occupancy Control Temperature and Humidity Sensor; Set Point and Day/Night Control Temperature and Humidity Sensor; Set Point Control Temperature and Humidity Sensor; Occupancy Control Temperature and Humidity Sensor; Day/Night Control HVAC Components. Generic HVAC interface. Functions: Mode, vane position, fan speed, sensors and on/off HVAC Components. Generic HVAC interface. Functions: Error control: AC Error code, Error states and disablements Digital Input. Single Input Contact Table 14.3 Description of reception (Rx) EEPs © Intesis Software S.L. - All rights reserved This information is subject to change without notice ® IntesisBox is a registered trademark of Intesis Software SL URL Email tel http://www.intesis.com [email protected] +34 938047134 45 / 46 IntesisBox® DK-RC-ENO-1i / 1iC 15. User’s Manual r1 eng Regulations and standards CE conformity: R&TTE EU-directive on Radio and Telecommunications Terminal Equipment The general registration for the radio operation is valid for all EU countries as well as for Switzerland. Standards: UNE-EN UNE-EN UNE-EN UNE-EN 50491-3:2010 60950-1:2007 61000-6-2:2006 61000-6-3:2007 FCC ID: SZV-STM300C IC: 5731A-STM300C The enclosed device complies with Part 15 of the FCC Rules. Operation is subject to the following two conditions: (i.) this device may not cause harmful interference and (ii.) this device must accept any interference received, including interference that may cause undesired operation. Warning: Changes or modifications made to this equipment not expressly approved by Intesis Software may void the FCC authorization to operate this equipment. © Intesis Software S.L. - All rights reserved This information is subject to change without notice ® IntesisBox is a registered trademark of Intesis Software SL URL Email tel http://www.intesis.com [email protected] +34 938047134 46 / 46