1
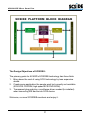
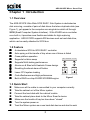
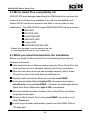
ARS-2012PE
Mirror Smart Plus
SCSI-to-SCSI RAID 1 Controller
for Desktop IDE Hard Drives
User’s Manual
Version 1.0
Copyright
2001
Copyright and Trademarks Information
The information of product in this manual is subject to change without
prior notice and does not represent a commitment on part of the vendor,
who assume no liability or responsibility for any errors that may appear in
this manual.
ACARD and SCSIDE are the trademarks of ACARD Technology Corp.
IBM is a trademark of the International Business Machine Corporation.
Microsoft and the Windows Logo are registered trademarks and Windows
is a trademark of Microsoft Corporation. All brand names and trademarks
are properties of their respective owners.
This manual contains materials protected under International Copyright
Laws. All rights reserved. No part of this manual may be reproduced,
transmitted or transcribed without the expressed written permission of
the manufacturer and authors of this manual.
Table Of Contents
Chapter 0 What is the SCSIDE Technology? ................ 1
Chapter 1 Introduction .................................................... 3
1.1 Overview ................................................................. 3
1.2 Feature ..................................................................... 3
1.3 Quick Start ............................................................... 3
1.4 Specification ............................................................ 4
1.4.1 Packing List ....................................................... 4
1.4.2 Parts specification .............................................. 4
1. Mirror Smart Cabinet ................................ 4
2. SCSI Adapter (Option) .............................. 4
Chapter 2 Hardware Installation ..................................... 5
2.1 Installing host adapter ............................................
2.2 ARS-2012PE Mirror Smart compatibility list .........
2.3 What you should know before the installation .....
2.4 ARS-2012PE installation .........................................
5
6
6
7
2.4.1 Cable Connection .............................................. 7
2.4.2 ARS-2012PE Advance Cable Connection ....... 10
2.4.3 Power Connection ........................................... 11
2.4.4 Other Part of Internal Connection ................... 12
2.4.5 External Power Connection ............................. 13
2.4.6 External Cable Connection ............................. 13
2.4.7 Configuring your Mirror Smart ....................... 15
2.5 ARS-2012PE’s control panel instruction ............. 17
Chapter 3 Troubleshooting ........................................... 19
3.1 Basic troubleshooting ......................................... 19
3.2 Advanced Troubleshooting................................. 20
For Windows 2000 System ....................................... 20
Appendix 1 Mirror Smart Plus Compatibility List ......... 24
Appendix 2 SCSI Controller Compatibility List ............ 25
Appendix 3 Mirror Smart Utility ..................................... 26
Appendix 4 Technical Support Form ............................ 34
ARS-2012PE Mirror Smart Plus
Chapter 0 What is the SCSIDE Technology?
SCSIDE® is a revolutionary invention developed by ACARD Technology
Ltd. It not only offers the unprecedented functionality of converting IDE
data flow into SCSI bus, but also minimize the converting overhead. This
technology has opened up a numbers of possibilities of SCSI applications to use low cost IDE device. The following examples are just a short
list of the SCSIDE® application.
1. Convert IDE hard drive into an external SCSI hard drive for data
backup in notebook and desktop PCs.
2. Convert IDE 50X CD-ROM into a 50X Ultra SCSI CD-ROM. Which is
brand new in the world.
3. Convert your favorite IDE DVD-ROM into a Ultra SCSI DVD-ROM.
4. Create a DVD-ROM Server by daisy chain Multiple SCSIDE® DVDROM.
5. Convert 5400rpm or 7200rpm DMA33/66/100 HD into UW-SCSI HD
for PC Workstation, PC Server, even for Unix Workstation and
Server.
The basic architecture of SCSIDE® is a highly integrated multi CPUs
ROC “RAID On a Chip” design. This ROC design utilizes ACARD
Technology’s many years expertise in IDE, SCSI and RISC CPU chip
design. As illustrated in the following diagram, this ROC has multiple
CPUs, its own ROM and RAM, DMA controllers and external ROM
interface for flash-ROM firmware update. ACARD Technology has also
polished the firmware design to make the IDE to SCSI conversion a truly
PnP “plug and play” experience. The firmware has been test with almost
all brands of IDE DMA33/66/100 HD, ATAPI CD-ROM, DVD-ROM. No
matter what type of IDE device you have, ATA hard drive, CD-ROM, CDRW or DVD-ROM, you can easily plug it on and ready to enjoy your
SCSI adventure.
Because of this intelligent firmware design, you do not have to install
driver to on you OS to use SCSIDE® series of products. To the OS, it
acts like a SCSI device, just plug and play.
1
ARS-2012PE Mirror Smart Plus
The Design Objectives of SCSIDE®:
The primary goals for ACARD’s SCSIDE® technology has three folds:
1. Bring down the cost of using SCSI technology by less expensive
device.
2. Create some application the people want but currently not available
(50X SCSI CD-ROM, high speed SCSI DVD-ROM).
3. Transparent plug and play, no software driver needed (to installed)
when converting IDE device into SCSI device.
Welcome, our new SCSIDE® members and enjoy it.
2
ARS-2012PE Mirror Smart Plus
Chapter 1 Introduction
1.1 Overview
The ARS-2012PE Ultra Wide SCSI RAID 1 Sub-System is dedicated as
disk mirroring, consists of pairs of disk drives that store duplicate data (see
Figure 1), yet appear to the computer as a single drive which all through
SCSI (Small Computer System Interface). With ACARD micro-controller
core built-in, it provides more flexible and stable for high exploring
application. ARS-2012PE supports IDE devices such as hard disk drive,
which can be easily attached to SCSI bus.
1.2 Feature
! A standalone SCSI-to-SCSI RAID 1 controller
! Auto-spring out the handle of tray when one of drives is failed
! Cross-platform operation
! Supports hot drive swap
! Supports Multi-tasking performance
! Aluminum & Steel with Heatsink Frame design
! Resetting functional alarm-off button
! Lower CPU system loading
! Cost effectiveness and high performance
Figure 1
! Built-in RAID-on-chip ACARD SCSIDE® engine
SCSI-to-SCSI RAID 1 Controller
D0
D0
D1
D1
Dn
Dn
Identical data is recorded on both HDD
1.3 Quick Start
! Make sure all the cable is connectted to your computer correctly
! Take the cabinet out of the Mirror system
! Connect the hard disk with the cabinet’s cable
! Take the cabinet place back to the Mirror Smart’s device
! Make sure the hsndle of tray bar have been “closed”
! Turn the system power on
! Treat the Mirror system as a new hard disk device and start to work
3
ARS-2012PE Mirror Smart Plus
1.4 Specification
1.4.1 Packing List
When you open the Mirror Smart Plus cabinet, please find out your
product model and then check the following packing list.
!
!
!
!
ARS-2012PE
Drivers CD & Utilties
User Manual
AEC-6712UW SCSI card (optional)
1.4.2 Parts specification
1. Mirror Smart Plus Cabinet
Material
-
Aluminum & Steel Base and Cover, ABS shell
and front panel
Environment -
Temperature
Operating 0 oC to 70 oC
Storage -20 oC to 85 oC
Humidity
-
15% to 90%
Dimentions
-
Models:
Length:
Width:
Height:
ARS-2012PE
28cm
18cm
16cm
2. SCSI Adapter (Option)
Please refer to SCSI adapter User’s manual
4
ARS-2012PE Mirror Smart Plus
Chapter 2 Hardware Installation
The hardware installation may include two parts, the first part is a simple
SCSI host adapter installation. Please, contact with ACARD for purchasing SCSI card if you do not have a SCSI card and want to use the AEC6712UW card (option). The second part is the Mirror Smart Plus
installation, which is also straight forward, only take about few minutes to
complete. Please follow the following instructions.
Before you install an IDE device into the ARS-2012PE, you may set the
IDE device as “Master or Standalone” mode by adjusting the jumper
setting.
To connect an IDE hard drive on Mirror Smart Plus, please know that if
use the old disk which already have the data or a version of OS installed,
we recommend that you have to backup your data before any installation
and re-install the OS after the hardware installation. It will not work without
re-install the OS even the old disk have a version of OS from the beginning
(for DOS and Windows). Due to the way SCSI card commands are different from the ON-Board IDE controller, it will create reading/writing error, so
we strong recommend that after hardware installation just treat the IDE
hard disk as the new one.
2.1 Installing host adapter
For installing the host SCSI adapter, please refer to the AEC-6712UW
adapter manual comes together with ARS-2012PE kit or your original
adapter supplier. Then, configure your AEC-6712UW software driver using
the supplied CD-ROM disc.
5
ARS-2012PE Mirror Smart Plus
2.2 Mirror Smart Plus compatibility list
ARS-2012PE were designed specifically for DMA Hard drive, we have fully
tested all kind of Hard drive available in our lab, the compatibility with
different SCSI card and to operate under Mac or Linux system is very
stabilization. The ARS-2012PE support DMA33/66/100 Hard drive include:
! IBM HDD
! MAXTOR HDD
! QUANTUM HDD
! SEAGATE HDD
! Fujitsu HDD
! WESTERN DIGITAL HDD
* Please see appendix 1 for the detail of the list
or visit www.acard.com for the newest list
2.3 What you should know before the installation
Before you install the Mirror Smart Plus, the following things that we
strongly recommend:
! If two hard drive are in different storage capacity, Mirror Smart Plus will
treat smallest one as a standard capacity at first time installation.
! When two hard drive have the same storage capacity, Mirror Smart
Plus will treat top of the hard drive as standard one.
! Normally, both hard drives either one could do a hot SWAP.
! During the rebuilding (Rebuild light is ON), the source drive device
should not be removed (hot SWAP). However, the destination device
(Hard Drive Error/ Malfunction light is ON) is removable.
! When the rebuild have been finished, Mirror Smart Plus will make a
long beep sound alarm.
! When the Mirror Smart Plus is doing hot SWAP, the system must
keep “Power on”.
! In order to get a better performance, please use Ultra DMA 33/66 or
100 hard disk.
6
ARS-2012PE Mirror Smart Plus
2.4 ARS-2012PE installation
2.4.1 Cable Connection
Before you connect Mirror Smart Plus system to your device, recognize
the different interface connectors of SCSI and IDE on the cabinet. The
longer connector on external rear board, which has 68 pins, is the SCSI
connector. Inside the cabinet, there is IDE ribbon cable connection. Please
note this connector will be connected to IDE hard drive.
External Board
* When the drive is failed, you
can not remove the hard drive
tray until 10 sec later since the
alarm is acting
1 2 3 4 5 6 7 8
DIP Switch
Auto-spring out the
handle of tray when
the drive is failed
SCSI connector
Hard Disk Cabinet
7
ARS-2012PE Mirror Smart Plus
Open cabinet methods:
Step 1. Make sure the system is power off and using the tool to open the
handle bar.
Step 2. Hold the handle bar and pull the tray out off the cabinet.
Handle Bar
Push to open
Handle Bar
* The handle bar is a switch to control
hard drive power. Do not arbitrarily
open the handle bar during system
operating, unless there is a system
alarm due to the hard drive failure.
Power connector
IDE connector
8
ARS-2012PE Mirror Smart Plus
The cabinet connection methods:
Step 1. Find out pin 1 of 40-pin IDE connector on IDE hard drive.
Step 2. Find out a color line of the internal IDE ribbon cable indicating pin 1
of connector.
Step 3. Connect the internal IDE cable to IDE hard drive aligning with pin-1
to pin-1.
Step 4. Connect 4-pin power cable to IDE hard drive’s power connector.
Step 5. Revrse the “open cabinet methods” setps, put the cabinet back to
the system.
IDE Hard Disk
9
ARS-2012PE Mirror Smart Plus
2.4.2 ARS-2012PE Advance Cable Connection
For the advance cable connection, normally the cable inside the box have
been installed by producer. However, before you connect Mirror Smart
Plus to your device, recognize the inside circuit board and check if all the
connector have been connected. Also, to get familiar with those connector will help you to troubleshoot if Mirror Smart Plus would not work
properly. Below the figure shows the way of opening back case for
Mirror Smart Plus.
Pull to open
Power connector
SCSI connector
DIP Switch
connector
10
ARS-2012PE Mirror Smart Plus
The internal rear board connection methods:
Step 1. Find out pin 1 of 68-pin SCSI connector on internal rear board.
Step 2. Get a color line of the SCSI ribbon cable indicating pin 1 of
connector.
Step 3. Connect the SCSI cable to internal circuit board aligning with pin-1
to pin-1.
2.4.3 Power Connection
Please find out the power connection from your hardware power supply.
There is one internal power connectors for device. You need to connect the
power connectors to Mirror Smart Plus. Please see the figures below for
the way of connection.
11
ARS-2012PE Mirror Smart Plus
2.4.4 Other Part of Internal Connection
After you connect the main cable and power connection, you will find that
there is one small cable connectors need to be connected as well. The
connector is used to connect External DIP Switch. Please find out the
right position to connect it. Please see the figures below for the way of
connection.
External Jumper
Setting Connector
12
ARS-2012PE Mirror Smart Plus
2.4.5 External Power Connection
After the above installations are completed, your are ready to connect the
external power connection, please see the graph below.
1 2 3 4 5 6 7 8
Power line
2.4.6 External Cable Connection
As this time, your IDE harddisk with Mirror Smart Plus is just like an
external SCSI device. You can follow the direction below to install your
external SCSI devices while you have only one or more than one SCSI
devices.
Step 1. Identify the first 68-pin external SCSI cable.
Step 2. Plug one end of the 68-pin external SCSI cable into the host
adapter external 68-pin connector.
Step 3. Plug the other end of this SCSI cable into Mirror Smart Plus’s
external SCSI connector device.
Step 4. Enable the terminator of Mirror Smart Plus if it is the last device
in the SCSI chain. (Please see the following figure 1.)
Step 5. Take another external SCSI cable and plug it onto second
connector on the same SCSI device if your SCSI Device in daisy
chain.
Step 6. Plug the other end of this SCSI cable onto one of the external
connectors on the next SCSI device. If you have more SCSI
devices, please repeat Step 3. to 5.
Step 7. Please note that, at the last one SCSI device, you need to
enable its’ terminator. (Please see the following figure 2.)
13
ARS-2012PE Mirror Smart Plus
Connecting one device (Figure 1.)
1 2 3 4 5 6 7 8
Power line
Connect to
SCSI Adapter
Connecting more than one device (Figure 2.)
Other SCSI device (e.g. connect
with another Mirror Smart Plus)
1
2 3
4 5
6
7 8
1
Power line
Connect to
SCSI Adapter
Power line
14
2 3
4 5
6
7 8
ARS-2012PE Mirror Smart Plus
2.4.7 Configuring your Mirror Smart Plus
(DIP Switch Setting)
DIP Switch Setting
SCSI ID number configurations have to be set up on ARS-2012PE. The
setting of SCSI ID number can be done by using DIP Switch to adjust ON
/ OFF .
1 2 3 4 5 6 7 8
ON
1
2
3
4
5
6
7
8
Please follow the instruction below and decide the suitable DIP Switch
setting.
1.
2.
ON
Terminator Enable / Disable. Generally, when the
device is at the end of the SCSI bus cable or there is
only one device on this cable, you should set the terminator as ON. The default value is ON.
ON
7
SCSI ID Number. For every unique device on one SCSI adapter
card, there is a unique ID number indicating that device. Follow the
instruction attached on enclosure to set an ID number until the IDE
device get a unique number.
1 "ON-SCSI ID 1
2 "ON-SCSI ID 2
3 "ON-SCSI ID 4
4 "ON-SCSI ID 8
5 "Reserve
6 "Reserve
7 "ON-Terminator Enable
8 "Reserve
ON
1
2
3
4
5
6
7
8
OFF
Default: All OFF (ID=0)
15
ARS-2012PE Mirror Smart Plus
SCSI ID Number Instruction for ARS-2012PE
ON
ON
ID=0
(Default)
ID=1
1
2
3
4
5
6
7
8
1
2
3
4
5
6
7
8
2
3
4
5
6
7
8
2
3
4
5
6
7
8
ON
ON
ID=2
ID=3
1
2
3
4
5
6
7
1
8
ON
ON
ID=4
ID=5
1
2
3
4
5
6
7
8
2
3
4
5
6
7
8
1
ON
ID=6
ID=7
1
N/A
ON
ON
ID=8
ID=9
1
2
3
4
5
6
7
1
8
ON
2
3
4
5
6
7
8
2
3
4
5
6
7
8
2
3
4
5
6
7
8
2
3
4
5
6
7
8
ON
ID=10
ID=11
1
2
3
4
5
6
7
8
1
ON
ON
ID=12
ID=13
1
2
3
4
5
6
7
8
1
ON
ON
ID=14
ID=15
1
2
3
4
5
6
7
8
1
16
ARS-2012PE Mirror Smart Plus
2.5 ARS-2012PE’s control panel instruction
Fan Failure LED: If the fan of the cabinet can not work properly, the LED
will be lit on.
Hard Drive Error or Malfunction LED: This LED will be indicated when
the hard drive have error or bad sector inside.
Hard Drive Access LED: This LED means that the Mirror Smart Plus is
reading/writting data from/to the hard disk.
Hard Drive Power LED: The sign will show you if each hard drive has
actived with the power.
Rebuilding LED: When you replace one hard drive, the original data of the
other will be stored and copy completely to new one. This time, the rebuilding LED will indicate that data is copying to the new hard drive.
Alarm-Off Restting Button: When alarm is actived, push the button can
be buzz off.
System Power LED: The sign will show you if the Mirror Smart Plus
system have been connected with power.
* You must place the handle bar back to “Close” after
Handle Bar
finishing all hardware installation. Otherwise, the
“Alarm” for disk failure will be acting when power
on the computer.
Fan Failure LED
Alarm-Off Resetting Button
Hard Drive Error or
Malfunction LED
Rebuilding LED
System Power LED
Hard Drive Access LED
Hard Drive Power LED
17
ARS-2012PE Mirror Smart Plus
A
C
B
* During the normal operation, if the Mirror Smart Plus detect one of drives is
failed, the target of fail drive LED will glitter for 10 seconds with alarm.
Then, the target of fail drive LED will keep lightening with Handle Bar out
and indicates the fail drive need to be replaced and installed a new drive.
* After the new drive install into the cabinet and plug into the system, the
system will check the new drive. At this time, LED A ,B and C will
keep lightening. And the target of new drive LED will glitter and indicate
the hard drive is checking if ready .
* When the new drive is ready, LED A ,B and C keep lightting, the new
drive LED will keep glittering. However, LED A ,B and C will light up
and indicate the system is rebuilding data to the new drive.
* During rebuilding or only one drive in the system, Mirror Smart Plus will
sound a short beep 2 times in every 8 seconds with LED glittering until
replacing a new drive if the source drive have bad sector inside.
* If the fan of the cabinet can not work properly, the target of fan fail LED will
glitter with alarm one time in every second until the “Alarm-Off Resetting
Button” to be pressed for 0.5 second. Under this status, please contact to
the dealer or ACARD distributor.
18
ARS-2012PE Mirror Smart Plus
Chapter 3 Troubleshooting
3.1 Basic troubleshooting
If you install your Mirror Smart Plus and it does not function properly,
follow the basic troubleshooting below.
1. Check power supply.
When starting to check the malfunction devices, you should check the
power status (ON / OFF).
2. Verify IDE device.
Always make the IDE device functions is in the Master/Standard mode
before you install Mirror Smart Plus.
3. Check host adapter.
Verify the adapter card is seated in its slot on the motherboard.
4. Check all connectors and cables.
Check Mirror power connector, SCSI connector, IDE connector, device
power connector, and ribbon cable are connected well. Ribbon cables are
easily damaged because of un-proper fold. You can try a new cable known
to be good. Make sure no connector pins are bent. Verify pin 1 on the
interface cable is aligned with pin 1 on the drive and host adapter.
5. Verify the DIP Switch setting.
Start over the section configuring your Mirror Smart Plus (DIP Switch
Setting and power connection) to check if the DIP Switch setting is
correct.
6. SCSI ID conflict.
If you have multiple SCSI devices, please make sure that ID of the SCSI
device do not duplicate. To reduce the chance the ID switch malfunction, it
is recommended to test it individually.
7. Poor external cable problems.
This may happen if the daisy chained with many SCSI device and some of
the external cables are not the high density 50 pins (or 68pins UW-SCSI)
cables. The 25pin to 50 pins SCSI cable has weak grounding, so if the
daisy chained with more SCSI device to system through the 25/50 pins
SCSI cable and having intermittent failure, it is recommended that you
change this cable with another better quality one.
19
ARS-2012PE Mirror Smart Plus
3.2 Advanced Troubleshooting
Let’s use an example of installing a ARS-2012PE Mirror Smart Plus into
ACARD’s SCSI Controllers AEC-6712UW to show a proper way of
software troubleshooting (configuration). Assume that we set an SCSI ID
number “0” to AEC-6712UW.
For Windows 2000 System
1. Verify the SCSI host adapter.
Check the device name shown on the list of devices to see if the device
name of SCSI adapter is exact the one you have installed with AEC6712UW. The method is shown below.
Step 1. Double click on “My computer”. Then enter the “Control
Panel”.
20
ARS-2012PE Mirror Smart Plus
Step 2. Double click on “System”.
Step 3. In “System Properties” choose “Hardware” then click on
“Device Manager”.
21
ARS-2012PE Mirror Smart Plus
Step 4. In “SCSI and RAID controllers” to double click on “ACARD
AEC6712UW PCI Ultra/W SCSI Controller” to check if the device
you connect to AEC-6712UW is correct.
2. Verify your IDE device.
If you can find your IDE device name which you install with AEC-6712UW
on “Device Manager”, then you have installed your AEC-6712UW
successfully. If you can not find your device name but find a named Mirror
Smart-No Device, check the internal IDE connector of AEC-6712UW. It
could be caused by unsuitable connection or malfunction IDE device. Follow
the instruction below to see how to check your IDE device.
Step 1. Click on “Disk drives” to show your hard disk drives.
22
ARS-2012PE Mirror Smart Plus
Step 2. Double click on “ACARD MirrorSmart7.9G SCSI Disk Device”
to choose “General” to check the “Device Status” to see if the
Mirror Smart Plus device is working properly.
23
ARS-2012PE Mirror Smart Plus
Appendix 1
Mirror Smart Plus HDD Compatibility List
Quantum
FireBall AS series
FireBall LM series, LC series, LB series, LD series
FireBall KX series, KA series
FireBall CX series, CR series, EX series
FireBall EL series
Seagate
Barracuda IDE series
Barracuda ATA II 100 series
ST320430A, ST313620A, ST3240AT,
ST38422A, ST36531A
IBM
DTLA series, DPTA series, DTTA series, DJNA series, 60 GXP, 75 GXP
Maxtor
54098U8, 52049U4, 91366U4, 94098U8, 91020U3, 98196H8, 5T020H2
Fujitsu
MPF-3204AT, MPD-3173AT, MPD-3084AT
Western Digital
Expert 13BA, Caviar AC14300, Caviar 300BB, Caviar 600AB
* Please visit www.acard.com for the newest list
24
ARS-2012PE Mirror Smart Plus
Appendix 2
Mirror Smart Plus SCSI Controller Compatibility List
Adaptec ASC 29160
Adaptec ASC 39160
Adaptec AHA 2940U2W
Adaptec AHA 2940UW
Initio 9100UW
Tekram DC-390U2W(53C895)
Tekram DC-390U3W
ACARD AEC6712UW
Tekram 390UF LSI Symbios 53C875 Ultra Wide SCSI controller
25
ARS-2012PE Mirror Smart Plus
Appendix 3
Mirror Smart Utility
To change some basic setting, please choose “Preference” under “Setup”
list.
Setting for popup up message when errors occur
Setting for two hard drives data comparison
Setting the time for saving event log
Setting the time for updating the status of Mirror Smart
26
ARS-2012PE Mirror Smart Plus
For setting Mirror Smart functions, please choose “Mirror Smart Setup”
under “Setup” list.
The rebuilding speed
choose
Setting alarm-off resetting
button if work
For Mac User choose
Setting for fan 3 if detection
For using read data
only choose
Setting for fan 2 if detection
Setting alarm mor e
than 10 seconds
Setting for fan 1 if detection
Setting to support
ATA66 hard drive
Setting for fan 0 if detection
Setting to take a
turns for reading
both hard drives
rather than one
27
ARS-2012PE Mirror Smart Plus
For changing Mirror Smart size, please choose “Change Mirror Size” under
“Setup” list.
Setting the Mirror Size
(Adjusting more bigger than curr ent mirror size only)
28
ARS-2012PE Mirror Smart Plus
To update firmware, please choose “Update Firmware” under “Setup” list.
Then select the firmware file from the updating source. For checking
currently is using firmware version, please see the utility window on
“Revison” item.
The firmw are version is using
in this Mirror Smart system
From the update firmware to select
the newest version driver
After selecting the firmware file then clike on “Open”. The confirmation of
update firmware window will pop up. Click on “Yes”, the updating process
will go through.
29
ARS-2012PE Mirror Smart Plus
For checking Mirror Smart Utility version, please click on “About”. The
explanation of the windows, please check the following diagram.
About U tility Ver sion
Target ID Number
ACARD Mir ror
Smart is using
The S tatus of
device is using
Host Bus ID Number & the
Model of SC SI card is using
The har d drive on the
bottom of the system status
The har d drive on the
top of the system status
As RA ID 1 active,
treat whole system to
be one har d drive only status
The fans on the bottom
of the system status
The fans on the top
of the system status
To compare and check tw o
har d drive if have same data
30
ARS-2012PE Mirror Smart Plus
For checking “Source” HD and “Target” HD if have the same data, please
click on “Compare HDDs” button. The system will check it. During the
rebuilding process, the diagram same as comparing HD.
Comparing and checking two hard drives
or doing hard drive r ebuilding process
When HD have been detected error or malfunction, the diagram as following.
Under this status indicate the HD does not
exist or HD have been detected error
31
ARS-2012PE Mirror Smart Plus
For looking for a history log record, just Load Event Log under “Event Log”
list. Then select the file for you need and open it to check.
To open history event log file
History Event Log Window
32
ARS-2012PE Mirror Smart Plus
The “Event Log” will show the status on every event time. This record will
help you to identify what is going wrong when problems occur.
33
ARS-2012PE Mirror Smart Plus
Appendix 4
Technical Support Form
Email: [email protected]
http://www.acard.com
Model:
F/W Version:
ARS-2012PE
System Configuration
Main Board vendor
BIOS version
SCSI adapter
Chipset
Memory
Dispay card
Other I/O card
OS version
Hard Disk
Configuration
Hard Disk Model/type
Capacity
Firmware version
IDE Device Connect
CD-ROM model
CD-R model
MO or Removable
HDD
Others
Problem Description
MALARS2012PE10-0
34