1
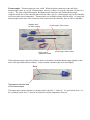
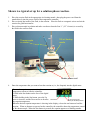
J-KEM® Scientific, Inc.
KEM Scientific, Inc.
6970 Olive Blvd.
St. Louis, MO 63130
(314) 863-5536
Fax (314) 863-6070
E-Mail: [email protected]
Instruments for Science from Scientists
How to Set Up a Reaction with J-KEM Scientific’s
Digital Temperature Controller
This application note shows how to set up a typical heated reaction using J-KEM Scientific’s digital
temperature controller. For this example, the Model Gemini controller is used, but the application note
applies equally well to all J-KEM temperature controller models. If you have questions about specific
models of temperature controllers, or any safety related question, please feel free to contact J-KEM
Scientific. This application note does not supercede any information in the Controllers actual User
manual. The User manual for each model is always the reference for that model.
The Model Gemini is a dual channel controller that allows two independent reactions to be run on the same
controller, one reaction on Channel 1 and the second on Channel 2. In this example, we will only use
channel 1.
Gemini Dual Channel
Temperature Controller
Thermocouple
receptacle
Channel 1 has a 100 hour
to turn heating On (Off)
at a user set time.
Channel 2 does
not have a timer
Thermocouple extension
cord
Thermocouple
Thermocouples – Thermocouples are color coded. When the plastic connector on the end of the
thermocouple is blue, it is a type T thermocouple, when it is yellow it is a type K, and when it is black it is
a type J. The color of the thermocouple, the thermocouple extension cord, and the thermocouple
receptacle on the face of the controller must all be the same color (i.e., thermocouple type) or the controller
will not read the correct temperature. Thermocouples are available in many different styles. As long as the
thermocouple has the same color connector as the connector on the controller, they are 100% compatible.
Stainless steel,
no Teflon coating
12 inch length, Teflon coated
Teflon coated
hypodermic needle
6 inch length, Teflon coated
When a thermocouple is placed in solution, often it is desirable to bend the thermocouple slightly so that
more of the tip extends into the solution. It does not hurt a thermocouple to be bent slightly.
Bend
Temperature sensitive end
of the thermocouple
The temperature sensitive portion of a thermocouple is the first ¼” of the tip. It’s good for the first ½” to
be is solution, but the first ¼” must be in solution to read the temperature correctly.
Heaters – Your J-KEM controller works with virtually any 120 volt (or 230 volt heaters outside of the
USA) heater, including any size heating mantle, 120 vac oil baths, hot plates, ovens, and many other style
heaters. If you have questions about the compatibility of specific heaters, please contact j-KEM.
1 liter heating mantle
10 ml heating mantle
Oil bath
J-KEM’s 200-Series, Apollo, and Gemini controllers are compatible with any size heating mantle from 5
ml to 50 liter, and any 120 Vac oil bath (do not use with oil baths rated less than 120 Vac).
J-KEM’s 150-Series economy controllers are compatible with 500 ml heating mantles and larger, and 120
Vac oil baths (do not use with oil baths rated less than 120 Vac).
J-KEM’s 230 Vac controllers are compatible with any 230 Vac heating mantle 100ml and larger. They are
not compatible with any size oil bath.
Shown is a typical set up for a solution phase reaction.
1.
2.
3.
Place the reaction flask in the appropriate size heating mantle., then plug the power cord from the
mantle directly into the power outlet of the temperature controller.
Place a stirring bar inside of the flask, in the solution. Place the flask on a magnetic stirrer and stir the
reaction for good heat transfer.
Place a thermocouple in solution and make sure that at least the first ¼” (1/2” is better) is covered by
the fluid in the reaction flask.
Thermocouple
in solution
100 ml Heating
mantle
Heater power cord
4.
Enter the temperature that you want to heat the reaction to (i.e., the Setpoint) into the digital meter.
To enter the setpoint temperature (i.e., the
temperature to heat to) into the controller:
1. Hold in the Star button on the face of the digital
meter.
2. While holding in the Star button, press the Up
Up (to increase) and
arrow to increase, and the Down arrow to decrease Star button
Down (to decrease) arrows
the setpoint temperature.
When the desired setpoint temperature is showing in the display, release the star button to load the
setpoint. When no buttons are pressed on the controller, the controller shows the temperature sensed
by the thermocouple. When the Star button is pressed, the setpoint appears as a blinking number.
5.
Set the correct Power Control Level. Your J-KEM controller has a built in Power Control Computer
PCC) that precisely regulates power to the heater. For the computer to work correctly, it must know
the volume of solution that is being heated. It’s important to understand that the PCC is set to the
Volume of solution being heated, not the size of the heater or the size of the flask.
75 ml of solution in a 100 ml flask
15 ml of solution in a 100 ml flask
If the flask above is placed in a
100 ml heating mantle, the
power control input should be
set to the “10-100 ml” setting.
The power control computer is
always set to the Volume of
solution being heated, not the
size of the flask or heater.
If the flask above is placed in a
100 ml heating mantle, the
power control input should be
set to the “50-500 ml” setting.
When the power control computer is set
to the correct power level, your
controller can regulate virtually any
heater to +-0.1o C with less than 1o C
overshoot on initial warming.
For a detailed explanation of the Power Control Computer, see Section Two in the controller’s User
manual.
Other Features of Your J-KEM Controller.
Serial Communications – J-KEM’s Research Grade controllers have USB communications as a standard
features. KEM-Net control and data logging software is available at no charge on J-KEM’s web site.
100 Hour Timers – Some models of controllers have built-in 100 hour times that turn heating On or Off at
a user set time. See the user manual for instructions on how to set the timer functions.
Custom Features – J-KEM welcomes inquires about temperature control applications requiring custom
hardware or software.