1
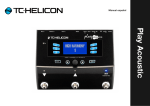
USER’S MANUAL
v1.9
Table of Contents
CONNECTION GUIDE . . . . . . . . . . . .3
BASICS . . . . . . . . . . . . . . . . . . . . 4
SOFT BUTTONS . . . . . . . . . . . . . . . 8
GENRE . . . . . . . . . . . . . . . . . . . . 8
FAVORITE . . . . . . . . . . . . . . . . . . .8
SETUP - INPUT . . . . . . . . . . . . . . . .9
SETUP - OUTPUT . . . . . . . . . . . . . . 12
SETUP - SYSTEM . . . . . . . . . . . . . . 14
SETUP - LOOP . . . . . . . . . . . . . . . 16
SETUP - MIDI . . . . . . . . . . . . . . . . 17
EFFECTS . . . . . . . . . . . . . . . . . . . 19
EFFECTS - UMOD (MICRO MOD) . . . . . 20
EFFECTS - DELAY . . . . . . . . . . . . . . 21
EFFECTS - REVERB . . . . . . . . . . . . . 23
EFFECTS - HARMONY . . . . . . . . . . . 24
EFFECTS - DOUBLE . . . . . . . . . . . . . 26
EFFECTS - HARDTUNE . . . . . . . . . . . 27
EFFECTS - TRANSDUCER . . . . . . . . . . 28
EFFECTS - GUITAR . . . . . . . . . . . . . 29
MIX . . . . . . . . . . . . . . . . . . . . . 33
PRACTICE . . . . . . . . . . . . . . . . . . 34
TROUBLESHOOTING . . . . . . . . . . . 35
Connection Guide
MIDI In Inst In/Thru
USB
Phones
Power In
Switch3 In
Aux In
Out to P.A.
or DAW
Mic In
Power In - Connect the included power supply (ALWAYS USE A TC-HELICON POWER SUPPLY. USING
ANY OTHER POWER SUPPLY MAY DAMAGE THE UNIT AND WILL VOID YOUR WARRANTY.)
USB - Connect to your computer with the included cable. Use VoiceSupport to manage presets and update Firmware. www.tc-helicon.com/products/voicesupport
Phones - Headphone output.
Left+Right - Main XLR outputs connect to your P.A. system or audio interface. Always use balanced cables to avoid HUMMMMMMM.
Switch3 In - Use a TRS cable to connect a Switch 3, which can control looping. If you use the S3, you
have access to looping without pressing the Up and Down footswitches.
Aux In - Use a 1/8” cable to connect any music source you like, espcially the 8-Track from your 1974
Comet. When an input is detected here, Play will use the music to figure out Key/Scale info.
MIDI In - Connect a MIDI cable to your keyboard or computer to send Notes information for Harmony/Hardtune. Some CC’s are also available. (see Setup - MIDI for more info)
Inst IN/THRU - Connect a guitar or keyboard (audio not MIDI) to IN. To pass guitar signals to an
amplifier and bypass internal guitar processing, connect a 1/4” cable to your guitar rig from the THRU
jack.
Mic In - This is where the magic happens. Plug your dynamic, condenser or MP-75 Mic in here. Remember to set the mic type and level, as described in the QuickStart Guide.
3
Basics
Mic Gain Knob
Once you’ve connected your microphone and selected the Mic Type (pg. 9 Dynamic, Condenser, MP75), use the Mic Gain Knob to set the input level for your microphone.
As you increase the level, pay close attention to the LED on the top of the VoiceLive Play GTX.
You want the input to light the LED Green. It’s OK if the LED sometimes lights Yellow, but it should
never turn Red. If it does turn Red, reduce the level. Red means the input is overloading.You’ve got
powerful lungs!
4
Basics
LCD Display
1.
Patch Name (Geddit Started)
2.
Patch Number (27)
3.
FAV – Shown if the current preset is tagged as a Favorite
4.
NP – Shown when NaturalPlay key/scale information is being processed by the system
5.
LOOP – Shown when a loop is playing in the background
6.
GENRE – Displays the name of the genre selected in the genre screen. Not shown when the genre is set to ALL.
7. MIDI - Shown when MIDI information is being recieved.
*What is NaturalPlay?
NaturalPlay is the voodoo we do inside the VoiceLive Play GTX to figure out which key your music
is in. If you plug in a Guitar or Keyboard to the INST In, NaturalPlay will look there first for key/scale
info. Next, it will look at the MIDI input. Finally, it will look at the Aux input and RoomSense mics.
Once the GTX “hears” Key/Scale information from one of the inputs, it will set the Key/Scale on the
fly. NP is only shown when a change in Key/Scale is detected, so don’t panic if you don’t see it all the
time.
5
Basics
Switches and Operation
1.
The UP and DOWN switches allow you to navigate through presets. Press once for a single preset change. Press and HOLD to quickly move through presets.
2.
HIT/TALK – In normal operation, this button acts as a HIT button. When activated, a new effect or effects will be added to the current patch. This feature is perfect for adding effects like Harmony to a chorus section of a song, or even to a single line or word.
3.
When you press and HOLD the HIT/TALK button, the VoiceLive Play GTX enters TALK mode. All effect output is muted and the mic input is passed directly to the output.
If you have a guitar plugged into the INST IN, you will enter TALK/TUNER mode, activating the guitar tuner. The guitar output is muted to allow tuning, but the Dry voice is still passed to the output, allowing you to tune your instrument and still entertain the crowd with witty banter.
4.
To enter LOOP mode, press and hold the UP and DOWN switches simultaneously. Once in LOOP mode, the DOWN footswitch controls REC/PLAY/OVERDUB functions, the UP footswitch controls the STOP/CLEAR functions and the HIT button exits LOOP mode.You may exit loop mode while a loop is still playing. That means you can choose a new vocal sound and then re-enter LOOP mode to add a new overdub to the loop. Press and hold the DOWN footswitch after performing an OVERDUB to UNDO.
*LOOP mode is the default action when pressing the UP and DOWN buttons simultaneously. The alternative mode, set on SYSTEM page 5 under UP/DN Function is KEY/SCALE mode, described below.
5. To access TAP TEMPO, press and hold the UP and HIT switches simultaneously. Once you see the tempo on the LCD screen, tap the HIT button in time with your music. When you’re finished, stop tapping and the screen will “time out” back to the preset screen.Voila!
6.
To enter KEY/SCALE mode and select the KEY/SCALE to be used with Harmony and Hard
tune effects, press and hold the UP and DOWN switches simultaneously. To save your select-
ed KEY/SCALE, press EXIT.
*If you don’t know the KEY/SCALE that a particular song is in, tryusing the last chord of the song for
the KEY and Major 2 for the SCALE. It’s often correct, especially in popular music.
6
Basics
Control Knob and Arrow Buttons
The control knob is used to move through presets and to move through various settings when in Edit,
System or other menu areas. The Arrow Buttons act similarly, moving through presets, styles, Genres
etc..
Back
Exits the current screen or mode.
Store
When you have made a change to a preset, simply press STORE. The first press will bring up the name/
location window, allowing you to re-name and/or relocate the preset. Pressing STORE again will save
the preset, along with its new name or location.
To change the NAME of a preset, press the STORE button once, then press the Left Blue Soft Button
to modify the letters/numbers. Press STORE again to complete the process.
To save the current preset in a different LOCATION press the STORE button once, then press the
Right Blue Soft Button and use the control knob to select the destination number for the preset. Press
STORE again to complete the process.
If you change your mind and don’t want to save the changes, simply press BACK.
*Soft Buttons and their operation are described in more detail on the next page.
7
Soft Buttons
There are six (6) “soft” buttons, three (3) on each side of the LCD Display. Each button is context specific, meaning that when its function is available, you’ll see it lit up with a WHITE or BLUE LED. When
there is no function available, the button will not be lit. In WHITE LED mode, the text on the button
refers to its action. In BLUE LED mode, the button will select the segment of the LCD screen that is
beside the button. Not every menu uses all six (6) buttons.
Genre
Sorts presets by category, ranging from musical style to effect type. When in the GENRE menu, use the
Control Knob to navigate through the available options. Press BACK to return to the main window,
where you will see just the presets contained within the GENRE that you have selected. Presets can
be associated with multiple genres.
Favorite
The “Favorite” button toggles the current preset as a “FAV”. When on, FAV will be seen in the top
right corner of the LCD, as shown above.
If you set one or more presets as a “FAV”, you can see a list of only those presets by choosing FAV
from the GENRE screen. If there are no “FAV” presets tagged, FAV will not appear in the GENRE options.
*Using Fav’s is a great way to make set-lists or group all of your custom presets together, so you can
find them easily.
8
Setup - Input
When pressed, the VoiceLive Play GTX enters the SETUP menu, which is comprised of 6 pages and
controls the general functions of the device:
Mic Type – Selects the type of microphone.
There are 4 settings:
1.
DYNAMIC MIC– for dynamic mics (like an SM-58 or OM5)
2.
CONDENSER MIC – for condenser mics (like a Beta 87A)
3.
MP-75 MIC - for use with our MP-75 microphone, which has an onboard switch to control various functions of your VoiceLive Play GTX, such as the HIT or LOOP functions.
*Mic Control defaults to HIT when MP-75 is selected.
4.
USB – Digital audio can be passed to the VoiceLive Play GTX via the USB port. allowing you to send vocals from a DAW to the unit for processing.
Room Sense – Controls the way the two onboard RoomSense microphones function.
There are 3 settings:
1.
AMBIENT – RoomSense uses the onboard mics and passes that signal via the headphone out
put. Control for RoomSense level can be found in the MIX section. To avoid feedback, the RoomSense output is only passed to the headphone output and not the XLR output.
*Try using the AMBIENT setting alongside a vocal mic to pick up an instrument, like an acoustic guitar or piano, and mix it in with your vocals.You can also mix some of the AMBIENT signal into an in-ear monitor mix to give you room sounds with your direct mic feeds.
2.
AMBIENT/AUTO – In addition to the ability to output RoomSense sounds via the headphone mix, the onboard RoomSense mics will also listen to musical information from the surrounding environment (a single instrument or even your whole band will work!) to determine the KEY/
SCALE for harmony/hardtune.
3.
VOICE – The RoomSense mics are used as the primary vocal input. This action is only available via headphones.
9
Setup - Input cont.
Guitar – Adjusts the guitar input gain.
Different guitars have different output levels, based on their pickups and electronics. Use this setting to
ensure that your guitar input isn’t too low or too high. (Strat’s tend to be less “hot” than a Les Paul)
Without singing into your mic, play your guitar as hard as you would at your most intense. Really rock
it out. (make sure the volume on your guitar is maxed)
Turn up the Guitar level until the RED “IN” LED lights while you play, then back the level down by
3-4dB. Doing this will ensure you have enough signal to properly feed the amp simulation processors.
Mic Control – Sets the action associated with the Mic-Button.
There are 4 settings:
1.
HIT – The mic button controls HIT in any patch that has a HIT function assigned.
2.
HIT + TALK - Pressing the mic button engages the HIT function. Pressing and HOLDING the
mic button engages TALK mode, bypassing all effects. Press again to exit TALK mode.
3.
PRESET UP – Cycles through the presets, moving forward through the menu.
4.
LOOP – Activates or De-Activates RECORD/PLAY/O-DUB for Looping. For Looping.
Tone Style – Applies varying amounts of Adaptive EQ, Compression and Gate.
There are 9 styles to choose from:
1.
OFF – No Tone Style is applied.
2.
NORMAL – Some “bottom”, “mid” and “air” EQ , light compression and minor gating (when the input level gets low enough, the input is muted) is applied to the signal.
3.
LESS BRIGHT – Similar to Normal, but with less emphasis on high frequency EQ.
4.
NORM+WARMTH – Similar to Normal, with a small “mid bump” to add some warmth to the voice.
5.
MORE COMP – Utilizes the Normal EQ and Gating settings, but with more aggressive com-
pression settings. This is a good setting to try if you have a large dynamic range when singing and want to keep your levels under control.
6.
NORM NO GATE – Removes the Gate function from the normal setting. This means that even at very low input levels, the mic is still active or “hot”.
7.
LESS BRIGHT NG – The same as Less Bright, but with the Gate function removed.
8.
WARMTH NG – The same as NORM+WARMTH, but with the Gate function removed.
9.
MORE COMP NG – The same as MORE COMP, but with the Gate function removed.
10
Setup - Input cont.
Pitch Cor Amt
Pitch Correction Amount allows you to control the amount of Auto-Chromatic Pitch Correction the
VoiceLive Play GTX applies to all incoming signals from the microphone. For a natural sound, we find
that 50% or less is a good place to start. If you’re having a hard time hitting notes accurately, or want
an Auto-Tuned sound on all of your vocals, experiment with amounts closer to 100%.
*If you’re new to Auto-Chromatic Pitch Correction, you may find that the sound you hear with Correction engaged sounds “doubled”. This is due to you hearing both the corrected signal from the VoiceLive Play GTX and your own voice via bone conduction in your noggin. The two sounds have small
variances which can be interpreted as “doubling”. It’s perfectly normal, but will take a bit of getting
used to. The Audience won’t hear the “doubling”.
11
Setup - Output
Output – Sets the way VoiceLive Play GTX outputs sound via the XLR outputs.
There are 3 settings:
1.
STEREO – XLR outputs receive a stereo mix of all voices, guitar and other inputs.
2.
MONO – A MONO full-mix signal is on the LEFT and a DRY vocal is on the RIGHT. Any Tone and Pitch Cor Amt settings from the Setup menu are included on the RIGHT DRY channel.
3.
DUAL MONO – All lead and effected vocals are sent via the LEFT output and all guitar, aux/
digital signals are sent via the RIGHT output. Loops are passed in Stereo.
Vocal Cancel – Attempts to remove the vocals from a piece of music.
There are two settings:
1.
OFF – No processing is performed on the aux input.
2.
ON – Processing occurs to attempt to remove lead vocals from a piece of music. This pro-
cess can create “Karaoke” style music for you to sing along to, including key information for harmony generation. The processing capability can vary quite a bit from song to song, depend-
ing on the way the song was originally mixed.
Lead Mute – Mutes the Lead vocal and only outputs processed signals.
There are two settings:
1.
OFF – Lead vocals are routed to the main mix.
2.
ON – Lead vocals are removed from the main mix.
12
Setup - Output cont.
USB Out Level - Controls the level of the USB output. If the device you are connected to is clipping at its input, try turning this setting down.
Headphone Lim- There is a built-in headphone limiter, to provide protection from
large volume increases, spikes, dropped mics, screaming fans etc. 0dB is the default, but
you can set it lower if you want more protection.
Ear damage can occur quickly at high volumes, so be cautious when using headphones
or in-ear monitors!
13
Setup - System
LCD Contrast – Controls the contrast of the LCD screen. Depending on the ambient light in the
room, different settings may have more or less effect.
UP/DN Function – Set the behavior of pressing the UP/DN footswitches simultaneously.
1.
LOOPING – Enters LOOP mode
2.
SET KEY – Enters KEY/SCALE mode
Lead Dly – Delays the incoming vocal signal very slightly to compensate for the small amount of
latency introduced when effects are processed by the system. This delaying of the signal allows the
output voices, like harmonies, to be perfectly in sync with the lead vocal.
There are 3 settings:
1.
OFF – No delay compensation is used.
2.
VOICE SYNC – The lead vocal is delayed an amount equal to the maximum latency of the system with all effects turned ON.
3.
AUTO – The lead vocal will be delayed by an amount equal to the latency of the currently
enabled effect blocks. Using more effect blocks will increase the latency compensation amount.
Tune Reference – Default is 440Hz and can be changed in 0.5Hz increments.
Pitch Pipe Level – Controls the level of the Pitch Pipe in the Practice screen.
Aux in Type – Performs magical calculations to help make harmonies more accurate.
There are 2 settings:
1.
LIVE – Use when you are playing live or processing a recorded vocal track from your DAW us
ing the AUX in to provide guide tracks.
2.
TRACKS – Use when you’re singing along with pre-recorded music, like an mp3 player.
14
Setup - System cont.
Global Key – Sets the key to be used with harmony generation and/or pitch correction.
There are two settings:
1.
OFF – Key can be set per individual preset, via direct key setting (C, D, F# etc.), INST In (Guitar/Keyboard) via NaturalPlay, Room Sense, MIDI or Aux.
2.
ON – When a key is chosen within a preset, that key will remain when the preset is changed.
Global Tempo – Sets globally applied tap tempo.
There are two settings:
1.
OFF – Tap tempo set within a preset changes from preset to preset.
2.
ON – Tap tempo set within a preset will maintain that setting when the preset is changed.
Global Guitar FX – Controls the way guitar effects are applied to presets.
There are two settings:
1.
OFF – Guitar effects are set per-preset.
2.
ON – Tap tempo set within a preset will maintain that setting when the preset is changed. This setting is especially useful to acoustic guitar players, who may want to find a “sound” that works for their guitar and then stick with it for all songs.
Guitar Gate – Sets the gate threshold for guitar input.
Guitars have varying amounts of “noise” inherent in their signal. Sometimes it’s desireable to set a gate
to “cut off” or “mute” the guitar when the incoming signal is very low. We’ve set the threshold pretty
low by default, but you may want to raise it to suit your style. Having a higher gate threshold can be
effective when playing quick chords with rests in between.
15
Setup - Loop
Input – Determines the input source used for loop recording.
There are three settings:
1.
LEAD + GUITAR – All voices and guitar are recorded to the loop.
2.
GUITAR – Sound coming in via the Inst IN is recorded to the loop.
3.
LEAD – Input from the MIC IN is recorded to the loop.
4.
AUX - Only the signal from the Aux In is sent to the loop.
5. ALL - If you hear it, it’s going to the looper.
Undo – Toggles the loop Undo function.
There are two settings:
1.
ON – Undo is active and may be used to undo the last change made to your loop. It is com-
mon to use Undo when you’ve added a loop section that you’re not happy with and want to try it again. Loop time is 15 seconds.
2.
OFF – Disables Undo, freeing some memory for additional looping. Loop record time is dou-
bled to 30 seconds.
Loop Feedback – Controls the amount of loop record feedback.
When recording a loop with multiple passes (or parts), the signal from the first loop pass is added to
the next, and so on. If all of these passes were put together at 100% volume, the loop you’re working
on would get louder, and louder, and LOUDER, until it was distorting the output of the device.
The purpose of the loop feedback control is to prevent this volume increase from happening. When
you record a new pass to the existing loop, it is recorded at 100% volume, but the existing loop is
blended with it at the Loop Feedback setting.
The calculation works like this: Input + (Loop x LoopFeedback) = Loop Output. i.e. Input + (Loop x
90%) = Output *Run away! Scary math!*
Most users find a setting of around 90% works well, but you may find a different setting that works
best for you.
16
Setup - MIDI
MIDI Chan – Sets the channel that the VoiceLive Play GTX listens to for Notes information.
Make sure that your output/control (Keyboard, Computer etc.) device is set to the same channel as
the VoiceLive Play GTX.
CC Chan – Sets the channel that the VoiceLive Play GTX listens to for CC information.
Make sure that your output device is set to the same channel as the GTX.
MIDI CC’s are as follows:
Patch Change - General
Set Key - 30
Set Scale - 31
HIT On/Off - 28 (0-63/64-127 for toggle)
TALK On/Off - 114 (0-63/64-127 for toggle)
Split Dir – Looks at the defined region of the keyboard for Notes information.
There are two settings:
1.
Above – Notes played above the Splitnote are registered for Notes information.
2.
Below – Notes played below the Splitnote are registered for Notes information.
Filter – Ingores specific information, based on the setting.,
There are four settings:
1.
None – All relevant MIDI data is processed.
2.
Prgchange - Ingores all Program Change information, if it is recieved.
3. Sysex - Ignores Sysex information. This can prevent unwanted firmware updates.
4. PC+Sysex - Ignores both Sysex and Program Change information.
Transpose – Transposes all incoming Notes information.
Transposition is limited to four (4) octaves in either direction.
Splitnote – Sets the note at which Split Above/Below is registered.
17
Setup - MIDI cont.
Sysex ID – Identifies the VoiceLive Play GTX when performing system updates.
If you are not using VoiceSupport, make sure that the MIDI program you are using to transfer Sysex is
set to the same ID as the GTX.
PBRange - Sets the Pitch Bend Range, in semi-tones. Max is 12 (Octave)
MIDI Control - Sets the unit to respond to MIDI control messages.
There are 3 settings:
1. Merge - Listens for control messages on both MIDI and USB.
2. MIDI - Listens for control messages on just the MIDI port.
3. USB - Accepts control messages on the USB port.
*If you are trying to connect to VoiceSupoort, Merge or USB must be selected to enable communication with your computer.
18
Effects
When pressed, the VoiceLive Play GTX enters the Effects menu, which is comprised of 8 pages and
controls the effects blocks.
There is one parameter common to all effects pages:
Control – Turns the effect on and off.
There are three settings:
1.
2.
3.
OFF – The effect block is inactive. No processing is done.
ON - The effect block is active and will process the signal according to the selected style.
HIT – The effect is assigned to the VoiceLive Play GTX HIT button, or the button on an MP-75 microphone and will become active when the HIT button is lit.
(See Section 1 – SETUP for instructions on how to activate Mic Control)
*HIT does not apply to guitar effects. If you would like to have the guitar effects change during the
course of a song, we suggest making multiple presets to create the desired sounds.
19
Effects - µMod (Micro Mod)
The VoiceLive Play GTX effects blocks are:
ff µMod (Micro Mod)
Contains effects that Flange, Phase, Pan, Rotate or otherwise modulate the signal.
There are two parameters:
Level – Controls the overall level of the µMod effect. Press the right-middle soft button to select
this parameter and use the control knob to adjust the level. 0dB is the maximum volume for the effect.
Style – Select the style menu by pressing the lower left soft button and use the control knob to
change styles.
There are 24 styles to choose from:
1.
MICROMOD CLONE
2.
MICROMOD WIDER
3.THICKEN
4.
LIGHT CHORUS
5.
MEDIUM CHORUS
6.
WIDE CHORUS
7.
MONO CHORUS
8.
FAST ROTOR
9.FLANGER
10.
FLANGE FEEDBACK
11.
FLANGE NEGATIVE
12.
MONO FLANGE
13.
SOFT FLANGE
14.PANNER
15.TUBE
16.
UP TUBE
17.
DOWN TUBE
18.
DOWN & UP TUBE
19.
RISE AND FALL
20.
OTTAWA WIDE
21.
CYLON MONO
22.
CYLON STEREO
23.
ALIEN VOICEOVER
24.UNDERWATER
20
Effects - Delay
ff Delay
Contains Delay effects which repeat the input signal based on the style and the current
tempo.
There are two parameters:
Feedback – Controls the amount of the delayed signal that is fed back into the effect. Higher levels
of feedback will make the delay continue for a longer period of time.
Style – Select the style menu by pressing the lower left soft button. It will be the only one lit on the
left side of the LCD screen.
There are 18 styles to choose from:
1.QUARTER
2.EIGHTH
3.TRIPLET
4.DOTTED
5.LONGDOT
6.LONGTRIP
7.SIXTEENTH
8.
PINGPONG 1
9.
PINGPONG 2
10.
PINGPONG 3
11.
MULTITAP 1
12.
MULTITAP 2
13.
MULTITAP 3
14.
MULTITAP 4
15.
MULTITAP 5
16.
MULTITAP 6
17.CLASSICSLAP
18.SINGLESLAP
Advanced - To enter the advanced menu, press and hold any of the lit BLUE LED soft buttons. To
exit the advanced menu, press BACK.
Filter Style - Adds filters to simulate different types of Delay hardware or sound.
There are 13 styles to choose from:
1. Digital
2.Tape
21
Effects - Delay cont.
3.Analog
4.Radio
5.Megaphone
6.
Cell Phone
7.Lo-Fi
8.
Hi Cut 1
9. Hi Cut 2
10.
Hi Cut 3
11.
Low Cut 1
12.
Low Cut 2
13.
Low Cut 3
*Some of the styles are consistent, meaning that the sound is effected (like Megaphone) and all subsequent Delay “taps” sound the same. Some are cumulative, like “Analog” where processing is applied
throughout the feedback loop, which changes the sound of the Delay over time. Experiment with the
styles to find what works for your particular sound.
Tempo - You can set the Delay tempo manually here. Settings are saved per-preset but are overridden, but not overwritten, if Global Tempo is ON.
22
Effects - Reverb
ff Reverb
Creates “room” around your voice. Essentially, it puts your dry vocal into a simulated
space, small or large, to give a sense of depth and distance.
There are 3 parameters:
Level - Controls the overall level of the Reverb. Press the right-middle soft button to select this
parameter and use the control knob to adjust the level. 0dB is the maximum volume for the effect.
Decay – Determines how long it takes for the reverb to fade away. Longer times generally sound like
large spaces, while shorter times sound like small spaces. Each preset has its own decay time, but you
can change it.
Style – Determines the size of the simulated space and also the type of material being used to create the simulation.
There are 28 styles to choose from:
1.
SMOOTH PLATE
2.
REFLECTION PLATE
3.
THIN PLATE
4.
BRIGHT PLATE
5.
REAL PLATE
6.
REAL PLATE LONG
7.
JAZZ PLATE
8.
QUICK PLATE
9.
SOFT HALL
10.
AMSTERDAM HALL
11.
BROADWAY HALL
12.
SNAPPY ROOM
13.LIBRARY
14.
DARK ROOM
15.
MUSIC CLUB
16.
STUDIO ROOM
17.WAREHOUSE
18.
BOUNCY ROOM
19.
BRIGHT CHAMBER
20.
WOODEN CHAMBER
21.
ST. JOSEPH CHURCH
22.
DOME CHAPEL
23.
HOCKEY ARENA
24.MUSEUM
25.
INDOOR ARENA
26.
COZY CORNER
27.
THIN SPRING
28.
FULL SPRING
23
Effects - Harmony
ff Harmony
Creates harmonies to accompany your lead vocal, using one or more voices.
There are three parameters:
Level – Controls the overall level of the Harmonies. Press the right-upper soft button to select this
parameter and use the control knob to adjust the level. 0dB is the maximum volume for the effect.
Key – The most important setting for any harmony generation is the key. Get it right and things
sound amazing… get it wrong and they sound, well, bad.
There are two Key modes:
1.
2.
Auto – Key is set automatically based on input from INST In, MIDI, Aux or RoomSense. The priority of inputs is as listed. For example, if you have a guitar plugged into the INST In and tracks playing via the Aux in, the system will read Key/Scale from the guitar.
Key – Allows you to choose any of the 12 keys (C through A) in western music.
Style – Determines the number of harmony voices and the way those voices relate to your lead vocal.
There are 28 styles to choose from:
1.HIGH
2.HIGHER
3.LOW
4.LOWER
5.
OCATVE UP
6.
OCTAVE DOWN
7.
HIGH & LOW
8.
HIGH & HIGHER
9.
HIGH & LOWER
10.
HIGER &LOWER
11.
HIGHER & LOW
12.
LOWER & LOW
13.
OCT DOWN & UP
14.
OCT DOWN & HIGHER
15.
OCT DOWN & HIGH
16. OCT DOWN & LOW
17. OCT DOWN & LOWER
18. OCT UP & HIGHER
19. OCT UP & HIGH
20. OCT UP & LOW
21. OCT UP & LOWER
22. +7 SEMITONES
23. -5 SEMITONES
23. 24. 25.
26.
27.
28. +7 & -5 SEMITONES
+12 & +7 SEMITONES
+12 & -5 SEMITONES
-12 & +7 SEMITONES
-12 & -5 SEMITONES
NOTES
*NOTES Mode will only play harmonies when
MIDI Notes information is recieved. See MIDI
section for settings.
24
Effects - Harmony cont.
Advanced - To enter the advanced menu, press and hold any of the lit BLUE LED soft buttons. To
exit the advanced menu, press BACK.
Scale - If the Key is set manually (not AUTO), the advanced menu will allow you set the Scale associated with the Key.
There are 6 settings to choose from:
1. 2. 3. 4. 5. 6. MAJOR 1
MAJOR 2
MAJOR 3
MINOR 1
MINOR 2
MINOR 3
25
Effects - Double
Double
Creates a sense that one or more vocalists are singing in unison, with small differences
in the timing and timbre of each voice. Some refer to doubling as “thickening”.
There are two parameters:
Level - Controls the overall level of the Doubling. Press the right-middle soft button to select this
parameter and use the control knob to adjust the level. 0dB is the maximum volume for the effect.
Style – Determines the number of voices and the timing of the Double.
There are 10 styles to choose from:
1.
1 VOICE TIGHT
2.
1 VOICE LOOSE
3.
2 VOICES TIGHT
4.
2 VOICES LOOSE
5.SHOUT
6. 1 VOICE OCT UP
7.
1VOICE OCT DOWN
8.
2 VOICES OCT UP
9.
2 VOICES OCT DOWN
10. OCT UP & OCT DOWN
*Tight and Loose refers to how closely the Double is timed with the lead vocal. Loose timing can feel
“larger” or more effected.
26
Effects - HardTune
ff Hardtune
Ah Hardtune… some call it the Cher effect and others refer to it as Auto-Tune. Whatever you name it, if you’re looking for that radio-pop tuned sound, this is your effect.
It has 3 parameters:
Shift – Takes the input note you are singing and shifts it up or down by a semi-tone.You can shift up
or down 12 semi-tones, which is equal to an octave in each direction.
Gender – Manipulates the timbre of your voice to sound more male or more female in nature.
Extreme settings for this parameter will sound very un-natural, but that may be just the effect you’re
looking for.
Style – Determines the accuracy, speed and aggressiveness of the tuning effect.
There are 7 styles to choose from:
1.POP
2.
COUNTRY GLISS
3.ROBOT
4.
CORRECT NATURAL
5.
CORRECT CHROMATIC
6.DRONE
7.
GENDER BENDER
27
Effects - Transducer
ff Transducer
Contains effects that modify the sound by adding various filters and overdrive components.
There are three parameters:
Drive – Controls the amount of overdrive applied to the signal. More drive will distort the signal and create megaphone style effects.
Filter – Employs a filter that changes the sound of the Transducer to be “thinner” or more “muddy”
depending on the preset. Thinner filter settings sound more like a radio or walkie-talkie.
Style - Select the style menu by pressing the lower left soft button. It will be the only one lit on the
left side of the LCD screen.
There are 8 styles to choose from:
1.MEGAPHONE
2.RADIO
3.
ON THE PHONE
4.OVERDRIVE
5.
BUZZ CUT
6.STACK
7.TWEED
8.COMBO
Advanced - To enter the advanced menu, press and hold any of the lit BLUE LED soft buttons.
Routing - Applies the Transducer sound to the selected audio.
There are 2 settings:
1.
OUTPUT - Applies the effect to the lead voice and any voices derived from it, like Harmony or Doubling.
2.
FX - Applies the effect only to voices within an effect. For example, if you are using a Delay, the initial “tap” of the Delay will be uneffected, but subsequent “taps” will have the Transducer ef-
fect.
Gate Threshold - Transducer effects are very prone to feedback via a P.A.. The Transducer block
has an independent gate that can be set to help alleviate feedback. Raising the threshold will cause the
effect to “kick in” at a higher input volume, which can help avoid feedback while you’re not singing.
Gain - Controls the overall level of the Transducer effect.
28
Effects - Guitar
ff Guitar
Guitar effects are handled in the same way as the vocal effects, with some minor changes. The guitar sounds are selected by style and there is an advanced menu for fine control over parameters. Guitar settings are saved per-preset, unless Global Guitar is set to
ON in the Setup menu.
If you select a guitar style and modify it, those settings will be lost if you move away
from the style. It is best to save the preset if you have modified a style with custom settings and want to retain those settings. Factory guitar styles cannot be overwritten by
the user.
When you have a particular modified guitar style that you would like to apply to several
presets, we suggest copying that preset to a new location and then modifying the vocal
effects to suit.
There are four parameters available for guitar effects:
Amp - Selects the Amp style.
There are 11 Amps to choose from:
1. ACOUSTIC
2. CLEAN
3.
COMP(Compressed)
4. COMP ATK
(Compressed with increased attack)
5.
BF COMBO
(Black Face Combo)
6. BRIGHT
7. CRUNCH 1
8. CRUNCH 2
9. CRUNCH 3
10. HONK
11. INSANE
Drive - Replicates the Drive control that you would find on an amplifier. More Drive can create a
more distorted or “broken-up” sound.
29
Effects - Guitar cont.
Level - Replicates the Volume or Level control on an amplifier. This control can increase or decrease
overall volume of the amplifier without adding distortion.
This control is also useful in matching guitar levels from preset to preset.
Style - Select from the factory designed guitar styles, which include settings for Amp Type, Drive,
Level, Reverb, uMod and Delay.
There are 41 styles to choose from:
(Styles preceeded by AC are designed for ACoustic guitar)
1. MED CRUNCH
2.
WIDE FLANGE DRI
3.
MOD DELAY
4. AC ROOM + THICK
5. TEXAS HONK
6.
CLEAN SPRING
7.
LONG AMBIENCE
8.
CLEAN AMP
9. CLEAN LONG VERB
10.
CLEAN ROOM
11.
CLEAN FLANGER
12.
CLEAN ROTOR
13.
CRUNCH VERB
14.
TOUCH DRIVE
15. DARK DRIVE
16. 12 STRING
17.
FLANGE DRIVE
18.
80’s GLAM
19.
MOD DLY PANNER
20.
COMP TREMOLO
21.
EDGE DRIVE
22.
MOD DLY FX
23.
COMP CHORUS
24.
ROTOR DRIVE
25.ETHEREALITY
26.
HONK SLAP
27.
ROOMY HONK
28.
METAL RECTIFIER
29.
RECTO 2
30.
METAL WIDE
31.
INSANE FLANGER
32.
OD CHORUS
33.
AC HALL
30
Effects - Guitar cont.
34.
35.
36.
37.
38.
39.
40.
41.
AC ROOM
AC ROOM +THICK
COMP + HALL
AC LONG FX
AC SLAP ROOM
AC PONG FX
AC FLANGE
AC WIDE
Advanced Guitar - These settings can be accessed by pressing and holding any of the
BLUE LED soft buttons while on the guitar effects page.
There are 3 pages of Advanced Guitar settings where you can edit uMod, Reverb and Delay styles, EQ,
Compression, Tempo and Speaker Rolloff. When a Reverb, Delay or µMod effect is active, the graphic
on the guitar page will change to show a “stompbox” style image of the effect, connected to the amp.
The settings are:
ff Page 1
µMod Style - Includes effects like Chorus, Flange, Rotor etc.
The styles available are the same as those listed in the Effects - µMod section.
µMod Level - Controls the overall level of the effect. (OFF-0dB)
Delay Style - Includes effects that repeat the guitar input in various ways.
The styles available are the same as those listed in the Effects - Delay section.
Delay Level - Controls the overall level of the effect. (OFF-0dB)
Reverb Style - Placed the guitar into a simulated physical space.
The styles available are the same as those listed in the Effects - Reverb section.
Reverb Level - Controls the overall level of the effect. (OFF-0dB)
*These effects are independent of the settings for vocals. For example, you can use one type of Delay
on your voice and another on your guitar.
31
Effects - Guitar cont.
ff Page 2
Treble - Controls the amount of high frequency boost or cut. The EQ point and width (Q) changes
between amp styles to reflect their real-world operation.
Bass - Controls the amount of low frequency boost or cut. The EQ point and width (Q) changes
between amp styles to reflect their real-world operation.
Mid - Controls the amount of mid frequency boost or cut.
Mid Freq- Controls the specific frequency that the Mid control affects.
Comp Ratio - Controls the compression ratio of any signals entering the guitar signal path. Higher
compression ratios will affect the sound more noticeably. (which may be just what you want)
Comp Thresh - Sets the level at which the compressor begins to attenuate the signal.
The combination of ratio and threshold create the “compressed” sound, so experiment with different
values on each control until you find something you like.
ff Page 3
µMod Speed - Sets the speed (in Hz or Hertz) of any modulation effects.
Delay Feedback - Controls the number of Delay “taps” that you hear. Lower numbers make the
Delay end sooner (not the time between “taps”, just how long you hear it before it’s gone) and higher
numbers make the Delay last longer.
Speaker Rolloff - Sets the low-pass (or hi-cut) filter point frequency. This setting is useful in
changing the overall tonal qualities of the Amp setting.
32
Mix
Enters the Mix window, where various levels within the VoiceLive Play GTX can be adjusted.
The mix controls affect the main output.
There are 6 parameters:
Harmony – Controls the overall level of all voice generated effects like Harmony and Double.
Guitar Level - Adjusts the output level of the guitar. This control is also dependent on the Guitar Input level, set in the Setup screen.
Out Level - Controls the overall output level of the VoiceLive Play GTX.
Delay/Reverb - Changes the level of any Delay and Reverb effects simultaneously.
Headphone Level - Adjustst the volume of the headphone output.
USB Level - Adjusts the level of the incoming USB signal.
33
Practice
The practice screen gives you valuable feedback about your pitch while you sing. In fact, the stats
monitor runs continuously as you use the VoiceLive Play GTX and will give you an up to the minute
record of how accurately you’ve been singing. After using the practice tool for some time, you can use
the information it gathers to help you focus on improving specific areas of your vocal performances.
There are 6 items on the practice screen:
Range – Shows the highest and lowest note sung
Longest – Shows time, in seconds, of your longest held note.
Accuracy – Displayed in a percentage form (67%), this indicates how often you are accurately hitting
a note. Using the VoiceLive Play GTX for longer periods of time without resetting the stats will give a
more accurate representation of your accuracy.
Average – Shows, in cents (1/100th of a semi-tone) how sharp or flat you are singing on average. If
your average is several cents sharp or flat, you’re likely singing a large number of your notes sharp or
flat.
Problem Notes – Keeps a list of the notes that you’ve “missed” the most often. There are two sec-
tions, one for notes you are sharp (#) on and one for notes that you are flat (b) on. Sometimes, practicing the identified notes along with a piano or other instrument can help train your voice to be more
accurate when singing those particular pitches.
34
Troubleshooting
Sometimes, things just aren’t working the way you expect them to. Here are a few things to keep an
eye on.
Looping Tips
When it comes to looping, practice is the key.You might notice that your loops have a small gap between the end of the phrase and when the loop restarts. This happens when you mis-time pressing the
PLAY/REC/O-DUB button. Pay careful attention to co-ordinating your button press to the down beat,
so that the loop beginning and end is seamless.
Experiment with exiting LOOP MODE and picking a different vocal sound for the next O-DUB layer.
You can get some great results by simply varying the sounds that are part of the loop.
When adding an O-DUB layer, you can record multiple passes of O-DUB parts without starting and
stopping the looper. This allows you to add numerous parts, which can all be removed with a single
UNDO action. (they can also be brought back by repeating the UNDO action)
Using a Switch3 will give you permanent access to looping without pressing the Up and Down footswitches. It frees up those switches to be assigned for Key/Scale selection, plus you don’t have to go in
and out of loop mode to change presets. It times out automatically, so you can choose a new sound.
The Switch3 buttons are mapped as follows:
1. Rec/Play/O-Dub
2. Stop/Clear (Hold)
3. Undo
The benefit of having undo on a separate button is the ability to perfectly time your undo, rather than
waiting a moment for a Hold to be registered.
Note: When a Switch3 is plugged in, Key/Scale selection is automatically assigned to UP/DN. When the
Switch3 is unplugged, UP/DN remains Key/Scale and will need to be changed in the setup menu if you
wish to assign UP/DN back to Looping.
For more info on Switch 3, check out:
www.tc-helicon.com/products/switch-3
35
Troubleshooting cont.
I’m singing, but I can’t hear anything!
- Make sure you’ve turned up the input gain, so that the INPUT LED is lighting green.
- Have you plugged in your headphones or connected to a P.A.?
- Is the P.A. turned on, connected to its speakers and recieving signal?
If not, check your P.A. manual to make sure everything is set up correctly.
- Are you using a condenser mic? Did you make sure to change the mic type to condenser in
the setup menu?
I’ve turned on the Harmony Effects, but they don’t sound right.
- Did you select a Key/Scale? Is it the right key for the song?
- If you’re using RoomSense to listen for Key information, make sure it’s close to whichever instrument is playing the most clearly defined chords. (Rhythm Guitar, Piano etc.)
- If you’re using an mp3 player to sing along with tracks, set the AUX IN TYPE to Tracks in the
SETUP menu. (Some tracks will work better for NaturalPlay than others, based on the mix and instrumentation of the recording)
- If you’re using Guitar or MIDI to control Harmony, make sure you’ve got the Key set to AUTO on the Harmony effect page.
None of the effects seem to be making any changes to the sound.
- Is the unit in Talk mode? If the HIT LED is flashing, tap it once to return to normal mode.
How do I get back all of the Factory Presets?
-When powering up the unit, press and hold the two “arrow” buttons next to the Control Knob.
*Any changes you have made to presets will be erased. Back up your custom presets via VoiceSupport.
How do I perform a full Factory Reset?
-When powering up the unit, press and hold “Back” and “Store”.
*Any changes you have made to presets or setup information will be erased. Back up your cutom presets and setup data via VoiceSupport.
36
Troubleshooting cont.
VoiceSupport is a bit confusing, where can I learn more about it?
- Go to: http://www.tc-helicon.com/products/voicesupport/support/
I’ve been using this thing for a while now, but I’m not famous!
- You will become famous for your singing... tomorrow.
For any other issues, check our FAQ at: http://tcsupport.custhelp.com/
If you still haven’t found what you’re looking for:
http://www.tc-helicon.com/products/voicelive-play-gtx/support/
37