1
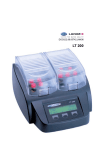
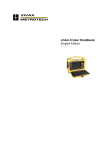
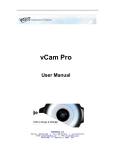
User Manual
vCamPro - Pushrod CCTV Inspection System
(vCam Pro - Model 2.1)
Vivax Corporation,
23-27 Bland Street,
Emerson, NJ 07630
U.S.A.
Toll Free
Tel
Fax
Email
+1(866) 332-1688
+1(201) 265-5502
+1(201) 265-5504
[email protected]
Ver.2.1. January 2006
(English)
Page 1 of 1
vCamUser Manual
vs 2.1-Jan06 (English)
CONTENTS
1 INTRODUCTION
1.1
1.2
1.3
1.4
1.5
1.6
1.7
1.8
1.9
1.10
1.11
System Features………………………………………………… 3
System Components…………………………………………… 3
Important Information………………………………………….... 4
Serial Numbers ……………..………………………………….. 4
Setup……………………………………………………………… 5
Command Module – Controls…………………………………. 6
Keyboard Function Keys……………………………………….. 7
Titler………………………………………………………………. 7
LCD ………..……………………………………………………... 7
Command Module Cover (Lid)………………………………… 8
Cable Reel Components……………………………………….. 8
2 OPERATING INSTRUCTIONS
2.1
2.2
2.3
2.4
Powering up System.…………………………………………… 9
Using The Reel & The Counter ……………………………… 9
Using a Pipe/Cable Locator To Locate The Camera ………. 10
Using The Display and The DVD Player….…………………. 10
3 SERVICE & SUPPORT
3.1
North America & Europe…………….………………………… 10
Page 2 of 2
vCamUser Manual
vs 2.1-Jan06 (English)
1.0 INTRODUCTION
1.1 SYSTEM FEATURES
The vCam System is designed to provide video images from inside pipes, ducts
and chimneys. The system includes :
Command module - this houses a DVD player/recorder for recording and
playing back video images, a LCD display for viewing video from the
camera or from the DVD. The command module also houses the circuitry and
software required to add titles, date, time, distance and an audio commentary
to the images recorded.
Cable reel - this Kevlar reinforced cable enables the user to push the cable
considerable distances along a pipe, but retains sufficient flexibility to pass
through tight bends such as a 4 inch (100 mm) P trap. The standard cable
length is 200 feet (60 m) - other lengths are available on request (maximum
400 feet [120 m]). The approximate length of cable deployed from the reel is
displayed on the control module screen using information provided by a
counter mechanism built into the reel. This is intended as a rough guide only the count can be set to zero by pressing the “reset” button on the front panel
of the control module.
Camera and sounder module - consists of a removable camera head
which houses a color CCTV camera and an array of LED’s to provide light.
This is mounted to a spring that assists the camera in passing around bends.
A sounder (sonde) is fitted in the rear compartment of the spring assembly,
and provides a low frequency signal for pinpointing the camera location from
the surface with a pipe/cable locator
1.2 SYSTEM COMPONENTS
Your vCam System includes the following parts as standard :
Control module (including keyboard and DVD remote control)
Cable reel
Camera and sounder module (fitted to the cable reel)
Interface cable (for connecting cable reel to control module)
Vivax User manual
DVD recorder/player manuals
1 x Recordable DVD (disk)
Page 3 of 3
vCamUser Manual
vs 2.1-Jan06 (English)
1.3 IMPORTANT INFORMATION.
Power Supply - The vCamPro operates on 110vAC-240vAC, 50Hz/60Hz
power systems,
Video Systems - The vCamPro is designed for use with PAL or NTSC
systems only - the video/audio components in the vCamPro adjust video
format automatically to suit the camera fitted.
MANUAL SELECTION - The User can configure the titler to PAL or NTSC
(manually) and change the sounder frequency (512Hz or 640Hz) - both these
selections are achieved by pressing “F2” on the keyboard - the unit toggles
between PAL with 640Hz sounder frequency and NTSC with 512Hz sounder
frequency. (Examples : USA & Canada = NTSC & 512Hz; United Kingdom
= PAL & 640Hz; China = PAL & 640Hz)
1.4 SERIAL NUMBERS
Each of the following modules of the vCamPro has its own serial number.
Control Module - serial number is a plastic adhesive label located at the top
of the recess that houses the LCD display
Reel Assembly - the serial number is a plastic or aluminum label located on
the top of the housing that contains the counter mechanism
Camera - the serial number is laser etched onto the outside of the camera
body (not on the removable plastic or aluminum skid)
NOTE. Always quote the appropriate serial number(s) in all communication with
the factory, or authorized service centers.
Cable Reel serial number
Camera serial number
Page 4 of 4
vCamUser Manual
vs 2.1-Jan06 (English)
Control Module serial number
1.5 SETUP
Setting up the vCam system is easy.
Open the lid of the system - this can be removed or left attached to the
command module.
Keyboard - plug the keyboard into the command module (the keyboard can
be removed from the lid, by lifting the metal plate on which it is mounted.
Index marks are provided to assist in returning it to its correct position.
The keyboard MUST be plugged in before the vCamPro is powered up,
if the keyboard is disconnected during use - it should be reconnected and
the unit powered up again to reinitialize the titler system.
Interface cable - ensure that the interface cable plug is correctly connected
at the reel, and connect the other end to the appropriate socket on front
panel. (ensure that the plug is aligned correctly before tightening - locate the
plug into the socket using the index slots provided - once it slides into the
socket rotate until it pulls the plug firmly into place and locks
NEVER FORCE THE PLUG
Microphone - if an external microphone (option) is being used plug it in.
However if no external microphone is connected the internal microphone will
be used). The microphone system will only be active when the microphone is
on, and the microphone activated light is illuminated.
Power cable - Plug the mains cable into back of the cable storage
compartment and the other end into an available (grounded) power source
(110v AC or 240vAC
Page 5 of 5
vCamUser Manual
vs 2.1-Jan06 (English)
1.6 COMMAND MODULE - CONTROLS
The Command Module front panel contains the LCD/DVD player/recorder
and all the controls and connectors necessary for the operation of the vCam
System. The controls and connector panel is subdivided into five functional
areas as shown below.
When illuminated system
power is “ON”
When illuminated
transmitter is “ON”
Transmitter “OFF/ON”
When illuminated
Microphone is “ON”
Socket - for External
Microphone
Microphone “OFF/ON”
Internal Microphone
“Reset “ - press to zero
cable counter
Socket for Keyboard
“Video Out” socket
Control to adjust camera
lighting (LED’s)
Socket for interface cable
from cable reel
System Fuse - 3A (250v)
Main System “OFF/ON”
Ground / Earth
Figure 2 Command Module Front Panel
Page 6 of 6
vCamUser Manual
vs 2.1-Jan06 (English)
1.7 KEYBOARD FUNCTION KEYS
The main software setup functions can be controlled by using the “Function
Keys” on the keyboard.
F1: Change date and time
F2: Toggle between NTSC/512Hz sounder and PAL/640Hz sounder
F3: Toggle between feet and meters
F4: Add background to text (makes it easier to read)
F5: Toggle to MM/DD/YYYY date format
F6: Toggle to DD/MM/YYYY date format
F7: Toggle to YYYY/MM/DD date format
F8: Move titler content to the bottom of the left
F9: Move titler content to the top of the left
F10: Move titler content to the bottom of the right
F11: Move titler content to the top of the right
F12: Move titler content to the middle of screen
TAB: Toggle titler content off/on
ESC: Used to clear all the text on the screen
1.8 TITLER
The vCamPro is equipped with a “titler” system - this enables the user to add
information to the video images being recorded. Basic system information such
as date, time, length of cable deployed can be captured, and additional text - up
to nine lines of 24 characters can be added.
The titler is toggled on/off by pressing the “TAB” key on the keyboard. The
content of the titler can be erased by pressing “ESC” at any time the titler is on.
Text is entered using the keyboard, the “F4” key can be used to toggle on/off a
background behind each character typed - a background to the text can make
the text easier to read. The content of the text can be moved to different parts of
the viewing screen by using the keys “F8, F9, F10,F11,F12”
If the titler information can be seen on the vCamPro LCD it will be recorded on
the DVR, if it is not visible, it will NOT be recorded.
1.9 LCD (Main vCamPro Screen)
The LCD has it’s own controls, they function as follows
AV:
Mode:
Timer:
Menu :
Switches between AV1 input and AV2input
Turns the displayed image Up, down or mirror
Send the screen to sleep after 30, 60, 90, or 120 minutes
Used to adjust the basic LCD controls such as BRIGHT,
CONTRAST, COLOR, VOLUME, UP AND DOWN , RESET
Page 7 of 7
vCamUser Manual
vs 2.1-Jan06 (English)
1.10 COMMAND MODULE COVER (LID)
The Command Module cover provides a convenient storage location for
items associated with the Command Module. Foam and securing straps
are used to secure the items to prevent damage during transportation. Lid
contains the keyboard, the DVD remote and the camera removal wrench
(optional)
1.11 CABLE REEL COMPONENTS
The Cable Reel features are shown below.
Cable Drum
Feet
(used when the reel is
operated horizontally)
Camera Module
Slip Ring Assembly
Brake
Hooks for storage
of interface cable
Wheels
Feet
(used when the reel is
operated vertically)
Page 8 of 8
vCamUser Manual
vs 2.1-Jan06 (English)
2.0 OPERATING INSTRUCTIONS
2.1 POWERING UP THE SYSTEM
The system is powered on by using the “ON/OFF” switch on the front
panel. The “Power on Indicator” will light up and you will hear the fan
inside the control module.
On some models the LCD screen powers on automatically, other models
require you to press the LCD ON/OFF button on the front of the LCD panel.
A “No signal” message may appear on the LCD screen. This is normal.
Turn on the DVD player/recorder - even if you do not you intend to
record or play a disk Depending on the model of DVR several DVR
messages will appear on the DVR display. Typical examples are :
“DVD Rewritable” “Hello” “PRG 007 & LIVE” “Pr 007” on the DVD
player/recorder display. These messages will last several seconds and then
disappear. The main vCamPro LCD will be blank or display the message
“No signal”
You need then to select the image source on the DVR (or DVR remote) that
will supply the image to be shown on the screen. Press the “source” button
several times until the picture from the camera shows on the screen.
The system is now ready to use
2.2 USING THE REEL AND THE COUNTER
If the brake is released completely the
pushrod cable will try and unwind itself.
It can move very quickly
The brake should always be partially applied to slow cable deployment
care should be taken when stopping the cable deploying to avoid injury
The counter will provide an approximate guide to the length of cable
deployed. This is displayed on the main vCamPro LCD display. The
counter can be set to “Zero” at any time by pressing the “Reset” button on
the front panel of the control module. The counter will count up and down,
but will not display values that are negative (ie less than Zero). The length
of cable is displayed in 1.6 feet (0.5m) increments. The length can be
displayed in feet or meters by pressing “F3” on the keyboard.
Page 9 of 9
vCamUser Manual
vs 2.1-Jan06 (English)
2.3 USING A PIPE/CABLE LOCATOR TO LOCATE THE CAMERA
The vCAMPro is equipment with a sounder (sonde) transmitter. This sounder
is located at the end of the camera spring assembly (about 12 inches
[300 mm]) behind the camera. It is used to enable the User to locate the
position and estimate the depth of the camera.
In NTSC mode the sounder will transmit a 512Hz signal, in PAL mode a
640Hz signal. This transmitter is activated by pressing the appropriate
button on the front panel. It is recommended that the transmitter is turned
off when not in use, as in some circumstances it can cause interference on
the video images being displayed or recorded.
When choosing a Locator to use with the vCamPro, it is essential that it will
locate either 512Hz or 640Hz signals. The supplier of the locator will be able to
advise you.
2.4 USING THE DISPLAY AND THE DVD PLAYER
Full recording and playback functionality is provided by the DVR
player/recorder.DVD technology and performance and models are
constantly changing, from time to time Vivax will use DVR equipment from
different manufacturers. The instruction manual for the DVR is included with
the vCamPro. Please turn to the DVR instruction manual to learn how
to use the DVR
3.0 SERVICE & SUPPORT
Contact Vivax for the name of your local Vivax Sales Representative or Service Center :
3.1 North America & Europe
Vivax Corporation
23-27 Bland Street
Emerson, NJ 07630
U.S.A.
T/Free 1-866-332-1688 (USA/Canada)
Tel# +1(201) 265-5502
Fax# +1(201) 265-5504
Email
[email protected]
Page 10 of 10
vCamUser Manual
vs 2.1-Jan06 (English)