1
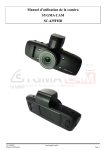
GSF991 User Manual For GSF991 http://stores.ebay.com.au GSF991 Setup Guide Rev C 1|Page Contents Overview.......................................................................................................................................... 3 Specification .................................................................................................................................... 3 Features ........................................................................................................................................... 4 Key Function .................................................................................................................................... 5 Battery and charging ....................................................................................................................... 6 Operation ........................................................................................................................................ 6 Menu Options .................................................................................................................................. 7 Instructions for Viewing Crystal Clear Video Files With GPS Trackback.......................................... 9 GSF991 Setup Guide Rev C 2|Page Getting Started —————————————————————— Please charge the device via wall or USB for at least 12 hours before use. If the battery does not have full charge the unit may not function optimally. Overview —————————————————————— The Crystal Clear is a high definition dash mounted video recording device integrated with in built GPS tracking and accelerometer readings. It can record full high definition at 1920 x 1080 pixels with a 5 mega pixel sensor. It can store up to 32GB of video footage onto a class 6 or higher MicroSD card. Specification —————————————————————— GSF991 Setup Guide Rev C 3|Page Features —————————————————————— 120 degree ultra wide angle lens. 1920x1080P FULL HD high quality resolution. H.264 video compression technology. 5 mega pixels CMOS Sensor 4X digital zoom 1.5 inch LCD Direct HDMI transfer 1080p 30fps / 720p 60fps Suction cap mount Built in GPS tracking chipset Built in Accelerometer sensors Crash protection Seamless continuous recording Automatic start up/shut down. GSF991 Setup Guide Rev C 4|Page Key Function —————————————————————— MODE: Switches between the video, camera, playback and options MENU: Lock files so they are not written over from cyclic record menu items. In the reviewing condition, for browsing images, adjust the volume. POWER: Press to switch on the camera when off. Pressing while in recording mode will turn on the LED light. Hold for 2 seconds to power down the device. DOWN/VOL-: Turns on and off microphone when recording current file. Lowers volume in playback REC/OK Key: Press to start/stop recording. Play and pause during playback and ok/confirm in menu options. GSF991 Setup Guide Rev C 5|Page Battery and charging —————————————————————— This device uses a miniUSB cable to charge. This may be from the 12V/24V cigarette lighter port in your vehicle or also from a computer using a USB port or a common phone/digital camera charger with the same plug. When using the device in the car it is recommended to use the car charger at all times as recording in 1080p drains a lot of power. It is also recommended to fully charge the device via USB before taking into the car to ensure longevity of the battery. It is recommended to have your LCD auto off set at around 1 minute for safety, and also power consumption, and also “Automatic Video Recording Upon Start On” to have the device automatically turn on when you start the car. This will only work if cyclic record is on. The device will auto power off once the car has been turned off. Please also make sure you use the charger supplied in the box. A car charger with more than 5V may damage your device. Operation —————————————————————— Pre-Start Check 1. Ensure the window mount is properly secured onto the window and that it has been placed in an area which will not have objects hindering vision. 2. The memory card in the device should be Class 6 or above and has been formatter prior to inserting into the device. 3. Car charger has been plugged in. Camcorder Mode: 1. Press REC button to start the video recording, and then press REC button to stop the video recording. During the process, red icon will flash on the screen. See next section for menu items to better suit your application. GSF991 Setup Guide Rev C 6|Page Menu Options —————————————————————— Video recording quality: Choose the resolution you wish to record in. It is recommended you record in 1920x1080 however you may also choose from also: 1440x1080 30p, 1280x720 30p, 848x480 60p, 848x480 30p, 640 x480 30p, 320x240120p, 320x240 30p. Circulating video recording: Circulating recording allows you to record for an indefinite amount of time. New recorded files will write over all old recorded files that are not locked. Automatic video recording upon start on: If connected to the car charger, the device will automatically power and start recording after 3 seconds. Volume adjust: Adjust the volume from levels 0 to 10. Language: Set your preferred language. TV out NTSC/PAL: North America uses NTSC The rest of the world – PAL Auto off: Set idle time to power off the device. Format: Formats the SD card, this will clear all existing data present on this card. Time/Date Stamp: If enabled, the date and time (when recorded), will be shown on the video. Date: Use up or down key to change the digits and press OK to go to next item Auto LCD off Time: Set the time for the LCD shut off when inactive. The video will still record but for safety reasons it is best to set an auto off time. Reset system: Reset all options back to factory settings. GSF991 Setup Guide Rev C 7|Page Night Mode: If insufficient light is present at time of recording enabling night mode will increase the lens sensitivity to light. Light source frequency: Depending on the electrical frequency of the power source, you may see horizontal lines/static. If this occurs change the light frequency from 50hz to 60hz or vice versa. G-sensor: In the event of a crash, the camera will automatically lock the recording file at the time. This icon will appear in the top right hand corner of the screen. Locked files become ‘Read Only’ which protects the file from being deleted. Adjust the sensitivity of the G sensor if the recorder locks too many files from normal driving. Too many locked files can cause the cyclic recording to not perform correctly. GSF991 Setup Guide Rev C 8|Page Instructions for Viewing Crystal Clear Video Files With GPS Trackback —————————————————————— This manual has been written for users of Windows OS. If you wish to view the standalone video footage without GPS playback we recommend viewing the videos using VLC player. VLC can be downloaded for free from http://www.videolan.org/vlc/. Note that you can still view the speed stamp (speed stamp must be ‘on’ in settings at the time of recording footage) on the standard video player. Here are the steps to following in order to simultaneously view your dash camera footage with your location on Google maps. Follow the instructions carefully to setup the software correctly. Instructions 1. To be able to play video records, your computer must have the appropriate codecs and software. We recommend that you download the latest K-Lite Codec Pack. If you are unsure, choose the assembly "Mega", it will play all video formats. Klite is constantly improving its codec pack and fixes compatibility. It is not recommended to install any more codecs, because they may conflict with each other and video can stop playing completely. http://codecguide.com/download_kl.htm If you have a 64-bit system, you still need to install the 32-bit version of the codecs. You will also require the Registrator Viewer software. The latest version can be found at the following link. http://goshockfree.com/software/RegistratorViewer.exe Save the File in a location easily accessible as this will be your regular viewing program. GSF991 Setup Guide Rev C 9|Page 2. Open GSF991 Setup Guide Rev C and make sure the following settings are enabled. 10 | P a g e 3. Access the video and GPS data in the DCIM and GPS folders respectively by connecting the Crystal Clear with your PC using the USB cable provided. 4. Open the storage device and locate the folders DCIM and GPS. We recommend making a copy on your local storage drive in the above case (C:) Select both folders and drag them into the empty white space in the bottom right hand corner of the Registrator Viewer Program like so: GSF991 Setup Guide Rev C 11 | P a g e If the video files have been grouped (only one video file is being displayed), Click the following button to degroup. Please note this is not applicable if you have only one video file saved onto the memory card. GSF991 Setup Guide Rev C 12 | P a g e The selected video is now ready to be played by clicking GSF991 Setup Guide Rev C 13 | P a g e NOTE: If you are experiencing your map to still show the incorrect location for example Try unchecking the Flip/Reflect Y (Latitude) as per the previous instruction. Uncheck this option GSF991 Setup Guide Rev C 14 | P a g e