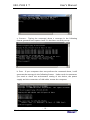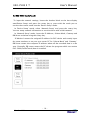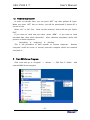
1
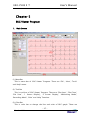
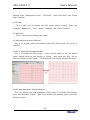
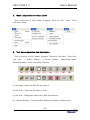
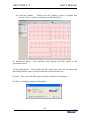
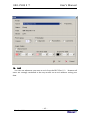
EKG-PLUS II
EKG Viewer
Version 1.4
EKG-PLUS II ™
User’s Manual
EKG-Plus II ™ Professional – Standard Edition
Copyright © 2004 Bionet Co., Ltd. All rights reserved.
This document is being furnished by Bionet Co., Ltd. For information
purposes only to licensed users of the EKG-Plus II ™ software product and is
furnished on an “AS IS: basis, that is, without any warranties, whatsoever,
expressed or implied.
Information in this document is subject to change without notice and does
not represent a commitment on the part of Bionet Co., Ltd.
The software
described in this document is furnished under a license agreement.
The
software may be used only in accordance with the terms of that license
agreement.
It is against the law to copy or use the software except as
specifically allowed in the license.
No part of this document may be
reproduced or retransmitted in any form or by any means, whether
electronically or mechanically, including, but not limited to the way of:
photocopying, recording, or information recording and retrieval systems,
without the express written permission of Bionet Co., Ltd.
EKG-Plus II ™ Professional – Standard Edition
Initial Publishing March 2004. Printed in Korea.
Visit our Web Site at www.bio2net.com
-1-
Version 1.4
EKG-PLUS II ™
User’s Manual
Technical Support
Bionet America, U.S. Subsidiary of Bionet Co., Ltd., provides fee based technical
support via telephone for this product. Please visit http://www.BionetUS.com
for current rates. This support is limited in scope to getting the software
communicating with the Bionet branded ECG machine.
While Bionet America
makes every good faith effort to provide accurate and reliable support, the
customer assumes all risk for the use of the technical support service. If you
are not familiar with computer networking, then Bionet America strongly
recommends that you have your system administrator or local networking
technician assist you with the setup.
Customer Service
Bionet America, Inc.
2691 Dow Ave. Ste B
Tustin, CA 92780
T. 714-734-1760
F. 714-734-1761
[email protected]
-2-
Version 1.4
EKG-PLUS II ™
User’s Manual
Table of Contents
Preface
Chapter 1
EKG-Plus II ™ System Requirements
Chapter 2
EKG-Plus II ™ Installation
Chapter 3
EKG-Plus II ™ Network Setting
Chapter 4
Chapter 5
1.
Connection
2.
PC Setting
3.
Device Setting
BMS Server Program
1.
Operation guide of EKG Device
2.
Start BMS Server Program
3.
Menu composition and description
EKG Viewer Program
1.
Main Screen
2.
Menu composition and description
-3-
Version 1.4
EKG-PLUS II ™
User’s Manual
3.
Tool bar composition and description
4.
Color bar composition and description
5.
EKG bar composition and description
6.
Setting dialog composition and description
7.
File open and close
8.
Save as JPEG file
9.
Connection with EKG device
10.
9.1.
Monitoring mode
9.2.
Recording mode
9.3.
Order
EKG graph viewer control
10.1
Channel
10.2
Rhythm lead
10.3
Sensitivity
10.4
Speed
10.5
Measurement
10.6
Magnifying Glass
11.
Patient information management
12.
Analysis result management
13.
Print
14.
13.1
Print Preview
13.2
Print Option
Exit
-4-
Version 1.4
EKG-PLUS II ™
User’s Manual
Preface . . .
EKG-Plus II ™ has been designed and specially programmed for making EKG2000(CardioCare) and EKG-3000(CardioTouch) completely operable in a
network environment.
EKG-Plus II ™ has remarkable advantages as follows.
- Permanent data acquisition by saving EKG data in computer.
-
You can check patient signal on the monitor and record or save it.
-
Viewing format adjustment available without printing requirement.
-
You can choose desired channels on the monitor.
-
You can adjust sensitivity and speed immediately without printing.
-
You can check analysis result and edit or write more description on it.
-
You can print to a regular PC printer with your computer.
You can save the file as JPEG format.
Enjoy using EKG-Plus II ™ software.
Manufacturer :
Phone :
FAX :
Bionet Co., Ltd.
+82 – 2 – 6300 – 6418
+82 – 2 – 6300 – 6425
E-mail :
[email protected] / [email protected]
-5-
Version 1.4
EKG-PLUS II ™
User’s Manual
Chapter 1
EKG-Plus II ™ System Requirements
The recommended environment for the operation of EKG-Plus II ™ are nicely
summarized in the table below.
EKG-Plus II ™ users will get better results
when their system specifications exceed the recommended.
Environment
Recommended requirement
OS
Windows98 or higher
CPU
Pentium III or higher
RAM
128MB or more
Monitor
17 inch or bigger
Graphic Card
VGA RAM 64MB or more
& Resolution
& 1024 x 768 or higher
CD-ROM
O
Serial port
O
Network Card
Installed(100 M) & static IP required
Network environment through hub
LAN Cable
: Normal LAN cable
Direct connection with local PC
: Twisted LAN cable
EKG Device
EKG-2000 : Ver4.7 or higher
Software Version
EKG-3000 : Ver4.2 or higher
-6-
Version 1.4
EKG-PLUS II ™
User’s Manual
Chapter 2
EKG-Plus II ™ Installation
1. Close all applications before beginning installation.
2. Execute “setup.exe” under your CD-ROM drive.
3. Follow each instruction on each step.
< Step 1 >
-7-
Version 1.4
EKG-PLUS II ™
User’s Manual
< Step 2 >
< Step 3 >
-8-
Version 1.4
EKG-PLUS II ™
User’s Manual
< Step 4 >
< Step 5 >
-9-
Version 1.4
EKG-PLUS II ™
User’s Manual
< Step 6 >
- 10 -
Version 1.4
EKG-PLUS II ™
User’s Manual
Chapter 3
EKG-Plus II ™ Network Setting
1. Connection
(1) Direct connection
Use an ethernet cross-over cable to directly connect the EKG device with the
computer.
(2) Peer-to Peer way (Using HUB)
Plug the EKG device directly into a network hub using a standard ethernet
cable. Notice hat target folder where the data will be written must be
shared(read / write).
(3) If you want to use two LAN card in one PC
If you are on a network but wish to use the direct connect method, it is
recommended that you install two network cards in your computer. One for
conncetion to your network and the other to communicate with the EKG device.
▶ Your local network administrator can give you information on which is best
for your situation and how to implement it into your environment.
- 11 -
Version 1.4
EKG-PLUS II ™
User’s Manual
2. PC Setting
EKG-Plus II ™ software for PC Windows and EKG device(EKG-2000[CadioCare]
or EKG-3000[CadioTouch]) connects together via your network.
Thus, in
order to run EKG-Plus II ™ users need to set up the network prior to
connecting the PC with the appropriate device.
In case of ‘Windows 2000’
(other versions will be similar), follow the step-by-step procedures outlined
below to set up your network.
(1) Have the network cards ready and install them according to the procedures
provided by the card manufacturer.
(2) Having installed, select the network icon on the desktop. Then select
‘Properties’ from option menu by right clicking your mouse.
(3) When you select the ‘Properties’, a menu option as shown below will pop up.
Generally, when the setup process of ‘Make new connection’ and network card
is done, the card will be set up as ‘Local Area Connection’ or ‘Local Area
Connection 2’.
If only one card has been installed then there should be either
‘Local Area Connection’ or ‘Local Area Connection 2’ only.
Select the newly
installed icon and run the ‘Properties’ menu option by right-clicking your
mouse.
- 12 -
Version 1.4
EKG-PLUS II ™
User’s Manual
(4) To set network, select ‘internet protocol (TCP/IP)’ option and ‘Properties’
option.
- 13 -
Version 1.4
EKG-PLUS II ™
User’s Manual
(5) If the Internet is accessed via network, or computers in hospitals are
accessed through the hub, then numerical values should have been pre-input
in the ‘IP address (I)’ area, ‘Subnet mask (U)’ and the ‘Default gateway (D)’ as
below.
In this case you just need to take note of the numbers assigned to IP
and gateway; use the same numbers for setting up the device.
It is not
possible to use automatic IP allocation function based on windows system.
You must allocate device’s own IP address manually.
If you doing the initial setup of your network, connect the EKG device with
the network as appropriate, then select the option ‘Use the following IP
address (S)’ and input as below.
< Example >
z
IP address -> 192.168.10.186
z
Subnet mask –> 255.255.255.0
z
Default gateway -> 192,168.10.1
- 14 -
Version 1.4
EKG-PLUS II ™
User’s Manual
(6) When ‘Windows’ restarts then users need to ensure that the network has
been set up correctly.
There should be no problem if the network had been
set up previously but if it has been newly set up then users need to click on the
‘Start’ button then select the ‘Run’ on the menu item.
(7) Type ‘cmd’ and click the ‘OK’ button as below.
(8) If the computers are connected via hub, or the devices are set up through
the hub then users can test the connection by inputting the IP address as
below.
- 15 -
Version 1.4
EKG-PLUS II ™
User’s Manual
a. Success : Typing the command above a message in the following
format generates and repeats itself if it has been correctly set up
b. Error : If your computer does not perform the command above, it will
generate the message in the following format.
Under such circumstances
you need to check the environment setting of the device, the power
supply and the connection of LAN cable; restart the computer.
- 16 -
Version 1.4
EKG-PLUS II ™
User’s Manual
3. Device Setting
3.1 EKG-2000 (CadioCare)
You can use the below buttons, when you need to setup system device
environment.
SETUP key
Left arrow key.
Right arrow key or DOT input.
(1) IP setup
a. Press SETUP key.
b. Press right arrow key three times.
Make ‘SYS’ blink.
[ PAT Æ FLT Æ PRN Æ SYS ]
c. Press SETUP key to enter sub-menu.
d. And press right arrow key three times.
Make ‘IP’ blink.
[ DATE Æ TIME Æ HOSP Æ IP ]
e. Then SETUP key to activate IP setup mode
f.
Input IP address with arrow & number key.
If your operation
environment has assigned IP address for EKG device, it is OK to
input that number.
Example IP )
Then press ‘ESC’ key.
192.168.10.120
(2) SM [ Subnet mask ] setup
- 17 -
Version 1.4
EKG-PLUS II ™
User’s Manual
a. Repeat same procedure from above ‘a’ to ‘c’.
b. Instead of making IP blinking, choose ‘SM’ for setup respectively.
c. Then SETUP key to activate SM setup mode
d. Refer your network setup first on this configuration and input
exactly same number as your system.
& number key.
Example SM )
Input SM address with arrow
Then press ‘ESC’ key.
255.255.255.0
(3) GW [ Gateway ] setup
a. Repeat same procedure from above ‘a’ to ‘c’.
b. Instead of making IP blinking, choose ‘GW’ for setup respectively.
c. Then SETUP key to activate SM setup mode
d. Refer your network setup first on this configuration and input
exactly same number as your system.
& number key.
Then press ‘ESC’ key.
Example GW )
192.168.10.1
Input GW address with arrow
(4) DB [ Database server IP address ] setup.
a. Repeat same procedure from above ‘a’ to ‘c’.
b. Instead of making IP blinking, choose ‘DB’ for setup respectively.
c. Then SETUP key to activate SM setup mode
d. This is for server IP setup where recorded data is tansferred to.
If
your computer and EKG device are connected directly, then input
your computer IP address. Input DB address with arrow & number
key.
Then press ‘ESC’ key.
Example DB )
192.168.10.186
(5) KEY 5 function definition.
a. Repeat same procedures from above ‘a’ to ‘c’ of IP setup category.
b. Instead of making IP blinking, choose ‘KEY5’ for setup.
c. Please select ‘DataBase’. (If you want to use external FAX function,
please choose ‘FAX’.)
Then press ‘ESC’ key.
- 18 -
Version 1.4
EKG-PLUS II ™
User’s Manual
3.2 EKG-3000 (CadioTouch)
To input the network settings, locate the shadow block on the time display
area(Device Setup) and press the rotary key or press with the touch pen to
convert the current mode into the ‘Device Setup’ mode.
In ‘Device Setup’ mode, select ‘Network Setup’ and press the rotary key.
You can setup network information to use the device with a LAN network.
In ‘Network Setup’ mode, input the IP Address, Subnet Mask, Gateway and
DB Server as below using the rotary key.
‘IP Address’ means the assigned IP address for EKG device and exactly input
the same numbers as on your your server PC for ‘Subnet Mask’ and ‘Gateway’.
DB Server means the computer IP address where all the recorded data is to be
sent. Generally, DB server means the PC where the program which can receive
EKG-3000(CardioTouch) data is installed.
- 19 -
Version 1.4
EKG-PLUS II ™
User’s Manual
Chapter 4
BMS Server Program
BMS Server program enables you to store test data at a remote computer by
pressing ‘Net’ Key on device.
In this case, server will save transferred file with
patient name and test date.
1. Operation guide of EKG Device
1.1 Patient information input
If you want to transfer test data to desired computer, you need to input
patient information in EKG device first.
All other information can be edited in
computer later on, but only the patient ID must be identified because this will
be used to identify transferred data.
For “How to input patient ID”, please see
operation manual of EKG-2000 or EKG-3000.
- 20 -
Version 1.4
EKG-PLUS II ™
User’s Manual
1.2 Network data transfer
In order to transfer data, you can press ‘NET’ key after patient ID input.
When you press ‘NET’ key on device, you will be questioned if patient ID is
correct or not.
Select “Yes” or “No” first.
After Yes/No selection, device will ask you “Select
EKG”.
If you want to send new test data, select “NEW”.
recorded data, then select “Recorded”.
If you want to send
After selection completed, device will
process as below sequence.
“Recording”
Æ
“analyzing”
Æ
“Sending”
This is full procedure of data transfer to remote computer.
Remote
computer could be server or normal personal computer which has network
card with it.
2. Start BMS Server Program
Click start and go to ‘Program’ -> ‘Bionet’ -> ‘EKG Plus II’ folder.
execute BMS Server program.
- 21 -
Version 1.4
And
EKG-PLUS II ™
User’s Manual
Also you can execute BMS Server program by clicking below icon.
BMS Server
After running the program, BMS Server tray icon will appear on lower right
screen.
If computer begins receiving data from remote EKG device, tray icon will be
changed as below picture.
Change
<->
3. Menu composition and description
If you click BMS Server tray icon, you can see below pop up menu.
3.1 Run EKG Viewer
This enables you to start ‘EKG Viewer’ program directly.
3.2 Data List
This enables you to open the list file and review the saved files.
- 22 -
Version 1.4
EKG-PLUS II ™
User’s Manual
3.3 Environment
This enables you to setup proper environment for connection with server and
device. In this mode, tray icon will be changed as below picture.
- 23 -
Version 1.4
EKG-PLUS II ™
User’s Manual
(1)
(2)
(4)
(3)
(1) Working Dir :
Select working directory where you will save test files.
(2) EKG Viewer :
It is recommended to make same directory as EKG-Plus II ™
working directory.
execution file.
This is the window where you need to link to ‘EKG Viewer’
If you setup this path, you can start ‘EKG Viewer’ program
directly.
(3) CardioXP IP : set the IP of the device. To use ‘Sending order’ correctly, IP
address should be set appropriately. (Note: this functionality is only valid with
the CardioXP EKG device.)
- 24 -
Version 1.4
EKG-PLUS II ™
User’s Manual
(4) JPEG : Set the JPEG auto generation. If you push the [JPEG] button, you can
setup the options as below.
(4-1)
(4-2)
(4-3)
(4-4)
(4-5)
(4-6)
(4-7)
4-1) Create JPEG : If you check it, the JPEG auto generation function will be
enabled.
4-2) Type : Select the ECG display type, when the JPEG image was created.
4-3) Rhythm CH : If you select the [6CH+1Rhythm] or [3CH+1Rhythm], this
option use to be select the rhythm channel.
4-4) Gain : Select the ECG gain value.
4-5) Smoothing Filter : Use the smoothing filter or not.
4-6) JPEG Size : Select the JPEG image size.
4-7) Create Information : Create the text based information file or not, when
the JPEG image was created.
- 25 -
Version 1.4
EKG-PLUS II ™
User’s Manual
3.4 Sending order
This is to send the patient’s information to the device.
Fill out the patient’s information and click [Order] . Then, the information is
transferred to the device.
* ‘Sending order’ is for CardioXP only.
3.5 Run Upgrade
Execute the program to upgrade EKG device firmware.
3.6 Exit
This enables you to quit the BMS Server program
- 26 -
Version 1.4
EKG-PLUS II ™
User’s Manual
Chapter 5
EKG Viewer Program
1. Main Screen
(1)
(2)
(3)
(4)
(6)
(7)
(5)
(8)
(1) Menu Bar
This is menu bar of ‘EKG Viewer’ Program. There are ‘File’, ‘View’, ‘Tools’
and ‘Help’ menu.
(2) Tool Bar
This is tool bar of ‘EKG Viewer’ Program. There are ‘File Open’, ‘File Close’,
‘File Save’, ‘1 Screen Display’, ‘2 Screen Display’, ‘Monitoring Mode’,
‘Recording Mode’, ‘Print’ and ‘Help’ Function.
(3) Color Bar
This is color bar to change the line and color of EKG graph. There are
- 27 -
Version 1.4
EKG-PLUS II ™
User’s Manual
‘Default Style’, ‘Background Color’, ‘Grid Style’, ‘Inner Grid Style’ and ‘Graph
Style’ Function.
(4) EKG Bar
This is EKG bar to change the EKG graph viewer control. There are
‘Channel’, ‘Rhythm Ch’, ‘Gain’, ‘Speed’, ‘Measure’ and ‘Glass’ Function.
(5) Status Bar
This is status bar to display each state.
(6) Information & Analysis Window
This is to display input information from EKG device and the result of
analysis.
(7) EKG Graphic Data Display Window
This is to display the EKG graph.
If you see the graph in the full screen
mode, double click the left button of mouse.
return of original screen mode.
And press the ‘ESC’ key to
The below tab is to display opened file name.
Change
<->
(8) EKG Beat Parameter Display Window
This is to display the beat parameter of EKG data. If you hide this window,
press the ‘Minimize’ button.
And if you display this window again, press the
‘Restore’ button.
- 28 -
Version 1.4
EKG-PLUS II ™
User’s Manual
2. Menu composition and description
This is menu bar of ‘EKG Viewer’ Program. There are ‘File’, ‘View’, ‘Tools’
and ‘Help’ menu.
3. Tool bar composition and description
This is tool bar of ‘EKG Viewer’ Program. There are ‘File Open’, ‘File Close’,
‘File Save’, ‘1 Screen Display’, ‘2 Screen Display’, ‘Monitoring Mode’,
‘Recording Mode’, ‘Print’ and ‘Help’ Function.
(1)
(2)
(3)
(4)
(5)
(6)
(7)
(8)
(9)
(1) File Open : Select the EKG file and open it.
(2) File Close : Close the file which is open.
(3) File Save : Change this open file to JPEG file and save.
(4) 1 Record Display : Change the EKG display to display a single record.
- 29 -
Version 1.4
EKG-PLUS II ™
(6) 2 Record Display :
User’s Manual
Change the EKG display screen to display two
records. This is useful to compare two different EKGs.
(6) Monitoring Mode : This monitors and displays the EKG signal of the
connected device.
(7) Recording Mode : This records the EKG signal and saves the file under the
[Recording] folder using a file name based on the present time.
(8) Print : This prints the EKG graph or other inspection information.
(9) Help : It displays program information.
- 30 -
Version 1.4
EKG-PLUS II ™
User’s Manual
4. Color bar composition and description
You can choose grid or graph color which is most convenient for you and
select how line thickness appears on monitor using this bar.
(1)
(2)
(3)
(4)
(5)
(1) Default Style : You can change all into default style.
(2) Background Color : You can setup back ground color of chart paper on
monitor.
(3) Main Grid Style : You can choose color or line thickness for main grid.
(4) Inner Grid Style : You can choose color or line thickness for inner grid.
(5) Graph Style : You can choose color or line thickness for EKG graph
5. EKG bar composition and description
This is EKG bar to change the EKG graph viewer control.
(1)
(2)
(3)
(4)
(5)
(1) Channel : This is the function to set up the channel form.
(6)
Four types of
channel forms are provided: 3ch+1rhy, 6ch+1rhy, 12ch rhy and beat report.
(2) Rhythm Ch : This is the function to select the rhythm lead.
This rhythm
lead in 3CH, 6CH, the Rhythm Lead is recorded for 10 seconds on the bottom
of the printing form, it becomes the standard for other channels.
(3) Gain : This is the function used to adjust the sensitivity.
There are four
choices, auto, 5mm/mV, 10mm/mV, and 20mm/mV.
(4) Speed : This is the function used to adjust the signal width. Three values,
12.5 mm/s, 25 mm/s, and 50 mm/s are available for adjustment.
- 31 -
Version 1.4
EKG-PLUS II ™
User’s Manual
(5) Measure : This is the function used to measure the width or height of EKG
graph data.
(6) Glass : This is the function used to magnify a part of EKG graph data.
6. Setting dialog composition and description
(1)
(2)
(3)
(1) Device Information : This is the function used to set IP address of
connected device.
You can use it in monitoring & recording mode.
(2) Display Resolution : This adjusts the size of the EKG graph screen.
The size of the
basic signal is set at display mode and generally one stage
lower resolution than monitor resolution is recommended and the size of
the full screen is same as the size of the full screen mode. Generally the
same provision as the monitor resolution is recommended.
(3) JPEG Image : This adjusts the size of the JPEG image.
7. File open and close
This is the function used to open stored file.
dialogue box.
- 32 -
Version 1.4
Below window is normal file
EKG-PLUS II ™
User’s Manual
8. Save as JPEG file
Save the open file after changing into the JPEG file.
9. Connection with EKG device
If device is turned on and connected by proper cable, then clicking
connection button will display a welcome message.
If it doesn’t work, check the IP address of connected device.
LAN cable.
Then check
Please note that the LAN cable must be a cross-over cable if using
a direct connection rather than though a hub.
- 33 -
Version 1.4
EKG-PLUS II ™
User’s Manual
9.1 Monitoring mode
When you want to monitor EKG signals, you can click ‘Monitoring mode’ icon
from above toolbar.
stable or not.
Monitoring mode can be used to check if the signal is
If operator thinks the signal is fine, then start to record or
analysis afterwards.
In monitoring mode, it is fixed in the 12 channel viewer mode, only
sensitivity control is possible.
9.2
Recording mode
To use recording mode, click ‘Recording mode’ icon from above toolbar.
After clicking this icon, data acquisition status will be displayed first and
processing status will be displayed on process bar.
- 34 -
Version 1.4
EKG-PLUS II ™
User’s Manual
Same as in recording mode, you can see data acquisition status and
processing status information as bar information.
seconds to get a result.
It will take about 30
If it doesn’t work, you can see the error message.
Then check connection with EKG device.
9.3
Sending order
Click [Order] from [Tools], then following window will be shown. Fill out all
information and click [Order]. Then, the information is going to be transferred
to the device. (This function is for CardioXP only.)
- 35 -
Version 1.4
EKG-PLUS II ™
User’s Manual
10. EKG graph viewer control
10.1 Channel
After acquiring the data or data with analysis result,
3 channel or 6 channel viewer option could be used to
study more detailed waves.
This function is only avaiable when you open stored
data or just acquired data from patient by recording or
analysis mode.
By using stored file, recorded data or analysis data, you can
see 12 channel view by clicking ‘12Ch’.
lead has no meaning.
In 12 channel viewer mode, rhythm
It is possible to select sensitivity and speed of data.
(1) 12 CH : 12 Channel
(2) 6 CH + 1 : 6 Channel + 1 Rhythm Channel
- 36 -
Version 1.4
EKG-PLUS II ™
User’s Manual
(3) 3 CH + 1 : 3 Channel + 1 Rhythm Channel
- 37 -
Version 1.4
EKG-PLUS II ™
User’s Manual
(4) Beat Report : Bit Parameter (Pon / Poff / QRSon / QRSoff / Toff)
This is to display the bit parameter of EKG data. If you hide this window,
press the ‘Minimize’ button.
And if you display this window again, press the
‘Restore’ button.
10.2 Rhythm lead
Choose any lead that you want to setup as
representative rhythm lead.
This rhythm lead in 3CH, 6CH, the Rhythm Lead
is recorded for 10 seconds on the bottom of the
printing form, it becomes the standard for other
channels.
10.3 Sensitivity
- 38 -
Version 1.4
EKG-PLUS II ™
User’s Manual
This is the function used to adjust the sensitivity
when the sensitivity is so high that the signal is
overlapped with the signals of the adjacent channels, or
when the sensitivity is so low that the reading is
difficult. There are four settings; auto, 5 mm/mV, 10
mm/mV, 20 mm/mV.
10.4 Speed
This is the function used to adjust the signal
width. Three values, 12.5 mm/s, 25 mm/s, and 50
mm/s are available for adjustment. 25 mm/s
means to record the signal of the electrocardiogram
for a second on 25 mm. Therefore, the width of 12.5 mm/s is a half of the
width of 25 mm/s, and the width of 50 mm/s becomes two times of the width
of 25 mm/s. If you want to record the broad width of the signal, set up the
higher value.
10.5 Measurement
This is the function used to measure the width of EKG graph data.
And this is the function used to measure the height of EKG graph data.
- 39 -
Version 1.4
EKG-PLUS II ™
User’s Manual
10.6 Magnifying Glass
This is the function used to magnify the part of EKG graph data.
- 40 -
Version 1.4
EKG-PLUS II ™
User’s Manual
11. Patient information management
If you want to view the patient information
select the ‘Information’ tab.
And select the
‘Analysis’ tab to view the analysis result.
If you want to edit the data, press the ‘Edit’
button, and press the ‘Save’ button to save
edited data.
If you hide this window, press the ‘Minimize’
button.
And if you display this window again,
press the ‘Restore’ button.
- Patient Information
- Hospital & Doctor Information
- Recorded Date & Time Information
12. Analysis result management
If you want to check and edit analysis result
or add more description on it, then please
click ‘Analysis’ tab button.
If you want to edit the data, press the ‘Edit’
button, and press the ‘Save’ button to save
edited data.
(1) Analysis Parameter
- Heart Rate
- PR Interval
- QRS Duration
- QT/QTc
- P/R/T Axis
(2) Analysis Result
(3) Doctor Comment
- 41 -
Version 1.4
EKG-PLUS II ™
User’s Manual
13. Print
13.1 Print Preview
You can use this function, when you want to preview printed EKG data.
Print Option
If you want to print recorded EKG data or stored EKG data, click print icon
from above toolbar.
You can use this function to set the printer or change print options.
the printing, make sure your printer is setup as “Landscape” format.
- 42 -
Version 1.4
Before
EKG-PLUS II ™
User’s Manual
14. Exit
You can use whenever you want to exit from the EKG-Plus II ™.
However all
users are strongly cautioned to be very careful not to exit without saving your
data.
- 43 -
Version 1.4