1
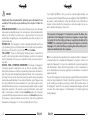
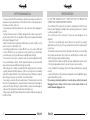
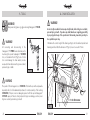
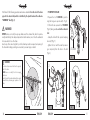
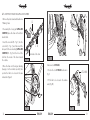
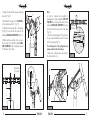
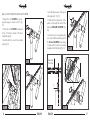
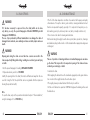
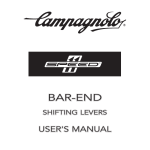
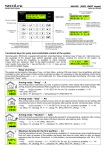
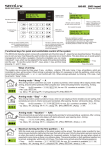
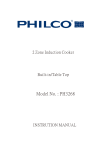
CHAINS
WARNING!
Carefully read, follow and understand the instructions given in this manual. It is an
essential part of the product, and you should keep it in a safe place for future reference.
MECHANIC QUALIFICATION - Please be advised that many bicycle service and repair
tasks require specialized knowledge, tools and experience. General mechanical aptitude may not be sufficient to properly service or repair your bicycle. If you have any
doubt whatsoever regarding your service/repair ability, please take your bicycle to a
qualified repair shop.
INTENDED USE - This Campagnolo® product is designed and manufactured for use
only on road racing style bicycles that are ridden only on smooth road or track surfaces.
Any other use of this product, such as off-road or on trails is forbidden.
"AN ACCIDENT" - Please note that throughout this manual, reference is made that "an
accident" could occur. Any accident could result in damage to your bicycle, its components
and, more importantly, could cause you or a bystander to sustain severe personal injury or
even death.
LIFESPAN - WEAR - INSPECTION REQUIREMENT - The lifespan of Campagnolo®
components depends on many factors, such as rider size and riding conditions.
Impacts, falls, improper use or harsh use in general may compromise the structural integrity of the components and significantly reduce their lifespan. Some components are
also subject to wear over time. Please have your bicycle and its components regularly
inspected by a qualified mechanic for any cracks, deformation, signs of fatigue or wear
(use of penetrating fluid or other visual enhancers to locate cracks on parts is recommended). Disassembly your bicycle components and especially the pedals, is required
during these inspections. If the inspection reveals any deformation, cracks, impact
marks or stress marks, no matter how slight, immediately replace the component;
components that have experienced excessive wear also need immediate replacement.
The frequency of inspection depends on many factors; check with your authorized
representative of Campagnolo S.r.l. to select a schedule that is best for you.
24
ENGLISH
If you weigh 82 kg/180 lbs or more, you must be especially vigilant and have your
bicycle inspected more frequently (than someone weighting less than 82 kg/180 lbs) for
any evidence of cracks, deformation, or other signs of fatigue or stress. Check with your
mechanic to discuss whether the components you selected are suitable for your use,
and to determine the frequency of inspections.
The components of Campagnolo® 11s transmissions, as well as the brakes, rims,
pedals and all other Campagnolo® products are designed as a single integrated system. Not to affect safety, performance, longevity, functionality and the
WARRANTY, use exclusively the parts and components supplied or specified by
Campagnolo S.r.l., without interfacing or replacing them with products, parts or
components manufactured by other companies.
Note: Tools supplied by other manufacturers for components similar to Campagnolo®
components may not be compatible with Campagnolo® components. Likewise, tools
supplied by Campagnolo S.r.l. may not be compatible with components supplied by
other manufacturers. Always check with your mechanic or the tool manufacturer to
insure compatibility before using tools supplied by one manufacturer on components
supplied by another.
The user of this Campagnolo® product expressly recognizes that there are risks inherent
in bicycle riding, including but not limited to the risk that a component of the bicycle
can fail, resulting in an accident, personal injury or death. By his purchase and use of
this Campagnolo® product, the user expressly, voluntarily and knowingly accepts and/
or assumes these risks and agrees to hold Campagnolo S.r.l. harmless against any
resulting damages.
ENGLISH
25
SAFETY RECOMMANDATIONS
BEFORE EVERY RIDE
- Please be advised that if the maintenance and repair procedures provided in this
manual are not properly performed, or if the other instructions in this manual are not
followed, an accident could occur.
- Never make any modifications whatsoever to any component of any Campagnolo®
product.
- Parts which have been bent or otherwise damaged in an accident or as a result of
any other impact must not be re-straightened. They must be replaced immediately
with original Campagnolo® parts.
- Wear clothes which are snug-fitting and which make you visible to traffic, such as
neon fluorescent or other bright colors.
- Avoid biking at night because it is more difficult for you to be seen by traffic, and
it is more difficult for you to see obstructions on the ground. If you do ride at night,
you should equip your bicycle with and use a headlight and a tail light.
- Never use a bicycle or bicycle component unless you are thoroughly familiar with
its use and maintenance history. "Used" equipment may have been misused and
abused, and can unexpectedly fail resulting in an accident.
- When riding in wet conditions, remember that the stopping power of your brakes
is greatly reduced and that the aderence of the tires on the ground is considerably
reduced. This makes it harder to control and stop your bicycle. Extra care is required
when riding your bicycle in wet conditions to avoid an accident.
- Never spray your bicycle with water under pressure. Pressurized water, even form
the nozzle of a small garden hose, can pass under seals and enter your Campagnolo
components, thereby affecting its operation. Wash your bicycle and Campagnolo
components by wiping them down with water and neutral soap.
- Always wear a properly fitted and fastened bicycle helmet that has been approved
by ANSI or SNELL.
DO NOT RIDE YOUR BICYCLE IF IT DOES NOT PASS THIS PRE-RIDE TEST
CORRECT ANY CONDITION BEFORE YOUR RIDE.
- Be sure that all of the components of your bicycle, including but not limited to your
brakes, pedals, handgrips, handlebars, frame and seating system, are in optimum
condition and suitable for use.
- Be sure that none of the components of bicycle are bent, damaged or out of
alignment.
- Check to be sure that all quick release fasteners, nuts and bolts are properly
adjusted. Bounce the bicycle on the ground and listen and look for anything which
may be loose.
- Be sure that your wheels are perfectly centred. Spin the wheels to be sure that they
do not wobble up and down or from side to side, and that they do not make contact
with the fork legs or brake pads while rotating.
- Check all reflectors to make sure that they are clean, straight and securely mounted.
- Check you brake pads and cables to be sure they are in good condition.
- Test your brakes in the beginning of your ride to make sure that they are operating
properly.
- Learn and follow the local bicycle laws and regulations, and obey all traffic signals,
signs and laws while you ride.
If you ever any comments, questions or concerns, please contact your nearest
Campagnolo Service Center. A list of service centers may be found on our
website at www.campagnolo.com.
26
ENGLISH
ENGLISH
27
2 - CHAIN INSTALLATION
1 - TOOLS
WARNING!
WARNING!
Always wear safety glasses or goggles when using Campagnolo® UT-CN300.
WARNING!
An incorrectly assembled chain unexpectedly break, while riding in an accident,
personal injury, or death. If you have any doubt whatsoever regarding your ability
to properly perform any of the operations in this manual, please take your bicycle
to a qualified repair shop.
•Determine the correct length of the chain by putting it onto the smallest sprocket and
chainring and check that the dimension H (Fig. 2) does not exceed 8÷15 mm.
All connecting and disconnecting of the
Campagnolo® 11 SPEED chains should be performed using the special Campagnolo® UT-CN300
tool, not included in this kit (Fig.1). Use of other
tools could damage the chain and/or provoke
unexpected chain failure resulting in an accident,
personal injury or death.
1
WARNING!
The pusher of the Campagnolo® tool UT-CN300 is fitted with a pin with a replaceable
tapered tip which is of fundamental importance for correct assembly of the bushing
ULTRA-LINK; if the pin is worn or damaged, replace it with the special Campagnolo®
UT-CN301 spare pin. Failure to timely replace the tip pin can damage your chain, resulting in an accident, personal injury or death.
H = 8÷15 mm max
2
28
ENGLISH
ENGLISH
29
•Perform all of the following operations and remove extra links from the side of the chain
opposite the external link, which is identified by the plastic band and the adhesive
“WARNING!” label (Fig. 3).
WARNING!
NEVER remove or modify in any way whatsoever this external link, which is permanently identified by the stamped production batch number, since it has the calibrated
holes needed to close the chain.
Use of any other connecting link to join the chain may result in unexpected opening of
the chain while riding, resulting in an accident, personal injury or death.
• TO OPEN THE CHAIN:
• Prepare the tool UT-CN300 by positioning the tongue in open mode (X - Fig. 4)
- fit the link to be opened in tool UT-CN300
(Fig. 4) taking care to end with an internal
link:
- clamp the link with the special clamping
device (Z) (Fig. 5)
- tighten the tool until the small pin emerges completely from the hole in the link
(Fig. 6).
UT-CN300
X
4
WARNING!
Z
To shorten chain, remove links from the opposite
side of the chain.
NEVER remove or modify this link in anyway
whatsoever.
Carefully read, follow and understand the owner's
manual before performing any operation of the
chain.
H = 8÷15
mm max
5
3
30
ENGLISH
ENGLISH
6
31
2.1 - INSERTING THE BUSHING ULTRA-LINK CN-RE500
• Remove the plastic band and the adhesive
"Warning" label.
D
• To assembly the closing pin ULTRA-LINK
CN-RE500, place the chain on the bottom
bracket shell.
• Insert the inner link (B - Fig. 7) into the
outer link (C - Fig. 7), and then insert the
drive part of the union bushing ULTRA-LINK
CN-RE500 (D - Fig. 7) into the hole of the
link from the inside of the chain towards
the outside.
C B
External side of the chain
9
7
• Unscrew tool UT-CN300.
• Move the chain on to the larger chainring
(keeping it on the smallest sprocket), then
position the links to be closed in the area
indicated in Figure 8.
• Position the tool UT-CN300 as shown in
Fig. 9.
• Fit the link to be closed in the relative
seats (Fig. 10).
8
32
UT-CN300
10
ENGLISH
ENGLISH
33
• Clamp the link with the special clamping
device (Z - Fig. 11).
Note
In order to minimize the possibility of
damaging the chain irreparably, DO NOT
TIGHTEN the tool beyond the beat. Let the
bushing ULTRA-LINK CN-RE500 (E) protrude 0.1 mm from the inner side of the chain
(Fig. 14).
• Insert the protruding part of the guide into
the hole provided at the base of the tool and
split it by bending (Fig. 15).
The terminal part of the split guide must
always remain inside the bushing.
• Remove the clamping device and remove
the chain from the tool.
Y
• Check that the tongue of tool UT-CN300 is
in the external position (Y - Fig. 11).
• Check that the tapered tip of the pusher
(F) (Fig. 12) is in line with the centre of the
bushing ULTRA-LINK CN-RE500 (E) (Fig. 12).
• While exerting a uniform force, screw in
the tool (Fig. 13) so that the bushing ULTRALINK CN-RE500 (E) has completely entered
the thickness of the chain.
Z
11
Internal side
of the chain
EE
0,1 mm
14
E
External
side
Lato
esterno
della
catena.
of the
chain
E
FF
12
34
13
15
ENGLISH
ENGLISH
35
• Lock the link by means of the special
locking device (Z - Fig. 19).
2.2 - LOCKING THE BUSHING ULTRA-LINK CN-RE500
• Prepare the tool UT-CN300 by positioning the tongue in closure mode (Y - Fig.
16).
• Position the tool UT-CN300 as indicated
in Fig. 17 (from the outside of the chain
towards the inside).
• Insert the link to close into the provided
seats (Fig. 18).
• Check that the tapered tip of the
pusher is in line with the centre of the
bushing ULTRA-LINK CN-RE500 (Fig.
20).
Y
• Screw in the tool to bring the pusher
into contact with the protruding end of
the Ultra-link CN-RE500 bush, turning
it by about 3⁄4 of a turn and exerting
moderate force till distorted (Fig. 21).
Z
19
Internal
side
Lato esterno
della
of thecatena
chain
16
F
17
36
18
20
ENGLISH
ENGLISH
21
37
• The slight protrusion (X) (towards the
external side of the chain) of the small pin
(E) from the link (Fig. 22) is entirely normal and does not obstruct normal chain
movement.
NEVER try to eliminate this protrusion!
• Make sure that chain closure does not
present any "harsh points" or links that do
not bend freely (Fig. 23).
Free the joints as required with delicate lateral bending of the links (Fig. 24).
E
E
X
X
External side of
the chain
22
24
23
38
NO!
NO!
SÌ!
OK!
ENGLISH
ENGLISH
39
3 - CHAIN OPENING
4 - CHAIN MAINTENANCE
WARNING!
If it becomes necessary to open and close the chain (which can be done
only twice), use only the special Campagnolo Ultra-link CN-RE500 pin with
Campagnolo UT-CN300 tool.
The use of pin produced by different manufacturers can damage the chain. A
damaged chain can break, even suddenly, and cause accidents, injuries and even
death.
WARNING!
Opening and closing the chain on more than two occasions can result in the
chain unexpectedly failing while riding, resulting in an accident, personal injury
or death.
• Get the special Campagnolo® bushing ULTRA-LINK CN-RE500
• Only and exclusively use the tool UT-CN300.
Identify the opening link on the chain; this must be different and away from the one
used for closing the first time (a link that can be recognizable from the impression
showing the production batch).
Note
To open the chain, carry out the operations indicated in chapter 2 “Chain installation”,
using the Campagnolo® tool UT-CN300 only.
40
ENGLISH
• The life of the chain depends on conditions of use and on the frequency and quality
of maintenance. To keep the chain in good condition, cleaning and lubrication must
therefore be repeated frequently, especially if it is subjected to heavy-duty use (i.e.
after washing your bicycle, after every ride in wet, dusty or muddy conditions etc.).
• Do not remove the chain for cleaning and lubrication.
•Before lubricating, thoroughly clean the drive system (chain, sprocket set, chainrings
and derailleur pulleys) with a brush or cloth saturated with an appropriate degreaser
or detergent.
WARNING!
The use of sprockets or chainrings which are not marked Campagnolo® can damage the chain. This may result in its unexpected opening of the chain and cause
accidents, personal injury or death.
• Lubricate the chain. • After applying the lubricant move the cranks and engage all possible gear combinations in order to thoroughly lubricate the entire drive system.
• Thoroughly clean any residual lubricant from the bicycle and floor. • At the end of lubrication operations CAREFULLY degrease the braking surface and
the brake shoes.
ENGLISH
41
5 - CHAIN REPLACEMENT
WARNING!
• Traces of lubricant on the rims and brake pads can reduce or eliminate the braking capabilities of your bicycle, resulting in an accident, personal injury or death.
• Using poor-quality or incorrect lubricant may damage the chain and cause excessive wear or damage to the system. A damaged drive system can malfunction,
resulting in an accident, personal injury or death.
A chain typically lasts between 2,000 miles and 5,000 miles, depending on the conditions of use and on the frequency and quality of maintenance operations. Use a high
precision caliper gauge to measure, in different points of the chain, the length as indicated in fig. 25. If even one of the measurement is longer than 132.60 mm the chain
must immediately be replaced.
NOTE
Never spray your bicycle with water under pressure. Pressurized water, even from
the nozzle of a small garden hose, can pass seals and enter into your Campagnolo®
components, damaging them beyond repair. Wash your bicycle and Campagnolo®
components by wiping them down with water and neutral soap.
Failure to timely replace the chain can result in unexpect chain failure while riding,
resulting in an accident, personal injury or death.
WARNING!
WARNING!
Salt water environments (as found on winter roads and near the seaside) can cause
galvanic corrosion on most bike parts. Carefully rinse, clean, dry and re-lubricate
all exposed parts to avoid damage, malfunctions and accidents.
132,60 mm max
1
2
3
4
5
6
25
42
ENGLISH
ENGLISH
43