1
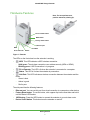
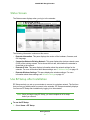
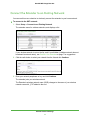
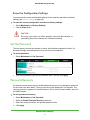
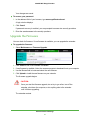
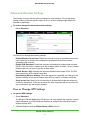
Easy, Reliable & Secure N300RE WiFi Range Extender User M anua l 350 East Plumeria Drive San Jose, CA 95134 USA April 2013 202-11247-01 v1.0 N300RE WiFi Range Extender Support Thank you for selecting On Networks products. On Networks recommends that you use only the official On Networks support resources. After installing your device, locate the serial number on the label of your product and use it to register your product at www.on-networks.com/register. You must register your product before you can use On Networks telephone support. On Networks recommends registering your product through the On Networks website. For product updates and web support, visit support.on-networks.com. Trademarks Brand and product names are trademarks or registered trademarks of their respective holders. Information is subject to change without notice. In the interest of improving internal design, operational function, and/or reliability, On Networks reserves the right to make changes to the products described in this document without notice. On Networks does not assume any liability that may occur due to the use or application of the product(s) or circuit layout(s) described herein. 2 Contents Chapter 1 Getting Started Hardware Features. . . . . . . . . . . . . . . . . . . . . . . . . . . . . . . . . . . . . . . . . . . . 5 How the Extender Works . . . . . . . . . . . . . . . . . . . . . . . . . . . . . . . . . . . . . . . 6 When to Use Your Extender . . . . . . . . . . . . . . . . . . . . . . . . . . . . . . . . . . . 6 Position Your Extender . . . . . . . . . . . . . . . . . . . . . . . . . . . . . . . . . . . . . . . 7 Ethernet Port Connection . . . . . . . . . . . . . . . . . . . . . . . . . . . . . . . . . . . . . . . 8 Log In to the Extender . . . . . . . . . . . . . . . . . . . . . . . . . . . . . . . . . . . . . . . . . 9 Status Screen . . . . . . . . . . . . . . . . . . . . . . . . . . . . . . . . . . . . . . . . . . . . . . . 10 Use EZ Setup after Installation. . . . . . . . . . . . . . . . . . . . . . . . . . . . . . . . . . 10 Chapter 2 Extender Network Settings Connect the Extender to an Existing Network . . . . . . . . . . . . . . . . . . . . . . 14 Use WPS to Join the Extender Wireless Network . . . . . . . . . . . . . . . . . . . 15 Wireless Settings . . . . . . . . . . . . . . . . . . . . . . . . . . . . . . . . . . . . . . . . . . . . 16 Set Up WPA, WPA2, or WPA + WPA2. . . . . . . . . . . . . . . . . . . . . . . . . . 17 Set Up WEP . . . . . . . . . . . . . . . . . . . . . . . . . . . . . . . . . . . . . . . . . . . . . . 17 IP Address Setup . . . . . . . . . . . . . . . . . . . . . . . . . . . . . . . . . . . . . . . . . . . . 19 Attached Devices . . . . . . . . . . . . . . . . . . . . . . . . . . . . . . . . . . . . . . . . . . . . 20 Back Up and Manage Extender Settings . . . . . . . . . . . . . . . . . . . . . . . . . . 21 Back Up Configuration . . . . . . . . . . . . . . . . . . . . . . . . . . . . . . . . . . . . . . 21 Restore Configuration. . . . . . . . . . . . . . . . . . . . . . . . . . . . . . . . . . . . . . . 21 Erase the Configuration Settings . . . . . . . . . . . . . . . . . . . . . . . . . . . . . . 22 Set the Password . . . . . . . . . . . . . . . . . . . . . . . . . . . . . . . . . . . . . . . . . . . . 22 Password Recovery . . . . . . . . . . . . . . . . . . . . . . . . . . . . . . . . . . . . . . . . . . 22 Upgrade the Firmware . . . . . . . . . . . . . . . . . . . . . . . . . . . . . . . . . . . . . . . . 23 Advanced Wireless Settings. . . . . . . . . . . . . . . . . . . . . . . . . . . . . . . . . . . . 24 View or Change WPS Settings . . . . . . . . . . . . . . . . . . . . . . . . . . . . . . . . 24 Set up a Wireless Access List by MAC Address . . . . . . . . . . . . . . . . . . 25 Appendix A Supplemental Information Factory Settings . . . . . . . . . . . . . . . . . . . . . . . . . . . . . . . . . . . . . . . . . . . . . 28 Technical Specifications . . . . . . . . . . . . . . . . . . . . . . . . . . . . . . . . . . . . . . . 28 Appendix B Notification of Compliance 3 1. Getting Started 1 This chapter covers the following topics: • Hardware Features • How the Extender Works • To cable a computer to the extender: • Log In to the Extender • Use EZ Setup after Installation 4 N300RE WiFi Range Extender Hardware Features Note: For best performance, position antennas pointing up. Device On/Off button WPS button Factory Reset button Ethernet port WPS Link Rate PC to Extender Status Figure 1. Extender The LEDs on the front show how the extender is working: • WPS. This LED indicates a WPS wireless connection. - Solid green. The wireless connection uses wireless security (WPA or WPA2). - Blinking green. A WPS connection is in progress. • PC to Extender. The LED is lit when the extender is connected to a computer. • Status. This LED is lit when the extender is powered on. • Link Rate. This LED indicates a wireless connection between the extender and the router. - Green is best. - Amber is good. - Red is poor. The side panel has the following features: • Ethernet port. You can use this port for a wired connection to a computer or other device. • Factory Reset button. To use this button, stick a paper clip into the reset hole and hold it until the Status LED flashes. • WPS button. Press the WPS button to connect the extender to your wireless router. • Device On/Off button. This button turns the extender on and off. Getting Started 5 N300RE WiFi Range Extender How the Extender Works The extender works like a bridge between a wireless router and a computer or wireless device outside the wireless router’s range. To do this, the extender has two main jobs: 1. The extender connects to a WiFi network. When the extender joins a WiFi network, it acts as a network client. This is similar to how a computer connects to a network. 2. The extender acts as an access point for computers. The extender has its own wireless network called On_Networks_EXT. In its role as an access point, the extender performs tasks that wireless routers do, such as broadcasting its network name (SSID). The extender must do each of these jobs so that both ends of the bridge are in place. Figure 2. WiFi Range Extender in a home When to Use Your Extender On Networks recommends that you connect to the extender only in the locations where your WiFi connection is poor or does not work at all. Data traffic routed through the extender is slower than traffic that goes only through the router. For this reason, in location where you have a good connection to your home network, you should connect to it directly. The LEDs can help you tell if the extender is correctly set up and working effectively. • The best performance is delivered when both the Link Rate and PC to Extender LEDs light green. • A workable performance is delivered when the Link Rate LED is lit amber and the PC to Extender LED is lit green. Getting Started 6 N300RE WiFi Range Extender Position Your Extender The ideal location to place the extender is halfway between your wireless router and the location that has poor wireless coverage. Figure 3. Extender location The best position for the extender is one that has a clear line of sight between the extender and the wireless router and also between the extender and your computer or wireless device. If there is no power outlet nearby, or you prefer to place the extender elsewhere, move the extender closer to the computer. If the Link Rate LED is green or amber and the PC to Extender LED is green, the extender is working as expected. To improve the Link Rate LED from red or amber to green: 1. Connect to the extender from a computer that is outside the range of your router and log in to www.mywifiextender.net. EZ Setup helps you connect the extender to a WiFi network. 2. If the Link Rate LED is red or the extender cannot join the network, move the extender closer to the router or to a different spot with a better line of sight. 3. As you move the extender, continue to check the Link Rate and the PC to Extender LEDs until you find a location where the Link Rate LED lights green or amber, and the PC to Extender LED lights green. You might have to unplug the extender as you move it to a different location. If you do, from the new location, power up the extender and continue to check the LEDs. 4. Once the LEDs show that the extender is in a good location, open a browser and type www.mywifiextender.net in your browser and use EZ Setup. Getting Started 7 N300RE WiFi Range Extender Ethernet Port Connection Usually, you connect to the extender wirelessly, but you can use its Ethernet port to connect a wired device such as an Ethernet-enabled gaming console, printer, or computer. N300RE Range Extender Blu-ray player WiFi router Figure 4. Ethernet port connection. CAUTION: Do not use an Ethernet cable to connect the extender to a router. If you do so, the extender does not work because it is designed only to use a wireless connection to the router. To cable a computer to the extender: 1. Plug the extender into an electrical outlet. 2. Connect your computer to the extender with an Ethernet cable. 3. Launch a web browser. The first time you connect to the extender, EZ Setup displays. See Use EZ Setup after Installation on page 10. If you already set up the extender, your browser connects to the Internet. Getting Started 8 N300RE WiFi Range Extender If you have trouble connecting: • If you connect the Ethernet cable to the extender, and launch your browser quickly, the computer might need a couple of minutes to recognize the Ethernet LAN connection before you can connect. • Make sure that your Ethernet cable is securely connected to the extender and the computer, and that the PC to Extender LED is lit. If the LED is off, then reconnect the Ethernet cable, and relaunch your Internet browser. Log In to the Extender You can log in to the extender to use menu selections to view or change the extender settings. To log in to the extender: 1. On your computer or wireless device, launch a web browser. 2. In the address field of your browser, enter http://www.mywifiextender.net. You are prompted to enter a user name and password. If you do not see the log in prompt, make sure to include http:// when you type http://www.mywifiextender.net in your browser. 3. Type admin for the user name. 4. Type the password. The default password is admin. On Networks recommends that you set a more secure password after you log in (see Set the Password on page 22). • If your extender has an Internet connection, the extender checks for new firmware. • The Status screen displays. Getting Started 9 N300RE WiFi Range Extender Status Screen The Status screen displays when you log in to the extender. The following information is shown on this screen: • Extender Information. This pane displays the version of the hardware, firmware, and GUI language. • Connection Status to Existing Network. This pane displays the wireless network name (SSID) of the existing network. It also shows the link rate, and whether the extender is connected to the network. • Extender IP Info. This pane displays information about the network settings for the extender. For more information about these settings, see IP Address Setup on page 19. • Extender Wireless Settings. This pane displays the wireless settings. For more information about these settings, see Wireless Settings on page 16. Use EZ Setup after Installation EZ Setup can help you set up your extender to connect to a wireless network. The first time that you use your web browser to connect to the extender, EZ Setup automatically displays. You can use EZ Setup after installation by logging in to the extender. Note: Once you begin using EZ Setup, you must complete all of its steps before you can exit. To use the EZ Setup: 1. Select Home > EZ Setup. Getting Started 10 N300RE WiFi Range Extender The extender detects wireless networks and displays a list. 2. Either select a network from the list, or select the Manually input my wireless SSID radio button and type the SSID. 3. Click Continue. 4. Enter the passphrase for your wireless network and click Continue. The extender wireless network name (SSID) changes to the name of your wireless network name with _EXT added to the end. 5. (Optional) In the Name (SSID) field, type a different name for the extender network. 6. Click Continue. The extender connects to your existing WiFi network. Getting Started 11 N300RE WiFi Range Extender When this happens, your computer is automatically disconnected from the extender WiFi network. 7. (Optional) To use the same password to access the extender network that you use for your network, click the copy password button. 8. With the software that you use to manage your wireless connections, join the extender wireless network. 9. Select the check box to confirm that you have connected to the extender network. 10. Click Continue. Getting Started 12 2. Extender Network Settings This chapter covers the following topics: • Connect the Extender to an Existing Network • Use WPS to Join the Extender Wireless Network • Wireless Settings • Attached Devices • Attached Devices • Back Up and Manage Extender Settings • Set the Password • Upgrade the Firmware • Advanced Wireless Settings 13 2 N300RE WiFi Range Extender Connect the Extender to an Existing Network You can use this menu selection to wirelessly connect the extender to your home network. To connect to the WiFi network: 1. Select Setup > Connect to an Existing Network. The extender scans for wireless networks, and displays a list. If your wireless network is not on the list, and it is not hidden (a hidden network does not broadcast its network name), see Position Your Extender on page 7 for suggestions. 2. Click the radio button to select your network from the list and click Continue. 3. Enter your network passphrase or key and click Continue. The extender joins your wireless network. The Extender’s wireless network name (SSID) changes to the name of your wireless network name with _EXT added to the end. Extender Network Settings 14 N300RE WiFi Range Extender Your computer or wireless devices is automatically disconnected from the Extender WiFi network. 4. With the software that you use to manage your wireless connections, join the Extender wireless network. 5. Click the I have connected to the Extender network button. Use WPS to Join the Extender Wireless Network Wi-Fi Protected Setup (WPS) lets you connect to a secure WiFi network without typing its password. Instead, press a button or enter a PIN. Some older WiFi equipment is not compatible with WPS. WPS works only with WPA2 or WPA wireless security. To use WPS to join the extender network: 1. Select Home > WPS Setup. 2. Click Next. By default, the Push Button (recommended) radio button is selected. 3. Use either the push button or PIN method. • To connect with the push button method, click the • button. To connect with a PIN, select the PIN number radio button and enter the client PIN in the field that displays. Extender Network Settings 15 N300RE WiFi Range Extender The extender tries to find the wireless client (the computer) that is attempting to join the network. If you are using a WPS button, it tries for 2 minutes. If you are using a PIN, it tries for 4 minutes. 4. On your computer or wireless device, use its WPS software to connect to the extender. The WPS process automatically sets up your wireless computer with the network password and connects you to the wireless network. Wireless Settings You can use the Wireless Settings screen to change the network name (SSID) for the extender’s network and to set up wireless security. If you do not change these settings, the network name is On_Networks_EXT, and the network is open (no wireless security is set up). Note: If you use a wireless computer to change the extender’s wireless settings, you will be disconnected when you click Apply. To reconnect, you must select the new network name that you created, and enter the passphrase or wireless security key that you set up. To change the wireless settings for the extender’s network: 1. Select Setup > Wireless Settings. 2. In the Name (SSID) field, you can type in a new name to customize your extender network. 3. In the Security Options section of the screen, select the type of wireless security that you want to use on your network. • None. This setting is for an open wireless network. Any wireless computer or device is allowed to join this network. Extender Network Settings 16 N300RE WiFi Range Extender • WEP. WEP is an older standard, and is less secure than WPA or WPA2. WEP uses encryption keys and data encryption for data security. You can select 64-bit or 128-bit encryption. • WPA-PSK [TKIP]. WPA is more secure than WEP. When using wireless computers or devices that support WPA, you can enter a passphrase to join the extender’s wireless network. • WPA2-PSK [AES]. WPA2 is even more secure, but some older computers do not support this standard. When using wireless computers or devices that support WPA2, you can enter the passphrase to join the extender’s wireless network. • WPA-PSK [TKIP] + WPA2-PASK [AES]. When using wireless computers or devices that support either WPA or WPA2, you can enter the passphrase to join the extender’s wireless network. 4. Click Apply. Your settings are saved. If your computer was connected wirelessly to the extender network, it is disconnected. To join the extender network, you need to use the new settings that you specified. Set Up WPA, WPA2, or WPA + WPA2 Both WPA and WPA2 provide strong data security. WPA with TKIP can be used on Windows systems with Service Pack 2 or later. WPA2 with AES is a hardware implementation; see your device documentation before implementing it. To set up WPA or WPA2 in the extender: 1. Select Setup > Wireless Settings. 2. In the Security Options section, select the radio button for the WPA or WPA2 option of your choice. The settings displayed on the screen depend on which security option you select. 3. Enter the passphrase (the wireless password for the extender network). 4. Click Apply. Your settings are saved. If your computer was connected wirelessly to the extender network, it is disconnected. To join the extender network, you need to use the new settings that you specified. Set Up WEP On Networks recommends that you use WPA or WPA2 wireless security because it is more secure than WEP. If you choose to use WEP, you can set it up in this screen. To set up WEP security: 1. Select Setup > Wireless Settings. Extender Network Settings 17 N300RE WiFi Range Extender 2. In the Security Options section, select the WEP radio button. 3. Select the authentication type: Automatic, Open System, or Shared Key. The default is Open System. The authentication is separate from the data encryption. You can select authentication that requires a shared key, but still leaves data transmissions unencrypted. Security is stronger if you use both the Shared Key and WEP encryption settings. 4. Select the encryption strength setting: • WEP 64-bit encryption. Enter ten hexadecimal digits (any combination of 0–9, a–f, or A–F). • WEP 128-bit encryption. Enter 26 hexadecimal digits (any combination of 0–9, a–f, or A–F). 5. Enter the encryption keys. You can type in the values or generate the four data encryption keys. Wireless computers or devices must use the passphrase or type the keys to access the extender network. • To use a passphrase to generate the keys, enter a passphrase, and click Generate. The keys are generated. • Fill in the Key 1–Key 4 fields. - These values are not case-sensitive. Enter ten hexadecimal digits (any combination of 0–9, a–f, or A–F). - Select which of the four keys you want to be the default. Data transmissions are encrypted using the default key. The other keys can be used only to decrypt received data. 6. Click Apply. Your settings are saved. If your computer was connected wirelessly to the extender network, it is disconnected. To join the extender network, you need to use the new settings that you specified. Extender Network Settings 18 N300RE WiFi Range Extender IP Address Setup The IP Address Setup screen shows whether the extender is set to get its IP address dynamically from the router (this is the most common setting), or is set as a static IP address. By default, the extender is set up so that the router in your existing network assigns the extender an IP address. Most networks are set up so that the router automatically assigns IP addresses. To view the IP address setup: Select Maintenance > IP Address. By default, the Get Dynamically IP Address From Router check box is selected. On Networks recommends this setting because it is easy to use and is compatible with most networks. To specify a static IP address: On Networks recommends that you do this only if you have a specific reason and you have experience with static IP addresses or you have a technically experienced person help you. 1. Select Maintenance > IP Address 2. Select the Use Static IP Address radio button. 3. In the IP Address field, enter the static IP address. 4. In the IP Subnet Mask field, enter the subnet mask associated with the IP address. 5. In the Gateway IP Address field, enter the IP address for the gateway. 6. In the Primary DNS field, enter the primary Domain Name Server (DNS). 7. In the Secondary DNS field, enter the secondary Domain Name Server (DNS). 8. Click Apply. Your changes are saved. Extender Network Settings 19 N300RE WiFi Range Extender Attached Devices Use the Attached Device screen to view all computers or devices that are currently connected to your network. To view attached devices: 1. Select Maintenance > Attached Devices. Wired devices are connected to the extender with Ethernet cables. Wireless devices have joined the wireless network. The following information is displayed: • # (number). The order in which the device joined the network. • IP Address. The IP address that the extender assigned to this device when it joined the network. This number can change if a device is disconnected and rejoins the network. • MAC Address. The unique MAC address for each device does not change. The MAC address is typically shown on the product label. • Device Name. If the device name is known, it is shown here. 2. You can click Refresh to update this screen. Extender Network Settings 20 N300RE WiFi Range Extender Back Up and Manage Extender Settings You can save your extender configuration settings in a file and restore them. The configuration file is saved on your computer. Back Up Configuration To back up the configuration settings: 1. Select Maintenance > Backup Settings. 2. Click Backup. Your browser extracts the configuration file from the extender. 3. If you do not have your browser set up to save downloaded files automatically, locate where you want to save the file. 4. You can give the file a meaningful name, such as internet_adapter.cfg. Restore Configuration To restore saved configuration settings: 1. Select Maintenance > Backup Settings. 2. On the Backup Settings screen, click Browse. 3. Locate and select the previously saved backup file. 4. Click Restore. CAUTION: Do not try to go online, turn off the extender, shut down the computer, or do anything else to the extender until it finishes restarting. A screen displays letting you know that the device has been restored to the previous settings. The extender restarts. This takes about 1 minute. Extender Network Settings 21 N300RE WiFi Range Extender Erase the Configuration Settings You can erase the current configuration settings for the extender and restore its factory settings (see Factory Settings on page 28). To erase the current configuration and return to factory settings: 1. Select Maintenance > Backup Settings. 2. Click the Erase button. CAUTION: Do not try to go online, turn off the extender, shut down the computer, or do anything else to the extender until it finishes restarting. Set the Password The user name to access the extender is admin, and its default password is admin. On Networks strongly recommends that you set a more secure password. To set the password: 1. Select Maintenance > Set Password. 2. Type the old password, type the new password twice, and then click Apply. Password Recovery On Networks recommends that you enable password recovery if you change the password for the router user name admin. Then you can recover the password if it is forgotten. This recovery process is supported in Internet Explorer, Firefox, and Chrome browsers, but not in the Safari browser. To set up password recovery: 1. Select Maintenance > Set Password. 2. Select the Enable Password Recovery check box. 3. Select two security questions, and provide answers to them. 4. Click Apply. Extender Network Settings 22 N300RE WiFi Range Extender Your changes are saved. To recover your password: 1. In the address field of your browser, type www.mywifiextender.net. A login window displays. 2. Click Cancel. If password recovery is enabled, you are prompted to answer two security questions. 3. Enter the saved answers to the security questions. Upgrade the Firmware You can check for firmware. If new firmware is available, you can upgrade the extender. To upgrade the firmware: 1. Select Maintenance > Firmware Upgrade. 2. Click Check to see if new firmware is available. 3. If new firmware is available, follow the onscreen prompts to download it onto your computer. 4. Use the Browse field to locate and select the new firmware. 5. Click Upload to install the new firmware on your extender. The firmware upgrade begins. CAUTION: Once you start the firmware upgrade, do not try to go online, turn off the extender, shut down the computer, or do anything else to the extender until it finishes upgrading. The extender restarts. Extender Network Settings 23 N300RE WiFi Range Extender Advanced Wireless Settings The extender is set up with the optimum settings for most situations. Do not alter these settings unless you have a specific reason to do so. Incorrect settings might disable the extender unexpectedly. To view or change the advanced wireless settings: Select Advanced. You can view or change the following settings: • Enable Wireless Access Point. Enable the extender to work as a wireless access point. If this check box is cleared, then computers or wireless devices cannot connect wirelessly to the extender. • Enable SSID Broadcast. Enable the extender to broadcast its wireless network name (SSID). If this check box is cleared, then the wireless network is hidden. To join a hidden wireless network, you have to type the wireless name. • Disable Device’s PIN. Selecting this check box disables the extender’s PIN. The PIN can be used for a WPS wireless connection. • Keep Existing Wireless Settings. When this check box is selected, the settings in the Wireless Settings screen stay the same when WPS is used for a wireless connection. • Setup Access List. Specify a list of computers or wireless devices that are allowed to connect to the network. If you use an access list, then computers that are not on the list are not allowed to join the wireless network. View or Change WPS Settings To specify WPS Settings: 1. Select Advanced. The Router’s PIN field displays the PIN that you use on a registrar (for example, from the Network Explorer on a Vista Windows computer) to configure the extender’s wireless settings through WPS. 2. (Optional) Select or clear the Disable Router’s PIN check box. Extender Network Settings 24 N300RE WiFi Range Extender The PIN function might temporarily be disabled when the extender detects suspicious attempts to break into the extender’s wireless settings by using the extender’s PIN through WPS. You can manually enable the PIN function by clearing the Disable Router’s PIN check box. 3. (Optional) Select or clear the Keep Existing Wireless Settings check box. By default, the Keep Existing Wireless Settings check box is selected. On Networks recommends that you leave this check box selected. If you clear this check box, the next time a new wireless client uses WPS to connect to the extender, the extender wireless settings change to an automatically generated random SSID and security key. 4. Click Apply. Your changes are saved. Set up a Wireless Access List by MAC Address You can set up a list of computers and wireless devices that are allowed to join the extender network. This list is based on the unique MAC address of each computer and device. Each network device has a MAC address, which is a unique 12-character physical address, containing the hexadecimal characters 0–9, a–f, or A–F only, and separated by colons (for example, 00:09:AB:CD:EF:01). Typically, the MAC address is on the label of the wireless card or network interface device. If you do not have access to the label, you can display the MAC address using the network configuration utilities of the computer. You might also find the MAC addresses in the Attached Devices screen. To set up a wireless access list: 1. Select Advanced. The Advanced Wireless Settings screen displays. 2. Click the Setup Access List button. 3. Click Add. Extender Network Settings 25 N300RE WiFi Range Extender The Wireless Card Access Setup screen displays a list of currently active wireless cards and their Ethernet MAC addresses. 4. If the computer or device you want is in the Available Wireless Cards list, select that radio button; otherwise, type a name and the MAC address. You can usually find the MAC address on the bottom of the wireless device. Tip: You can copy and paste the MAC addresses from the Attached Devices screen into the MAC Address field of this screen. To do this, use each wireless computer to join the wireless network. The computer should then appear in the Attached Devices screen. 5. Click Add. The screen changes back to the Wireless Card Access List screen. 6. Add each computer or device you want to allow to connect wirelessly. 7. Select the Turn Access Control On check box. 8. Click Apply. To edit or delete a wireless device from the access list: 1. Select Advanced. The Advanced Wireless Settings screen displays. 2. Click the Setup Access List button. 3. In the table, select the radio button next to the wireless device that you want to edit or delete. 4. Do one of the following: • Click the Edit button. The Edit Wireless Card screen displays. a.Edit the address information. • b. Click the Accept button. Click the Delete button. The address is removed from the table. Extender Network Settings 26 A. Supplemental Information This appendix covers the following topics: • Factory Settings • Technical Specifications 27 A N300RE WiFi Range Extender Factory Settings To return the extender to its factory settings Use a paperclip to press and hold the Factory Settings button on the side panel for 7 seconds. The extender resets, and returns to its factory settings. Factory Settings Smart Wizard Enabled Wireless Wireless communication Enabled Wireless network name (SSID) On_Networks_EXT Security Disabled Transmission speed Auto* Country/Region United States (varies by region) Operating mode 802.11n, 802.11g, 802.11b Data rate Up to 300 Mbps *. Maximum wireless signal rate (IEEE Standard 802.11). Actual throughput will vary. Network conditions and environmental factors, including volume of network traffic, building materials and construction, and network overhead, lower actual data throughput rate. Technical Specifications Technical Specifications Network protocol and standards compatibility Data and Routing Protocols: TCP/IP, DHCP server and client AC input 100-240V~, 0.3A (Max) Physical specifications • Dimensions: 112 x 74 x 45 mm (4.41 x 2.91 x 1.77 in) • Weight: 0.245 kg (0.54 lb) Environmental • Operating temperature: 32° to 140° F (0° to 40° C) • Operating humidity: 90% maximum relative humidity, noncondensing • Electromagnetic emissions: Meets requirements of: FCC Part 15 Class B. Interface • Local: 10BASE-T, 100BASE-Tx, RJ-45 • 802.11n/g/b Supplemental Information 28 B. Notification of Compliance B Regulatory Compliance Information This section includes user requirements for operating this product in accordance with National laws for usage of radio spectrum and operation of radio devices. Failure of the end-user to comply with the applicable requirements may result in unlawful operation and adverse action against the end-user by the applicable National regulatory authority. This product's firmware limits operation to only the channels allowed in a particular Region or Country. Therefore, all options described in this user's guide may not be available in your version of the product. Europe – EU Declaration of Conformity Products bearing the marking comply with the following EU directives: • EMC Directive 2004/108/EC • Low Voltage Directive 2006/95/EC If this product has telecommunications functionality, it also complies with the requirements of the following EU Directive: • R&TTE Directive 1999/5/EC Compliance with these directives implies conformity to harmonized European standards that are noted in the EU Declaration of Conformity. Intended for indoor use only in all EU member states, EFTA states, and Switzerland. This device may not be used for setting up outdoor radio links in France and in some areas the RF output power may be limited to 10 mW EIRP in the frequency range of 2454 - 2483.5 MHz. For detailed information the end-user should contact the national spectrum authority in France. FCC Requirements for Operation in the United States FCC Information to User This product does not contain any user serviceable components and is to be used with approved antennas only. Any product changes or modifications will invalidate all applicable regulatory certifications and approvals. FCC Guidelines for Human Exposure This equipment complies with FCC radiation exposure limits set forth for an uncontrolled environment. This equipment should be installed and operated with minimum distance of 20 cm between the radiator and your body. This transmitter must not be co-located or operating in conjunction with any other antenna or transmitter. • This device may not cause harmful interference, and • This device must accept any interference received, including interference that may cause undesired operation. FCC Radio Frequency Interference Warnings & Instructions This equipment has been tested and found to comply with the limits for a Class B digital device, pursuant to Part 15 of the FCC Rules. These limits are designed to provide reasonable protection against harmful interference in a residential installation. This equipment uses and can radiate radio frequency energy and, if not installed and used in accordance with the instructions, may cause harmful interference to radio communications. However, there is no 29 N300RE WiFi Range Extender guarantee that interference will not occur in a particular installation. If this equipment does cause harmful interference to radio or television reception, which can be determined by turning the equipment off and on, the user is encouraged to try to correct the interference by one or more of the following methods: • Reorient or relocate the receiving antenna. • Increase the separation between the equipment and the receiver. • Connect the equipment into an electrical outlet on a circuit different from that which the radio receiver is connected. • Consult the dealer or an experienced radio/TV technician for help. FCC Caution • Any changes or modifications not expressly approved by the party responsible for compliance could void the user’s authority to operate this equipment. • This device complies with Part 15 of the FCC Rules. Operation is subject to the following two conditions: (1) This device may not cause harmful interference, and (2) this device must accept any interference received, including interference that may cause undesired operation. • For product available in the USA and Canada market, only channel 1~11 can be operated. Selection of other channels is not possible. • Pour les produits disponibles aux États-Unis / Canada du marché, seul le canal 1 à 11 peuvent être exploités. Sélection d'autres canaux n'est pas possible. • This device and its antenna(s) must not be co-located or operation in conjunction with any other antenna or transmitter. • Cet appareil et son antenne (s) ne doit pas être co-localisés ou fonctionnement en association avec une autre antenne ou transmetteur. Canadian Department of Communications Radio Interference Regulations This digital apparatus (N300RE WiFi Range Extender) does not exceed the Class B limits for radio-noise emissions from digital apparatus as set out in the Radio Interference Regulations of the Canadian Department of Communications. This Class [B] digital apparatus complies with Canadian ICES-003. Cet appareil numérique de la classe [B] est conforme à la norme NMB-003 du Canada Industry Canada This device complies with RSS-210 of the Industry Canada Rules. Operation is subject to the following two conditions: (1) This device may not cause harmful interference, and (2) this device must accept any interference received, including interference that may cause undesired operation. IMPORTANT NOTE: Radiation Exposure Statement: This equipment complies with IC radiation exposure limits set forth for an uncontrolled environment. This equipment should be installed and operated with minimum distance 20cm between the radiator & your body. Caution: Ce dispositif est conforme à la norme CNR-210 d'Industrie Canada applicable aux appareils radio exempts de licence. Son fonctionnement est sujet aux deux conditions suivantes: (1) le dispositif ne doit pas produire de brouillage préjudiciable, et (2) ce dispositif doit accepter tout brouillage reçu, y compris un brouillage susceptible de provoquer un fonctionnement indésirable. NOTE IMPORTANTE: Déclaration d'exposition aux radiations: Cet équipement est conforme aux limites d'exposition aux rayonnements IC établies pour un environnement non contrôlé. Cet équipement doit être installé et utilisé avec un minimum de 20 cm de distance entre la source de rayonnement et votre corps. Notification of Compliance 30 N300RE WiFi Range Extender Interference Reduction Table The table below shows the recommended minimum distance between On Networks equipment and household appliances to reduce interference (in feet and meters). Household Appliance Recommended Minimum Distance (in feet and meters) Microwave ovens 30 feet / 9 meters Baby Monitor - Analog 20 feet / 6 meters Baby Monitor - Digital 40 feet / 12 meters Cordless phone - Analog 20 feet / 6 meters Cordless phone - Digital 30 feet / 9 meters Bluetooth devices 20 feet / 6 meters ZigBee 20 feet / 6 meters Notification of Compliance 31