1
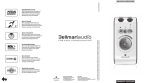
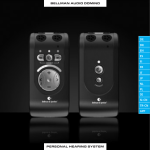
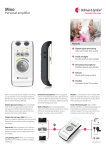
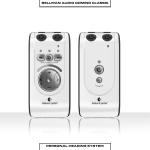
BELLMAN AUDIO MINO
PROFESSIONAL COMMUNICATOR
Bellman® Audio Mino
Professional Communicator, BE2030
Introduction
Thank you for choosing products from Bellman & Symfon.
Bellman Audio is an assistive listening system. The system consists of a number
of units which facilitate listening under different circumstances. Bellman Audio
products make everyday life easier for many people and give them the freedom
to freely pursue their interests.
The flexible battery charging ensure that the products can be used safely
and easily throughout the world.
Read through the entire user manual before starting to use the product.
Refer to the diagram showing the accessories and connection options.
Important safety instructions
18
•
Read these Instructions.
•
Keep these Instructions.
•
Heed all Warnings.
•
Follow all instructions.
•
Do not use this apparatus near water.
•
Clean only with a dry cloth.
•
Do not block any of the ventilation openings. Install in accordance with the
manufacturers instructions.
•
Do not install near any heat sources such as radiators, heat registers, stoves, or
other apparatus (including amplifiers) that produce heat.
•
Do not defeat the safety purpose of the polarized or grounding - type plug.
A polarized plug has two blades with one wider than the other. A grounding
type plug has two blades and a third grounding prong. The wide blade or the
third prong are provided for your safety. When the provided plug does not fit
into your outlet, consult an electrician for replacement of the obsolete outlet.
•
Protect the power cord from being walked on or pinched particularly at plugs,
convenience receptacles, and the point where they exit from the apparatus.
•
Only use attachments/accessories specified by the manufacturer.
•
Unplug this apparatus during lightning storms or when unused for long
periods of time.
•
Refer all servicing to qualified service personnel. Servicing is required when
the apparatus has been damaged in any way, such as power-supply cord or
plug is damaged, liquid has been spilled or objects have fallen into the apparatus, the apparatus has been exposed to rain or moisture, does not operate
normally, or has been dropped.
Please note: The BE2030 Audio Mino Professional Communicator is not a hearing
instrument. Bellman & Symfon AB recommend that anyone who is experiencing
hearing loss should consult a doctor.
Warning! The BE2030 Audio Mino Professional Communicator has a very
powerful amplifier and the sound level can cause discomfort or, in serious cases,
endanger hearing if the product is used carelessly. Always turn the volume down
to a low level before putting on the headphones!
Warning! The BE2030 Audio Mino Professional Communicator is powered by
rechargeable Lithium-Ion batteries. Do not expose the batteries to fire or to direct
sunlight. The batteries must only be changed by Bellman & Symfon staff and
must only be replaced by batteries of the same type. There is a risk of explosion if EN
the batteries are not replaced correctly. The batteries must be charged fully before
using the products for the first time. Batteries should be charged in temperatures
of between +5°C and +40°C.
Warning! The BE2030 Audio Mino Professional Communicator must only
be charged by charging accessories recommended by Bellman & Symfon.
Warning! The AC/DC adapter must not be exposed to water drops or splashes
and objects containing liquids, such as vases must not be placed on the unit.
To disconnect the power fully, the AC/DC adapter plug must be disconnected
from the mains socket. The AC/DC adapter plug must not be blocked and must
be easy to access for the intended use. Rating information is shown on the rear
of the AC/DC adapter.
Warning! To reduce the risk of fire or electric shock, do not expose this appliance
to rain or moisture.
Warning! For the safety of your children - Please be aware that this product may
include small parts. Ensure that the package and small parts are kept out of reach
of children.
This symbol indicates that integral electrical equipment must not be treated
as household waste. It should be taken to the relevant collection depot for the
recycling of electrical and electronic equipment. You can obtain more detailed
information about recycling of the product from your local authorities, from
the nearest recycling station or from the shop you purchased the product from.
19
Figure references
1
Internal microphone
2
Internal microphone setting LED
5
Button for selecting internal
microphone
Green: Omnidirectional microphone
Orange: Directional microphone
6
On/off button
7
Button for selecting T position
3
Battery status LED
8
Volume and Tone LED Indicator
9
Button for increasing sound level
Green: Switched on with well
charged battery
Blinking Green: Switched on but
the battery charge is low
Blinking Orange: Switched on with
flat battery - will soon switch itself off
Orange: Charging
4
External sound source input LED
14 Charging socket
Green: T position
Orange: External mic
Orange and Green: Line in (stereo)
16 External sound source input 2.5 mm
jack plug
20
10 Button for reducing sound level
11 Button for reducing treble
12 Button for increasing treble
13 Headphone output 3.5 mm jack
plug
15 Clip
Getting started
Testing
1
Connect the Headphones to the headphone output (13).
2
Give one short press on the On/Off button i (6) to start Mino.
3
Listen to the internal microphone and adjust the volume using
the Volume Buttons (+ 9 or - 10).
Mino always starts with the internal microphone (1) selected as the sound source.
In addition, the volume control is always set to low volume to avoid unpleasant
sound levels.
The volume control adjusts the sound level by +(9) raising and - (10) lowering
the volume while the Volume and Tone LED Indicator (8) shows the sound level.
The more LEDs that are lit, the higher the volume. The LED indicator goes out 5
seconds after the sound volume has been set.
The tone control adjusts the sound quality by > (12) increasing and < (11) reducing
the treble. The Volume and Tone LED Indicator (8) shows the tone setting. The LED
indicator goes out 5 seconds after the sound quality has been set.
EN
When you have finished, you can switch off Mino by pressing the On/Off button i
(6) and holding it down until the Battery Status LED (3) goes out.
How to use the Bellman Audio Mino
The BE2030 Bellman Audio Mino Professional Communicator is a digital
comunicator which has been specifically developed to provide an exceptional
sound experience even in demanding situations. The Bellman Audio Mino works
extremely well for speech and music. You can use the built-in microphones or
use an external sound source. As an external sound source you can choose an
inductive loop, an external microphone or you can connect the Stereo Cable Set
to a stereo sound source.
Symbols and indicators
The following symbols are used in the user manual and can be explained as follows:
The warning triangle indicates information which must be followed in
order to guarantee operation and also in some cases to ensure personal
safety.
The light bulb (tip, note) indicates information which can be useful to help
you get the most out of the product.
21
Charging
Mino is supplied with a built-in rechargeable battery. The battery must be charged
before using the product for the first time. Mino contains a Lithium-Ion battery
and a universal charger.
Warning: The product may only be charged with the charger supplied or using
accessories from Bellman & Symfon.
Connect the charger as illustrated in the fold-out section of the manual.
Fit the plug and check that it is locked properly before it is connected to the wall
socket. When the charging connector is connected to the Charger and Mino, the
Battery Status LED (3) changes from green to orange to indicate that charging is
taking place. When charging is finished, after about 2.5 hours, the LED turns green
again.
Function
Connect BE9122 Bellman Stereo Headphones, BE9128 Bellman Neck Loop, BE9125
Bellman Stetoclip, BE9124 Bellman In-ear Phones or another listening product
recommended by Bellman & Symfon to the headphone output (13) on the
right-hand side as illustrated in the fold-out section of the manual.
Switching on
Press the On/Off button i (6). The Battery Status LED (3) starts to shine with a
green light to indicate that the unit is on.
Mino always starts with the internal microphone selected as the sound source.
In addition, the volume control is always set to low volume to avoid unpleasant
sound levels.
Selecting the sound volume
Use the volume control’s + button (9) to increase and the - button (10) to
reduce the sound level. The Volume and Tone LED Indicator (8) shows the sound
level. The more LEDs that are lit, the higher the volume. The LED indicator goes
out 5 seconds after the sound volume has been set.
Selecting the tone
Use the tone control’s < button (11) to reduce and the > button (12) to increase
the treble in the tone. The Volume and Tone LED Indicator (8) shows the selected
setting. The LED indicator goes out 5 seconds after the sound quality has been set.
Switching off
When you have finished, you can switch off Mino by pressing the On/Off buttons
i (6) and holding it down until the Battery Status LED (3) goes out.
22
Choice of microphones
Mino contains two microphone options: one omnidirectional and one directional
microphone.
You can switch between omnidirectional and directional microphone reception
by pressing the M button (5). The omnidirectional microphone is indicated by
the Microphone LED (2) lighting up green and the directional microphone by it
lighting up orange.
With the directional microphone you can ”point” towards the sounds source that
you are interested in listening to while reducing sound from other directions. This
is particularly useful in difficult listening situations, e.g. in crowds or in very noisy
environments.
Telecoil/T position
The built-in telecoil is angled at 45 degrees in order to catch inductive signals from
an inductive loop both when Mino is in the horizontal position (in the hand or on a
table) and in the vertical position (on a clip or neck strap).
The T position can be used in premises where an inductive loop (or hearing loop)
has been fitted. Look for the inductive loop symbol or ask staff whether there is an
inductive loop if you are unsure. The T position is indicated by the indicator for the
external sound source lighting up green.
EN
Selecting the signal source
It is easy to select the sound source.
The user can manually choose between the internal microphone (MIC position) or
built-in telecoil (T position) by pressing the buttons M(5) and T (7) on the front.
When switching between signal sources, the volume control will be set automatically to a low level to avoid unpleasant sound levels.
Mino automatically selects the input for the external sound source (16) when
something is connected. When you remove the connector, Mino will automatically
return to the internal microphone (M position).
External sound source
If the audio cable supplied (which has a small 2.5 mm jack plug on one end) is
connected to the external sound source input (16), the internal microphone will be
disconnected and the external sound source will be automatically selected. The
External Sound LED (4) will light up green and orange at the same time to indicate
that the sound is coming from an external sound source.
If the audio cable is disconnected, the sound will be reconnected to the internal
microphone again.
With the audio cable connected to a TV, hi-fi equipment, MP3 player or similar
sound source, you can listen to absolutely first class stereo sound.
The input sensitivity is automatically adjusted to suit different sound sources.
23
External microphone
You can connect an external microphone to the external sound source input (16).
The External Sound LED (4) will light up orange at the same time to indicate that
the sound is coming from an external microphone.
The input sensitivity is automatically adjusted to a suitable amplification when
an external microphone is connected.
Combined signal sources
When you are listening via an External Sound Source, this sound can be combined
with the sound that the internal microphone is receiving.
Choose to listen to the External Sound Source by pressing the T button (7).
Hold down the M button (5) until both the MIC LED (2) and T LED (4) light up.
The sound from the external sound source is now mixed with the sound from the
internal microphone. You can adjust the balance between the external sound and
the internal microphone by holding down the M button (5) at the same time as
setting the balance using the < (11) or >(12) button.
If you want to go back to listening to external sound, press the T button (7) and
if you want to switch over to listening on the internal microphone, press the M
button (5) instead.
Battery indicator
The Battery Status LED (3) normally lights up green. This indicates that the unit is
switched on and the battery level is satisfactory.
When the battery is low, the Battery Status LED (3) blinks green until the battery
is almost completely flat when it blinks orange instead. As soon as it blinks green,
it is time to charge the unit again. If the unit is not charged, it is switched off
automatically.
Charging starts automatically when you connect a charger to the Charging Socket
(14). Charging in progress is indicated on the unit by an orange light. Once the
battery is fully charged, the indicator changes to green and the battery is
continuously trickle charged until the charger is disconnected.
24
Troubleshooting in brief
Problem
Nothing happens when
you try to start the unit.
Solution
•
Connect the charger and check that charging
starts within 10 seconds.
Please note! If charging does not start within
10 seconds, disconnect the charger immediately and contact your nearest dealer!
No sound can be heard in
the headphones when the
unit is switched on.
•
Turn up the volume using the volume control
+ (9).
•
Check that the internal microphone has been
selected as the signal source and that it works
by gently scraping on the microphones (1).
•
Check that the headphone plug is securely
inserted in the headphone output.
•
Connect the headphones to another sound
source (with a 3.5 mm headphone output) to
test whether the headphones are working.
No sound can be heard in
•
the headphones when the
unit is switched on and
External Sound is selected.
Check that the sound source is correctly
connected to the unit if the stereo cable is
connected to the External Sound Source Input
(16).
A high-pitched noise is
heard in the headphones.
•
Turn down the volume or increase the distance
between the microphone and headphones.
•
Direct the microphone away from you.
EN
For further information about the product in English, refer to the Appendix.
25
Appendix
Settings
Bellman Audio Mino has more settings than those you can access in user mode.
By going into the Settings Menu you can adjust settings that you do not normally
need to change or which are adjusted when first used and never need to be
changed again.
Settings Menu
How to get into the Settings Menu.
•
Start the unit by pressing the On/Off button i (6).
•
Hold down the On/Off button i (6) and press down the Volume - button
(10) within 1 second until the T LED (4) starts to blink.
•
When the T LED (4) starts to blink, you can release both the buttons.
•
Press and hold down the T button (7) within 2 seconds of the moment the T
LED (4) starts to blink.
•
Release the T button (7) immediately once the T LED (4) has gone out.
You are now in Balance Control mode.
Overview of the Settings Menu
In the Settings Menu you can switch
between the different settings by
pressing the T button (7) or
the M button (5). Each
press of the T button
moves you clockwise on
to the next setting in the
list and the M button
takes you anti-clockwise
to the previous setting in
the list.
When you have finished
adjusting your settings,
give a short press on the
On/Off button i (6) to
return to normal user
mode.
114
Balance control
The balance between the right and left-hand channels can be
set to compensate, for example, for a hearing loss in one ear.
Press the < button (11) to adjust the balance on the left and the >
button (12) to adjust the balance on the right.
The standard setting is centered balance.
Basic attenuation
Different headphones have different sensitivity levels and you can
compensate for this with basic attenuation. What you actually set
is the attenuation you require at the maximum power output you
want to have (which is therefore 0 dB attenuation). This setting is
useful when you want to adjust the maximum volume in user mode
for a pair of headphones or in-ear phones with a higher sensitivity
than the BE9122 Bellman Stereo Headphones or, for example, if you
want to limit the volume for a child.
Use the > button (12) to reduce the basic attenuation (increase the
volume) and the < button (11) to increase the basic attenuation
(reduce the volume). The basic attenuation is adjusted in increments of 3 dB.
The standard setting is 0 dB attenuation, which corresponds to the
maximum output signal.
Stereo/Mono
The line-in signal can be rendered in either Stereo or in Mono.
The intelligibility of speech can be increased in certain listening
situations, such as when watching TV, if the signal is in Mono.
Press the + (9) button to select Stereo.
Press the - (10) button to select Mono.
The standard setting is Stereo.
APP
Bass reduction
Low-frequency interference such as fans and road noise can be
tiring if you are exposed to it for a long period. By activating bass
reduction, low-frequency interference and sounds are reduced.
Press the + (9) button to select Bass Reduction.
Press the - (10) button to deactivate Bass Reduction and get
level frequency response.
The standard setting is deactivated Bass Reduction.
115
Adjusting the Tone Control
The Tone Control Blocking function has been developed in case
you want to make it easier for the user to use Mino. This setting
can be used to choose whether or not the user should be able to
adjust the Tone Control. If you choose to switch off the tone control
buttons, you can preset the Tone Control that will be used in user
mode.
Activation and deactivation of Tone Control in User Mode
Press the + (9) button to activate the Tone Control buttons.
Press the - (10) button to deactivate them.
The standard setting is Tone Control activated.
Presetting the Tone Control
Press the < button (11) and the > button (12) to preset the Tone
Control to the level that will be used in user mode.
The standard setting is Tone Control centered (level frequency
response)
Please note that if the Tone Control is activated, the preset value will be
changed as soon as the Tone Control is changed in user mode.
Blocking the T position
T
The T position can be blocked if you know that the T position will
not be used. This setting is for those who will never use the
position and want to avoid selecting this position by mistake.
Press the + (9) button to activate the T position.
Press the - (10) button to deactivate the T position.
The standard setting is activated T position.
Resetting to the factory setting
You can use this to reset all settings to the standard settings
the product was delivered with from the factory.
Press and hold down the + button (9) until all the LEDs on the
display (8) are lit. After resetting is completed, the display will
blink for a short period.
Version information
The product version information is presented here via a pattern
of lit and blinking LEDs. This internal information is only intended
as an aid for servicing and support.
116
Testing
It is easy to test Mino yourself. If Mino is not working as described below, you can
carry out further troubleshooting as instructed in the Troubleshooting section
below.
How to test
The testing of Mino has been divided into three parts. One part for internal microphones, one part for external sound and finally one for charging.
Internal microphones
•
Switch on the unit and make sure that the Battery Status LED (3) lights
up green.
•
Connect the headphones to the Headphone Socket (13) and scrape
carefully on the round microphone (1) with your finger and check that
there is a scraping sound in the headphones.
•
Press the M button (5) and make sure that the MIC LED (2) changes
colour and lights up orange.
•
Carefully scrape the small microphone hole on the top (1) and the round
microphone (1) with your finger and check that there is a scraping sound
in the headphones.
•
Press the buttons (9, 10, 11, 12) and check that the Volume and Tone LED
indicator changes.
External sound
•
Press the T button (7) and make sure that the External Sound LED (4) lights up
green.
•
Hold the unit against an electrical watch with mechanical hands
(with built-in battery) and check that it ticks.
•
Connect an external sound source to the External Sound Source Input (16)
and check that the sound from the sound source is heard in the headphones.
The External Sound Source Input (16) can be tested, for example, by connecting a CD player or a radio to the input via a BE9126 audio cable. The unit
automatically switches to an external sound source when a connector is connected to the External Sound Source Input (16).
APP
Charging
•
Ensure that Mino is switched off.
•
Connect the charger to the mains socket.
•
Connect the charging cable to both the charger and the unit’s charging
socket (14), see the fold-out section of the manual.
•
Check that the unit’s Battery Status LED lights up.
117
Troubleshooting
Problem
118
Solution
The sound is louder in one ear than
in the other.
•
Adjust the Balance
in the Settings Menu.
The sound volume is low even
though the volume is set to max.
•
Adjust the Basic Attenuation
in the Settings Menu.
The sound is only in Mono even
though it is connected via a stereo
cable to a sound source which
provides stereo sound.
•
Change to Stereo in the
Settings Menu.
The bass reproduction is weak.
•
Switch off Bass Reduction
in the Settings Menu.
The Tone Control cannot be adjusted.
•
Use the Settings Menu
to activate the Tone Control
buttons or to adjust the sound.
It is not possible to select T position.
•
Use the Settings Menu to
activate the T position.
The unit is acting strangely.
•
Reset the unit to the factory
settings in the Settings Menu.
Humming occurs when connecting
the stereo cable while charging.
•
Only use the charger supplied,
BE9142.
Technical information
Power supply
Battery power:
Built-in lithium-ion battery , 3,7V 618 mAh,
type McNair MCP413048
CAUTION
Danger of explosion if battery is incorrectly replaced.
Replace only with the same or equivalent type.
Operating time, fully
charged:
18 hours (standard battery)
Charging time:
2.5 hours (standard battery)
Input signals
Microphone:
Built-in electric condenser microphones.
(omnidirectional or directional)
Line input:
2.5 mm stereo jack plug, sensitivity 0 dBV (maximum input signal)
Automatic selection between line input and external microphone
Telecoil:
Angled at 45° for optimal function horizontally
and vertically
Output signals
Headphone socket:
3.5 mm stereo jack plug
Output power headphone
socket:
100 mW at 16 Ω load
APP
Distortion:
BE9122 Headphones BE9124 In-ear phones
0.6% THD
0.08% THD
Dynamic range:
90 dB SNR (electrical)
Frequency range:
40-10,000 Hz (electrical)
Max. output level,
saturation:
BE9122 Headphones
BE9124 In-ear phones
BE9125 Stetoclip
124.3 dB SPL (@ 2.5 kHz)
132.0 dB SPL (@ 5 kHz)
133.7 dB SPL (@ 1 kHz)
119
Amplification, full volume
(1 kHz, 60 dB SPL input
signal):
BE9122 Headphones
BE9124 In-ear phones
BE9125 Stetoclip
42.5 dB
55.0 dB
58.2 dB
Amplification, full volume
(60 dB SPL input signal,
HFA):
BE9122 Headphones
BE9124 In-ear phones BE9125 Stetoclip
46.5 dB
51.5 dB
52.0 dB
Properties
120
Volume control:
9 increments of 5 dB
Tone control:
+/- 10 dB in 9 increments, cut-off frequency 1.6 kHz
On/Off button:
Clear, countersunk pushbutton
Microphone and T position:
Separate pushbuttons
Combined sound sources:
For mixing external sound and sound
from the internal microphone
Balance control
(right/left):
0-20 dB programmable reduction in increments
of 5 dB
Setting for max. volume:
0-21 dB programmable reduction in increments
of 3 dB
Bass Reduction setting:
Lowering of frequencies under 400 Hz by 10 dB
Dynamic compressor:
•
10 channels
•
Dynamic amplification 0-35 dB
•
Compression 3:1
•
Expansion 1:1.5
•
Attack time 20 ms <3kHz, 25 ms ≥3kHz
•
Recovery time 110 ms <3kHz, 200 ms ≥3kHz
Dynamic noise reduction:
10 channel adaptive noise reduction
Feedback handling:
Adaptive feedback reduction
Digital signal processing:
22,050 kHz sampling frequency
16-bit resolution in stereo
Additional information:
•
Stereo/Mono setting
•
Resetting to the factory setting
•
Casing designed to reduce contact noise
Additional information
For indoor use only.
External dimensions
H x W x D 99 x 48 x 22 mm
Weight
75 g
Colour:
Grey with white front panel and silver-coloured
buttons.
Regulatory requirements
CE, RoHS, WEEE, FCC, C-Tick
Accessories
BE9122 Stereo headphones
BE9124 In-ear phones
BE9125 Stetoclip
BE9126 Stereo cable kit, 5 m (16 feet)
BE9127 External microphone, 5 m (16 feet)
BE9128 Neck loop
BE9129 MicroSet
BE9143 USB car charger
BE9147 Travel case
BE1360 Scart switch
Measurements
Frequency range (acoustic) (BE9122 Headphones, BE9124 In-ear phones and
BE9125 Stetoclip):
APP
Preliminary measurements:
Output signal with BE9122,
Stereo headphones
Output signal with BE9125,
Stetoclip
Output signal with BE9124,
In-ear phones
121
FCC compliance statement
This device complies with Part 15 of the FCC Rules. Operation is subject to the following
two conditions: (1) this device may not cause harmful interference, and (2) this device
must accept any interference received, including interference that may cause undesired
operation.
Warning: Changes or modifications to this unit not expressly approved by the
party responsible for compliance could void the user’s authority to operate the
equipment.
Note: This equipment has been tested and found to comply with the limits for a
Class B digital device, pursuant to Part 15 of the FCC Rules. These limits are designed to provide reasonable protection against harmful interference in a residential
installation. This equipment generates, uses and can radiate radio frequency energy and, if not installed and used in accordance with the instructions, may cause
harmful interference to radio communications. However, there is no guarantee
that interference will not occur in a particular installation. If this equipment does
cause harmful interference to radio or television reception, which can be determined by turning the equipment off and on, the user is encouraged to try to correct
the interference by one or more of the following measures:
•
Reorient or relocate the receiving antenna.
•
Increase the separation between the equipment and receiver.
•
Connect the equipment into an outlet on a circuit different from that to which the
receiver is connected.
•
Consult the dealer or an experienced radio/TV technician for help.
Statement for Industry Canada
Le fonctionnement de cet équipement est soumis aux conditions suivantes:
(1) l’équipement concerné ne doit pas causer d’interférences, et (2) il doit accepter
toute interférence reçue, y compris les interférences risquant d’engendrer un
fonctionnement indésirable.
Cet appareil numérique de la classe B est conforme à la norme NMB-003 du Canada.
This Class B digital apparatus complies with Canadian ICES-003.
122
Accessories
ear phones
Travel case
Neck loop
These original accessories are especially
developed to maximize the performance of your Mino.
Contact your nearest dealer or visit:
www.bellman.com
MicroSet™
Headphones
Stetoclip
APP
EXT. MICROPHONE, 5 m, 16 ft
CABLE KIT, 5 m, 16 FT
USB car charger
123
Warranty conditons
Dear customer. Thank you for your purchase of this Bellman & Symfon® product.
Our vision is to supply outstanding products that are of great value for our
customers. For this reason, we have put all our best efforts into designing and
manufacturing this product. However, if you should have any questions about
the product or if you require repair, please contact us.
General warranty conditions. Your Bellman & Symfon® product is covered by a
limited warranty. Please read the following conditions carefully and keep this information in a safe place. Please also save your receipt or other proof of purchase
as you will need this for warranty claims.
Warranty period. The warranty is depending on the type of product purchased
and is valid from date of purchase.
Bellman & Symfon offers warranty as per below:
Bellman Products in general
Two years of warranty from date of purchase
Bellman Neckloop
One year of warranty from date of purchase
Rechargeable batteries
One year of warranty from date of purchase
Bellman Accessories
90 days of warranty from date of purchase
Warranty conditions. Bellman & Symfon warrants that the Product that you
have purchased is free from manufacturing defects in materials and workmanship when dispatched from our warehouse. Your sales receipt is your proof of
the date of purchase and the warranty period commences as of that date. During
the warranty period, Bellman & Symfon will have the option for the defective
product to be repaired or replaced. The replacement product will be of equal or
greater function and in good working and physical order. Such a replacement
will be supplied from refurbished stock. The repaired or replaced product will be
under warranty for the remainder of the original product’s warranty period.
Warranty limitations. This warranty automatically becomes void if the product
has been physically damaged or rendered defective (a) as a result of accident,
misuse, or abuse, or other circumstances beyond Bellman & Symfon’s control;
(b) by the use of parts or peripherals not authorized by Bellman & Symfon; (c) as
a result of normal wear and tear; (d) by use within an improper operating environment; (e) by modification of the product; (f) by the serial number or product
code sticker being removed or defaced; (g) as a result of service rendered by
anyone other than a Bellman & Symfon Authorized Service Agent; (h) as a result
of the product being operated other than in accordance with Bellman & Symfon
AB’s users manual. Neither does the warranty cover failure due to causes outside
Bellman & Symfon’s control such as failure in your phone carrier’s line service (if
applicable) or Acts of God. No warranty is offered for disposable batteries.
Return policies / warranty claim. Please see www.bellman.com/warranty
124