1
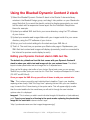
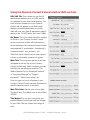
Blueball Design
Dynamic Content 2 Stack
Readme Manual v1.0
A unique responsive stack that dynamically populates and updates a content area
within the stack using a warehoused external XML flat text file and image files.
©2013 Blueball Design LLC USA • All Rights Reserved. • Page 1
The Blueball Dynamic Content 2 stack
allows anyone to update the content
within it dynamically without having to
open and edit the actual Rapidweaver
site file.
The Blueball Dynamic Content 2 stack offers a powerful
dynamic basic CMS functionality that’s very easy to setup
and use.
With the Dynamic Content stacks, we wanted to make it so any Rapidweaver user
could create an area on a Stacks 2 page in a Rapidweaver site whose content is
dynamically created and placed each time the page is loaded into a browser
window. This content is loaded from an easy-to-edit XML text file and images
warehoused that is on your hosting site’s server directory.
There’s no need for extra CMS solutions to be used, and the Dynamic Content 2
stack’s XML text file is very simple to set up, edit and upload into place! To update
your Dynamic Content 2 stack’s content, all you have to do is edit the XML text file
and add your images. This allows for any specified individual to update the content
area by editing the XML text file and adding images in from both Macs and PCs
using a simple text editor and the image editor of your choice.
The benefits of using the Dynamic Content 2 stack on your site.
• You can publish your Stacks page from within Rapidweaver without having to
worry about overwriting any CMS files!
• Anyone can update the Dynamic Content 2 stack’s content from any location.
Perfect for clients who want to update the one page on a regular basis.
• Does not require you to republish your site file to update the Dynamic Content 2
stack area.
• The Dynamic Content 2 stack is responsive by default so your content will
display great on smart phone and tablet devices with smaller screen sizes.
©2013 Blueball Design LLC USA • All Rights Reserved. • Page 2
What can you use the Dynamic Content 2 stack for?.
• Product specials
• Product listings
• Weekly or daily specials
• Upcoming events
• Real estate listings
• School events
• Classroom assignments
• And much more!
What’s Included In Your Blueball
Dynamic Content 2 Stack Download.
After downloading your file, double click on it to unzip your
Blueball Dynamic Contents 2 stacks folder.
Inside your Blueball_DynamicContent2_v1.0 folder you will find the Blueball
Dynamic Content 2 stack and the Blueball Dynamic Test 2 stack, 2 user manual
readme files (1 for each stack), 2 XML text files to get you started, and dcs_images
folder with 3 placeholder images in it to use with the Dynamic Content 2 stack.
©2013 Blueball Design LLC USA • All Rights Reserved. • Page 3
Table of contents
Blueball Dynamic Content 2 stack overview...................................................
Pg 2-3
What’s included with your Blueball Dynamic Content 2 stack download.........
Pg 3
Table of Contents...........................................................................................
Pg 4
Blueball Dynamic Content 2 stack installation.................................................
Pg 4
Rapidweaver and Stacks plugin requirements................................................
Pg 5
Browsers supported ......................................................................................
Pg 5
How to use the Blueball Dynamic Content 2 stack ........................................
Pg 6-11
Blueball Dynamic Content 2 stack FAQ .........................................................
Pg 12
License and usage details..............................................................................
Pg 13-14
Legalese stuff we have to include...................................................................
Pg 14
How to install your Blueball Dynamic
Content 2 stacks into Rapidweaver.
Installing your Blueball Dynamic Content 2 stack and
Blueball Dynamic Text 2 stacks into Rapidweaver just
requires a quick double click on each stack. That’s it.
If you are using the current versions of Rapidweaver 5+ and the Stacks 2 page
plugin, all you need to do is double click on each of the 2 Blueball Dynamic Content
2 stack files. They will then be automatically installed for you into Rapidweaver’s
Application Support folder into the Stacks folder within it. Then restart Rapidweaver
and your stacks will be available to use on your Stacks pages.
After installing your 2 Blueball Dynamic Content 2 stacks and restarting
Rapidweaver 5+, you’ll see the 2 stacks listed together in the Stacks 2
Elements library window under a group called “Blueball Design”, making it
easier to locate and select the Blueball Dynamic Content 2 and Blueball Dynamic
Text 2 stacks to use and drag onto your Stacks 2 page as you build your
Rapidweaver site pages.
©2013 Blueball Design LLC USA • All Rights Reserved. • Page 4
The Blueball Dynamic Content stacks
require the following Rapidweaver and
Stacks plugin versions
The Blueball Dynamic Content 2 stacks will only work with Stacks
plugin version 2.0 and above.
Recommend using Stacks version 2.1.13 and above for maximum
compatibility. Note that the Blueball Dynamic Content 2 stacks will not work with
Stacks v1.4.4.
Rapidweaver version that works with Stacks version 2.0+.
Recommend using Rapidweaver v5.3.1 and above for best results.
The Blueball Dynamic Content stacks
work with the following browsers:
Firefox
Safari
Chrome
Internet Explorer 8
Internet Explorer 9
Internet Explorer 10
Opera
Safari iOS
Android OS
©2013 Blueball Design LLC USA • All Rights Reserved. • Page 5
Using the Blueball Dynamic Content 2 stack
1) Select the Blueball Dynamic Content 2 stack in the Stacks 2 elements library
window in the Blueball Design group, and drag it into position on your Stacks site
page. Note that if you want the stack’s content to display responsively you must
use the stack with a responsive theme layout like the FreeStack Responsive
theme for example.
2) Upload your edited XML text file to your server directory using the FTP software
of your choice.
3) Upload your warehoused images folder with your images inside it to your server
directory using the FTP software of your choice.
4) Set up your hud control settings for the stack and your XML file url.
5) That’s it. The next time you preview your Stacks site page in Rapidweaver, your
XML file’s text content and images will display dynamically (must be connected to
the Internet for preview mode display to work).
Editing your Dynamic Content stack’s XML text file.
The default dcs_default.xml text file that comes with your Dynamic Content 2
stack is where you add in text and image urls for your various items. The default
layout includes placeholder text and image urls for 3 separate items.
Open up the file using a text editor of your choice. Some basic ones you can use are
TextEdit on your Mac (note you must use it in “Plain Text” mode) and Notepad for PC users
(DO NOT use MS Word!).
Once you open the XML file up you will see 4 items to add your content into:
Title - This is where you add in each individual item’s headline. Type in your headline
replacing where it says “Add Title Copy Here” replacing this text with your own headline
copy for each of the 3 items leaving in the quote marks. This will appear slightly smaller
than the main headline for the overall area you will add in through the user interface
options when it is displayed.
Imageurl - This is where you add in each individual image’s full absolute url (web address)
path. Type in your image’s url leaving in the quote marks replacing the placeholder
image url for each item instance where it says:
“http://yourdomainname.com/dcs-images/imagename.jpg”
©2013 Blueball Design LLC USA • All Rights Reserved. • Page 6
Description - This is where you add in each individual item’s description content. Basically
one paragraph of text that will appear under your item’s title. Type in your text replacing
the default “Lorem ipsum” placeholder description text with your own description
copy for each of the 3 items.
Note that you can add in html styling code like bold <b>, italic <i>, or <h1>, etc. into the
description text area and it will display correctly on your site page showing the html
formatting you have specified. You must use valid html code or you rtext may not display
correctly as expected.
Once you finishing adding in your copy (and html formatting) to the file, save it to your hard
drive giving it a unique name. Be sure you do not have any spaces in the file name.
Creating and adding your images to your Dynamic Content 2
Stack dcontent area.
We provide 3 placeholder images within the dcs_images folder. These images are 400px
wide by 250px tall. You will need to create 3 new images to use for your individual items in
your Dynamic Stacks 2 content area.
You MUST use at least 3 images or the same amount of images you have listed in your
XML text file associated with the Dynamic Content 2 stack, or it will not display correctly.
If you do not have any images then use the Dynamic Text 2 stack instead.
Using the image editor of your choice, (we recommend ones like Acorn, Pixelmator,
Imagewell, or Photoshop Elements) create 3 images from 100px to 400px in width or
wider if needed. Just make them no wider than the 100% size you want them to display to
begin with.
For the best display results, using identical sized images is required. Give each one of
them a unique name with no spaces in the name and save them optimizing them for web
use (we recommend saving them as a .jpg file), and drag them into the dcs_images folder.
Important to note! If you have multiple Dynamic Stack pages or multiple Dynamic Content
stacks on a single Stacks page in your site, you will need to create separate image files for
each stack or page that must all have unique image file names. They all need to be placed
into the dcs_images folder or a single folder with the name of your choice applied to it.
Note the name to use for your image url paths in your Dynamic Content 2 XML text file.
©2013 Blueball Design LLC USA • All Rights Reserved. • Page 7
Uploading your Dynamic Content 2 stack’s XML text file and
images folder to your server directory.
Once you have your XML text file edited and saved using a unique name, it’s time to
upload the file to your server directory.
If your Dynamic Content 2 stack’s XML text file is uploaded to the main root level
of your site’s server directory, then the link for it might look something like this
example:
http://yourdomainname.com/dcs_default.xml
If your Dynamic Content 2 stack’s XML text file is uploaded into a page’s sub
folder on your site’s server directory, then the link for it might look something like this:
http://yourdomainname.com/productspecials/dcs_default.xml
This reflects the XML text file being placed into a folder named productspecials in your
server directory’s root level.
To keep things simple, we recommend uploading your XML text file into the root
level on your server directory, i.e. where your index.html home page file is located
in.
The dcs_images folder must also be uploaded to the same main root level.
Once you decide on the location to place your XML text file and image folders into, use a
FTP program like Cyberduck (free download), Transmit, YummyFTP, Fetch, etc. to log into
your server and upload it into position.
You can set this up for your client to use so that it points to the location where the file is to
be uploaded. Then all they have to do is log in, and drag and drop the updated XML text
file and any images into position on the server directory replacing the ones currently there.
©2013 Blueball Design LLC USA • All Rights Reserved. • Page 8
Using the Dynamic Content 2 stack’s built-in HUD controls.
URL XML File: This is where you put the full
absolute web address url to your XML text file
you uploaded to your site’s server directory. You
must use the complete url or your Dynamic
Content will not appear in your Stack area!
Replace the default placeholder url currently
there with your own. See url examples in page 8
above to use. DO NOT add in the “www” prefix!
Div Name: This is the name that will be created
for the div in your Dynamic Content 2 stack
where your actual content will be placed into.
Some examples of div names are shown below:
winterspecials01, productsale1, homelisting01,
homeworkweek2, dcs_contentv1, etc.
*Note that the div names cannot have a space
in them or use special characters or glyphs.
Main Title: This is the main title line of text that
will appear at the very top of your Dynamic
Content 2 stack area. Add in whatever you want
the title to be, something as simple as “This
Week’s Specials On Our All Natural Products!”
or “Upcoming Meetings” or “Tonight’s
Homework”, “New Home Listings”, etc.
How you type it is how it will appear in your
Dynamic Content 2 stack div area. Spaces and
special characters are ok to use here.
Main Title Color: Set the color of your Main
Title line of text. The default color is set to Black
000000.
Title Weight: Pop up menu control lets you
choose between normal and bold font weights
for your Main Title text. Default font weight is
bold.
©2013 Blueball Design LLC USA • All Rights Reserved. • Page 9
Title Align: Pop up menu control lets you choose between left, right, and center alignment
for your Main Title text. Default is Left Align.
Title Size: Use the slider control to enlarge or reduce the default Main Title font size.
Default is 2.3em. Font sizes are 0em to 8em.
Title Line Height: Slider control allows you to set the Main Title line height from 0em to
5em. Default Main Title line height is 1.2em.
Sub Title Color: Set the color of your Sub Title(s) text. The default color is set to Black
000000.
Sub Title Weight: Pop up menu control lets you choose between normal and bold font
weights for your Sub Title text. Default font weight is bold.
Sub Title Size: Use the slider control to enlarge or reduce the default Main Title font size.
Default is 2.3em. Font sizes are 0em to 8em.
Sub Title Height: Slider control allows you to set the Sub Title line height from 0em to
5em. Default Sub Title line height is 1em.
Paragraph Text Color: Set the color of your paragraph text. The default color is set to
Black 000000.
Paragraph Size: Use the slider control to enlarge or reduce the default Paragraph font
size. Default is 1em. Font sizes are 0em to 5em.
Paragraph Line Height: Slider control allows you to set the Paragraph text line height
from 0em to 5em. Default Paragraph text line height is 1.2em.
Mobile Layout Settings.
Mobile Breakpoint: Slider control allows you to set the breakpoint width your Dynamic
Content 2 stack’ content’s responsive mobile layout will display at on a tablet or
smartphone. Default is set to 600px.
Mobile Title Size: Use the slider control to enlarge or reduce the mobile layout default
Main Title font size when displayed on a smart phone screen. Default is 1.8em.
Mobile Image Width: Use the slider control to set the percentage width that your images
will display at on the mobile layout. Default is set to 100%.
Mobile Sub Title Size: Use the slider control to enlarge or reduce the mobile layout
default Sub Title font size when displayed on a smart phone screen. Default is 1.3em.
Mobile Paragraph Size: Use the slider control to enlarge or reduce the mobile layout
default Paragraph font size when displayed on a smart phone screen. Default is 1em.
©2013 Blueball Design LLC USA • All Rights Reserved. • Page 10
Previewing your Dynamic Content 2 stack page in
Rapidweaver.
To preview your page within the Rapidweaver work window, you must do the
following first:
•
Upload your XML text file and warehoused images folder to your server directory.
•
In the Dynamic Content 2 Stacks page inspector window make sure you have the
“Render HTML in Edit mode” box checked.
•
Make sure you enter all your information correctly into the user interface options,
especially the url to the XML text file.
•
The Mac you are working on with Rapidweaver must be connected to the Internet.
That’s it. Now your Dynamic Content 2 stack will preview in Rapidweaver for you like any
other stack on a Rapidweaver Stacks page showing your dynamically generated content
live.
Publishing your Dynamic Content 2 site page.
The great thing about the Dynamic Content 2 stack is that you can publish your
entire Rapidweaver site again and again, including your Dynamic Content 2 site
page, without having to worry about overwriting any files. Since your Dynamic
Content 2 stack is using external file sources outside your Rapidweaver site files to
generate it’s content with dynamically, there is nothing for Rapidweaver to overwrite when
it publishes your site files to your server.
Since your XML text file is edited and uploaded separately along with your images folder,
there’s no possibility of them being overwritten by Rapidweaver. This is the perfect
solution for any Rapidweaver users and /or their clients who don’t want to have
to go through the hassle of republishing their site from within Rapidweaver when
they update just one or two site pages. Now you can do it by editing a simple XML
text file and your images, and uploading the updated XML text file and images to the
server directory from any Mac or PC.
©2013 Blueball Design LLC USA • All Rights Reserved. • Page 11
Blueball Dynamic Content 2 stack FAQs
and answers.
FAQ: What browsers does the Dynamic Content 2 stack support?
Answer: All modern browsers! The great thing about this stack is that it
worked perfectly with every modern browser we tested it with.
This includes Safari, Firefox, Chrome, Opera, IE7, IE8, IE9, IE10, and iOS and
Android browsers.
FAQ: Can I have more than 1 Dynamic Content 2 stack page in my site?
Answer: Yes! You can have as many Dynamic Content 2 stacks or
Dynamic Text 2 Stacks site pages as you want in your Rapidweaver site,
but each page’s Dynamic Content stack’s div name and XML text file name
must be unique! As long as the file names are not the same, your individual
Dynamic Content 2 stacks and Dynamic Text 2 Stacks site pages will display
correctly.
FAQ: Will my Dynamic Content 2 XML file and image files be overwritten
when I republish my Rapidweaver site files?
Answer: NO! That’s the beauty of this stack. Since the Dynamic Content 2 stack
uses an external XML text file and a warehoused images folder to dynamically
populate the div with its content in the Dynamic Content 2 custom named div area,
nothing can be overwritten when any Rapidweaver site files are republished.
FAQ: My XML text file copy and images content is not appearing in my
Dynamic Content 2 Stack on my Stacks site page?
Answer: This could be caused by several things and is easy to fix. First,
make sure you have your XML text file and images folder uploaded to your server
directory. Second, make sure your XML File URL is listed correctly in the Dynamic
Content 2 stack’s hud control field and is using the full absolute url path (see top of
page 9 for more details) to the XML text file on your server. An example of a full
absolute url would be this: http://yourdomainname.com/dcs_default.xml
Also make sure that the individual Image urls are correct and use full absolute url
paths too or your content will not display correctly.
©2013 Blueball Design LLC USA • All Rights Reserved. • Page 12
Blueball Dynamic Content 2 Stack License
and Usage details.
Attention Designers:
Please read this Usage License before incorporating any part of the Blueball Dynamic
Content 2 and Dynamic Text 2 stacks into your Rapidweaver site. By Incorporating any
part of the Blueball Dynamic Content 2 and Dynamic Text 2 stacks in your own work, you
are agreeing to be bound by the terms of this license listed below.
Licensing and Usage Rights:
These Rapidweaver stacks were created by the designers at blueballdesign.com
and is copyright 2013 by Blueball Design LLC, USA and Charles Lockhart with all
rights reserved. You are licensed to use the Blueball Dynamic Content 2 and Dynamic
Text 2 stacks for your personal or business Rapidweaver site needs.
**NOTE: If you are a website designer you only have to purchase the Blueball
Dynamic Content 2 and Dynamic Text 2 stacks once and you can use it as often
as you like, but if you have clients that want to use the Blueball Dynamic Content
2 and Dynamic Text 2 stacks to maintain and update their web site after you
release it to them, then you will need to purchase an additional copy for them too.
Theme and Stack Usage Restrictions:
Our Rapidweaver themes, style sheets, images, stacks, and related files may not
be resold, distributed or added to any type of digital collection by any means
whatsoever. They may not be offered for download or use from any website nor placed
online for promotional purposes whatsoever. Each Blueball Rapidweaver theme template
and stack must be used as supplied for its original intended purpose. This simply means
you may not select images or code from our Blueball Rapidweaver themes and stacks, or
style sheets to add to another application, theme, or stack, nor port our themes and
stacks for use with another application.
Image Credits and Usage:
Photo and Image Credits (headers, background images, navigation buttons, and other
graphics used by CSS): All images were created by blueballdesign.com designers or were
open source images that were downloaded and edited in Photoshop by Blueball Design
designers. Images, photos and graphics in our Rapidweaver themes and stacks may not
be used anywhere other than in sites developed from the Rapidweaver themes and stacks
you have purchased from Blueball Design.
©2013 Blueball Design LLC USA • All Rights Reserved. • Page 13
Liability Limitations:
BlueballDesign.com Rapidweaver themes and stacks are provided "as is" without warranty
above and beyond updates, bug fixes or repairs. You may alter the appearance of the
theme and/or stack, or its graphics, but only for your personal use. If you customize a
Blueball Design theme or stack for a client, you must purchase an additional
Blueball theme or stack for your client if they plan to maintain their site
themselves before passing the customized Blueball Design Rapidweaver theme
and/or stack on to them for future use. Any modifications are at the sole risk of the
user and BlueballDesign.com does not guarantee the performance of any Blueball
Rapidweaver theme template or stack, and its files which have been altered or modified.
We also can not provide support for modified Blueball Design Rapidweaver themes and
stacks, or graphics. You are solely responsible for adding or editing your
Rapidweaver website's content. We do not provide training for Rapidweaver or the
Stacks page plugin.
Legalese Fine Print:
1. The CSS in this theme and stacks are the creative work of Blueball Design,
blueballdesign.com, and it's designers. Redistribution of this Rapidweaver theme template
and stacks is strictly prohibited.
2. All theme and stacks files including but not limited to CSS files, images files and
javascript are Copyright © 2013 blueballdesign.com, and Blueball Design LLC USA.
3. UNLESS OTHERWISE AGREED TO BY THE PARTIES IN WRITING, THIS DESIGN IS
OFFERED BY THE COPYRIGHT HOLDER AS-IS, AND ANY REPRESENTATIONS OR
WARRANTIES OF ANY KIND CONCERNING THE MATERIALS, EXPRESS, IMPLIED,
STATUTORY, OR OTHERWISE, INCLUDING, WITHOUT LIMITATION, WARRANTIES OF
TITLE, MERCHANTABILITY, FITNESS FOR A PARTICULAR PURPOSE,
NONINFRINGEMENT, OR THE ABSENCE OF LATENT OR OTHER DEFECTS,
ACCURACY, OR THE PRESENCE OR ABSENCE OF ERRORS, WHETHER OR NOT
DISCOVERABLE, ARE DISCLAIMED.
4. EXCEPT TO THE EXTENT REQUIRED BY APPLICABLE LAW, IN NO EVENT WILL THE
COPYRIGHT HOLDER BE LIABLE ON ANY LEGAL THEORY FOR ANY SPECIAL,
INCIDENTAL, CONSEQUENTIAL, PUNITIVE, OR EXEMPLARY DAMAGES ARISING OUT
OF THIS LICENSE OR THE USE OF THIS THEME OR STACKS, EVEN IF THE
COPYRIGHT HOLDER HAS BEEN ADVISED OF THE POSSIBILITY OF SUCH DAMAGES.
©2013 Blueball Design LLC USA • All Rights Reserved. • Page 14