1
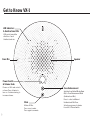
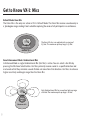
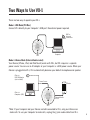
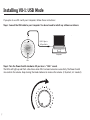
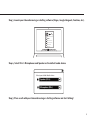
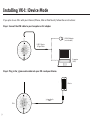
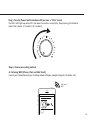
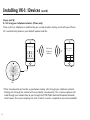
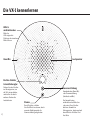
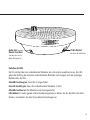
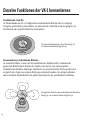
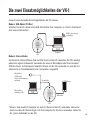
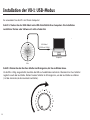
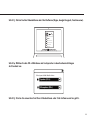
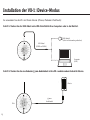
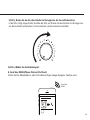
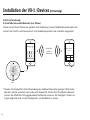
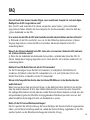
VX-1 Internet Conference Station
User Manual
Benutzerhandbuch
說明書
说明书
1
Languages
English User Manual...................................................................................................... 1
Deutsch Benutzerhandbuch.......................................................................................... 15
繁體中文說明書........................................................................................................ 29
简体中文说明书........................................................................................................... 43
Table of Contents
The Basics.......................................................................................................................2
Get to Know VX-1............................................................................................................ 3
Get to Know VX-1: Mics................................................................................................... 5
Two Ways to Use VX-1 ................................................................................................... 6
Installing VX-1: USB Mode............................................................................................... 7
Installing VX-1: iDevice Mode.......................................................................................... 9
FAQ.............................................................................................................................. 12
Troubleshooting............................................................................................................ 13
Specifications................................................................................................................ 14
1
The Basics
The IPEVO VX-1 Internet Conference Station provides a high-quality, fuss-free teleconferencing
experience. Hear and be heard clearly without the hassle of installing drivers and extra software.
Simply plug in your computer or iDevice (iPhone, iPad, or iPod Touch) and launch your preferred
conferencing software.
VX-1 has been designed and engineered specifically to receive and transmit human voices.
When in action, VX-1 utilizes built-in noise reduction, echo cancellation technology and audio
enhancement to clarify and smooth voices.
VX-1 is equipped with a total of five high-definition microphones: one Omnidirectional Mic (Omni
Mic) and four Unidirectional Mics. You can choose to capture the whole conversation using the
Omni Mic or choose just a few people by selecting a specific Unidirectional Mic.
2
Get to Know VX-1
LED Indicators
& Unidirectional Mic
LEDs point toward the
direction of each
Unidirectional mic.
Omni Mic
Speaker
Power Switch
& Volume Knob
Powers on VX-1 and controls
volume. Turn clockwise to
turn on. Continue turning to
increase volume.
Zone Enhancement
Switches from Default Mode (Omni
Mic) to Zone Enhancement Mode
(Unidirectional Mic).
Mute
Mutes all Mics.
Press once to mute.
Press again to unmute.
3
Press to select a different
Unidirectional Mic/Zone.
Selection progresses clockwise
from left of Power Switch.
Audio Jack/
iDevice Port
Use this port to connect
your iDevice to VX-1.
PC/AC Adapter Port
Connect the USB cable
to this port.
LED Behavior
VX-1 has four Unidirectional mics that can be selected individually. The LEDs point toward the
direction of each Unidirectional microphone. LEDs also indicate the current status of VX-1.
All Green: Omni Mic on.
Single Green: One Unidirectional Mic active.
All Red: All Mics are muted.
Flashing: VX-1 is processing and thinking. Wait till LEDs stop flashing to continue use.
4
Get to Know VX-1: Mics
Default Mode: Omni Mic
The Omni Mic is the only mic active in VX-1’s Default Mode. The Omni Mic receives sound evenly in
a 360-degree range, making it best suited for capturing the voices of all participants in a conference.
Optimal 6.5 ft.
The Omni Mic has a an optimal pick-up range of
6.5 feet. The maximum pick-up range is 13 feet.
Maximum 13 ft.
Zone Enhancement Mode: Unidirectional Mics
In Enhanced Mode a single Unidirectional Mic (Uni Mic) is active. You can select a Uni Mic by
pressing the Mic Zone Select button. Uni Mics primarily receive sound in a specific direction and
are tuned so that they minimize sounds that do not come from that direction. Uni Mics also have a
higher sensitivity and longer range than the Omni Mic.
Each Unidirectional Mic has an optimal pick-up range
of 10 feet. The maximum pick-up range is 16 feet.
Optimal
10 ft.
Maximum 16 ft.
5
Two Ways to Use VX-1
There are two ways to operate your VX-1.
Mode 1: USB Mode (PC/Mac)
Connect VX-1 directly to your Computer’s USB port. No external power required.
WiFi or
Internet
Connection
Computer
VX-1
Mode 2: iDevice Mode (External Audio in/out)
Your iDevice (iPhone, iPad, and iPod Touch) works with VX-1, but VX-1 requires a separate
power source. You can use an AC adapter or your Computer as a USB power source. When your
iDevice is plugged into VX-1, VX-1 automatically becomes your default microphone and speaker.
Choice 1:
USB AC Adapter
(not included)
Power Source
iDevice
Choice 2:
Computer (USB)
External Audio
in/out
VX-1
*Note: If your Computer and your iDevice are both connected to VX-1, only your iDevice can
make calls. To use your Computer to make calls, unplug the 3.5mm audio cable from VX-1.
6
Installing VX-1: USB Mode
If you plan to use VX-1 with your Computer, follow these instructions:
Step 1: Connect the USB cable to your Computer. You do not need to install any software or drivers.
USB B-Type to
A-Type Cable
Computer
VX-1
Step 2: Turn the Power Switch clockwise till you hear a “Click” sound.
The LEDs will light up and flash a few times when VX-1 has been turned on successfully. The Power Switch
also controls the volume. Keep turning the knob clockwise to increase the volume (1= Quietest, 10= Loudest).
7
Step 3: Launch your teleconferencing or chatting software (Skype, Google Hangouts, Facetime, etc.).
Step 4: Select VX-1’s Microphones and Speaker as the default audio device.
Select your default Audio device:
Speaker (VX-1)
Microphone (VX-1)
Step 5: Place a call with your teleconferencing or chatting software and start talking!
8
Installing VX-1: iDevice Mode
If you plan to use VX-1 with your iDevice (iPhone, iPad or iPod Touch), follow these instructions:
Step 1: Connect the USB cable to your Computer or AC adapter.
USB AC Adapter
(not included)
USB B-Type to
A-Type Cable
Computer
(USB)
VX-1
Step 2: Plug in the 3.5mm audio cable into your VX-1 and your iDevice.
iDevice
3.5mm Audio
Cable
VX-1
9
Step 3: Turn the Power Switch clockwise till you hear a “Click” sound.
The LEDs will light up when VX-1 has been turned on successfully. Keep turning the knob to
adjust the volume (1= Quietest, 10= Loudest).
Step 4: Choose your calling method.
A. Call using WiFi (iPhone, iPad, and iPod Touch)
Launch your teleconferencing or chatting software (Skype, Google Hangouts, Facetime, etc.).
Call using
WiFi
10
Installing VX-1: iDevices (cont’d)
Step 4 (cont’d):
B. Call using your Cellphone network. (iPhone only)
Place a call to a cellphone or landline like you usually do when making a call with your iPhone.
VX-1 automatically becomes your default Speaker and Mic.
(408)-490-30 5
Office
Call using
Cellphone
Network
(408)-123-456
Sunnyvale, CA
VX-1
*Note: Sound quality will not be as good when making calls through your cellphone network.
Making calls through the internet will ensure better sound quality. This is because phone calls
made through your network have to pass through the PTSN (Public Switched Telephone Network)
which lowers the sound sampling rate (rate at which sound is sampled) to conserve bandwidth.
11
FAQ
If my Computer and iDevice are both plugged into VX-1, can I make calls using my Computer?
No. VX-1 will automatically switch to your iDevice if you have plugged in the 3.5mm audio cable. If
you wish to use your Computer to make calls please unplug the 3.5mm audio cable from VX-1.
When powering on VX-1 the LEDs flash a few times and stop. Is this normal?
Yes. When VX-1 powers on it has to communicate internally with 3 IC chips. When it has finished
communicating the blinking will stop, at this moment in time VX-1 is then ready to be used.
When I plug in or remove the 3.5mm audio cable from VX-1, the LEDs flash a few times before
stopping. Is this normal?
Yes. When you plug in or remove the audio cable, VX-1 switches modes to either load/unload your
iDevice. Once loading/unloading is complete the LEDs will stop flashing and VX-1 is ready to go.
What type of USB AC adapter can I use with VX-1?
VX-1 needs an adapter with a rating of at least 5V/500mA. As long as your AC adapter’s rating is the
same or more (e.g. 5V/1A, 5V/2.1A) it is compatible with VX-1. If you have an iDevice, your iDevice AC
adapter is also compatible with VX-1.
Why is the sound quality better when making calls using the internet/WiFi versus making calls using a
cellphone network?
When you use the internet to make a call the sound sampling rate is higher (16k Hz) than when you
make a call using a cellphone network (8K Hz). This is why sound quality is better when you call
using the internet. The reason for the low sampling rate is because when you make a call through
your cellphone network it passes through the Public Switched Telephone Network (PSTN) to save
bandwidth PTSN lowers the sampling rate.
Does VX-1 remember my Mic settings?
VX-1 will remember which Mic setting was selected before you pressed mute and will revert to the
previous setting when you unmute. However, VX-1 will only remember your mic settings for the
current session.
12
Troubleshooting
I cannot see or select VX-1 as my active speaker/microphone in my conferencing software (PC/Mac only).
1. VX-1 is not turned on. Please check to see VX-1 has been turned on properly (LEDs should be lit up).
Turn the green knob clockwise to power on VX-1.
2. The 3.5mm- audio cable is plugged in. Please unplug the audio cable. Your computer will not be
able to detect VX-1 if the audio cable has been plugged in.
3. The USB Cable is loose or not connected. Please make sure the USB cable has been plugged in securely.
No sound is coming from the speaker.
1. The speaker is on mute. Please check your Computer or iDevice settings to make sure you have not
selected mute.
2. The person you are calling has their microphone on mute. Please ask them to unmute their microphone.
3. The speaker volume is too low. Please increase the volume. You can do this by turning the Green
knob clockwise or by adjusting the volume on your Computer/iDevice.
4. The person you are calling has their microphone sensitivity set too low. Please ask them to set
their microphone sensitivity to high.
5. Make sure you have selected VX-1’s speaker as the active speaker in your software or application
(PC/Mac only).
The person I am calling cannot hear me.
1. Your microphone is set to mute. If the LED indicators on VX-1 are red then your Microphones are
currently muted. Press the red mute button to unmute. If the indicators are green please check to
see that your microphone has not been muted on your iDevice or Computer.
2. The person you are calling has set their speaker on mute. Please ask them to unmute their speaker.
3. The person you are calling has set their speaker volume too low. Please ask them to increase the
speaker volume.
4. Make sure you have selected VX-1’s microphone as the active microphone in your software or
application (PC/Mac only).
5. Your microphone sensitivity is set too low. Please adjust the microphone sensitivity to high. VX-1’s
default microphone sensitivity is set to high, so you should only need to adjust sensitivity if you
have adjusted it before (PC/Mac only).
13
Specifications
Input and Output:
Type B USB Connector x 1
• Interface : Type B USB 2.0 Full-Speed (Compatible with USB 1.1)
• Power Supply : USB bus-powered (5V / 500mA)
• Max. Power Consumption : 2.5 W
3.5mm Stereo Headphone Jack x 1
Microphones
• High Sensitivity Omnidirectional Microphone x 1
• High Sensitivity Unidirectional Microphone x 4
• Frequency bandwidth : 50 ~ 20,000 Hz
Speaker
• Frequency bandwidth : 20 ~ 20,000 Hz
Size and Weight
Dimensions (Ø x H): Ø188 x 50mm/ Ø7.4 x 2.0inches
Weight : 17ozs/480g
Operating System
Windows XP/Vista/7/8
Mac OSX 10.5 and up
141
Inhalt
Überblick...................................................................................................................... 16
Die VX-1 kennenlernen.................................................................................................. 17
Einzelne Funktionen der VX-1 kennenlernen.................................................................. 19
Die zwei Einsatzmöglichkeiten der VX-1......................................................................... 20
Installation der VX-1: USB-Modus.................................................................................. 21
Installation der VX-1: iDevice-Modus............................................................................. 23
FAQ.............................................................................................................................. 26
Fehlersuche.................................................................................................................. 27
Technische Daten.......................................................................................................... 28
15
Überblick
Mit der IPEVO VX-1 Internet Conference Station können Sie unkompliziert und ohne Abstriche
bei der Ton- und Klangqualität Videotelefonkonferenzen durchführen. Sie brauchen keine
Treiber und Zusatzsoftware zu installieren. Schließen Sie die VX-1 einfach an Ihren Computer
oder Ihr Apple-Mobilgerät (iPhone, iPad oder iPod Touch) an und starten Sie Ihre bevorzugte
Videotelefoniesoftware.
Die VX-1 wurde speziell für dem Empfang und die Übertragung der menschlichen
Stimme entwickelt. Die VX-1 verfügt über eine integrierte Nebengeräuschunterdrückung,
Echoauslöschung und Klangverstärkung für klare und glatte Stimmen.
Die VX-1 ist mit insgesamt fünf HD-Mikrofonen ausgestattet – einem omnidirektionalen (Omni
Mic) und vier unidirektionalen Mikrofonen. Nehmen Sie mit Omni Mic alle Teilnehmer einer
Unterhaltung auf oder mit einem der unidirektionalen Mikrofone nur bestimmte Personen.
16
Die VX-1 kennenlernen
LEDs &
unidirektionales
Mikrofon
LEDs zeigen die
Richtung der einzelnen
Mikrofone an
Omni Mic
Lautsprecher
Ein/Aus-Schalter
& Lautstärkeregler
Drehen Sie den Schalter
im Uhrzeigersinn, um
die VX-1 einzuschalten,
und stellen Sie durch
weiteres Drehen die
Lautstärke ein
17
Zonenverstärkung
Standardmodus (Omni Mic)
oder Zonenverstärkung
(Unidirectional Mic)
Stumm
Durch Drücken schalten
Sie alle Mikrofone stumm, durch
erneutes Betätigen wird die
Stummschaltung aufgehoben
Zur Auswahl eines
unidirektionalen Mikrofons
oder einer Zone Schalter
drücken. Auswahl im
Uhrzeugersinn, beginnend mit
dem Mikrofon links der Ein-/
Aus-Taste
Audio Jack/
iDevice- Anschluss
PC/AC-Netzteil
Anschluss für USB-Kabel
Schließen Sie hier Ihr
Apple-Mobilgerät an
Verhalten der LEDs
Die VX-1 verfügt über vier unidirektionale Mikrofone, die sich einzeln auswählen lassen. Die LEDs
geben die Richtung der einzelnen unidirektionalen Mikrofone an Sie zeigen auch den jeweiligen
Betriebsstatus der VX-1.
Alle LEDs leuchten grün: Omni Mic ist eingeschaltet
Eine LED leuchtet grün: Eines der unidirektionalen Mikrofone ist aktiv
Alle LEDs leuchten rot: Alle Mikrofone sind stummgeschaltet
LEDs blinken: Es laufen gerade interne Verarbeitungsprozesse. Warten Sie, bis die LEDs nicht mehr
blinken, und nehmen Sie dann Ihre weiteren Einstellungen vor
18
Einzelne Funktionen der VX-1 kennenlernen
Standardmodus: Omni Mic
Im Standardmodus der VX-1 ist lediglich das omnidirektionale Mikrofon aktiv. Es empfängt
Tonsignale gleichmäßig in einem Radius von 360 Grad und ist deshalb am besten geeignet, um
die Stimmen aller Gesprächsteilnehmer aufzunehmen.
Optimal 2m
Die optimale Reichweite des Omni Mic beträgt 2m.
Die maximale Reichweite liegt bei 4m.
Maximal 4m
Zonenerweiterung: Unidirektionale Mikrofone
Im erweiterten Modus ist eines der fünf unidirektionalen Mikrofone aktiv. Sie können das
gewünschte Mikrofon durch Drücken des Knopfes unter der Ein-/Aus-Taste auswählen.
Unidirektionale Mikrofone empfangen Schallwellen aus einer bestimmten Richtung und sind so
eingestellt, dass Signale aus anderen Richtungen unterdrückt werden. Sie verfügen außerdem
über eine höhere Empfindlichkeit und größere Reichweite als das omnidirektionale Mikrofon.
Der optimale Abstand zu den unidirektionalen Mikrofonen
beträgt 3m, der maximale Abstand liegt bei 5m.
Optimal
3m
Maximal 5m
19
Die zwei Einsatzmöglichkeiten der VX-1
Lernen Sie nun die beiden Einsatzmöglichkeiten der VX-1 kennen.
Modus 1: USB-Modus (PC/Mac)
Schließen Sie die VX-1 direkt an die USB-Schnittstelle Ihres Computers an. Die VX-1 funktioniert
ohne externe Stromzufuhr.
WLAN- oder Internetverbindung
Computer
VX-1
Modus 2: iDevice-Modus
Sie können Ihr iDevice (iPhone, iPad und iPod Touch) mit der VX-1 benutzen. Die VX-1 benötigt
jedoch eine eigene Stromquelle. Verwenden Sie einen AC-Netzadapter oder Ihren Computer
(USB-Anschluss) als Stromquelle. Sobald Ihr iDevice mit der VX-1 verbunden ist, wird die VX-1
automatisch als Standardmikrofon und -lautsprecher ausgewählt
Möglichkeit 1:
USB-Netzteil
(nicht im Lieferumfang
enthalten)
Stromquelle
iDevice
Möglichkeit 2:
Computer (USB)
AUX-Kabel
VX-1
*Hinweis: Sind sowohl Ihr Computer als auch Ihr iDevice mit der VX-1 verbunden, können Sie
Anrufe nur über das iDevice tätigen. Um Ihren Computer für Anrufe zu verwenden, ziehen Sie
das 3.5mm-Audiokabel aus der VX-1.
20
Installation der VX-1: USB-Modus
So verwenden Sie die VX-1 mit Ihrem Computer:
Schritt 1: Stecken Sie das USB-Kabel in die USB-Schnittstelle Ihres Computers. Die Installation
zusätzlicher Treiber oder Software ist nicht erforderlich.
USB-Kabel
(USB B auf USB A)
Computer
VX-1
Schritt 2: Drehen Sie den Ein-/Aus-Schalter im Uhrzeigersinn, bis Sie ein Klicken hören.
Ist die VX-1 richtig eingeschaltet, leuchten die LEDs auf und blinken mehrmals. Über den Ein-/Aus-Schalter
regeln Sie auch die Lautstärke. Drehen Sie den Schalter im Uhrzeigersinn, um die Lautstärke zu erhöhen
(1 ist die minimale ,10 die maximale Lautstärke).
21
Schritt 3: Starten Sie Ihre Videotelefonie oder Chat-Software (Skype, Google Hangouts, Facetime usw.).
Schritt 4: Wählen Sie die VX-1-Mikrofone und Lautsprecher in den Audioeinstellungen
als Standard aus.
Select your default Audio device:
Speaker (VX-1)
Microphone (VX-1)
Schritt 5: Starten Sie einen Anruf mit Ihrer Videotelefonie oder Chat-Software und los geht’s.
22
Installation der VX-1: iDevice-Modus
So verwenden Sie die VX-1 mit Ihrem iDevice (iPhone, iPad oder iPod Touch):
Schritt 1: Stecken Sie das USB-Kabel in die USB-Schnittstelle Ihres Computers oder in das Netzteil.
USB-Netzteil
(nicht im Lieferumfang enthalten)
USB-Kabel
(USB B auf USB A)
Computer
(USB)
VX-1
Schritt 2: Stecken Sie das eine Ende des 3,5mm-Audiokabels in Ihre VX-1 und das andere Ende in Ihr iDevice.
iDevice
3,5mmAudiokabel
VX-1
23
Schritt 3: Drehen Sie den Ein-/Aus-Schalter im Uhrzeigersinn, bis Sie ein Klicken hören.
Ist die VX-1 richtig eingeschaltet, leuchten die LEDs auf. Drehen Sie den Schalter im Uhrzeigersinn,
um die Lautstärke einzustellen (1 ist die minimale ,10 die maximale Lautstärke).
Schritt 4: Wählen Sie die Verbindungsart.
A. Anruf über WLAN (iPhone, iPad und iPod Touch)
Starten Sie Ihre Videotelefonie- oder Chat-Software (Skype, Google Hangouts, Facetime usw.).
Anruf über
WLAN
24
Installation der VX-1: iDevices (Fortsetzung)
Schritt 4 (Fortsetzung):
B. Anruf über das mobile Datennetz (nur iPhone)
Stellen Sie mit Ihrem iPhone wie gewohnt eine Verbindung zu einer Mobilfunknummer oder zum
Festnetz her. Die VX-1 wird automatisch als Standardlautsprecher und -mikrofon ausgewählt.
(408)-490-30 5
Office
Anruf über
mobiles
Datennetz
(408)-123-456
Sunnyvale, CA
VX-1
*Hinweis: Die Tonqualität ist bei Verwendung des mobilen Datennetzes geringer. Mit Anrufen
über das Internet erreichen Sie eine bessere Tonqualität. Anrufe über Ihr mobiles Datennetz
müssen das öffentliche leitungsgebundene Telefonnetz passieren. Die Häufigkeit, mit der ein
Signal abgetastet wird, ist dort herabgesetzt, um Bandbreite zu sparen.
25
FAQ
Kann ich Anrufe über meinen Computer tätigen, wenn sowohl mein Computer als auch mein AppleMobilgerät an die VX-1 angeschlossen sind?
Nein. Die VX-1 wird automatisch Ihr iDevice ansprechen, wenn Sie das 3,5mm-Audiokabel
angeschlossen haben. Möchten Sie Ihren Computer für Anrufe verwenden, ziehen Sie bitte das
3,5mm-Audiokabel aus der VX-1.
Ist es normal, dass die LEDs der VX-1 beim Einschalten zunächst mehrmals blinken und dann nicht mehr?
Ja. Während sich die VX-1 einschaltet, muss sie mit drei Mikrochips kommunizieren. Ist dieser
Vorgang abgeschlossen, hören die LEDs auf zu blinken. Ab diesem Zeitpunkt ist die VX-1
verwendungsbereit.
Wenn ich das 3,5mm-Audiokabel in die VX-1 stecke oder es herausziehe, blinken die LEDs mehrmals
auf. Ist dieses Verhalten normal?
Ja. Wenn Sie das Audiokabel einstecken oder herausziehen, verbindet oder trennt die VX-1 Ihr
iDevice. Sobald dieser Vorgang abgeschlossen ist, hören die LEDs auf zu blinken und die VX-1 ist
verwendungsbereit.
Welche Art von USB-Netzteil kann ich mit der VX-1 verwenden?
Für die VX-1 benötigen Sie ein Netzteil mit mindestens 5V und 500mA. Alle Netzteile mit
mindestens 5V/500mA sind mit der VX-1 kompatibel, also z. B. auch 5V/1A oder 5V/2,1A. Das
Netzteil Ihres iDevice ist ebenfalls mit der VX-1 kompatibel.
Warum ist die Tonqualität bei Anrufen über das Internet/WLAN besser als bei Anrufen über das
mobile Datennetz?
Wenn Sie einen Anruf über das Internet tätigen, ist die Abtastrate höher (16 kHz) als bei Anrufen
über das mobile Datennetz (8 kHz). Eine höhere Abtastrate führt zu einer besseren Tonqualität.
Die niedrige Abtastrate bei Anrufen über das mobile Datennetz kommt dadurch zustande, dass die
entsprechenden Signale das öffentliche leitungsgebundene Telefonnetz passieren müssen, dort
jedoch die Abtastrate herabgesetzt wird, um Bandbereite zu sparen.
Merkt sich die VX-1 meine Mikrofoneinstellungen?
Die VX-1 speichert die letzte Einstellung, die Sie vor Betätigen der Stummschalttaste vorgenommen
haben, und ruft diese Einstellung wieder ab, sobald die Stummschaltung aufgehoben ist. Die VX-1
speichert jedoch nur die Mikrofoneinstellungen der aktuellen Sitzung.
26
Fehlersuche
In den Audioeinstellungen meiner Videotelefoniesoftware wird die VX-1 nicht als Lautsprecher oder
Mikrofon angezeigt und kann nicht ausgewählt werden (betrifft nur PC oder Mac).
1. Die VX-1 ist nicht eingeschaltet. Bitte überprüfen Sie, ob Sie die VX-1 richtig eingeschaltet haben (die
LEDs müssen leuchten). Drehen Sie den grünen Schalter im Uhrzeigersinn, um die VX-1 einzuschalten.
2. Das 3.5mm-Audiokabel ist eingesteckt. Bitte ziehen Sie das Audiokabel heraus. Ihr Computer kann
die VX-1 nicht erkennen, wenn das Audiokabel eingesteckt ist.
3. Das USB-Kabel ist locker oder nicht eingesteckt. Bitte stellen Sie sicher, dass das USB-Kabel fest sitzt.
Die Lautsprecher geben keinen Klang wieder.
1. Die Lautsprecher sind stummgeschaltet. Bitte sehen Sie in den Audioeinstellungen Ihres Computers
oder iDevice nach, ob die Stummschaltung aktiviert ist.
2. Ihr angerufener Gesprächsteilnehmer hat das Mikrofon stummgeschaltet. Bitten Sie ihn, die
Stummschaltung aufzuheben.
3. Die Lautstärke des Lautsprechers ist zu niedrig. Bitte erhöhen Sie die Lautstärke. Drehen Sie dazu den
grünen Schalter im Uhrzeigersinn oder verändern Sie die Lautstärke an Ihrem Computer oder iDevice.
4. lhr angerufener Gesprächsteilnehmer hat die Empfindlichkeit des Mikrofons nicht hoch genug
eingestellt. Bitten Sie ihn, die Empfindlichkeit entsprechend anzupassen.
5. Prüfen Sie in den Audioeinstellungen Ihrer Software, ob Sie die VX-1 als aktiven Lautsprecher
gewählt haben (betrifft nur PC oder Mac).
27
Der von mir angerufene Gesprächsteilnehmer hört mich nicht.
1. Ihr Mikrofon ist stummgeschaltet. Leuchten die LEDs auf Ihrer VX-1 rot, sind gerade alle Mikrofone
stummgeschaltet. Drücken Sie den roten Knopf, um die Stummschaltung aufzuheben. Leuchten die
LEDs grün, prüfen Sie bitte in den Audioeinstellungen ihres Computers oder iDevice, ob das Mikrofon
stummgeschaltet ist.
2. Ihr angerufener Gesprächsteilnehmer hat den Lautsprecher stummgeschaltet. Bitten Sie ihn, die
Stummschaltung aufzuheben.
3. lhr angerufener Gesprächsteilnehmer hat eine zu niedrige Lautstärke für den Lautsprecher gewählt.
Bitten Sie ihn, die Lautstärke des Lautsprechers zu erhöhen.
4. Prüfen Sie in den Audioeinstellungen Ihrer Software, ob die VX-1 als aktives Mikrofon ausgewählt
wurde (betrifft nur PC oder Mac).
5. Die Empfindlichkeit Ihres Mikrofons ist nicht hoch genug eingestellt. Bitte passen Sie die Empfindlichkeit
Ihres Mikrofons entsprechend an. Die Empfindlichkeit des VX-1-Mikrofons ist standardmäßig auf hoch
eingestellt. Deshalb brauchen Sie die Empfindlichkeit nur anzupassen, wenn Sie diese Einstellung
vorher verändert haben (betrifft nur PC oder Mac)
Technische Daten
Ein- und Ausgabe:
1 Typ-B-USB-Anschluss
• Schnittstelle: Typ B USB 2.0 Full-Speed (kompatibel mit USB 1.1)
• Stromversorgung: über USB, 5V/500mA)
• Maximale Leistungsaufnahme: 2,5 W
1 3.5mm-Stereo Kopfhöreranschluss
Mikrofone
• 1 omnidirektionales High-Sensitivity-Mikrofon
• 4 unidirektionale High-Sensitivity-Mikrofone
• Frequenzbereich: 50 ~ 20.000 Hz
Lautsprecher
• Frequenzbereich: 20 ~ 20.000 Hz
Größe und Gewicht
Abmessungen (Ø x H): Ø188 x 50mm/ Ø7.4 x 2.0inches
Gewicht: 17ozs/480g
Betriebssystem:
Windows:XP/Vista/7/8
Mac OSX 10.5 und höher
281
© 2014 IPEVO Inc. All rights reserved. IPEVO, VX-1, the IPEVO logo, and other IPEVO marks are owned by IPEVO Inc. and may be
registered. All other trademarks are the property of their respective owners.
Customer Service (International)
Email: [email protected]
Tel: +886-2-5550-8686
Customer Service (USA)
Email: [email protected]
Tel: 1 (408) 490 – 3085


![MC75AX User Guide [German] (P/N 72E-133503](http://vs1.manualzilla.com/store/data/006885074_1-3f2026ccf938c23710f47470b3397d2d-150x150.png)