1
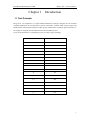
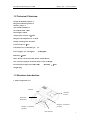
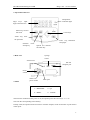
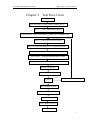
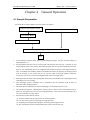
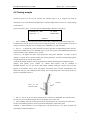
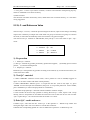
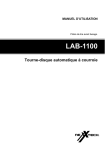
Coagulometer
Koag-o-test Vet
User Manual
BGT BioGenTechnologies GmbH
Von-Langen-Weg 10
D-48565 Steinfurt
Tel.: 02551/4090 Fax.: 02551/1298
Web: www.biogentechnologies.de
E-Mail: [email protected]
BGT BioGenTechnologies GmbH
Koag-o-test Vet user manual
Content
Chapter 1
Introduction .............................................................................2 1.1 Test Principle ....................................................................................................................... 2 1.2 Technical Criterions: ........................................................................................................... 3 1.3 Structure Introduction ......................................................................................................... 3 Chapter 2
Installation ...............................................................................5 2.1 Save and Transportation Condition: .................................................................................... 5 2.2 Work Condition: .................................................................................................................. 5 2.3 Instrument Installation: ....................................................................................................... 5 Chapter 3
Chapter 4
Test Flow Chart .......................................................................6 General Operation ................................................................7 4.1 Sample Preparation ............................................................................................................. 7 4.2 Testing sample ..................................................................................................................... 8 4.3 Basic Operation Rules ....................................................................................................... 10 4.4 Result Report..................................................................................................................... 11 Chapter 5
Utility ....................................................................................15 5.1 Program ............................................................................................................................. 15 5.2 Q. C. and Reference Value ................................................................................................ 18 5.3 Clock ................................................................................................................................. 19 5.4 UTILITY ........................................................................................................................... 19 Chapter 6
Maintenance ..........................................................................22 6.1 Maintenance ...................................................................................................................... 22 Trouble and Handle ................................................................................................................. 23 Appendix 1: Input Method ........................................................................24 Appendix 2: Install printer-paper ..............................................................25 1
BGT BioGenTechnologies GmbH
Koag-o-test Vet user manual
Chapter 1 Introduction
1.1 Test Principle
Koag-o-test Vet coagulator is a single-channel Hemostasis Analyzer designed to test manifold
coagulate parameters. Its test principle is optical colorimetric method. After mixing reagent and
blood plasma, Fibrin protein change to Fibrin protein solidification so that the light consistency to
test sample is changed, then the instrument test the solidification end.
It can test all parameters in coagulating process in a large range, including:
ITEM
No.
ITEM
1
PT
2
APTT
3
TT
4
FIB
5
VT
6
PS
7
PC
8
F2
9
F5
10
F7
11
F8
12
F9
13
F10
14
F11
15
F12
16
XA
17
LA
2
BGT BioGenTechnologies GmbH
Koag-o-test Vet user manual
1.2 Technical Criterions:
Sample incubation position: 5
Reagent incubation position: 2
Software Timer: 1
Test Channel Number: 1
Saved Items Sum: 1000
Wavelength: 470nm
Temperature Control: 37±0.5°C
Reagent Consumption: Low to 20 uL
Sample Consumption: 20-30 uL
Coherence Error: ≤ 5%
Calculation: S%, PTR, INR, g/L etc.
Power Supply: A.C. 220V±15%
50 HZ±3HZ
Efficiency: ≤120W
Inner Printer: 24 bits Thermal Printer (Wide 58mm)
Size: 34cm in Length X 30.5cm in Wide X 11cm in Height
Environment: Temperature 15°C-30°C
Humidity :≤90%
Weight: 8kg
1.3 Structure Introduction
1. Main components view
Display
Thermal
Printer
Operation
Keyboard
Reagent incubation
position
Sample incubation
position
Test channel
3
BGT BioGenTechnologies GmbH
Koag-o-test Vet user manual
2. Operation Panel view
Temperature
indication light
Digit keys: input
digits and characters
Menu key, back to
last menu
Cursor keys
‘Enter’ key, enter
the operation
Feed key, handwork
feed paper
Software timer
startup key
Optical test channel
activation key
3. Back view
Syringe
socket
fixation seat
RS-232
computer port
Power
switch
Three-core
power socket
.
Earth-pole
4. Menu
1-MEASURE
5-QC
2-PRINT
6-CLOCK
The menu has 7submenus after power is on, the operator press the cursor keys ‘1—7’ to
enter into the corresponding menu directly.
In daily work, the operator do the first item to measure samples, do the second item to print out the
result report.
4
BGT BioGenTechnologies GmbH
Koag-o-test Vet user manual
Chapter 2 Installation
2.1 Save and Transportation Condition:
Environment Temp: 0°C~40°C
Relative Humidity: ≤90%
2.2 Work Condition:
Koag-o-test Vet Coagulator is a precise electrical instrument, for the instrument can be used
normally and get an accurate result, the environment must acquire certain requirement as follows:
Environment Temp: 15°C~30°C
Relative Humidity: ≤90%
Pressure: 86KPa~106KPa
Voltage: A.C. 220V±33V, 50Hz±3Hz
Earth-Pole: Special Medical instrument’s earth-pole, the required resistance is less than 0.5Ω
Addition: the instrument must be put in a platform which has enough room, stable level without any
vibration; the position should avoid the equipments such as fans, air conditioners etc in order not to
effect the accuracy of temperature control; it is prohibited to be installed in the environment which is
high temperature, sunlight shines directly or has much dust; also it can not be put with the equipments
which has strong efficiency, heavy interference such as the centrifuges, refrigerators,thermostats etc in
the same room or use the same elec. Power socket .
2.3 Instrument Installation:
2.3.1 Open the instrument’s packing box. First, check carefully whether the instrument,
accessories in the packing box match with the packing list. If there is any shortage or damage,
contact the suppliers quickly;
2.3.2 Second, get out the instrument cautiously after checking carefully, then put it on a stable,
smooth work platform;
2.3.3 Third, Connect the earth-pole to the earth which is on the right side of the back of instrument
with medically special earth-line;
2.3.4 Fourth, Get the elec. Power line, connect one line to the elec. Power socket which is in the
middle of the back board, then connect the other line to the three-core socket which has installed
earth-line.
5
BGT BioGenTechnologies GmbH
Koag-o-test Vet user manual
Chapter 3 Test Flow Chart
Switch power on
Open instrument to incubate until the TEMP light is on
Press ‘1’ to enter “MEASURE” submenu
Put the sample or reagent in the incubation position, press `TIMER`to time
Press ‘1’ to input test items in all channels
Press ‘2’ to input test patient No. in corresponding channel
Put the incubated sample in corresponding test channel
Press ‘OPTIC’, “PLEASE ADD REAGENT” twinkle
Add reagent along the cuvette without bubble
Self-test automatically
Show the result on the screen
YES
Continue
Prepare next sample and reagent
No
Press ‘MENU’ to return
Press ‘2’ to enter “PRINT”
Edit and Print result
Press ‘MENU’ to return
Switch power off
6
BGT BioGenTechnologies GmbH
Koag-o-test Vet user manual
Chapter 4 General Operation
4.1 Sample Preparation
Two methods to collect samples, the flow chart is as follows:
Collocate anticoagulant reagent
Anticoagulant tube sample blood vein directly
Vein Sample Blood
Mix with anticoagulant instantly
3600r/min centrifugal 10min, get the upper liquor (blood plasma)
Test
1. Use 0.109mol/L sodium citrate liquor as anticoagulant reagent, the ratio of blood sample to
anticoagulant is 9:1.
2. The hemostatic-belt must not be tied too tight and the time must not past 5 minutes in vein
sample blood, or the cruor and the fibrin dissolve gene will be activated; Sampling can not be
done in vein transfusion position or neighborhood position; Puncture must appear blood for
once, avoid blood clot, bubble, pollution of bubble and tissue; the quantity of sampling blood
must be accurate, it can not be used if it is less than 90% of arranged quantity. Select the
second one or third one if select anticoagulant tube (Vacuum sample tube).
3. Mixing the blood sample with anticoagulant sufficiently and instantly after sampling the blood,
centrifugal as soon as quickly.
4. The centrifugal speed is 3500rph, time is 10minutes, the test operation must be done in
60minutes after sampling blood.
5. The blood plasma tube must be airproof with plug to avoid the PH value to raise.
6. All instruments(injectors, sampling-tube, testing-cup etc) which contact with sample must be
plastic or silica glass metal. It can’t use simple glass tube, or the cruor will be activated, also it
can’t use eradicator or purge liquor.
7. Several factors infect the test results:
(1). Na2C2O4, EDTA and glycogen aren’t fit as anticoagulant;
(2). Use fibrin solve liquor can prolong the coagulate time;
(3). Sampling and management improperly will change the coagulate time;
(4). The instruments which used repeatedly must clean in time and drying.
7
BGT BioGenTechnologies GmbH
Koag-o-test Vet user manual
4.2 Testing sample
Switch the power on for 10—20 minutes, the indicate light is on, it suggests the temp of
instrument’s two test channels have added to the constant temperature of 37±0.5°C, sample testing
can be started.
In the main menu, press “1” to enter into the “MEASURE” interface, it will show:
SAMPLE No.: 4096
TEST No.: 2
T1: 00:00
NAME:APTT
XXXXX
1. Press ‘TIMER’ key to startup the software timer when incubate the sample and reagent, the
incubation time will be shown on the screen to help the operator to finish incubation correctly. It
will give an alarm when the time is enough, press ‘TIMER’ key to stop the alarm.
2. Press ‘1’, ‘A’ appear the cursor, input the test items, input the corresponding item No. directly
to select the needed items, press ‘ENTER’ key to assure (the system will ENTER automatically if
input 2 numbers); press ‘MENU’ key to cancel.
3. Press ‘2’, ‘B’ appear the cursor, input patient No., then press ‘ENTER’ to assure, or press
‘MENU’ to cancel. Every channel finishes per test the patient No. will add 1 automatically, please
modify the patient No. for the same patient.
4. Put the incubated sample in the corresponding test channel, absorbing the incubated reagent
quantity with pipette, press ‘OPTIC X’, “Please add reagent” will be twinkled at
XXXXX/YYYYY row on the screen; add reagent instantly along the cuvette cliff, press the
pipette to the bottom. Move away the pipette, instrument starts self-test automatically. The
instrument will give off stridulation after testing, the corresponding test result will be shown on
the line of XXXXX./YYYYY.
Cuvette
Lean on the
Cuvette’s cliff
5. Press ‘1’ and ‘2’ to set new items and patient No. if the test is unfinished. Do with the tested
cuvette, get a new incubated sample in the test channel, test the new one.
6. Press ‘MENU’ key back to the main menu after finishing last test. Then enter the “Result” to
do the corresponding operation, and to print the tested patient’s total result report.
Addition: 1. Other channels can be startup when one channel stars to test, these channels test
concurrently without disturbance.
8
BGT BioGenTechnologies GmbH
Koag-o-test Vet user manual
2. If the patient’s ID is ‘0’, the instrument will not save or print the channel’s result after testing.
3. Operate carefully when add samples into sample instrument, do not let bubble enter into the
liquor. The correct operation to add plasma and add reagent in as follows:
Add plasma operation:
①Put the pipette’s tip to the bottom of the cuvette;
②Press the pipette to the first stop position, the state is as chart 2, there is some plasma in the
needle;
③Put the pipette to the position as chart 3, press the pipette to the bottom to add residual plasma.
The pipette should be over the liquor surface when add all plasma as chart 4, it will effect the test
result if it is underneath or touching the liquor surface.
CHART 1
CHART 2
CHART 3
CHART 4
Add reagent operation: Put the pipette in the cuvette’s cliff as chart 5, add reagent. Press the
pipette to the bottom, the reagent must be discharged with certain speed in order that the reagent
and plasma mixing equably, the pipette should be over the liquor surface without touching it as
chart 6.
CHART 5
CHART 6
9
BGT BioGenTechnologies GmbH
Koag-o-test Vet user manual
4.3 Basic Operation Rules
1. Power on: Switch the electrical power on, the system starts to self-test, the constant temperature
instrument heat the test channel concurrently, TEMP indicator light will be on after waiting for
10-20 minutes, the tests can be done.
2. Power off: Press “MENU” key to return to the main menu after finishing operation, then switch
the electricity power off, remember it can not be power off in the process of testing or printing.
3. Basic Operation Rules of Parameters:
3.1 PT TEST (SHANGHAI TAIYANG REAGENT)
3.1.1 Switch the power on, wait for the TEMP indicator light on; Sample 3500 centrifugal for 10
minutes;
3.1.2 Incubating the PT applied reagent (Get proper quantity according to the tests) for 10 minutes
at 37°C;
3.1.3 Add plasma 20ul, incubating for 2 minutes (Add the sample to the bottom of the cup without
any bubble);
3.1.4 Put the incubated sample in the test channel, add 40ul PT applied reagent with online
sampling instrument;
3.1.5 Press “OPTIC” key, add PT reagent after the screen show “Add reagent” (Press it to the
bottom until hearing the stridulation), the instrument starts to self-test;
3.1.6 The screen show “RESULT: XX, XS” after about 30 seconds;
3.1.7 Test continually with repeating step 4 to step 6, Press ‘MENU’ key back to main menu.
3.2 APTT TEST
3.2.1 Switch the power on, wait for the TEMP indicator light on; Sample 3500 centrifugal for 10
minutes;
3.2.2 Get some APTT reagent(Get proper quantity according to the tests) without incubating;
3.2.3 Add plasma 20uL, mix with 20uL APTT reagent, incubating for 3 minutes at 37°C;
3.2.4 Put the incubated mixing liquor in the test channel, absorb 20Ul CaCl2 incubated liquor with
online sampling instrument, and it’s consistency is 0.025mol/L;
3.2.5 Press ‘OPTIC’, add CaCl2 liquor(When you hearing the stridulation) after the screen shows
“ADD REAGENT”, it starts to test;
3.2.6 It will show “RESULT: XX.XS” after about 100s;
3.2.7 Test continually with repeating step 4 to step 6, press ‘MENU’ back to main menu;
3. TT TEST
3.3.1 Switch the power on, wait for the TEMP indicator light on; Sample 3500 centrifugal for 10
minutes;
3.3.2 Incubating TT reagent (Get proper quantity according to the tests) for 10 minutes at 37°C;
3.3.3 Add plasma 30ul, incubating for 3 minutes (Add the sample to the bottom of the cup without
any bubble);
3.3.4 Put the incubated cuvette in the test channel, add 30ul TT reagent with online sampling
instrument;
3.3.5 Press “OPTIC” key, add TT reagent after the screen show “Add reagent” (Press it to the
10
BGT BioGenTechnologies GmbH
Koag-o-test Vet user manual
bottom until hearing the stridulation), the instrument starts to test;
3.3.6 The screen show “RESULT: XX, XS” after about 40 seconds;
3.3.7 Test continually with repeating step 4 to step 6, Press ‘MENU’ key back to main menu.
3.4 Common use Clotting and reagent dosage
TEST ITEM
SAMPLE (ul)
REAGENT 1 (ul)
PT
20
40
APTT
20
20
TT
30
30
REAGENT 2 (ul)
CaCl2
20
4.4 Result Report
Enter “REPORT” submenu to edit and print.
Press ‘3’ in main menu, it will show:
1— EDIT SAMPLE
2— DEL RESULT
Edit, modify all patients’ info. by the first item including name, gender, age and blood group;
Dele patient’s given result by the second item;
Add patient’s given result by the third item;
Print/Dele patient’s all results by the fourth item.
4.4.1 Edit sample info.
You can input every patient’s name, gender, age and blood group according to this function. Firstly,
it will show:
SAMPLES SUM:
SAMPLE No.: __
XXX
MENU — RETURN
Input ID (1—59999) or search with ‘↓’ key, press ‘enter’ key to enter next interface after found
needed ID. If the ID you input is not existed in internal memory, it will show:
SAMPLES SUM:
XXX
SAMPLE No.: XXXXX
THE SAMPLE IS NOT EXISTED!
CREAT NEW ITEM? Y
Creat new patient record if you answer ‘Y’ or press ‘ENTER’, then turn to next step; answer ‘N’
or press ‘MENU’ to return:
11
BGT BioGenTechnologies GmbH
Koag-o-test Vet user manual
SAMPLE S SUM:
SAMPLE No.: __
XXX
You can input new patient ID.
Turn to next step after finding patient or creating new patient, it will show at the second row:
SAMPLE No.: XXXXX
NAME: __
You can input 12 characters here at most, press ‘ENTER’ key if it is less than 12 characters,
then it will show the patient ID and name at the first row:
ID: XXXXX
GENDER: X
AGE: XXX
BLOOD GROUP: XX
NAME: XXXXXXXX
Gender: input ‘M’ or ‘F’, ‘M’ is male, ‘F’ is female;
Age: input 0—999, unit is: ‘Y’ (year);
Blood group: A/B/O/AB
Note: Only input corresponding content in above items, the system will accept.
If the ID you input is existed in internal memory, it will show the saved info. Directly, you can
modify them then press ‘MENU’ to return, you can’t input the patient’s TEL. and ADD., but there
is room in result report for you to add.
4.4.2 DEL Result
You can delete wrong result in test result according to this function.
Firstly, input patient ID which has been existed or use search function.
SAMPLE SUM.: XXXXX
SAMPLE No: __
MENU RETURN
Next it will show:
12
BGT BioGenTechnologies GmbH
Koag-o-test Vet user manual
SAMPLE No.: XXXXX
NAME: XXXXX
ITEM SUM:
XX
0
APTT
35.8
S
PRESS ‘ENTER’ TO DELE
The position of 0 is the result of the given patient, APTT shows the item name, position of 35.8
shows the test result, ‘S’ shows the unit. You can check them with ‘∧’ ‘∨’, press ‘ENTER’ key to
delete if there is any results you needn’t. This step can’t be recovered, so be careful. Press
‘MENU’ to return to last interface.
4.4.3 Add result
Some tests can’t be finished in this analyzer, so you must use other instruments while the results
must be sent out concurrently, define this test before using this function:
SAMPLE SUM:
SAMPLE No: __
XXXXX
MENU — RETURN
ID which you input here can be existed No. or new No., use search function at the same time.
Then it will show:
SAMPLE No: XXXXX
ITEM No.: __
NAME: XXXXXXXX
Now you can use search function ‘∨’ or input ID directly, but it must be defined ID.
It will show:
ID: XXXXXX
ITEM No.: XX
RESULT: __
NAME: XXXXXXX
NAME: XXXXX
Input the result get from other methods, press ‘MENU’ key to return to last interface.
13
BGT BioGenTechnologies GmbH
Koag-o-test Vet user manual
4.4.4 Print/Dele result report
1— PRINT APPOINTED SAMPLE
2— PRINT ALL SAMPLES
3— DEL SELECTED SAMPLE
4— DELE ALL SAMPLES
1) Print Report
(1) Print the appointed patient
If you want to print the appointed patient, select this function, it will show:
PRINT
SAMPLE No:
MENU—RETURN
You can input ID (1—59999) to print directly or search with ‘∨’ key, press ‘ENTER’ key to print
patient’s report, or press ‘MENU’ to return.
(2) Print all samples
a. Startup this function, it will show:
START FROM: __
Now you can input the startup date of the patient, then it will show:
BEGINDATE: XX
END DATE: __
XX
It will look for all files in internal memory after you input an end date, starts to print if you find
the result fit to the condition, print for every result until finish printing; if you want to stop printing
in midway, only method is to close the system.
b. When the system suggests you to input the ‘BEGIN DATE’, press ‘ENTER’ key to print all
results in internal memory, then it will show:
PRINT ALL SAMPLES Y ?
14
BGT BioGenTechnologies GmbH
Koag-o-test Vet user manual
Now you can press ‘Y’, ‘N’, ‘MENU’:
Press ‘Y’ to print all results instantly;
Press ‘N’ to return to ‘BEGIN DATE:’ state;
Press ‘MENU’ to return to last interface.
2) Dele patient report
(1)Delete appointed patient report
Select this function to delete the appointed patient’s record and all saved results of the patient
in internal memory. Firstly, it will show:
DEL SELECTED SAMPLE
Sample No: __
MENU—RETURN
You can input with digit keys or use search function, then press ‘ENTER’ key to delete. Press
‘ENTER’ key after you find the appointed ID, the system will delete it directly without suggestion,
so be careful.
(2)Dele all patients
This function is close to the interface of ‘PRINT ALL PATIENTS REPORTS’.
Chapter 5 Utility
There are 3 submenus for you to setting, you can modify and add test items in “PROGRAM”, or
test and print Q.C. report in “QC ”, or setting system utilities in “UTILITY”.
5.1 Program
This section mainly introduces how to setting the reagent test parameters. It suggests you to
setting parameters according to the reagent manual for every time to change the reagent.
1) Enter program submenu
Press ‘4’ key to enter program submenu in main menu, it will show:
1— ITEM DEFINITION
2— SHOW ITEMS SUM
3— DELETE TEST
2) Item definition
Main function: input operation parameters of all test items into the instrument, follow the below
procedures to finish it:
15
BGT BioGenTechnologies GmbH
Koag-o-test Vet user manual
① Press ‘1’, it will show:
ITEM No.: XX
NAME:
Input a code which is 1 bit or 2 bits in XX, it can’t be 0, press ‘ENTER’ key if it is less than 2 bits.
If the code which you input has been existed in system, then search the code and show the
parameters on the screen, the cursor will stop at the back of ‘NAME’.
② You can input or modify the test name here, please input the abbreviate name which is 1—4
bits such as: PT, APTT, TT ETC.
ITEM CODE: XX
NAME: XXXXXX
Press ‘∨’ key or ‘ENTRE’ key to enter next step.
③ Select one in ‘B’, ‘C’ and ‘0’ with ‘<’ and ‘>’ keys,
‘B’: Coagulation + Quantitative;
‘C’: Coagulation;
‘0’: Results get from other items;
Then press ‘∨’ or ‘ENTER’ key to turn to next step.
④ Now the cursor stays at the back of “RESULT METHOD”: it will show S—R—I%—E—U,
press ‘∨’ key, it will select successively: S, R, I, %, E, U. Among them: S—second method,
R—short for PTR, I—short for INR, %—percentage method, E—absorbance value,
U—consistence method, press ‘>’ key, you can select or hide the result method in the cursor. Press
‘∨’ key or ‘ENTER’ to turn to next item.
⑤ Input normal value’s high limit in “HIGH REF.”, the value of reference reagent list is 1—9999;
⑥ Input normal value’s low limit in “LOW REF.”, the value of reference reagent list is 1—9998,
and the low value must be less then high value;
⑦ Input the item’s normal contrast value in ‘NORMAL CONTRAST VALUE’’;
16
BGT BioGenTechnologies GmbH
Koag-o-test Vet user manual
⑧ Input ISI value in ‘ISI’;
⑨ Percentage method: If you select ‘%’ in result method, you must input %—S standard curve;
Consistence curve: If you select ‘%’ in result method, you must input C—S standard curve;
Absorbance curve: If you select ‘0’ in result method, you must input C—E standard curve;
⑩ Max Test time: Time to test the given item;
If the code you input in ① is not existed in internal memory, it will show:
THE CODE IN NOT EXISTED!
CREAT NEW ITEM?
Y/N
If you answer ‘Y’, it will save the code and turn to ② step;
If you answer ‘N’, it will give up the code and return to input ‘CODE’ state.
CURVE EXAMPLE:
% — S CURVE:
0.0%—40.0S
C — S CURVE:
575.0mg/dL—6.0S
25.0%—30.0S
C — E CURVE:
575.0mg/dL—0.080E
287.0mg/dL—11.6s
287.0mg/dL—0.055E
50.0%—22.0S
143.5mg/dL—19.8S
143.5mg/dL—0.039E
75.0%—16.0S
71.8mg/dL—34.4S
71.8mg/dL—0.020E
100.0%—12.0S
0.0mg/dL—60.0S
0.0mg/dL—0.0E
3) Item sum
Press “2—ITEM SUM” to see saved test item sum in internal memory, press ‘1’ , the system will
recover factory installation, any modification saved in memory will lost, it will suggest after press
17
BGT BioGenTechnologies GmbH
Koag-o-test Vet user manual
‘1’ once, press ‘1’ twice if you want to continue, or return to last interface with pressing any key.
There are solidified 15 test items in factory.
4) Dele test items
This function will delete unnecessary items, delete them first in internal memory, or it will show
wrong suggestion.
5.2 Q. C. and Reference Value
The aim of Q.C. is to test,control the precision degree of the test; supervise the change of stability;
improve the conformity of sample test result about one group or between two groups in common
test work; it will assure the reliability of the test result for every patient sample.
You need to test Q.C. material in “MEASURE”, then print Q.C. curve and result in “QC”. “QC”
menu:
1— SELECT QC
2— SELECT QC
3— PRINT
QC
4— PRINT
QC
TEST
NO.
CURVE
RESULT
1). Preparation
1.1 Select Q.C. material:
(1) The Q.C. material dry powder produced by professional supplier; (2) Healthy person’s blood
plasma; (3) Animals’ blood plasma.
1.2 Prepare Q.C. material:
Dilute the Q.C. blood plasma dry powder according to the manual, lay it aside for 20 minutes, use
it after it becomes stable.
2). Test Q.C. material
2.1 Enter “REPORT” submenu in main menu, creat a patient No. such as 59000(It suggests to
input ‘3’ to avoid to confuse with other normal patients);
2.2 Enter “MEASURE” submenu, press ‘1’ to input the item No. (such as TT, input ‘3’); press
‘ENTER’ to assure and quit item installation, then press ‘2’ to input the patient No. such as 59000,
press ‘ENTER’ key to assure and quit patient No. installation;
2.3 Measure the prepared Q.C. materials with the method to measure sample;
2.4 You needn’t do the first step operation in testing the item Q.C. result, repeat 2 and 3 steps
directly, item No. and patient No. should be the same to the ones in first time to test. You can enter
“QC” to print the Q.C. curve and result if the test results over 5 units.
3).Print Q.C. result and curve
3.1 Enter “QC”, select the item No. of the Q.C. in the operation ‘1—SELECT QC TEST’ and
setting the target value. You can evaluate or consult other materials.
3.2 Select the corresponding patient No. such as 59000 in the operation ‘2- SELECT QC No.’
18
BGT BioGenTechnologies GmbH
Koag-o-test Vet user manual
3.3 Carry out the Operation ‘3’.‘4’to print the Q.C. curve and result (Including MEAN and SD)
after carrying out operation ‘1’.‘2’.
3.4 When you test and print the Q.C. curve and result later, you should define the target value
according to the last Q.C. result.
Note: 1.The operation for all patients in every test are the same except the test items. Select the
patient No. and the same test items for each test, you can not test other items for the appointed
patient No., or it will not print the correct Q.C. curve and result.
2. If there is not target value for the Q.C. material, you can test it for 10 times continually to assure
all items’ target values, then calculate the MEAN and SD as the target value and deviation. The
target value should be ascertained when you change new reagent.
3. Because the normal value range for different areas and different people are different, also the
instruments are different, other range only can be reference. Please creat the normal range fit to
this area’s people!
5.3 Clock
You can enter “CLOCK” submenu, it will show current time. You can modify time and date in
“MAINTAIN”.
Koag-o-test Vet COAGULATION ANALYZER
DATE: 01-01-2001
TIME: 12:00:00
MENU - RETURN
5.4 UTILITY
This menu mainly consists in “UTILITY” submenu. Press ‘7’ to enter it in main menu:
1-TEMP ADJ
2-SET FAN
3-ADC
4- PTR SETUP
1). TEMP ADJ
The screen will show:
5-DATABASE
6-SET CLOCK
7-COM SETUP
SET TEMPERATURE: 37.00
CELL TEMPERATURE: 37.02
CURSOR - CHG SET
MENU - RETURN
You can change or set temperature with ‘<’ ‘>’keys by 1°C unit, or with ‘∨’ ‘∧’ keys by 0.1°C unit.
2).SET FAN
It will show:
19
BGT BioGenTechnologies GmbH
Koag-o-test Vet user manual
SET FAN
1 – TURN ON FAN
2 – TURN OFF FAN
MENU - RETURN
Now,
1— Fan is on;
2— Fan is off;
3). ADC
It shows the internal AD transfer parameter of the instrument, service personnel use it for
maintenance only.
4). PTR SETUP
1— PRINT DAILY RESULT
2— INSTANT PRINT
3— FORWARD PRINT
4— LQ300K+
Select ‘1— PRINT DAILY RESULT’, then to print report in ‘REPORT’, it will print all patients
and results in internal memory for that day. (General select this mode ).
You can select the time to print the report.
①If you don’t print report during test, please don’t select ‘2-INSTANT PRINT’ ;
②If you print a report for every sample during test, please select ‘2-INSTANT PRINT’.
Select ‘3-FORWARD PRINT’, it will print out results forward, otherwise, it will be backward.
Select ‘4-LQ300K+’ only when you want to print by the outer printer, such as EPSON LQ300K+.
5). DATABASE
The internal memory will be effected because of some reason, then it will save wrong data, it will
effect the result report if without modification, this function is as follows:
1— MODIFY SUM
2—DELETE THE APPOINTED SAMPLE
C
D
A
B
E
A: The amount of patients saved in the system, range: 1—255;
20
BGT BioGenTechnologies GmbH
Koag-o-test Vet user manual
B: The actual amount of patients detected by the instrument.;
C: Current position of patients’ file: range 0—249
D: Patient No., range:1—9999
E: Saved patient’s sample, range: 0—30
(1) In normal condition, A should be equal to B, now ‘1’ key is useless. In actual application,
because there
are too many disturbance factors especially the moment of turning on and turning off, it is
instability in the twinkle of power on and power off, now it is very easy disturbed to make mistake.
It will suggest wrong information after detecting the mistake, now you need adjust the patients’
file with handwork modification, or it will show wrong result.
Method: Press ‘1’, the cursor will appear in A, modify the value in A equal to the one in B then
press ‘ENTER’ key to correct the mistake.
(2) If you delete the patient’s information in patients’ file, search the patient with ‘↓’ ‘↑’, the
patient No. will be shown in D, press ‘2’ to delete the patient.
Note: This operation can not be recovered, so be careful. If you delete the appointed result of the
patient, operate in “RESULT REPORT”.
(3) Press ‘MENU’ back to last menu.
6). SET CLOCK
Enter “ SET CLOCK” submenu, it will show:
SET CLOCK
1 – TIME FORMAT
2 – DATE AND TIME
MENU - RETURN
Set the time with pressing ‘1’ or ‘2’, then it will return to last interface. You can enter ‘CLOCK’
interface to observe it.
7).COM SETUP
Press ‘7’ enter the set COM interface:
COM SETUP
SERIAL: ON
PARITY: EVEN
BAUD RATE:
19200
If you want to transmit the sample data measured just now to the program of the
computer ,you can enter this function to setup the RS-232 port.
8). System Reposition
When the system is disturbed by other reasons, this function can help you to reposit the system be
back to out-firm installation. Input ‘XXXXX’ in ‘UTILITY’ submenu to startup the function, it
21
BGT BioGenTechnologies GmbH
Koag-o-test Vet user manual
will ask you:
1 - RESTORE SYSTEM
2 - RESTORE DATABASE
Press ‘1’ to reposit the system, then press ‘Y’ twice; press ‘2’ to clean the patients file away, then
press ‘Y’ twice; press ‘MENU’ back, all patients’ information and results will be lost after
reposition in internal memory, so be careful.
Chapter 6 Maintenance
6.1 Maintenance
Maintenance of Koag-o-test Vet Coagulator is as follows:
1. Maintenance for every day
1) Put blank flow cell to protect light source when test channel is not in using;
2) Check if there is dust in test channel and every incubation position everyday, clean them with
soft tissue or tampon with alcohol.
3) Clean used flow cell and needle. Method: First clean them with tap water, then immerge them
with 0.5% NaClO liquor for 30 minutes; clean them with tap water again, at last clean them with
DI water twice, dry them for preparation.
2. Clean instrument’s appearance
Wipe the instrument appearance with wet cloth (Turn the electricity power off and get away the
plug).
Note: Clean the instrument with clean water,neutral purge reagent or non-causticity scour, but you
can’t clean it with organic reagent or hot water, or it will be distorted or damaged.
22
BGT BioGenTechnologies GmbH
Koag-o-test Vet user manual
Trouble and Handle
phenomena
No Display
cause
a) The power doesn’t supply
b) The electricity doesn’t work
c) Signal display line is loose
d) Matter with screen
method
a) Turn on the power
b) Check the power socket
c) Check the display cable
d) Replace screen
Adjust the contrast adjustor
Dark Display
The contrast of the display is
changed with the environment.
Contrast
adjustor
a) Replace the new paper
b) Check if there are any gauffer on
the paper or if the paper is vertical
with the roll axis. If it is not, uplift
the roll axis and put paper even.
Fail Printing
a) No paper.
b) Printer-paper is put incorrectly
Print but no
letters
a) Printer-paper thermal face
a) Connect the printer-paper
doesn’t connect to the printer head
thermal face to printer head
b)Printer-paper isn’t thermal
b) Install printer-paper correctly
paper
Instable results
a) Invalidate reagent
b) Incubate reagent and sample
improperly
c) Earth-line hasn’t been connected
with disturbance
d) Trouble with instrument
a) Replace reagent
b) Operate follow the guideline
c) Connect earth-line again
d) Contact our customers
department
If there are other trouble which can’t be solved, please contact our after-service
department.
23
BGT BioGenTechnologies GmbH
Koag-o-test Vet user manual
Appendix 1: Input Method
The system uses “input method” in ‘PATIENT NAME’, ‘DOCTOR NAME’, ‘REPORT HEAD’,
‘ADD TEST ITEM’, the consent method is ENGLISH, press ‘MENU’ to enter ‘INPUT
METHOD’ interface, it will show:
INPUT METHOD
1— ENGLISH (CAPITAL)
2— ENGLISH(MINISCULES)
3— NUMERIC
1. English input method.
The correspondent relation of cursor keys to ENGLISH characters are as follows:
1— A,B,C
2— D,E,F
3— G,H,I
4— J,K,L
5— M,N,O
6— P,Q,R
7— S,T,U
8— V,W,X
9— Y,Z
0—— —,.,/,α,β,γ,δ,ε,ζ,η,θ,ι,κ,λ,μ,ν,ξ,ο,π,ρ,σ,τ,υ,φ,χ,ψ,ω.
Press ‘1’ key one time and you will get A.
1 ------------------Press ‘1’ key twice quickly and you will get B.
1—1 -------------Press ‘1’ key three times quickly and you will get C.
1—1—1 ---------Press ‘2’ key one time and you will get D.
2 -------------------Press ‘2’ key twice quickly and you will get E.
2—2 --------------Press 2 key three times quickly and you will get F.
2—2—2 ---------You can get the others alphabet and mark with the analogy.……
2. Numeric input method
Input numeric directly under the Numeric input interface with pressing ‘3’
You can select capital letters or miniscule by using ‘OPTIC’ key.
A
B
C
D
E
F
24
BGT BioGenTechnologies GmbH
Koag-o-test Vet user manual
Appendix 2: Install printer-paper
1 Open the printer cover interface, press ‘FEED’, press it again to stop it after there is no residual
paper, get the surplus paper out;
2 Put new paper in paper groove, the thermal printer paper are different in two sides, so pull the
end of paper out when the thermal side faces downwards;
Paper Cover
The non-thermal
paper
groove
output
paper
roll-axis
paper
3 Take the roll axis out upwards, put the thermal side under the roll axis as figure 2, the direction
of paper should be vertically with the one of the roll axis, it avoids the printer paper to be locked
so that it can’t print normally;
4 Install the roll axis, put the gear in the right side of the printer, then install another side and press
it to lock it tight;
5 Press ‘FEED’, adjust it if the paper can’t get out or its direction is not vertically with the one of
roll axis, or it can’t work; press ‘FEED’ to stop it after printing a segment(When paper get out of
the paper cover) ;
6 Pull out of the printer-paper from cover, and then close it.
Attention: “FEED” function consists in Main menu, Measure sample interface, Waiting keyboard
input interface, “PRINT/DELETE RESULT REPORT” interface and “RESULT REPORT” of Q.C.
report interface, close “FEED” function in other interfaces.
25