1
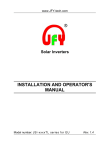
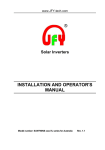
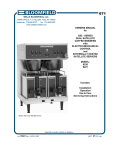
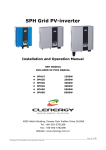
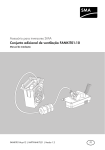
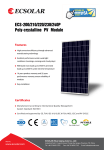
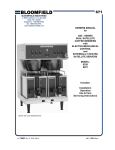
www.JFY-tech.com Solar Inverters INSTALLATION AND OPERATOR'S MANUAL Model number: JS I- xxxxTL ser ie s for UK Rev. 1.4 www.JFY-tech.com REVISION TABLE Document Revision Author Date Change Description 1.0 Falcon.Tang 09/03/2012 First release 1.1 Falcon.Tang 12/09/2012 Cancel the accessory of special RS-232 cable 1.2 Falcon.Tang 01/04/2013 Increase the information for JSI-2500TL 1.3 Falcon.Tang 04/07/2013 Amend the pin definition of RS485 1.4 Falcon.Tang 23/12/2013 Increase the information for JSI-1100TL SAVE THESE INSTRUCTIONS ! IMPORTANT SAFETY INSTRUCTIONS JFY-tech: Reproduction and disclosure of the contents of this manual are strictly forbidden without prior authorization of JFY-tech. 2 www.JFY-tech.com GENERAL PRECAUTIONS For your own safety and that of the unit, you must read and understand the instructions contained in this document before starting to work. Keep these instructions in a place accessible to all the personnel who work with the unit so that these may be consulted. Only professional technician may install and operate our units. WARNING: To avoid risk of electric shock from energy stored in capacitor, please wait for at least 5 minutes to access the conductor part of input or output terminals of the inverter after it is disconnected from the output of PV panel and AC grid. There is a fuse in our units. For continued protection against risk of fire, replace only with same type and ratings of fuse. The replacement should be done by qualified service personnel. The installation of inverter must be performed in full compliance with the relative local standards and regulations. No spare parts in package box. To avoid risk of electric shock, Do not remove machine cover. No user serviceable parts inside. Refer servicing to qualified service personnel. Please contact your reseller if you need to know the nearest authorized repair center or qualified service personnel. As a qualified service personnel, you should know both ac and dc voltage sources are terminated inside this units. Each circuit must be individually disconnected before servicing. Read and understand all the instructions contained in this manual and become familiar with the safety symbols in the relevant paragraphs before you install and commission the equipment. The connection to the AC grid must be done only after receiving approval from the administering authority as required by national and state interconnection regulations, and can be done only by qualified personnel. Keep the whole surface of the photovoltaic panel covered with material opaque to solar radiation before connecting panel to equipment; this will ensure that no dangerous high voltage is present at the connection cables. This unit is designed to feed power to the public power grid (utility) only. Do not connect this unit to an AC source or generator. Connecting Inverter to external devices could result in serious damage to your equipment. By the way, we have special types for these applications. If you are interested, please contact your local dealer. Although designed to meet all safety requirements, some parts and surfaces of Inverter are still hot during operation. To reduce the risk of injury, do not touch the heatsink at the back of the solar inverter or nearby surfaces while Inverter is operating. By the way, keep it away from any flammable objects. 3 www.JFY-tech.com This version of JSI inverters shall be used with panels connected in a “floating” way, i.e. with positive and negative terminal not connected to the ground. The equipment is provided with several labels, some of them with a yellow background, which are related to safety issues. Make sure to read the labels and fully understand them before installing the equipment. The symbols are: Equipment grounding conductor (Main grounding protective earth, PE) Alternate Current (AC) value Direct Current (DC) value Phase Grounding (Earth) To avoid risk of electric shock from energy stored in capacitor, please wait for at least 5 minutes to access the conductor part of input or output terminals of the inverter after it is disconnected from the output of PV panel and AC grid. Caution: The temperature of metal enclosure may be high during operation. Disposal: Do not dispose of electrical appliances as unsorted municipal waste, use separate collection facilities. Contact you local government for information regarding the collection systems available. If electrical appliances are disposed of in landfills or dumps, hazardous substances can leak into the groundwater and get into the food chain, damaging your health and well-being. 4 www.JFY-tech.com CONTENT 1. OVERVIEW................................................................................................... 6 2. INSTALLATION...........................................................................................8 2.1 Package inspection .........................................................................8 2.2 Selecting the place of installation ................................................8 2.3 Fixed on the wall................................................................................9 2.4 System diagram and connection label ....................................... 11 2.5 Connecting to the AC grid (utility)..................................................12 2.6 Connecting to PV Panel (DC input) ............................................ 13 3. CONTROL PANEL FUNCTIONS....................................................... 14 3.1 Operate the Function Key ............................................................. 14 3.2 G e n e r a l L C D D i s p l a y I n f o r m a t i o n ................................... 16 4. INVERTER START-UP AND OPERATION ........................................ 17 5. CO M M UN IC AT I O N S ...........................................................................18 5.1 Data communications with RS232.................................................18 5.2 Data communications with RS485 (optional)...............................18 5.2.1 RS485 Serial Port........................................................................18 5.2.2 RJ45 Connectors.........................................................................19 5.2.3 RS485 Daisy Chain......................................................................19 5.3 Monitor Inverter..................................................................................21 6. INTERFACE PROTECTION AND SETTING POINTS....................... 21 7. TROUBLE SHOOTING ............................................................................22 8. SPECIFICATIONS .................................................................................... 23 9. JFY-tech WARRANTY ............................................................................ 28 10. JFY-tech CONTACT INFORMATION ...............................................30 5 www.JFY-tech.com 1. OVERVIEW 1.1 Machine Overview Control and display panel RS232 outlet PV input RS485 inlet and outlet (optional) AC terminals cover (AC terminals is inside) Front View Bottom View Fig.1 Overviews of inverter 6 www.JFY-tech.com Opening the package After opening the package, please check the contents of the box. It should contain the following accessories: Item 1. 2. Name Solar inverter Mounting frame 3. Mounting screws and blocks 6pcs/9pcs 4. 5. 6. Safety-lock screws Socket head wrench DC socket assembly RS-485 sockets, one with 120 ohm terminal resistor Instruction manual Monitor software(CD) Warranty sheet 2pcs/4pcs 1pcs 1set/2set/3set 7. 8. 9. 10. Quantity 1pcs 1pcs Optional 1pcs 1pcs 1pcs JSI-xxxxTL series include JSI-1100TL,JSI-1500TL,JSI-2000TL, JSI-2500TL, JSI-3000TL,JSI-3600TL,JSI-5000TL, JSI-6000TL 7 www.JFY-tech.com 2. INSTALLATION WARNING: The electrical installation of JSI inverter must be performed in compliance with applicable local and national standards and laws. WARNING: The connection of JSI inverter to the AC grid must be performed only after receiving authorization from the utility that operates the grid. 2.1 Package Inspection The customer is encouraged to perform the following checks: Inspect the package box for apparent damage, such as holes, cracking or any sign of possible damage to its contents. Describe any damage or shortage on the receiving documents and have the carrier sign his/her full name. Open the package box and inspect the contents for internal damage. While unpacking, be careful not to discard any equipment, parts or manuals. If any damage is detected, call the delivering carrier to determine the appropriate action. Save all shipping material for the event the carrier sends an inspector to verify damage! If the inspection reveals damage to the inverter, please call your local supplier or the authorized distributor. They will determine if the equipment should be returned for repair. They will also provide instructions on how to get the equipment repaired; It is the customer’s responsibility to file a claim with the carrier. Failure to file a claim with the carrier may void all warranty service rights for any damage; Carefully store the original packaging of JSI inverter since it shall be used in case it is necessary to ship it for repair. 2.2 Selecting the place of installation Place of installation should be selected based on the following considerations: JSI inverters shall be set at a suitable height from the ground to enable easy readout view of the display and the LEDs. Select a well ventilated place sheltered from direct sun radiation. Choose a place that allows fluent air flow around the unit. Allow sufficient room around the unit to enable easy installation and removal of the object from its mounting surface. The following figure shows the recommended minimum clearances around the inverter: 8 www.JFY-tech.com 200mm (8”) 200mm (8”) 200mm (8”) 200mm (8”) Fig.2 Installing minimum clearances around inverter 2. 3 Fixed on the wall Step1: Drill 6 or 9 holes as illustrated in the Fig.3 Step2: Fix the mounting frame as illustrated in the Fig.4 by the screws, then, hang the inverter on the mounting frame. Step3: Fix safety-lock screws at left side and right side as illustrated in Fig.5 with the attached socket head wrench. Step4: Check the installation conditions. For JSI-1100TL/-S and JSI-1500TL/-S For JSI-2000TL/-S, JSI-2500TL/-S JSI-3000TL/-S, and JSI-3600TL/-S 9 www.JFY-tech.com For JSI-6000TL/-S For JSI-5000TL/-S Fig.3 The size of mounting frame Fig.4 Hang inverter to mounting frame Fig.5 Fix safety-lock screws The customer is encouraged to perform the following checks: Do not install the solar inverter on a gradient surface. Check the upper straps of solar inverter and ensure it to fit on to the bracket. 10 www.JFY-tech.com Ensure safety-lock screws (M5 socket head cap screws) to insert into the mounting frame through inverter’s heatsink. Check the secure mounting of the solar inverter by trying to raise it from the bottom. The solar inverter should remain firmly attached. Choose a strong mounting wall to prevent vibrations while inverter is operating. 2. 4 Sy s t e m Di a g r a m an d Con n e c t i o n La b e l The JSI series are a single phase solar inverters. They are responsible for converting the direct current generated by PV panels into single-phase 230Vac 50Hz alternating current for delivery into the AC grid. The JSI series can be used in an on-grid PV system to produce electricity. The installation of the JSI series and their connection to the AC grid shall be done in accordance with local regulations and may require the installation of adequate electricity consumption measuring devices. The JSI series only operates when it is connected to the AC grid and can not operate as a stand-alone unit. The simplified connection diagram of the inverter is as follows. Fig.6 The PV system diagram A. B. C. D. PV Panels: Provide DC power to inverter. Solar inverter: Converts DC (Direct Current) power from PV panel(s) to AC (Alternating Current) power. Because Inverter is grid-connected it controls the current amplitude according to the PV Panel power supply. Inverter always tries to convert the maximum power from your PV panel(s). DC Switch and AC Switch: “DC switch” is between PV Panels and solar inverter while “AC Switch” is between AC Grid (Utility) and solar Inverter. They are be simplified in this diagram. In fact, they may consist of electrical breaker, fuse and connecting terminals. To comply with local safety standards and codes, the connection system should be designed and implemented by a qualified technician. JFY-tech also provides the solar inverter with an integrated DC switch demonstrated in dashed border in Fig.6. –S suffix indicates the inverter is integrated a DC switch in PV input side. AC Grid (Utility): Referred to as “grid” in this manual, is the way your electric 11 www.JFY-tech.com power company provides power to your place. Please note that Inverter can only connect to low-voltage systems (namely, 220/230Vac, 50Hz). Note: JFY-tech provides an integrated switch box that includes DC switch, AC switch, DC fuse, AC fuse, DC SPD and AC SPD devices as an option. Of course, you can get similar switch box from your local market. Fig. 7 Connections available on inverter bottom and relevant marking E. F. PV INPUT: Connected to PV Panels by MC4 terminals. RS232: Connected to monitoring computer by special RS232 cable provided by JFY-tech. G. RS485: daisy-chain communication for one or more inverters. H . AC TERMINAL (three blocks in right hand): Connected to AC Grid. 2. 5 Connecting to the AC Grid (Utility) A. Measure AC grid (utility) voltage and frequency. It should be 230VAC (or 220VAC), 50Hz and single phase. B. Open AC Switch between solar inverter and AC Grid (Utility). C. Open AC terminals cover and connect AC wires on AC terminals as follows: Fig. 8 AC terminals under AC terminals cover Recommended AC wires Model JSI-1500TL JSI-1100TL Diameter (mm) C r o s s A r e a ( m m ²) 1.83 2.63 12 A W G no . 13 www.JFY-tech.com JSI-2000TL JSI-2500TL JSI-3000TL JSI-3600TL JSI-5000TL JSI-6000TL 2.05 3.31 12 2.59 5.27 10 WARNING: HIGH LEAKAGE CURRENT! EARTH CONNECTION IS NECESSARY BEFORE CONNECTING PV PANEL. Incorrect grounding can cause physical injury, death or equipment malfunction and increase electromagnetic interference. Make sure that grounding conductors are adequately sized as required by safety regulations. Do not connect the ground terminals of the unit in series in case of a multiple installation. This product can cause current with a d.c. component. Where a residual current operated protective device (RCD) or monitoring (RCM) device is used for protection in case of direct or indirect contact, only an RCD or RCM of Type B is allowed on the supply side of this product. A RCD with a residual current setting of 30mA, located between the inverter and the mains, shall be provided at the endue application! 2. 6 Connec t ing to PV Pan el (DC inpu t) A. B. C. D. E. Under any condition! Make sure the maximum open circuit voltage (Voc) of each PV string is less than 550VDC for JSI-6000TL and JSI-5000TL, less than 500VDC for JSI-2000TL, JSI-2500TL, JSI-3000TL and JSI-3600TL, less than 450VDC for JSI-1100TL and JSI-1500TL. The length of input wire must be less than 30m. By the way, generally, in the lowest ambient temperature of your installing field, the Voc of PV string is the highest. Use MC4 (Multi-contact) connectors for PV array terminals. Open DC Switch and Connect the positive and negative terminals from the PV panel to DC switch, then to positive (+) terminals and negative (-) terminals on the solar inverter. Each DC terminal on inverter can withstand 20Adc. When connecting PV panels to DC Switch, then, DC Switch to the terminals of inverter, please make sure the polarity is correct. Incorrect polarity connection could permanently damage the unit. Please confirm short-circuit current of the PV string. The total short-circuit current of the PV string should be less than the inverter’s maximum DC input current. High voltages exist when the PV panel is exposed to the sun. To reduce risk 13 www.JFY-tech.com of electric shock, avoid touching live components and treat connection terminals carefully. Note: Ensure that photovoltaic field voltage polarity matches the “+” and “-” symbols. Before connecting JSI inverters with the photovoltaic field, JFY-tech recommends to check, using a proper gauge, that the polarity value and the voltage allowed value between positive and negative contacts are correct. 3. CONTROL PANEL FUNCTIONS There is an LCD screen, two LEDs and one function key on the front of the solar inverter. The LCD and LED provide you with details of the status of your Inverter. You also can use this Function key as a simple control. Fig. 9 Control panel A. LCD Screen: Display the operating data and situations, warning/error codes and information. B. The model of inverter (for example,JSI-3000TL) C. ALARM LED: Indicates the fault of inverter. D. POWER LED: Indicates the inverter is running normally. E. Function Key: Used to set different parameter and display language for the inverter. F. Description of inverter. Note: To save power, the LCD display’s backlight automatically turns off after 10 seconds. 3 . 1 Ope r a te the Funct io n Key To view the operating data of the inverter, you can press the Function Key. Of course, the data also will automatically and periodically display. To set different display contrast and display language for the inverter, please carefully refer to the following chart. 14 www.JFY-tech.com To lockup or unlock display message as follows: 15 www.JFY-tech.com 3 . 2 Ge ne r al LCD Dis pl a y Inf or m ati on State Message In LCD STATE DISPLAY CONTENT COMMENTS Wait State Standby PV input voltage low Waiting Connect in Initial waiting xxS Reconnect in xxS Inverter connection State Connect OK System checking System checking Connect to Grid Exx System error code Wxx System warning code Auto Test State Auto Testing Protection auto test Program State Programming Update Software Fault State Main Operating Messages In LCD STATE DISPLAY CONTENT COMMENTS Normal Operation JFY-TECH WWW.JFY-TECH.COM JSI-xxxxTL Ver Jx.x SN: xxxxxxx Etoday = xx.xkWh Etotal = xxxxkWH Pac = xxxx.xW Iac = xx.xA Vac = xxx.xV Fgrid = xx.xHz Abbr. company name JFY-TECH’s website The inverter model The FW version The Serial Number The energy today The total energy in lifetime The output power of inverter The output current of inverter The grid voltage The grid frequency 16 www.JFY-tech.com Vdc=xxx.xV G83 The PV input voltage Comply with main standard English Contrast x Current selected language LCD Contrast Note: Etoday will display the output energy in last day before the inverter continuously work until 30 minutes in the early morning. 4. INVERTER START-UP AND OPERATION WARNING: Do not place any items on JSI inverter during operation. When the inverter is operating, do not touch the heatsink since some parts may become very hot. Step 1: Ensure that the AC cable and DC cable is connected correctly, unused DC plugs and AC terminal cover are sealed. Step 2: Connect the DC and AC switches. The inverter starts up automatically when DC-power from the PV strings is sufficient. Once the solar inverter starts, it enters one of the following 3 states in turn: Standby: The PV string can only provide just enough voltage to minimum requirements of the internal controller unit. Waiting: When the PV string DC voltage is greater than 100V, the inverter enters a “waiting” state and attempts to connect to the grid. Normal: When PV string DC voltage is greater than 150V, Inverter operates in the normal state. The Inverter will keep MPPT function and deliver power to AC Grid when it is in normal operation. Maybe it will stop under the situation of low input DC-power, don’t worry, it will automatically restart again when DC-power from the PV string is sufficient. Error or Warning status Inverter is designed to be user-friendly, therefore, the error or warning status of the Inverter can be easily understood by reading the information shown on the front panel display. All possible messages are shown in the following table. DISPLAY Auto Test Failed W01 No grid W02 Vin overvoltage COMMENTS System fault Auto Test does not pass No Utility, No Grid Connect PV panel Voltage is too high 17 www.JFY-tech.com E01 E02 E03 E04 E05 E06 E07 E08 E09 E10 E11 E12 E13 E14 Isolation error Ileak error Grid fault Coherence error Over temperature Relay failure DCinj failure EEPROM failure Com. failure DC bus OV. DC bus UV. Vref error DC sensor fault GFCI failure Insulation Problem of PV panel GFCI Fault, leakage current is too high Grid voltage/frequency is out of range Inverter fault Consistent Fault Internal temperature abnormal Output relay Fault Output Current DC Offset too high EEPROM Fault Communication Fault DC Bus over-voltage DC Bus under-voltage 2.5V Reference Voltage Fault DC current sensor fault GFCI Device is damaged 5. COMMUNICATIONS 5.1 Data communication with RS232 Fig. 10 RS232 serial port Open the cover of RS232 serial port, connect solar Inverter and computer by RS232 cable. By the way, the communication distance should be below 10m. If your computer doesn't have any RS232 port, only has USB ports, please buy a RS232-USB converter for the communication in the local market. 5.2 Data communication with RS485 (optional) 5.2.1 RS485 Serial Port The RS485 is used for several inverters’ communication. Ethernet cable is applied to connect each inverter herein. Only three cables in ethernet cable are applied: two signal ones and one for ground connection. 18 www.JFY-tech.com Fig. 11 The waterproof RJ45 socket and connectors for RS485 port To help installation, the inverter features two RJ45 sockets to separate input ethernet cable from output ethernet cable. 5.2.2 RJ45 Connectors The RS485 serial connection, whether single unit or several inverters as daisy chain, can be performed by means of the RJ45 connectors (See Fig.11). It makes no difference if its sockets is no.1 or no.2 since they are connected in parallel, and signals are thus the same. One socket is for input ethernet cable with RJ45 connector, another socket is for output ethernet cable with RJ45 connector. The output ethernet cable reaches the following unit. RS485 pin definition is as follows: RJ45 connectors Pin # Signal Name 1 RTN Description 2 Signal Return Common reference for logical signals. Not Used 3 4 Not Used Not Used 5 Not Used 6 Not Used 7 -TR 8 +TR - Data Line Required for RS485 communication. + Data Line Required for RS485 communication. NOTE: You can buy T-568B standard Straight-Through ethernet cable to connect two adjacent inverters in local market. Of course, you can do it by yourself and remember the ethernet cable is Straight-Through. 5.2.3 RS485 Daisy Chain RJ45 connectors may be used to connect a single JSI inverter or multiple JSI inverters daisy chained together. Up to 31 inverters can be daisy chained. Recommended 19 www.JFY-tech.com maximum daisy chain length is 1000m. With multiple daisy-chained inverters, each unit will be automatically assigned a RS485 address with JFY monitoring software. The RJ45 socket with120Ω terminal resistor should be installed at the last inverter in the chain. JFY-tech provide a special RJ45 socket with terminal resistor and a vacant RJ45 socket in the attached accessories. When the inverter is not the last one in the chain, please draw out the terminal resistor and use it as a vacant RJ45 socket. In order to ensure that the communication on the RS485 line is very safe, JFY-tech recommends connecting an isolating RS232-485 adapter between the first inverter in the daisy chain system and the computer. Of course, non-isolating RS232-485 adapter can also work. The following diagram shows how to connect multiple inverters in a daisy chain configuration. Fig.12 Multiple daisy-chain connection NOTE: The RS485 link supports up to 31 inverters. NOTE: The RJ45 socket with120Ω terminal resistor should be installed at the last inverter in the chain. Even if there is only one inverter, the 120Ω terminal resistor is also necessary. 20 www.JFY-tech.com 5.3 Monitor Inverter After RS232 or RS485 link is connected correctly, open JFY monitoring software “JFY communicator” that is installed from the attached CD, the user can monitor the inverters. The right side of the main interface is the detailed information of inverter. As to more detailed setting methods and other functions, please refer to “JFY communicator user’s manual” in the CD. 6. INTERFACE PROTECTION AND SETTING POINTS Incorporated interface protection is designed according to G83(E.g.), it is insensitive to normal voltage and frequency variations in AC grid. The interface protections ensure that the inverter cease to energize AC grid when any parameters listed as below exceeds the applied operating setting points. Disconnection is provided in case of any hardware malfunctioning. The solar inverter will cease to energize AC grid in response to an interface protection, it is achieved by the simple isolation of two internal AC relays in series. Default interface protection settings Parameters Setting trip time Setting protection point Over voltage Under voltage 60ms 60ms 264Vac 198Vac Over frequency 60ms 50.49Hz Under frequency 60ms 47.51Hz Loss of the Mains 120ms DC injection current 120ms 500mA PV array Insulation 100ms resistance Reconnection time 20s 240ms Sudden change of 60ms 20ms residual current 1Mohm Continuous change of residual current 240mA --- --25mA 45mA 120mA 170ms 21 www.JFY-tech.com WARNING: This product can cause current with a d.c. current component. Where a residual current-operated protective device (RCD) or monitoring device(RCM) is used for protection in case of direct or indirect contact, only an RCD or RDM of Type B is allowed on the supply side of this product. 7. TROUBLE SHOOTING In most situations, the Inverter requires very little service. However, if Inverter is not able to work perfectly, please refer to the following instructions before calling your local dealer or service personnel. If any problems arise, the “Alarm” LED on the front panel will be red and the LCD displays the relevant information. Please refer to the following table for a list of potential problems and their solution. DISPLAY No any display in LCD or LED W01 No grid W02 Vin overvoltage E01 Isolation error E02 Ileak error E03 Grid fault HOW TO DO? Check PV-input connections Check grid connection cables. Check the Voc of PV string, see if it is greater than or too close to max. input DC voltage of relative inverter type. Check the impedance is between PV (+) & PV (-) and the PV-Inverter is earthed. The impedance must be greater than 2MΩ The leakage current is too high. Unplug the inputs from the PV string and check the peripheral AC system. Make sure grid voltage and frequency meet the specifications NOTE: During periods of little or no sunlight, the solar inverter may continuously start up and shut down. This is due to insufficient power generated to operate the control circuits, not a trouble. If you can not solve the trouble with above procedures, Please contact your local dealer or service personnel. Before contacting the authorized local dealer or service personnel, please find and keep at hand the following information: Information of JSI inverter 1. Inverter Model 22 www.JFY-tech.com 2. 3. 4. 5. 6. Serial Number Week of manufacture Which LED is red? Which warning/error is displayed? Do you notice whether warning/error can be repeated? Information of the PV array 1. 2. The model and manufacturer of the PV panels Number of strings in the PV array and number of panels per string 8. SPECIFICATIONS 23 www.JFY-tech.com Model JSI-1100TL JSI-1500TL Parameter Input Data Max. DC power Max. DC voltage MPPT operating voltage range Number of parallel inputs Number of MPP trackers Max. input current (total) 1170W 1720W 450V 450V 80V-450V 100V-450V 1 1 1 1 11.7A 10A Output Data Nominal AC output power 1100W 1500W Max. AC power 1100W 1650W 5.3A 7.9A 198~264Vac 198~264Vac 47.01~50.49Hz 47.01~50.49Hz Power factor (cos φ) >0.99 >0.99 THDI(at nominal output power) <3% <3% AC connection Single phase Single phase Max. efficiency 96.4% 96.5% Euro efficiency 95.4% 95.5% MPPT efficiency 99.6 % 99.6 % Max. output current AC grid voltage range AC grid frequency range General Data Dimensions (W /D / H) in mm Weight Operating temperature range 345/152/315 345/152/315 12Kg 12Kg –25 °C ~+60 °C –25 °C ~+60 °C 24 www.JFY-tech.com Model JSI-2000TL JSI-2500TL Parameter Input Data Max. DC power Max. DC voltage MPPT operating voltage range Number of parallel inputs Number of MPP trackers Max. input current (total) 2300W 2620W 500V 500V 100V-450V 100V-450V 1 2 1 1 13A 14.5A Output Data Nominal AC output power 2000W 2500W Max. AC power 2200W 2500W Max. output current 10.5A 12.5A 198~264Vac 198~264Vac 47.01~50.49Hz 47.01~50.49Hz AC grid voltage range AC grid frequency range Power factor (cos φ) >0.99 >0.99 THDI(at nominal output power) <3% <3% AC connection Single phase Single phase Max. efficiency 97% 97% Euro efficiency 96.2% 96.1% MPPT efficiency 99.6% 99.6% General Data Dimensions (W /D / H) in mm Weight Operating temperature range 345/152/355 345/152/355 13Kg 13Kg –25 °C ~+60 °C –25 °C ~+60 °C 25 www.JFY-tech.com Model JSI-3000TL JSI-3600TL Parameter Input Data Max. DC power 3550W Max. DC voltage 500V MPPT operating voltage range Number of parallel inputs Number of MPP trackers Max. input current (total) 3750W 500V 100V-450V 100V-450V 2 2 1 1 20A 21A Output Data Nominal power AC output 3000W 3600W Max. AC power 3400W 3600W Max. output current 15.7A 16A AC grid voltage range AC grid frequency range 198~264Vac 198~264Vac 47.01~50.49Hz 47.01~50.49Hz Power factor (cos φ) >0.99 >0.99 THDI(at nominal output power) <3% <3% AC connection Single phase Single phase Max. efficiency 97.2% 97.3% Euro efficiency 96.4% 96.5% MPPT efficiency 99.6 % 99.6 % General Data Dimensions (W /D / H) in mm Weight Operating temperature range 345/152/385 345/152/385 15Kg 15Kg –25 °C ~+60 °C –25 °C ~+60 °C 26 www.JFY-tech.com Model JSI-5000TL JSI-6000TL Parameter Input Data Max. DC power 5200W 6250W Max. DC voltage 550V 550V 100V-500V 100V-500V 3 3 1 1 MPPT operating voltage range Number of parallel inputs Number of MPP trackers Max. input current (total) 22.5A 27.5A Output Data Nominal AC output power 4600W 6000W Max. AC power 5000W 6000W 24A 31.2A Max. output current AC grid voltage range AC grid frequency range 198~264Vac 198~264Vac 47.01~50.49Hz 47.01~50.49Hz Power factor (cos φ) >0.99 >0.99 THDI(at nominal output power) <3% <3% AC connection Single phase Single phase Max. efficiency 97.6% 97.6% Euro efficiency 97% 97.1% MPPT efficiency 99.6 % 99.6 % General Data Dimensions (W /H / D) in mm Weight Operating temperature range 345/162/505 345/162/573 19Kg 24Kg –25 °C ~+60 °C –25 °C ~+60 °C 27 www.JFY-tech.com 9. JFY-tech WARRANTY Warranty Policy: Warranty Period: The JSI Series PV Grid-tied inverters provided by Shenzhen JingFuYuan Tech. Co., LTD. (abbr. JFY-tech) have 60-month warranty period. The system accessories provided by JFY-tech have 24-month warranty period. Warranty Time Start: From the date that you get goods from our distributors. Warranty Evidence: The Purchasing Invoice from the distributors & Product Series No. Note: JFY-tech will count from 2 months later according to ex-factory date as the warranty start time if client fails to provide the purchasing invoice and other documents. Scope: Any damages that occur during the WARRANTY PERIOD will be evaluated by Distributor and JFY-tech to define its scope and responsibility. Warranty Principles: To provide better service to JFY-tech’s end users, all JFY-tech’s authorized distributors are requested to respond to end users’ warranty claim, and the authorized distributors will replace any products or parts of the product during the warranty period proved to be defective in design or manufacture. The following cases will be excluded from the warranty (the Distributors are liable for investigation of the following): 1) “Warranty Card” not being sent back to distributor or JFY-tech. 2) Product modified or design changed or parts replaced not approved by JFY-tech. 3) Modifications, changes, or attempted repairs and erase series number or seals by non JFY-tech’s technician. 4) Incorrect installation or commissioning 5) Failure to observe the applicable safety regulations (G83 standards, etc.) 6) The Product has been improperly stored and damaged while being stored by the end user. 7) Transport damage, Painting scratch caused by shipping pumping. It should declare to insurance company as soon as containers unload with enough evidence. 8) Failure to observe the user manual, the installation guide, and the maintenance regulations 9) Incorrect use or inappropriate operation 10) Insufficient ventilation of the device 11) The maintenance procedures relating to such product have not been 28 www.JFY-tech.com observed or performed to an acceptable standard. 12) Force majeure (e.g., lightning, overvoltage, storm, fire) Claims that go beyond the rights cited in the warranty principles, in particular claims for compensation for direct or indirect damages arising from the defective device, for compensation for costs arising from disassembly and installation, or loss of profits are not covered by JFY-tech’s warranty, insofar JFY-tech is not subject to statutory liability. Warranty Claim Procedure: Please report defective devices with a brief error description to the JFY-tech’s distributors. If we agree to a replacement, we generally send an equivalent replacement device according to model and age, the remainder of the warranty entitlement will be transferred to the replacement device. In this case, you do not receive a new certificate since your entitlement is documented at JFY-tech. The replacement will be packaged appropriately for transport and shipped out within 2 working days. The defective device is to be packed in this transport packaging for return transport to the distributor. If the on-site service of re-installation is necessary, the end customers need to negotiate with the distributors in advance. All warranty services in warranty period are free of charge. 29 www.JFY-tech.com 10. JFY-tech CONTACT INFORMATION Shenzhen JingFuYuan Tech. Co., LTD. ADD: 5th Floor ,12th Block ,Nangang Second Industrial Park ,Nanshan District ,Shenzhen ,P.R.China Tel: +86-755-26632536 Fax: +86-755-26505986 Email: [email protected] 30