1
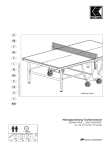
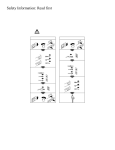
Table Tennis Table Assembly Instructions
Champ 5.0
Model No’s: 7138-600/7178-600
D
GB
F
NL
E
I
Der Umwelt zuliebe: Wir drucken auf 100% Altpapier!
PL
Abbildung ähnlich
10
13
GB
Assembly Instructions
Before assembling or using the table-tennis table, please read the following instructions carefully. They contain important
information for use and maintenance of the equipment as well as for your personal safety. Keep these instructions
in a safe place for maintenance purposes or for ordering spare parts.
All KETTLER products are designed in accordance with the latest safety regulations and undergo a constant process of quality
control during manufacturing. The knowledge gained in this process is used to constantly improve and develop our products. In order
to offer our customers the very best in product quality, we reserve the right to make technical changes at any time. In spite of this,
should you have any cause for complaint, please contact your KETTLER dealer.
Note on Safety
The table-tennis table should be used only for its intended
pur pose, i.e. for playing with suitable table-tennis bats and balls.
All other uses are prohibited and may be dangerous. The
man ufacturer cannot be held liable for damage or injury caused
by improper use of the table.
Damaged or worn components may endanger your safety or
shorten the lifespan of the table-tennis table. Replace worn or
damaged components immediately and remove the table from
use until this has been done. Use only spare parts manufactured
by KETTLER.
The table-tennis table complies with all safety regulations.
Incorrect repairs, alterations to the design (removal of original
parts, addition of other components etc.) may endanger the
safety of the user.
Instruct other persons (in particular children) using the table in
its correct use, and draw their attention to any potential source
of danger, especially when setting up or dismantling the table.
Caution: While assembly of the product keep off children’s
reach (Choking hazard - contains small parts).
When setting up or dismantling the table, stay clear of its
folding radius.
When folded up, the table-tennis table presents a large surface
to the wind. For this reason, ensure that it is stored in a
shel tered position.
The table-tennis table may be pushed only into the transport
position because there is otherwise a danger of injury.
The unit complies with the standard EN 14468–1:2004.
Depending on frequency of use, check all screws, bolts etc.
regularly to ensure that they are in good condition.
In case of enquiry, please contact your KETTLER dealer.
Handling the equipment
Do not use the table-tennis table until it has been fully and
cor-rectly assembled and checked.
For practising without a partner, the table halves can be folded
up singly.
Ensure that table-tennis tables which are not weatherproof are
not exposed to dampness or rain. Keep them well away from
direct sources of heat. Should the surface become warped, lay
the table on a level surface for a few days.
For more information on the sport of table-tennis, you are
referred to the specialist literature on the subject.
Set the table up on a level surface.
Do not cover it with plastic foil, under which condensation may
form. We recommend the weatherproof KETTLER tarpaulin, art.
no. 7032-300.
Instructions for Assembly
The equipment must be assembled with due care by two adult
persons.
Ensure that you have received all the parts required (see check
list) and that they are undamaged. Should you have any cause
for complaint, please contact your KETTLER dealer.
Before assembling the equipment, study the drawings carefully
and carry out the operations in the order shown by the
diagrams. The correct sequence is given in capital letters.
Please note that there is always a danger of injury when
working with tools or doing manual work. Therefore please be
careful when assembling this machine.
Ensure that your working area is free of possible sources of
danger, for example don’t leave any tools lying around. Always
dispose packaging material in such a way that it may not cause
any danger. There is always a risk of suffocation if children
play with plastic bags!
Caution: While assembly of the product keep out children’s
List of spare parts
When ordering spare parts, always state the full article number,
spare-partnumber, the quantity required and the S/N of the product (see spare parts drawing).
Example order: Art. no. 07138-600 / spare-part no. 94130118
/ 2 pieces / S/N......
Important: spare part prices do not include fastening material; if
fastening material (bolts, nuts, washers etc.) is required, this
should be clearly stated on the order by adding the words „with
fastening material“.
Do not use corrosive or abrasive materials to clean the
equipment. Ensure that such materials are not allowed to pollute the
environment . In most cases, a slightly dampened cloth is sufficient.
Waste Disposal:KETTLER products are recyclable. At the end of
its useful life please dispose of this article correctly and safely
(local refuse sites).
reach (Choking hazard - contains small parts).
The fastening material required for each assembly step is shown in
the diagram inset. Use the fastening material exactly as instructed.
Bolt all the parts together loosely at first, and check that they
have been assembled correctly. Tighten the locknuts by hand
until resistance is felt, thenuse spanner to finally tighten nuts
completely against resistance (locking device).Then check that
all screw connections have been tightened firmly. Attention:
once locknuts have been unscrewed they no longer function correctly (the locking device is destroyed), and must be replaced.
For technical reasons, we reserve the right to carry out
preliminary assembly work (e.g. addition of tubing plugs).
Please keep original packaging of this article, so that it may be
used for transport at a later date, if necessary. Goods may only be
returned after prior arrangement and in (internal) packaging, which
is safe for transportation, in the original box if possible. It is important to provide a detailed defect description / damage report!
GB KETTLER GB Ltd.
Kettler House, Merse Road
North Moons Moat
Redditch, Worcestershire B98 9HL
+44 1527 62423
+44 1527 591901
www.kettler.co.uk Mail: [email protected]
3
Checkliste (Packungsinhalt)
GB Checklist (contents of packaging)
F
Liste de vérification (contenu de l’emballage)
NL Checklijst (verpakkingsinhoud)
D
GB
F
NL
E
Lista de control (contenido del paquete)
I
Lista di controllo (contenuto del pacco)
PL
Lista kontrolna (zawartość opakowania)
Sie benötigen zusätzlich folgendes Werkzeug (Gehört nicht zum Lieferumfang):
You also need the following tools (Not included):
Vous avez besoin de cet util en complément (con compris dans la livraison)
U heeft tevens volgend gereedschap nodig (Is niet in de levering ingesloten):
E
Usted necesita adicionalmente la siguiente herramienta (no pertenece al volumen de suministro):
I
Per eseguire il montaggio, Vi occorre il seguente attrezzo (non è incluso nel volume di fornitura):
PL
10
13
Dodatkowo potrzebne są następujące narzędzia (nie objęte zakresem dostawy):
11
Messhilfe für Verschraubungsmaterial
GB Measuring help for screw connections
F
Gabarit pour système de serrage
NL Meethulp voor schroefmateriaal
1
12
E
Ayuda para la medición del material de atornilladura
I
Misura per materiale di avvitamento
PL
Wzornik do połączeń śrubowych
2
3
4
13
5
6
7
14
8
9
10
15
11
D
Sichern Sie die Plattenhälfte für die folgenden Montageschritte unbedingt gegen Abrutschen und/oder Umkippen!
E
Asegure la mitad de la plancha para los próximos pasos de
montaje contra deslizamiento y/o vuelco!
GB
Position one of the table halves and ensure that it cannot slip
or tilt over.
I
F
Il est absolument nécessaire de sécuriser les plateaux pour les
opérations de montage qui suivront, afin qu’ils ne puissent ni
glisser ni se renverser.
Per eseguire le seguenti fasi montaggio occorre assolutamente assicurare il piano di gioco contro lo scivolamento
e/oppure il ribaltamento.
PL
Po drugiej stronie uło y połówk płyty. Dla nast pnych
operacji monta owych nale y koniecznie zabezpieczy
połówk płyty przed ze lizgni ciem si i/lub przewróceniem si!
NL
Blokkeer deze bladhelft voor het volgende deel van de montage tegen wegglijden en/of kantelen.
12
16
13
ø 25 mm
1x
14
15
M6x30
17
16
17
18
18 Handhabungshinweis
GB Handling
F
Indication relative à la manipulation
NL Bedieningsinstruktie
E
Instrucciones de manejo
I
Avvertenze per il maneggio
PL
Wskazówki obsługowe
19
20
19
21
22
760mm
20
21
Ersatzteilliste
GB Spare parts list
F
Liste des pièces de rechange
Bezeichnung
Lista de las piezas de recambio
I
Elenco dei pezzi di ricambio
PL
NL Reserveonderdeellijst
Teil
E
Stück
. Nr.
Lista części zamiennych
Ersatzteil-Nr. .
für 07138-600
CHAMP 5.0
indoor
1
2
3
4
5
6
7
8
9
10
11
12
13
14
15
16
17
18
19
20
21
22
23
24
25
26
27
28
29
30
31
32
33
34
35
36
37
38
39
40
41
42
43
44
45
46
47
48
49
50
51
52
54
55
22
TT-Platte (Bitte unbedingt Art.-Nr. des TT-Tisches angeben!)
Stopfen für Profil 4255
Verbindungsrohr
Gelenkstück (4169)
U-Röhrchen 23x19x65 schwarz
Fußrohr
Stopfen mit Gewinde M16 (4270)
Zwischenstrebe
Schubstrebe
Gelenkstück (3983)
Endstopfen (3984)
Verbindungsrohr
PA-U-Scheibe 26 x 19 x 6; schwarz
Stützrohr
Verbindungsrohr
Gleitstücke (je 2 x rechts und links) mit Zubehör
Schlägerhalter
Netzhalter
Netz
Spannlaschen
Alu-Netzhalter
Seitenblende, oben (4800)
Seitenteil
Radverbinder (3509) mit Bremse
Radverbinder (3510)
Röhrchen 12 x 1,8 x 85
Sicherungshebel unten (3499)
Sicherungshebel ohne Raste (3479)
Sicherungshebel mit Raste (3478)
Zugfeder
Zugdraht
Röhrchen 10 x 1,9 x 16
Seitenblende, unten (4808)
TT-Rad 140 mm mit Bremsnocken
TT-Rad 140 mm ohne Bremsnocken
Bremshebel (3507)
Verstellrad (2324)
Lamellengleiter 40 x 25 mm mit Ausklinkung
Anschlagwinkel
Begrenzungswinkel
Schraubenbeutel (o. Abb.)
PE-Röllchen 12/6,3 x 8 mm schwarz
Distanzhülse (2802)
Distanzhülse (3473)
Auslösehebel (3500–1)
Auslösehebel (3500–2)
Rändelstift
Reibschutz (1668)
Spreizniet ø6 x 9,5 mm
Rändelmutter (4813) für Netzhalter
Ballhalter, rechts
Ballhalter, links
Abdeckung 4803
Abdeckkappe SW 10
2
4
2
4
4
4
4
2
4
12
4
2
4
4
3
1
2
2
1
2
2
2
2
2
2
4
4
2
2
2
4
10
2
4
4
2
4
4
2
2
1
4
4
2
2
2
2
4
4
2
2
2
2
4
94130118
70110454
94111315
70130456
10107038
94111318
70130460
94111320
94110945
70130789
70111059
94111323
10107067
94111325
94111326
94180367
70113887
94180343
73301011
10128013
25058709
70113848
94111299
70130847
70130848
97201441
70130826
70130827
70130828
25616011
25057020
97200573
70130804
40120135
40120136
70130816
70113750
10100009
97201284
97201819
94180363
10108136
70130525
70130825
70130833
70130834
11101020
70130890
10418503
70113889
70113885
70113886
70115018
70132298
Ersatzteil-Nr.
für 07178-600
CHAMP 5.0
outdoor
94130125
70110454
94111315
70130456
10107038
94111318
70130460
94111320
94110945
70130789
70111059
94111323
10107067
94111325
94111326
94180367
70113887
94180343
73301011
10128013
25058709
70113848
94111299
70130847
70130848
97201441
70130826
70130827
70130828
25616011
25057020
97200573
70130804
40120135
40120136
70130816
70113750
10100009
97201284
97201819
94180363
10108136
70130525
70130825
70130833
70130834
11101020
70130890
10418503
70113889
70113885
70113886
70115018
70132298
Ersatzteilzeichnung und –liste
GB
F
NL
Spare parts drawing
E
Designación de las piezas de recambio
Dessin des pièces de rechange
I
Disegno dei pezzi di ricambio
PL
Reserveonderdeeltekening
Rysunek części zamiennych
1
11
51
3
42
5
52
4
6
17
8
33
55
19
21
20
40
18
30
22
28
29
31
27
45 46 50
32
16
47
15 14 10 13 10
9 12
7 37
2 44 48 43 39 38
35 25 23 36 34 24 26 38 49 54
Xylem Holdings Ltd T/A Table-Tennis-Tables.co.uk
7 Oak Industrial Park, Chelmsford Road, Great Dunmow , Essex CM6 1XN
Tel: 01371 875000 Fax: 01371 875099
Website: www.table-tennis-tables.co.uk Email: [email protected]
23