1
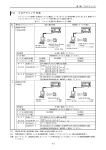
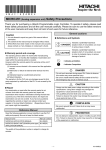
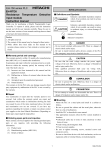
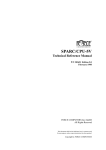
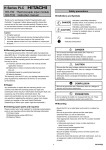
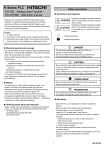
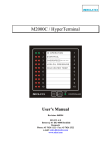
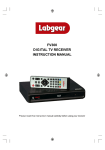
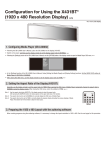
H Series MICRO-EH Ethernet Option Board Instruction manual Thank you for purchasing a Hitachi Programmable Logic Controller. To operate it safely, please read this instruction manual and all the user manuals carefully. Please be sure to use the latest versions of user manuals and keep them at hand of end users for future reference. Caution 1. All rights reserved. 2. The content of this manual may be changed without notice. 3. While efforts have been made on this manual to be accurate, please contact us if any mistake or unclear part is found. Installation ! CAUTION - Do not attach and detach an option board with power applied to MICRO-EH. Otherwise, there is a danger of breakdown and/or malfunction. Warranty period and coverage (1) Remove the cover A, B, and C from a basic unit. The warranty period is within 18 months after manufacturing date (MFG No) or 12 months after installation. Examination and repair within the warranty period is covered. However within the warranty period, the warranty will be void if the fault is due to; (1) Incorrect use from instructed in this manual and the application manual. (2) Malfunction or failure of external other devices than this unit. (3) Attempted repair by unauthorized personnel. (4) Natural disasters. The warranty is for the PLC only, any damage caused to third party equipment by malfunction of the PLC is not covered by the warranty. C A C B (2) Insert a connector on the back of EH-OBETH into a connector on a basic unit as shown. Repair Any examination or repair after the warranty period is not covered. A within the warranty period any repair and examination which results in information showing the fault was caused by any of the items mentioned above, the repair and examination cost are not covered. If you have any questions regarding the warranty or repair cost, please contact your supplier or the local Hitachi Distributor. (Depending on failure part, repair might be impossible.) (3) Attached screws fixate an option board to a basic unit. Screw position is [1] and [2] in EH-OBETH. Ordering spare parts and inquiries Please contact your local suppliers for ordering products/spare parts or any inquires with providing the following information. (1) Product name (2) Manufacturing number (MFG No.) (3) Details of failure Attached screws [2] Reference manual [1] Read the following application manuals carefully depend on series to use the PLC safely and properly. Be sure to keep the latest version. Manual name (4) Attach the cover A and B. Manual No. MICRO-EH APPLICATION MANUAL NJI-350*(X) MICRO-EH BASIC UNIT (20-point, 40-point, NJI-465*(X) 64-point type) APPLICATION MANUAL *: The alphabet between 350 and (X) means a version. The first edition is a space. And this is modified without notice. Name A B Type APPLICATION MANUALS CDM-PLC (Also other instruction manuals and application manuals of Hitachi PLC are included.) -1- NJI-540(X) Installing EH-OBMEM on communication board Basic specifications (1) After fixing a communication board by screws, insert a connector on the back of EH-OBMEM into a connector on the front of the communication board. Item Ethernet standard Transmission modulation method Medium access method Protocol Transmission speed Max. cable length to HUB Cable EH-OBMEM Specifications Conforms to IEEE802.3 Baseband CSMA/CD TCP/IP, UDP/IP 10 / 100 Mbps (Auto negotiation) 100 (m) Category 5 UTP or STP cable Communication specifications Item Communication protocol Number of connections Connection mode Watchdog timer (2) Fix EH-OBMEM to the option board by attached tapping screw. Attached tapping screw Specifications H-Protocol (task code communication) 2 connections Undesignated IP, Passive 1 to 65,535 seconds Name of each part Appearance [2] (3) Attach the cover A. [3] Features EH-OBETH is an option board to convert Serial to Ethernet. This allows to communicate with MICRO-EH over Ethernet network using H-Protocol. Since EH-OBETH has 2 logical ports, in total 3 communication lines are available in MICRO-EH (RS232C + 2 Ethernets) 2 [5] 3 [4] LINK (orange) ACTIVITY (green) STATUS (red) [5] [1] HMI 1 PC [1] Connection port RJ-45 type connector Connect Category 5 UTP or STP cable. [2] Status display LED Each LED displays the status of Ethernet communication individually. LINK : On (orange) when connecting by cable to HUB or communication device. ACTIVITY : On (green) during communication. STATUS : Not used [3] Memory board connector Connector for a memory board. [4] Connector for basic unit Connector to mount on a basic unit (located on the back side). [5] Mounting hole Use M3 screw to fix. Ethernet HUB Serial (RS-232C) -2- NJI-540(X) (2) Start web browser on PC and type the URL Setting of communication parameters Web browser is used to set the communication parameters. Setting parameter [ ]: Default setting IP address Subnet Mask Gateway address Protocol Port No. Watchdog Timer [192.168.0.1] [255.255.255.0] [None] [TCP] [3004, 3005] [30 sec.] Type the following URL into address field. http://[IP Address of EH-OBETH] (3) Enter user name and account The following window to login appears. Enter user name and password. Baudrate [ 4,800 bps ] Response wait [ 20 ms] Station No. [ none ] Baudrate [ 4,800 bps] Station No. [ None ] * These parameters are set by WRF03D Default setting User Name: root (fixed) Password: (none) i Communication setting Be sure to set communication parameters for both EH-OBETH and a basic unit. Communication parameters of a basic unit are set in special internal output WRF03D. WRF03D Field a b c d e 15 12 11 a b c 8 7 d (4) Language choice After logging in, a window to choose language appears. 0 e Content 0 : Setting completed, 1 : Setting change request 0 : Transmission control procedure 1 1 : Transmission control procedure 2 0 : Without station number, 1 : With station number Transmission speed H0 : 4800bps H1 : 9600bps H2 : 19.2kbps H3 : 38.4kbps Other than above : 4,800bps Station number (Set by BCD) Ex) Transmission control procedure 1, 38.4kbps, Without station number WRF03D = H8300 If basic unit complete the setting, setting value is changed as below . H8300 Î H0300 Choose your language. (5) Network setting (setting between host and Ethernet port) Choose “NETWORK” in the menu in the left side on the screen. In addition, the serial communication on EH-OBETH supports the “transmission control procedure 1”. Be sure to set transmission control procedure 1 in a basic unit. (1) Connect EH-OBETH to PC HUB Category 5 UDP or STP cable LAN Port Click the OK after entering the required parameters. -3- NJI-540(X) (6) Port setting (between communication board and basic unit) Choose “SERIAL” in the menu in the left side on the screen. Convenient functions (1) Password protection for communication parameters Password can be set in “ADMINISTRATOR” menu to protect communication parameters. Up to 20 alphameric characters can be set. [Notice] Do not forget your password. If the password is lost, it is impossible to change communication setting. (2) If IP address is unknown If the settings of serial communication of EH-OBETH is matched with basic unit, IP address and MAC address can be monitored in special internal outputs shown below. Special internal output WRF1A9 WRF1AA WRF1AB WRF1AC WRF1AD WRF1AE WRF1AF Click the OK after entering the required parameters. i Port setting Request Timeout is waiting time to respond. Use the default value (20ms) in normal use. (7) Saving the setting information Choose “SYSTEM” in the menu in the left side on the screen. Check the box of SAVE and then click the OK. IP Address Meaning IP address (1st byte) IP address (2nd byte) IP address (3rd byte) IP address (4th byte) MAC address (1st and 2nd bytes) MAC address (3rd and 4th bytes) MAC address (5th and 6th bytes) 192 168 0 1 WRF1A9 WRF1AA WRF1AB WRF1AC MAC Address XX XX WRF1AD XX XX WRF1AE XX XX WRF1AF i Value of special internal output Above special internal outputs are set once at start up of EH-OBETH. In ROM version 1.50 or older MICRO-EH, if retentive area is cleared or CPU is initialized, above values are cleared to 0. Basic units supporting EH-OBETH EH-OBETH can be used with following basic units. Basic units supporting EH-OBETH 64 points type Hardware Rev. 1.10 or later 40 points type (MFG No. 05Gxx or later) 20 points type Other than above EH-OBETH is not supported. (8) Rebooting the option board Rebooting EH-OBETH is required to enable the settings. Check the box of REBOOT and click the OK or restore power to the basic unit. ! CAUTION - If EH-OBETH is used with unsupported MICRO-EH, the system might be unstable due to power short. -4- NJI-540(X)