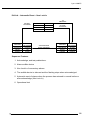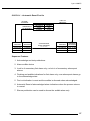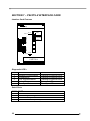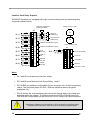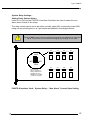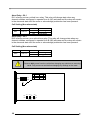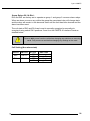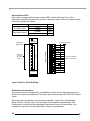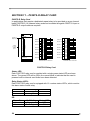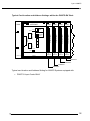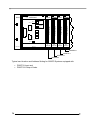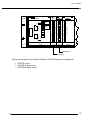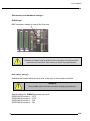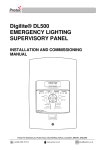
1
System 9000TS Event Recorder
INSTRUCTION MANUAL
The following methods are used in this manual to alert the user to important information:-
WARNING!
Warnings are provided for safety and MUST be followed
CAUTION
Cautions are provided to prevent damage to the instrument.
NOTE
These are used to give general information to ensure correct operation.
DATED
29-04-09
13-06-11
18
28-05-13
19
20
23-09-13
11-11-14
DESCRIPTION
Watchdog Relay coil state correction
Modified event list, IRIGB section, Trouble
shooting guide, Dual redundant.
Watchdog Relay Coil & Contact States
clarified
Advice regarding PSU type
Safe operating instructions updated
AUTHOR
PC
AI
APPROVED
DF
DF
PC
DF
AI
JAC
PC
DF
The copyright in this work is vested in Measurement Technology Limited and this document is issued for
the purpose only for which it is supplied. No licence is implied for the use of any patented feature. It
must not be reproduced in whole or in part, or used for tendering or manufacturing purposes except
under an agreement or with the consent in writing of Measurement Technology Limited and then only on
the condition that this notice is included in any such reproduction. Information furnished is believed to be
accurate but no liability in respect of any use of it is accepted by Measurement Technology Limited.
2
System 9000TS Event Recorder
REV
16
17
System 9000TS
TABLE OF CONTENTS
System 9000TS Event Recorder ........................................................................................................ 2
SECTION 1 - INTRODUCTION ..................................................................................... 8
SECTION 2 - SYSTEM DESCRIPTION AND FEATURES ........................................... 9
GENERAL ................................................................................................................................................. 9
UNIVERSAL CARD SLOTS ........................................................................................................................ 11
POLARISATION KEYS ............................................................................................................................... 11
SYSTEM CONNECTIONS........................................................................................................................... 11
CUSTOMER CONNECTIONS ...................................................................................................................... 11
FULLY FIELD CONFIGURABLE................................................................................................................... 11
PRINT OUTS ........................................................................................................................................... 11
FIRST-UP ALARMS .................................................................................................................................. 11
SYSTEM RELAYS .................................................................................................................................... 12
TIME DELAYS.......................................................................................................................................... 12
AUTO SHELVE ........................................................................................................................................ 12
SLEEP MODE .......................................................................................................................................... 12
SECTION 3 – MECHANICAL DETAILS ..................................................................... 13
LOGIC RACK ........................................................................................................................................... 13
MOUNTING ............................................................................................................................................. 13
EARTHING .............................................................................................................................................. 13
PLUG-IN CARDS ...................................................................................................................................... 13
LAMP / LED DISPLAYS ............................................................................................................................ 14
MULTIPLE RACKS SYSTEMS .................................................................................................................... 14
CHASSIS INTERCONNECTING RIBBON DETAILS ......................................................................................... 15
SECTION 4 – OPERATING INSTRUCTIONS ............................................................ 16
PRE-CHECKS .......................................................................................................................................... 16
STATUS LED .......................................................................................................................................... 16
POWER ON ............................................................................................................................................ 16
SECTION 5 – TECHNICAL SPECIFICATION ............................................................ 17
LOGIC SUPPLY........................................................................................................................................ 17
SUPPLY CURRENT .................................................................................................................................. 17
INDIVIDUAL REPEAT RELAYS ................................................................................................................... 17
COMMON RELAYS ................................................................................................................................... 17
FUSE RATINGS ........................................................................................................................................ 17
EMC COMPLIANCE ................................................................................................................................. 18
CONDUCTED RFI IMMUNITY..................................................................................................................... 18
RADIATED EMISSIONS ............................................................................................................................. 18
CONDUCTED EMISSIONS ......................................................................................................................... 18
RADIATED POWER FREQUENCY MAGNETIC FIELD..................................................................................... 18
ESD EFFECTS ........................................................................................................................................ 18
SURGE WITHSTAND – OSCILLATORY........................................................................................................ 18
ELECTRICAL FAST TRANSIENT/BURST IMMUNITY ...................................................................................... 18
SURGE IMMUNITY.................................................................................................................................... 18
ENVIRONMENT ........................................................................................................................................ 18
INPUT SPECIFICATIONS ........................................................................................................................... 19
OUTPUT SPECIFICATIONS ........................................................................................................................ 19
SECTION 6 – ALARM SEQUENCES ......................................................................... 20
SUMMARY .............................................................................................................................................. 20
ISA A – AUTOMATIC RESET – LOCK IN..................................................................................................... 22
ISA A-4-5-6 – STATUS ........................................................................................................................... 24
3
ISA M – MANUAL RESET – LOCK IN ......................................................................................................... 25
ISA R – RINGBACK ................................................................................................................................. 26
ISA F1A-1 – AUTOMATIC RESET FIRST UP .............................................................................................. 27
ISA F2M-1 – MANUAL RESET FIRST UP .................................................................................................. 28
ISA F3A – AUTOMATIC RESET FIRST UP ................................................................................................. 30
SECTION 7 – P925TS-X INTERFACE CARD ............................................................ 32
INTERFACE CARD FEATURES ................................................................................................................... 32
DIAGNOSTIC LED’S ................................................................................................................................ 32
SERIAL PORTS........................................................................................................................................ 32
GENERATING REPORTS........................................................................................................................... 33
BUFFERS................................................................................................................................................ 33
SORT DELAY PERIOD .............................................................................................................................. 33
SYSTEM RELAY OUTPUTS ....................................................................................................................... 34
AUDIBLE ALARM RELAYS ......................................................................................................................... 34
GROUP RELAYS ...................................................................................................................................... 34
GROUP RELAYS WITH REFLASH ............................................................................................................... 34
DIAGNOSTIC RELAY OUTPUTS ................................................................................................................. 34
WATCHDOG RELAY ................................................................................................................................. 34
TIME SYNCHRONISATION ......................................................................................................................... 35
TIME SYNCHRONISATION JUMPER SETTING .............................................................................................. 35
INTERFACE CARD RELAY OUTPUTS. ........................................................................................................ 36
SYSTEM RELAY SETTINGS:- .................................................................................................................... 37
SETTING RELAY CONTACT STATES .......................................................................................................... 37
HORN RELAY:- RL1 ................................................................................................................................ 38
HORN RELAY:- RL2 ................................................................................................................................ 38
GROUP RELAYS RL3 & RL4:- ................................................................................................................. 39
RELAYS RL5 - RL8:-............................................................................................................................... 40
REFLASH COMMON ALARM RELAYS ......................................................................................................... 40
POWER FAILURE MONITORING:- PF ......................................................................................................... 41
PRINTER FAILURE ALARM ........................................................................................................................ 42
TIME SYNC. FAILURE .............................................................................................................................. 42
BUFFER OVERLOAD ALARM ..................................................................................................................... 42
WATCHDOG RELAY:- WD ........................................................................................................................ 42
SECTION 7A – P925TS-X1/2 DUAL REDUNDANT INTERFACE CARD .................. 43
DUAL INTERFACE CARD FEATURES .......................................................................................................... 43
DIAGNOSTIC LED’S ................................................................................................................................ 43
DUAL REDUNDANT SYSTEM..................................................................................................................... 43
DOMINANT X1 AND SUBMISSIVE X2 ......................................................................................................... 43
DOMINANT X1 CONTROL FUNCTION ......................................................................................................... 44
SUBMISSIVE X2 CONTROL FUNCTION ...................................................................................................... 44
SWITCHOVER PROTOCOL ........................................................................................................................ 44
SWITCHOVER SCENARIO’S ...................................................................................................................... 44
TABLE BELOW LISTS EVENT TYPE’S SPECIFIC TO A DUAL REDUNDANT 9000TS SYSTEM. ............................... 46
DUAL REDUNDANT SPECIFIC EVENT TYPE’S ............................................................................................. 46
SECTION 8 – INPUTS AND OUTPUTS...................................................................... 47
OPTICALLY COUPLED INPUTS .................................................................................................................. 47
DIGITAL INPUTS ...................................................................................................................................... 47
LOCK IN ................................................................................................................................................. 47
LAMP/LED OUTPUTS .............................................................................................................................. 47
REPEAT RELAY OPTION .......................................................................................................................... 47
DUAL HORN RELAY ................................................................................................................................. 48
GROUP RELAYS ...................................................................................................................................... 48
REFLASH FACILITY .................................................................................................................................. 48
WATCHDOG RELAY ................................................................................................................................. 48
4
System 9000TS
RS485 COMMUNICATION OPTION............................................................................................................ 48
RS232 PRINTER PORT ........................................................................................................................... 48
RS232 PROGRAMMING PORT ................................................................................................................. 48
CONTROL INPUTS ................................................................................................................................... 48
GROUP INHIBITS ..................................................................................................................................... 49
DATA STORAGE ...................................................................................................................................... 49
SECTION 9 – P925TS-I INPUT CARD ....................................................................... 50
SIGNAL INPUT VOLTAGE SELECTION ........................................................................................................ 50
POWER ON / STATUS LED ....................................................................................................................... 51
ALARM STATUS LED’S ............................................................................................................................ 52
INPUT CARD FACE PLATE & WIRING ........................................................................................................ 52
PUSHBUTTON CONNECTIONS .................................................................................................................. 52
SECTION 10 – P925TS-O OUTPUT CARD................................................................ 54
LAMP PROTECTION ................................................................................................................................. 54
OUTPUT DRIVE TYPE .............................................................................................................................. 54
CARD ADDRESS SETTINGS ...................................................................................................................... 54
POWER ON / STATUS LED ...................................................................................................................... 54
LAMP / LED OUTPUT STATUS LED .......................................................................................................... 55
SECTION 11 – P925TS-R RELAY CARD .................................................................. 56
STATUS LED .......................................................................................................................................... 56
RELAY STATUS LED’S ............................................................................................................................ 56
OPERATING MODE .................................................................................................................................. 57
CONTACT STATE .................................................................................................................................... 58
COIL STATE ............................................................................................................................................ 58
SECTION 12 – LOGIC AND SIGNAL POWER OPTIONS ......................................... 61
STANDARD SYSTEMS USING 24VDC LOGIC AND SIGNAL POWER ............................................................. 61
LOGIC SUPPLY........................................................................................................................................ 61
SIGNAL SUPPLY ...................................................................................................................................... 61
OPTIONAL ISOLATED 24VDC SIGNAL INPUT POWER ................................................................................. 62
LOGIC SUPPLY........................................................................................................................................ 62
SIGNAL SUPPLY ...................................................................................................................................... 62
OPTIONAL 125VAC/DC HIGH VOLTAGE SIGNAL INPUTS ........................................................................... 63
LOGIC SUPPLY........................................................................................................................................ 63
SIGNAL SUPPLY ...................................................................................................................................... 63
OPTIONAL 48VAC/DC HIGH VOLTAGE SIGNAL INPUTS ............................................................................. 65
LOGIC SUPPLY........................................................................................................................................ 65
SIGNAL SUPPLY ...................................................................................................................................... 65
SECTION 13 – CARD ADDRESS SETTINGS ............................................................ 66
P925TS-I INPUT / P925TS-O OR P925TS-R OUTPUT CARD TYPICAL ADDRESSES SETTINGS ................... 67
SECTION 14 – END OF LINE LOAD .......................................................................... 68
SECTION 15 – INTER CARD COMMUNICATIONS ................................................... 69
UNIVERSAL CARD SLOTS ........................................................................................................................ 69
P9000TS LOCAL MTL COMMUNICATION SWITCH LOCATION AND SETTING ................................................ 70
UPPER RACK SWITCH SETTINGS ............................................................................................................. 71
LOWER RACK SWITCH SETTINGS ............................................................................................................. 71
SECTION 16 – EXAMPLES OF 9000TS SYSTEMS .................................................. 72
P9000TS SOE ONLY CARD LAYOUT ...................................................................................................... 72
9000TS SOE AND ANNUNCIATOR CARD LAYOUT ..................................................................................... 73
5
9000TS SOE ANNUNCIATOR AND REPEAT RELAY LAYOUT CARD ............................................................. 74
TYPICAL CARD LOCATION AND ADDRESS SETTINGS WITHIN THE P925TS-RK RACK ................................... 75
SECTION 17 – 9000TS EVENT TYPE KEY ............................................................... 78
P925TS-I INPUT CARD EVENT TYPE KEY ................................................................................................ 78
P925TS-0 OUTPUT CARD EVENT TYPE KEY............................................................................................ 79
P925TS-R RELAY CARD EVENT TYPE KEY ............................................................................................. 79
9000TS SYSTEM INTERNAL EVENT TYPE KEY.......................................................................................... 79
SECTION 18 – PORT 1 SERIAL COMMUNICATIONS .............................................. 82
PORT 1 PROTOCOL FORMATS. ................................................................................................................ 82
AMS TIME STAMPED EVENT PROTOCOL .................................................................................................. 82
MODBUS RTU PROTOCOL....................................................................................................................... 82
READ REQUEST – MASTER ..................................................................................................................... 82
READ RESPONSE – 9000TS SLAVE ......................................................................................................... 85
WRITE SINGLE REQUEST/RESPONSE – MASTER AND 9000TS SLAVE ....................................................... 85
WRITE MULTIPLE REQUEST – MASTER .................................................................................................... 86
WRITE MULTIPLE RESPONSE – SLAVE ..................................................................................................... 86
EXCEPTION RESPONSE – 9000TS SLAVE ................................................................................................ 87
SECTION 19 – PORT 2 SERIAL COMMUNICATION ................................................ 88
PORT 2 PROTOCOL FORMATS. ................................................................................................................ 88
PROG ................................................................................................................................................... 88
MODBUS RTU ..................................................................................................................................... 88
MODBUS RTU PROTOCOL....................................................................................................................... 88
READ REQUEST – MASTER ..................................................................................................................... 88
READ RESPONSE – 9000TS SLAVE ......................................................................................................... 91
WRITE SINGLE REQUEST/RESPONSE – MASTER AND 9000TS SLAVE ....................................................... 91
WRITE MULTIPLE REQUEST – MASTER .................................................................................................... 92
WRITE MULTIPLE RESPONSE – SLAVE ..................................................................................................... 92
EXCEPTION RESPONSE – 9000TS SLAVE ................................................................................................ 93
WHARTON PROTOCOL ............................................................................................................................ 93
SECTION 20 – PORT 3 SERIAL COMMUNICATION ................................................ 94
PORT 3 PROTOCOL FORMATS. ................................................................................................................ 94
WHARTON PROTOCOL ............................................................................................................................ 94
HOPF PROTOCOL .................................................................................................................................. 94
FOXBRGH 9600 E 1 8 .......................................................................................................................... 94
AUG CAT, G22, ALM ............................................................................................................................ 94
MODBUS RTU PROTOCOL....................................................................................................................... 94
READ REQUEST – MASTER ..................................................................................................................... 95
READ RESPONSE – 9000TS SLAVE ......................................................................................................... 97
WRITE SINGLE REQUEST/RESPONSE – MASTER AND 9000TS SLAVE ....................................................... 97
WRITE MULTIPLE REQUEST – MASTER .................................................................................................... 98
WRITE MULTIPLE RESPONSE – SLAVE ..................................................................................................... 98
EXCEPTION RESPONSE – 9000TS SLAVE ................................................................................................ 99
SECTION 21 – IRIGB – OPTION .............................................................................. 100
TIME CODE INPUT SPECIFICATIONS:- ..................................................................................................... 100
CONNECTIONS AND HARDWARE SETTINGS:-............................................................................................ 101
IRIGB CARD STATUS INDICATION:- ........................................................................................................ 103
IRIGB DATE AND TIME:- ....................................................................................................................... 104
IRIGB SYNC:- ...................................................................................................................................... 105
SECTION 22 – SPARE PARTS LIST ....................................................................... 106
SECTION 23 – SERVICING ...................................................................................... 107
6
System 9000TS
SECTION 24 – TROUBLE SHOOTING GIUDE ........................................................ 110
STATUS LED ON ALL CARDS FAIL TO ILLUMINATE ..................................................................................... 110
STATUS LED ON SOME INPUT CARDS FAIL TO ILLUMINATE ......................................................................... 110
STATUS LED ON SOME OUTPUT CARDS FAIL TO ILLUMINATE ..................................................................... 111
STATUS LED ON SOME RELAY CARDS FAIL TO ILLUMINATE ........................................................................ 111
EVENTS LOST DURING POWER DOWN ..................................................................................................... 112
PORT 2 CONFIGURATION (PROGRAMME) DOES NOT WORK ....................................................................... 113
INPUT CARD CHANNEL DOES NOT RESPOND TO LOCAL INPUT CHANGE ...................................................... 113
OUTPUT CARD CHANNEL DOES NOT RESPOND TO LOCAL INPUT CHANGE................................................... 113
RELAY CARD CHANNEL DOES NOT RESPOND TO INPUT CHANGE ............................................................... 113
INPUT CARD CHANNEL DOES NOT RESPOND TO REMOTE INPUT CHANGE ................................................... 113
OUTPUT CARD CHANNEL DOES NOT RESPOND TO REMOTE INPUT CHANGE................................................ 114
INPUT CARD FAILS TO SIGN ON .............................................................................................................. 114
OUTPUT CARD FAILS TO SIGN ON ........................................................................................................... 114
RELAY CARD FAILS TO SIGN ON ............................................................................................................. 114
SUSTAINED WATCHDOG RELAY FAULT .................................................................................................... 114
INTERMITTENT WATCHDOG RELAY FAULT ................................................................................................ 114
SUSTAINED PRINTER WATCHDOG FAULT ................................................................................................. 115
INTERMITTENT PRINTER WATCHDOG FAULT............................................................................................. 115
SUSTAINED AMS WATCHDOG FAULT ...................................................................................................... 115
INTERMITTENT AMS WATCHDOG FAULT.................................................................................................. 115
UNABLE TO CLEAR STATUS EVENT.......................................................................................................... 115
INTERFACE CARD STATUS LED NOT ILLUMINATED / FLASHING ................................................................... 115
INTERFACE CARD SYNC LED NOT ILLUMINATED / FLASHING....................................................................... 116
CARD FUNCTIONS INCORRECTLY ............................................................................................................ 116
UNABLE TO SILENCE AUDIBLE / HORN ON INPUT CARD ONLY SYSTEM ........................................................ 116
SILENCE AUDIBLE / HORN ON INPUT CARD ONLY SYSTEM UNRESPONSIVE.................................................. 116
SECTION 25 – CONTACT ........................................................................................ 117
Procedures for Factory Repair and Return Warranty ..................................................................... 117
7
SECTION 1 - INTRODUCTION
The 9000TS system is modular in design and can be used to display alarms for
immediate action and / or to record and print alarms for later analysis.
Typical systems comprise:•
Stand alone Sequential Event Recorder providing time stamping of events to a
1mS resolution.
•
Sequential Event Recorder with Combined Alarm Annunciation features and
Remote Displays
•
Sequential Event Recorder with Combined Alarm Annunciation features,
Remote Displays and Signal Duplicating Relays.
•
Stand alone Remote Logic Annunciator systems
•
Optional Alarm Management Software (AMS)
9000TS Systems are fully programmable using MTL’s windows based software utility
which is provided free of charge.
A programming port, RS232, is provided on the front of the Interface Card for
connection to a suitable PC / Laptop and no special programming language skills are
required as the user can simply enable or disable pre-defined features on a per
channel basis and the revisions can be down loaded to the system via the Interface
Card. Configuration data is stored in EEPROM on the individual cards without the
need for battery back-up.
9000TS Systems are constructed using a combination of the following key parts
MODEL NUMBER
P925TS-RK
P925TS-RK-ETN
P925TS-X
P925TS-I
P925TS-O
P925TS-R
P925TS-BL
P925TS-CABLE-1
8
FUNCTION
19” Rack Chassis (Base Unit)
19” Rack Chassis (Expansion Unit)
Interface Card
16 channel Input Cards
16 channel Output Cards
16 channel Repeat Relay Cards
Blanking Plates (For unused positions)
Rack Interconnection Ribbon Cable 1 metre length (standard)
System 9000TS
SECTION 2 - SYSTEM DESCRIPTION AND FEATURES
General
9000TS Systems are constructed using industry standard 19” Racks with front access to
the associated logic cards and rear access to custom terminals. All terminals are of the
rising clamp type suitable for a maximum of 2.5mm sq. wire and each terminal block
can be removed to aid installation. Terminal blocks are provided with locking screws for
increased security during normal operation.
RACK
INPUT
INTERFACE
STATUS
SYNC
RX TX
PORT 2
INTERNAL
2
PORT 3
3
RX TX
PORT 3
1
P925TS-RK
P925TS-X
P925TS-I
1
2
3
4
5
6
7
8
9
10
11
12
13
14
15
16
1A
P925TS-O
STATUS
1
2
3
4
5
6
7
8
9
10
11
12
13
14
15
16
RELAYS 1 TO 16
1
STATUS
OUTPUTS 1 TO 16
PORT 1
INPUTS 1 TO 16
PRINTER
PORT 2 (PROG)
RX TX
1
2
3
4
5
6
7
8
9
10
11
12
13
14
15
16
RELAY
OUTPUT
STATUS
1B
P925TS-R
P925TS-BL
A P925TS-RK 19” 3U Base Rack with 13 card slots is supplied with each system and
the following can be used as required.
•
•
•
•
•
•
P925TS-X Interface Card
P925TS-I
Input Cards (16 channel)
P925TS-O Output Cards (16 channel)
P925TS-R Relay Cards (16 channel)
P925TS-BL Blanking Plates to protect and cover unused positions
P925TS-RK-ETN 19” 3U Expansion Racks with 14 card slots
Any combination of Input, Output or Relay Cards can be used to suit individual
applications. Ribbon sockets are provided on the rear of each rack allowing all of the
common system bus to be linked to expansion racks using factory supplied ribbon
cables.
9
Each Rack is equipped with its own 24VDC Logic and Signal Supply Fuse for added
protection and status LED’s are provided per fuse.
10
System 9000TS
Universal Card Slots
All card slots within the racks are universal in application therefore Input, Output or
Relay Cards can be inserted into any available slot. Cards are inserted from the front
of the rack and once inserted automatically connect to the customer terminals located
on the rear of the chassis. Locking screws are provided at the top and bottom of each
card to ensure they are firmly seated at all times.
Polarisation Keys
For added security all cards and slots are supplied with polarisation keys to prevent
accidental insertion into the incorrect position within the racks. The polarisation can be
changed but care must be taken to ensure the associated field wiring is disconnected
and re-wired before cards of a different type are inserted into slots previously occupied
by different card types. For example high voltage inputs may have been used on a
socket that it being upgraded for use with low voltage outputs.
System Connections
In larger applications multiple racks can used to form larger systems and common bus
connections between racks are linked via MTL supplied plug in ribbon cables. These
connect to dedicated ribbon sockets located on the rear of each rack and are labelled
ribbon IN and ribbon OUT. The standard ribbon is 1mtr in length but additional length
cables can be supplied at time of order if required.
Customer Connections
Industry standard rising clamp terminal blocks, capable of accepting a maximum of
2.5mm2 cable are provided on the rear of each rack for connection of logic power,
signal power, signal inputs, lamp and relay outputs. Locking screws are provided at
the top and bottom of each terminal block to allow them to be easily removed during
installation, commissioning or fault finding.
Fully Field Configurable
Each channel within the 9000TS System can be configured by the customer using the
RTK supplied software utility and all programming information is stored in non-volatile
memory on individual cards with a minimum of 20 years retention. Full details of the
software and available features are provided via a separate manual.
Print Outs
A dot matrix printer can be directly connected to the P925TS-X Interface Card to
dynamically print the alarms as they occur or the user can choose to disable the print
function for later analysis. 3 tactile pushbuttons located on the face of the Interface
Card allow the user to trigger predefined reports as detailed later in this manual.
First-Up Alarms
When a group of alarms is initiated, it is often critical to know the first alarm to occur
within the group as it allows the user to quickly identify the primary cause of failure.
This should reduce downtime and allow the plant to be returned to the operational
state in the shortest possible time. A printout of events to a 1mS resolution and or a
First-Up alarm sequences can be used to identify the primary cause of failure.
11
System Relays
Eight relays are provided within the P925TS-X Interface Card comprising two horn
relays and six common relays, which can be software configured to provide common
alarm group or failure alarm contacts for use with 3rd party devices.
Time Delays
Whilst some of the alarms in the system may require events to be captured to a 1ms
resolution some of the alarms may not need to respond in the same manner. Input
Cards are therefore provided with incremental time delays that allow the user to
configure each channel to activate and / or de-activate after a pre-set time limit has
elapsed. Each channel can be selected between 1 and 65,000ms
Auto Shelve
When high-speed events are being captured and stored in logs a faulty input contact
to an alarm channel can quickly fill the associated event buffers. Each channel can be
software configured to automatically shelve an alarm if the frequency of alarms
exceeds the specified norm within a defined time period. Once the channel returns to
set limits it will be automatically removed from auto shelve and will carry on
responding in the normal way. When auto-shelve occurs the event is stored in memory
and printed as required.
Sleep Mode
In applications where plant areas are not manned on a permanent basis – Sleep Mode
– can be used to disable the output drives to Displays and Audibles. This feature is
used to minimise drain on the primary power source, (typically batteries), and to
prevent unnecessary noise pollution.
Sleep mode is a standard feature of the 9000TS System and it is important to note that
whilst in this mode the logic continues to respond to alarms in the normal manner. The
pushbutton functions are disabled during sleep mode to ensure that once this feature
has been turned off the operator can use the associated pushbuttons to control the
alarms in the normal way.
12
System 9000TS
SECTION 3 – MECHANICAL DETAILS
WARNING!
Installation, configuration and maintenance of this annunciator must only be
performed by competent service personnel
Logic Rack
The 9000TS System is mounted in industry standard 19" Racks manufactured to
IEC297-3 (DIN1494 Pt5). On larger systems multiple racks are supplied and ribbon
cables, which plug into dedicated sockets on the rear of each rack, are used to link
common bus lines.
WARNING!
This annunciator is designed for panel mounting. The rear portion of the
annunciator must be protected by an enclosure that is at least IP30 and can
only be accessed using a key or tool. Access to the rear enclosure must be
limited to service personnel only.
When mounting the rack care must be taken to ensure that there is sufficient room to
withdraw the cards from the front of the rack and for cable access to the rows of 16
way terminals mounted on the rear of the rack. Customer inputs and outputs are
capable of accepting cable up to a maximum of 2.5mm2 and each terminal block can
be removed for ease of wiring using the locking screws provided at either end of the
block
Mounting
The 19” Rack should be mounted in a location that is free from excessive moisture,
vibration, heat and dust with sufficient clearance at the front to withdraw all cards
without obstruction and space at the rear to connect the associated field wiring. All
spare positions in a rack are fitted with all of the necessary edge connectors and
chassis blanking plates for ease of expansion at a later date. Additional Input, Output
or Relay Cards can therefore be plugged in and connected with ease.
Earthing
To comply with the EMC requirements for electrostatic discharge IEC801-2 it is
essential that each 19" Rack is suitably earthed. A dedicated earth point is supplied on
the right hand side plate of each rack for this purpose.
Plug-in Cards
The first rack in any system is supplied with one P925TS-X Interface Card and thirteen
vacant card slots, which can be used for a combination of :-
13
CARD TYPE
P925TS-1
P925TS-O
P925TS-R
P925TS-BL
FUNCTION
16 Channel Input Card
16 Channel Output Card
16 Channel Repeat Relay Card
Blanking Plates
SPACE REQUIRED
One Card Slot
One Card Slot
Two Card Slots
One Card Slot
Once the cards are plugged into the rack they automatically connect to the
motherboard to link all of the control functions between cards and to provide
connections to the Customer terminals mounted on the rear of the rack.
WARNING!
Hazardous voltages may exist inside the System 9000TS. Blanking plates
must be fitted over any unused card slots or when cards are removed and
the System 9000TS is left unattended.
Lamp / LED Displays
The 9000TS System is able to drive existing displays or MTL can supply the system
with MTL manufactured display units as required.
Multiple Racks Systems
In larger SOE or combined SOE / Annunciator schemes multiple racks can be supplied
as required.
These systems still only 1 x P925TS-X Interface Card for communication to the
outside world and to being able to configure the associated cards.
The common signals required between racks are fully buffered and are connected
using MTL supplied plug in ribbon cables which connect into dedicated sockets on the
rear of the associated racks as typically shown below.
14
System 9000TS
Chassis Interconnecting Ribbon Details
FUSE 1
FUSE 2
INPUT
OUTPUT
RTK SUPPLIED CHASSIS
INTERCONNECTING RIBBON
FUSE 1
PART NO. P925TS-CABLE-1
FUSE 2
INPUT
(1 Metre supplied as standard)
OUTPUT
15
SECTION 4 – OPERATING INSTRUCTIONS
Pre-checks
The system is supplied fully tested and, if requested, pre-configured to suit your
application so detailed on site re-testing should not be necessary.
After connections have been completed the following pre-checks should be made
before applying power.
1. Ensure the equipment is earthed using the specific earth stud on the right-hand
side of the P925TS-RK Euro-rack.
2. Check that the power supply is adequately rated and suitable for the primary supply
available and that the output voltage is suitable for use with the 9000TS system.
3. The 9000TS System requires a 24VDC logic supply and the 24VDC signal supply
is derived from this supply as standard. (Options exists for high voltage inputs fed
via external power source as detailed within this manual)
4. Check that all cards are fully seated and the retaining screws have been tightened.
5. Check all alarm contacts are volt-free and correctly wired using the common
voltage +24VDC available on terminal +VC for standard systems (Options exists for
high voltage inputs fed via external power source as detailed within this manual)
6. Care should be taken with the output wiring to the display to ensure no shorts
occur.
7. Please note a short in the output will not damage the equipment but could give
extremely misleading results.
WARNING!
Hazardous voltages may exist inside the System 9000TS.
All cards must be fully seated and screwed down before power is applied.
Blanking plates must be fitted over any unused card slots.
Status LED
Each card is supplied with a status LED which is used for fault and setup indication:LED
ON
OFF
STATUS
Normal Operation
Faulty card or card not recognised in software
Power ON
After completing the above pre-checks, power can be supplied to the unit. The system
will complete an initial self-test and will search for all of the installed cards. During this
time the status LED on the associated input / output card will illuminate as soon as the
system recognises the card and its settings.
WARNING!
Hazardous voltages may exist on the rear connections of the annunciator.
Remove all power before removing any cover or connector. Ensure all
covers and connectors are fully secured before restoring power.
16
System 9000TS
SECTION 5 – TECHNICAL SPECIFICATION
Logic Supply
24VDC ( 19 to 36VDC )
A range of power supplies are available to convert from
higher AC or DC primary supply voltages.
Any external power supply connected to the annunciator must be compliant to
UL60950 or EN60950 or suitable equivalent standards.
Supply Current
MODEL NO
P925TS-X
P925TS-I
P925TS-O
P925TS-R
RTK LED
RTK 28V
@ 24VDC for all card types
TYPE
Interface Card
Input Card
Output Card
Relay Card
LED Cluster
Lamp
CURRENT
1A
100mA
100mA plus Lamp / LED load
250mA
20mA each
40mA each
Individual Repeat Relays
VOLTAGE
24VDC
125VDC
RATING (RESISTIVE)
2A
0.5A
Common Relays
VOLTAGE
24VDC
125VDC
RATING (RESISTIVE)
2A
0.5A
Fuse ratings
FUSE
F1
RATINGS
1A/T
PURPOSE
Protects the +24VDC signal supply from each chassis
F2
5A/F
Protects the main 24VDC logic supply to each chassis
Alarm Sequences
Compliant to ISA Standard S18.1 – 1979 (R.1992)
Each channel can be configured to operate in accordance
with the standard ISA sequences detailed in ISA-S18.1
1979.
17
Terminals
Rising clamp type terminals complete with locking screws.
Maximum cable size 2.5 mm Square
EMC Compliance
Radiated RFI Immunity
IEC 61000-4-3
Conducted RFI Immunity
IEC 61000-4-6
Radiated Emissions
IEC 61000-6-3
Conducted Emissions
IEC 61000-6-3
Radiated Power Frequency Magnetic Field
IEC 61000-4-8
ESD Effects
IEC 61000-4-2
Surge Withstand – Oscillatory
ANSI C37.90.1
Electrical Fast Transient/Burst Immunity
IEC 61000-4-4
Surge Immunity
IEC 61000-4-5
LVD Compliance
EN61010-1:2010
IEC61010-2-201 Ed. 1
Environment
Operating temperature
0°C to 60°C
Storage temperature
-20°C to 80°C
Humidity
18
0-95% RH, non-condensing
System 9000TS
Input Specifications
Contact
Volt Free contacts that can be software configured to be
either normally open or normally closed.
Voltage
24V AC/DC with selectable option per channel for
125VAC/DC (Option for 48VAC/DC)
Contact resistance
N/C series resistance of contact cables 20K Ohm max
Contact resistance
N/O parallel resistance of contact cables 200K Ohm min
Alarm contact current
Typical loop current 2mA
Input response time
Selectable form 1mS to 65,000mS
First up discrimination
1mS
Input protection
The equipment is protected against reverse connection of
the supply input.
Pushbuttons
Control pushbuttons can be software configured as
required and normally use +24VDC as a common return in
systems using high voltage inputs they use the same return
as the signals (48VAC/DC or 125VAC/DC)
Output Specifications
Output cards
Each channel can drive up to 160mA @ 24VDC, making it
suitable for multi bulb / LED displays or multiple repeat
displays.
System relays
There are eight systems relays comprising two horn relays
and six common relays, which can be configured as group
or fault relays. A volt free contact is provided per relay,
which can be set to normally open or normally closed as
required.
All contacts are rated at 2A @ 24VDC
Repeat relays
As an option 16 channel repeat relay cards are available
which provide a volt free contact per relay, which can be
set to normally open or normally closed as required.
All contacts are rated at 2A @ 24VDC
Communications
RS485 Bi-directional modbus communication port, 9 Pin
programming port and 25 Pin printer port.
19
SECTION 6 – ALARM SEQUENCES
On systems supplied with P925TS-O Output Cards each channel can be programmed
to operate to a sequence defined within ISA-S18.1 Alarm Sequences. Full details of
how to set each channel to the required alarm sequence are provided in the 9000TS
Configuration Manual.
The following paragraphs detail the most common features.
Summary
Within the alarm annunciator market a common standard has been adopted by all key
manufacturers and end users with regards to operational sequences. These standards
are used worldwide to define the visual indication, audible alarm and the action the
operator must take to control the annunciator.
The Instrument Society of America provide full details of each alarm sequence within
ISA 18.1-1979 (R1992) and MTL are fully compliant with the stated sequences. The
most common sequences are detailed within this section of the manual.
Pushbuttons
Six pushbutton functions are provided within the 9000TS System to allow the user to
be able to control any of the available sequences.
1. Lamp Test – is used to test the LED assemblies by illuminating them in a
steady state for as long as the pushbutton is pressed
2. Functional Test – is used to simulate an input on all channels and therefore all
windows and horn circuits will operate in accordance with the selected ISA
sequence and additional pushbuttons will need to be pressed to step through
the alarm sequence to return the unit to its normal state
3. Mute – is used to silence the audible alarm whilst allowing the associated alarm
window to continue to operate in accordance with the selected ISA sequence
4. Acknowledge – is used to silence the alarm and change the state of the
associated alarm window in accordance with the selected ISA sequence
5. Reset – is used to return the alarm to the normal off state once the Input has
returned to the normal condition
6. First Reset – is used to reset the flash sequence on the first alarm to occur
within a defined group of alarms. Once first reset has been pressed the next
alarm to occur within the group will flash at the first up alarm rate.
20
System 9000TS
Audible Alarms
Each channel within the annunciator can be set to operate RL1 and RL2 common horn
relays as required and RL5 – 8 can be set as additional horn relays as required.
Automatic Reset
Once a channel has been acknowledged and its input has returned to normal the
alarm can be set to automatically reset without the operator having to press the reset
pushbutton
Non Latch Sequence – (No Lock In)
Alarms can be set to non lock-in, which allows the alarm to automatically return to the
non alarm state as soon as the signal input returns to normal
Ringback Sequence
Ringback sequence is used to inform the operator both visually and audibly that an
alarm condition has cleared and the channel can be reset to its normal off state. When
a contact returns to normal the associated window will flash at approx ½ the speed of
a normal alarm and the audible will sound. This identifies the specific alarm and
informs the operator that the alarm can be reset to its normal off state.
First Up Sequences
When monitoring devices with interlinked functions such as a turbine or compressor it
is often important to know the specific alarm that occurred first, as it will invariably
result in cascade of secondary alarms. This allows the operator to focus on the root
cause of failure and therefore limits the downtime and associated costs. This is
achieved by having the first-up alarm flashing in a different manner compared to the
subsequent alarms. Four different first-up sequences are available F0, F1, F2 and F3
as detailed below and in the following sequence tables.
F0 The standard mode adopted by MTL Instruments, which indicates the first-up alarm
by flashing at twice the rate of subsequent alarms.
F1 In this mode subsequent alarms appear in the acknowledged state, hence they do
not flash. The audible device does not operate when subsequent alarms occur,
unless still operating from the first alarm. The acknowledge pushbutton will reset
the first-up indication.
F2 In this mode all subsequent alarms do not flash, they will however operate the
audible device. The acknowledge pushbutton will reset the first-up indication.
F3 In this mode initial alarms appear with an intermittent flash rate and subsequent
alarms flash at a steady rate. On acknowledge subsequent alarms revert to the
steady on state and only the first alarm continues to flash at a slower rate.
Please note auto reset and non lock- in functions are not recommended when using
first up sequences as the true sequence of events cannot be guaranteed.
The most common sequences are detailed below:-
21
ISA A – Automatic Reset – Lock In
RETURN
TO NORMAL
PROCESS
ABNORMAL
OR NORMAL
SEQUENCE
VISUAL
AUDIBLE
ACKNOW
ON
SILENT
PROCESS
NORMAL
SEQUENCE
VISUAL
AUDIBLE
NORMAL
OFF
SILENT
TO
ABNORMAL
ACKNOWLWDGE
WHILE NORMAL
ACKNOWLEDGE
WHILE ABNORMAL
PROCESS
ABNORMAL
OR NORMAL
SEQUENCE
VISUAL
AUDIBLE
ALARM
FLASHING
AUDIBLE
Sequence Features
1. Acknowledge and test pushbuttons.
2. Alarm audible device
3. Lock In of momentary alarms until acknowledged
4. The Audible device is silenced and the flashing stops when acknowledged.
5. Automatic reset of acknowledged alarms when the process has returned to
normal
6. Operational test
22
System 9000TS
ISA A-4 – Automatic Reset – Non Lock In
TO
ABNORMAL
RETURN
TO NORMAL
PROCESS
ABNORMAL
OR NORMAL
SEQUENCE
VISUAL
AUDIBLE
ACKNOW
ON
SILENT
PROCESS
NORMAL
SEQUENCE
VISUAL
AUDIBLE
NORMAL
OFF
SILENT
ACKNOWLEDGE
WHILE ABNORMAL
RETURN
TO NORMAL
PROCESS
ABNORMAL
OR NORMAL
SEQUENCE
VISUAL
AUDIBLE
ALARM
FLASHING
AUDIBLE
Sequence Features
1. Acknowledge, and test pushbuttons.
2. Alarm audible device
3. Non Lock In of momentary alarms
4. The audible device is silenced and the flashing stops when acknowledged.
5. Automatic reset of alarms when the process has returned to normal before or
after acknowledge (Non Lock In)
6. Operational test
23
ISA A-4-5-6 – Status
RETURN
TO NORMAL
PROCESS
NORMAL
SEQUENCE
VISUAL
AUDIBLE
NORMAL
OFF
SILENT
PROCESS
ABNORMAL
OR NORMAL
SEQUENCE
VISUAL
AUDIBLE
ALARM
ON
SILENT
TO
ABNORMAL
Sequence Features
1. Test pushbutton.
2. No alarm audible
3. The visual alarm does not flash
4. Non Lock In of momentary alarms
5. Automatic reset of alarms when the process has returned to normal before or
after acknowledge (Non Lock In)
6. Operational test
24
System 9000TS
ISA M – Manual Reset – Lock In
RESET
WHILE NORMAL
PROCESS
ABNORMAL
OR NORMAL
SEQUENCE
VISUAL
AUDIBLE
ACKNOW.
ON
SILENT
PROCESS
NORMAL
SEQUENCE
VISUAL
AUDIBLE
NORMAL
OFF
SILENT
ACKNOWLEDGE
WHILE ABNORMAL
TO
ABNORMAL
PROCESS
ABNORMAL
OR NORMAL
SEQUENCE
VISUAL
AUDIBLE
ALARM
FLASHING
AUDIBLE
Sequence Features
1. Acknowledge, reset and test pushbuttons.
2. Alarm audible device
3. Lock In of momentary alarms until acknowledged
4. The Audible device is silenced and the flashing visual alarm stops when
acknowledged.
5. Manual reset of acknowledged alarms when the process has returned to normal
6. Operational test
25
ISA R – Ringback
RESET
PROCESS
NORMAL
SEQUENCE
VISUAL
AUDIBLE
RINGBACK
SLOW FLASH
PULSING
RETURN
TO NORMAL
PROCESS
NORMAL
SEQUENCE
VISUAL
AUDIBLE
NORMAL
OFF
SILENT
TO ABNORMAL
ACK WHILE ABNORMAL
PROCESS
ABNORMAL
OR NORMAL
SEQUENCE
VISUAL
AUDIBLE
ALARM
FAST FLASH
AUDIBLE
RETURN TO NORMAL
PROCESS
ABNORMAL
SEQUENCE
VISUAL
AUDIBLE
ACKNOW
ON
SILENT
ACKNOW
WHILE NORMAL
Sequence Features
1. Acknowledge, reset and test pushbuttons.
2. Alarm audible device. (optional Ringback audible device)
3. Lock In of momentary alarms until acknowledged
4. The audible device is silenced and the flashing stops when acknowledged
5. Ringback visual ad audible indications when the process condition returns to
normal
6. Manual reset of Ringback indications
7. Operational test
26
System 9000TS
ISA F1A-1 – Automatic Reset First Up
RETURN
TO NORMAL
SUBSEQUENT
TO ABNORMAL
PROCESS
ABNORMAL
SEQUENCE
VISUAL
AUDIBLE
ACKNOW.
ON
SILENT
PROCESS
NORMAL
SEQUENCE
VISUAL
AUDIBLE
NORMAL
OFF
SILENT
ACKNOWLEDGE
WHILE ABNORMAL
(FIRST OUT RESET)
FIRST TO
ABNORMAL
PROCESS
ABNORMAL
OR NORMAL
SEQUENCE
VISUAL
AUDIBLE
FIRST ALARM
FLASHING
AUDIBLE
Sequence Features
1. Acknowledge and test pushbuttons.
2. Alarm audible device
3. Lock In of momentary first alarm only, no lock in of momentary subsequent
alarms
4. Flashing and audible indications for first alarm only, new subsequent alarms go
to the acknowledge state.
5. First out indication is reset and the audible is silenced when acknowledged.
6. Automatic Reset of acknowledged alarm indications when the process returns
to normal
7. Silence pushbutton can be used to silence the audible alarm only
27
ISA F2M-1 – Manual Reset First Up
SEQUENCE DIAGRAM
RESET WHILE
NORMAL
PROCESS
NORMAL
SEQUENCE
NORMAL
VISUAL
OFF
AUDIBLE
SILENT
FIRST TO
ABNORMAL
SUBSEQUENT TO
ABNORMAL
PROCESS
ABNORMAL
OR NORMAL
SILENCE
SEQUENCE
SUBSEQUENT
ALARM
VISUAL
ON
AUDIBLE
ON
ACKNOWLEDGE
PROCESS
ABNORMAL
OR NORMAL
PROCESS
ABNORMAL
OR NORMAL
SEQUENCE
ACKNOWLEDGED
SEQUENCE
FIRST ALARM
VISUAL
ON
VISUAL
FLASHING
AUDIBLE
SILENT
AUDIBLE
AUDIBLE
ACKNOWLEDGE
(FIRST OUT RESET)
PROCESS
ABNORMAL
OR NORMAL
ACKNOWLEDGE
(FIRST OUT RESET)
SEQEUNCE
FIRST SILENCED
VISUAL
FLASHING
AUDIBLE
SILENT
SILENCE
SEQUENCE ISA F2M-1
(MANUAL RESET FIRST OUT WITH NO SUBSEQUENT ALARM FLASHING & SILENCED PUSHBUTTON)
28
System 9000TS
PROCESS
CONDITION
LINE
1
2
3
FIRST
SUB.
4
FIRST
5
SUB.
6
FIRST
7
SUB.
8
FIRST
9
NORMAL
ABNORMAL
ABNORMAL
ABNORMAL OR
NORMAL
ABNORMAL OR
NORMAL
ABNORMAL OR
NORMAL
PUSHBUTTON
OPERATION
SEQUENCE
STATE
VISUAL
DISPLAY
NORMAL
FIRST ALARM
SUB. ALARM
OFF
FLASHING
ON
ACKNOWLEDGE
BEFORE SIL
ALARM
AUDIBLE
DEVICE
SILENT
AUDIBLE
AUDIBLE
TO LINE 7
SILENCE
FIRST SILENCED
FLASHING
SILENT
ABNORMAL OR
NORMAL
SILENCE
ACKNOWLEDGE
ON
SILENT
ABNORMAL OR
NORMAL
ACKNOWLEDGE
AFTER SILENCE
NORMAL
RESET
TO LINE 7
NORMAL
OFF
SILENT
REMARKS
LOCK-IN
LOCK-IN
FIRST OUT
RESET
MANUAL
RESET
REQUIRED
FIRST OUT
RESET
MANUAL
RESET
SEQUENCE FEATURES
1. Silence, acknowledge, reset and test pushbuttons
2. Alarm audible device
3. Lock-in of momentary alarms until acknowledged.
4. Option1 – silence pushbutton to silence the alarm audible device
while retaining the first out flashing indication
5. Flashing indication for first alarm only. new subsequent alarms have
the same visual indication as acknowledged alarms.
6. First out indication is reset when acknowledged
7. Manual reset of acknowledged alarm indications after process
conditions return to normal.
8. Operational test
29
ISA F3A – Automatic Reset First Up
SEQUENCE DIAGRAM
RETURN
TO NORMAL
PROCESS
NORMAL
SEQUENCE
NORMAL
VISUAL
OFF
AUDIBLE
SILENT
ACKNOWLEDGE
WHILE ABNORMAL
ACKNOWLEDGE
WHILE NORMAL
FIRST TO
ABNORMAL
SUBSEQUENT TO
ABNORMAL
PROCESS
ABNORMAL
OR NORMAL
STATE
SUBSEQUENT
ALARM
VISUAL
FAST FLASHING
AUDIBLE
ON
FIRST OUT RESET
PROCESS
ABNORMAL
OR NORMAL
SUBSEQUENT
ACKNOWLEDGE
SEQUENCE
FIRST ALARM
VISUAL
ON
VISUAL
INTERMITTENT
FLASHING
AUDIBLE
SILENT
AUDIBLE
AUDIBLE
PROCESS
ABNORMAL
SEQUENCE
FIRST OUT RESET
WHILE NORMAL
FIRST OUT RESET
WHILE ABNORMAL
PROCESS
ABNORMAL
OR NORMAL
FIRST
SEQUENCE
ACKOWLEDGED
VISUAL
SLOW FLASHING
AUDIBLE
SILENT
ACKNOWLEDGE
SEQUENCE ISA F3A
(AUTOMATIC RESET FIRST OUT WITHOUT FLASHING & RESET PUSHBUTTON)
30
System 9000TS
SEQUENCE TABLE
LINE
PROCESS
CONDITION
1
NORMAL
PUSHBUTTON
OPERATION
SEQUENCE
STATE
VISUAL
DISPLAY
NORMAL
OFF
INTERMITTENT
FLASHING
FAST
FLASHING
2
FIRST
ABNORMAL
FIRST ALARM
3
SUB.
ABNORMAL
SUB. ALARM
4
FIRST
ABNORMAL
OR NORMAL
5
FIRST
ABNORMAL
OR NORMAL
6A
SUB.
ABNORMAL
6B
SUB.
NORMAL
7A
FIRST
ABNORMAL
7B
FIRST
NORMAL
8
FIRST OUT
RESET BEFORE
ACKNOWLEDGE
ACKNOWLEDGE
ALARM
AUDIBLE
DEVICE
SILENT
AUDIBLE
LOCK-IN
AUDIBLE
LOCK-IN
FIRST OUT
RESET
TO LINE 3
FIRST
ACKNOWLEDGED
SLOW
FLASHING
SILENT
SUB.
ACKNOWLEDGE
ON
SILENT
TO LINE 8
TO LINE 6A
FIRST OUT
RESET AFTER
ACKNOWLEDGE
NORMAL
TO LINE 8
NORMAL
OFF
REMARKS
SILENT
FIRST OUT
RESET
REQUIRED
MAINTAINED
ALARM
MOMENTARY
ALARM
FIRST OUT
RESET
FIRST OUT
RESET
AUTOMATIC
RESET
SEQUENCE FEATURES
1. Silence, acknowledge, reset and test pushbuttons
2. Alarm audible device
3. Lock-in of momentary alarms until acknowledged.
4. Flashing indication for first alarm only. New subsequent alarms have the
same visual indication as acknowledged alarms.
5. First out indication is reset when acknowledged
6.
Manual reset of acknowledged alarm indications after process conditions
return to normal.
7.
Operational test
31
SECTION 7 – P925TS-X INTERFACE CARD
Interface Card Features
INTERFACE
STATUS
SYNC
RX TX
PORT 2
PORT 2 (PROG)
INTERNAL
PORT 1
1
2
PORT 3
PRINTER
RX TX
3
RX TX
PORT 3
P925TS-X
Diagnostic LED’s
PORT
1
2
3
TYPE
Modbus Communication
Programming
Time Synchronisation
System Status
Time Sync Status
FUNCTION
Transmit & Receive LED’s
Transmit & Receive LED’s
Transmit & Receive LED’s
Power On LED
Time Sync LED
Serial Ports
PORT
1
2
3
32
TYPE
RS485 Modbus Communication Port
RS232 Programming Port
RS232 Time Synchronisation Port
RS232 Printer Port (25 Pin)
System 9000TS
Generating Reports
Three tactile pushbuttons are provided on the front of the P925TS-X Interface Card to
allow the user to trigger pre-defined reports from a 9000TS System using the
sequential of event feature.
Caution:Depending on the type of report required the resulting print out may be several pages
long and therefore the printer will be fully utilised while the print out is in process. To
prevent accidental triggering of reports each pushbutton must be held down for a short
period to confirm that the report should be printed.
Report Print Outs
PUSHBUTTON REPORT TYPE
1
Generates a printed report for ALL channels in the alarm condition.
Generates a printed report indicating any input that has been
shelved because the number of alarm events within a defined
2
period has exceeded the programmed parameters for the specific
channel or the channel has been manually shelved in software.
Generates a printed report indicating the events stored within the
3
event history buffer. Caution:- this can be in excess of 1,000 events.
Pressed simultaneously generates a printed report indicating the
1&3
configuration of all alarm legend details
Pressed simultaneously generates a printed report indicating the
1, 2 & 3
configuration of all channels in the system
Buffers
The following buffers are available within the interface card.
FUNCTION
Sort Buffer
AMS Buffer
Printer Buffer
CAPACITY
1,000 Events
1,000 Events
1,000 Events
Please note these buffers are in addition to the 1,000 event buffers located on each 16
channel card within the system. As an example a 19” rack containing 13 input cards is
capable of storing 13,000 events in addition to the above.
Sort Delay Period
In applications where alarm bursts occur in quick succession the user can software
configure a sort time delay period in seconds to ensure that data remains in strict time
order. Once the sort delay period has elapsed the information is passed onto the AMS
and Printer buffers when requested.
33
System Relay Outputs
The P925TS-X Interface Card is equipped with eight system relays having the
following functions:Audible Alarm Relays
Two systems relays RL1 and RL2 are always factory supplied as horn relays on the
Interface card. Each channel can be configured to activate relay 1 or relay 2. When the
associated channel goes into alarm the horn relay will activate and the relay will
remain in the alarm state until the silence or acknowledge pushbutton has been
pressed.
Group Relays
RL3 and RL4 are factory set as Group Relay 1 and 2 and RL5 to RL8 can be software
configured to operate as group relays. Each channel can be configured to activate any
of the group relays. When the associated channel goes into alarm the group relay will
activate and the relay will remain in the alarm state until all alarms in the group have
returned to normal and the logic has been reset
Group Relays with Reflash
Group Relays can also be configured to include a Reflash function.
In this Mode when an additional alarm occurs within the same group the associated
relay contacts will revert to normal for approx 500mS and then re-alarm.
Diagnostic Relay Outputs
Systems relays RL5 to RL8 can be software configured to provide volt free contact
outputs for the following events:EVENT TYPE
Internal Faults
Printer Faults
Sort Log Full
AMS Log Full
Printer Log Full
GPS Lock Fault
GPS Serial Fault
Sync Fault
Watchdog Relay
A Watchdog Relay RL9 is provided as standard, which will change state as soon as
the 9000TS detects an internal communication failure or card fault. The P925TS-X
Interface Card is equipped with 2 x Jumpers LK6 and LK8 which allow the contact and
coil state. LK6 allows selection of EN (Energised) or DE-EN (De-Energised) Coil in the
normal state and LK8 allows selection of the watchdog relay contact to N/O or N/C
34
System 9000TS
Time Synchronisation
Internal Time Synchronisation
The P925TS-X Interface Card generates a time sync pulse, which is broadcast to all of
the associated I/O Cards in the system as a common time base.
External Time Synchronisation
If preferred the 9000TS can be synchronised to an external time source such as IRIGB or GPS
The P925TS-X Interface Card is equipped with a three-way header and two-way
shorting bar, which allows the user to select whether the time synchronisation pulses
are via internal or external sources.
Shorting bar LK4 is used to set the required time synchronisation path as shown
below.
WARNING!
Remove ALL power from the unit before changing any switches or removing
cards. Fully remove a card before changing any settings on the card.
Time Synchronisation Jumper Setting
SET TIME SYNC
TO INTERNAL OR
EXTERNAL SYNC
AS REQUIRED
USING LINK LK4
NC
NO NC
RL4
NO NC
RL3
NO NC
RL2
NO
RL1
EXT-SYNC
EXT-SYNC
LK4
INT-SYNC
INT-SYNC
NC
NO NC
RL8
NO NC
RL7
NO NC
RL6
NO
RL5
35
Interface Card Relay Outputs.
All 9000TS Systems are equipped with eight common relays plus one watchdog relay
as typically shown below.
SIGNAL SUPPLY 1 AMP
OPTIONAL EXTERNAL
AUDIBLE ALARMS
X2
RL1-1
1
CRITICAL
HORN [HN1]
RL2-1
2
NON-CRITICAL
HORN [HN2]
RL3-1
3
COMMON ALARM GROUP [GP1]
RL4-1
4
COMMON ALARM GROUP [GP2]
RL5-1
5
SYNC.
FAILURE
RL6-1
6
COMM'S
FAIL
RL7-1
7
PRINTER
FAILURE
RL8-1
8
POWER
FAILURE
F1
F2
LOGIC SUPPLY 5 AMP
RL9-1
X1
1
2
3
4
5
6
7
8
9
WATCHDOG [WD]
SYNC. I/P
A
B
TRANSMIT
A
B
RECEIVE
MASTER / SLAVE
Note:•
RL1 and RL2 are factory set as horn relays
•
RL3 and RL4 are factory set as Group Relay 1 and 2
•
RL5 to RL8 are software configurable for use as group, horn or fault monitoring
relays. The functions shown for RL5 - RL8 are therefore shown as typical
examples only.
•
RL9 is factory set as a watchdog relay which will change state if any faults are
detected within the system. The Relay can be set to EN or DE-EN using Link
LK6 and the Contact state can be set to N/O or N/C using Link LK8 as required.
WARNING!
Hazardous voltages may be present on the rear panel connections when
connectors are removed. Take care not to touch any exposed parts.
36
System 9000TS
System Relay Settings:Setting Relay Contact States
Links LK1 to LK8 on the P925TS-X Interface Card allow the user to select the nonalarm state of each of the relays.
The relay contact can be set to be either normally open (NO) or normally closed (NC)
using a 2 way shorting bar on a 3 pin header as detailed in the diagram below.
WARNING!
Remove ALL power from the unit before changing any switches or removing
cards. Fully remove a card before changing any settings on the card.
LK4
NC
LK3
NO NC
RL4
LK1
LK2
NO NC
RL3
NO NC
NO
RL2
RL1
HN2
HN1
LK4
NC
NO
RL4
LK7
LK8
SET SYSTEM
RELAY CONTACT
NON ALARM STATE
SHOWN SET FOR
NORMALLY CLOSED
( OPEN TO ALARM )
NC
NO NC
RL8
RL7
LK5
LK6
NO NC
NO NC
RL6
NO
RL5
P925TS-X Interface Card:- System Relay – “Non Alarm” Contact State Setting
37
Horn Relay:- RL1
RL1 is factory set as a critical horn relay. This relay will change state when any
channel software configured to operate Horn A (HA) activates and the relay will remain
in the abnormal state until the mute or acknowledge pushbutton has been pressed.
Coil Setting (Non-alarm state)
RELAY SWITCH
RL1
STATE
OFF
ON
SW1-1
FUNCTION
De-energised
Energised
Horn Relay:- RL2
RL2 is factory set as a non critical horn relay. This relay will change state when any
channel software configured to operate Horn B (HB) activates and the relay will remain
in the abnormal state until the mute or acknowledge pushbutton has been pressed.
Coil Setting (Non-alarm state)
RELAY SWITCH
RL2
STATE
OFF
ON
SW1-2
FUNCTION
De-energised
Energised
WARNING!
Remove ALL power from the unit before changing any switches or removing
cards. Fully remove a card before changing any settings on the card.
OFF
ON
1
HORN A
DE-EN
EN
2
HORN B
DE-EN
EN
SW1-
ON
SW1
OFF
1 234
24V
110V
LK11 LK10
ON
OFF
CONTACT
VOLTAGE
38
LK9
ON
OFF
POWER
FAIL
System 9000TS
Group Relays RL3 & RL4:RL3 and RL4 are factory set to operate as group 1 and group 2 common alarm relays.
When an alarm occurs on any within the group the associated relay will change state
and the relay will remain in the abnormal state until the fault has been cleared and the
alarm has been reset.
The coil state of RL3 and RL4 can be set to normally energised or normally deenergised using switch SW1 positions 3 and 4 on the P925TS-X Interface Cards as
detailed below
WARNING!
Remove ALL power from the unit before changing any switches or removing
cards. Fully remove a card before changing any settings on the card.
Coil Setting (Non-alarm state)
RELAY SWITCH
RL3
SW1-3
RL4
SW1-4
STATE
OFF
ON
OFF
ON
FUNCTION
De-energised
Energised
De-energised
Energised
39
ON
SW1
OFF
SW1-
OFF
1 23 4
24V
110V
LK11 LK10
ON
OFF
CONTACT
VOLTAGE
ON
3
GROUP A
EN
DE-EN
4
GROUP B
EN
DE-EN
LK9
ON
OFF
POWER
FAIL
Relays RL5 - RL8:RL5 - RL8 are factory supplied as normally energised relays and any relay can be
software configured to one of the following functions
Group Relay 1 – 6
Any channel configured to the associated group will de-energise the relay on alarm
and the relay will remain in the abnormal state until the alarm has been cleared and reset
Group Relay 1 - 6 with reflash function added
Additional HA or HB Horn relay
Combined HA & HB Horn relay
Internal fault
Printer fault
Log fault
GPS fault
Sync. fault
Reflash Common Alarm Relays
Group relays can be software configured to allow the associated relay contacts to drop
out and re-alarm, reflash, if additional alarms occur in the same group whilst the Relay
is already in the alarm state.
40
System 9000TS
Power Failure Monitoring:- PF
RL5 can be configured to monitor the 24VDC logic supply and/or signal supply.
The relay will de-energise if the associated supply fails. Links LK9, LK10 and LK11 are
provided on the P925TS-X Interface Card to allow the user to select: -
LINK
LK9
LK10
LK11
POSITION
ON
OFF
ON
OFF
ON
OFF
FUNCTION
Loss of the 24VDC logic supply will de-energise the relay.
Disabled
Loss of the signal supply will de-energise the relay.
Disabled
Signal Supply Monitoring level is set to 24V AC/DC
Signal supply Monitoring level is set to 110V AC/DC
WARNING!
Remove ALL power from the unit before changing any switches or removing
cards. Fully remove a card before changing any settings on the card.
OFF
ON
1
HORN A
DE-EN
EN
2
HORN B
DE-EN
EN
3
GROUP A
EN
DE-EN
4
GROUP B
EN
DE-EN
SW1-
ON
SW1
OFF
1 23 4
LK10
LK11
ON
24V
OFF
125V
ENBALE
SIGNAL-FAIL
MONITORING
SIGNAL
MONITOR
LEVEL
LK9
ON
OFF
24V
110V
LK11 LK10
ON
OFF
CONTACT
VOLTAGE
LK9
ON
ENABLE
POWER-FAIL
MONITORING
OFF
POWER
FAIL
41
Printer Failure Alarm
System relays RL3 - RL8 can be software configured to operate in the event of a
printer failure alarm being received by the 9000TS System.
Time Sync. Failure
System relays RL3 - RL8 can be software configured to operate in the event of a time
sync. error signal being generated by the 9000TS System
Buffer Overload Alarm
System relays RL3 - RL8 can be software configured to operate in the event of a
buffer overload signal being generated by the 9000TS System
Watchdog Relay:- WD
RL9 is factory set as a watchdog relay
The relay is normally de-energised and will energise if the system detects a fault. The
relay will automatically reset when the fault condition has been removed. The coil state
can be changed from normally DE-EN to normally EN using Link LK6 and the contact
state can be set to N/O or N/C using Link LK8 as required.
Customer terminals are available on the rear of the rack as shown in the diagram
below.
SIGNAL SUPPLY 1 AMP
OPTIONAL EXTERNAL
AUDIBLE ALARMS
X2
RL1-1
1
CRITICAL
HORN [HN1]
RL2-1
2
NON-CRITICAL
HORN [HN2]
RL3-1
3
F1
F2
COMMON ALARM GROUP [GP1]
LOGIC SUPPLY 5 AMP
42
RL4-1
4
COMMON ALARM GROUP [GP2]
RL5-1
5
SYNC.
FAILURE
RL6-1
6
COMM'S
FAIL
RL7-1
7
PRINTER
FAILURE
RL8-1
8
POWER
FAILURE
RL9-1
X1
1
2
3
4
5
6
7
8
9
WATCHDOG [WD]
SYNC. I/P
A
B
TRANSMIT
A
B
RECEIVE
MASTER / SLAVE
System 9000TS
SECTION 7A – P925TS-X1/2 DUAL REDUNDANT
INTERFACE CARD
Dual Interface Card Features
INTERFACE
STATUS
SYNC
RX TX
PORT 2
RX TX
INTERNAL
PORT 1
1
2
PORT 3
PRINTER
PORT 2
3
RX TX
PORT 3
P925TS-X1/2
The purpose of this section is to describe the differences between the standard
interface card as described above and the dual redundant interface card. All other
functionality is assumed to be the same.
Diagnostic LED’s
LED
STATUS
SYNC
FUNCTION
Master status - illuminated indicates internal comms
port 0 control.
Time Sync – Flash rate of 1 pulse/sec ok
Dual Redundant System
A Dual Redundant system has two interface cards. The system is intended to provide
a secondary interface card in the event of a failure associated with the primary
interface card. When no fault exists the customer ports 1, 2, and 3 on both cards
provide the same contact and alarm data. Internal events data may be different since
this is card specific.
Dominant X1 and Submissive X2
There are two types of dual redundant interface card Dominant and Submissive,
Indentified on the front handle by the letters X1 and X2 respectively. Selection of these
two card types is via a single link LK7 on the PC104 card within the interface card
module.
Dominant LK7 Not Fitted.
43
Submissive LK7 Fitted.
Dominant and Submissive cards communicate with each other via “Port 4” three
terminal connector on the front face plate, note in later systems this connection maybe
internal. It is important that the Dominant and Submissive Port 4 Terminal’s (if fitted)
should be connected pin1 to pin1 etc.
Dominant X1 Control Function
During power up the Dominant interface card assumes master mode control of internal
communications between interface card and Input and Output cards (Port 0). Control
of the internal communications will only be relinquished if certain criteria are met –
Refer to Switchover protocol. While the dominant card is a master to Port 0 customer
Ports 1, 2 and 3 are fully active .If the card relinquishes control of Port 0 then Port 1
will no-longer respond to AMS requests.
Submissive X2 Control Function
On power up the Submissive card assumes slave mode for Port 0. Submissive master
control of the internal communications will only take place if certain criteria are met –
Refer to Switchover protocol. Customer Ports 1, 2 and 3 are fully active irrespective of
Submissive Port 0 control status.
Switchover Protocol
The transfer of Port 0 control between Dominant and Submissive is defined by a set of
rules. The rules which apply differ depending on the quality of Port 4 communications
between Dominant and Submissive. If Port 4 status is ok then switchover is based on
a customer Port status comparison, else switchover is based on Port 0 status. As a
default, switchover is not allowed within 12 seconds of a previous switchover.
Port 4 status ok
Based on a predefined hierarchy port 0 control will be assigned to which ever interface
card is considered to have the healthiest Port 1, 2 or 3 status.
The default port comparison hierarchy is as follows:Port 1 Most important.
Port 3
|
Port 2
|
Port 6 Least important.
Port 4 status fault
If Port 0 status ok. Port 0 control will remain with Dominant or Submissive.
If Port 0 status fault. Dominant will attempt to take control, if unsuccessful then
Submissive will assume control.
Note: Control on power up will always be allocated to the Dominant card first were
possible.
Switchover Scenario’s
Table below assume port 4 status ok.
44
System 9000TS
DOM FAILURE MODE
None
Power up
None
Port 0 fail
None
Port 1 fail
Port 1 fail
Port 1 fail
Port 1 fail
Port 1 fail
Port 3 fail
Port 3 fail
Port 3 fail
Port 3 fail
Port 3 fail
Port 2 fail
Port 2 fail
Port 2 fail
Port 2 fail
Port 2 fail
Port 6 fail
Port 6 fail
Port 6 fail
Port 6 fail
Port 6 fail
SUB FAILURE MODE
None
None
Power up
None
Port 0 fail
Port 1 fail
Port 3 fail
Port 2 fail
Port 6 fail
None
Port 1 fail
Port 3 fail
Port 2 fail
Port 6 fail
None
Port 1 fail
Port 3 fail
Port 2 fail
Port 6 fail
None
Port 1 fail
Port 3 fail
Port 2 fail
Port 6 fail
None
MASTER CONTROL
No change
Submissive
Dominant
Submissive
Dominant
No change
Submissive
Submissive
Submissive
Submissive
Dominant
No change
Submissive
Submissive
Submissive
Dominant
Dominant
No change
Submissive
Submissive
Dominant
Dominant
Dominant
No change
Submissive
Table below assume port 4 status fault.
DOM FAILURE MODE
None
Power up
None
Port 0 fail
None
Port 1 fail
Port 1 fail
Port 1 fail
Port 1 fail
Port 1 fail
Port 3 fail
Port 3 fail
Port 3 fail
Port 3 fail
SUB FAILURE MODE
None
None
Power up
None
Port 0 fail
Port 1 fail
Port 3 fail
Port 2 fail
Port 6 fail
None
Port 1 fail
Port 3 fail
Port 2 fail
Port 6 fail
MASTER CONTROL
No change
Submissive
Dominant
Submissive
Dominant
No change
No change
No change
No change
No change
No change
No change
No change
No change
45
Port 3 fail
Port 2 fail
Port 2 fail
Port 2 fail
Port 2 fail
Port 2 fail
Port 6 fail
Port 6 fail
Port 6 fail
Port 6 fail
Port 6 fail
None
Port 1 fail
Port 3 fail
Port 2 fail
Port 6 fail
None
Port 1 fail
Port 3 fail
Port 2 fail
Port 6 fail
None
No change
No change
No change
No change
No change
No change
No change
No change
No change
No change
No change
Table below lists event type’s specific to a dual redundant 9000ts system.
Dual Redundant Specific Event Type’s
EVENT TYPE
164
165
166
167
168
169
170
171
172
173
174
175
176
177
178
179
180
181
182
183
184
185
186
187
188
189
190
191
46
DESCRIPTION
DOM Port 3 serial com OK
DOM Port 3 serial com Fail
DOM Port 2 serial com OK
DOM Port 2 serial com Fail
DOM Port 1 serial com OK
DOM Port 1 serial com Fail
DOM Dualred link OK
DOM Dualred link Fail
SUB Port 3 serial com OK
SUB Port 3 serial com Fail
SUB Port 2 serial com OK
SUB Port 2 serial com Fail
SUB Port 1 serial com OK
SUB Port 1 serial com Fail
SUB Port 0 serial com OK
SUB Port 0 serial com Fail
DOM Port 0 serial com OK
DOM Port 0 serial com Fail
DOM control OK
DOM control Fail
SUB control OK
SUB control Fail
SUB DOM Compare Config OK
SUB DOM Compare Config Fail
DOM SUB Compare Config OK
DOM SUB Compare Config Fail
SUB Dualred link OK
SUB Dualred link Fail
System 9000TS
SECTION 8 – INPUTS AND OUTPUTS
Optically Coupled Inputs
All inputs to the 9000TS System are optically coupled to increase the tolerance of the
system to noise interference and to allow operation from AC or DC voltage sources.
Digital Inputs
P925TS-I Input Cards are designed to operate from either normally open or normally
closed volt free contacts with a fused +24VDC being supplied by the 9000TS System
for use as a signal supply voltage.
As an alternative the customer can use 24VDC powered Inputs which connect directly
to the associated Input card. If powered inputs are required the OV reference of the
customers supply should be connected to the OVC IN terminal on the rear of each
chassis as this links the common return path of all of the optically coupled inputs.
As an option +125VDC powered inputs can be used, and each channel is equipped
with a 3 pin header and 2 way shorting bar which allows the user to set the input to
match the required signal supply voltage level.
For example: The standard input card allows selection of 24VAC/DC OR 125VAC/DC
and an optional card is available for systems requiring 48VAC/DC.
As field contacts are often located a long way from the associated logic it is
recommended that input cables be run separately from circuits carrying heavy currents
or high voltages to minimise the effects of induced voltages. All inputs are provided
with transient filters so that low voltage interference is ignored
WARNING!
Hazardous voltages may be present on the rear panel connections when
connectors are removed. Take care not to touch any exposed parts.
Lock In
Each channel can be software configured to capture fleeting alarms or to allow them to
automatically return to the off state as soon as the contact returns to normal.
Lamp/LED Outputs
P925TS-O Output Cards, located in the adjacent slot to P925TS-I Input Cards, allow
connection to conventional remote mounting lamp / LED displays. Each of the 16
outputs is short circuit protected and capable of driving 160mA @24VDC.
Repeat Relay Option
P925TS-R Repeat Relay Cards provide 16-volt free contact outputs. Each output can
be set to normally open or normally closed using 3 way header pins and 2 way
shorting bars on a per channel basis as required. The repeat relay feature is typically
used to provide an isolated input to 3rd party Scada packages.
47
Dual Horn Relay
Two of the common relays RL1 and RL2 are factory set as horn relays and these can
be used to connect to remote audible devices. The remote audibles are often referred
to as priority and non-urgent and provide the operator with distinct tones that help
determine the speed of response required.
Group Relays
Six of the common relays can be configured, as group relays and each channel can be
set to drive any of these relays. The relays typically provide summary alarm contacts
for use by 3rd party devices. An example of this would be alarm groups determined by
the alarm type, temperature, pressure, or level.
Reflash Facility
Each of the common group relays can be software configured to reflash every time a
new alarm occurs within the same group, which allows the associated contacts to
return to normal for approx 500ms and then return to the alarm state.
Fault Relays
Any of the common relays can be configured to provide volt free contact outputs which
will change state in the event of a printer fault or primary event buffer overflow.
Watchdog Relay
Each 9000TS System is equipped with a watchdog relay as standard and this relay will
activate in the event of an internal error or communication failure.
RS485 Communication Option
A modbus communication port, Port 1, is provided on the front of the P925TS-X
Interface Card to allow 3rd party data to be transmitted to 3rd party devices if required.
RS232 Printer Port
A standard 25 pin printer port is provided on the front of the P925TS-X Interface Card
to allow direct connection to a suitable dot matrix printer for dynamic printing of events
as they occur.
RS232 Programming Port
A 9 pin programming port, Port 2 is provided on the front of the P925TS-X Interface
Card to allow the system to be programmed using the MTL supplied windows style
software utility and a suitable lap top computer or PC.
Control Inputs
Any digital input channel can be configured to operate as a pushbutton input to provide
control of the associated lamp / LED outputs. The input can be configured for use as
Lamp Test, System Test, Silence, Acknowledge, Reset, First Reset, Lamp & Audible
Test or as a Sleep Mode control input.
48
System 9000TS
Group Inhibits
Each system is provided with eight inhibit groups which allows the user to configure
multiple digital inputs to each group to inhibit the alarms during prolonged
maintenance periods.
Once an inhibit group has been formed any spare input channel can be configured as
the inhibit group control input and a remote inhibit switch can be used to inhibit all of
the alarms within the group as required.
Data Storage
The P925TS-X interface card stores configuration data for all cards in the system.
Once a 9000TS System has been configured the user can replace any Input, Output
or Relay Card and all of the settings for the new card will be automatically updated
with the settings from the original card using stored configuration data held within the
P925TS-X interface card.
MTL strongly recommend that all configurations be saved to a separate source as a
back up before any alterations to the system are made.
The 9000TS system is designed for safety critical applications therefore all card types
are designed to be removed and re-inserted in the rack with power applied to ensure
that the remaining system continues to monitor during this phase.
Although the P925TS-X Interface Card stores configuration data for the associated
I/O cards the same data is also stored locally on the individual cards allowing the
alarm system to continue to operate as a conventional annunciator even if the
P925TS-X Interface Card is removed.
49
SECTION 9 – P925TS-I INPUT CARD
The P925TS-I Input Card is capable of accepting sixteen digital inputs and is equipped
with a micro-controller and EEPROM, which allows configuration details to be stored in
non-volatile memory. No battery backup is required to maintain this memory and
system configuration can be changed tens of thousands of times without degradation.
All inputs are optically coupled to ensure maximum reliability in harsh electrical
environments, however as field contacts are often great distances from the
annunciator it is still advisable to run the contact cables separately from circuits
carrying heavy currents and/or high voltages to minimise the effects of induced
voltages from these cables. A transient filter is built into the input circuitry so that low
voltage interference will be ignored.
Voltage inputs can also be used if the 0VS of the 9000TS is linked to the OV of the
direct voltage supply to provide a common reference.
Normally open or normally closed continuous or fleeting contacts can be used and the
input can be software configured to capture events within the range 1 to 65,000 mS
Signal Input Voltage Selection
The P925TS-I Input Card is suitable for operation from either 24VAC/DC or
125VAC/DC switched or powered inputs. Each card is equipped with shorting links
LK1 to LK16, which allows the user to select the associated field input voltage for each
channel. In standard applications +24VDC is derived from the P925TS-X Interface
Card for use as a signal supply voltage but it is possible to use external voltage
sources if required.
WARNING!
Remove ALL power from the unit before changing any switches or removing
cards. Fully remove a card before changing any settings on the card.
50
System 9000TS
CARD ADDRESS SETTING
PG1
BINARY 1 2 4 8 16 32 64 128
SW1
1 234 5678
ON
OFF
LK1
24VAC/DC VERSION
RTK LOCAL REMOTE
COMMS
COMMS
SW3
LOC
1 2
1 2
TX RX
TX RX
SW2
REM
ON
OR
OFF
LK1
END OF LINE LOAD RESISTOR
SWITCH TO ON IF LAST IN CHAIN
125VAC/DC VERSION
24V
125V
LK1
LK2
LK3
LK4
LK5
LK6
LK7
LK8
LK9
LK10
LK11
LK12
LK13
LK14
LK15
LK16
REFERENCE FIELD
Power on / Status LED
Each Card is supplied with a single green status LED on the front panel.
The LED would be on in the normal state to indicate that the card is powered and
there is no fault within the card.
If the user presses the status pushbutton (recessed below the status LED) the Status
LED will flash for a short period of time while the Inputs contact state is being checked.
If the unit is incorrectly powered down the status LED will flash until the buffers have
been reset
51
Alarm Status LED’s
Each card is equipped with sixteen yellow LED’s, which indicates if any of the
associated signal inputs are in the normal or abnormal alarm state as a diagnostic aid
and would operate as follows:INPUT SET FOR
Normally Open
Normally Closed
SIGNAL CONTACT
Open
Closed
Closed
Open
LED
OFF
ON
OFF
ON
INPUT
1
2
3
4
5
6
7
8
9
10
11
12
13
14
15
16
INPUTS
CONTACT
STATUS
YELLOW
LED'S
+ VC SIGNAL SUPPLY
STATUS
P925TS-I
CHANNEL NUMBERS
POWER ON
GREEN LED
1
2
3
4
5
6
7
8
9
10
11
12
13
14
15
16
TYPICAL SIGNAL
INPUT CONTACTS
Input Card Face Plate & Wiring
Pushbutton Connections
Any channel can be configured as a pushbutton control input to allow the operator to
control the operational sequence if the input card is being used with P925TS-O Output
Cards.
There are seven pushbutton control inputs available:- Lamp Test, Acknowledge,
Reset, Silence, System Test, First Up Reset and Combined Lamp/Audible Test.
Pushbuttons connected to the associated Input should be of the momentary, nonmaintained, type with one Normally Open contact per pushbutton.
52
System 9000TS
The common return of the pushbuttons is normally +24VDC however as pushbuttons
use standard digital input channels the common return will always be at the same
voltage level as the alarm inputs (24VDC as standard optionally 48VAC/DC or
125VAC/DC.
WARNING!
If 125V alarm inputs are used on the System 9000TS, hazardous voltages
may be present on remote push buttons.
Where 125V alarm inputs are used, all remote push buttons must be
mounted in the same enclosure as the System 9000TS.
Where only 24V or 48V alarm inputs are used, the remote push buttons
may be mounted in different enclosures/locations.
CHANNEL NUMBERS
Example:- A system that requires Test, Acknowledge and Reset Pushbuttons would
be factory supplied with pushbutton inputs available on channel 14, 15 & 16 on the last
P925TS-I Input Card within the system,.
1
2
3
4
5
6
7
8
9
10
11
12
13
14
15
16
RESET
ACK
TEST
+VC ( +24VDC AS STANARD )
P925TS-I Input Card – Typical Pushbutton Wiring
Please note if a P925TS-O Output Card is located in the adjacent slot to a P925TS-I
Input Card with channels wired as pushbutton inputs the associated outputs would only
be active when the pushbutton is pressed.
53
SECTION 10 – P925TS-O OUTPUT CARD
The P925TS-O Output Card is equipped with sixteen open collector outputs each
capable of providing 160mA @ 24vdc which can be connected to lamp / LED displays
as required.
The output of each channel sinks to OV on alarm and therefore +24VDC is used a
common return for all Lamp / LED outputs.
Lamp Protection
During installation and commissioning or as a result of filament failure a short circuit
may occur in the output drive causing excessive current to flow in the lamp driving
circuit.
The 9000TS System is equipped with automatic electronic crowbars, which will protect
the output circuit if excessive current is drawn. If the output fails to operate in the
correct manner the drive circuit is turned off and will periodically attempt to
automatically recover until the fault has been removed.
Output Drive Type
Each of the sixteen output channels is capable of driving either conventional filament
lamps or LED’s.
When used with filament lamps the individual output drives pass a small current to
each remotely wired lamp to prevent large inrush currents and thermal shock during
lamp test.
In applications that require LED’s the “keep alive” current must be disabled in software
on a per channel basis to prevent the LED’s from illuminating at approx 40% of normal
brightness during the off cycle.
Card Address Settings
A P925TS-O Output Card is located to the right of the associated P925TS-I Input Card
each pair of cards must have the same address. i.e. If the 1st input card in the system
is set to address 0 the 1st output card must be set to 0 for the cards to function as a
linked pair.
Power On / Status LED
Each Card is supplied with a single green status LED on the front panel.
The LED would be on in the normal state to indicate that the card is powered and
there is no fault within the card.
If a card fault is detected the LED will go to off
54
System 9000TS
Lamp / LED Output Status LED
Each card is equipped with 16 x Red LED’s, which will operate as a slave of the
associated lamp / LED output drive.
The LED will therefore be off, flashing or steady in accordance with the configured
alarm sequence. As remote displays are often mounted several meters from the
associated display the LED’s can be used during commissioning / fault finding to verify
that the output is functioning correctly at the local rack.
OUTPUT
1
2
3
4
5
6
7
8
9
10
11
12
13
14
15
16
OUTPUTS
OUTPUT
STATUS
RED
LED'S
+ VS
STATUS
P925TS-O
CHANNEL NUMBERS
POWER ON
GREEN LED
1
2
3
4
5
6
7
8
9
10
11
12
13
14
15
16
Output Card Face Plate & Wiring
WARNING!
Hazardous voltages may be present on the rear panel connections when
connectors are removed. Take care not to touch any exposed parts.
55
SECTION 11 – P925TS-R RELAY CARD
P925TS-R Relay Card
In applications that require a dedicated repeat relay to be provided on a per channel
basis P925TS-R (16) channel relay cards can be added alongside P925TS-I Input or
P925TS-O output cards as required.
RELAY
POWER ON
GREEN LED
RELAY 1
RELAY 2
RELAY 3
RELAYS
ALARM
STATUS
AMBER
LED'S
STATUS
1
2
3
4
5
6
7
8
9
10
11
12
13
14
15
16
RELAY 4
RELAY 5
RELAY 6
RELAY 7
P925TS-R
RELAY 8
1A
1B
2A
2B
3A
3B
4A
4B
5A
5B
6A
6B
7A
7B
8A
8B
INTERNAL RELAY CONTACT
RELAY 9
RELAY 10
RELAY 11
RELAY 12
RELAY 13
RELAY 14
RELAY 15
RELAY 16
9A
9B
10A
10B
11A
11B
12A
12B
13A
13B
14A
14B
15A
15B
16A
16B
INTERNAL RELAY CONTACT
P925TS-R Relay Card
Status LED
Each P925TS-R relay card is supplied with a single green status LED as shown
above. The green LED will be ON in the normal state to indicate that the card is
powered and no internal card faults have been detected.
Relay Status LED’s
Each P925TS-R relay card is equipped with 16 x amber status LED’s, which monitor
the alarm state of each relay.
Alarm State
Normal
Abnormal
Coil Setting
De-Energised
Energised
Status LED
OFF
ON
Coil Setting
Energised
De-Energised
Status LED
OFF
ON
OR
Alarm State
Normal
Abnormal
56
System 9000TS
Operating Mode:The operating mode of each P925TS-R relay card can be configured to operate as:•
Input Follower
P925TS-R relay cards set to this mode will activate when the signal input is
abnormal and will return to normal as soon as the input returns to the non alarm
state.
OR
•
Logic Follower
P925TS-R relay cards set to this mode will activate when the signal input is
abnormal and will remain active until the alarm input has returned to normal and
the operator has cleared the alarm using the pushbuttons associated with the
configured alarm sequence.
Switch SW3 Positions 1 and 2 on the lower card are used to set the relay function:SW3-1
ON
OFF
SW3-2
OFF
ON
Function
Relays follow the Input
Relays follow the alarm
The finished P925TS-R assembly comprises 2 x (8) channel relay cards with a
common face plate.
The lower card, part no CB5507POP, provides the first 8 x relays as shown below:-
LK4
NC
LK3
NO NC
RL4
LK2
NO NC
RL3
LK1
NO NC
RL2
NO
RL1
LK4
NC
NO
RL4
LK7
LK8
SET SYSTEM
RELAY CONTACT
NON ALARM STATE
SHOWN SET FOR
NORMALLY CLOSED
( OPEN TO ALARM )
NC
NO NC
RL8
RL7
LK5
LK6
NO NC
NO NC
RL6
NO
RL5
57
The upper card, part no CB5488POP, provides an additional 8 x relays as shown
below:-
LK4
NC
LK3
NO NC
RL4
LK2
NO NC
RL3
LK1
NO NC
RL2
NO
RL1
LK4
NC
NO
RL4
LK7
LK8
SET SYSTEM
RELAY CONTACT
NON ALARM STATE
SHOWN SET FOR
NORMALLY CLOSED
( OPEN TO ALARM )
NC
NO NC
RL8
RL7
LK5
LK6
NO NC
NO NC
RL6
NO
RL5
WARNING!
Remove ALL power from the unit before changing any switches or removing
cards. Fully remove a card before changing any settings on the card.
Contact State:Each of the 16 x relays is equipped with 1 x changeover contact and the user can
select the non alarm state of each relay to Normally Open or Normally Closed using a
3 way header and 2 way shorting bar.
In the example shown above Relay 4 has been set to Normally Closed
Coil State:The non alarm coil state of each P925TS-R relay card can be configured to:•
Normally energised (de-energised on alarm)
OR
•
58
Normally de-energised (energised on alarm)
System 9000TS
Switch SW3 position 3 on the lower card is used to set the non alarm coil state
SW3-3
OFF
ON
Function
Normally De-Energised
Normally Energised
WARNING!
Remove ALL power from the unit before changing any switches or removing
cards. Fully remove a card before changing any settings on the card.
BDM
SW3
1 234 5678
ON
OFF
UNUSED
COIL STATE
RELAY FUNCTION
RTK LOCAL REMOTE
COMMS
COMMS
SW1
LOC
1 2
1 2
TX RX
TX RX
SW2
REM
ON
OFF
END OF LINE LOAD RESISTOR
SWITCH TO ON IF LAST IN CHAIN
P925TS-R Relay Card (lower board part no CB5507POP) switch locations
Switch SW3 positions 1 and 2 are used to set the relay function
Switch SW3 position 3 is used to set the relays to energised or de-energised
Switch SW3 positions 4 to 8 are not used
Switch SW1 and SW2 are used to set the end of line resistors if the P925TS-R is the
last card in the system.
59
60
System 9000TS
SECTION 12 – LOGIC AND SIGNAL POWER OPTIONS
Standard Systems Using 24VDC Logic And Signal Power
If the system derives its power from a source that is higher than 24VDC an external
AC/DC or DC/DC power supply unit must be used to convert the incoming supply
voltage into the required 24VDC logic supply.
Logic Supply
The 24VDC logic supply should be connected to the terminals marked +VS and 0VS
on the logic rack. The logic supply is protected with a 5A Fuse (F2) and a monitor LED
is provided to indicate the status of the fuse.
Signal Supply
Standard 9000TS Systems provide +24VDC as a signal supply voltage which is
derived from the logic supply on the P925TS-X Interface Card.
The 24VDC logic supply outputs +VS and OVS are wired into the signal supply input
terminals marked +VC IN and OVC IN.
The signal supply voltage, (+24VDC), is available on terminal +VC OUT for distribution
to the customers signal input contacts. The signal supply output is protected with a 1A
fuse (F1) and a monitor LED is provided to indicate the status of the fuse.
Please note:- Each P925TS-I Input Card is equipped with a 3 pin header and 2 way
shorting bar that allows selection of inputs suitable for operation from 24VAC/DC or
125VAC/DC. Please ensure the jumper is in the correct position before applying
power.
CONTACT FUSE 1A/F
F1
FAIL
F2
FAIL
SUPPLY FUSE 5A/T
CONTACT SUPPLY
P1
1
2
3
4
5
6
+VC OUT
+VC OUT
+VC OUT
+VC OUT
+VC IN
0VC IN
24VDC SIGNAL SUPPLY
OUTPUT VOLTAGE
RIBBON INPUT
RIBBON OUTPUT
P2
1
2
3
4
5
6
+VS
+VS
+VS
0VS
0VS
0VS
24VDC
LOGIC SUPPLY
RACK SUPPLY
24VDC Combined Logic / Signal Input Power Wiring
61
Optional Isolated 24VDC Signal Input Power
In situations of extreme electrical noise, it may be preferable to power the alarm logic
and signal inputs from separate isolated power supplies. This will significantly reduce
any disturbance due to large currents flowing in the common supply lines. Systems
using isolated 24VDC logic and 24VDC signal supplies should be connected as
follows:Logic Supply
The 24VDC logic supply should be connected to the terminals marked +VS and 0VS
on the logic rack. The logic supply is protected with a 5A fuse (F2) and a monitor LED
is provided to indicate the status of the fuse.
Signal Supply
The 24VDC signal supply should be connected to the signal supply input terminals
marked +VC IN and OVC IN, this input is filtered and protected with a 1A fuse (F1) and
a monitor LED is provided to indicate the status of the fuse.
The signal supply voltage, (+24VDC), is available on terminal +VC OUT for distribution
to the associated signal input contacts.
Please Note: - Each P925TS-I Input Card is equipped with a 3 pin header and 2 way
shorting bar that allow selection of inputs suitable for operation from 24VAC/DC or
125VAC/DC. Please ensure the jumper is in the correct position before applying
power.
CONTACT FUSE 1A/F
F1
FAIL
F2
FAIL
SUPPLY FUSE 5A/T
CONTACT SUPPLY
P1
1
2
3
4
5
6
+VC OUT
+VC OUT
+VC OUT
+VC OUT
+VC IN
0VC IN
24VDC SIGNAL SUPPLY
OUTPUT VOLTAGE
24VDC SIGNAL SUPPLY
INPUT VOLTAGE
RIBBON INPUT
RIBBON OUTPUT
P2
1
2
3
4
5
6
+VS
+VS
+VS
0VS
0VS
0VS
24VDC
LOGIC SUPPLY
RACK SUPPLY
24VDC Logic and Isolated 24VDC Signal Input Power Wiring
62
System 9000TS
Optional 125VAC/DC High Voltage Signal Inputs
Systems using isolated 24VDC logic and H.V. 125VAC/DC signal supplies should be
connected as follows:Logic Supply
The 24VDC logic supply should be connected to the terminals marked +VS and 0VS
on the logic rack. The logic is protected with a 5A fuse (F2) and a monitor LED is
provided to indicate the status of the fuse.
Signal Supply
The high voltage 125VAC/DC signal supply should be connected to the signal supply
input terminals marked +VC IN and OVC IN, this input is filtered and protected with a
1A fuse (F1) and a monitor LED is provided to indicate the status of the fuse.
The high voltage signal supply voltage (+125VAC/DC) is available on terminal +VC
OUT for distribution to the associated signal input contacts.
Caution:- High voltages will be present on all of the signal input circuits when the
associated contacts are in the closed position.
WARNING!
Hazardous voltages may be present on the rear panel connections when
connectors are removed. Take care not to touch any exposed parts.
Please note- Each P925TS-I Input Card is equipped with a 3 pin header and 2 way
shorting bar that allows selection of inputs suitable for operation from 24VAC/DC or
125VAC/DC. Please ensure the jumper is in the correct position before applying
power.
63
CONTACT FUSE 1A/F
F1
FAIL
F2
FAIL
SUPPLY FUSE 5A/T
CONTACT SUPPLY
P1
1
2
3
4
5
6
+VC OUT
+VC OUT
+VC OUT
+VC OUT
+VC IN
0VC IN
125VAC/DC SIGNAL SUPPLY
OUTPUT VOLTAGE
125VAC/DC SIGNAL SUPPLY
INPUT VOLTAGE
RIBBON INPUT
RIBBON OUTPUT
P2
1
2
3
4
5
6
+VS
+VS
+VS
0VS
0VS
0VS
24VDC
LOGIC SUPPLY
RACK SUPPLY
24VDC Logic and Isolated 125VAC / DC Signal Input Power Wiring
WARNING!
Remove ALL power from the unit before changing any switches or removing
cards. Fully remove a card before changing any settings on the card.
64
System 9000TS
Optional 48VAC/DC High Voltage Signal Inputs
Systems using isolated 24VDC logic and optional H.V. signal supplies should be
connected as follows:Logic Supply
The 24VDC logic supply should be connected to the terminals marked +VS and 0VS
on the logic rack. The logic is protected with a 5A fuse (F2) mounted on the rear of the
19” rack and a monitor LED is provided to indicate the status of the fuse.
Signal Supply
The high voltage signal supply, (+48VAC/DC), should be connected to the signal
supply input terminals marked +VC in and OVC, this input is filtered and protected with
a 1A fuse (F1) and a monitor LED is provided to indicate the status of the fuse.
The high voltage signal supply, (+48VAC/DC), is available on terminal +VC OUT for
distribution to the associated signal input contacts.
Caution:- High voltages will be present on all of the signal input circuits when the
associated contacts are in the closed position.
Note- Each P925TS-I Input Card is equipped with a 3 pin header and 2 way shorting
bar that allows selection of inputs suitable for operation from 48VAC/DC or 250VAC
/DC. Please ensure the jumper is in the correct position before applying power.
CONTACT FUSE 1A/F
F1
FAIL
F2
FAIL
SUPPLY FUSE 5A/T
CONTACT SUPPLY
P1
1
2
3
4
5
6
+VC OUT
+VC OUT
+VC OUT
+VC OUT
+VC IN
0VC IN
HIGH VOLTAGE
SIGNAL SUPPLY
OUTPUT VOLTAGE
HIGH VOLTAGE
SIGNAL SUPPLY
INPUT VOLTAGE
RIBBON INPUT
RIBBON OUTPUT
P2
1
2
3
4
5
6
+VS
+VS
+VS
0VS
0VS
0VS
24VDC
LOGIC SUPPLY
RACK SUPPLY
24VDC Logic and Isolated High Voltage Signal Input Power Wiring
65
SECTION 13 – CARD ADDRESS SETTINGS
Each card in the system must be set to a unique address using switch SW1 position 1
to 8, which is located in the top left hand corner of the associated P925TS-I input
Card, P925TS-O Output Card. The first P925TS-I Input Card in the system is normally
set to address O (All SW1-* switches off) and the remaining cards should be set
according to card type as follows:9000TS systems equipped with P925TS-I Input Cards each card is set to its own
unique address
9000TS systems equipped with P925TS-I Input Cards and P925TS-O Output Cards
each pair of input and output cards needs to be set to the same address.
9000TS systems equipped with P925TS-I Input Cards, P925TS-0 Output Cards and
P925TS-R Relay cards each pair of input and output cards needs to be set to the
same address.
Note:- The P925TS-R Repeat Relay cards do not require the address to be set
BINARY 1 2 4 8 16 32 64 128
ON
OFF
SW1
1 234 5678
CARD ADDRESS SETTING
WARNING!
Remove ALL power from the unit before changing any switches or removing
cards. Fully remove a card before changing any settings on the card.
66
System 9000TS
Please note
A maximum of 250 unique addresses can be set as required
Card Address Switch Location
P925TS-I Input / P925TS-O or P925TS-R Output Card Typical Addresses Settings
NO
0
1
2
3
4
5
6
7
8
9
10
11
12
13
14
15
16
17
18
19
20
21
22
23
24
25
26
27
28
29
30
31
32
33
34
35
36
37
38
39
40
ADDRESS
BINARY
00000000
00000001
00000010
00000011
00000100
00000101
00000110
00000111
00001000
00001001
00001010
00001011
00001100
00001101
00001110
00001111
00010000
00010001
00010010
00010011
00010100
00010101
00010110
00010111
00011000
00011001
00011010
00011011
00011100
00011101
00011110
00011111
00100000
00100001
00100010
00100011
00100100
00100101
00100110
00100111
00101000
-1
OFF
ON
OFF
ON
OFF
ON
OFF
ON
OFF
ON
OFF
ON
OFF
ON
OFF
ON
OFF
ON
OFF
OFF
OFF
ON
OFF
ON
OFF
ON
OFF
ON
OFF
ON
OFF
ON
OFF
ON
OFF
ON
OFF
ON
OFF
ON
OFF
-2
OFF
OFF
ON
ON
OFF
OFF
ON
ON
OFF
OFF
ON
ON
OFF
OFF
ON
ON
OFF
OFF
ON
ON
OFF
OFF
ON
ON
OFF
OFF
ON
ON
OFF
OFF
ON
ON
OFF
OFF
ON
ON
OFF
OFF
ON
ON
OFF
-3
OFF
OFF
OFF
OFF
ON
OFF
ON
ON
OFF
OFF
OFF
OFF
ON
ON
ON
ON
OFF
OFF
OFF
OFF
ON
ON
ON
ON
OFF
OFF
OFF
OFF
ON
ON
ON
ON
OFF
OFF
OFF
OFF
ON
ON
ON
ON
OFF
DIL SWITCH SW1-4
-5
OFF
OFF
OFF
OFF
OFF
OFF
OFF
OFF
OFF
OFF
OFF
OFF
OFF
OFF
OFF
OFF
ON
OFF
ON
OFF
ON
OFF
ON
OFF
ON
OFF
ON
OFF
ON
OFF
ON
OFF
OFF
ON
OFF
ON
OFF
ON
OFF
ON
OFF
ON
OFF
ON
OFF
ON
OFF
ON
ON
ON
ON
ON
ON
ON
ON
ON
ON
ON
ON
ON
ON
ON
ON
ON
OFF
OFF
OFF
OFF
OFF
OFF
OFF
OFF
OFF
OFF
OFF
OFF
OFF
OFF
OFF
OFF
ON
OFF
-6
OFF
OFF
OFF
OFF
OFF
OFF
OFF
OFF
OFF
OFF
OFF
OFF
OFF
OFF
OFF
OFF
OFF
OFF
OFF
OFF
OFF
OFF
OFF
OFF
OFF
OFF
OFF
OFF
OFF
OFF
OFF
OFF
ON
ON
ON
ON
ON
ON
ON
ON
ON
-7
OFF
OFF
OFF
OFF
OFF
OFF
OFF
OFF
OFF
OFF
OFF
OFF
OFF
OFF
OFF
OFF
OFF
OFF
OFF
OFF
OFF
OFF
OFF
OFF
OFF
OFF
OFF
OFF
OFF
OFF
OFF
OFF
OFF
OFF
OFF
OFF
OFF
OFF
OFF
OFF
OFF
-8
OFF
OFF
OFF
OFF
OFF
OFF
OFF
OFF
OFF
OFF
OFF
OFF
OFF
OFF
OFF
OFF
OFF
OFF
OFF
OFF
OFF
OFF
OFF
OFF
OFF
OFF
OFF
OFF
OFF
OFF
OFF
OFF
OFF
OFF
OFF
OFF
OFF
OFF
OFF
OFF
OFF
67
SECTION 14 – END OF LINE LOAD
Communication End Of Line Resistors
Each P925TS-* Card is equipped with two off 2 way DIL switches labelled SW2 and
SW3. When selected to the on position these switches provide the required end of line
load resistor to balance the communication line. SW2 is used for the MTL internal
communication network and SW3 is used for the external communication network.
Please note:- SW2 and SW3 should only be set to the on position on the last card in
the system
CARD ADDRESS SETTING
BINARY 1 2 4 8 16 32 64 128
ON
OFF
SW1
PG1
FACTORY
USE ONLY
1 234 5678
RTK LOCAL REMOTE
COMMS
COMMS
SW3
LOC
1 2
1 2
TX RX
TX RX
SW2
REM
ON
OFF
END OF LINE LOAD RESISTOR
SWITCH TO ON IF LAST IN CHAIN
End of Line Resistor Switch Location
WARNING!
Remove ALL power from the unit before changing any switches or removing
cards. Fully remove a card before changing any settings on the card.
68
System 9000TS
SECTION 15 – INTER CARD COMMUNICATIONS
Universal Card Slots
All card slots are universal in application therefore all card types can be inserted from
the front of the rack using the associated card guides and once inserted each card
automatically connects to the customer terminals located on the rear of the chassis via
the motherboard.
Each card slot on the chassis motherboard is equipped with a dedicated 2 way DIL
switch located on the inside face of the chassis motherboard.
This switch must be set to the appropriate setting for each application.
WARNING!
Remove ALL power from the unit before changing
any switches on the motherboard.
If adjacent card slots are equipped with P925TS-I Input Cards the switch should be set
to the off position, which will disable the local MTL communications bus between
adjacent slots.
However if adjacent card slots are equipped with P925TS-I Input and P925TS-O or R
Output Cards the switch must be in the on position.
With switch 1 and 2 in the on position local MTL communication data is passed
between the cards to allow the inputs to activate the associated outputs (Lamp/LED or
relay).
69
INPUT OUTPUT
INTERFACE
RACK
STATUS
1
2
3
STATUS
SYNC
RX TX
PORT 2
DETAIL
INTERNAL
PORT 1
2
PORT 3
3
13
14
15
16
RX TX
PORT 3
ON
1 2
ON
P925TS-X
1 2
P925TS-RK
OUTPUTS
2
1
ON
1
PRINTER
PORT 2 (PROG)
RX TX
STATUS
1
2
3
4
5
6
7
8
9
10
11
12
13
14
15
16
3
4
P925TS-I
P925TS-O
P9000TS Local MTL Communication Switch Location and Setting
When more than one rack is supplied within a 9000TS System a ribbon cable is used
to connect all system bus lines between racks using the ribbon OUT of Rack 1 to
connect to the ribbon IN of Rack 2. Switches are also provided on the inside face of
each of the rack motherboard to allow local communication to be passed between the
last card of Rack 1 and the first card of Rack 2 depending on the card type. Example:If the last slot in the upper rack is a P925TS-I Input Card and the first card in the
adjacent rack is a P925TS-O Output Card then the local communication switches must
be set to ON in both chassis as shown in the following diagrams.
70
System 9000TS
INPUT OUTPUT
RACK
ONE
STATUS
STATUS
ON
1 2
RIBBON IN
STATUS
1
2
3
4
5
6
7
8
9
10
11
12
13
14
15
16
1
2
3
4
5
6
7
8
9
10
11
12
13
INPUTS
1
2
3
4
5
6
7
8
9
10
11
12
13
14
15
16
OUTPUTS
ON
1 2
RIBBON OUT
P925TS-RK
INPUTS
ON
1 2
DETAIL
RIBBON OUT
1
2
3
4
5
6
7
8
9
10
11
12
13
14
15
16
INPUT
1
2
13
P925TS-I
P925TS-O
P925TS-I
Upper Rack Switch Settings
OUTPUT INPUT
RACK
TWO
STATUS
DETAIL
ON
1 2
ON
1 2
RIBBON IN
RIBBON IN
STATUS
STATUS
1
2
3
4
5
6
7
8
9
10
11
12
13
14
15
16
INPUTS
1
2
3
4
5
6
7
8
9
10
11
12
13
14
15
16
OUTPUTS
1
2
3
4
5
6
7
8
9
10
11
12
13
14
15
16
INPUTS
P925TS-RK
OUTPUTS
ON
1 2
RIBBON OUT
1
2
3
4
5
6
7
8
9
10
11
12
13
14
15
16
OUTPUT INPUT
STATUS
1
2
3
4
P925TS-O
P925TS-I
P925TS-O
P925TS-I
Lower Rack Switch Settings
71
SECTION 16 – EXAMPLES OF 9000TS SYSTEMS
Option 1 – P925TS-I Input Cards Only
Sequence of event function only (Max. 1984 channels per interface card)
Typical 9000TS components for a 208 channel SOE only system mounted in a single
rack
1 - P925TS-RK Rack Chassis
1 - P925TS-X Interface Card
13 - P925TS-I Input Cards (13 x 16 = 208 channels)
INPUT
INTERFACE
RACK
INPUT
STATUS
STATUS
SYNC
RX TX
PORT 2
2
PORT 3
3
RX TX
PORT 3
P925TS-RK
P925TS-X
1
2
3
4
5
6
7
8
9
10
11
12
13
14
15
16
STATUS
1
2
3
4
5
6
7
8
9
10
11
12
13
14
15
16
INPUTS 49 TO 64
1
INPUT
STATUS
INPUTS 33 TO 48
PORT 1
1
2
3
4
5
6
7
8
9
10
11
12
13
14
15
16
INPUTS 7 TO 32
INTERNAL
INPUTS 1 TO 16
PRINTER
PORT 2 (PROG)
RX TX
1
2
3
4
5
6
7
8
9
10
11
12
13
14
15
16
INPUT
STATUS
1
2
3
4
P925TS-I
P925TS-I
P925TS-I
P925TS-I
P9000TS SOE Only Card Layout
Please note:- The parts indicated above are an example of a typical system. Larger
systems can be constructed using multiple racks and additional interface cards if the
maximum capacity of a single P925TS-X interface card is exceeded. It is also possible
to use a combination of card types to suit specific applications
72
System 9000TS
Option 2 – P925TS-I Input and P925TS-O Output Cards
Sequence of event plus alarm annunciation (Max. 1984 channels per interface card)
Typical 9000TS components for a 96-channel SOE plus annunciation system mounted
in a single rack.
1
1
7
6
- P925TS-RK Rack Chassis
- P925TS-X Interface Card
- P925TS-I Input Cards (6 x 16 = 96 channels plus 3 pushbutton inputs)
- P925TS-O Output Cards (6 x 16 = 96 channels)
INPUT
INTERFACE
RACK
OUTPUT INPUT
STATUS
STATUS
SYNC
RX TX
PORT 2
2
PORT 3
RX TX
PORT 3
3
1
P925TS-RK
P925TS-X
P925TS-I
1A
P925TS-O
1
2
3
4
5
6
7
8
9
10
11
12
13
14
15
16
2
P925TS-I
STATUS
1
2
3
4
5
6
7
8
9
10
11
12
13
14
15
16
OUTPUTS 17 TO 32
1
OUTPUT
STATUS
INPUTS 17 TO 32
PORT 1
1
2
3
4
5
6
7
8
9
10
11
12
13
14
15
16
OUTPUTS 1 TO 16
INTERNAL
INPUTS 1 TO 16
PRINTER
PORT 2 (PROG)
RX TX
1
2
3
4
5
6
7
8
9
10
11
12
13
14
15
16
STATUS
2A
P925TS-O
9000TS SOE and Annunciator Card Layout
Please note:- The parts indicated above are an example of a typical system. Larger
systems can be constructed using multiple racks and additional interface cards if the
maximum capacity of a single P925TS-X interface card is exceeded. It is also possible
to use a combination card types to suit specific applications.
73
Option 3 – P925TS-I Input, P925TS-O Output and P925TS-R Relay Cards
Sequence of event plus annunciation plus repeat relays (Max. 1984 channels per
interface card)
Typical 9000TS components for a 48 channel SOE plus annunciation plus repeat relay
per channel system mounted in a single rack.
1 - P925TS-RK Rack Chassis
1 - P925TS-X Interface Card
4 - P925TS-I Input Cards (3 x 16 = 48 channels plus 3 pushbutton inputs)
3 – P925TS-O Output Cards (3 x 16 = 48 channels)
3 – P925TS-R Relay Cards (3 x 16 = 48 relays)
RACK
INPUT
INTERFACE
OUTPUT
STATUS
SYNC
RX TX
PORT 2
INTERNAL
2
PORT 3
3
RX TX
PORT 3
P925TS-RK
P925TS-X
1
2
3
4
5
6
7
8
9
10
11
12
13
14
15
16
RELAYS 1 TO 16
1
1
2
3
4
5
6
7
8
9
10
11
12
13
14
15
16
OUTPUTS 1 TO 16
PORT 1
INPUTS 1 TO 16
PRINTER
PORT 2 (PROG)
RX TX
1
2
3
4
5
6
7
8
9
10
11
12
13
14
15
16
RELAY
STATUS
STATUS
STATUS
1
1A
1B
P925TS-I
P925TS-O
P925TS-R
9000TS SOE Annunciator and Repeat Relay Layout Card
Please note:- The parts indicated above are an example of a typical system. Larger
systems can be constructed using multiple racks and additional interface cards if the
maximum capacity of a single P925TS-X Interface Card is exceeded. It is also
possible to use a combination of card types to suit specific applications.
74
System 9000TS
Typical Card location and Address Settings within the P925TS-RK Rack
INPUT
INTERFACE
RACK
INPUT
STATUS
STATUS
SYNC
RX TX
PORT 2
2
PORT 3
3
RX TX
PORT 3
P925TS-RK
P925TS-X
1
2
3
4
5
6
7
8
9
10
11
12
13
14
15
16
STATUS
1
2
3
4
5
6
7
8
9
10
11
12
13
14
15
16
INPUTS 49 TO 64
1
INPUT
STATUS
INPUTS 33 TO 48
PORT 1
1
2
3
4
5
6
7
8
9
10
11
12
13
14
15
16
INPUTS 7 TO 32
INTERNAL
INPUTS 1 TO 16
PRINTER
PORT 2 (PROG)
RX TX
1
2
3
4
5
6
7
8
9
10
11
12
13
14
15
16
INPUT
STATUS
1
2
3
4
P925TS-I
P925TS-I
P925TS-I
P925TS-I
ADDRESS 3
ADDRESS 2
ADDRESS 1
ADDRESS 0
Typical card location and Address Setting for 9000TS Systems equipped with
•
P925TS-I Input Cards ONLY
75
INPUT OUTPUT INPUT OUTPUT
INTERFACE
RACK
STATUS
STATUS
STATUS
SYNC
RX TX
PORT 2
2
PORT 3
3
RX TX
PORT 3
P925TS-RK
P925TS-X
STATUS
1
2
3
4
5
6
7
8
9
10
11
12
13
14
15
16
OUTPUTS 17 TO 32
1
STATUS
1
2
3
4
5
6
7
8
9
10
11
12
13
14
15
16
INPUTS 17 TO 32
PORT 1
1
2
3
4
5
6
7
8
9
10
11
12
13
14
15
16
OUTPUTS 1 TO 16
INTERNAL
INPUTS 1 TO 16
PRINTER
PORT 2 (PROG)
RX TX
1
2
3
4
5
6
7
8
9
10
11
12
13
14
15
16
1
1A
2
2A
P925TS-I
P925TS-O
P925TS-I
P925TS-O
ADDRESS 1
ADDRESS 1
ADDRESS 0
ADDRESS 0
Typical card location and Address Setting for 9000TS Systems equipped with
•
•
76
P925TS-I Input and
P925TS-O Output Cards.
System 9000TS
RACK
STATUS
STATUS
SYNC
RX TX
PORT 2
INTERNAL
PORT 3
3
RX TX
PORT 3
1
P925TS-X
P925TS-I
1
2
3
4
5
6
7
8
9
10
11
12
13
14
15
16
STATUS
1
2
3
4
5
6
7
8
9
10
11
12
13
14
15
16
1A
RELAYS 1 TO 16
1
STATUS
OUTPUTS 1 TO 16
PORT 1
1
2
3
4
5
6
7
8
9
10
11
12
13
14
15
16
INPUTS 1 TO 16
PRINTER
PORT 2 (PROG)
RX TX
2
P925TS-RK
RELAY
INPUT OUTPUT
INTERFACE
1B
P925TS-R
P925TS-O
ADDRESS 0
ADDRESS 0
Typical card location and Address Setting for 9000TS Systems equipped with
•
•
•
P925TS-I Input,
P925TS-O Output and
P925TS-R Relay Cards.
77
SECTION 17 – 9000TS EVENT TYPE KEY
The following lists can be used to identify the event type ET**
P925TS-I Input Card Event Type Key
EVENT TYPE
0
1
2
3
4
5
6
7
8
9
10
11
12
13
14
15
16
17
18
19
20
21
22
23
24
25
26
27
28
29
30
31
32
33
34
35
36
37
78
DESCRIPTION
Alarm returning to normal
Alarm activation
Alarm shelved
Alarm manually disabled in software
Alarm unshelved
Alarm manually enabled in software
Configuration change
Group inhibited
Group uninhibited
Lamp test PB activated
Lamp test PB return to normal
Acknowledge PB activated
Acknowledge PB return to normal
Reset PB activated
Reset PB return to normal
Silence PB activated
Silence PB return to normal
System test PB activated
System test PB return to normal
First up / Ack PB activated
First up / Ack PB return to normal
Lamp test / Ack PB activated
Lamp test / Ack PB return to normal
Sleep mode PB activated
Sleep mode PB return to normal
Inhibit PB Group 1 activated
Inhibit PB Group 1 return to normal
Inhibit PB Group 2 activated
Inhibit PB Group 2 return to normal
Inhibit PB Group 3 activated
Inhibit PB Group 3 return to normal
Inhibit PB Group 4 activated
Inhibit PB Group 4 return to normal
Inhibit PB Group 5 activated
Inhibit PB Group 5 return to normal
Inhibit PB Group 6 activated
Inhibit PB Group 6 return to normal
Inhibit PB Group 7 activated
System 9000TS
38
39
40
41
42
43
44
45
46
47
48
49
50
51
52
Inhibit PB Group 7 return to normal
Inhibit PB Group 8 activated
Inhibit PB Group 8 return to normal
Input Fault SC activated – None standard
Input Fault SC normal – None standard
Input Fault OC activated – None standard
Input Fault OC normal – None standard
Not used
Write input normal
Write input abnormal
Fram Fault
Local relay card OK
Local relay card fault
Write Disable activated
Write Disable normal
P925TS-0 Output Card Event Type Key
EVENT TYPE
64
65
66
67
68
69
70
DESCRIPTION
Alarm event return to normal
Subsequent alarm event activated
First-up alarm event activated
Subsequent alarm event acknowledged
First-up alarm event acknowledged
Alarm event ringback
Configuration change
P925TS-R Relay Card Event Type Key
EVENT TYPE
125
126
127
DESCRIPTION
Relay event return to normal
Relay event activated
Configuration change
9000TS System Internal Event Type Key
EVENT TYPE
128
129
130
131
132
DESCRIPTION
Printer OK
Printer offline
Printer busy
Printer disconnected
Printer no paper
79
133
134
135
136
137
138
139
140
141
142
143
144
145
146
147
148
149
150
151
152
153
154
155
156
157
158
159
160
161
162
163
164
165
166
167
168
169
170
171
172
173
174
175
176
177
80
Printer unknown state
Printer log OK
Printer log full
Modbus log OK
Modbus log full
Raw log OK
Raw log full
Sync OK
Sync fail
Power OK
Power fail
Input card found
Input card missing
Output card found
Output card missing
Relay card found
Relay card missing
Watchdog OK
Watchdog Fail
Contact request OK
Contact request Fail
Alarm request OK
Alarm request Fail
Relay request OK
Relay request Fail
Internal request OK
Internal request Fail
Disabled request OK
Disabled request Fail
Gps Lock OK
Gps Lock Fail
DOM Port 3 serial com OK
DOM Port 3 serial com Fail
DOM Port 2 serial com OK
DOM Port 2 serial com Fail
DOM Port 1 serial com OK
DOM Port 1 serial com Fail
DOM Dualred link OK
DOM Dualred link Fail
SUB Port 3 serial com OK
SUB Port 3 serial com Fail
SUB Port 2 serial com OK
SUB Port 2 serial com Fail
SUB Port 1 serial com OK
SUB Port 1 serial com Fail
System 9000TS
178
179
180
181
182
183
184
185
186
187
188
189
190
191
SUB Port 0 serial com OK
SUB Port 0 serial com Fail
DOM Port 0 serial com OK
DOM Port 0 serial com Fail
DOM control OK
DOM control Fail
SUB control OK
SUB control Fail
SUB DOM Compare Config OK
SUB DOM Compare Config Fail
DOM SUB Compare Config OK
DOM SUB Compare Config Fail
SUB Dualred link OK
SUB Dualred link Fail
81
SECTION 18 – PORT 1 SERIAL COMMUNICATIONS
Port 1 Protocol Formats.
PROTOCOL
RTK AMS
Modbus RTU
Modbus RTU
Modbus RTU
TYPE
RS485
RS485
RS485
RS485
BAUD RATE
38400
38400
9600
9600
START BIT
1
1
1
1
PARITY BIT
EVEN
EVEN
NONE
EVEN
STOP BIT
1
1
1
1
AMS Time Stamped Event Protocol
Refer to MTL Instruments for technical assistance
Modbus RTU Protocol
RTU tables.
Each character represents 8 bit binary data in hexadecimal
format.
Y represents a character with more than one possible value.
TIME represents elapsed time of 3 ½ characters min.
Read Request – Master
START
SYSTEM
ADDR
FUNC
TIME
Y
0x01
START
ADDR
HI
Y
START
ADDR
LO
Y
NO. OF
INPUTS
HI
Y
NO. OF
INPUTS
LO
Y
LRC
ERROR
CHECK
YY
STOP
TIME
System address
Range is 0x00 (0) to 0xFE (254). Default is 0x00.
Start address HI/LO word
Indentifies first data bit to be read. The data type returned for this address depends on
a number of factors. Standard systems supplied before August 2011 can only return
contact data in the range 0 to 1984:Address of first bit = Start address.
Address 0 will contain contact data for inputs 1.
Address 1 will contain contact data for inputs 2.
Address 254 will contain contact data for inputs 255.
Address 255 will contain contact data for inputs 256.
Etc.
Bespoked systems supplied before August 2011 may have additional data types
available, please contact RTK for specific information / manual.
82
System 9000TS
After August 2011 all systems have the data types, contact offset and port offset
functionality defined below:There are two data groups containing data types these are listed below together with
their default address range. Contact and port offsets are assumed to be 0:•
•
Status Group – Data types
o Contact, Address range 0 – 1984 max.
o Alarm, Address range 2000 – 3984 max.
o Relay, Address range 4000 – 5984 max.
o Disable, Address range 6000 – 7984 max.
o Inhibit, Address range 8000 – 9984 max.
o Shelved, Address range 10000 – 11984 max.
o Internal, Address range 12000 – 13984 max.
o Channel Fault, Address range 14000 – 15984 max.
Port Group – Data types
o Coil, Address range 16000 – 17984 max.
The data type returned depends on the combination of Start address, Contact Offset,
Port Offset and number of inputs.
Note: If status and coil first data bits overlap “coincide” the data type returned will
always be Status.
Status data type - Address of first data bit = Start address - Contact Offset.
Examples below with Contact offset = 0:Default – Start address 0 - Contact status data for input 1.
Default – Start address 2000 - Alarm status data for input 1.
Default – Start address 4000 - Relay Contact status data for input 1.
Default – Start address 6000 - Disable status data for input 1.
Default – Start address 8000 - Inhibit Contact status data for input 1.
Default – Start address 10000 - Shelved status data for input 1.
Default – Start address 12000 - Internal status data for input 1.
Default – Start address 14000 – Channel Fault status data for input 1.
Examples below with Contact offset = 40000:Default – Start address 40000 - Contact status data for input 1.
Default – Start address 42000 - Alarm status data for input 1.
Default – Start address 44000 - Relay Contact status data for input 1.
Default – Start address 46000 - Disable status data for input 1.
Default – Start address 48000 - Inhibit Contact status data for input 1.
Default – Start address 50000 - Shelved status data for input 1.
Default – Start address 52000 - Internal status data for input 1.
Default – Start address 54000 – Channel Fault status data for input 1.
83
Port data type - Address of first data bit = Start address – Port Offset.
Example below with Port offset = 0:Default – Start address 16000 - Coil data for input 1.
Example below with contact offset = 40000:Default – Start address 56000 - Coil data for input 1.
Note: If status and coil first data bits overlap “coincide” the data type returned will
always be Status.
No of inputs HI/LO word
Number of data bits to return. Maximum allowable number of data bits “channels” to
read with single message is 1984.
Status data type – Address of Last data bit =
(No of inputs – 1) + (Start address - Contact Offset).
Port data type - Address of Last data bit =
(No of inputs – 1) + (Start address – Port Offset).
Note: If status and coil first data bits overlap “coincide” the data type returned will
always be Status.
84
System 9000TS
Read Response – 9000TS Slave
START
SYSTEM
ADDR
FUNC
BYTE
COUNT
N
DATA
BYTES
LRC
ERROR
CHECK
STOP
TIME
Y
0X01
Y
Y*N
YY
TIME
System address
Range is 0x00 (0) to 0xFE (254). Default is 0x00.
Byte count
Number of data Bytes returned. One data byte is returned for every 8 data bits
requested with a minimum of one data byte assuming at least one data bit was
requested.
Data Byte 1, Bit 0 = First data bit requested.
Data Byte 1, Bit 7 = 8TH data bit requested.
Data Byte 2, Bit 0 = 9TH data bit requested.
Data Byte 2, Bit 7 = 16TH data bit requested.
Etc.
Write Single Request/Response – Master and 9000TS Slave
Master write request and 9000TS slave write response are the same.
START
SYSTEM
ADDR
FUNC
TIME
Y
0x05
DATA
ADDR
HI
Y
DATA
ADDR
LO
Y
DATA
HI
DATA
LO
Y
Y
LRC
ERROR
CHECK
YY
STOP
TIME
System address
Range is 0x00 (0) to 0xFE (254). Default is 0x00.
Data address word HI/LO word
Indentifies the address of the data bit to be written. Only port coil data type can be
written:Port Coil Address = Data address + Port Offset.
Default first coil address in system = 0.
Data HI/LO word
Set Coil abnormal: Data HI = 0xFF, Data LO = 0x00.
Set Coil normal:
Data HI = 0x00, Data LO = 0x00.
85
Write Multiple Request – Master
START
SYSTEM
ADDR
FUNC
TIME
Y
0x0F
START
ADDR
HI
Y
START
ADDR
LO
Y
NUM
COILS
HI
Y
NUM
COILS
LO
Y
BYTE
COUNT
N
Y
DATA
BYTES
Y*N
LRC
ERROR
CHECK
YY
STOP
TIME
System address
Range is 0x00 (0) to 0xFE (254). Default is 0x00.
Start address word HI/LO word
Indentifies the address of the first data bit to be written. Only port coil data type can be
written:First Port Coil Address = Start address + Port Offset.
Default first coil address in system = 0
Number coils HI/LO word
Number of coils to be written. Max number possible 1984.
Byte Count
Number of data Bytes sent. One data byte is sent for every 8 data bits “coils” written
with a minimum of one data byte assuming at least one data bit “coil” is written.
Data Bytes
Each bit in a data byte represents a coil.
Set Input abnormal: Data bit = HI.
Set Input normal:
Data bit = LO.
Write Multiple Response – Slave
START
SYSTEM
ADDR
FUNC
START
ADDR HI
START
ADDR LO
TIME
Y
0x0F
Y
Y
System address
NUM
INPUTS
HI
Y
Range is 0x00 (0) to 0xFE (254). Default is 0x00.
Start address HI/LO word
Same as the original request.
Number inputs HI/LO word
Same as the original request.
86
NUM
INPUTS
LO
Y
LRC
ERROR
CHECK
YY
STOP
TIME
System 9000TS
Exception Response – 9000TS Slave
9000TS slave response to invalid requests.
START
FUNCTION
SYSTEM
ADDR
EXCEPTION
CODE
TIME
Y
Y
Y
LRC
ERROR
CHECK
YY
STOP
TIME
System address
Range is 0x00 (0) to 0xFE (254). Default is 0x00.
Function
Invalid read request function 0x01 = 0x81.
Invalid write request function 0x05 = 0x85.
Invalid write request function 0x0F = 0x8F.
Exception Codes
Illegal data address = 0x02.
Illegal data value = 0x03.
Busy = 0x06.
87
SECTION 19 – PORT 2 SERIAL COMMUNICATION
Port 2 Protocol Formats.
PROTOCOL
PROG
MODBUS RTU
MODBUS RTU
GPS WF1
TYPE
RS232
RS232
RS232
RS232
BAUD RATE
38400
38400
9600
19200
START BIT
1
1
1
1
PARITY BIT
EVEN
EVEN
NONE
EVEN
STOP BIT
1
1
1
1
PROG
Port is available for programming function only.
MODBUS RTU
Note: If port is set for a protocol other than programming i.e. dual function then button
2 on the front of the interface card should be used to toggle between functions – Refer
to configuration manual for more details.
Modbus RTU Protocol
RTU tables.
Each character represents 8 bit binary data in hexadecimal
format.
Y represents a character with more than one possible value.
TIME represents elapsed time of 3 ½ characters min.
Read Request – Master
START
SYSTEM
ADDR
FUNC
TIME
Y
0x01
START
ADDR
HI
Y
START
ADDR
LO
Y
NO. OF
INPUTS
HI
Y
NO. OF
INPUTS
LO
Y
LRC
ERROR
CHECK
YY
STOP
TIME
System address
Range is 0x00 (0) to 0xFE (254). Default is 0x00.
Start address HI/LO word
Indentifies first data bit to be read. The data type returned for this address depends on
a number of factors. Standard systems supplied before August 2011 can only return
contact data in the range 0 to 1984:Address of first bit = Start address.
Address 0 will contain contact data for inputs 1.
Address 1 will contain contact data for inputs 2.
Address 254 will contain contact data for inputs 255.
Address 255 will contain contact data for inputs 256.
Etc.
88
System 9000TS
Bespoked systems supplied before August 2011 may have additional data types
available, please contact MTL for specific information / manual.
After August 2011 all systems have the data types, contact offset and port offset
functionality defined below:There are two data groups containing data types these are listed below together with
their default address range. Contact and port offsets are assumed to be 0:•
•
Status Group – Data types
o Contact, Address range 0 – 1984 max.
o Alarm, Address range 2000 – 3984 max.
o Relay, Address range 4000 – 5984 max.
o Disable, Address range 6000 – 7984 max.
o Inhibit, Address range 8000 – 9984 max.
o Shelved, Address range 10000 – 11984 max.
o Internal, Address range 12000 – 13984 max.
o Channel Fault, Address range 14000 – 15984 max.
Port Group – Data types
o Coil, Address range 16000 – 17984 max.
The data type returned depends on the combination of Start address, Contact Offset,
Port Offset and number of inputs.
Note: If status and coil first data bits overlap “coincide” the data type returned will
always be Status.
Status data type - Address of first data bit = Start address - Contact Offset.
Examples below with Contact offset = 0:Default – Start address 0 - Contact status data for input 1.
Default – Start address 2000 - Alarm status data for input 1.
Default – Start address 4000 - Relay Contact status data for input 1.
Default – Start address 6000 - Disable status data for input 1.
Default – Start address 8000 - Inhibit Contact status data for input 1.
Default – Start address 10000 - Shelved status data for input 1.
Default – Start address 12000 - Internal status data for input 1.
Default – Start address 14000 – Channel Fault status data for input 1.
Examples below with Contact offset = 40000:Default – Start address 40000 - Contact status data for input 1.
Default – Start address 42000 - Alarm status data for input 1.
Default – Start address 44000 - Relay Contact status data for input 1.
Default – Start address 46000 - Disable status data for input 1.
Default – Start address 48000 - Inhibit Contact status data for input 1.
Default – Start address 50000 - Shelved status data for input 1.
Default – Start address 52000 - Internal status data for input 1.
Default – Start address 54000 – Channel Fault status data for input 1.
89
Port data type - Address of first data bit = Start address – Port Offset.
Example below with Port offset = 0:Default – Start address 16000 - Coil data for input 1.
Example below with contact offset = 40000:Default – Start address 56000 - Coil data for input 1.
Note: If status and coil first data bits overlap “coincide” the data type returned will
always be Status.
No of inputs HI/LO word
Number of data bits to return. Maximum allowable number of data bits “channels” to
read with single message is 1984.
Status data type – Address of Last data bit =
(No of inputs – 1) + (Start address - Contact Offset).
Port data type - Address of Last data bit =
(No of inputs – 1) + (Start address – Port Offset).
Note: If status and coil first data bits overlap “coincide” the data type returned will
always be Status.
90
System 9000TS
Read Response – 9000TS Slave
START
SYSTEM
ADDR
FUNC
BYTE
COUNT
N
DATA
BYTES
LRC
ERROR
CHECK
STOP
TIME
Y
0X01
Y
Y*N
YY
TIME
System address
Range is 0x00 (0) to 0xFE (254). Default is 0x00.
Byte count
Number of data Bytes returned. One data byte is returned for every 8 data bits
requested with a minimum of one data byte assuming at least one data bit was
requested.
Data Byte 1, Bit 0 = First data bit requested.
Data Byte 1, Bit 7 = 8TH data bit requested.
Data Byte 2, Bit 0 = 9TH data bit requested.
Data Byte 2, Bit 7 = 16TH data bit requested.
Etc.
Write Single Request/Response – Master and 9000TS Slave
Master write request and 9000TS slave write response are the same.
START
SYSTEM
ADDR
FUNC
TIME
Y
0x05
DATA
ADDR
HI
Y
DATA
ADDR
LO
Y
DATA
HI
DATA
LO
Y
Y
LRC
ERROR
CHECK
YY
STOP
TIME
System address
Range is 0x00 (0) to 0xFE (254). Default is 0x00.
Data address word HI/LO word
Indentifies the address of the data bit to be written. Only port coil data type can be
written:Port Coil Address = Data address + Port Offset.
Default first coil address in system = 0.
Data HI/LO word
Set Coil abnormal: Data HI = 0xFF, Data LO = 0x00.
Set Coil normal:
Data HI = 0x00, Data LO = 0x00.
91
Write Multiple Request – Master
START
SYSTEM
ADDR
FUNC
TIME
Y
0x0F
START
ADDR
HI
Y
START
ADDR
LO
Y
NUM
COILS
HI
Y
NUM
COILS
LO
Y
BYTE
COUNT
N
Y
DATA
BYTES
Y*N
LRC
ERROR
CHECK
YY
STOP
TIME
System address
Range is 0x00 (0) to 0xFE (254). Default is 0x00.
Start address word HI/LO word
Indentifies the address of the first data bit to be written. Only port coil data type can be
written:First Port Coil Address = Start address + Port Offset.
Default first coil address in system = 0
Number coils HI/LO word
Number of coils to be written. Max number possible 1984.
Byte Count
Number of data Bytes sent. One data byte is sent for every 8 data bits “coils” written
with a minimum of one data byte assuming at least one data bit “coil” is written.
Data Bytes
Each bit in a data byte represents a coil.
Set Input abnormal: Data bit = HI.
Set Input normal:
Data bit = LO.
Write Multiple Response – Slave
START
SYSTEM
ADDR
FUNC
START
ADDR HI
START
ADDR LO
TIME
Y
0x0F
Y
Y
System address
NUM
INPUTS
HI
Y
Range is 0x00 (0) to 0xFE (254). Default is 0x00.
Start address HI/LO word
Same as the original request.
Number inputs HI/LO word
Same as the original request.
92
NUM
INPUTS
LO
Y
LRC
ERROR
CHECK
YY
STOP
TIME
System 9000TS
Exception Response – 9000TS Slave
9000TS slave response to invalid requests.
START
FUNCTION
SYSTEM
ADDR
EXCEPTION
CODE
TIME
Y
Y
Y
LRC
ERROR
CHECK
YY
STOP
TIME
System address
Range is 0x00 (0) to 0xFE (254). Default is 0x00.
Function
Invalid read request function 0x01 = 0x81.
Invalid write request function 0x05 = 0x85.
Invalid write request function 0x0F = 0x8F.
Exception Codes
Illegal data address = 0x02.
Illegal data value = 0x03.
Busy = 0x06.
Wharton Protocol
Refer to manufacturers manual or MTL Instruments for additional information.
Note: If port is set for a protocol other than programming i.e. dual function, then button
2 on the front of the interface card should be used to toggle between functions – Refer
to configuration manual or more details.
93
SECTION 20 – PORT 3 SERIAL COMMUNICATION
Port 3 Protocol Formats.
PROTOCOL
Wharton Format 1
Date & Time Protocol
HOPF Date & Time
Protocol
FOXBRGH “MODBUS
RTU”
AUG CAT “MODBUS
RTU”
AUG G22 “MODBUS
RTU”
AUG ALM “MODBUS
RTU”
9000TS MASTER
“MODBUS RTU”
9000TS SLAVE
“MODBUS RTU”
GLOBAL MASTER
”MODBUS RTU”
TYPE
RS232
BAUD RATE
19200
START BIT
1
PARITY
EVEN
STOP BIT
1
RS232
19200
1
EVEN
1
RS232
9600
1
EVEN
1
RS232
9600
1
NONE
1
RS232
9600
1
NONE
1
RS232
9600
1
NONE
1
RS232
9600
1
EVEN
1
RS232
9600
1
EVEN
1
RS232
38400
1
EVEN
1
Wharton Protocol
Refer to manufacturers manual or MTL Instruments for additional information.
HOPF Protocol
Refer to manufacturers manual or MTL Instruments for additional information.
FOXBRGH 9600 E 1 8
This allows the user to connect the 9000TS system to a Foxborough 3rd party device,
Protocol is standard Modbus RTU, Contact MTL for additional information.
AUG CAT, G22, ALM
This allows the user to connect the 9000TS system to an August PLC 3rd party device
with a bespoked port mapping structure, Protocol is standard Modbus RTU. Contact
MTL for additional information.
Modbus RTU Protocol
RTU tables.
Each character represents 8 bit binary data in hexadecimal
format.
Y represents a character with more than one possible value.
TIME represents elapsed time of 3 ½ characters min.
94
System 9000TS
Read Request – Master
START
SYSTEM
ADDR
FUNC
TIME
Y
0x01
START
ADDR
HI
Y
START
ADDR
LO
Y
NO. OF
INPUTS
HI
Y
NO. OF
INPUTS
LO
Y
LRC
ERROR
CHECK
YY
STOP
TIME
System address
Range is 0x00 (0) to 0xFE (254). Default is 0x00.
Start address HI/LO word
Indentifies first data bit to be read. The data type returned for this address depends on
a number of factors. Standard systems supplied before August 2011 can only return
contact data in the range 0 to 1984:Address of first bit = Start address.
Address 0 will contain contact data for inputs 1.
Address 1 will contain contact data for inputs 2.
Address 254 will contain contact data for inputs 255.
Address 255 will contain contact data for inputs 256.
Etc.
Bespoked systems supplied before August 2011 may have additional data types
available, please contact MTL for specific information / manual.
After August 2011 all systems have the data types, contact offset and port offset
functionality defined below:There are two data groups containing data types these are listed below together with
their default address range. Contact and port offsets are assumed to be 0:•
•
Status Group – Data types
o Contact, Address range 0 – 1984 max.
o Alarm, Address range 2000 – 3984 max.
o Relay, Address range 4000 – 5984 max.
o Disable, Address range 6000 – 7984 max.
o Inhibit, Address range 8000 – 9984 max.
o Shelved, Address range 10000 – 11984 max.
o Internal, Address range 12000 – 13984 max.
o Channel Fault, Address range 14000 – 15984 max.
Port Group – Data types
o Coil, Address range 16000 – 17984 max.
The data type returned depends on the combination of Start address, Contact Offset,
Port Offset and number of inputs.
Note: If status and coil first data bits overlap “coincide” the data type returned will
always be Status.
95
Status data type - Address of first data bit = Start address - Contact Offset.
Examples below with Contact offset = 0:Default – Start address 0 - Contact status data for input 1.
Default – Start address 2000 - Alarm status data for input 1.
Default – Start address 4000 - Relay Contact status data for input 1.
Default – Start address 6000 - Disable status data for input 1.
Default – Start address 8000 - Inhibit Contact status data for input 1.
Default – Start address 10000 - Shelved status data for input 1.
Default – Start address 12000 - Internal status data for input 1.
Default – Start address 14000 – Channel Fault status data for input 1.
Examples below with Contact offset = 40000:Default – Start address 40000 - Contact status data for input 1.
Default – Start address 42000 - Alarm status data for input 1.
Default – Start address 44000 - Relay Contact status data for input 1.
Default – Start address 46000 - Disable status data for input 1.
Default – Start address 48000 - Inhibit Contact status data for input 1.
Default – Start address 50000 - Shelved status data for input 1.
Default – Start address 52000 - Internal status data for input 1.
Default – Start address 54000 – Channel Fault status data for input 1.
Port data type - Address of first data bit = Start address – Port Offset.
Example below with Port offset = 0:Default – Start address 16000 - Coil data for input 1.
Example below with contact offset = 40000:Default – Start address 56000 - Coil data for input 1.
Note: If status and coil first data bits overlap “coincide” the data type returned will
always be Status.
No of inputs HI/LO word
Number of data bits to return. Maximum allowable number of data bits “channels” to
read with single message is 1984.
Status data type – Address of Last data bit =
(No of inputs – 1) + (Start address - Contact Offset).
Port data type - Address of Last data bit =
(No of inputs – 1) + (Start address – Port Offset).
Note: If status and coil first data bits overlap “coincide” the data type returned will
always be Status.
96
System 9000TS
Read Response – 9000TS Slave
START
SYSTEM
ADDR
FUNC
BYTE
COUNT
N
DATA
BYTES
LRC
ERROR
CHECK
STOP
TIME
Y
0X01
Y
Y*N
YY
TIME
System address
Range is 0x00 (0) to 0xFE (254). Default is 0x00.
Byte count
Number of data Bytes returned. One data byte is returned for every 8 data bits
requested with a minimum of one data byte assuming at least one data bit was
requested.
Data Byte 1, Bit 0 = First data bit requested.
Data Byte 1, Bit 7 = 8TH data bit requested.
Data Byte 2, Bit 0 = 9TH data bit requested.
Data Byte 2, Bit 7 = 16TH data bit requested.
Etc.
Write Single Request/Response – Master and 9000TS Slave
Master write request and 9000TS slave write response are the same.
START
SYSTEM
ADDR
FUNC
TIME
Y
0x05
DATA
ADDR
HI
Y
DATA
ADDR
LO
Y
DATA
HI
DATA
LO
Y
Y
LRC
ERROR
CHECK
YY
STOP
TIME
System address
Range is 0x00 (0) to 0xFE (254). Default is 0x00.
Data address word HI/LO word
Indentifies the address of the data bit to be written. Only port coil data type can be
written:Port Coil Address = Data address + Port Offset.
Default first coil address in system = 0.
Data HI/LO word
Set Coil abnormal: Data HI = 0xFF, Data LO = 0x00.
Set Coil normal:
Data HI = 0x00, Data LO = 0x00.
97
Write Multiple Request – Master
START
SYSTEM
ADDR
FUNC
TIME
Y
0x0F
START
ADDR
HI
Y
START
ADDR
LO
Y
NUM
COILS
HI
Y
NUM
COILS
LO
Y
BYTE
COUNT
N
Y
DATA
BYTES
Y*N
LRC
ERROR
CHECK
YY
STOP
TIME
System address
Range is 0x00 (0) to 0xFE (254). Default is 0x00.
Start address word HI/LO word
Indentifies the address of the first data bit to be written. Only port coil data type can be
written:First Port Coil Address = Start address + Port Offset.
Default first coil address in system = 0
Number coils HI/LO word
Number of coils to be written. Max number possible 1984.
Byte Count
Number of data Bytes sent. One data byte is sent for every 8 data bits “coils” written
with a minimum of one data byte assuming at least one data bit “coil” is written.
Data Bytes
Each bit in a data byte represents a coil.
Set Input abnormal: Data bit = HI.
Set Input normal:
Data bit = LO.
Write Multiple Response – Slave
START
SYSTEM
ADDR
FUNC
START
ADDR HI
START
ADDR LO
TIME
Y
0x0F
Y
Y
System address
NUM
INPUTS
HI
Y
Range is 0x00 (0) to 0xFE (254). Default is 0x00.
Start address HI/LO word
Same as the original request.
Number inputs HI/LO word
Same as the original request.
98
NUM
INPUTS
LO
Y
LRC
ERROR
CHECK
YY
STOP
TIME
System 9000TS
Exception Response – 9000TS Slave
9000TS slave response to invalid requests.
START
FUNCTION
SYSTEM
ADDR
EXCEPTION
CODE
TIME
Y
Y
Y
LRC
ERROR
CHECK
YY
STOP
TIME
System address
Range is 0x00 (0) to 0xFE (254). Default is 0x00.
Function
Invalid read request function 0x01 = 0x81.
Invalid write request function 0x05 = 0x85.
Invalid write request function 0x0F = 0x8F.
Exception Codes
Illegal data address = 0x02.
Illegal data value = 0x03.
Busy = 0x06.
99
SECTION 21 – IRIGB – option
The 9000TS system can be linked to an IRIGB network providing accurate time and
date information. This option is not provided as default and should be requested when
ordering.
Time Code Input Specifications:Format types – auto detected
IRIGA (A132) (BNC analogue)
IRIGB (B122), (B123) (BNC analogue)
NASA (BNC analogue)
Amplitude
2 Vpk - pk min, 10Vpk - pk max
Polarity
Detected automatically
Modulation ratio
2:1 min, 3:1 typical, 4:1 max
Input impedance
>10K Ohms
Timing Accuracy
Better than 100ppm
Common Mode Voltage
Differential input, +/-100V max
100
System 9000TS
Connections and hardware settings:IRIGB Input
BNC connector located on rear of the first rack.
WARNING!
Hazardous voltages may be present on the rear panel connections when
connectors are removed. Take care not to touch any exposed parts.
Rack switch setting’s
Switches are located within the first rack, at the rear of the interface card slot.
WARNING!
Remove ALL power from the unit before changing any switches.
Switch settings for SINGLE interface card rack:IRIGB SW16 position 1 – OFF
IRIGB SW16 position 2 – OFF
IRIGB SW15 position 1 – ON
IRIGB SW15 position 2 - ON
101
SW16
SW15
Switch settings for DUAL interface card rack:IRIGB SW1 position 1 – ON
IRIGB SW1 position 2 – ON
IRIGB SW2 position 1 – OFF
IRIGB SW2 position 2 – OFF
SW1
SW2
102
System 9000TS
IRIGB Card link settings
There are no customer selectable links on the IRIGB card. Link positions are shown
below for information only
Jumper links
IRIGB Card Status indication:The IRIGB card status can be ascertained via an LED (LED5) situated on the front of
the IRIGB card. On earlier models the status LED could only be viewed by looking
through the top of the rack via the grill, on the latest versions a viewing window on the
front of the interface card has been added.
Status LED
Status LED
103
The status LED flashes a status pattern to assist in diagnosing installation errors. The
pattern is a sequence of short and long flashes. Trailing short flashes are deleted so
the status pattern can repeat more frequently. Table below details these patterns, it
includes data relating to GPS communications which is not relevant, only flash
positions 2 and 6 should be considered for the purpose of IRIGB diagnostics.
Flash Position
Flash Position Meaning of Short (cleared) Flash
Meaning of Long (set) Flash
1
GPS satellite receiver being used for
time reference
2
Synchronization to better than 5μsec
verified with last 5 seconds
Modulated time code input being
used for
time reference
Synchronization to better than
5μsec not
verified within last 5 seconds
1 PPS pulse from GPS satellite
receiver is bad. In applications with
modulated time code inputs only,
this status bit will
always be set.
No serial data being received from
GPS
satellite receiver. In applications
with
modulated time code inputs only,
this status bit will always be set.
GPS satellite receiver is not
tracking enough
satellites for accurate UTC time. In
applications with modulated time
code inputs
only, this status bit will always be
set.
Time code input not decodable. In
applications without modulated
time code
inputs, this status bit will always be
set.
Waiting for “SET NEXT 1PPS
TIME” command. Used for Option
– M only
1PPS Pulse from GPS satellite
receiver is OK
3
GPS satellite receiver serial data being
received OK
4
GPS satellite receiver is tracking
enough satellites for accurate UTC
time.
5
Time code input being decoded
6
7
If using 1PPS, set NEXT 1PPS TIME
command sequence has been
performed. Used for Option –M only
Waiting for “SET NEXT 1PPS TIME”
command. Used for Option –M only
IRIGB Date and Time:The IRIGB card extracts months, days, hours, minutes, seconds, milliseconds and
microseconds information from the IRIGB network message it does not however
extract year information, the year information has to be entered manually using the
configuration software date and time sync message. Once the year information has
been set correctly it will remain correct indefinitely so long as the 9000TS is powered.
When the 9000TS is power down the year information will remain correct for six
months, after which the date and time information would have to be manually set once
again.
104
System 9000TS
IRIGB Sync:Until the IRIGB card achieves an accurate time sync with the incoming IRIGB network
the 9000TS clock will free run using the IRIGB card clock as its reference, once an
accurate time sync to the IRIGB signal is established the 9000TS clock is effectively
tied to the IRIGB network time. There are three ways to check for IRIGB network
synchronisation:1. Status LED as described in previous section.
2. Select a common relay to follow “GPS Lock Fault” – relay will change state
when sync is lost.
3. Indicium – Event type 162 indicates sync ok and event type 163 indicates sync
lost.
Note: IRIGB sync loss will be reported after a period of approx 250 seconds. IRIGB
sync re-established will be reported in approx 30 seconds.
105
SECTION 22 – SPARE PARTS LIST
PART NO
P925TS-RK
P925TS-RK-ETN
P925TS-I
P925TS-O
P925TS-R
P925TS-X
P925TS-BL
P925TS-CABLE-1
FU-1A-003
FU-5A-005
106
DESCRIPTION
Base Rack
Expansion Rack
16 Channel Input Card
16 Channel Output Card
16 Channel Relay Card
Interface Card
Blanking Plate
1 metre Ribbon Cable for interconnecting Chassis
(standard length)
1A Signal Supply Fuse
5A Logic Fuse
System 9000TS
SECTION 23 – SERVICING
WARNING!
Installation, configuration and maintenance of this annunciator must only be
performed by competent service personnel
WARNING!
Remove ALL power from the unit before changing any switches or removing
cards. Fully remove a card before changing any settings on the card.
WARNING!
Hazardous voltages may exist inside the System 9000TS. Blanking plates
must be fitted over any unused card slots or when cards are removed and
the System 9000TS is left unattended.
Module Removal
9000TS Systems can be constructed using a combination of 16 channel input, output
and relay cards as required.
P925TS-I Input Cards
Each card type is universal in application and can therefore be exchanged with any
other card in the system.
However, before a card is relocated the following points should be considered.
•
Card address setting: - Each card within the rack has been factory set to a
unique address to allow inter-card and system wide communication – therefore
it is important to note the address setting of any card before any changes are
made. Full details of address setting are provided within this manual
•
Automatic configuration: - The 9000TS System is designed to allow hotswapping of cards and the interface card will automatically detect the
introduction of a new card and the configuration will be automatically updated to
the same settings as the original card.
•
Signal supply voltage level: - Standard systems use +24VDC supplied via the
alarm rack for use as a signal supply voltage. In certain applications higher
107
voltage inputs may be required and therefore each channel is equipped with a 3
way header and 2 way shorting bar to allow the user to select either the
standard 24VAC/DC setting or the optional 125VAC/DC setting. An additional
option exists for a 48VAC/DC version.
P925TS-O Output Cards
Each card type is universal in application and can therefore be exchanged with any
other card in the system.
However, before a card is relocated the following points should be considered.
•
Card address setting: - Each card within the rack has been factory set to a
unique address to allow inter-card and system wide communication – therefore
it is important to note the address setting of any card before any changes are
made. Full details of address setting are provided within this manual
P925TS-R Relay Cards
Each card type is universal in application and can therefore be exchanged with any
other card in the system.
However, before a card is relocated the following points should be considered.
•
Card address setting: - Each card within the rack has been factory set to a
unique address to allow inter-card and system wide communication – therefore
it is important to note the address setting of any card before any changes are
made. Full details of address setting are provided within this manual
•
Coil state: - Each relay can be set to operate from a normally energised or
normally de-energised condition – please ensure any new card is set to the
same configuration.
•
Contact state:- The contact state of each relay can be set to normally open or
normally closed
P925TS-X Interface Cards
•
Card switch settings: - In the unlikely event of failure of the interface card the
user would need to check that the new card has all of the jumpers set to same
position as the original card.
•
Software configuration: - Once the card has been installed the user would
need to down-load the original configuration from a suitable PC.
108
System 9000TS
SAFETY
The P925TS-X Interface contains a processor card which is equipped with a lithium
coin-cell long life battery.
This battery should be removed by suitably qualified personnel at the end of its life.
If required the replacement model number is CR 2032 Coin cell. (3.0V lithium,
180mAH)
Please dispose of the battery in accordance with local laws and we note it should not
be placed with normal waste.
BATTERY DISPOSAL
109
SECTION 24 – TROUBLE SHOOTING GIUDE
WARNING!
Remove ALL power from the unit before changing any switches or removing
cards. Fully remove a card before changing any settings on the card.
Status Led on all cards fail to illuminate
Possible cause:• Interface card not started.
Solution:• Check that sync and status LED’s on the interface card are flashing at approx 0.5 Hz, if not
then restart the system and wait 3 minutes for the system to start. Check again the sync
and status LED’s for correct function, if the interface card has failed to started contact MTL
for advice.
Status led on some input cards fail to illuminate
Possible cause:• Input card has address set incorrectly.
Solution:• Remove card and check / change address settings on 8way switch as per user instructions.
Replace card and check if status Led illuminates.
Possible cause:• More than one input card has the same address.
Solution:• Remove all input cards and check / change address settings on 8way switch as per user
instructions. Replace input cards one by one confirming each time the sign on address via
the display LED’s on the front of the input card, printer or AMS outputs. If a card signs on
with the wrong address please re-check the address settings, if they are found to be correct
then contact MTL for advice and possible replacement card.
Possible cause:• New card does not fit within defined system structure. E.g. the system structure is set for 10
input cards and the user has fitted 11 to the system.
Note: An input card cannot sign on if it is not defined within the SYS9000 structure.
Solution:• If the card to be added is of the same type as existing cards in the system then it is possible
to use the “add and remove” card feature in the configuration software to add an additional
card. It is important to note that this feature is not available on all versions of the
configuration software, if you do not appear to have this feature please contact MTL for
advice and possible configuration software update.
If the card to be added to the system is a new card type e.g. your system consists of only
input cards and you wish to add output cards you must contact MTL for advice.
Possible cause:• Card is faulty.
Solution:• If you have tried all of the above solutions without success then contact MTL for advice and
possible card replacement.
110
System 9000TS
Status led on some output cards fail to illuminate
Possible cause:• Output card has address set incorrectly.
Solution:• Remove card and check / change address settings on 8way switch as per user instructions.
Replace card and check if status Led illuminates.
Possible cause:• More than one output card has the same address.
Solution:• Remove all output cards and check / change address settings on 8way switch as per user
instructions. Replace output cards one by one confirming each time the sign on address via
the display LED’s on the front of the output card, printer or AMS outputs. If a card signs on
with the wrong address please re-check the address settings, if they are found to be correct
then contact MTL for advice and possible replacement card.
Possible cause:• New card does not fit within defined system structure. E.g. the system structure is set for 10
output cards and the user has fitted 11 to the system.
Note: An output card cannot sign on if it is not defined within the SYS9000 structure.
Solution:• If the card to be added is of the same type as existing cards in the system then it is possible
to use the “add and remove” card feature in the configuration software to add an additional
card. It is important to note that this feature is not available on all versions of the
configuration software, if you do not appear to have this feature please contact MTL for
advice and possible configuration software update.
If the card to be added to the system is a new card type e.g. your system consists of input
and output cards and you wish to add relay cards you must contact MTL for advice.
Possible cause:• Card is faulty.
Solutions:If you have tried all of the above solutions without success then contact MTL for advice and possible
card replacement.
Status led on some relay cards fail to illuminate
Possible cause:• Relay card has address set incorrectly.
Solution:• Remove card and check / change address settings on 8way switch as per user instructions.
Replace card and check if status Led illuminates.
Possible cause:• Input and Relay card not linked. The relay card cannot sign on without being linked to an
input card this is done via switches on the rack mother board.
Solution:• Check mother board switch settings between complementary input and relay cards, refer to
section “INTER CARD COMMUNICATIONS” for information.
Possible cause:• More than one relay card has the same address.
Solution:• Remove all relay cards and check / change address settings on 8way switch as per user
instructions. Replace relay cards one by one confirming each time the sign on address via
the display LED’s on the front of the relay card, printer or AMS relays. If a card signs on
with the wrong address please re-check the address settings, if they are found to be correct
then contact MTL for advice and possible replacement card.
111
Possible cause:• New card does not fit within defined system structure. E.g. the system structure is set for 10
relay cards and the user has fitted 11 to the system.
Note: A relay card cannot sign on if it is not defined within the SYS9000 structure.
Solution:• If the card to be added is of the same type as existing cards in the system then it is possible
to use the “add and remove” card feature in the configuration software to add an additional
card. It is important to note that this feature is not available on all versions of the
configuration software, if you do not appear to have this feature please contact MTL for
advice and possible configuration software update.
If the card to be added to the system is a new card type e.g. your system consists of input
and relay cards and you wish to add output cards you must contact MTL for advice.
Possible cause:• Card is faulty.
Solution:• If you have tried all of the above solutions without success then contact MTL for advice and
possible card replacement.
Events lost during power down
Possible cause:• Interface card battery link disabled position or battery needs replacing.
Solution:Remove the interface card. At the rear of the interface card you will see a circular button
battery cell, next to this battery cell is a link this should be in the Battery enabled position. If
the link is correct then the battery needs replacing. Battery model number is CR 2032
button cell.
o
o
Link in position closest to Ethernet connector – Battery enabled
Link in position furthest from Ethernet connector – Battery disabled
Battery cell
112
Battery link
Ethernet connector
System 9000TS
Port 2 configuration (programme) does not work
Possible cause:• Port set to dual functionality.
Solution:• Press button 2 on the front of the interface card to toggle between port functionality. When
port 2 programme function is selected it will remain in the programming mode until button 2
is pressed again or port 2 has been idle for one minute or more.
Input card channel does not respond to local input change
Possible cause:• Input channel remote mapping is selected.
Solution:• De-select remote mapping by following instruction in the configuration manual.
Output card channel does not respond to local input change
Possible cause:• Output channel remote mapping is selected.
Solution:• De-select remote mapping by following instruction in the configuration manual.
Possible cause:• Input and Output card not linked. The output card receives local channel data via a local
serial network linking complementary input and output cards. The serial network link is
selected via switches on the rack mother board.
Solution:• Check mother board switch settings between complementary input and output cards. Refer
to section “INTER CARD COMMUNICATIONS” for information.
Relay card channel does not respond to input change
Possible cause:• Input and Relay card not linked. The relay card receives local channel data via a local serial
network linking complementary input and relay cards. The serial network link is selected via
switches on the rack mother board.
Solution:• Check mother board switch settings between complementary input and relay cards. Refer
to section “INTER CARD COMMUNICATIONS” for information.
Input card channel does not respond to remote input change
Possible cause:• Input channel remote mapping is not selected.
Solution:• Select remote mapping by following instruction in the configuration manual.
Possible cause:• Input channel is incorrectly port mapped.
Solution:• Refer to configuration manual for information on port mapping.
113
Output card channel does not respond to remote input change
Possible cause:• Output channel remote mapping is not selected.
Solution:• Select remote mapping by following instruction in the configuration manual.
Possible cause:• Output channel is incorrectly I/O mapped.
Solution:• Refer to configuration manual for information on I/O mapping.
Input Card fails to sign on
Refer to trouble shooting heading – “Status Led on some input cards fail to illuminate”
Output Card fails to sign on
Refer to trouble shooting heading – “Status Led on some output cards fail to illuminate”
Relay Card fails to sign on
Refer to trouble shooting heading – “Status Led on some relay cards fail to illuminate”
Sustained watchdog relay fault
Possible cause:• Card not signed on.
Solution:• Refer to trouble shooting heading – “Status Led on some input cards fail to illuminate”
• Refer to trouble shooting heading – “Status Led on some output cards fail to illuminate”
• Refer to trouble shooting heading – “Status Led on some relay cards fail to illuminate”
Possible cause:• 9000TS system structure is modified when a watchdog error existed. Watchdog faults,
events, status block entries cannot be cleared in the normal way if the card that created the
record no longer exists in the system structure.
Solution:• Restore the original 9000TS system structure using the configuration software or remove
and refit the interface card battery; this will clear all records including outstanding events.
Intermittent watchdog relay fault
Possible cause:• Input card has address set incorrectly.
Solution:• Remove card and check / change address settings on 8way switch as per user instructions.
Replace card and check if status Led illuminates.
Possible cause:• Output card has address set incorrectly.
Solution:• Remove card and check / change address settings on 8way switch as per user instructions.
Replace card and check if status Led illuminates.
114
System 9000TS
Possible cause:• Input/Output/Relay card is faulty.
Solution:• If you have tried all of the above solutions without success then contact MTL for advice and
possible card replacement.
Sustained printer watchdog fault
Refer to trouble shooting heading – “Sustained watchdog relay fault”
Intermittent printer watchdog fault
Refer to trouble shooting heading – “Intermittent watchdog relay fault”
Sustained AMS watchdog fault
Refer to trouble shooting heading – “Sustained watchdog relay fault”
Intermittent AMS watchdog fault
Refer to trouble shooting heading – “Intermittent watchdog relay fault”
Unable to clear status event
Possible cause:• 9000TS system structure has been modified causing a status value to be allocated against
a card which no longer exists in the system structure. A default status value cannot be
cleared in the normal way if the card that created the record no longer exists in the system
structure.
Solution:• Restore the original 9000TS system structure using the configuration software or remove
and refit the interface card battery; this will clear all records including outstanding events.
Interface card status led not illuminated / flashing
Possible cause:• System initialising.
Solution:• Please wait up to 3 minutes for system to start.
Possible cause:• Power fault.
Solution:• Check all power supply levels and connections.
Possible cause:• Interface card fault.
Solution:• If you have tried all of the above solutions without success then contact MTL for advice and
possible card replacement.
115
Interface card sync led not illuminated / flashing
Possible cause:• System initialising.
Solution:• Please wait up to 3 minutes for system to start.
Possible cause:• Power fault.
Solution:• Check all power supply levels and connections.
Possible cause:• External sync fault.
Solution:• Check external sync connections on the rear of the rack.
Possible cause:• Interface card fault.
Solution:• If you have tried all of the above solutions without success then contact MTL for advice and
possible card replacement.
Card functions incorrectly
Possible cause:• Card configuration downloaded to interface card in the system but changes have not yet
been distributed throughout the system.
Solution:• Please wait up to 3 minutes for changes to be effected.
Unable to silence audible / horn on input card only system
Possible cause:• Silence Pushbutton input not enabled.
Solution:• Enable Silence Pushbutton global setting. Refer to configuration manual for more details.
Possible cause:• Input cards not linked.
Solution:• Silence function in an input card only system requires all input cards to be linked together
via the local network. Check that mother board switch settings between all input cards are
enabled. Refer to section “INTER CARD COMMUNICATIONS” for information.
Silence audible / horn on input card only system unresponsive
Possible cause:• Silence pushbutton uses only input channel.
Solution:• An input card only system using an input channel only for silence function can take several
seconds to silence the horn / audible. This delay can be removed if an additional silence
pushbutton contact is added, this extra contact should be normally open and connected to
the terminals marked M/S +ve and M/S –ve on the rear of the first rack.
116
System 9000TS
SECTION 25 – CONTACT
Measurement Technology Limited
Great Marlings
Butterfield
Luton
LU2 8DL
United Kingdom
Telephone / Fax Number List
Telephone: 0044 (0) 1582 723633
Fax: 0044 (0) 1582 422283
Procedures for Factory Repair and Return Warranty
Should you require to return an annunciator, please contact MTL for details.
117