1
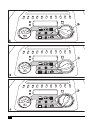
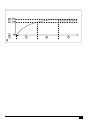
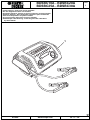
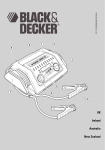
UK
Ireland
Australia
New Zealand
2
1
2
4
3
Intended use
Your Black & Decker battery charger is designed to charge
lead-acid batteries. This product is intended for household,
consumer use only.
X
X
X
Safety instructions
Warning! When using mains-powered appliances, basic
safety precautions, including the following, should always be
followed to reduce the risk of fire, electric shock, personal
injury and material damage.
X
Read all of this manual carefully before using the
appliance.
X
The intended use is described in this manual. The use
of any accessory or attachment or the performance of
any operation with this appliance other than those
recommended in this instruction manual may present a
risk of personal injury.
X
Retain this manual for future reference.
Power cord safety
Warning! Never alter the ac power cord or plug. If it will not
fit, have a proper outlet installed by a qualified electrician.
Improper connection may result in an electric shock.
Specific safety instructions for battery chargers
The following symbols are marked on the appliance:
This tool is double insulated; therefore no earth wire
is required. Always check that the power supply
corresponds to the voltage on the rating plate.
Read all of this instruction manual carefully.
Using your appliance
Always take care when using the appliance.
X
This appliance is not intended for use by young or infirm
persons without supervision.
X
The appliance is not to be used as a toy.
X
Use in a dry location only. Do not allow the appliance to
become wet.
X
Do not immerse the appliance in water.
X
Do not open body casing. There are no userserviceable parts inside.
X
Do not operate the appliance in explosive atmospheres,
such as in the presence of flammable liquids, gases or
dust.
X
To reduce the risk of damage to plugs and cords never
pull the cable to remove the plug from a socket outlet.
After use
X
When not in use, the appliance should be stored in a
dry, well ventilated place out of the reach of children.
X
Children should not have access to stored appliances.
X
When the appliance is stored or transported in a vehicle
it should be placed in the boot or restrained to prevent
movement following sudden changes in speed or
direction.
X
The appliance should be protected from direct sunlight,
heat and moisture.
Inspection and repairs
X
Before use, check the appliance for damaged or
defective parts. Check for breakage of parts, damage to
switches and any other conditions that may affect its
operation.
4
Do not use the appliance if any part is damaged or
defective.
Have any damaged or defective parts repaired or
replaced by an authorised repair agent.
Never attempt to remove or replace any parts other than
those specified in this manual.
This appliance is intended for indoor use only
This is not intended for storage.
Read these instructions before use:
If the supply cord is damaged, it must be replaced by the
manufacturer or an authorised Black & Decker Service
Centre in order to avoid a hazard.
X
Never attempt to charge non-rechargeable batteries.
X
Have defective cords replaced immediately.
X
Do not expose the battery charger to water.
X
Do not open the battery charger.
X
Do not probe the battery charger.
X
Never allow the red and black battery clamps (4) to
touch each other or another common metal conductor.
This could cause damage to the appliance and/or create
a spark/ explosion hazard.
X
Always store the battery clamps (4) in the storage
provided when not in use.
X
Batteries
Warning! Never attempt to charge a frozen battery.
X
Never attempt to open for any reason.
X
Do not expose the battery to water.
Warning! Battery fluid is a diluted sulphuric acid and may
cause personal injury or damage to property. In case of skin
contact, immediately rinse with water. If redness, pain or
irritation occurs seek medical attention. In case of eye
contact, rinse immediately with clean water and seek
immediate medical attention.
When disposing of batteries, follow the instructions
given in the section "Protecting the environment".
X
Add distilled water in each cell until the battery acid
reaches the level specified by the battery manufacturer.
This helps to purge excess gas from the cells. Do not
overfill. For a battery without cell caps (maintenance
free), carefully follow the manufacturer's charging
instructions.
X
Study all the battery manufacturer's specific
precautions, such as removing or not removing cell
caps while charging, and the recommended charging
rates.
X
Make sure that the initial charging rate does not exceed
the battery manufacturer's requirement.
Warning! Risk of explosive gas mixtures. Working in the
vicinity of a lead-acid battery is dangerous. Batteries
generate explosive gases during normal battery operation.
For this reason, it is of utmost importance that each time,
before using your battery charger, you read this manual and
follow the instructions exactly.
X
Use of an attachment not recommended or sold by
Black & Decker may result in a risk of fire, electric shock,
or injury to persons.
X
An extension cord should not be used unless absolutely
necessary. Use of an improper extension cord could
result in a risk of fire and electric shock, and will void the
warranty.
X
LCD - Liquid Crystal Display
If any liquid crystal comes in contact with your skin:
X
Wash area thoroughly with plenty of water. Remove
contaminated clothing. If liquid crystal gets into your
eye. Flush the affected eye with clean water and then
seek medical attention. If liquid crystal is swallowed:
Flush your mouth thoroughly with water. Drink large
quantities of water and induce vomiting. Seek medical
attention.
Personal safety
Wear complete eye protection and suitable clothing to give
protection from contact with battery fluid.
Avoid touching the eyes while working with a battery. Acid,
acid particles or corrosion may get into the eyes.
Remove personal metal items such as rings, bracelets,
necklaces and watches when working with a lead-acid
battery. A lead-acid battery can produce a short circuit
current high enough to cause a severe burn.
Be extra cautious to reduce the risk of dropping a metal
object onto the battery. This might cause sparks or shortcircuit the battery or other electrical part, which can cause an
explosion.
Preparation before charging
The appliance must only be connected to a 12 V lead-acid
battery. Before charging, confirm that the voltage of the
battery is 12 V by referring to the label on the battery or from
the information available relating to its application e.g. car
user manual.
Do not use the appliance for charging dry-cell batteries that
are commonly used with home appliances. These batteries
may burst and cause injury to persons and damage to
property.
Warning! Explosive gas may be vented from lead acid
batteries when charging. Make sure that the area is well
ventilated and remove any sources of ignition when
conducting charging procedures.
X
Position the battery charger as far away from the battery
as the leads will allow. The battery charger contains
switches that may create a spark.
X
Do not place the battery charger above or stand the
battery charger on top of the battery.
X
Explosive gases may collect near the ground. Locate
the battery charger as high as possible above ground
level.
X
Do not use power tools in the charging area.
X
Do not smoke or have naked flames in the charging
area.
X
Follow the instructions for connecting and disconnecting
the battery charger leads or battery terminals.
Warning! A marine (boat) battery must be removed and
charged on shore. To charge it on board requires equipment
specially designed for marine use. This appliance is NOT
designed for such use.
Vehicles may have electrical and electronic systems (e.g.
engine management systems, mobile phones) that may be
damaged if subjected to high starting voltages and voltage
peaks. Before connecting the appliance to the vehicle, read
the vehicle's owner's manual to confirm that external
charging is allowed.
X
Follow these instructions and those published by the
battery manufacturer and vehicle manufacturer.
X
Only connect and disconnect the dc output clamps after
removing the supply cord from the electric outlet. Never
allow clamps to touch each other.
X
Check the polarity of the vehicle battery terminals
before connecting the appliance. Always disconnect the
negative (black) cable first: followed by the positive (red)
cable.
When charging a battery installed in the circuit follow the
manufacturers instructions for accessing the battery and the
following:
X
Do not charge the battery while the engine is operating.
5
Be aware that engine components e.g. the coolant fan
may start automatically. Keep hands and body away
from engine components and position the battery
charger and cables to prevent contact.
Make sure that the battery charger and the cables are
located to prevent damage from closure of doors and
engine compartment covers.
Make sure that the connections can be made without
touching the metal body or components adjacent to the
battery.
When using this appliance in proximity to the vehicle's
battery and engine, stand the appliance on a flat, stable
surface and be sure to keep all clamps, cords, clothing
and body parts away from moving parts of the vehicle.
If it is necessary to remove the battery from the vehicle
to charge or to clean the terminals, make sure that all
accessories in the vehicle are switched off, so as not to
cause a spark.
To reduce the risk of electric shock, disconnect the
appliance from any power source before attempting
maintenance or cleaning. Turning off controls without
disconnecting the appliance will not reduce this risk.
X
X
X
X
X
X
Connecting the battery charger
When all the preparations for charging and personal safety
have been completed, proceed as follows:
X
For most automotive and similar applications the battery
charger may be connected to the battery while it is
connected to the dc circuit. If this is acceptable follow
the instructions given in "Charging a battery installed in
the circuit".
X
If the battery must be disconnected from the circuit
before charging, follow the instructions given in
"Charging a battery disconnected from the circuit".
Charging a battery installed in the circuit
Warning! An incorrect connection, a battery short circuit,
location of the battery and the location of the battery charger
may create a hazard. Make sure that adequate preparation
has been made before proceeding.
Warning! If the battery posts cannot be accessed or the
battery charger clamps will contact the bodywork or
components adjacent to the battery, the battery must be
removed before charging. Follow the manufacturer's
instructions to remove the battery.
X
Check the polarity of the battery posts. A positive
(POS,P, +) battery post usually has a larger diameter
than the negative (NEG, N, -) battery post.
X
Follow the manufacturers' instructions to remove any
insulating covers from the battery posts.
X
Connect the positive (red) clamp from the battery
charger to the positive (POS, P, +) post of the battery.
6
X
Connect the negative (-) black clamp to the chassis or a
solid non-moving metal vehicle component or body part.
Never clamp directly to the negative battery terminal or
a moving part. Refer to the automobiles owner’s
manual.
When disconnecting the battery charger from the battery,
always:
X
Switch off and unplug the battery charger from the
mains supply.
X
Remove the negative clamp first.
X
Remove the positive clamp last.
X
Refit any insulating covers to the battery posts.
Charging a battery disconnected from the circuit.
Warning! An incorrect connection, a battery short circuit,
location of the battery and the location of the battery charger
may create a hazard. Make sure that adequate preparation
has been made before proceeding.
If the battery is not already removed from the circuit, follow
the manufacturers' instructions to remove the battery before
charging.
X
Check the polarity of the battery posts. A positive
(POS,P, +) battery post usually has a larger diameter
than the negative (NEG, N, -) battery post.
X
Connect the positive (red) clamp from the battery
charger to the positive (POS, P, +) post of the battery.
X
Connect the negative (black) clamp from the battery
charger to the negative (NEG, N, -) post of the battery.
When disconnecting the battery charger from the battery,
always:
X
Switch off and unplug the battery charger from the
mains supply.
X
Remove the negative clamp first.
X
Remove the positive clamp last.
X
Refit any insulating covers to the battery posts.
Features
1.
2.
3.
4.
5.
6.
7.
8.
9.
Digital display, scrolling message
Language selection button
Function control knob
Battery clamps
LED status indicator
Charging gauge
Cable storage
Clamp storage
Carry handle
Language selection
The smart charger can display error message and
information in your chosen language. To alter the initial
language (default English), proceed as instructed below:
X
X
Plug the unit into an ac source and during the
initialisation sequence, press the language button (2)
once; pressing the language button repeatedly allows
you to choose your language.
Once a language has been selected, the smart charger
will display all messages and information in this
language.
The language button does not need to be pressed each time
the unit is switched on; the smart charger remembers the
previous selection and defaults to this language.
General use instructions
X
Set up the unit as described in the “Connecting the
battery charger" section.
X
Turn the function control knob (3) to the desired function
position.
X
Plug the charger into a 230 Vac outlet.
X
Connect the charger clamps to the battery.
X
The digital display (1) will show ANALYSING
BATTERY, indicating that the unit is set up correctly and
ready to use.
X
CHECK BATTERY CONNECTIONS will be displayed
when the unit is plugged in and there is no battery
connected to the charger or the clamps are not
connected properly.
X
When the unit has completed analysing the battery, it
will begin the recharging process if the function control
knob (3) has been set to smart charge. The battery
voltage will then be displayed (for example;
CHARGING/12.5 VOLTS). As the battery charges, the
arrow on the charging gauge (6) will move indicating the
current percent of charge in the battery, from the red
zone (0 to 25% charged) toward the green zone (75100% charged).
X
When the unit is fully charged, BATTERY IS FULLY
CHARGED will be displayed and the green status LED
light (5) will light.
X
To turn the battery charger off, first disconnect the
mains cord, then disconnect the clamps (4). Observe
the “Safety Instructions" at the front of this manual when
disconnecting.
Use
The Black & Decker battery charger has a fast charge rate of
20A, 25A or 30A (depending on the model). It is designed for
charging 12V lead-acid batteries only, i.e. conventional
automotive, maintenance-free, marine, deep cycle and gel
batteries as used in cars, trucks, farm equipment, boats,
lawn mowers, garden tractors, motorcycles and various
other applications.
Autoselect technology
Select the application and the charger will do the rest.
4-Stage charging technology (fig. D)
The battery charger features 4-stage high-efficiency
charging technology using built-in microprocessor control
which ensures fast, safe and complete charging of
serviceable batteries.
Stage 1 - battery status
To make sure the battery can accept a charge, a connection
check prevents damage caused by reversed polarity.
Stage 2 - bulk charge
Charges fast by delivering pure DC current up to 80% of the
battery capacity.
Stage 3 - absorption
Avoids overcharging by slowly charging up to 100% of the
battery capacity.
Stage 4 - float mode
Maintains the battery fully charged indefinitely so it is always
ready for use.
Control panel
The following symbols are shown on the control panel:
Smart charge
Alternator check
Engine start
Smart charge (fig. A)
Automatically analyses the battery and selects the best
charging rate for the battery type, size and discharge level.
Approximate charging times
The battery charger will automatically adjust the charge rate
as the battery becomes charged and stop charging when the
battery is fully charged. Deep cycle batteries may require
longer charging times.
Alternator check (fig. B)
A faulty alternator can be the hidden cause of a discharged
battery.
Warning! Check only 12 Vdc systems.
7
Part 1 (no load)
X
Make sure that there is no load on the alternator by
turning off all the vehicles accessories.
X
The battery must be fully charged before testing the
alternator.
X
Run the engine for 3 minutes to achieve normal idle
speed and verify that there is a no-load voltage.
X
Using the function control knob (3), select alternator
check (fig. C) before connecting the clamps to the
battery, ANALYSING ALTERNATOR will be displayed
after the clamps are connected.
X
When the unit has completed checking, ALTERNATOR
GOOD will be displayed and the green LED will light to
indicate that the alternator is good or ALTERNATOR
BAD or ENGINE NOT RUNNING and the red LED will
light to indicate that the alternator is out of typical
voltage range.
Part 2 (under load)
X
Load the alternator by turning on as many accessories
as possible except for air-conditioning and defrost.
X
Once the unit has completed checking, ALTERNATOR
GOOD will be displayed and the green LED will light to
indicate that the alternator is good or ALTERNATOR
BAD or ENGINE NOT RUNNING and the red LED will
light to indicate that the alternator is out of typical
voltage range.
If the first alternator check indicates a good alternator and
the second indicates the alternator is not good, the problem
could be caused by any of the following:
X
Loose fan belts.
X
An intermittent diode failure.
X
Bad connections between the battery and alternator
and/or ground.
Note: ALTERNATOR BAD or ENGINE NOT RUNNING may
be displayed if a number of extra accessory loads have been
added to the charging system, thereby increasing current
demand from the alternator. Make sure that the alternator is
rated to support the application.
Engine start (fig. C)
Using the function control knob (3) select engine start before
connecting the clamps to the battery.
X
The LCD will show a 90-second count down, then
READY TO JUMP START ENGINE will display.
X
Crank the engine using the manufacturers guidelines,
typically in 3 to 5 second bursts. The LCD displays
STARTING.
X
Disconnect the mains cord and clamps observing the
“Safety instructions” at the front of this manual.
8
Warning! When a second attempt at starting an engine is
required, a five minute cooling down period is necessary
before attempting to re-start the engine.
The high current engine start function requires a resting/
cooling period between tries. The charger will not allow
operation in the engine start mode for 5 minutes. The LCD
will display COOLING DOWN, WAIT 5 MINUTES during this
time. After 5 minutes, repeat the above procedure.
Troubleshooting
Display indications, common problems and possible
solutions:
No Functions
X
Make sure that the battery charger is plugged into a live
230 Vac outlet.
X
Follow the steps outlined in the “Connecting the battery
charger” at the front of this manual.
X
The unit will turn on automatically after being properly
connected to the battery. If it does not come on, either it
is not connected properly to the terminals or the voltage
of the battery to be serviced is too low (below 0.5 Volts).
Smart charge fault condition messages
CHECK BATTERY CONNECTIONS - When this message
appears, the most common cause is a poor connection to
the battery.
X
Observing the “Safety instructions” at the front of this
manual, disconnect mains cord and the battery
clamps (4), clean the battery terminals and reconnect. If
the situation persists, we recommend taking your
battery to a certified automotive service centre for
evaluation.
REPLACE OR SERVICE BATTERY - The battery being
charged either has an internal open circuit, a shorted cell or
is highly sulphated and cannot accept a normal charge
current. We recommend taking your battery to a certified
automotive service centre for evaluation.
COOL DOWN CYCLE - red LED lit -The ventilation grill that
allows the air from flowing in and out of the charger may be
blocked.
X
Make sure there is ample ventilation before resuming
operation.
REVERSE CLAMPS ON TERMINALS - The red LED lights
and a continuous warning tone sounds.
The connections to the battery’s positive and negative
terminals are incorrect.
X
Observing the “Safety instructions” at the front of this
manual, disconnect the mains cord and the battery
clamps (4) and reconnect the clamps as described in
the section “Charging the battery”.
OVERTIME CONDITION - When this message is displayed,
the charging cycle has exceeded 18 hours; this condition
may occur because of the following:
X
The battery being charged is defective. See a service
centre to service or replace the battery.
X
The battery being charged has a very large capacity,
greater than that specified for the charger.
Charging a very cold battery
If the battery to be charged is very cold i.e., in temperatures
below freezing (0°C/32°F), it cannot accept a high rate of
charge. The initial charge rate will be low. The charge rate
will increase as the battery warms.
Warning! Never attempt to charge a frozen battery.
X
Mains plug replacement (U.K. & Ireland only)
If a new mains plug needs to be fitted:
X
Safely dispose of the old plug.
X
Connect the brown lead to the live terminal in the new
plug.
X
Connect the blue lead to the neutral terminal.
Warning! No connection is to be made to the earth terminal.
Follow the fitting instructions supplied with good quality
plugs. Recommended fuse: 3 A.
Protecting the environment
Separate collection. This product must not be
disposed of with normal household waste.
Alternator check fault condition messages
CHECK BATTERY CONNECTIONS - When this message
appears, the most common cause is a poor connection to
the battery.
X
Observe the “Safety Instructions” at the front of this
manual, disconnect the AC cord and the clamps, clean
the battery terminals and reconnect.
X
If the situation persists, we recommend taking your
battery to a certified automotive service centre for
evaluation.
REVERSE CLAMPS ON TERMINALS - The red LED lights
and a continuous warning tone sounds.
The connections to the battery’s positive and negative
terminals are incorrect.
X
Observing the “Safety instructions” at the front of this
manual, disconnect the AC cord and the clamps and
reconnect to the battery with the correct polarity.
Maintenance
Your Black & Decker tool has been designed to operate over
a long period of time with a minimum of maintenance.
Continuous satisfactory operation depends upon proper tool
care and regular cleaning.
Warning! Before performing any maintenance or cleaning
on the appliance, unplug the appliance.
X
From time to time wipe the appliance with a damp cloth.
Do not use any abrasive or solvent-based cleaner. Do
not immerse the appliance in water.
X
After each use, clean the battery clamps (4) and be sure
to remove any battery fluid that will cause corrosion of
the clamps (4).
X
Clean the outside case of the battery charger with a soft
cloth and, if necessary, mild soap solution.
X
Do not allow liquid to enter the battery charger. Do not
operate when the battery charger is wet.
Keep the battery charger cords loosely coiled during
storage to prevent damage to the cords.
Should you find one day that your Black & Decker product
needs replacement, or if it is of no further use to you, do not
dispose of it with household waste. Make this product
available for separate collection.
Separate collection of used products and packaging
allows materials to be recycled and used again. Reuse of recycled materials helps prevent
environmental pollution and reduces the demand
for raw materials.
Local regulations may provide for separate collection of
electrical products from the household, at municipal waste
sites or by the retailer when you purchase a new product.
Black & Decker provides a facility for the collection and
recycling of Black & Decker products once they have
reached the end of their working life. To take advantage of
this service please return your product to any authorised
repair agent who will collect them on our behalf.
You can check the location of your nearest authorised repair
agent by contacting your local Black & Decker office at the
address indicated in this manual. Alternatively, a list of
authorised Black & Decker repair agents and full details of
our after-sales service and contacts are available on the
Internet at: www.2helpU.com.
Lead acid batteries can be recharged many times.
At the end of their useful life, discard batteries with
due care for our environment:
X
X
Do not dispose of the battery in fire, as this may result in
an explosion.
Lead acid (Pb) batteries are recyclable. They must not
be disposed of with household waste. The battery must
9
be removed and disposed of in accordance with local
regulations.
Do not short-circuit the battery terminals.
Be aware that the battery is heavy.
If possible, operate the appliance to run the battery
down completely.
X
X
X
Place the battery in a suitable packaging to ensure that the
terminals cannot be short-circuited.
Take the battery to your service agent or a local recycling
station. Collected batteries will be recycled or disposed of
properly.
Technical data
BDSBC20A
Input voltage Vac 230
Rated input
W 390
Output
Vdc 12
voltage
Output
A 20
current
Weight
kg 2.5
Charger
20A
25A
30A
Volts
12
12
12
BDSBC25A
230
460
12
BDSBC30A
230
580
12
25
30
2.5
2.5
Battery capacity
20 - 360 Ah
20 - 450 Ah
20 - 560 Ah
EC declaration of conformity
BDSBC20A TYPE1, BDSBC25A TYPE1,
BDSBC30A TYPE 1
Black & Decker declares that these products conform to:
Standards & Legislation.
EN60335, 2006/95/EC
The undersigned is responsible for compilation of the
technical file and makes this declaration on behalf of
Black & Decker.
Kevin Hewitt
Director of Consumer Engineering
Spennymoor, County Durham, DL16 6JG,
United Kingdom
07-08-2008
10
Guarantee
Black & Decker is confident of the quality of its products and
offers an outstanding guarantee. This guarantee statement
is in addition to and in no way prejudices your statutory
rights. The guarantee is valid within the territories of the
Member States of the European Union and the European
Free Trade Area.
If a Black & Decker product becomes defective due to faulty
materials, workmanship or lack of conformity, within 24
months from the date of purchase, Black & Decker
guarantees to replace defective parts, repair products
subjected to fair wear and tear or replace such products to
make sure of the minimum inconvenience to the customer
unless:
X
The product has been used for trade, professional or
hire purposes.
X
The product has been subjected to misuse or neglect.
X
The product has sustained damage through foreign
objects, substances or accidents.
X
Repairs have been attempted by persons other than
authorised repair agents or Black & Decker service
staff.
To claim on the guarantee, you will need to submit proof of
purchase to the seller or an authorised repair agent. You can
check the location of your nearest authorised repair agent by
contacting your local Black & Decker office at the address
indicated in this manual. Alternatively, a list of authorised
Black & Decker repair agents and full details of our aftersales service and contacts are available on the Internet at:
www.2helpU.com
Please visit our website www.blackanddecker.co.uk to
register your new Black & Decker product and to be kept up
to date on new products and special offers. Further
information on the Black & Decker brand and our range of
products is available at www.blackanddecker.co.uk.
BDSBC10A - BDSBC20A
BDSBC25A - BDSBC30A
Partial support - Only parts shown available
Nur die aufgefuerten teile sind lieferbar
Reparation partielle - Seules les pieces indiquees sont disponibles
Supporto parziale - Sono disponibili soltanto le parti evidenziate
Solo estan disponibles las peizas listadas
So se encontram disponiveis as pecas listadas
Gedeeltelijke ondersteuning - alleen de getoonde onderdelen
zijn beschikbaar
1
E15448
www.2helpU.com
30 - 07 - 08
TYP.
1
$XVWUDOLD
%ODFN'HFNHU$XVWUDOLD3W\/WG
)OHWFKHU5RDG0RRURROEDUN
9LFWRULD
1HZ=HDODQG
%ODFN'HFNHU
7H$SXQJD3ODFH
0W:HOOLQJWRQ
$XFNODQG
8QLWHG.LQJGRP
%ODFN'HFNHU
%DWK5RDG
6ORXJK%HUNVKLUH6/<'
90540693
7HO
)D[
7HO
)D[
7HO
)D[
+HOSOLQH
L-09/08