1
PIO-32/32L(PCI)
Digital I/O Board with Opto-Isolation for PCI
User’s Guide
Copyright
Copyright 1998 CONTEC Co., LTD. ALL RIGHTS RESERVED
No part of this document may be copied or reproduced in any form
by any means without prior written consent of CONTEC Co., LTD.
CONTEC Co., LTD. makes no commitment to update or keep
current the information contained in this document. The
information in this document is subject to change without notice.
All relevant issues have been considered in the preparation of this
document. Should you notice an omission or any questionable
item in this document, please feel free to notify CONTEC Co.,
LTD.
Regardless of the foregoing statement, CONTEC assumes no
responsibility for any errors that may appear in this document nor
for results obtained by the user as a result of using this product.
Trademarks
MS, Microsoft, MS-DOS and Windows are trademarks of Microsoft
Corporation. Other brand and product names are trademarks of
their respective holder.
PIO-32/32L(PCI)
i
Product Configuration
- PIO-32/32L(PCI) Board ... 1
- Setup Program Diskette (3.5 inch / 1.44MB) ... 1
- User's Guide (this booklet) ... 1
Unpacking:
This board is specially packed in an anti-static bag to prevent
damage in shipping.
Check the contents to make sure that you have everything listed
above. If you do not have all the items, contact your distributor
or CONTEC group office where you purchased.
Notes!
Do not remove the board from its protective packaging until the
computer case is open and ready for installation. Electrical
static can cause damage to electronic components.
ii
PIO-32/32L(PCI)
Table of Contents
Copyright ............................................................................i
Trademarks ........................................................................i
Product Configuration ..................................................... ii
1. Introduction ............................................................. 1
About the PIO-32/32L(PCI) Board...............................1
Features.........................................................................1
Limited Three-Year Warranty......................................2
How to Obtain Service..................................................2
Liability .........................................................................2
Handling Precautions...................................................3
About the Manual .........................................................4
2. Component Locations and Setting .............................. 5
Component Locations........................................................5
Setting the Board ID.........................................................6
Setting Procedure .........................................................6
Setting the Interrupt Use.................................................7
3. Board Setup ............................................................. 9
Use CONTEC Windows Software Products.....................9
Without CONTEC Software Product .............................10
For Windows 98 Systems............................................10
For Windows 95 Systems............................................14
For other OS systems .................................................19
4. External Connection ............................................... 21
Interface Connector.........................................................21
Connecting the Interface Connector ..........................21
Interface Connector Pin Assignment.........................22
PCB96WS and CCB-96 Signal Assignments.............23
Input Circuit and Output Circuit...................................24
Input circuit ................................................................24
Output circuit..............................................................25
STB and ACK input and output circuits ...................26
Connection examples ..................................................27
PIO-32/32L(PCI)
iii
Surge Protection..............................................................28
5. I/O Ports and Registers ........................................... 29
I/O Address Map..............................................................29
Input/Output Data by Direct Access to I/O Ports..........31
Data Input...................................................................31
Data Output ................................................................32
Input/Output Data by Bit Number ................................33
Input a Bit Data..........................................................35
Output a Bit Data .......................................................35
Input/Output Data by Group Number ...........................36
Input a Group Data ....................................................38
Output a Group Data..................................................38
Digital Filter Function of Input Channels ....................39
Digital Filter Function Principle ...............................39
Set Digital Filter Time ...............................................40
Confirm the Digital Filter Setting Data ....................41
Output Data Monitor ......................................................42
Input from an I/O Port................................................42
Confirm an Output Bit ...............................................42
Monitor Output Data by Port Number ......................42
Handshake of Input Channel 0 to 15.............................43
Interrupt Control Function ............................................45
Set Interrupt Events...................................................46
Interrupt Event Masking ...........................................47
Interrupt Status Register...........................................47
Check Interrupt Setting .............................................47
Clear Interrupt Request Signal .................................48
6. System Reference.................................................... 49
Block Diagram.................................................................49
Specifications...................................................................50
7. Troubleshooting ...................................................... 51
8. Index ..................................................................... 53
iv
PIO-32/32L(PCI)
List of Figures
Figure 2.1.
Component Locations............................................... 5
Figure 2.2.
Board ID Settings (SW1).......................................... 6
Figure 2.3.
Setting the Interrupt Use........................................... 7
Figure 3.1.
Sample Programs on FD......................................... 19
Figure 4.1.
Connecting the Interface Connector ....................... 21
Figure 4.2.
Connector Used ...................................................... 21
Figure 4.3.
Interface Connector Pin Assignment ...................... 22
Figure 4.4.
PCB96WS and CCB-96 Signal Assignments.......... 23
Figure 4.5.
Input Circuit ........................................................... 24
Figure 4.6.
Output Circuit......................................................... 25
Figure 4.7.
STB Input Circuit ................................................... 26
Figure 4.8.
ACK Output Circuit ............................................... 26
Figure 4.9.
An Example to use Input I00 .................................. 27
Figure 4.10. An Example to use Output O40 .............................. 27
Figure 4.11. Connection Example of Output and Input Signal.... 27
Figure 4.12. Samples of Voltage Surge Protection ...................... 28
Figure 5.1.
Input Port Assignments .......................................... 29
Figure 5.2.
Output Port Assignments........................................ 30
Figure 5.3.
Input Port "I/O Address +0H ~ 3H"........................ 31
Figure 5.4.
Output Port "I/O Address +4H ~ 7H" ..................... 32
Figure 5.5.
Input Port "I/O Address +0H ~ 7H" and "I/O
Address +AH" ........................................................ 33
Figure 5.6.
Output Port "I/O Address +0H ~ 7H" and "I/O
Address +AH ~ BH"............................................... 34
PIO-32/32L(PCI)
v
Figure 5.7.
Input Port "I/O Address +0H ~ 7H" and "I/O
Address + CH" ....................................................... 36
Figure 5.8.
Output Port "I/O Address +0H ~ 7H" and "I/O
Address +CH ~ DH"............................................... 37
Figure 5.9.
Digital Filter Operation Principle ........................... 39
Figure 5.10. I/O Ports of Digital Filter Function......................... 39
Figure 5.11. Digital Filter Time and Setting Data....................... 40
Figure 5.12. Input Port "I/O Address + 4H ~ 7H"....................... 42
Figure 5.13. I/O Port Assignment of Handshake Function.......... 43
Figure 5.14. Timing of Handshake Function............................... 43
Figure 5.15. Input Port Assignment of Interrupt Function .......... 45
Figure 5.16. Output Port Assignment of Interrupt Function........ 45
Figure 5.17. Explanation of Interrupt Setting Register................ 46
Figure 6.1.
Block Diagram ....................................................... 49
List of Tables
Table 6.1. Specifications............................................................ 50
vi
PIO-32/32L(PCI)
Introduction
1. Introduction
About the PIO-32/32L(PCI) Board
PIO-32/32L(PCI) is a PCI bus-compatible add-on interface board
designed for isolated digital input/output. Plugged in a PCI bus
expansion slot on the motherboard of a personal computer, the
board can input and output up to 32 channels.
Features
PCI bus-compatible interface board is available to IBM PC
compatibles PC in which PCI bus slots have been installed .
- Opto-isolated input/output providing improved noise resistance
- Up to 32 (8 signals x 4 groups) input signals
- Up to 32 (8 signals x 4 groups) output signals
- Four input signals can also generate interrupt requests
- Up to 35 VDC, 100mA per signal, max. output
- In addition to its general-purpose input/output function, this board
also supports:
- Digital filter for input signals
- Output data monitor
- Handshake function for input signals of channels 0 to 15
- Bit input/output function
- Group input/output function
For details, refer to "Chapter 5: I/O Ports and Registers"
PIO-32/32L(PCI)
1
Introduction
Limited Three-Year Warranty
CONTEC Interface boards are warranted by CONTEC Co., LTD. to
be free from defects in material and workmanship for up to three
years from the date of purchase by the original purchaser.
Repair will be free of charge only when this device is returned
freight prepaid with a copy of the original invoice and a Return
Merchandise Authorization to the distributor or the CONTEC group
office, from which it was purchased.
This warranty is not applicable for scratches or normal wear, but
only for the electronic circuitry and original boards. The warranty
is not applicable if the device has been tampered with or damaged
through abuse, mistreatment, neglect, or unreasonable use, or if the
original invoice is not included, in which case repairs will be
considered beyond the warranty policy.
How to Obtain Service
For replacement or repair, return the device freight prepaid, with a
copy of the original invoice. Please obtain a Return Merchandise
Authorization Number (RMA) from the CONTEC group office
where you purchased before returning any product.
* No product will be accepted by CONTEC group without the
RMA number.
Liability
The obligation of the warrantor is solely to repair or replace the product.
In no event will the warrantor be liable for any incidental or
consequential damages due to such defect or consequences that arise
from inexperienced usage, misuse, or malfunction of this device.
2
PIO-32/32L(PCI)
Introduction
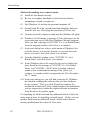
Handling Precautions
Take the following precautions when handling this board.
- Do not modify the board. CONTEC will bear no responsibility
for any problems, etc., resulting from modifying this board.
- Do not strike or bend the board. Doing so could damage the
board.
- Do not touch the board's metal plated terminals (edge connector)
with your hands. Doing so could cause connection malfunctions.
If the terminals are touched by someone's hands, clean the
terminals with industrial alcohol.
- There are switches on the board that need to be set in advance. Be
sure to check these before installing the board.
- Only set the switches and jumpers on the board to the specified
settings. Doing otherwise would cause trouble.
- Install the board in the computer's PCI expansion slot.
- Do not install or remove the board to or from the slot while the
computer's power is turned on. Doing so could cause trouble. Be
sure that the personal computer or the I/O expansion unit power is
turned off.
- The sum of the power consumed by the boards installed in the
personal computer's PCI bus expansion slots cannot be larger than
the personal computer's allowable power supply capacity. If the
boards' power sum is larger than this capacity, trouble could
occur.
PIO-32/32L(PCI)
3
Introduction
About the Manual
This manual consists of the following chapters:
4
Chapter 1
Introduction
Chapter 2
Component Locations and Setting
This chapter explains the names of major parts on the
board and its switch setting.
Chapter 3
Board Setup
This chapter describes the procedures for setting up
the board.
Chapter 4
External Connection
This chapter explains how to connect external devices
to the board.
Chapter 5
I/O Ports and Registers
This chapter provides the assignment and definition of
each I/O port bit used for the board.
Chapter 6
System Reference
This chapter summarizes hardware specifications of
the board and provides circuit block diagrams.
Chapter 7
Troubleshooting
This chapter asks a set of questions you need to
answer when you are in trouble with your board.
It also includes a checklist to fill out before calling
CONTEC group office for help.
PIO-32/32L(PCI)
Component Locations and Setting
2. Component Locations and Setting
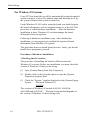
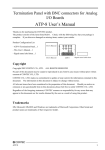
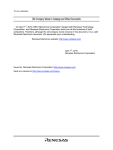
Component Locations
Figure 2.1. shows the names of major parts on the PIO-32/32L(PCI)
board.
Note that the switch setting shown below is the factory default.
• Jumper for interrupt
signal resource settings
JP1
INT
NOT USE
USE
1
PIO-32/32L(PCI)
• Interface connector
(CN1)
2
JP1
INT
3
SW1
BOARD ID
• BOARD ID Setting Switch
SW1
BOARD ID
45
23 6
CD
AB E
78 9
F01
Figure 2.1. Component Locations
PIO-32/32L(PCI)
5
Component Locations and Setting
Setting the Board ID
If you install two or more PIO-32/32L(PCI) boards on one personal
computer, assign a different ID value to each of the boards to
distinguish them.
The board IDs from 0 to F can be set to identify up to sixteen
boards.
If only one board is used, the original factory setting (Board ID = 0)
should be used.
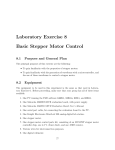
Setting Procedure
To set the board ID, use the rotary switch on the board. Turn the
SW1 knob to set the board ID as shown below.
SW1
BOARD ID
23456
CD
AB E
789
Factory default :
(BOARD ID = 0)
F01
Figure 2.2. Board ID Settings (SW1)
6
PIO-32/32L(PCI)
Component Locations and Setting
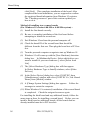
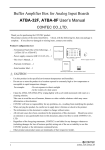
Setting the Interrupt Use
If you don't use the Interrupt function, you can let your PC
recognize the PIO-32/32L(PCI) board as a no-interrupt function
board in order to save the Interrupt resources of PC.
When the interrupt is used, this board is assigned the interrupt level
from your PC.
Setup when interrupt is used
Setup when interrupt is not used
JP1
INT
USE
JP1
INT
NOT USE
1 2 3
USE
NOT USE
1 2 3
(Factory setting)
Figure 2.3. Setting the Interrupt Use
PIO-32/32L(PCI)
7
Component Locations and Setting
8
PIO-32/32L(PCI)
Board Setup
3. Board Setup
The board setup method varies according to the operating system
being used.
Use CONTEC Windows Software Products
For MS Windows OS systems, we recommend you to use our
Windows software products (optional).
< Examples of CONTEC software products for Windows>
- Driver Software Package (Option)
API-PAC(W32)
- ActiveX Component Package (Option)
ACX-PAC(W32)
Please follow the setup instructions of the User’s manual shipped
with the software products and/or the help files of the package to
setup our interface board(s) to your system.
For details of CONTEC software products, please contact our sales
agencies.
PIO-32/32L(PCI)
9
Board Setup
Without CONTEC Software Product
The board setup method varies according to the operating system
being used. For MS Windows OS systems, we recommend you to
use our optional Windows software products. But if you are going
to program the board(s) yourself, for MS Windows 95/98 systems,
you should follow the instructions bellow to setup the board(s)
before you program the board(s). We do not support other Windows
OSs without a Contec software product. For other OSs, we give a
setup example by using MS-DOS system. You are supposed to refer
our example and setup the board(s) to your system yourself.
For Windows 98 Systems
Every PCI bus board/device will be automatically assigned required
system resources, such as I/O address range and interrupt level, by
the system whenever the system is turned on.
Under Windows 98 OS, before using the board you should register
the board information, such as assigned resources, to the OS. This
procedure is called hardware installation. After the hardware
installation is done, Windows 98 can then manage the board
information from its registers.
Following is hardware installation steps. After finished the
installation, you are supposed to confirm the registered board
information from Windows 98 registers.
This procedure does not install board driver(s). Lately you should
install driver program(s) yourself.
10
PIO-32/32L(PCI)
Board Setup
Hardware Installation Steps
(1) Set the board ID.
(2) Be sure the power of the personal computer is turned off; then
plug the board into a PCI bus slot in the system.
(3) Turn the personal computer ON to start up Windows 98.
(4) Because this is the first time Windows 98 detected the board
from the system, Windows 98 will display a message of [New
Hardware] on the screen and start run an [Add New Hardware
Wizard] program. After you find a massage of [PCI
Multimedia Device] from the program window, click [Next>]
to continue.
(5) In the next dialog box, select a radio button of [Search for the
best driver for your device. (Recommended).], then click
[Next>] to continue.
(6) In the next dialog box, select both of the [Floppy disk drives
(F)] and [Specify Location (L)] check boxes, then enter the
drive name, such as “A:”, and the directory name, WIN95, into
the [Location] field.
Insert the attached FD into the disk drive, then click [Next>] to
continue.
(7) In the [Windows driver file search for the device] dialog box,
check that "CONTEC Co., Ltd.-Board Name" and
"DIO_PI0.INF" in the [Location of driver] has been listed,
then click [Next>] to continue.
(8) In the next dialog box, you will find a message of “Windows
has finished installing the software that your new hardware
device requires.” Then you click [Finish] to complete the
installation of the board. After completed the board
installation, you are supposed to confirm the registered board
information from Windows 98 registers. The "Checking
resources" part of this section explains you how to do it.
PIO-32/32L(PCI)
11
Board Setup
Method of installing two or more boards:
(1) Install the first board correctly.
(2) Be sure to complete installation of the first board before
attempting to install a second one.
(3) Exit Windows 98 and turn the personal computer off.
(4) Set the board ID of the second board that should be different
from the first one. Then plug the board into a PCI bus slot.
(5) Turn the personal computer on and start the Windows 98 again.
(6) Windows 98 will display a massage of [New Hardware] on the
screen and start run an [Add New Hardware Wizard] program.
After you find a massage of [CONTEC Co., Ltd.-Board Name]
from the program window, click [Next>] to continue.
(7) In the next dialog box, select a radio button of [Display a list
of all the drivers in a specific location, so you can select the
driver you want.], then click [Next>] to continue.
(8) From the [Models] window, select "CONTEC Co., Ltd.Board Name" and click [Next>] to continue.
(9) In the [Windows driver file search for the device] dialog box,
there should be the message of "CONTEC Co., Ltd.-Board
Name" and "CONTEC~*.INF" in the [Location of driver]
window, after confirmed this message click [Next>] to
continue. (A number which is assigned by the OS will replace
the “*” mark.)
(10) In the next dialog box, you will find a message of “Windows
has finished installing the software that your new hardware
device requires.” Then you click [Finish] to complete the
installation of the board. After completed the board installation,
you are supposed to confirm the registered board information
from Windows 98 registers again.
For installing the third board and any additional boards, follow the
same steps as those for installing a second board. Before you can
install a third board or additional boards, all the boards that are
already installed must be in their PCI bus slots.
12
PIO-32/32L(PCI)
Board Setup
Notes!
- The second board cannot be properly installed unless the
resources (I/O addresses and interrupt level) for the board can
be allocated. Before attempting to install the second board,
first determine what PC resources are free to use.
- The resources used by each board do not depend on the location
of the PCI bus slot or the board itself. If you remove two or
more boards that have already been installed and then remount
one of them on the computer, it is unknown that which one of the
sets of resources previously assigned to the two boards is
assigned to the remounted board. In this case, you must check
the resource settings.
Checking resources
Follow the steps below to check the assigned resources managed by
the OS.
(1) Double-click on the [System] option in [Control Panel] to open
the [System Properties] property sheet. Select the [Device
Manager] tab.
(2) Click [Multi-function adapters] folder.
(3) Click [CONTEC Co., Ltd.-Board Name] folder to display its
properties.
(4) Select the [Resources] tab to check the device type, resource
settings, and the conflicting device list.
PIO-32/32L(PCI)
13
Board Setup
For Windows 95 Systems
Every PCI bus board/device will be automatically assigned required
system resources, such as I/O address range and interrupt level, by
the system whenever the system is turned on.
Under Windows 95 OS, before using the board you should register
the board information, such as assigned resources, to the OS. This
procedure is called hardware installation. After the hardware
installation is done, Windows 95 can then manage the board
information from its registers.
Following is hardware installation steps. After finished the
installation, you are supposed to confirm the registered board
information from Windows 95 registers.
This procedure does not install board driver(s). Lately you should
install driver program(s) yourself.
Procedure of Hardware Installation
<Checking the OS version>
The procedure of installing the board is different from the
Windows 95 versions. Before any installation, you must check the
version of Windows 95 that you are using.
(1) Open [Control Panel] from [My Computer].
(2) Double-click on the [System] option to open the [System
Properties] property sheet.
(3) Check the "System:" number displayed on the [General] page.
System :
Microsoft Windows 95
4.00.950
The versions of Windows 95 include 4.00.950, 4.00.950a,
4.00.950B and 4.00.950C. The board setup method depends on
the version of Windows 95 that is being used.
14
PIO-32/32L(PCI)
Board Setup
For Windows 95 version 4.00.950 or 4.00.950a systems:
(1) Set the board ID.
(2) Be sure the power of the personal computer is turned off; then
plug the board into a PCI bus slot in the system.
(3) Turn the personal computer ON to start up Windows 95.
(4) Windows 95 will come up with the [New Hardware] detection
dialog box. Select [Multimedia Device: Select which driver
you want to install for your new hardware.] and then [Driver
from disk provided by hardware manufacturer].
(5) In the [Install From Disk] dialog box, insert the attached FD
into the disk drive, enter the drive name and directory name in
the [Copy Distributed File From] field, then click [OK].
This completes installation of the board.
(6) Follow the instructions on the screen to complete installation
of the board. After completed the board installation, you are
supposed to confirm the registered board information from
Windows 95 registers. The "Checking resources" part of this
section explains you how to do it.
For Windows 95 version 4.00.950B or 4.00.950C systems:
(1) Set the board ID.
(2) Be sure to check that the personal computer is off; then plug
the board into a PCI bus slot in the system.
(3) Turn the personal computer on to start up Windows 95.
(4) Because this is the first time Windows 95 detected the board
from the system, Windows 95 will display a message of [New
Hardware] on the screen and start run an [Device Driver
Wizard] program. After you find a massage of [PCI
Multimedia Device] from the program window, click [Next>]
to continue.
(5) In the next dialog box, select [Specify Location...]. Insert the
attached FD into a drive, enter the drive name and directory
name (WIN95) in the [Location] field, then click [OK].
(6) In the next dialog box, there should be a message of "Updated
driver found for this device". After confirmed this message you
PIO-32/32L(PCI)
15
Board Setup
click [End]. This completes installation of the board. After
completed the board installation, you are supposed to confirm
the registered board information from Windows 95 registers.
The "Checking resources" part of this section explains you
how to do it.
Method of installing two or more boards
(For Windows 95 version 4.00.950 or 4.00.950a system) :
(1) Install the first board correctly.
(2) Be sure to complete installation of the first board before
attempting to install the second one.
(3) Exit Windows 95 and turn the personal computer off.
(4) Check the board ID of the second board that should be
different from the first one. Then plug the board into a PCI bus
slot.
(5) Turn the personal computer on again to start up Windows 95.
(6) Windows 95 will come up with the [New Hardware] detection
dialog box. In [Multimedia Device: Select which driver you
want to install for your new hardware.], select [Select from
List].
(7) The [Select Hardware Type] dialog box will then appear.
In [Select Hardware Type to Install] windows, select [Other
Devices].
(8) In the [Select Device] dialog box, select [CONTEC] from
[Manufacturers] window and select [CONTEC Co., Ltd.-Board
Name] from [Models] window.
(9) A [Change System Settings] dialog box appears.
messages to restart the computer.
Follow the
(10) When Windows 95 is restarted, installation of the second board
is completed. Check the assigned resources again.
For installing the third board and any additional boards, follow the
same steps as those for installing a second board. Before you can
install a third board or additional boards, all the boards that are
already installed must be in PCI bus slots.
16
PIO-32/32L(PCI)
Board Setup
Notes!
- The second board cannot be properly installed unless the
resources (I/O addresses and interrupt level) for the board can
be allocated. Before attempting to install the second board,
first determine what PC resources are free.
- The resources used for each board do not depend on the location
of the PCI bus slot or the board itself. If you remove two or
more boards that have already been installed and then re-mount
one of them on the computer, it is unknown which one of the sets
of resources previously assigned to the two boards is assigned to
the re-mounted board. In this case, re-check the resource
settings.
Method of installing two or more Boards
(For Windows 95 version 4.00.950B or 4.00.950C systems) :
(1) Install the first board correctly.
(2) Be sure to complete installation of the first board before
attempting to install the second one.
(3) Exit Windows 95 and turn the personal computer OFF.
(4) Check the board ID of the second board, then plug it into a PCI
bus slot. Assign to the second board a board ID different
from the ID assigned to the first board.
(5) Turn the personal computer on again to start up Windows 95.
(6) The OS will then automatically install the second board.
When the installation has been completed, check the assigned
resources again.
For installing the third board and any additional boards, follow the
same steps as those for installing a second board. Before you can
install a third board or additional boards, all the boards that are
already installed must be in PCI bus slots.
Notes!
- The second board cannot be properly installed unless the
resources (I/O addresses and interrupt level) for the board can
be allocated. Before attempting to install a second board, first
determine which PC resources are free.
- The resources used for each board do not depend on the location
of the PCI bus slot or the board itself. If you remove two or
PIO-32/32L(PCI)
17
Board Setup
more boards that have already been installed and then re-mount
one of them on the computer, it is unknown which one of the sets
of resources previously assigned to the two boards is assigned to
the re-mounted board. In this case, re-check the resource
settings.
Checking resources
Follow the steps below to check the assigned resources managed by
the OS.
(1) Double-click on the [System] option in [Control Panel] to open
the [System Properties] property sheet. Select the [Device
Manager] tab.
(2) Click on the [Multi-function adapters] folder.
(3) Click on the [CONTEC Co., Ltd.-Board Name] folder to
display its properties.
(4) Select the [Resources] tab to check the device type, resource
settings, and the conflicting device list.
18
PIO-32/32L(PCI)
Board Setup
For other OS systems
We use MS-DOS as an example to show how to use the board under
other operation systems, in addition of the Windows OS.
Refer the MS-DOS programs in the attached FD.
For a PCI bus board, the system will automatically assign usable
resources to the board. Refer the following procedure to confirm
the assigned resources.
Procedure
(1) Set the board ID.
(2) Be sure that the personal computer is off; then plug the board
into a PCI bus slot in the personal computer.
(3) Turn the personal computer ON to start up MS-DOS.
(4) Copy the programs that are under the DOS directory of the
attached FD to a directory of your HDD.
(5) Execute the PIOPCI.EXE resource confirmation program.
(6) Check the I/O addresses and interrupt level (IRQ) displayed on
the screen.
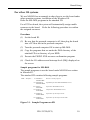
Sample programs for MS-DOS
The sample programs to use the board under MS-DOS are written
in Microsoft C.
The attached FD contains following sample programs.
DOS --- Samples ---
(i) PIOPCI.C
PIOPCI.EXE
(ii) PIO3232.C
PIO3232.EXE
Resource check program
Input/Output data (PIO-32/32(PCI) series)
(iii) PI64.C
PI64.EXE
Input data (PI-64(PCI) series)
(iv) PO64.C
PO64.EXE
Output data (PO-64(PCI) series)
(v) INTPC.C
INTPC.EXE
(vi) INT98.C
INT98.EXE
Input data by interrupt for PC
Input data by interrupt for PC-9800
Figure 3.1. Sample Programs on FD
PIO-32/32L(PCI)
19
Board Setup
For details on I/O addresses, see Chapter 5 "I/O Ports and
Registers."
Note!
When you use the board under a non plug-and-play OS like MSDOS, be sure that [PnP OS] is either [disabled] or set to [not to
use] in the PC's BIOS setup. If this is set to [Windows 95], for
example, the board might not be recognized properly.
20
PIO-32/32L(PCI)
External Connection
4. External Connection
Interface Connector
Connecting the Interface Connector
To connect an external device to this board, plug the cable from the
device into the interface connector (CN1).
CN1
Figure 4.1. Connecting the Interface Connector
- Connector used
PCR-E96LMD [mfd. by HONDA]
- Applicable connector
PCR-E96FA [mfd. by HONDA]
* Optional cable PCB96WS-**
A
Connector
17JE-23370-02(D8C) [mfd. by DDK]
or equivalent
B
B48
B47
B2
B1
Connector: PCR-E96FA [mfd. by HONDA]
Connector cover: PCS-E96LKPA [mfd. by HONDA]
A48
A47
* Optional cable PCB96PS-** + connector conversion board CCB-96
Connector
DCLC-J37SAF-20L9 [mfd. by JAE] or equivalent
A2
A1
On-board connector
name PCR-E96LMD
[mfd. by HONDA]
CCB-96
Connector: PCR-E96FA [mfd. by HONDA]
Connector cover: PCS-E96LKPA [mfd. by HONDA]
** represents the cable length (1.5, 3, or 5m).
Figure 4.2. Connector Used
PIO-32/32L(PCI)
21
External Connection
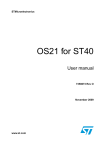
Interface Connector Pin Assignment
To connect an external device to this interface board, plug the
device into the on-board 96-pin connector shown below in Figure
4.3.
Common plus pin for
+6/+7 output ports
+7 port (Output)
+6 port (Output)
Common minus pin for
+6/+7 output ports
Unconnected
Common plus pin for
+4/+5 output ports
+5 port (Output)
+4 port (Output)
Common minus pin for
+4/+5 output ports
OP 6/7
OP 6/7
O 77
O 76
O 75
O 74
O 73
O 72
O 71
O 70
O 67
O 66
O 65
O 64
O 63
O 62
O 61
O 60
ON 6/7
ON 6/7
N.C.
N.C.
N.C.
N.C.
N.C.
N.C.
N.C.
N.C.
OP 4/5
OP 4/5
O 57
O 56
O 55
O 54
O 53
O 52
O 51
O 50
O 47
O 46
O 45
O 44
O 43
O 42
O 41
O 40
ON 4/5
ON 4/5
[49]
B48
B47
B46
B45
B44
B43
B42
B41
B40
B39
B38
B37
B36
B35
B34
B33
B32
B31
B30
B29
B28
B27
B26
B25
B24
B23
B22
B21
B20
B19
B18
B17
B16
B15
B14
B13
B12
B11
B10
B09
B08
B07
B06
B05
B04
B03
B02
B01
[96]
[1]
A48
A47
A46
A45
A44
A43
A42
A41
A40
A39
A38
A37
A36
A35
A34
A33
A32
A31
A30
A29
A28
A27
A26
A25
A24
A23
A22
A21
A20
A19
A18
A17
A16
A15
A14
A13
A12
A11
A10
A09
A08
A07
A06
A05
A04
A03
A02
A01
[48]
IP 2/3
IP 2/3
I 37
I 36
I 35
I 34
I 33
I 32
I 31
I 30
I 27
I 26
I 25
I 24
I 23
I 22
I 21
I 20
N.C.
N.C.
N.C.
N.C.
N.C.
N.C.
N.C.
EXTO0
EXTI0
N.C.
IP 0/1
IP 0/1
I 17
I 16
I 15
I 14
I 13
I 12
I 11
I 10
I 07
I 06
I 05
I 04
I 03 *
I 02 *
I 01 *
I 00 *
IN 0/1
IN 0/1
Common plus pin for
+2/+3 input ports
+3 port (Input)
+2 port (Input)
Unconnected
ACK signal for handshaking
STB signal for handshaking
Unconnected
Common plus pin for
+0/+1 input ports
and handshaking
+1 port (Input)
+0 Port (Input)
Common minus pin for
handshaking
Figure 4.3. Interface Connector Pin Assignment
Notes!
- I00~I03 can be used as interrupt signal.
- The numbers in brackets are pin numbers defined by the
connector manufacturer.
22
PIO-32/32L(PCI)
External Connection
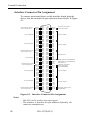
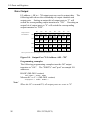
PCB96WS and CCB-96 Signal Assignments
Optional cable connectors and their corresponding signals are
shown in Figure 4.4. below.
Figure 4.4. PCB96WS and CCB-96 Signal Assignments
Note!
Not support signals for handshaking.
PIO-32/32L(PCI)
23
External Connection
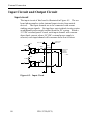
Input Circuit and Output Circuit
Input circuit
The input circuit of this board is illustrated in Figure 4.5. The onboard photocouplers isolate internal input circuits from outside
devices. The input channels are to be connected with current
sinking output signals. Driving these opto-isolated circuits require
an additional power supply isolated from the PC system. When a
12 VDC external power is used, each input channel will consume
about 4mA current; when a 24 VDC external power supply is
selected, each input channel will consume about 8 mA current.
External
Device
Board
VCC
5.1kΩ
3kΩ
Plus
Common
Input
Pin
Photocoupler
VCC
5.1kΩ
3kΩ
Photocoupler
Input
Pin
Figure 4.5. Input Circuit
24
PIO-32/32L(PCI)
External
Power
Supply
DC12V
~ 24V
External Connection
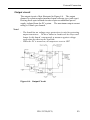
Output circuit
The output circuit of this illustrated in Figure 4.6. The output
channel is a photocoupler-insulated open-collector type (sink type).
Driving these opto-isolated circuits require an additional power
supply isolated from the PC system. The maximum output current
rating is 100mA per channel.
Notes!
- The board has no voltage surge protection circuits for protecting
output transistors. To drive inductive loads such as relays and
lamps by this board, consequently a measure against voltage
surge must be taken on the load side.
- When the PC is turned on, all output are reset to OFF.
Figure 4.6. Output Circuit
PIO-32/32L(PCI)
25
External Connection
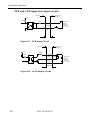
STB and ACK input and output circuits
Board
External
Device
VCC
5.1kΩ
3kΩ
External
Power
Supply
DC12V
~ 24V
Plus
Common
Input
Pin
Photocoupler
Figure 4.7. STB Input Circuit
External
Device
Board
VCC
10kΩ
1kΩ
Plus
Common
Output
Pin
Photocoupler
Minus
Common
Figure 4.8. ACK Output Circuit
26
PIO-32/32L(PCI)
*
Load *
External
Power
Supply
DC12V
~ 24V
External Connection
Connection examples
Board
Common plus for input (CN1 : A19pin)
+ External
Power
Supply
DC12~24V
I00 (CN1 : A03pin)
Figure 4.9. An Example to use Input I00
Common puls for output (CN1 : B19pin)
+
External
Power
Supply
DC12~24V
Board
5.1kΩ
LED
O40 (CN1 : B03pin)
Common minus for output (CN1 : B01pin)
Figure 4.10. An Example to use Output O40
External
Power Supply
DC12~24V
+
Output Board
Input Board
Common plus for output
Common plus for input
Output (sinking type)
Input ( for sinking output)
Common minus for output
Figure 4.11. Connection Example of Output and Input
Signal
PIO-32/32L(PCI)
27
External Connection
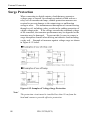
Surge Protection
When connecting to digital outputs a load that may generate a
voltage surge or current, for example an inductive load such as a
relay coil or incandescent lamp, suitable protection measures are
required to prevent damage to the output stage or malfunction
owing to noise. The instantaneous interruption of current flowing
through a coil, including a relay, results in the sudden generation of
a high-voltage pulse. If the voltage exceeds the withstand voltage
of the transistor, the transistor performance may be degraded or the
transistor may be damaged. To prevent this, be sure to connect a
surge absorption element when driving an inductive load including
a relay coil. Example of measures against voltage surge are shown
in Figure 4.12. below.
Figure 4.12. Samples of Voltage Surge Protection
Note!
The protection circuit must be installed less than 50 cm from the
load and contact to provide effective protection.
28
PIO-32/32L(PCI)
I/O Ports and Registers
5. I/O Ports and Registers
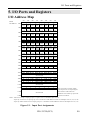
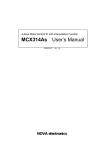
I/O Address Map
Board
I/O Address
+0H
+1H
+2H
+3H
+4H
+5H
+6H
+7H
+8H
D7
D6
I07
[7]
I06
[6]
I17
[15]
I16
[14]
I27
[23]
I26
[22]
I37
[31]
I36
[30]
O47
[39]
O46
[38]
O57
[47]
O56
[46]
O67
[55]
O66
[54]
O77
[63]
O76
[62]
X
X
D5
D4
D3
D2
Input Group 0
I05
I04
I03
I02
[5]
[4]
[3]
[2]
Input Group1
I15
I14
I13
I12
[13]
[12]
[11]
[10]
Input Group 2
I25
I24
I23
I22
[21]
[20]
[19]
[18]
Input Group 3
I35
I34
I33
I32
[29]
[28]
[27]
[26]
Input Group4
O45
O44
O43
O42
[37]
[36]
[35]
[34]
Input Group 5
O55
O54
O53
O52
[45]
[44]
[43]
[42]
Input Group 6
O65
O64
O63
O62
[53]
[52]
[51]
[50]
Input Group 7
O75
O74
O73
O72
[61]
[60]
[59]
[58]
Handshake Status Input
X
X
INT
IBF
+9H
D1
D0
I01
[1]
I00
[0]
I11
[9]
I10
[8]
I21
[17]
I20
[16]
I31
[25]
I30
[24]
O41
[33]
O40
[32]
O51
[41]
O50
[40]
O61
[49]
O60
[48]
O71
[57]
O70
[56]
STB
ACK
0
BDT
PD1
PD0
Not Allowed
+AH
0
0
0
+BH
+CH
+FH
PD7
PD6
PD5
~
+12H
+1FH
Group Data Input
PD4
PD3
PD2
Not Allowed
X
X
X
X
Interrupt Setting
IN1
IN0
X
IR
Digital Filter Setting
X
ST4
ST3
ST2
+10H
+11H
0
Not Allowed
+DH
+EH
Bit Data Input
0
0
IS1
IS0
ST1
ST0
Not Allowed
0
0
0
Interrupt Status
0
INTS3 INTS2 INTS1 INTS0 Ixx represents an input signal;
Oxx represents an output signal
that will be read back here;
Not Allowed
Numbers in brackets [ ] represent
input bit numbers.
Notes - All access except to input group 0 to 7 (port +0 to +7) should be byte access.
- Input by word access to input group 0 to 7 should be to I/O addresses that are multiples of 2 (+0, +2, +4, +6).
- Input by double word access to input group 0 to 7 should be to I/O addresses that are multiples of 4 (+0, +4).
Figure 5.1. Input Port Assignments
PIO-32/32L(PCI)
29
I/O Ports and Registers
Board
I/O Address +0H
D7
D6
D5
D4
D3
Output Group 0
D2
D1
D0
O41
[33]
O40
[32]
O51
[41]
O50
[40]
O61
[49]
O60
[48]
O71
[57]
O70
[56]
0
ACK
Not Allowed
Output Group1
+1H
Not Allowed
Output Group 2
+2H
Not Allowed
Output Group 3
+3H
Not Allowed
+4H
+5H
+6H
+7H
+8H
O47
[39]
O46
[38]
O57
[47]
O56
[46]
O67
[55]
O66
[54]
O77
[63]
O76
[62]
0
0
Output Group 4
O45
O44
O43
O42
[37]
[36]
[35]
[34]
Output Group 5
O55
O54
O53
O52
[45]
[44]
[43]
[42]
Output Group 6
O65
O64
O63
O62
[53]
[52]
[51]
[50]
Output Group 7
O75
O74
O73
O72
[61]
[60]
[59]
[58]
ACK Signal Setting
0
0
0
0
+9H
+AH
+BH
+CH
+DH
+EH
+FH
+10H
+11H
Not Allowed
0
0
0
0
PD7
PD6
0
0
0
0
0
0
0
0
0
0
Bit Data
0
0
0
0
BDT
Bit Select
BS5
BS4
BS3
BS2
BS1
BS0
Group Data
PD5
PD4
PD3
PD2
PD1
PD0
Group Select
0
0
0
PS2
PS1
PS0
Interrupt Setting
IN1
IN0
0
IR
IS1
IS0
Digital Filter Setting Register
0
ST4
ST3
ST2
ST1
ST0
Interrupt Mask Register
0
0
INTM3 INTM2 INTM1 INTM0
Interrupt Clear Register
0
0
INTC3 INTC2 INTC1 INTC0
0
~
+12H
Not Allowed
Oxx represents an output signal;
Numbers in brackets [ ] represent
output bit numbers.
+1FH
Notes - All access except to output group 0 to 7 (port +0 to +7) should be byte access.
- Output by word access from output group 4-7 should be from I/O addresses that are multiples of 2 (+4, +6).
- Output by double word access from output group 4-7 should be from I/O addresses that are multiples of 4 (+4).
Figure 5.2. Output Port Assignments
30
PIO-32/32L(PCI)
I/O Ports and Registers
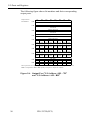
Input/Output Data by Direct Access to I/O Ports
Data Input
I/O address + 0H to + 3H input ports are used to read input channel
data. The following table shows input channels and their
corresponding input ports. If an input channel is "ON", a driving
current is running through the photo diode and the corresponding
bit of the input port contains "1". For example, if channel I07 is
ON, bit D7 of the I/O address + 0 port is read "1". If an input
channel is "OFF", no driving current is running through the photo
diode, and the corresponding bit of the input port is read "0".
Input Ports
I/O Address
+0H
+1H
+2H
+3H
D7
D6
D5
I07
[7]
I06
[6]
I05
[5]
I17
[15]
I16
[14]
I15
[13]
I27
[23]
I26
[22]
I25
[21]
I37
[31]
I36
[30]
I35
[29]
D4
D3
Input Group 0
I04
I03
[4]
[3]
Input Group1
I14
I13
[12]
[11]
Input Group 2
I24
I23
[20]
[19]
Input Group 3
I34
I33
[28]
[27]
D2
D1
D0
I02
[2]
I01
[1]
I00
[0]
I12
[10]
I11
[9]
I10
[8]
I22
[18]
I21
[17]
I20
[16]
I32
[26]
I31
[25]
I30
[24]
Ixx represents an input signal of CN1 connector.
Figure 5.3. Input Port "I/O Address +0H ~ 3H"
Programming examples
The following programming examples check the input channel I07.
If this channel is "ON" then program will continue. The
"PORT%" and "port" are sample I/O addresses.
BASIC (MS-DOS version)
DAT% = INPUT(PORT%)
IF(DAT% AND &H80) = &H80 THEN
-
Microsoft C or C++ (MS-DOS version)
data_in = inp(port);
while(data_in & 0x80)
-
PIO-32/32L(PCI)
31
I/O Ports and Registers
Data Output
I/O address + 4H to + 7H output ports are used to output data. The
following table shows the relationship of output channels and
output ports. Setting an output bit of output ports to "1" will
switch the corresponding output transistor to "ON". Resetting an
output bit of output ports to "0" will switch the corresponding
output transistor to "OFF".
Output Ports
I/O Address
+4H
+5H
+6H
+7H
D7
D6
D5
O47
[39]
O46
[38]
O45
[37]
O57
[47]
O56
[46]
O55
[45]
O67
[55]
O66
[54]
O65
[53]
O77
[63]
O76
[62]
O75
[61]
D4
D3
Output Group4
O44
O43
[36]
[35]
Output Group 5
O54
O53
[44]
[43]
Output Group 6
O64
O63
[52]
[51]
Output Group 7
O74
O73
[60]
[59]
D2
D1
D0
O42
[34]
O41
[33]
O40
[32]
O52
[42]
O51
[41]
O50
[40]
O62
[50]
O61
[49]
O60
[48]
O72
[58]
O71
[57]
O70
[56]
Oxx represents an output signal of CN1 connector.
Figure 5.4. Output Port "I/O Address +4H ~ 7H"
Programming examples
The following programming examples turn the O47 output
transistor to "ON". The "PORT%" and "port" are sample I/O
addresses.
BASIC (MS-DOS version)
OUT PORT% + &H04, &H80
Microsoft C or C++ (MS-DOS version)
outp(port + 0x04, 0x80) ;
Note!
When the PC is turned ON, all output ports are reset to "0".
32
PIO-32/32L(PCI)
I/O Ports and Registers
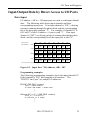
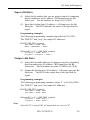
Input/Output Data by Bit Number
This board supports bit input/output function. Under this function,
you can specify a bit number and then input this bit status or output
to this bit. The following figure shows the relations of bit
numbers and their corresponding input ports.
Input Ports
I/O Address
+0H
+1H
+2H
+3H
+4H
+5H
+6H
+7H
+AH
D7
D6
D5
I07
[7]
I06
[6]
I05
[5]
I17
[15]
I16
[14]
I15
[13]
I27
[23]
I26
[22]
I25
[21]
I37
[31]
I36
[30]
I35
[29]
O47
[39]
O46
[38]
O45
[37]
O57
[47]
O56
[46]
O55
[45]
O67
[55]
O66
[54]
O65
[53]
O77
[63]
O76
[62]
O75
[61]
D4
D3
Input Group 0
I04
I03
[4]
[3]
Input Group1
I14
I13
[12]
[11]
Input Group 2
I24
I23
[20]
[19]
Input Group 3
I34
I33
[28]
[27]
Input Group4
O44
O43
[36]
[35]
Input Group 5
O54
O53
[44]
[43]
Input Group 6
O64
O63
[52]
[51]
Input Group 7
O74
O73
[60]
[59]
0
0
0
Bit Data
0
0
D2
D1
D0
I02
[2]
I01
[1]
I00
[0]
I12
[10]
I11
[9]
I10
[8]
I22
[18]
I21
[17]
I20
[16]
I32
[26]
I31
[25]
I30
[24]
O42
[34]
O41
[33]
O40
[32]
O52
[42]
O51
[41]
O50
[40]
O62
[50]
O61
[49]
O60
[48]
O72
[58]
O71
[57]
O70
[56]
0
0
BDT
Ixx represents an input signal; Oxx represents an output signal that will be read back here;
Numbers in brackets [ ] represent input bit numbers; BDT is input data.
Figure 5.5. Input Port "I/O Address +0H ~ 7H"
and "I/O Address +AH"
PIO-32/32L(PCI)
33
I/O Ports and Registers
The following figure shows bit numbers and their corresponding
output ports.
Output Ports
I/O Address
D7
D6
D5
+0H
D4
D3
D2
Output Group 0
D1
D0
O42
[34]
O41
[33]
O40
[32]
O52
[42]
O51
[41]
O50
[40]
O62
[50]
O61
[49]
O60
[48]
O72
[58]
O71
[57]
O70
[56]
0
0
BDT
BS2
BS1
BS0
Not Used
Output Group 1
+1H
Not Used
Output Group 2
+2H
Not Used
Output Group 3
+3H
Not Used
+4H
+5H
+6H
+7H
+AH
+BH
O47
[39]
O46
[38]
O45
[37]
O57
[47]
O56
[46]
O55
[45]
O67
[55]
O66
[54]
O65
[53]
O77
[63]
O76
[62]
O75
[61]
0
0
0
0
0
BS5
Output Group4
O44
O43
[36]
[35]
Output Group 5
O54
O53
[44]
[43]
Output Group 6
O64
O63
[52]
[51]
Output Group 7
O74
O73
[60]
[59]
Bit Data
0
0
Bit Select
BS4
BS3
Oxx represents an output signal; Numbers in brackets [ ] represent output bit numbers;
BDT is output data; BS0 to BS5 specify an input or output bit number.
Figure 5.6. Output Port "I/O Address +0H ~ 7H"
and "I/O Address +AH ~ BH"
34
PIO-32/32L(PCI)
I/O Ports and Registers
Input a Bit Data
(1) Select the bit number that you are going to input by outputting
this bit number to an I/O address + BH output port, the Bit
Select port. The bit numbers are from 0 to 63 (3FH).
(2) Input this bit data from I/O address + AH input port, the Bit
Data port. The BDT indicates the status of the specified bit
signal.
Programming examples
The following programming examples input the bit [31] (1FH).
The "PORT%" and "port" are sample I/O addresses.
BASIC (MS-DOS version)
OUT PORT% + &H0B, &H1F
BDT% = INP(PORT% + &H0A)
Microsoft C or C++ (MS-DOS version)
outp(port + 0x0b, 0x1f) ;
bit_data = inp(port + 0x0a) ;
Output a Bit Data
(1) Select the bit number that you are going to output by outputting
this bit number to an I/O address + BH output port, the Bit
Select port. The bit numbers are from 32 (20H) to 63 (3FH).
(2) Output this bit data to an I/O address + AH output port, the Bit
Data port. The BDT is the output data of the specified bit
signal.
Programming examples
The following programming examples output "1" to bit [63] (3FH).
The "PORT%" and "port" are sample I/O addresses.
BASIC (MS-DOS version)
OUT PORT% + &H0B, &H3F
OUT PORT% + &H0A, &H01
Microsoft C or C++ (MS-DOS version)
outp(port + 0x0b, 0x3f) ;
outp(port + 0x0a, 0x01) ;
Note!
After the PC is turned ON, all output bits are reset to "0".
PIO-32/32L(PCI)
35
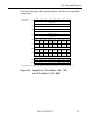
I/O Ports and Registers
Input/Output Data by Group Number
This board supports group input/output function. Under this
function, you can specify a group number instead of the I/O port
and then input from this port or output to this port. The following
figure shows group numbers and their corresponding input ports.
Input Ports
I/O Address
+0H
+1H
+2H
+3H
+4H
+5H
+6H
+7H
+CH
D7
D6
D5
I07
[7]
I06
[6]
I05
[5]
I17
[15]
I16
[14]
I15
[13]
I27
[23]
I26
[22]
I25
[21]
I37
[31]
I36
[30]
I35
[29]
O47
[39]
O46
[38]
O45
[37]
O57
[47]
O56
[46]
O55
[45]
O67
[55]
O66
[54]
O65
[53]
O77
[63]
O76
[62]
O75
[61]
D4
D3
Input Group 0
I04
I03
[4]
[3]
Input Group1
I14
I13
[12]
[11]
Input Group 2
I24
I23
[20]
[19]
Input Group 3
I34
I33
[28]
[27]
Input Group4
O44
O43
[36]
[35]
Input Group 5
O54
O53
[44]
[43]
Input Group 6
O64
O63
[52]
[51]
Input Group 7
O74
O73
[60]
[59]
PD7
PD6
PD5
Group Data
PD4
PD3
D2
D1
D0
I02
[2]
I01
[1]
I00
[0]
I12
[10]
I11
[9]
I10
[8]
I22
[18]
I21
[17]
I20
[16]
I32
[26]
I31
[25]
I30
[24]
O42
[34]
O41
[33]
O40
[32]
O52
[42]
O51
[41]
O50
[40]
O62
[50]
O61
[49]
O60
[48]
O72
[58]
O71
[57]
O70
[56]
PD2
PD1
PD0
Ixx represents an input signal; Oxx represents an output signal that will be read back here.
Figure 5.7. Input Port "I/O Address +0H ~ 7H"
and "I/O Address + CH"
36
PIO-32/32L(PCI)
I/O Ports and Registers
The following figure shows group numbers and their corresponding
output ports.
Output Ports
I/O Address
D7
D6
D5
+0H
D4
D3
D2
Output Group 0
D1
D0
O42
[34]
O41
[33]
O40
[32]
O52
[42]
O51
[41]
O50
[40]
O62
[50]
O61
[49]
O60
[48]
O72
[58]
O71
[57]
O70
[56]
PD2
PD1
PD0
PS2
PS1
PS0
Not Used
Output Group 1
+1H
Not Used
Output Group 2
+2H
Not Used
Output Group 3
+3H
Not Used
+4H
+5H
+6H
+7H
+CH
+DH
O47
[39]
O46
[38]
O45
[37]
O57
[47]
O56
[46]
O55
[45]
O67
[55]
O66
[54]
O65
[53]
O77
[63]
O76
[62]
O75
[61]
PD7
PD6
PD5
0
0
0
Output Group4
O44
O43
[36]
[35]
Output Group 5
O54
O53
[44]
[43]
Output Group 6
O64
O63
[52]
[51]
Output Group 7
O74
O73
[60]
[59]
Group Data
PD4
PD3
Group Select
0
0
Oxx represents an output signal; PS0 to PS2 specify an input or output group number.
Figure 5.8. Output Port "I/O Address +0H ~ 7H"
and "I/O Address +CH ~ DH"
PIO-32/32L(PCI)
37
I/O Ports and Registers
Input a Group Data
(1) Select the group number that you are going to input by
outputting this group number to an I/O address + DH output port,
the Group Select port. The group numbers are from 0 to 7.
(2) Input this group data from an I/O address + CH input port, the
Group Data port. The PD0 to PD7 represent the status of the
specified group signals.
Programming examples
The following programming examples input data from input group 0.
The "PORT%" and "port" are variables of I/O addresses.
BASIC (MS-DOS version)
OUT PORT% + &H0D, &H00
GDT% = INP(PORT% + &H0C)
Microsoft C or C++ (MS-DOS version)
outp(port + 0x0d, 0x00) ;
group_data = inp(port + 0x0c) ;
Output a Group Data
(1) Select the group number that you are going to output by
outputting this group number to an I/O address + DH output port,
the Group Select port. The group numbers are from 4 to 7.
(2) Output this group data to an I/O address + CH output port, the
Group Data port. The PD0 to PD7 are output data of the
specified group, which represent the related output channels.
Programming examples
The following programming examples output "FFH" to group 4.
The "PORT%" and "port" are sample I/O addresses.
BASIC (MS-DOS version)
OUT PORT% + &H0D, &H04
OUT PORT% + &H0C, &HFF
Microsoft C or C++ (MS-DOS version)
outp(port + 0x0d, 0x04) ;
outp(port + 0x0c, 0xff) ;
Note!
After the PC is turned ON, all output bits are reset to "0".
38
PIO-32/32L(PCI)
I/O Ports and Registers
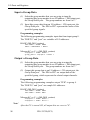
Digital Filter Function of Input Channels
This board is equipped with a digital filter function for input signals.
This function provides all input channels with a means of cutting
chattering and noise.
Digital Filter Function Principle
To use this function, you must set a filter time. The function
circuits will then check all input signals synchronizing with the
clock. A signal level, low or high, will be input only if the signal
level remains stable during the filter set time.
Therefore, if a signal level changes faster than the filter set time,
this level change will be ignored and the previous signal level will
be input.
Input Signal
Input to PC
Digital
Filter
Filter Setting Time
Input Signal
Valid
Invalid
Input to PC
Figure 5.9. Digital Filter Operation Principle
Input Ports
I/O Address
+FH
Output Ports
+FH
I/O Address
D7
D6
x
x
D7
D6
0
0
D5
D4
D3
D2
Digital Filter Setting
x
ST4
ST3
ST2
D1
D0
ST1
ST0
D5
D4
D3
D2
Digital Filter Setting
0
ST4
ST3
ST2
D1
D0
ST1
ST0
Figure 5.10. I/O Ports of Digital Filter Function
PIO-32/32L(PCI)
39
I/O Ports and Registers
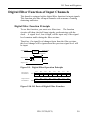
Set Digital Filter Time
To set the digital filter time, write a five-digit setting data to the
"I/O address + 0FH" output port, the Digital Filter Setting port.
The setting data should be: 0 to 20(14H).
Writing a "0" to this port will disable the digital filter function.
Notes!
- After power on, this port is reset to "0".
- Writing a setting data other than a "0" will apply this filter
function to all input channels. This function cannot be applied
to particular pins only but is applied to all input channels.
- Do not set a data more than 20(14H). Doing so may cause the
board malfunctioning.
The following table shows digital filter times and their
corresponding setting data.
Digital Filter Time[sec.] = 2n / (16 x 106)
n: = setting data(0 to 20)
Digital filter time
n
The filter function is not used.
0
Digital filter time
8µsec
7
1.024msec
14
0.125µsec
1
16µsec
8
2.048msec
15
0.25µsec
2
32µsec
9
4.096msec
16
0.5µsec
3
64µsec
10
8.192msec
17
1µsec
4
128µsec
11
16.384msec
18
2µsec
5
256µsec
12
32.768msec
19
4µsec
6
512µsec
13
65.536msec
20
n
Digital filter time
n
Figure 5.11. Digital Filter Time and Setting Data
For example, to set a 1msec filter time, the setting data should be
14(0EH) because 0.001 = (214 / 16000000)
40
PIO-32/32L(PCI)
I/O Ports and Registers
Programming examples
The following programming examples set the filter time for 1msec.
The "PORT%" and "port" are sample I/O addresses.
BASIC (MS-DOS version)
OUT PORT% + &H0F, &H0E
Microsoft C or C++ (MS-DOS version)
outp(port + 0x0f, 0x0e) ;
Confirm the Digital Filter Setting Data
Read the "I/O address + 0FH" input port, the Digital Filter Setting
port, will get the filter setting data that you have set.
The following programming examples input the filter setting data.
The "PORT%" and "port" are sample I/O addresses.
Programming examples
BASIC (MS-DOS version)
TIM% = INP(PORT% + &H0F)
Microsoft C or C++ (MS-DOS version)
set_time = inp(port + 0x0f) ;
PIO-32/32L(PCI)
41
I/O Ports and Registers
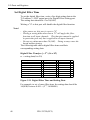
Output Data Monitor
This function allows you to read the last output data without
affecting that data.
Input Ports
I/O Address
+4H
+5H
+6H
+7H
D7
D6
D5
O47
[39]
O46
[38]
O45
[37]
O57
[47]
O56
[46]
O55
[45]
O67
[55]
O66
[54]
O65
[53]
O77
[63]
O76
[62]
O75
[61]
D4
D3
Input Group4
O44
O43
[36]
[35]
Input Group 5
O54
O53
[44]
[43]
Input Group 6
O64
O63
[52]
[51]
Input Group 7
O74
O73
[60]
[59]
D2
D1
D0
O42
[34]
O41
[33]
O40
[32]
O52
[42]
O51
[41]
O50
[40]
O62
[50]
O61
[49]
O60
[48]
O72
[58]
O71
[57]
O70
[56]
Figure 5.12. Input Port "I/O Address + 4H ~ 7H"
Input from an I/O Port
To monitor output data, you can read it as it is being output from the
output port.
Programming examples
The following programming examples output data AAH to I/O
address + 4H output port and then read it from I/O address + 4H
input port to confirm the output data. The "PORT%" and "port"
are sample I/O addresses.
BASIC (MS-DOS version)
OUT PORT% + &H04, &HAA
MDT% = INP(PORT% + &H04)
Microsoft C or C++ (MS-DOS version)
outp(port + 0x04, 0xaa) ;
m_data = inp(port + 0x04) ;
Confirm an Output Bit
Refer to the section "Input/Output Data by Bit Number".
Monitor Output Data by Port Number
Refer to the section "Input/Output Data by Group Number".
42
PIO-32/32L(PCI)
I/O Ports and Registers
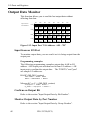
Handshake of Input Channel 0 to 15
Under this function, an external STB signal will latch channel 0 to
15 input data into input registers. This STB signal can also issue
an interrupt request signal if you set the interrupt event for it. An
ACK signal can be issued through software commands. By using
these STB and ACK signals, you can then handshake the input
actions with external circuits.
Note!
Outputting a hexadecimal data F0H to I/O address + 8H port will
reset (initial) the handshake function.
Input Ports
I/O Address
+8H
Output Ports
I/O Address
+8H
D7
D6
x
x
D7
D6
0
0
D5
D4
D3
D2
Handshake Status Input
x
x
INT
IBF
D5
D4
D3
D2
ACK Signal Setting
0
0
0
0
D1
D0
STB
ACK
D1
D0
0
ACK
Figure 5.13. I/O Port Assignment of Handshake Function
STB
IBF
Input Data
IOR
ACK
INT
Interrupt generated
Figure 5.14. Timing of Handshake Function
PIO-32/32L(PCI)
43
I/O Ports and Registers
Programming examples
The following programming examples input a latched data by
checking the INT status of the handshake status register. The
"PORT%" and "port" are sample I/O addresses.
BASIC (MS-DOS version)
OUT PORT% + &H08, &HF0
'INITIALIZE HANDSHAKEFUNCTION
WHILE((INP(PORT% + &H08) AND &H08) = 0)
'INPUT STATUSREGISTER
WEND
'CHECK INT STATUS
DAT% = INP(PORT%)
'INPUT DATA
OUT PORT% + &H08, 0
'OUTPUT ACK SIGNAL
OUT PORT% + &H08, 1
Microsoft C or C++ (MS-DOS version)
#include<stdio.h >
void main (void)
{
int dat;
outp(port + 0x08, 0xf0) ;
/* initialize handshake function
while(!(inp(port + 0x08) & 0x08)) ;
/* Cheching INT status
data = inp(port + 0x00) ;
/* input data
outp(port + 0x08, 0);
/* output ACK signal
outp(port + 0x08, 1);
}
44
PIO-32/32L(PCI)
*/
*/
*/
*/
I/O Ports and Registers
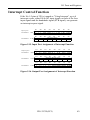
Interrupt Control Function
If the No.1-2 pins of JP1 is jumped as "Using Interrupt", up to 4
interrupt events, either I00 to I03 input signals or three of the four
input signals and the handshake signal (STB signal), can generate
an interrupt request signal.
Input ports
I/O Address
+EH
I/O Address +11H
D7
D6
D5
D4
D3
D2
Interrupt Setting
IN1
IN0
x
IR
x
x
D7
D6
D5
0
0
0
D1
D0
IS1
IS0
D4
D3
D2
D1
D0
Interrupt Status
0
INTS3 INTS2 INTS1 INTS0
Figure 5.15. Input Port Assignment of Interrupt Function
Output ports
I/O Address
+EH
I/O Address
+10H
I/O Address
+11H
D7
D6
D5
0
0
IN1
D7
D6
0
0
D7
D6
0
0
D4
D3
D2
Interrupt Setting
IN0
0
IR
D1
D0
IS1
IS0
D5
D4
D3
D2
D1
D0
Interrupt Mask Resister
0
0
INTM3 INTM2 INTM1 INTM0
D5
D4
D3
D2
D1
D0
Interrupt Clear Resister
0
0
INTC3 INTC2 INTC1 INTC0
Figure 5.16. Output Port Assignment of Interrupt Function
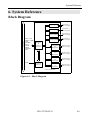
PIO-32/32L(PCI)
45
I/O Ports and Registers
Set Interrupt Events
You use the Interrupt Setting output port to set interrupt events and
the active logic of these events.
When you set the interrupt events,
I00 input signal can be connected only to internal signal INTa;
I01 input signal can be connected only to internal signal INTb;
I02 input signal can be connected only to internal signal INTc;
I03 input signal can be connected to internal signal INTd only.
The handshake event, however, can be connected to any of the
internal signals INTa to INTd.
0
0
Interrupt Setting
IN1 IN0
0
IR
IS1
IS0
Interrupt Events
IS1 IS0 Interrupt Events
0
0
0
1
Input Signal I00 - I03
Handshake
1
1
0
1
Prohibited Setting
Prohibited Setting
Interrupt Event Edge
IR External Signal
0
1
High
Low
Low (0
High (1
1)
0)
This Setting is for Interrupt Pin :
IN1 IN0 Interrupt Pin
INTa
0
0
I00
I01
I02
I03
Handshake
0
1
INTb
1
0
INTc
1
1
INTd
INTa
INTb
INTc
INTd
Interrupt
Control
Circuit
INTA
To PCI BUS
Interrupt Event Setting
Figure 5.17. Explanation of Interrupt Setting Register
46
PIO-32/32L(PCI)
I/O Ports and Registers
Interrupt Event Masking
This board uses I/O address + 10H output port for masking. Setting
a bit to "1" will mask the related event from generating an
unwanted interrupt request. For example, if you set the I01 input
signal as an interrupt event and you set INTM1 to "1" from I/O
address + 10H, then I01 input signal will not generate an interrupt
request, but it will still set the INTS1 of interrupt status register.
The relationship of interrupt events "INTa to INTd" and interrupt
masking bits is as following:
INTa : INTM0
INTb : INTM1
INTc : INTM2
INTd : INTM3
Note!
After power on, this +10H output port is reset as all "1".
Interrupt Status Register
This board connects only one interrupt request signal to the PCI bus,
the INTA bus signal. The board combines these four interrupt
requests into one signal. Before setting more than two interrupt
events for generating interrupt requests in your interrupt handler
program, you must first determine which event has requested this
interrupt service. The Interrupt Status input port is designed for
this purpose.
For example, if you have set the I00 to I03 as interrupt events and
the active logic is from low to high, a change of I00 from low to
high will set the interrupt status INTS0 to "1" and generate an
interrupt request. Interrupt events and their corresponding
interrupt status are shown below:
INTa : INTS0
INTb : INTS1
INTc : INTS2
INTd : INTS3
Check Interrupt Setting
You can check what you have set for the interrupt setting register by
reading the I/O address + 0EH input port.
PIO-32/32L(PCI)
47
I/O Ports and Registers
Clear Interrupt Request Signal
The interrupt of the PCI bus uses a level trigger instead an edge
trigger, which is used by the ISA bus. Therefore, the arrival of an
interrupt request means that the INTA has been assigned to low. If
you do not clear this request signal, the CPU will respond to this
interrupt request repeatedly. To avoid this kind of malfunctioning
in your interrupt handler program, you must clear the interrupt
request signal before you enable the interrupt.
For this board, you can use the Interrupt Clear output port for this
purpose. For example, if the INTS2 is "1" in the Interrupt Status
register of your interrupt handler program, INTc will generate an
interrupt request. Setting the INTC2 to "1" by output to the
Interrupt Clear port will clear this INTS2 interrupt request to enable
the next interrupt.
INTa : INTC0
INTb : INTC1
INTc : INTC2
INTd : INTC3
Programming example
The following sample program is part of a sample interrupt handler
program. The "port" is sample I/O address.
Microsoft C or C++ (MS-DOS version)
_disable() ;
n = inp(port + 0x11) & 0x0f ;
/*Find out which event(s) has/have requested interrupt.*/
out(port + 0x11, n) ;
/*Clear interrupt request signal.*/
.
.
/* Service the interrupt request.*/
.
_enable() ;
48
PIO-32/32L(PCI)
System Reference
6. System Reference
PCI BUS
Block Diagram
AD31~AD0
C/BE3~C/BE0
CLK
FRAME
IRDY
IDSEL
TRDY
DEVSEL
RST
INTA
Interface
&
Control
Circuits
Interrupt
Control
Circuit
Photocouplers
Input Port 0
(8ch, Group0)
Photocouplers
Input Port 1
(8ch, Group1)
Photocouplers
Input Port 2
(8ch, Group2)
Photocouplers
Input Port 3
(8ch, Group3)
Photocouplers
&
Transistors
Output Port 0
(8ch, Group4)
Photocouplers
&
Transistors
Output Port 1
(8ch, Group5)
Photocouplers
&
Transistors
Output Port 2
(8ch, Group6)
Photocouplers
&
Transistors
Output Port 3
(8ch, Group7)
PIO-32/32L(PCI)
Figure 6.1. Block Diagram
PIO-32/32L(PCI)
49
System Reference
Specifications
Table 6.1. lists the chief specifications of this board.
Table 6.1.
Specifications
Item
Input
Type
Specification
Opto - Isolated Input (for current sinking output) (Negative logic)
16 channels share a positive common
Resistor
3kΩ
Current required
3.4mA (Min.)
to turn ON
Current required
0.16mA (Max.)
to turn OFF
Number of channels
32 channels (4 of these 32 can be used as interrupt signal)
Interrupts
Combine four interrupt signals to one interrupt request signal as the INTA.
Either rising edge or falling edge of input signal can generate interrupt.
Output
Response time
1 ms (Max.)
Type
Opto - Isolated Open Collector Output (current sinking type) (Negative logic)
16 channels share a positive common and a negative common.
Voltage
35VDC (Max.)
Current
100mA max. per a channel
Number of channels
32 channels
Response time
1 ms (Max.)
I/O address
Any 32-byte boundary
Interrupt level
1 level use/not use (select with jumper switch)
Isolated voltage
1000Vrms
Boards in one system
Maximum of 16 boards can be install in a same system.
External power supply
12 to 24 VDC (+/- 15%)
Note: 4mA/12V to 8mA/24V per input channel
Power consumption
5 VDC 300mA (Max.)
Operating condition
0 to 50ºC, 20% to 90% (not condensing)
Connecting distance
50m (Typical)
(depending on wiring environment)
Dimension (mm)
176.4 (L) x 107.0 (H)
Weight
215 g
50
PIO-32/32L(PCI)
Troubleshooting
7. Troubleshooting
If you are having trouble with your board or program, first answer
the following questions to see if you can find the problem.
QUESTIONS:
STEPS TO TAKE:
Is the pilot light on?
The system must be turned on and the power supply must be
working. Check the main power switch and the power supply.
Did the system boot up?
If the board is installed and the system did not boot up, check the
following:
- Make sure that the board is plugged in firmly.
- Can you boot up if you chose not to use the interrupt?
Does your program work?
If the system booted and your program does not work, check the
following:
- Try one of the programs provided on disk and see if it works.
- Check the board address of your program.
- Check your interrupt handler program.
Does the sample program work?
Check the following:
- Try it with only the PIO-32/32L(PCI) board installed.
- Make sure that input signals are connected to the right pins.
- Make sure that output signals are recalled back correctly.
- Pin connections on the I/O cables are secure.
Still have a problem?
Contact CONTEC group office where you purchased as shown in
the last page of this manual.
PIO-32/32L(PCI)
51
Troubleshooting
Note!
Before you call, please make a list of the following information.
Our technical representatives will need the following information to
help you.
1. Your name, company, and phone number.
2. The brand and type of computer you are using
3. OS and Version (e.g. DOS Ver.6.2)
4. Name of the CONTEC board that you are using.
5. Names of other boards in the computer.
6. The programming language that you are using (and the version
number).
7. Are you using your own program or a CONTEC sample
program?
8. List AUTOEXEC.BAT.
9. List CONFIG.SYS.
52
PIO-32/32L(PCI)
Index
8. Index
B
Block Diagram, 49
O
Obtain Service, 2
Optional cable, 23
C
Output circuit, 25
Checking resources, 13, 18
Output Data Monitor, 42
Component Locations, 5
Output Port Assignments, 30
Connector used, 21
D
P
Pin Assignment, 22
Digital Filter, 39
F
S
Setting the Board ID, 6
Features, 1
Setting the Interrupt Use, 7
H
Handling Precautions, 3
Specifications, 50
Surge Protection, 28
Handshake, 43
T
I
Troubleshooting, 51
I/O Address Map, 29
Input circuit, 24
W
Warranty, 2
Input Port Assignments, 29
Interface Connector, 22
Interrupt Control, 45
PIO-32/32L(PCI)
53
A-41-771
LZC6621
021018 [980213]
CONTEC Group
JAPAN
: Headquarters
CONTEC Co., LTD.
3-9-31, Himesato, Nishiyodogawa-ku, Osaka 555-0025, Japan
Tel
: +81 (6) 6477-5219
Fax : +81 (6) 6477-1692
E-mail
: [email protected]
U.S.A.
: CONTEC MICROELECTRONICS U.S.A. INC.
744 South Hillview Drive, Milpitas, CA 95035 U.S.A.
Tel
: +1 (408) 719-8200
Fax : +1 (408) 719-6750
E-mail
: [email protected]
EUROPE
: CONTEC MICROELECTRONICS EUROPE B.V.
Binnenweg 4, 2132 CT, Hoofddorp, The Netherlands
Tel
: +31 (23) 567-3030
Fax : +31 (23) 567-3035
E-mail
: [email protected]
KOREA
: HYOJIN CONTEC Co., LTD.
Ki-im Bldg. #399, Shindolim-Dong, Kuro-ku, Seoul, Korea
Tel
: +82 (2) 2636-4277/8
Fax : +82 (2) 2636-4279
E-mail
: [email protected]
CHINA
:
INTERNATIONAL CONTEC TECHNOLOGY CO., LTD.
B-8F, Hua Tong Building, No. B19, Che Gong Zhuang West Road,
Hai Dian District, Beijing 100044, China
Tel
: +86(10)8801-8228
Fax : +86 (10)8801-8209
E-mail
: [email protected]
SHANGHAI CONTEC MICROELECTRONICS CORP.
No. 481 Gui Ping Road, Cao He Jing Hi-Tech Park Shanghai, 200233, China
Tel
: +86 (21) 6485-1907
Fax : +86 (21) 6485-0330
E-mail
: [email protected]
SHENYANG CONTEC MICROELECTRONICS Co., LTD.
No. 169, Qingnian Street, Shenhe District, Shenyang 110015, China
Tel
: +86 (24) 2392-9771
Fax : +86 (24) 2392-9773
TAIWAN
: MACROMATE CORP.
8F, Universal Center, No.179, Ta-Tung Rd., Sec.1 Hsi-Chih, Taipei Hsien, Taiwan,
R.O.C
Tel
: +886 (2) 2647-9353
Fax : +886 (2) 2647-9373
E-mail
: [email protected]
A-46-368
Ver. 2001. 02. 06